All Smart Glasses in your deployment must be enrolled before they can communicate with Workspace ONE UEM and access internal content and features. Enrollment is facilitated with the Workspace ONE Intelligent Hub for Android.
The enrollment flow of Smart Glasses are in the following order:
- Create an Enrollment User
- Upload the Workspace ONE Intelligent Hub .APF File for Smart Glasses
Upload the .apf file for your Smart Glasses deployment to enable a simplified enrollment. - Create Android (Legacy) Wi-Fi Profile for Staging Smart Glasses(Optional)
The staging Wi-Fi profile connects a device to a Wi-Fi network used for enrollment if the device is not configured to a network. - Create a Staging Package for Smart Glasses Create a staging package to configure your devices to connect to Wi-Fi, download the Workspace ONE Intelligent Hub, and enroll Smart Glasses with minimal interaction.
- Generate a Sideload Staging Package Workspace ONE UEM can create a sideload staging package that allows you to create one side staging enrollment for all devices and assign the device to an Organization Group as needed.
- Enroll Google Glass Using QR Code Enrollment The QR code enrollment method sets up and configures Google Glass smart glasses by scanning a QR code. The QR code contains a payload of JSON values with all the information needed for the device to be enrolled.
Important: The Google Glass enrollment script in the staging package includes additional commands that can be manually enabled. If you plan on blocking adb access, please note that if adb needs to be re-enabled at a later time, it can only be done by a trusted computer. This will typically be the computer that was used to run the script in the first place, or any computer trusted previously by Google Glass prior to enrollment.
Create an Enrollment User
-
Navigate to Devices > Users > List View > Add > Add User.
-
From the General tab, enter the details for your user.
-
Select Save.
Setting Description Security Type Choose Basic to add a basic user. Username Enter a username with which the new user is identified. Password Enter a password that the user can use to log in. Confirm Password Confirm the password. Full Name Complete the First Name, Middle Name, and Last Name of the user. Display Name Enter a name to represent the user in the Workspace ONE UEM console. Email Address Enter or edit the user's email address. Email Username Enter or edit the user's email username. Domain Select the email domain from the drop-down field.
Upload the Workspace ONE Intelligent Hub .APF File for Smart Glasses
Upload the .apf file for your Smart Glasses deployment to enable a simplified enrollment.
The Hub Package can be uploaded only in specific organization group types, for example, in organization groups of type ‘Customer’. It is recommended to upload the Workspace ONE Intelligent Hub Package at the highest organization group. You can find the file specific to your OEM located in MyWorkspace ONE.
-
Navigate to Devices > Provisioning > Components > Hub Packages and select Add.
Make sure you are using the top levelorganization group.
-
Select Upload and Choose File to browse for the .apf file of the Workspace ONE Intelligent Hub version you want to upload.
-
Select the .apf file and select Open to choose the file.
-
Select Save to close the upload dialog.
-
Enter a File Name.
-
Enter a Package Name.
-
Enter a Version for the Workspace ONE Intelligent Hub.
-
Select Save to upload the .apf file to the Workspace ONE UEM console.
Create Android (Legacy) Wi-Fi Profile for Staging Smart Glasses(Optional)
The staging Wi-Fi profile connects a device to a Wi-Fi network used for enrollment if the device is not configured to a network.
-
Navigate to Devices > Provisioning > Components > Profiles > Add Profile > Android (Legacy).
-
Select the General profile option.
-
Set the Profile Scope of the Wi-Fi profile.
- Staging Wi-Fi Profile – Connects a device to the Wi-Fi used for staging.
- Production Wi-Fi Profile – Connects a device to the Wi-Fi used for everyday use. Production Wi-Fi profiles are under Device > Profiles > List View > Add. You must use auto deployment and publish the profile before staging a device with it.
- Both – Connects the device to Wifi to be used for staging and continues use during production.
-
Navigate to Wi-Fi > Configure.
-
Provide the Service Set Identifier to name the network to which the device will connect.
-
Indicate if the Wi-Fi network is a Hidden Network.
-
Ensure the WiFi is setup as the Active Network.
-
Specify the Security Type of access protocol used and whether certificates are required.
-
Provide the Password required for the device to connect to the network.
-
Select Save & Publish.
Create a Staging Package for Smart Glasses
Create a staging package to configure your devices to connect to Wi-Fi, download the Workspace ONE Intelligent Hub, and enroll Smart Glasses with minimal interaction.
-
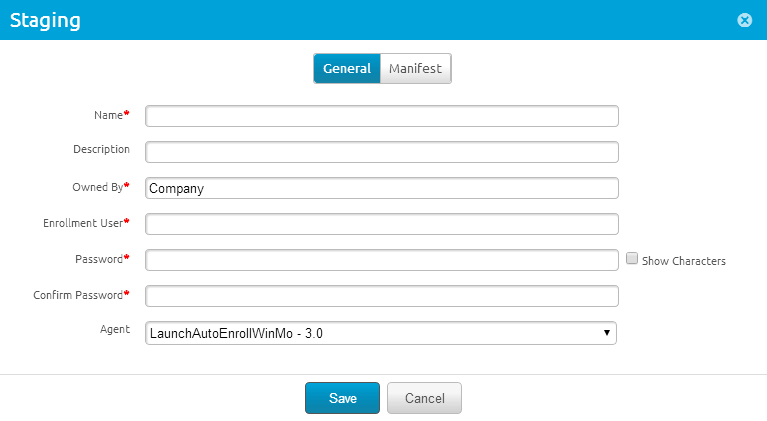
Navigate to Devices > Lifecycle > Staging > Add Staging > Android (Legacy).
-
Complete the required fields on the Generaltab.
Settings Description Name Enter the name of the staging configuration. Description Enter the description of the staging configuration. Enrollment User Enter the username of the enrollment user. Password Enter the password for the enrollment user. Confirm Password Re-enter the password for the enrollment user. Hub Select the Workspace ONE Intelligent Hub to download during staging.These are uploaded as the Workspace ONE Intelligent Hub Package. See how to Upload the .APF File for Smart Glasses. -
Select Save.
Generate a Sideload Staging Package
Workspace ONE UEM can create a sideload staging package that allows you to create one side staging enrollment for all devices and assign the device to an Organization Group as needed.
-
Navigate to Devices > Lifecycle > Staging > List View.
-
Choose a previous staging package that you want to create a sideloaded staging package for. Select the More option and select Staging Side Load from the drop-down.
-
Choose the Organization Group to which this staging applies.
-
Select Download to start downloading the zip file of the staging sideload.
-
Download and install the Android Debug Bridge to the computer from which you will stage devices.
For more information, see Google Developer Website
-
Unzip the staging file and connect the Smart Glasses to the staging computer.
-
Ensure that the Android Debug Bridge is enabled and running on the staging computer.
-
Run the autoenroll script.
- Find the script from the Workspace ONE Intelligent Hub folder saved to your computer and run the script from within the Workspace ONE Intelligent Hub folder.
Note: The auto-enroll script for Google Glass devices allows you to manually enable the following commands: Setting OTA server, Lock ADB access, Set an app into kiosk mode, and enable/disable camera.
The device should auto enroll into Workspace ONE UEM.
Enroll Google Glass Using QR Code Enrollment
The QR code enrollment method sets up and configures Google Glass smart glasses by scanning a QR code. The QR code contains a payload of JSON values with all the information needed for the device to be enrolled.
Note: Various word processing applications use special characters for editing. Using copy/paste can pick up those characters, invalidating your JSON. Consider validating your JSON using any free online tool.
You can use any online QR Code generator, such as Web Toolkit Online, to create your QR code before beginning enrollment. The QR code includes the Server URL and Group ID information. You can also include the user name and password or the user has to enter their credentials. Here is the format of the text to paste into the QR Code generator:
{
“COMPONENT”: “com.airwatch.androidagent/com.airwatch.agent.DeviceAdministratorReceiver”,
“LOCATION”:  “https://getwsone.com/mobileenrollment/airwatchagent.apk", “NFC_MIME”: “application/com.airwatch.agent.enroll”,
“NFC_MIME”: “application/com.airwatch.agent.enroll”,
“EXTRAS”:  “serverurl=https://EnrollmentURL/AirWatch\ngid=EnrollmentOG\nun=EnrollmentUserName\npw=EnrollmentUserPassword”
}
Note: QR Code enrollment is only applicable to Google Glass.
-
Follow the steps to create an enrollment user.
-
Create QR code using a QR code generator.
-
From your Google glasses, go to Settings > Device Options > Provisioning which launches the QR code reader.
-
Scan your QR code and follow the prompts.
-
Use the RunIntent File/Action to enable commands such as Setting OTA server, Lock ADB access, Set an app into kiosk mode, and enable/disable camera.
Important: To manage applications, the intent "install_non_market_apps" needs to be executed on the device first. Please see EE14 and EE15 documentation from Google for all of the intents that are now supported on Google Glass.
Was this page helpful?