Setting up Horizon Client involves installing the Horizon Client for Chrome app on client devices, configuring Omnissa Horizon Connection Server, and opening the required ports.
Preparing Horizon Connection Server
Before end users can connect to a server and access a remote desktop or published application, an administrator must install and configure Horizon Connection Server.
Configure the Omnissa Horizon Blast External URL
After the servers are installed, the Blast Secure Gateway setting is enabled on the applicable Horizon Connection Server instances in . Also, the Blast External URL setting is configured to use the Blast Secure Gateway on the applicable Horizon Connection Server instances.
By default, the URL includes the FQDN of the secure tunnel external URL and the default port number, 8443. The URL must contain the FQDN and port number that a client system can use to reach the Horizon Connection Server host.
For more information, see Set the External URLs for Horizon Connection Server Instances section in the Omnissa Horizon 8 Installation and Upgrade document.
Configure Firewall Rules
If you use third-party firewalls, configure rules to allow inbound traffic to TCP port 8443 for all Horizon Connection Server hosts in a replicated group, and configure a rule to allow inbound traffic (from servers) to TCP port 22443 on remote desktop virtual machines and RDS hosts in the data center.
For more information, see Firewall Rules for Client Web Browser Access section.
Configure User Authentication
Use the following check list when setting up user authentication.
- Verify that each Horizon Connection Server instance has a TLS certificate that can be fully verified by using the host name that you enter in the web browser. For more information, see the Horizon 8 Installation and Upgrade document.
- To use two-factor authentication, such as RSA SecurID or RADIUS authentication, verify that this feature is enabled on Horizon Connection Server. You can customize the labels on the RADIUS authentication login page. You can configure two-factor authentication to occur after a remote session times out. For more information, see the topics about two-factor authentication in the Horizon 8 Administration document.
- To hide the Domain drop-down menu in Horizon Client, enable the Hide domain list in client user interface global setting. This setting is enabled by default. For more information, see the Horizon 8 Administration document.
- To send the domain list to Horizon Client, activate the Send domain list global setting. This setting is deactivated by default. For more information, see the Horizon 8 Administration document.
- To provide unauthenticated access to published applications, enable this feature in Horizon Connection Server. For more information, see the Horizon 8 Administration document.
The following table shows how the Send domain list and Hide domain list in client user interface global settings determine how users can log in to the server from Horizon Client.
| Send domain list setting | Hide domain list in client user interface setting | How users log in |
|---|---|---|
| Deactivated (default) | Activated (default) | The Domain drop-down menu is hidden. Users must enter one of the following values in the User name text box.
|
| Deactivated | Deactivated | If a default domain is configured on the client, the default domain appears in the Domain drop-down menu. If the client does not know a default domain, *DefaultDomain* appears in the Domain drop-down menu. Users must enter one of the following values in the User name text box.
|
| Activated | Activated | The Domain drop-down menu is hidden. Users must enter one of the following values in the User name text box.
|
| Activated | Deactivated | Users can enter a user name in the User name text box and then select a domain from the Domain drop-down menu. Alternatively, users can enter one of the following values in the User name text box.
|
Firewall Rules for Client Web Browser Access
To allow client web browsers to make connections to Horizon Connection Server instances, remote desktops, and published applications, your firewalls must allow inbound traffic on certain TCP ports.
Horizon Client for Chrome connections must use HTTPS. HTTP connections are not allowed.
By default, when you install a Horizon Connection Server instance, the Horizon View Horizon Connection Server (Blast-In) rule is enabled in the Windows Firewall and the firewall is configured to allow inbound traffic to TCP port 8443.
| Source | Default Source Port | Protocol | Target | Default Target Port | Notes |
|---|---|---|---|---|---|
| Client web browser | TCP Any | HTTPS | Horizon Connection Server instance | TCP 443 | To make the initial connection, the web browser on a client device connects to a Horizon Connection Server instance on TCP port 443. |
| Client web browser | TCP Any | HTTPS | Blast Secure Gateway | TCP 8443 | After the initial connection is made, the web browser on a client device connects to the Blast Secure Gateway on TCP port 8443. The Blast Secure Gateway must be enabled on a Horizon Connection Server instance to allow this second connection to take place. |
| Blast Secure Gateway | TCP Any | HTTPS | Horizon Web Client Agent | TCP 22443 | If the Blast Secure Gateway is enabled, after the user selects a remote desktop or published application, the Blast Secure Gateway connects to the Horizon Web Client Agent on TCP port 22443 on the remote desktop virtual machine or RDS host. This agent component is included when you install Horizon Agent. |
| Client web browser | TCP Any | HTTPS | Horizon Web Client Agent | TCP 22443 | If the Blast Secure Gateway is not enabled, after the user selects a remote desktop or published application, the web browser on a client device makes a direct connection to the Horizon Web Client Agent on TCP port 22443 on the remote desktop virtual machine or RDS host. This agent component is included when you install Horizon Agent. |
Install or Upgrade Horizon Client for Chrome
Horizon Client for Chrome is a Chrome app, and you install it in the same way that you install other Chrome apps.
Prerequisites
Verify that the client device meets the system requirements for Horizon Client for Chrome. See System Requirements for Horizon Client for Chrome section.
Procedure
- Log in to the Chrome device.
- Download and install Horizon Client for Chrome from the Chrome Web Store.
Using the Google Admin Console to Configure Enrolled Chrome Devices
You can use the Google Admin console to configure Horizon Connection Server settings on enrolled Chrome devices.
You can configure a list of Horizon Connection Server instances, a default Horizon Connection Server instance, and certain server and client features.
When you configure a list of servers, the servers appear as shortcuts in Horizon Client. If you configure a default server, Horizon Client connects to that server automatically.
You configure these settings in a JSON configuration file. A Chrome administrator must use the Google Admin console to upload the JSON configuration file for the Horizon Client app. For detailed information about using the Google Admin console, see the G Suite Administrator Help.
Horizon Connection Server Instance List
You can use properties in the server-list section to configure a server list.
| Property | Description |
|---|---|
server | IP address or host name of the server. |
username | (Optional) Name of a user that is entitled to use the server. |
domain | (Optional) Domain of the user specified in the username property. |
description | (Optional) Description of the server. |
The following JSON configuration file example shows a list of servers.
{
  "broker_list": {
    "Value": {
      "settings": {
        "server-list": [{
          "server": "viewserver0.mydomain.com",
          "default": false,
          "description": "View Server 0",
          "username": "User0",
          "desktopId": "RDS2012R2DC",
          "domain": "TestDomain0"
        },{
          "server": "viewserver1.mydomain.com",
          "description": "View Server 1",
          "username": "User1",
          "domain": "TestDomain1",
          "default": false
        }, {
          "server": "123.456.1.2",
          "description": "View Server 2",
          "username": "User2",
          "default": false,
          "domain": "TestDomain2"
        }, {
          "server": "123.456.1.3",
          "description": "View Server 3",
          "username": "User3",
          "default": false,
          "domain": "TestDomain3"
        }, {
          "server": "viewserver4.mydomain.com",
          "description": "View Server 4",
          "username": "User4",
          "default": false,
          "domain": "TestDomain4"
        }]}
    }
  }
}
Default Horizon Connection Server Instance
You can use the default property to specify a default server in the server-list section. Valid values are true and false.
The following JSON configuration file example shows a default server.
{
  "broker_list": {
    "Value": {
      "settings": {
        "server-list": [{
          "server": "viewserver0.mydomain.com",
          "default": true,
          "description": "View Server 0",
          "username": "User0",
          "desktopId": "RDS2012R2DC",
          "domain": "TestDomain0"
        }]}
    }
  }
}
Client Features
To configure certain Horizon Client features, you can use settings in the common-setting section. The editable property specifies the availability of settings to change by the user. An asterisk in the following table indicates settings you can configure in the editable list.
Note: To ensure that modified settings take effect, users must restart Horizon Client.
| Setting | Description |
|---|---|
editable | Configures a list of Horizon Client settings and specifies whether a user can modify certain common settings. In general, the policy from each server determines value of the settings. You can add any client feature in this table marked with an asterisk (*).
If the value for a setting listed in the editable property is false, that setting is unavailable. The user cannot change that setting. The user interface appears gray. To make changes, the system administrator can update the policy set by the server.
If a setting is in editable property list and set to true, that setting is available in the user interface. The user can make a change.
Note: On first use, the client applies any settings in the policy for server. After that, if the setting is editable and has been changed by the user, the client uses that setting. Note: BCR settings in the Google Admin Console do not support editable. |
allowDataSharing* | Configures the data sharing feature. Set the value to enable or deactivate sharing. Valid values are true (enable) and false (deactivate). |
allowFileDownload |
Configures whether users can download files from a remote desktop to the client device using the file transfer feature. Set the value to enable or block file downloading.
Valid values are true (enable) and false (block). The default value is true.
Note: To enable file downloading with the file transfer feature, you must enable allowFileDownload on the client side and also set the Configure file transfer GPO setting to allow file downloading on the agent side. See Horizon Remote Desktop Features and GPOs. |
allowFileUpload |
Configures whether users can upload files to a remote desktop from the client device using the file transfer feature. Set the value to enable or block file uploading.
Valid values are true (enable) and false (block). The default value is true.
Note: To enable file uploading with the file transfer feature, you must enable allowFileUpload on the client side and also set the Configure file transfer GPO setting to allow file uploading on the agent side. See Horizon Remote Desktop Features and GPOs. |
autoForwardUSB* | Activates or deactivates automatic USB redirection. The value specifies whether automatic USB redirection is activated or deactivated. The editable property specifies whether users can change the USB auto-connect settings in the Settings window. Valid values for both properties are true and false. |
bcrEnabled | Enables the Browser Content Redirection feature. |
display* | Configures the use of local monitors available to the client. This setting can specify the size of the client window. This setting activates on launch of a remote desktop.
Available options:
display is missing from the list in the editable property or set to false. If set to true in the editable property, the user can change the setting. . |
enableAdvancedTouch |
Activates or deactivates support for advanced touchscreen gestures, as described in Touchpad, Touchscreen, Keypad, and Mouse Gestures section.
Valid values are true (activate) and false (deactivate). The default value is true. |
enableAnonymousLogin* | Configures the Unauthenticated Access feature that appears as Log in anonymously using Unauthenticated Access in the settings dialog box. The value property specifies whether the feature is enabled or deactivated. Valid values are true and false. |
enableFileAssociation |
Configures the activation state of the File Association feature described in Set File Association section. Valid values are as follows:
enableFileAssociation is not configured, File Association is enabled by default. |
enableHighResolution* | Configures the high resolution mode feature. The value property specifies whether the feature is activated or deactivated. The editable property specifies whether users can change the High Resolution Mode setting in Horizon Client. Valid values for both properties are true and false. |
enableMediaStream |
Determines whether client users can configure camera and microphone permissions for the Browser Redirection feature and the Media Optimization for Microsoft Teams feature for the Chrome client. Valid values are as follows:
true. For more information, see Configure Browser Redirection section and the Media Optimization for Microsoft Teams section in the Horizon Remote Desktop Features and GPOs document. |
enableMultiMonitor | Configures the Multi-Monitor feature. Use the value property to specify whether the feature is turned on or off. Valid values are true and false. |
enableH264 | Specifies whether the rendering method uses H.264 video mode. The client enables H.264 video mode. Valid values are true and false.
Note:
This option appears in the settings window only if you are using a normal display with a ratio greater than 100% and if the administrator has not deactivated the feature. |
enableRTAVH264Codec |
Enables or deactivates the H.264 codec for Real-Time Audio-Video. Valid values are true (enable H.264) and false (deactivate H.264).
The default value is true.
For more information, see Using the Real-Time Audio-Video Feature for Webcams, Microphones, and Speakers section. |
forcePrivateMode | Enable privacy mode for Horizon Cloud on Azure next-gen. Use this setting to force enable the privacy mode for end users. When this setting is enabled, users must authenticate to login. The user is then directed to the browser logout page when the Horizon client is closed or when the current server is disconnected. This setting is disabled when not configured |
enableNetworkIndicator |
Activates or deactivates the network notification feature. Valid values are true (feature activated) and false (feature deactivated). Whether or not this client setting takes effect depends on several factors, as described in Configure the Display of Network Notification Messages.
Setting the value to false removes the Disable network state display option from the Settings window.
The default value is true. |
enableLogoutTriggeredQuit | Triggers the client to close upon logout. When the policy option is enabled, the policy option triggers the client to close upon successful user logout.
This option accepts boolean values of type true or false. |
enableDisconnectionTriggeredQuit | Triggers the client to close upon the disconnection from the last active desktop or application. When the policy option is enabled, the policy option triggers the client to close upon the disconnection from the last active desktop or application.
This option accepts boolean values of type true or false. |
enableScreenSharing* |
Allows or disallows users to share the contents of their local screen when using published applications. Valid values are true (allow) and false (disallow).
The editable property specifies whether users can control their screen-sharing permissions from the Settings window. |
enableWebRTCRedirection* |
Activates or deactivates the media optimization feature for WebRTC-based applications.
When activated, this feature optimizes audio, video, and screenshare streams from WebRTC-based applications inside a remote desktop. This feature improves the overall audio-visual experience of users during virtual meetings and conference calls.
Valid values are true (feature activated) and false (feature deactivated).
The editable property specifies whether users can control the activation state of WebRTC media optimization from the Settings window. |
enableWindowsKey* | Activates or deactivates the Windows key for remote desktops. The value specifies whether the feature is activated or deactivated. The editable property specifies whether users can change the Enable Windows Key for Desktops setting in Horizon Client. Valid values for both properties are true and false. |
enhBcrEnabled | Enables the Browser Content Redirection feature in enhanced mode. Browser Content Redirection must be enabled for this to take effect.
Note that when configuring enhanced BCR <all_urls> is not supported in its Allowlist. Also, if a website is in both lists (or legacy is configured to <all_urls> and a website is in the enhanced list), when the user navigates to that site it will run enhanced BCR over legacy BCR.
|
hardwareAccelerationOption |
Configures the client-side GPU hardware acceleration for Real-Time Audio-Video. For more information, see Using the Real-Time Audio-Video Feature for Webcams, Microphones, and Speakers section.
Valid values are as follows:
|
hideSecondaryServer |
Configures whether Horizon Client displays a server icon for both the primary and secondary server host names, or for the primary server host name only.
Valid values are true (display a single icon for the primary host name only) and false.
true. |
ignoreCertErrors |
Configures whether the Browser Redirection feature opens pages that contain SSL or security certificate errors. Valid values are as follows:
false. For more information, see Configure Browser Redirection section. |
ignoreCertErrorsBcr | Enables Ignore Certification Errors for Browser Content Redirection. |
ignoreCertErrorsEnhBcr | Enables Ignore Certification Errors for enhanced Browser Content Redirection. |
networkStateConfig |
Specifies the threshold parameters used by Horizon Client to calculate the network quality score and determine network stability. For detailed information how Horizon Client uses these parameters, see Customize How Horizon Client Determines the Network Quality section. This setting includes the following properties:
|
powerSetting | Prevents the device from going to sleep in response to user inactivity in a remote session. By default, the Chrome device goes to sleep after 10 minutes. When you configure powerSetting, the device does not go to sleep until after the last remote session ends.
The keepAwakeLevel property specifies the level of the power policy. The following values are valid for the keepAwakeLevel property:
|
splitUSB |
Specifies the split redirection behavior for USB devices, as described in Split Composite USB Devices section.
This setting includes the following properties:
|
urlFiltering |
Configures URL Content Redirection rules for the client. The URL Content Redirection feature also requires agent-side configuration. For more information, see Requirements for Using URL Content Redirection and Configuring URL Content Redirection sections in the Horizon Remote Desktop Features and GPOs document.
Note: You must restart Horizon Client for any modified rules to take effect.
Note: The URL Content Redirection rules configured using the vdmutil command-line interface on a Horizon Connection Server instance take priority over the URL Content Redirection configured using the urlFiltering setting.
The urlFiltering setting has one property, protocols, which is set to an object array with the following properties:
agentRules.
|
useAssetIdReplaceMachineName |
Configures how to pass the client asset ID (the physical computer name) to a corresponding Horizon environmental variable. For more information, see Omnissa Knowledge Base (KB) article 92513.
Valid values are as follows:
false. |
ws1WebviewMode |
Configures whether users can authenticate into Horizon Client running as a managed app, such as an app managed by Unified Access Gateway and Omnissa Workspace ONE. Valid values are as follows:
secure-webview. |
The following example of a JSON configuration file shows the common settings and usage of the editable property. This example shows the recommended settings that maximize performance and efficiency for an optimal user experience.
{
  "broker_list": {
    "Value": {
      "settings": {
        "server-list": [
          {
            "server": "viewserver0.mydomain.com",
            "default": true,
            "description": "View Server 0",
            "username": "User0",
            "domain": "TestDomain0"
          }
        ],
        "common-setting": {
          "allowDataSharing": true,
          "allowFileDownload": true,
          "allowFileUpload": true,
          "autoForwardUSB": true,
          "autoForwardUSBPolicy": [
            {
               "desktop": "HorizonAutoUsbAll",
               "autoConnectAllOnStart": true,
               "autoConnectAllOnInsert": true
            }
         ],
         "browserRedir": {
               "bcrEnabled": true,
               "enhBcrEnabled": true,
               "enableMediaStream": true,
               "ignoreCertErrorsBcr": false,
               "ignoreCertErrorsEnhBcr": true
            },
          "enableAdvancedTouch": true,
          "enableAnonymousLogin": false,
          "enableDisconnectionTriggeredQuit": true,
          "enableFileAssociation": false,
          "enableH264": true,
          "enableHighResolution": false,
          "enableLogoutTriggeredQuit": true,
          "enableMediaStream": false,
          "enableNetworkIndicator": true,
          "enableRTAVH264Codec": true,
          "enableScreenSharing": true,
          "enableWindowsKey": true,
          "display": "multipleMonitors",
          "forcePrivateMode": true,
          "hardwareAccelerationOption": "no-preference",
          "hideSecondaryServer": true,
          "ignoreCertErrors": false,
          "useAssetIdReplaceMachineName": false,
          "ws1WebviewMode": "secure-webview",
          "networkStateConfig": {
            "networkStateTcpRttMSLow": 2,
            "networkStateTcpRttMSHigh": 400,
            "networkStateQualityScoreTcpThresholdGood": 85,
            "networkStateQualityScoreTcpThresholdPoor": 40,
            "networkStateRttCheckPeriodMs": 15000
          },
          "splitUSB": {
            "allowList": [
              {
                "device": "0554:1001",
                "excludedInterface": [
                  "00",
                  "01",
                  "02"
                ]
              }
            ]
          },
          "urlFiltering": {
            "protocols": [
              {
                "brokerHostname": "10.117.24.28",
                "protocol": "http",
                "remoteItem": "win2022_RDSH",
                "agentRules": ".*example1.com"
              },
              {
                "brokerHostname": "10.117.161.109",
                "protocol": "https",
                "remoteItem": "win10_VDI",
                "agentRules": ".*example2.com"
              }
            ]
          },
          "editable": {
            "allowDataSharing": true,
            "autoForwardUSB": true,
            "enableAnonymousLogin": true,
            "enableHighResolution": true,
            "enableH264": true,
            "enableWebRTCRedirection": true,
            "enableScreenSharing": true,
            "display": true
          }
        }
      }
    }
  }
}
Configure Horizon Web Client Agents to Use New TLS Certificates
To comply with industry or security regulations, you can replace the default TLS certificates that the Horizon Web Client Agent generates with certificates that a Certificate Authority (CA) signs.
When you install the Horizon Web Client Agent on a remote desktop, the Horizon Web Client Agent service creates default self-signed certificates. The service presents the default certificates to browsers that use Horizon Client for Chrome.
Note: In the guest operating system on the desktop virtual machine, this service is called the Omnissa Horizon Blast service.
To replace the default certificates with signed certificates that you obtain from a CA, you must import a certificate into the Windows local computer certificate store on each remote desktop. You must also set a registry value that allows the Horizon Web Client Agent to use the new certificate.
If you replace the default Horizon Web Client Agent certificates with CA-signed certificates, configure a unique certificate on each remote desktop. Do not configure a CA-signed certificate on a parent virtual machine or template that you use to create a desktop pool. That approach results in hundreds or thousands of remote desktops that have identical certificates.
Add the Certificate Snap-In to MMC on a Remote Desktop
Before you can add certificates to the Windows local computer certificate store, you must add the Certificate snap-in to the Microsoft Management Console (MMC) on the remote desktops where the Horizon Web Client Agent is installed.
Prerequisites
Verify that the MMC and Certificate snap-in are available on the Windows guest operating system where the Horizon Web Client Agent is installed.
Prerequisites
-
On the remote desktop, click Start and type
mmc.exe. -
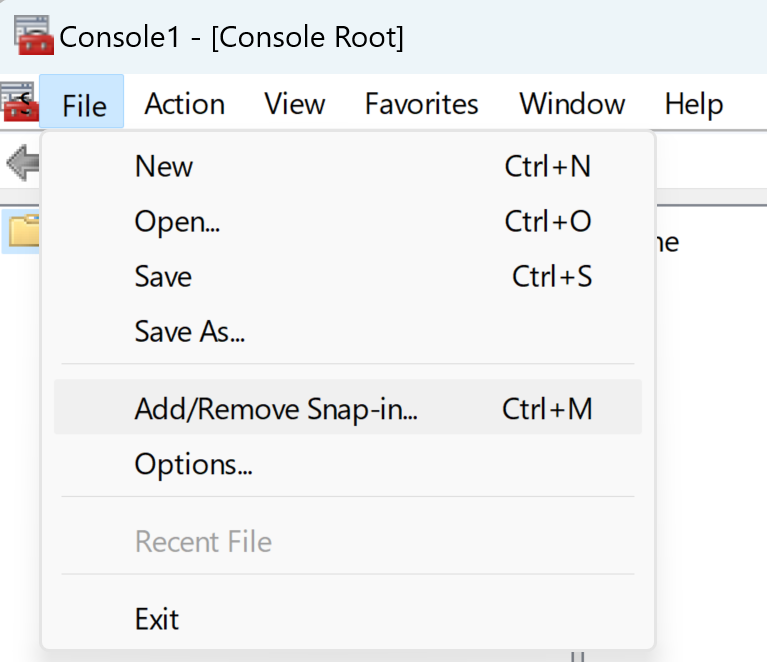
In the MMC window, go to File > Add/Remove Snap-in.
-
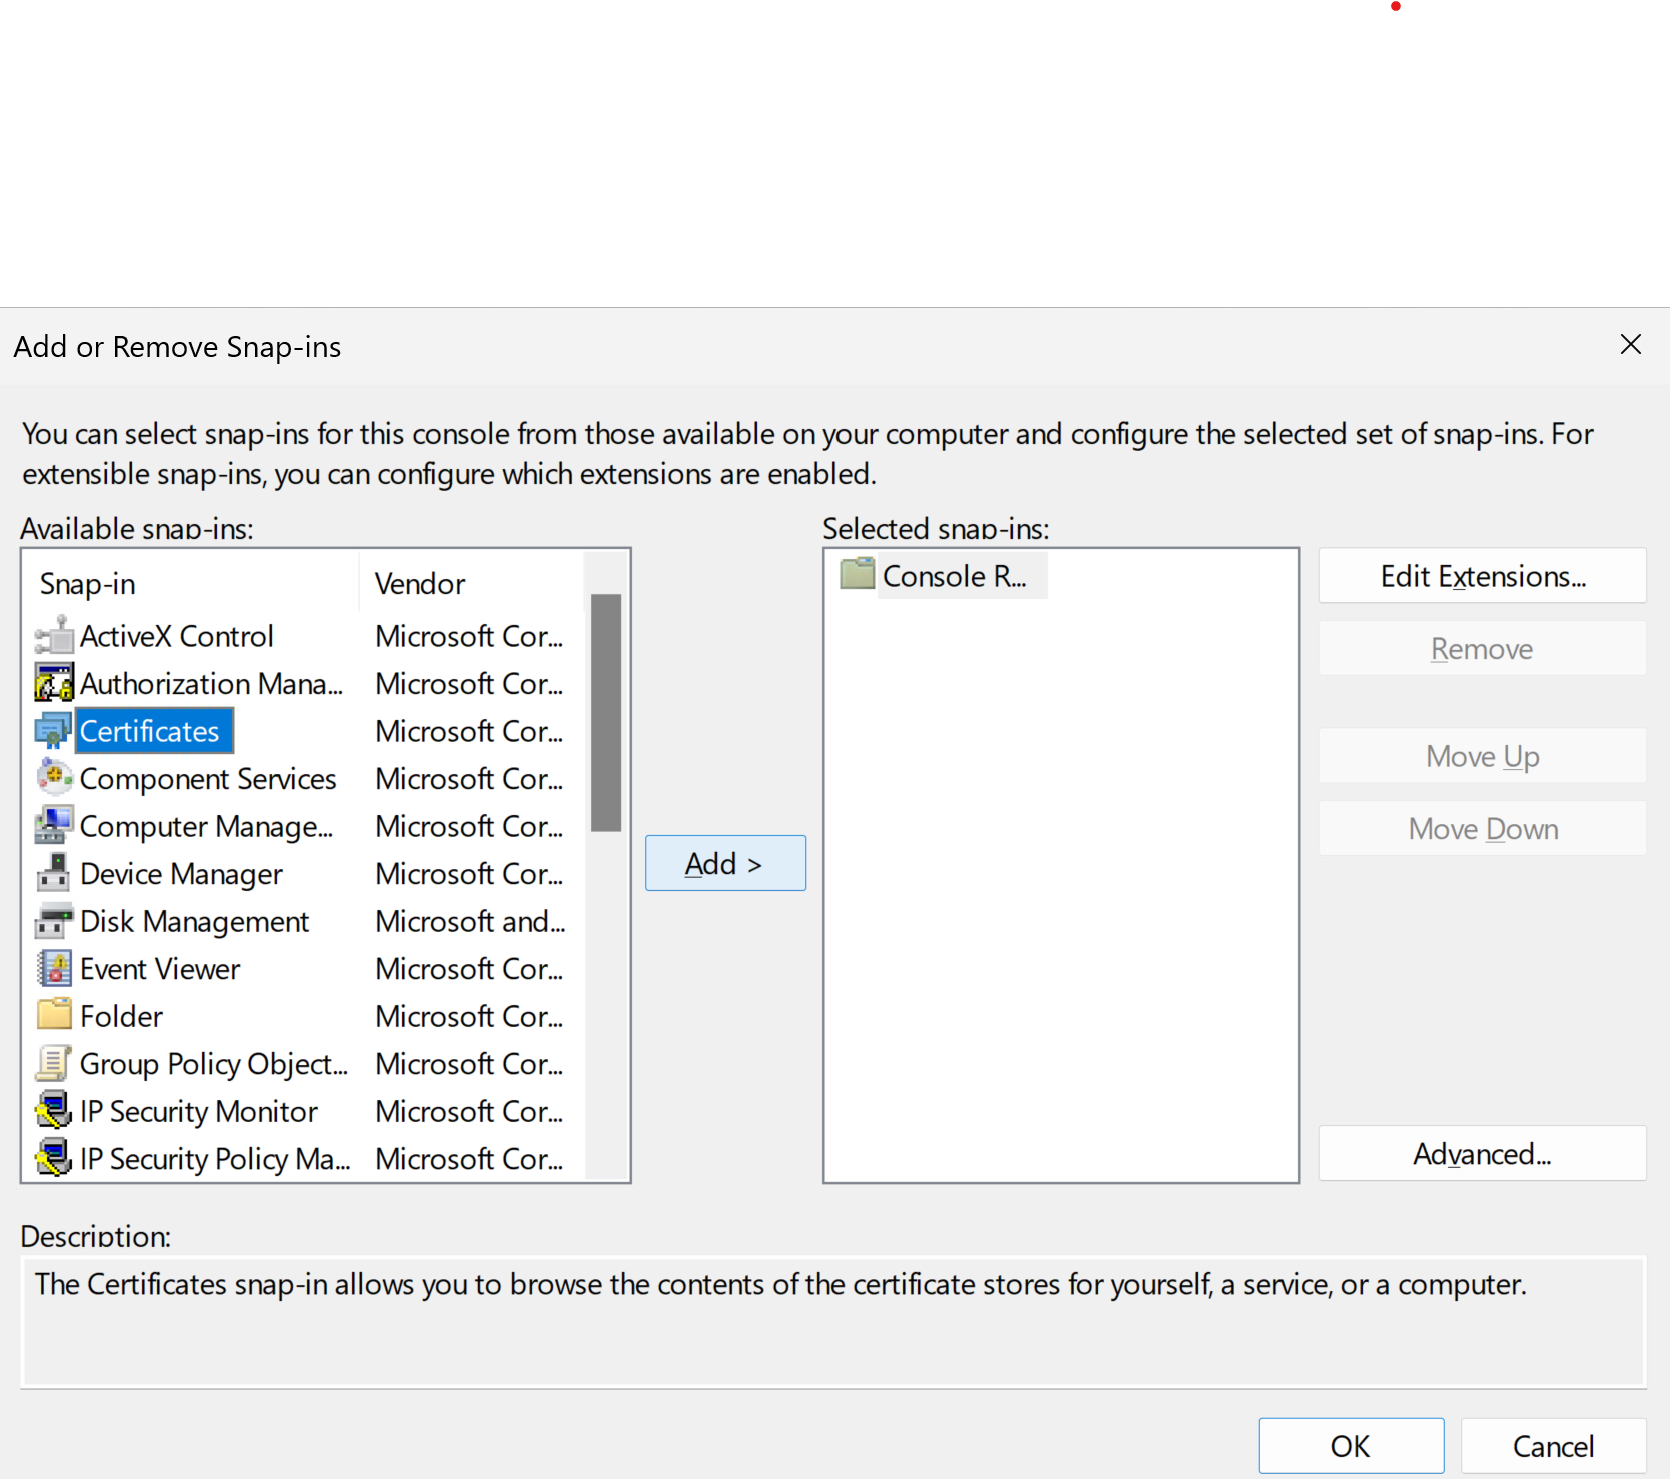
In the Add or Remove Snap-ins window, select Certificates and click Add.
-
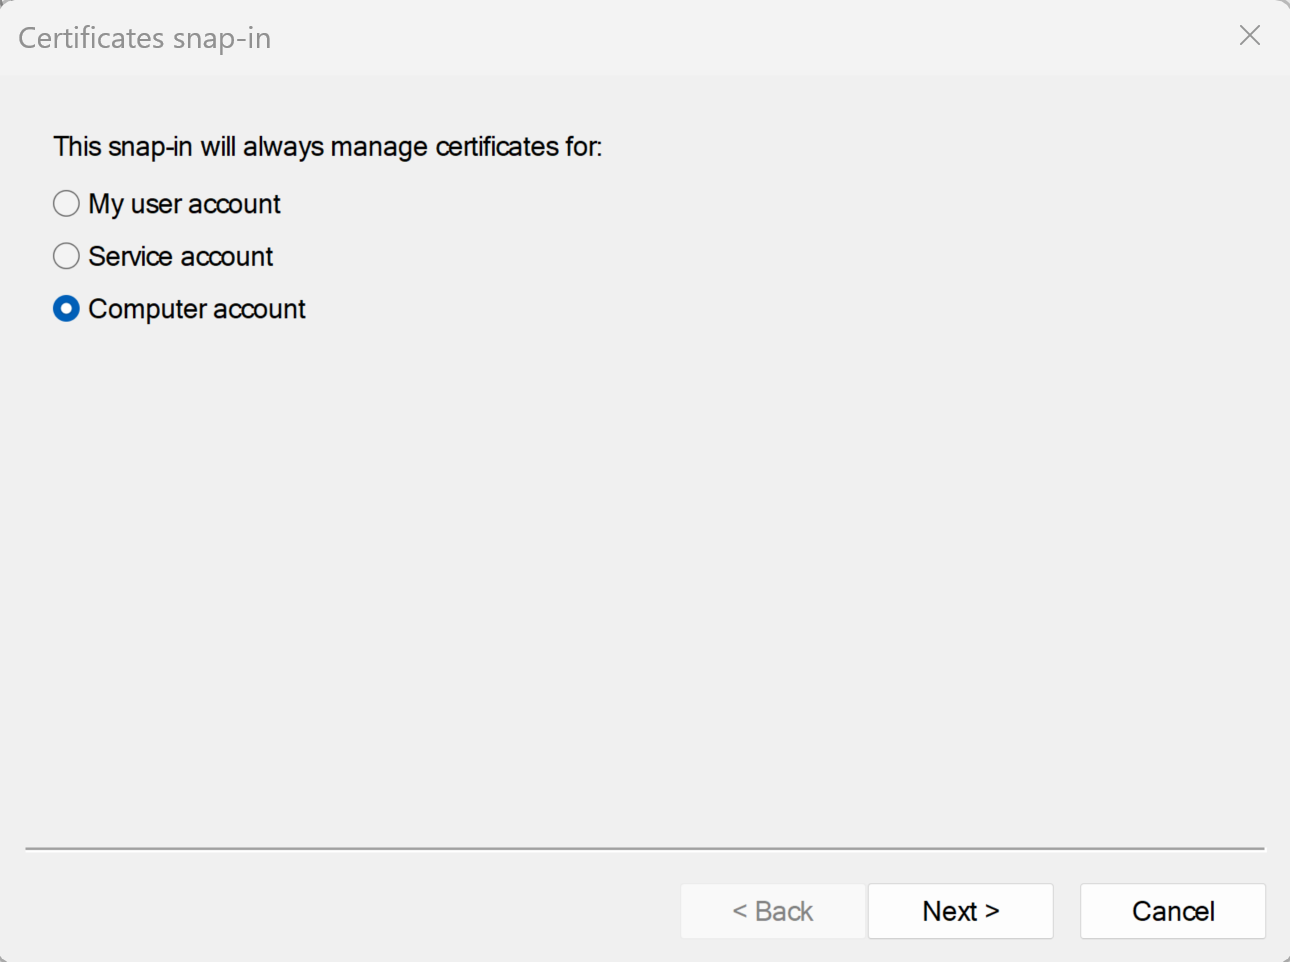
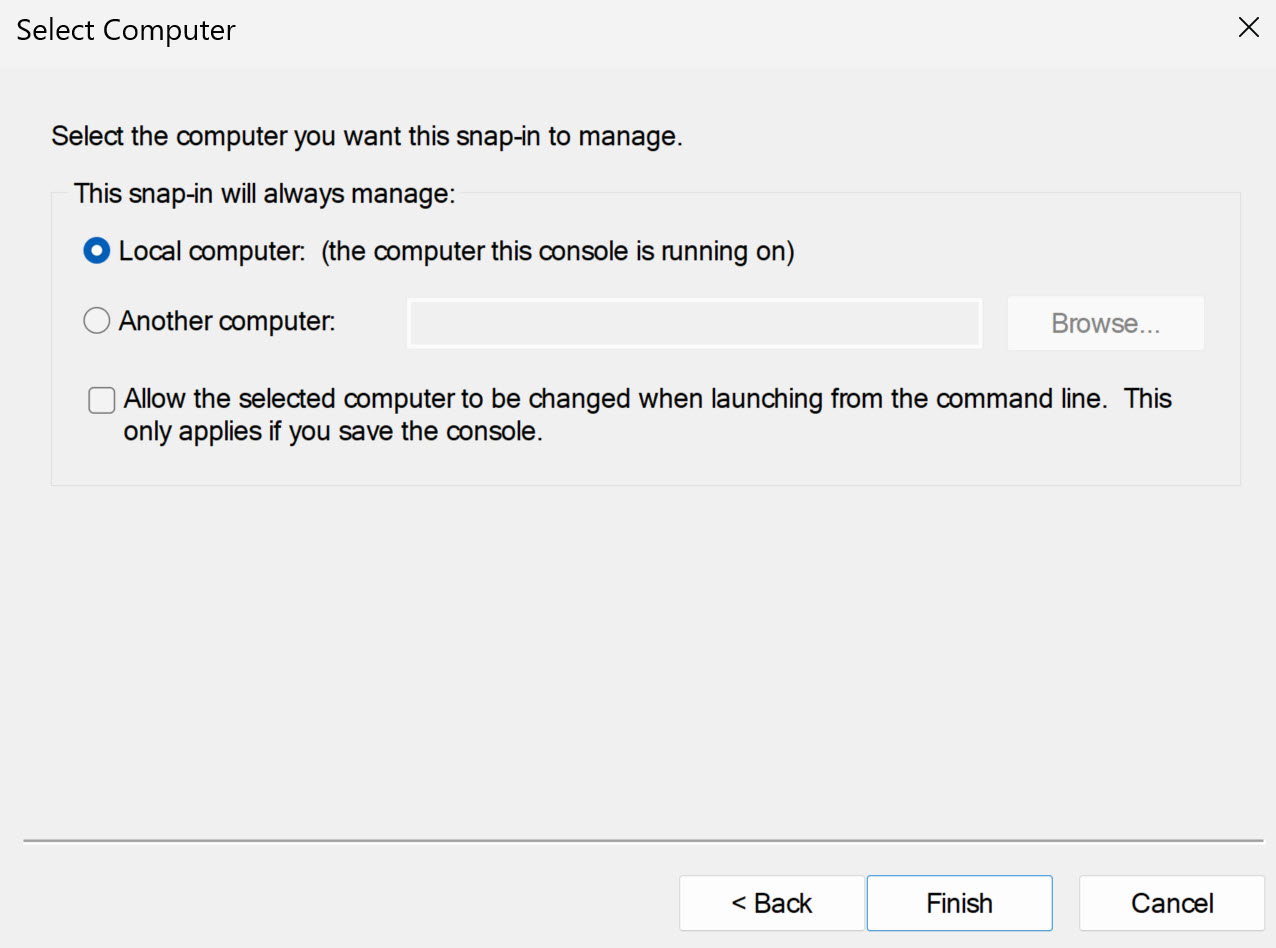
In the Certificates snap-in window, select Computer account, click Next, select Local computer, and click Finish.
-
In the Add or Remove snap-in window, click OK.
What to do next
Import the SSL certificate into the Windows local computer certificate store. See Import a Certificate for the Horizon Web Client Agent into the Windows Certificate Store topic.
Import a Certificate for the Horizon Web Client Agent into the Windows Certificate Store
To replace a default Horizon Web Client Agent certificate with a CA-signed certificate, you must import the CA-signed certificate into the Windows local computer certificate store. Perform this procedure on each remote desktop where the Horizon Web Client Agent is installed.
Prerequisites
- Verify that the Horizon Web Client Agent is installed on the remote desktop.
- Verify that the CA-signed certificate was copied to the remote desktop.
- Verify that the Certificate snap-in was added to MMC. See Add the Certificate Snap-In to MMC on a Remote Desktop section.
Procedure
-
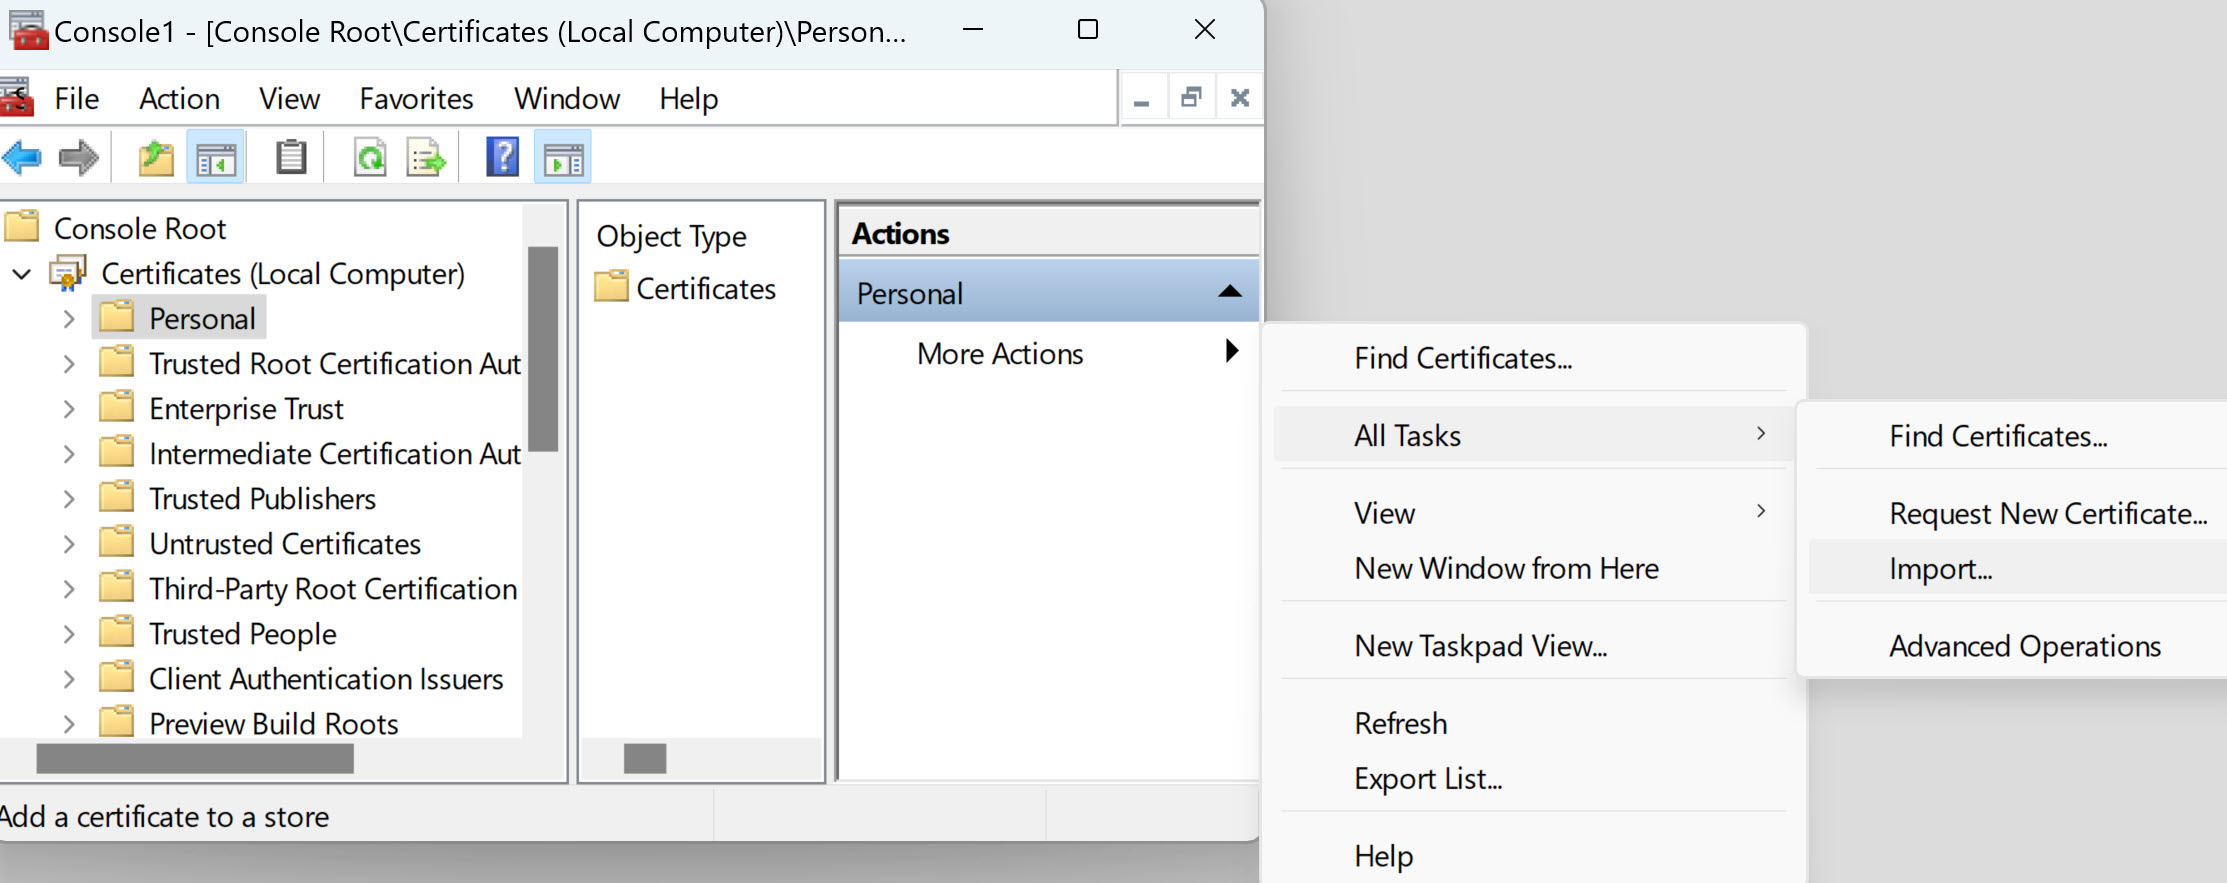
In the MMC window on the remote desktop, expand the Certificates (Local Computer) node and select the Personal folder.
-
In the Actions pane, go to More Actions > All Tasks > Import.
-
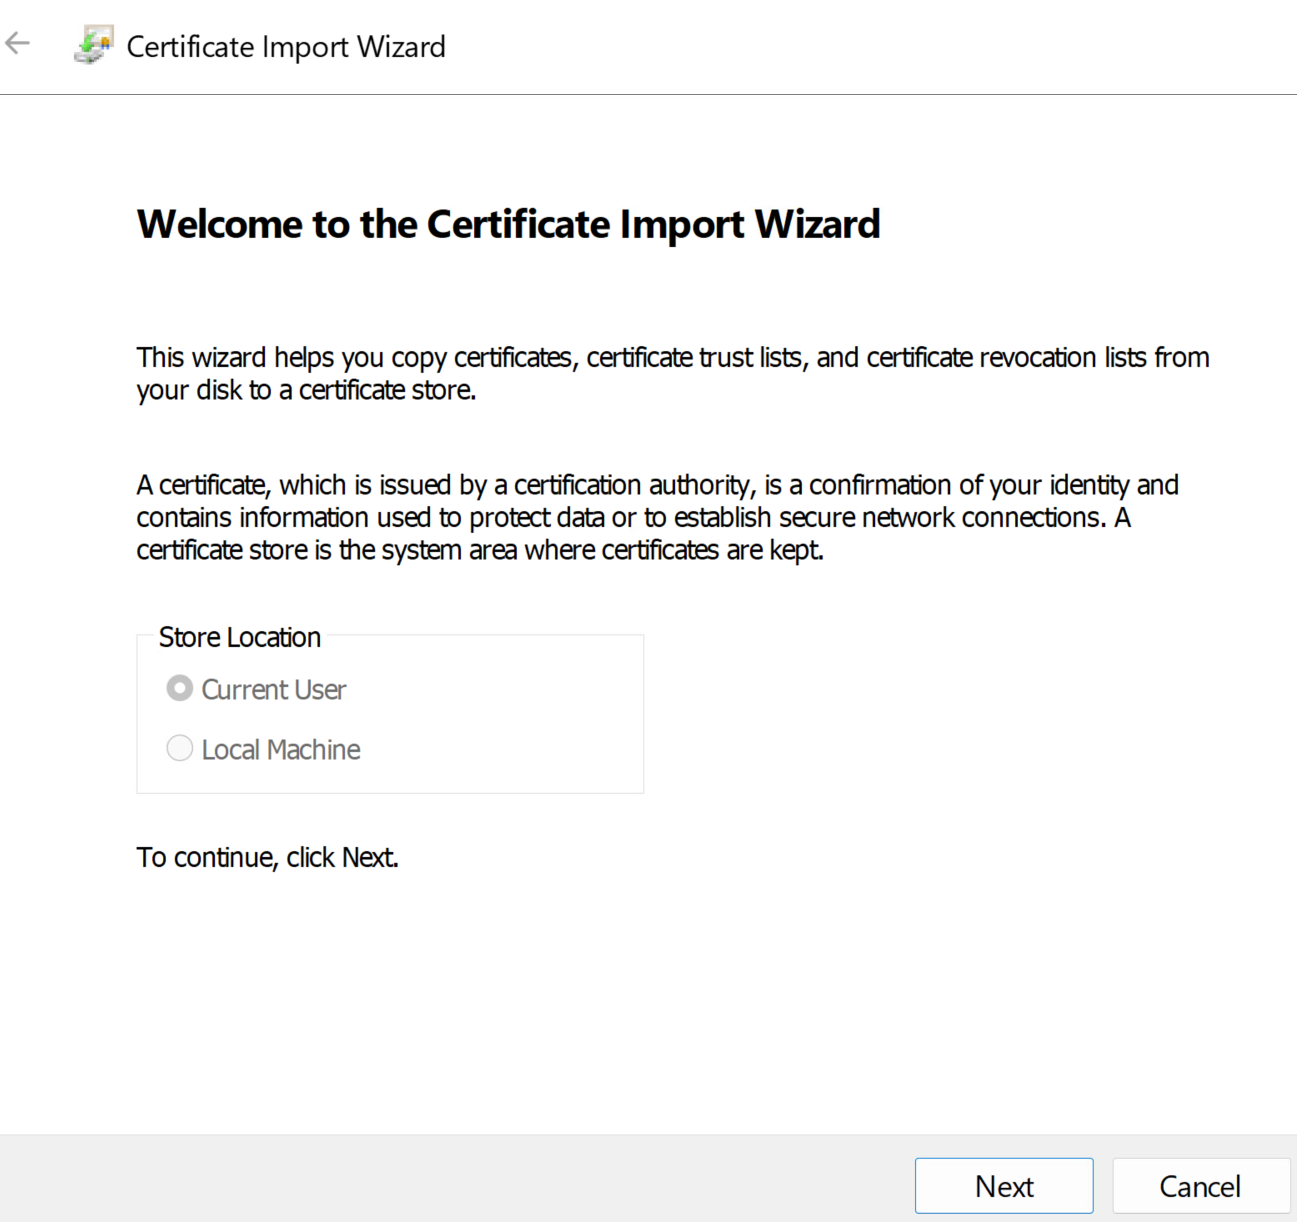
In the Certificate Import wizard, click Next and browse to the location where the certificate is stored.
-
Select the certificate file and click Open.
To display your certificate file type, you can select its file format from the File name drop-down menu.
-
Type the password for the private key that is included in the certificate file.
-
Select Mark this key as exportable.
-
Select Include all extendable properties.
-
Click Next and click Finish.
The new certificate appears in the Certificates (Local Computer) > Personal > Certificates folder.
-
Verify that the new certificate contains a private key.
a. In the Certificates (Local Computer) > Personal > Certificates folder, double-click the new certificate.
b. In the General tab of the Certificate Information dialog box, verify that the following statement appears:
You have a private key that corresponds to this certificate.
What to do next
If necessary, import the root certificate and intermediate certificates into the Windows certificate store. For more information, see the Import Root and Intermediate Certificates for the Horizon Web Client Agent section.
Configure the appropriate registry key with the certificate thumbprint. For more information, see Set the Certificate Thumbprint in the Windows Registry section.
Import Root and Intermediate Certificates for the Horizon Web Client Agent
If the root certificate and intermediate certificates in the certificate chain are not imported with the SSL certificate that you imported for the Horizon Web Client Agent, you must import these certificates into the Windows local computer certificate store.
-
In the MMC console on the remote desktop, expand the Certificates (Local Computer) node and go to the Trusted Root Certification Authorities > Certificates folder.
- If your root certificate is in this folder, and there are no intermediate certificates in your certificate chain, skip this procedure.
- If your root certificate is not in this folder, proceed to step 2.
-
Right-click the Trusted Root Certification Authorities > Certificates folder and click All Tasks > Import.
-
In the Certificate Import wizard, click Next and browse to the location where the root CA certificate is stored.
-
Select the root CA certificate file and click Open.
-
Click Next, click Next, and click Finish.
-
If an intermediate CA signed your server certificate, import all intermediate certificates in the certificate chain into the Windows local computer certificate store.
a. Go to the Certificates (Local Computer) > Intermediate Certification Authorities > Certificates folder.
b. Repeat steps 3 through 6 for each intermediate certificate that must be imported.
What to do next
Configure the appropriate registry key with the certificate thumbprint. For more information, see Set the Certificate Thumbprint in the Windows Registry topic.
Set the Certificate Thumbprint in the Windows Registry
To allow the Horizon Web Client Agent to use a CA-signed certificate that was imported into the Windows certificate store, you must configure the certificate thumbprint in a Windows registry key. You must take this step on each remote desktop on which you replace the default certificate with a CA-signed certificate.
Prerequisites
Verify that the CA-signed certificate is imported into the Windows certificate store. See Import a Certificate for the Horizon Web Client Agent into the Windows Certificate Store section.
Procedure
-
In the MMC window on the remote desktop where the Horizon Web Client Agent is installed, navigate to the Certificates (Local Computer) > Personal > Certificates folder.
-
Double-click the CA-signed certificate that you imported into the Windows certificate store.
-
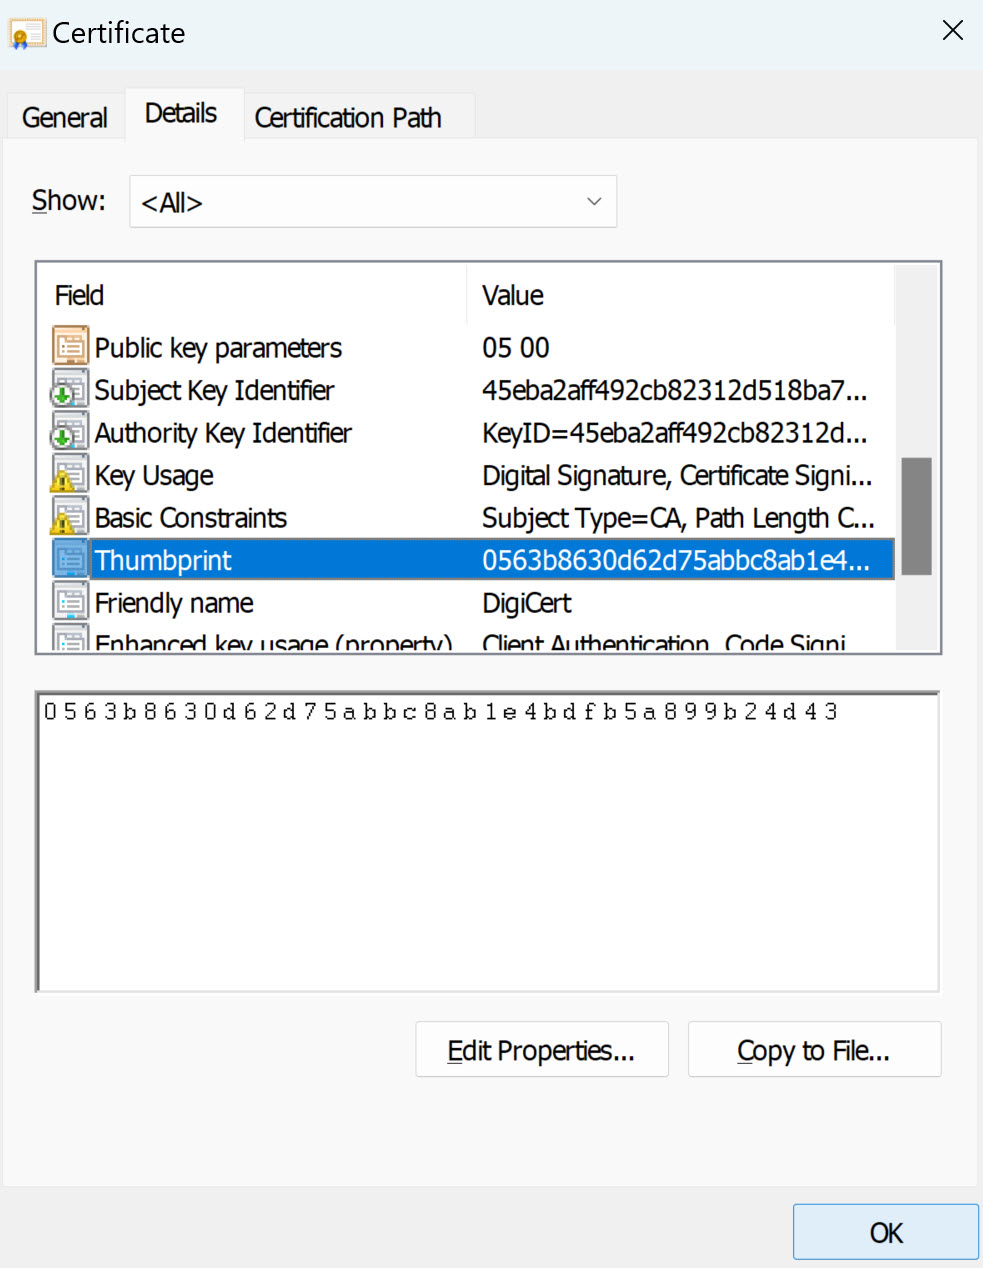
In the Certificates dialog box, click the Details tab, scroll down, and select the Thumbprint icon.
-
Copy the selected thumbprint to a text file.
For example:
31 2a 32 50 1a 0b 34 b1 65 46 13 a8 0a 5e f7 43 6e a9 2c 3eNote: When you copy the thumbprint, do not to include the leading space. If you inadvertently paste the leading space with the thumbprint into the registry key (in Step 7), the certificate might not be configured successfully. This problem can occur even though the leading space is not displayed in the registry value text box.
-
Start the Windows Registry Editor on the desktop where the Horizon Web Client Agent is installed.
-
Navigate to the
HKEY_LOCAL_MACHINE\SOFTWARE\Omnissa\Horizon\Blast\Configregistry key. -
Modify the
SslHashvalue and paste the certificate thumbprint into the text box. -
Reboot Windows.
Results
When a user connects to a remote desktop through Horizon Client for Chrome, the HTML Access Agent presents the CA-signed certificate to the user's browser.
Configure Horizon Web Client Agents to Use Specific Cipher Suites
You can configure the Horizon Web Client Agent to use specific cipher suites instead of the default set of ciphers.
By default, the Horizon Web Client Agent requires incoming TLS connections to use encryption based on certain ciphers that provide strong protection against network eavesdropping and forgery. You can configure an alternative list of ciphers for the Horizon Web Client Agent to use. The set of acceptable ciphers is expressed in the OpenSSL format. To see the cipher list format, you can search for openssl cipher string in a web browser.
Procedure
-
On the desktop where the Horizon Web Client Agent is installed, start the Windows Registry Editor.
-
Navigate to the
HKEY_LOCAL_MACHINE\SOFTWARE\Omnissa\Horizon\Blast\Configregistry key. -
Add a new String (REG_SZ) value,
SslCiphers, and paste the cipher list in the OpenSSL format into the text box. -
To make your changes take effect, restart the Omnissa Horizon Blast service.
In the Windows guest operating system, the service for the Horizon Web Client Agent is called Horizon Blast.
Results
To revert to using the default cipher list, delete the SslCiphers value and restart the Horizon Blast service. Do not simply delete the data part of the value because the Horizon Web Client Agent will then treat all ciphers as unacceptable, in accordance with the OpenSSL cipher list format definition.
When the Horizon Web Client Agent starts, it writes the cipher definition in the Horizon Blast service's log file. You can discover the current default cipher list by inspecting the logs when the Horizon Blast service starts with no SslCiphers value configured in the Windows Registry.
The Horizon Web Client Agent default cipher definition might change from one release to the next to provide improved security.
Using a CA-Signed Certificate with Unified Access Gateway
If you use a Unified Access Gateway appliance, you must install a CA-signed certificate that has a Subject Alternative Name (SAN) configured.
If you use a CA-signed certificate that does not have a SAN configured, or a self-signed certificate, users receive a "Your connection is not private" error and cannot connect with Horizon Client for Chrome.
Note: If you use a Horizon Connection Server instance, users can still connect by clicking the Proceed to ip-address (unsafe) link.
For information about installing and configuring certificates, see the Horizon 8 Installation and Upgrade document. For information about installing certificates in Chrome, see the Google Chrome documentation.
Was this page helpful?