There are three main components required to deploy the Omnissa Workspace ONE Tunnel solution. First, you will configure your console. Next, you will deploy your gateway. Lastly, you will return to the console to finish setting up the client configurations.
Here is the step-by-step process to configure Workspace ONE Tunnel for the Android platform, MDM mode (not Standalone). This is the most popular platform configuration; however, other platforms still require all three main components to be setup. Refer to your specific platform topics to learn more about their specific requirements and needs.
-
Configuring Tunnel for Windows Desktop
-
Configuring Tunnel for macOS
-
Configuring Tunnel for Android (Standalone)
-
Configuring Tunnel for iOS
Prerequisites for Configuring Tunnel for Android Devices MDM
To deploy Workspace ONE Tunnel on your Android Tunnel devices you will need to use the Workspace ONE UEM console with these versions:
-
Android version 8+
-
UEM console version 2109+
You will then start by configuring your Workspace ONE UEM console to use Workspace ONE Tunnel.
Configuring the Workspace ONE UEM console with the Workspace ONE Tunnel Page Settings
In the Workspace ONE UEM console go to the Tunnel Configuration options. Select: Groups & Settings > Configurations.
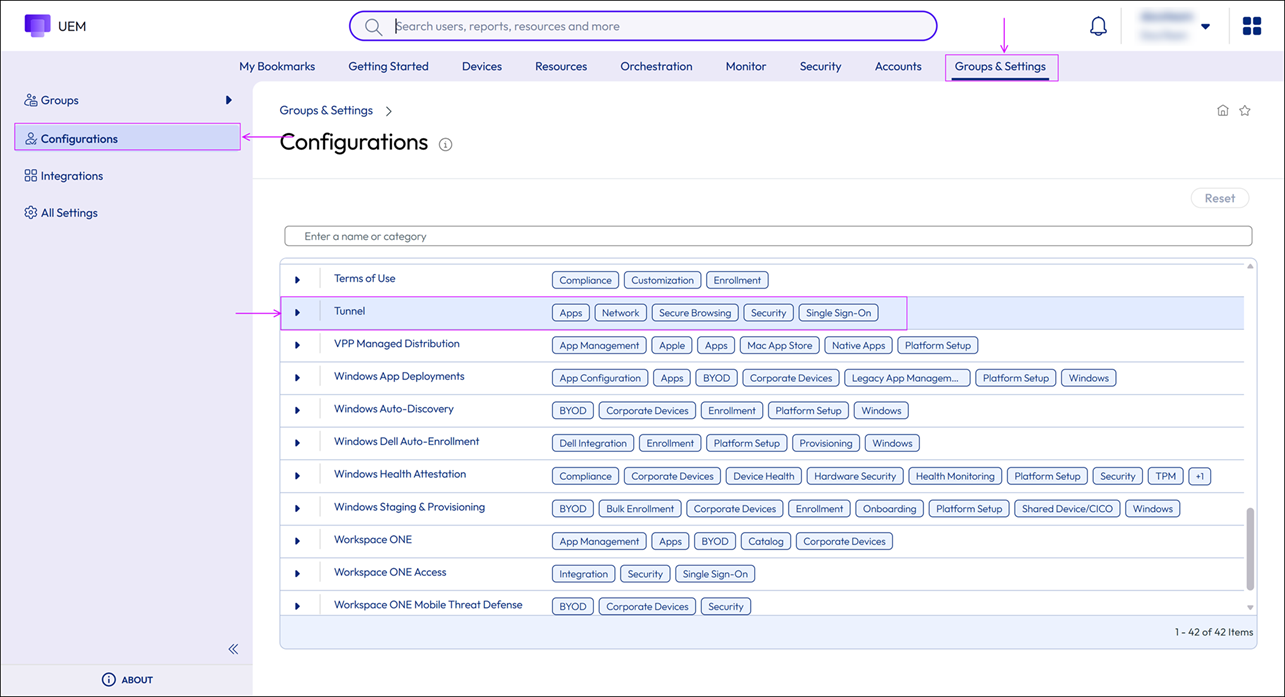
In the Search field, type Tunnel and press Enter.
This will provide a list of results. Select Tunnel from that list.
You should now see the Tunnel Configuration options. From here, you will configure:
-
The Deployment Details
-
The Server Authentication
-
The Client Authentication
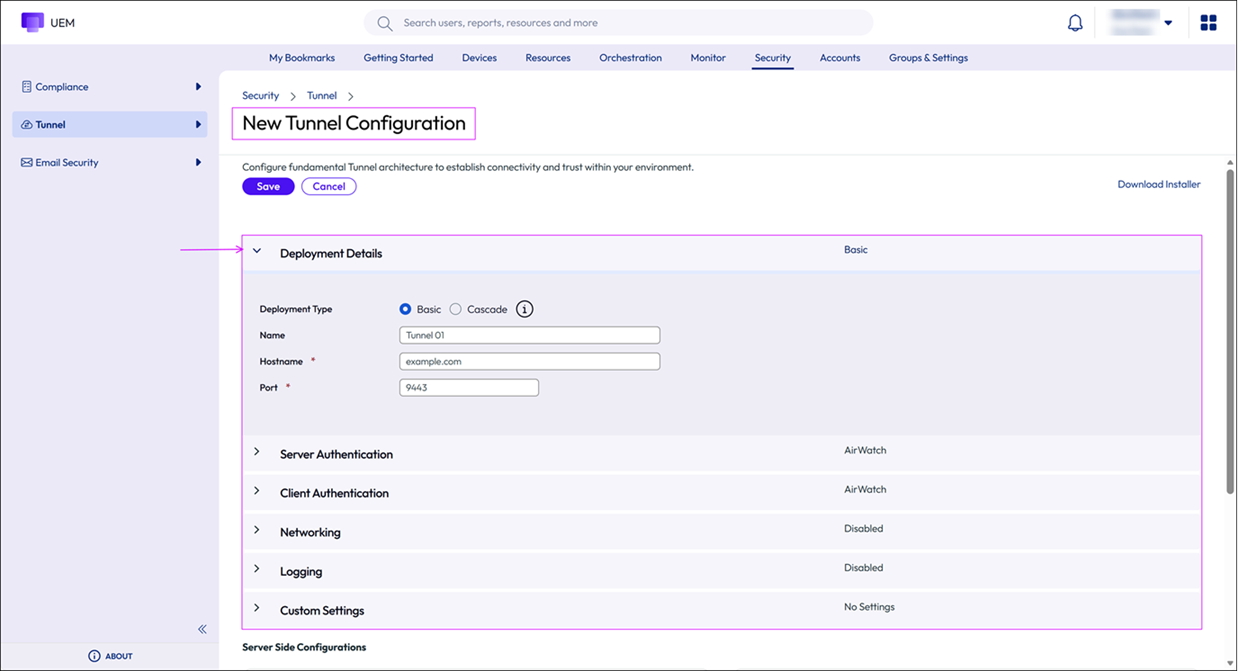
Deployment Details
To set the deployment details, you will need to know if you will be using either Single-Tier (Basic) or Multi-Tier (Cascade) mode.
-
Select either Basic or Cascade mode.
-
For the Hostname field, type Workspace ONE Tunnel and press Enter.
-
Next, enter the Port number that you would like to assign to this.
Server Authentication
By default, this setup uses an AirWatch certificate for secure server/client communication. If you are using the Basic mode (Single-Tier) for deployment, you can upload a third-party public SSL certificate to be used instead by selecting the Third-Party option. If you are using the Cascade mode (Muli-Tier) for deployment, you can upload a third-party public SSL certificate for the front-end server. The front-end server to back-end server communication is then secured by an AirWatch certificate. For more details refer to Managing Certificates..
Client Authentication
By default, this setup uses an AirWatch certificate for secure client/server communication. However, you can use Enterprise CA certificates instead by selecting the Third-Party option.
You can also enable multi-factor authentication for standalone enrollment by selecting SAML in the drop-down menu. If you do that, you will need to also configure the SAML authentication by providing the required information.
Congratulations, you have now configured your Workspace One UEM Console to use Tunnel Next, you can setup the network traffic rules.
Networking
Under Networking, define how Workspace ONE Tunnel communicates with Workspace ONE UEM and how the device traffic flows through your network.
-
Select Manage Server Traffic Rules with Tunnel** PAC Reader if you are using the PAC Reader to manage the traffic rules.
-
Select Default AWCM + API traffic via Server Traffic Rules if the communication between the Workspace ONE Tunnel and Workspace ONE UEM API or AWCM (AirWatch Cloud Messaging) uses the outbound proxy.
Network Traffic Rules
From the Workspace ONE UEM console you can define network traffic rules to granularly control how the Workspace ONE Tunnel server and Workspace ONE Tunnel application directs traffic from devices.
To configure the network traffic rules, you will set up:
-
Client-Side Configurations, which are also called device traffic rules and manage traffic from specific applications.
-
Server-Side Configuration, which enable you to manage the server network traffic when you have third-party proxies configured in your network.
Client Side Configuration
Device traffic rules force the Workspace ONE Tunnel app to do the following:
-
Send traffic through the Tunnel.
-
Block all traffic to specified domains.
-
Bypass the internal network and route traffic directly to the Internet.
-
Send traffic to a HTTPS proxy site.
The device traffic rules are created and ranked to give an order of execution. Every time a specified application is opened, the Workspace ONE Tunnel app checks the list of rules to determine which rule applies to the situation. If no set rules match, the default action is applied to all domains.
You can create multiple device traffic rules and associate them to individual Tunnel profiles. From the console, go to the Tunnel Configuration options. Under the Device Traffic Rules information block, click Edit to make changes.
Administrators can create multiple device traffic rules that will be assigned to the Android Tunnel profile. This profile is deployed to devices based on the smart group assigned to the profile.
Note:
The first device traffic rule assignment created is set as to be the default.
The following are Default Actions which apply to all Android apps, but can be modified:
| Default Action | Result | Example |
|---|---|---|
| Tunnel | All the apps on the device that are set to this will send network traffic through the tunnel (both Per-App or Full Device) | Setting the default action to Tunnel ensures that all configured apps without a defined traffic rule will use Workspace ONE Tunnel for internal communications. |
| Block | This will block all the apps on the device that are configured for Per-App or Full Device Tunnel from sending network traffic. | Setting the default action to Block ensures that all configured apps without a defined traffic rule cannot send any network traffic regardless of the destination. |
| Bypass | All the apps on the device are configured for Per-App or Full Device Tunnel to Bypass the tunnel and connect to the Internet directly. | Setting the default action to Bypass ensures that all configured apps without a defined traffic rule will bypass the Workspace ONE Tunnel to access their destination directly. |
| Proxy | Redirects traffic to the specified HTTPS proxy for the listed domains. The proxy must be HTTPS and must follow the correct format: https://example.com:port. | Setting the default action to Proxy will redirect the traffic to the specified HTTPS. |
Applying a Newly Created Device Traffic Rule:
Once you have created a device's traffic rule, you will also need to set what you would like it to apply to.
-
Click ADD RULE.
-
Click the down arrow to display the Application list.
-
Select one or more triggering applications to control with this new rule.
Note:
Alternatively on the drop-down menu, you can select All Applications to apply the rule to all Android applications listed in the drop-down. The Apps listed are the ones that you assigned to the Per-App VPN profile.
-
Enter one or more comma-separated, fully qualified, domain names as the destinations to which Workspace ONE Tunnel should apply the Device Traffic Rule.
Note:
A single asterisk (*) can be used as a wildcard for subdomains.
-
Select the Appropriate Action for Workspace ONE Tunnel to perform on traffic from the selected apps (Tunnel, Block, Bypass, or Proxy).
-
Adjust the device traffic rules rank in the list. The lower the number is ranked, the higher the priority it will be.
-
Click Save.
Server-Side Configuration of Server Traffic Rules:
Server traffic rules enable you to manage the network traffic when you have third-party proxies configured in your network. These rules apply to traffic originating from the Workspace ONE Tunnel. The rules force Tunnel to send traffic to specific destinations, either through the proxy or to bypass it.
Congratulations, you have now configured your Network Traffic Rules for both your Client and Server configurations. Next, you can distribute Workspace ONE Tunnel.
Distributing Workspace ONE Tunnel
After configuring the Workspace ONE Tunnel component, the workflow to enable and use Per-App or Full Device tunneling in Workspace ONE Tunnel includes creating a Tunnel profile for your end-user devices. These profiles depend on your device platform. After you create a profile, push the profiles and the apps to the devices.
The On Demand feature lets you configure apps to connect automatically using Tunnel when launched. The connection remains active until a time-out period of receiving no traffic, then it is disconnected. When using Tunnel, no IP address is assigned to the device, so you do not need to configure the network or assign a subnet to connected devices.
Congratulations, you have distributed Tunnel**.** Now, you can create a Workspace ONE Tunnel profile.
Creating a Tunnel MDM Profile
-
Go to: Devices > Profiles & Resources > Profiles. Click Add > Add Profile.
-
Provide a Profile Name.
-
Select Android and search or go to the VPN payload.
- For a Samsung Knox deployment, select Android and then select Container.
-
Expand the VPN payload from the list and click Add.
-
Select Workspace ONE Tunnel as the Connection Type and enter a Connection Name.
Note:
The Server text box populates automatically with your Workspace ONE Tunnel component server URL. If this component is not configured, you will see a message and a hyperlink to the system settings page where you can configure it.
-
Select the appropriate Device Traffic Rules created under the tunnel configuration page.
-
Configure the Always ON VPN setting if desired. If toggled ON, an option to enable Lockdown mode is displayed.
-
Click Next.
-
Select the appropriate Assignment and Deployment options.
-
Click Save & Publish.
Congratulations, you have created aWorkspace ONE Tunnel** Profile. Some applications will require the Device Traffic Rules (DTR) to be modified.
If you do not use Unified Access Gateway (UAG), Congratulations, you have fully deployed Tunnel. Your next step will be to configure the Gateway component.
If you do use Unified Access Gateway, you now need to deploy UAG to enable Workspace ONE Tunnel's edge services. More details can be found in the Unified Access Gateway Tech Zone also created an article about configuring the Tunnel Edge Service on UAG.
Congratulations, you have completed the quick start UEM Console part of Tunnel. Your next step will be to configure your Gateway component.
Was this page helpful?