Overview
Apple's macOS Platform SSO feature lets users log in to their macOS devices using their corporate credentials. Omnissa Access can be configured as the identity provider for Platform SSO, facilitating authentication with Active Directory or with a third-party identity provider. Third-party identity provider integrations through Omnissa Identity Service are also supported.
Configuring Omnissa Access as the identity provider for Platform SSO also enables you to use third-party identity providers that do not natively support Platform SSO.
IMPORTANT: If you have already configured Platform SSO with Omnissa Access as the identity provider, to configure the new features available in the Omnissa Access July 2026 release, follow this order:
-
Update the Platform SSO profile.
-
Push the profile to devices.
-
Ask users to reregister Platform SSO:
- On the macOS device, navigate to System Settings > Users & Groups > Network Account Server.
- Click Edit.
- In the Platform Single Sign-On section, click Repair.
Note: If users are on macOS version 14.0–14.3, we recommend they upgrade to a later version of macOS first and then upgrade the Intelligent Hub app before reregistering Platform SSO. Doing so preserves any previous Platform SSO registration.
Supported Identity Sources
Omnissa Access supports the following identity source configurations for Platform SSO:
-
Active Directory integration
Omnissa Access connects to Active Directory as the identity source. -
Third-party identity provider integration configured in Omnissa Access
Omnissa Access brokers authentication with a third-party identity provider such as Okta. For Secure Enclave-based Platform SSO, all identity providers are supported. For password-based Platform SSO, any identity provider that supports the OAuth 2.0 Password Grant flow is supported. -
Third-party identity provider integrations through Omnissa Identity Service
When Omnissa Identity Service is enabled for the Omnissa Access tenant, the third-party identity provider integrated with Omnissa Identity Service becomes the identity source.
Supported Platform SSO authentication methods
The following Platform SSO authentication methods are supported:
-
Password
The user's local macOS account password is synchronized with their identity provider password during Platform SSO registration. Subsequently, they log in to their device using their identity provider password, which is also used for SSO. -
Secure Enclave key
A cryptographic key is generated and stored in the device’s Secure Enclave during Platform SSO registration. Subsequently, users log in to their devices using their local account password or another method such as Touch ID. The Secure Enclave key is then automatically used for authentication with the identity provider for SSO. A password is not required.
Platform SSO Registration Options
You can configure the Platform SSO registration flow for users in the following ways:
-
Registration after enrollment
After a user's device is successfully enrolled with Workspace ONE UEM and the Platform SSO profiles are pushed to it, the user receives a registration notification and completes the Platform SSO registration manually. -
Registration during Setup Assistant flow for new devices
The user completes Platform SSO registration during the Setup Assistant flow on new devices. When the Setup Assistant finishes, Platform SSO is already configured and no additional action is required.
Limitations
This feature has the following limitations:
- Only single-user macOS devices are supported.
- Only Platform SSO version 1.0 is supported.
Requirements
- Omnissa Access Cloud
- Omnissa Identity Service (for Identity Service-enabled Access tenants)
- Workspace ONE UEM version 24.10 or later
Note: Version 26.04 or later is required for the following features: Secure Enclave authentication method, Platform SSO during Setup Assistant, and Omnissa Access SSO. - macOS Intelligent Hub app version 25.11 or later
Note: Version 26.06 or later is required for the following features: Secure Enclave authentication method, Platform SSO during Setup Assistant, and Omnissa Access SSO. - macOS version 14.4 or later
Note: Version 26 or later is required for the Platform SSO during Automated Device Enrollment (Setup Assistant) feature.
Prerequisites
- Your Workspace ONE UEM and Access tenants are integrated.
- The source of authentication in Workspace ONE UEM can be set to either Workspace ONE UEM or Omnissa Access.
- Intelligent Hub is configured in Workspace ONE UEM.
- Workspace ONE UEM is configured to manage macOS devices.
- The users for whom you want to enable Platform SSO exist in both Omnissa Access and Workspace ONE UEM. The externalId attribute is required for all users and the values must match between Omnissa Access and Workspace ONE UEM.
Note: For an Access tenant that has Identity Service enabled, see "Prerequisites for Omnissa Identity Service" instead. - You have the following privileges in Omnissa Access: A role that has Manage Settings privileges for the Identity and Access Management service.
- Prerequisites for Omnissa Identity Service (if Identity Service is enabled for the Access tenant):
- To use password as the Platform SSO authentication method, Omnissa Identity Service must be integrated with an identity provider using the OpenID Connect (OIDC) protocol. SAML is not supported for password-based Platform SSO.
Additionally, you must select the OAuth 2.0 Password Grant type in the OpenID Connect app in the third-party identity provider. The setting name might vary based on the identity provider. - The users for whom you want to enable Platform SSO are provisioned to Omnissa Identity Service and Workspace ONE UEM. The externalId attribute is required for all users.
- To use password as the Platform SSO authentication method, Omnissa Identity Service must be integrated with an identity provider using the OpenID Connect (OIDC) protocol. SAML is not supported for password-based Platform SSO.
Prerequisite for Third-party OAuth 2.0 IDP Integrations with Access: Configure Password Grant Flow for Platform SSO
Important: This prerequisite applies to the following scenario only:
- Password as the Platform SSO authentication method
- Third-party OAuth 2.0 identity provider integration configured in Omnissa Access
This prerequisite is not applicable to Active Directory.
For an Omnissa Identity Service-enabled Access tenant, only the step to select the OAuth 2.0 Password Grant type in the third-party identity provider applies.
When Omnissa Access is integrated with a third-party identity provider, it uses the OAuth 2.0 Password Grant flow for the Platform SSO feature. To configure this setup, follow these steps:
- Create an OpenID Connect IDP in Omnissa Access.
- Select the OAuth 2.0 Password Grant type in the third-party identity provider.
- Set password validation in Omnissa Access to use the OAuth 2.0 Password Grant flow.
Create an OpenID Connect IDP in Omnissa Access
Create an OpenID Connect IDP in Omnissa Access to integrate with the third-party identity provider. For detailed steps, see Add and Configure an OpenID Connect Third-Party Identity Provider in Omnissa Access.
If you have an existing integration with the third-party identity provider based on an OpenID Connect IDP, you can use that IDP for Platform SSO. However, if your existing integration uses a SAML IDP, you must create a new OpenID Connect IDP for Platform SSO. You can continue to use the SAML integration for other use cases.
Select the OAuth 2.0 Password Grant type in the identity provider
Select the OAuth 2.0 Password Grant type in the OpenID Connect app in the third-party identity provider. The setting name might vary based on the identity provider. For example, in Okta, the setting is called Resource Owner Password.
Note: This requirement also applies to an Omnissa Identity Service-enabled Access tenant where the third-party identity provider integrated with Omnissa Identity Service is used with password-based Platform SSO.
Set Password Validation in Omnissa Access to use OAuth 2.0 Password Grant Flow
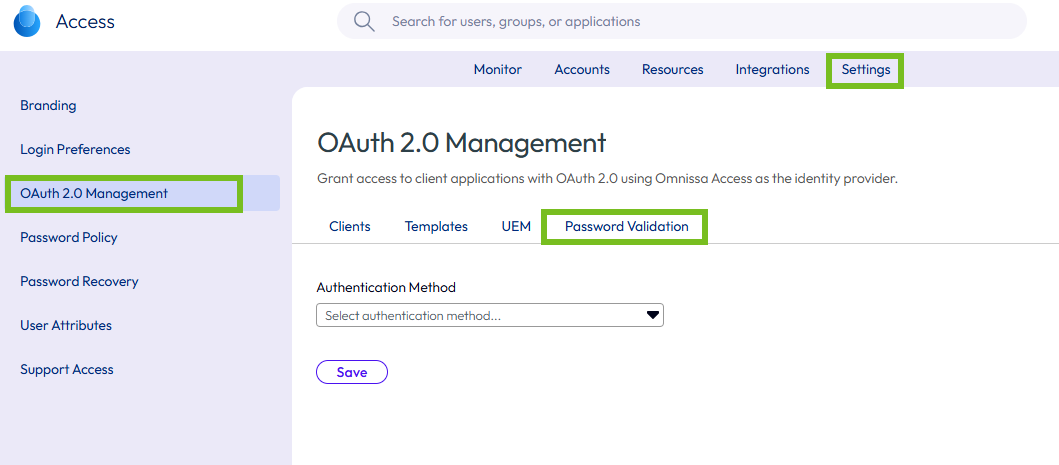
To support authentication with a third-party identity provider for Platform SSO, you must set password validation in Omnissa Access to use the OAuth 2.0 Password Grant flow. You make this selection in the OAuth 2.0 Management > Password Validation tab.
Caution: The selection in the Password Validation tab also applies to all OAuth 2.0 clients in Omnissa Access that have Grant type set to Password Grant. Users coming from those clients will be authenticated against the third-party OpenID Connect identity provider selected in the Password Validation tab, regardless of their directory type.
-
In the Omnissa Access console, navigate to Settings > OAuth 2.0 Management.
-
Select the Password Validation tab.
-
From the Authentication Method list, select the authentication method associated with the OpenID Connect IDP you created for the third-party identity provider integration.
-
Click Save.
Note: If no authentication method is selected in the OAuth 2.0 Management > Password Validation tab, password validation defaults to the directory type associated with the user.
Step 1: Upload Workspace ONE UEM Root Certificate to Omnissa Access
Upload the Workspace ONE UEM Issuer certificate to the Omnissa Access console to establish trust with Omnissa Access.
-
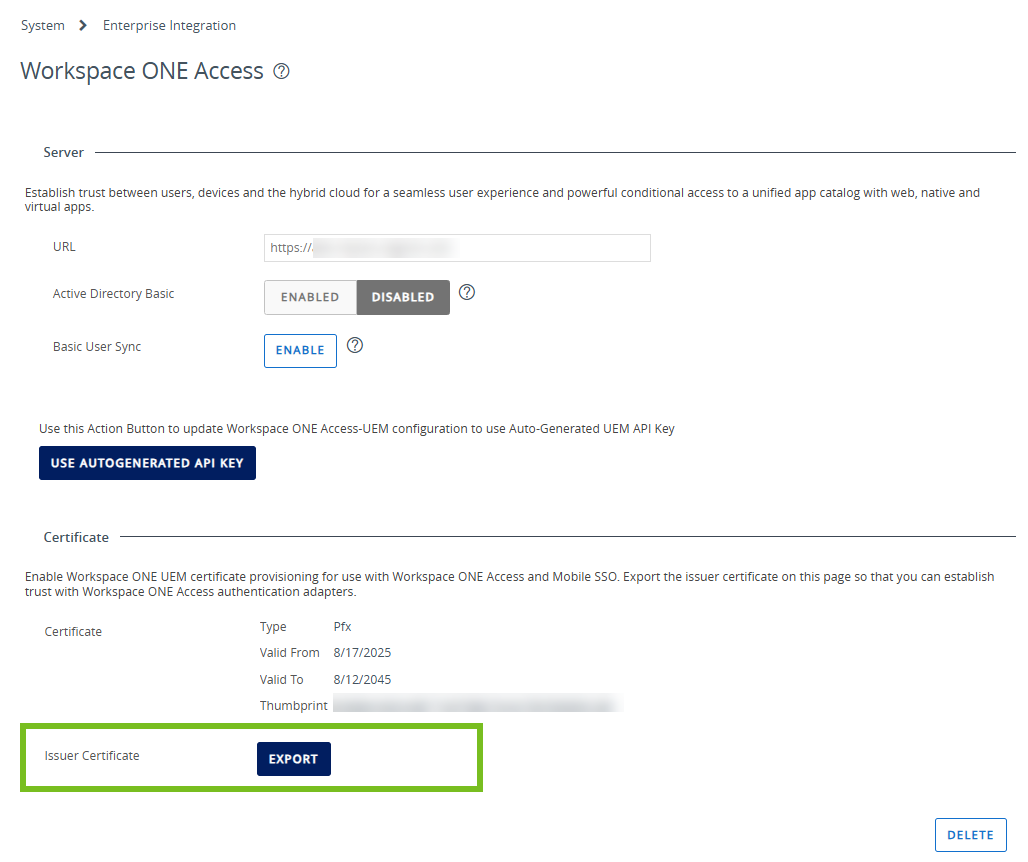
In the Workspace ONE UEM admin console, select Groups & Settings > All Settings, then navigate to Settings > System > Enterprise Integration > Workspace ONE Access > Configuration.
-
Export the Workspace ONE UEM Issuer Certificate.
-
Log in to the Omnissa Access console.
-
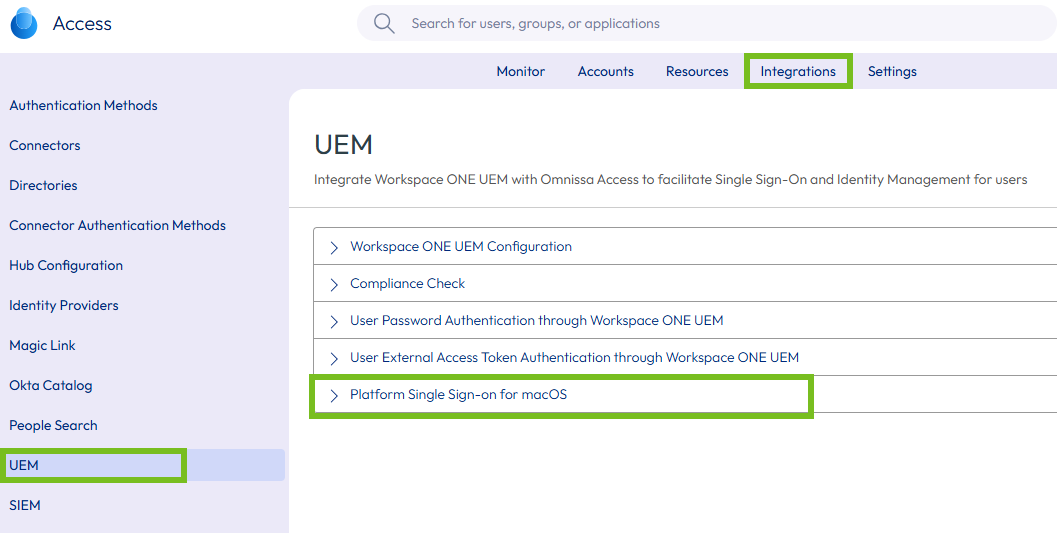
Navigate to Integrations > UEM > Platform Single Sign-on for macOS.
-
Upload the Workspace ONE UEM Issuer Certificate in the Platform Single Sign-on for macOS section.
Step 2: Create a User Profile with a Simple Certificate Enrollment Protocol (SCEP) Payload in Workspace ONE UEM
Add a user profile with a SCEP payload configured to use the AirWatch Certificate Authority, if you have not already done so.
Note:
- If you have already deployed an AirWatch Certificate Authority SCEP profile, skip this step.
- If you plan to configure Platform SSO for Automated Device Enrollment (Setup Assistant), create the profile as a device profile instead of a user profile. Be aware that the certificate will be available for all accounts on the device and take that into consideration if you use the certificate for any feature other than Platform SSO.
-
In the Workspace ONE UEM console, navigate to Resources > Profiles.
-
Select Add > Add Profile.
-
Select the Apple macOS platform.
-
On the Apple macOS page, select the following, then click Next.
-
Management Type: Imperative
-
Context: User
Note: If you plan to configure the Platform SSO during Automated Device Enrollment (Setup Assistant) feature, select Device instead.
-
-
Enter a name for the profile.
-
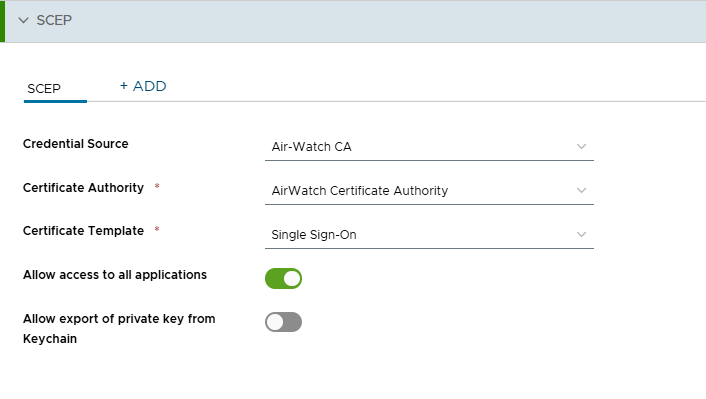
From the payloads list, find SCEP, click Add, and configure the payload.
-
In the Credential Source and Certificate Authority fields, select AirWatch Certificate Authority.
-
In the Certificate Template field, select Single Sign-On or Certificate (Cloud Deployment).
-
Deselect the Allow export of private key from Keychain toggle.
For example:
-
-
Click Next on the profile page.
-
On the Assignment page:
-
Click on the Smart Group search box and select the appropriate group from the list of Assignment Groups that appear.
-
For Assignment Type, select Auto.
-
-
Click Save and Publish.
Step 3: Create a Platform SSO Profile in Workspace ONE UEM
-
In the Workspace ONE UEM console, navigate to Resources > Profiles.
-
Select Add > Add Profile.
-
Select the Apple macOS platform.
-
On the Apple macOS page, select the following, then click Next.
-
Management Type: Imperative
-
Context: Device
-
-
Enter a name for the profile.
-
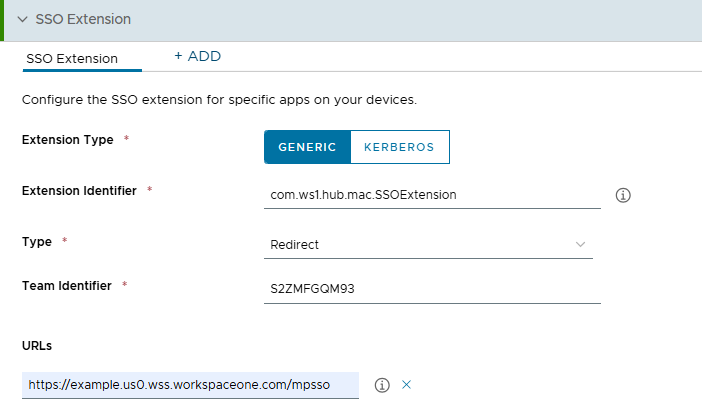
Scroll down the list of payloads until you find SSO Extension, then click Add and configure the SSO extension.
-
For Extension Type, keep the default value: Generic.
-
For Extension Identifier, enter
com.ws1.hub.mac.SSOExtension. -
For Type, keep the default value: Redirect.
-
For Team Identifier, enter
S2ZMFGQM93. -
For URLs, enter
https://AccessTenantFQDN/mpsso.Replace AccessTenantFQDN with your Omnissa Access tenant fully-qualified domain name (FQDN). For example: https://example.wss.workspaceone.com/mpsso.
-
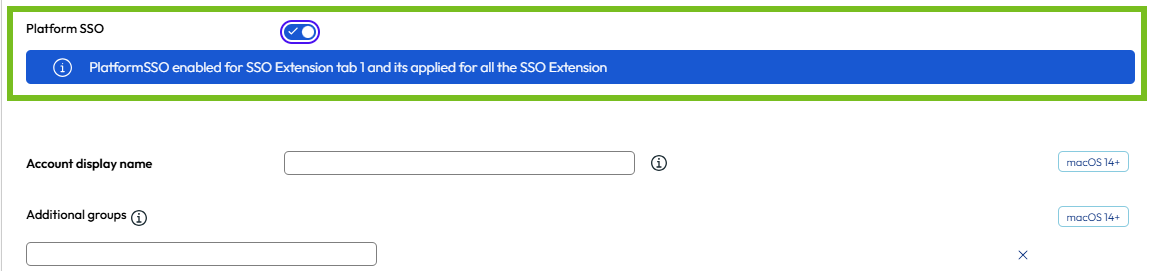
Enable the Platform SSO option.
-
For Account display name, enter a display name.
Important: The Account Display Name is visible to end users, so use a name that is meaningful in your context. In addition to appearing in the Intelligent Hub app, the name appears in the registration dialog boxes that end users use to register Platform SSO. For example, this prompt includes the name: "Your macOS password will be synchronized with your AccountDisplayName password. Enter your password to allow this."
-
Scroll down to the Authentication Method option and select either Password or Secure Enclave Key.
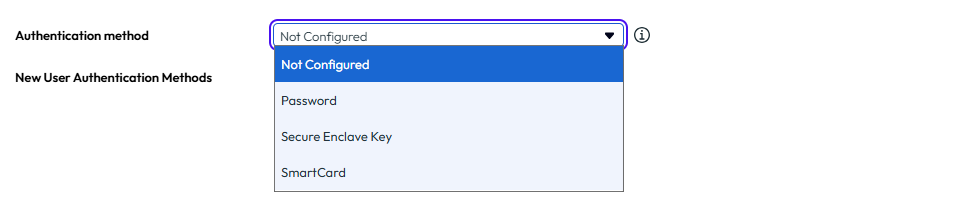
Note: Make sure that you configure the Authentication Method setting in the Platform SSO section of the SSO Extension profile, instead of the setting that appears earlier in the profile.
-
Set the Use shared device keys value to ENABLE.
-
In the Additional Settings > Custom XML text box, add:
<dict>
<key>AuthorizationRules</key>
<array>
    <dict>
        <key>URLPrefix</key>
        <string>https://AccessTenantFQDN/</string>
        <key>ExtensionManaged</key>
        <false/>
    </dict>
</array>
</dict>
Replace https://AccessTenantFQDN with your Omnissa Access tenant URL. For example: https://example.wss.workspaceone.com.
-
-
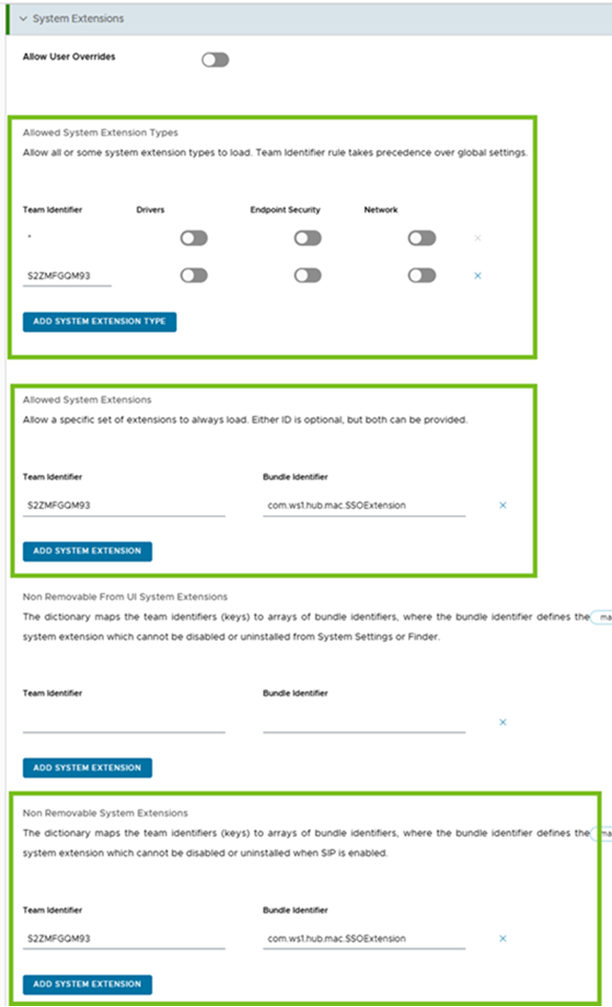
Add a System Extensions payload to add the Platform SSO Extension to the list of allowed system extensions.
-
From the payloads list, find System Extensions and click Add.
-
Under Allowed System Extension Types, enter
S2ZMFGQM93for Team Identifier. -
Under Allowed System Extensions, enter these values:
- Team Identifier:
S2ZMFGQM93 - Bundle Identifier:
com.ws1.hub.mac.SSOExtension
- Team Identifier:
-
Add the same values under Non Removable System Extensions.
Important: By default, Workspace ONE UEM requires you to add values in both the Non Removable From UI System Extensions and Non Removable System Extensions sections. Do not add the values to Non Removable From UI System Extensions; click the X to remove that row.
-
-
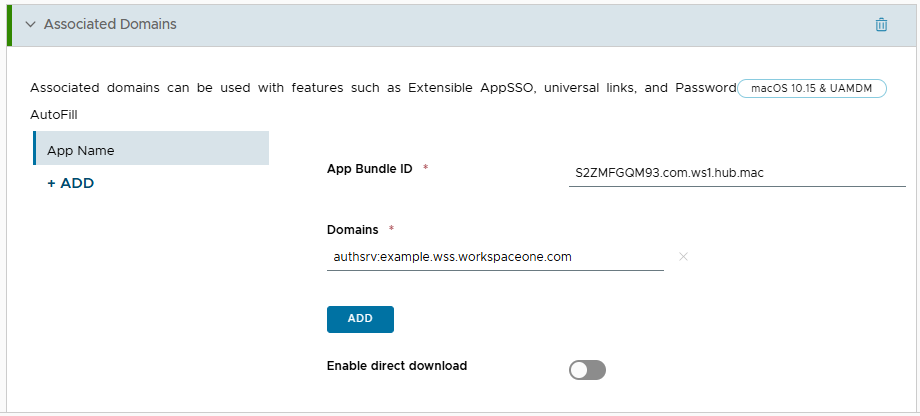
Add an Associated Domains payload to add the Omnissa Access tenant domain to the list of associated domains.
-
From the payloads list, find Associated Domains and click Add.
-
For App Bundle ID, enter
S2ZMFGQM93.com.ws1.hub.mac. -
For Domains, enter
authsrv:YourAccessTenantFQDN.For example: authsrv:example.wss.workspaceone.com
-
-
Click Next on the profile page.
-
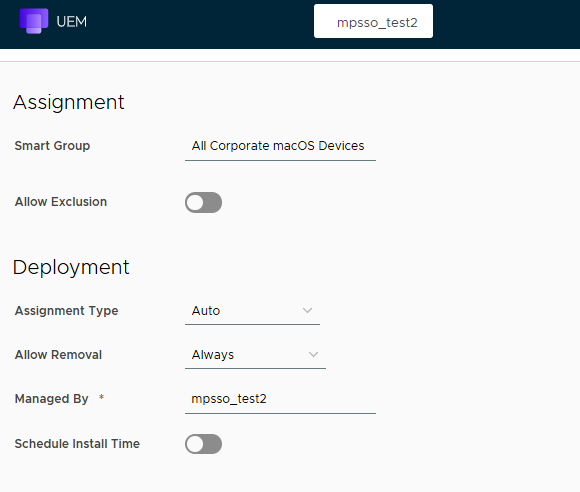
On the Assignment page:
-
Click on the Smart Group search box and select the appropriate group from the list of Assignment Groups that appear, such as All Corporate macOS Devices.
-
For Assignment Type, select Auto.
For example:
-
-
Click Save and Publish.
Step 4: Push profiles to macOS devices
Push the profiles you created or updated, including the new SSO Extension profile, to macOS devices.
- Profiles should be pushed automatically when enrolling the device.
- Verify that profiles were pushed successfully to enrolled devices.
To add Platform SSO registration to macOS Setup Assistant, see Configuring Platform SSO for Setup Assistant.
Configuring Platform SSO for Setup Assistant
You can configure Platform SSO to be part of Automated Device Enrollment (ADE), so that the Platform SSO registration can be completed during the macOS Setup Assistant flow on new devices. With this configuration, when the Setup Assistant flow finishes, password synchronization or Secure Enclave key is already set up. Users do not have to perform additional registration tasks after enrollment. Nor is a post-enrollment profile push required.
This configuration supports the Password and Secure Enclave key authentication methods.
Prerequisites
- Intelligent Hub app 26.06 or later
- Workspace ONE UEM 26.04 or later
- macOS 26 or later
- Complete Steps 1-3 described earlier in this document.
Note: Create the SCEP profile as a device profile, not a user profile. Be aware that the certificate will be available for all accounts on the device and take that into consideration if you use the certificate for any feature other than Platform SSO. - Make sure the device is assigned to the user after enrollment in Workspace ONE UEM.
Procedure
-
In the Workspace ONE UEM admin console, select Groups & Settings > All Settings, then navigate to Devices & Users > Apple macOS > Automated Device Enrollment.
-
Edit an existing ADE profile or create a new one for the Setup Assistant configuration.
-
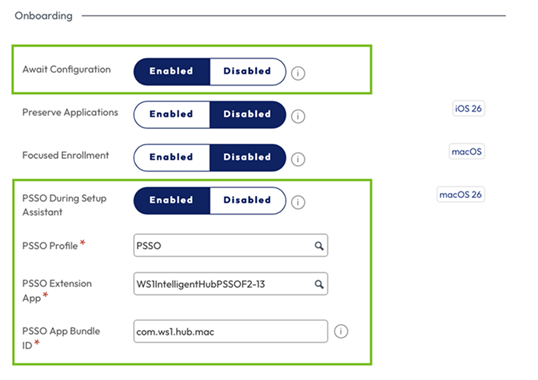
In the ADE profile, select the following options:
Await Configuration: Set to Enabled.
PSSO During Setup Assistant: Set to Enabled.
PSSO Profile: Select the Platform SSO profile you created earlier in "Step 3: Create a Platform SSO Profile in Workspace ONE UEM".
PSSO Extension app: Select the Intelligent Hub app. This can be the app that is available by default in Workspace ONE UEM or a bootstrap app.
PSSO App Bundle ID: Enter the bundle ID of the app, for example, com.ws1.hub.mac.
Biometric ID: If you select the Secure Enclave Key authentication method in the Platform SSO profile, set Biometric ID to Don't Skip.
For example:

-
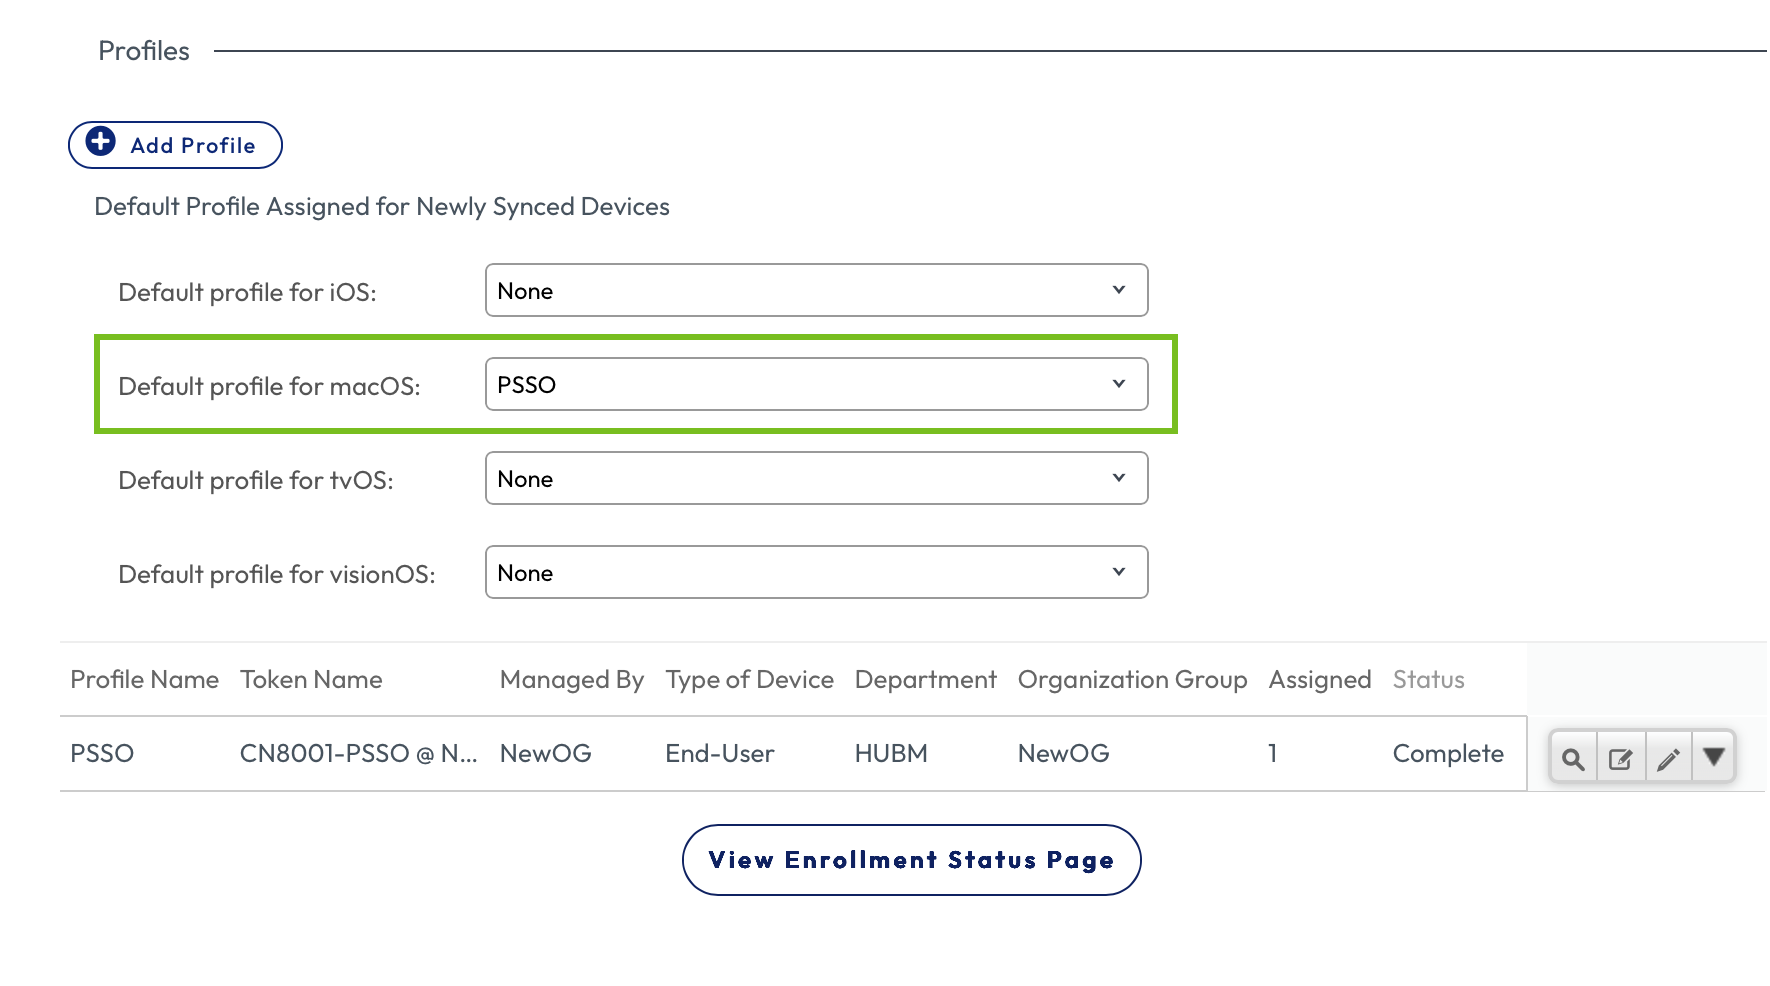
When the profile is ready, select it as the Default profile for macOS on the Automated Device Enrollment page.
-
Navigate to Resources > Profiles and edit the Platform SSO profile (with the SSO Extension payload) that you created earlier in "Step 3: Create a Platform SSO Profile in Workspace ONE UEM".
-
Scroll to the SSO Extension payload.
-
Enable the Enable Registration During Setup option.

-
Configure the Account name (short name) and Full name for the local account.
Select from the list of claims that Omnissa Access provides. For Account name, you can alternatively enter the following Apple value, which extracts the short name from the UPN:
com.apple.PlatformSSO.AccountShortName.Omnissa Access provides the following claims:
Claim Description oidUser ID in Access subUser ID in Access user_nameUsername in Access emailUser's email address given_nameUser's first name family_nameUser's last name namegiven_name+family_namedisplay_nameUser's display name For example:

-
-
(Optional) If you want to enable local account creation during Automated Device Enrollment, configure the following additional settings:
-
In the ADE profile, set Primary Account Setup to Don't Skip.

-
In the Platform SSO profile SSO Extension payload, set Enable Create First User During Setup to Enable.

If you want to disable local account creation during Automated Device Enrollment, use the following settings:
-
In the ADE profile, set Primary Account Setup to Skip.

-
In the Platform SSO profile SSO Extension payload, set Enable Create First User During Setup to Disable.

-
Configuring SSO to Intelligent Hub and Apps
When Platform SSO is configured, users can log in to their macOS devices with their identity provider or local credentials. Additionally, you can configure SSO in Omnissa Access to allow users to single sign-on to the Intelligent Hub app or portal and launch their apps without having to authenticate again.
Note that SSO only works with Webkit-based browsers and apps, such as Safari and DuckDuckGo. It is not supported on non-WebKit browsers or apps such as Chrome.
You can control which apps are allowed or denied SSO access using the SSO extension profile. See Specify apps list for SSO.
Prerequisites
- Intelligent Hub 26.06 or later
- Workspace ONE UEM 26.04 or later
- macOS 14.4 or later
- Configure Platform SSO as described in Steps 1-3 earlier in this document.
Configure the Platform SSO (for macOS) authentication method in Omnissa Access
-
In the Omnissa Access console, navigate to Integrations > Authentication Methods.
-
Select the Platform SSO (for macOS) authentication method.
-
Click Configure.
-
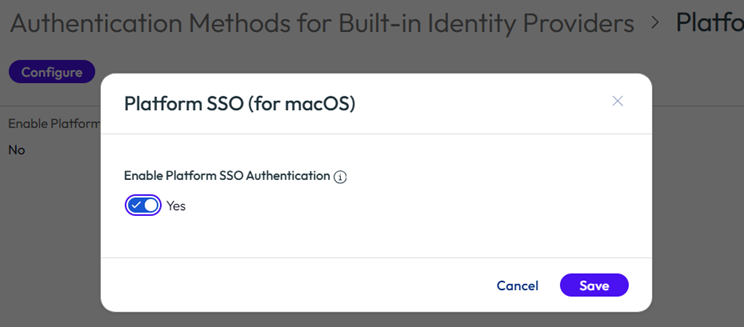
Toggle the Enable Platform SSO Authentication option to Yes, and click Save.
-
Navigate to Resources > Policies and add the authentication method to the relevant policies.
(Optional) Specify apps list for SSO
To control which apps can be accessed with SSO, you can optionally configure the allowedAppBundles key in the Custom XML field of the SSO Extension profile.
If the key is configured, only the apps whose bundle IDs are explicitly listed will be allowed to use SSO. If the key is not configured, the Platform SSO extension will attempt to authenticate all apps. Note that SSO to non-WebKit browsers and apps such as Google Chrome will not work even if they are listed as SSO requires WebKit support.
-
In the Workspace ONE UEM console, navigate to Resources > Profiles and edit the Platform SSO profile (with the SSO Extension payload) that you created earlier in “Step 3: Create a Platform SSO Profile in Workspace ONE UEM”.
-
Scroll to the SSO Extension payload.
-
In the Additional Settings > Custom XML text box, add the allowedAppBundles key to the existing XML in the format shown in the following example:
<dict>
    <key>allowedAppBundles</key>
    <array>
        <string>com.apple.Safari</string>
        <string>com.duckduckgo.macos.browser</string>
        <string>com.example.app</string>
    </array>
    <key>AuthorizationRules</key>
    <array>
        <dict>
            <key>URLPrefix</key>
            <string>https://AccessTenantFQDN</string>
            <key>ExtensionManaged</key>
            <false/>
        </dict>
    </array>
</dict>
IMPORTANT: Adding a browser or app bundle ID to the configuration does not enable SSO unless the browser or app supports WebKit. Non-WebKit browsers and apps, such as Chrome, are not supported for SSO.
User Experience with Password Synchronization (without Setup Assistant)
Registration Phase
After the user device is successfully enrolled and the Workspace ONE UEM profiles you configured for Platform SSO have been successfully pushed to it, the user will be prompted with a Registration Required notification to synchronize their local macOS password with the enterprise-managed password (identity provider password).
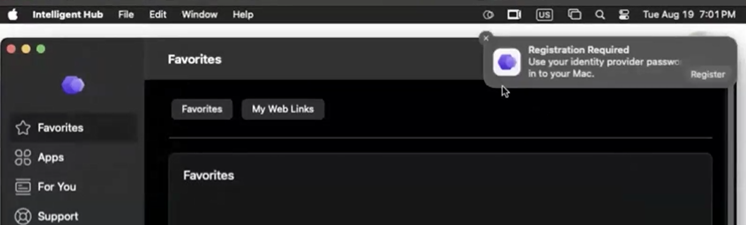
When the user clicks Register, they will be prompted first for the local password of the device (to access the keychain) and then for the identity provider password.
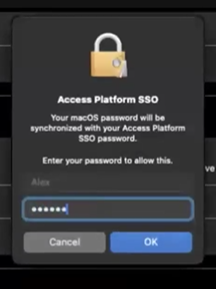
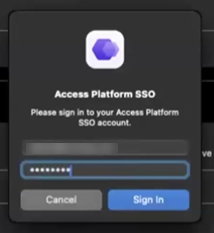
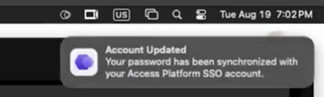
After the user successfully synchronizes the password, a confirmation notification appears.
Login Phase
Subsequently, the user must log into the macOS device using the identity provider password.
Troubleshooting
-
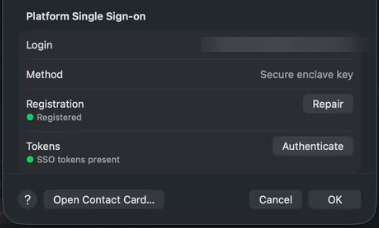
If users experience authentication failures or errors with Platform SSO, they can use the Repair button to reregister.
-
On the macOS device, navigate to System Settings > Users & Groups.
-
Click the information icon next to your name.
-
Under Platform Single Sign-On, click Repair.
-
-
Users can also repair the device registration:
- On the macOS device, navigate to System Settings > Users & Groups > Network Account Server.
- Click Edit.
- In the Platform Single Sign-On section, click Repair.
Next Steps: Configure Apple Mobile SSO in Omnissa Access
Follow the Configure Mobile SSO for Apple Authentication in Omnissa Access (Cloud only) documentation to configure Mobile SSO for Apple in Omnissa Access.
Was this page helpful?