Workflows can be used to install or remove resources in a specific order, perform actions such as onboarding workflows and so on your end user devices. You can sequentially install the resources during onboarding your devices into Omnissa Workspace ONE UEM or when resources have dependencies.
Note: Removal of resources on a device is supported only on Freestyle Orchestrator for desktop. To support removal of resources on your device, a minimum version of Omnissa Workspace ONE Intelligent Hub 2310 or later must be installed on your device.
Sequence the Installation and Removal of Resources for Freestyle Orchestrator Desktop
For Freestyle Orchestrator desktop, sequencing of the following resources is supported:
- Application sequencing: An admin can sequence the installation of different applications during deployment. For example, install Outlook and then install Outlook plugins.
- Profile sequencing: An admin can sequence the installation of profiles with other resources. For example, install the Wi-fi profile before any other resources.
- Integrate scripts with workflows: An admin can run scripts on devices using workflows and sequence the running of scripts during deployment.
Note: In a workflow, you can only select the resources that are available in the system's inventory and you cannot add resources from within the workflow. You can add resources into a workflow that is a part of your current organization group (OG) and your parent OG. However, you cannot view the resources managed at your child OG. To view the resources managed at your child OG, you must create a workflow at the child OG level. For more information about the usage of resources from various OGs, see the Working with Freestyle Orchestrator on Multiple Organization Groups topic.
Create a Workflow to Sequence the Installation of Applications
You can create a workflow to install all the applications in sequential order. The sequential installation of applications ensures that the installation of one application is successful before proceeding to the installation of another.
The following procedure shows the steps to create a workflow to sequence the installation of applications. In this procedure, the administrator creates a workflow to install Outlook, Zoom, and Skype applications on the devices assigned to an organization group (OG). So, the administrator creates a workflow to first install the Outlook application and then install the Zoom and Skype Outlook plug-ins.
Prerequisites
Before you begin creating a workflow, you must add the Outlook, Zoom, and Skype applications to the app inventory. To add the required applications to the inventory, navigate to your organization group (OG), and follow the procedure at the Deploy Applications to Devices topic in the Application Lifecycle Management guide. You must also add default policies to each of these applications.
Procedure
The following procedure describes the steps to create a workflow to first install the Outlook application and then install the Zoom and Skype applications.
-
Log in to the Workspace ONE UEM console.
-
Click Orchestration > Freestyle > Freestyle Orchestrator and click New.
-
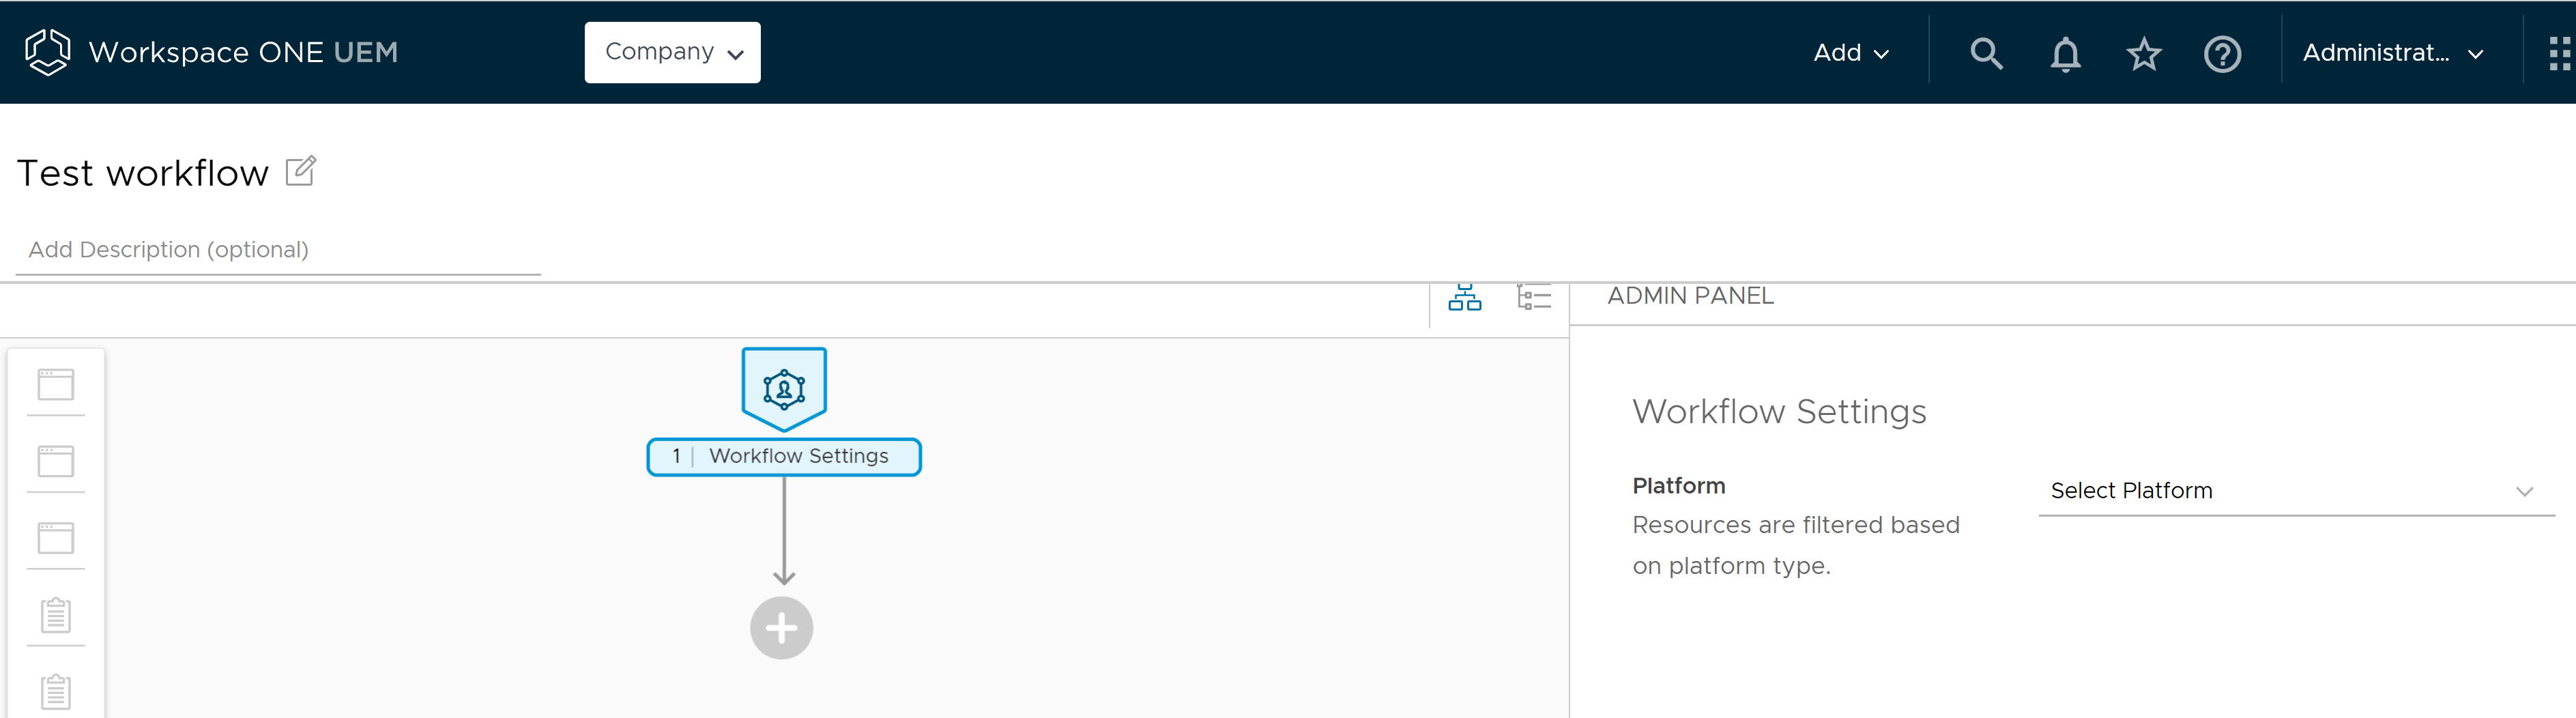
Enter a name in the New Freestyle Workflow. You can add an optional description to your workflow.
-
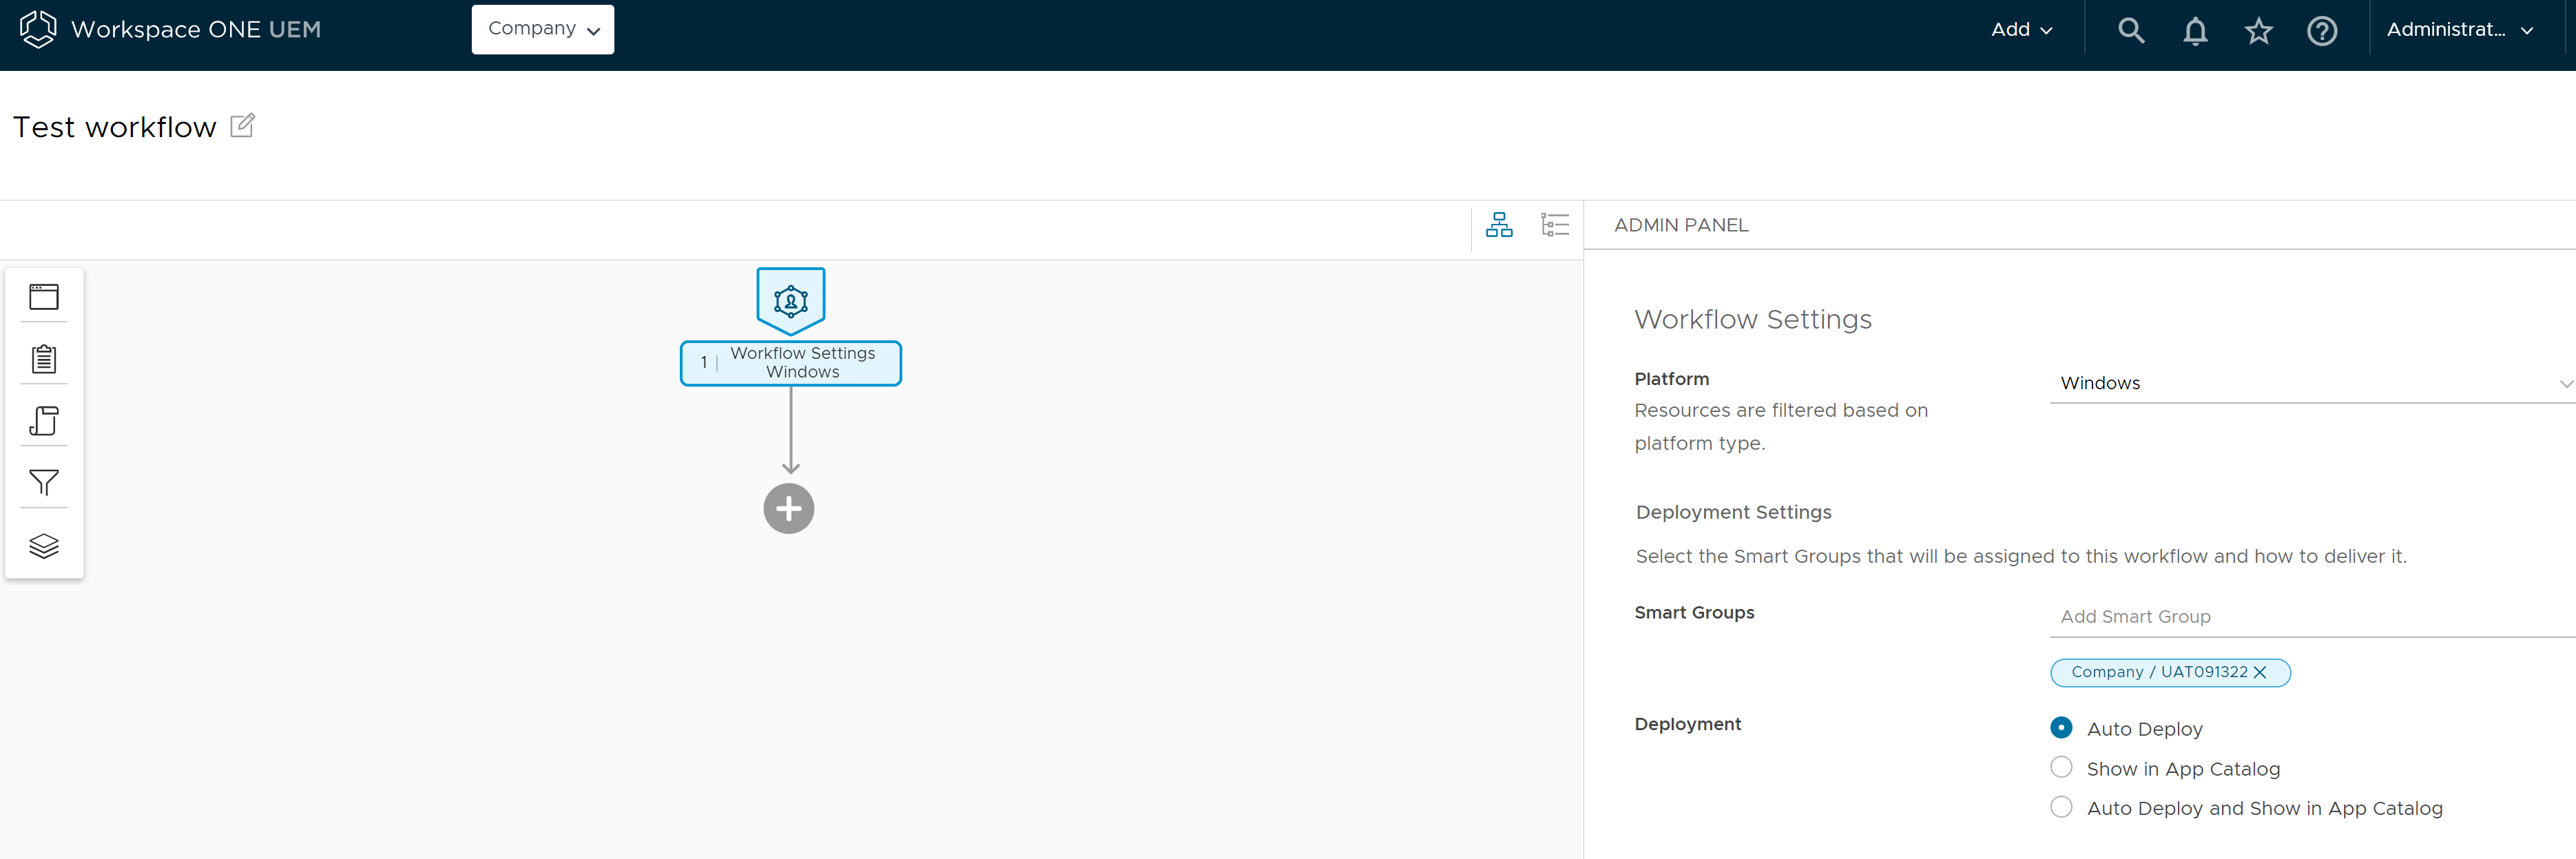
In the right Admin Panel Workflow Settings, select the Platform from the drop-down menu, and select Smart Groups to which you want to assign this workflow.
-
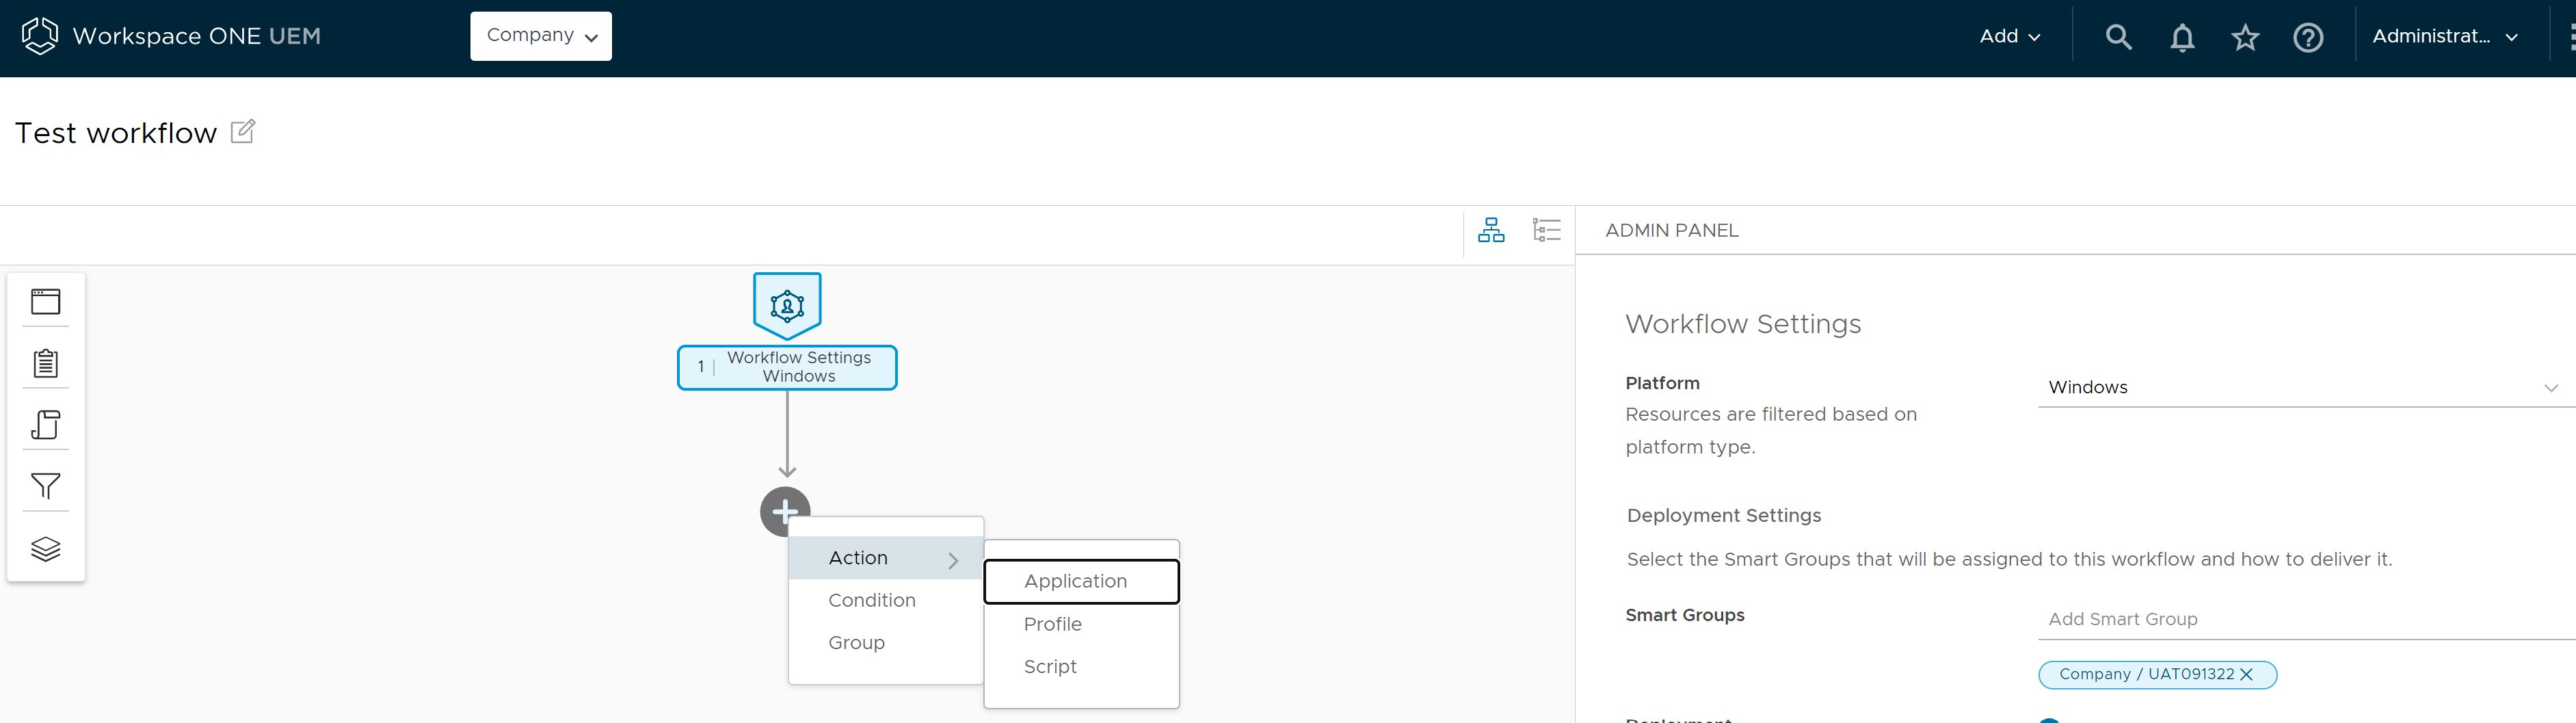
In the left pane, click + > Action > Application to add an application to the workflow.
-
In the right Admin Panel, under the Install Application perform the following steps:
a. In Application, click Search and Select, and enter Outlook in the Search for an existing application.
Note: A list of all the available applications are displayed in the Results section.
b. Navigate to the Outlook application and click Select to select the application.
c. In the Install Application screen, click the Version to select the version of the Outlook application to be installed.
-
In the left pane, click + > Action > Application to add the Zoom application to the workflow.
-
In the right Admin Panel, under the Install Application perform the following steps:
a. In Application, click Search and Select and enter Zoom in the Search for an existing application.
b. Click Select to select the Zoom application.
c. On the Install Application screen, click the Version to select the version of the Zoom application to be installed.
-
In the left pane, click + > Action > Application to add the Skype application to the workflow.
-
In the right Admin Panel, under the Install Application perform the following steps:
a. In Application, click Search and Select and enter Skype in the Search for an existing application.
b. Click Select to select the Skype application.
c. On the Install Application screen, click the Version to select the version of the Skype application to be installed.
-
Click Save to save your workflow.
-
Click Publish to publish the workflow to all selected devices upon device check-in.
Note: You can create and save your workflow anytime without publishing the workflow to your end user devices. You can return to the Workspace ONE UEM console later to publish a saved workflow.
Results
You can view the saved workflow in the Freestyle Orchestrator dashboard. When the workflow is assigned to the device, the Outlook application is installed first, followed by the Zoom and Skype applications, according to the order specified in the workflow. The sequential installation of applications ensures that all the applications are installed correctly.
Create a Workflow to Sequence the Installation of Profiles
The sequential installation of profiles ensures that a profile installation is complete before moving to the installation of another resource.
Note: Profile sequencing is supported on Windows and macOS platform. The profiles can be referred to in a workflow and assigned to a smart group only after the profiles are added to the system inventory.
The following procedure shows the steps to create a workflow to sequence the installation of profiles. In this procedure, the administrator creates a workflow to first install the passcode policy profile and then install the Wi-fi profile on the devices assigned to a particular OG.
Prerequisites
Before you begin creating a workflow, you must first create the passcode policy profile and the Wi-fi profile. For more information about creating profiles, see the macOS Device Profiles topic in the macOS Device Management guide and Profiles for Windows Desktop topic in the Windows Desktop Documentation guide.
In this example, the passcode policy profile is named passcode-policy-profile and the Wi-Fi profile is named wifi-profile.
Procedure
The following procedure describes the steps to first install the passcode policy profile and then install the Wi-fi profile.
-
Log in to the Workspace ONE UEM console.
-
Click Orchestration > Freestyle > Freestyle Orchestrator and click New.
-
Enter a name in the New Freestyle Workflow. You can add an optional description to your workflow.
-
In the right Admin Panel Workflow Settings, select the Platform from the drop-down menu, and select Smart Groups to which you want to assign this workflow.
-
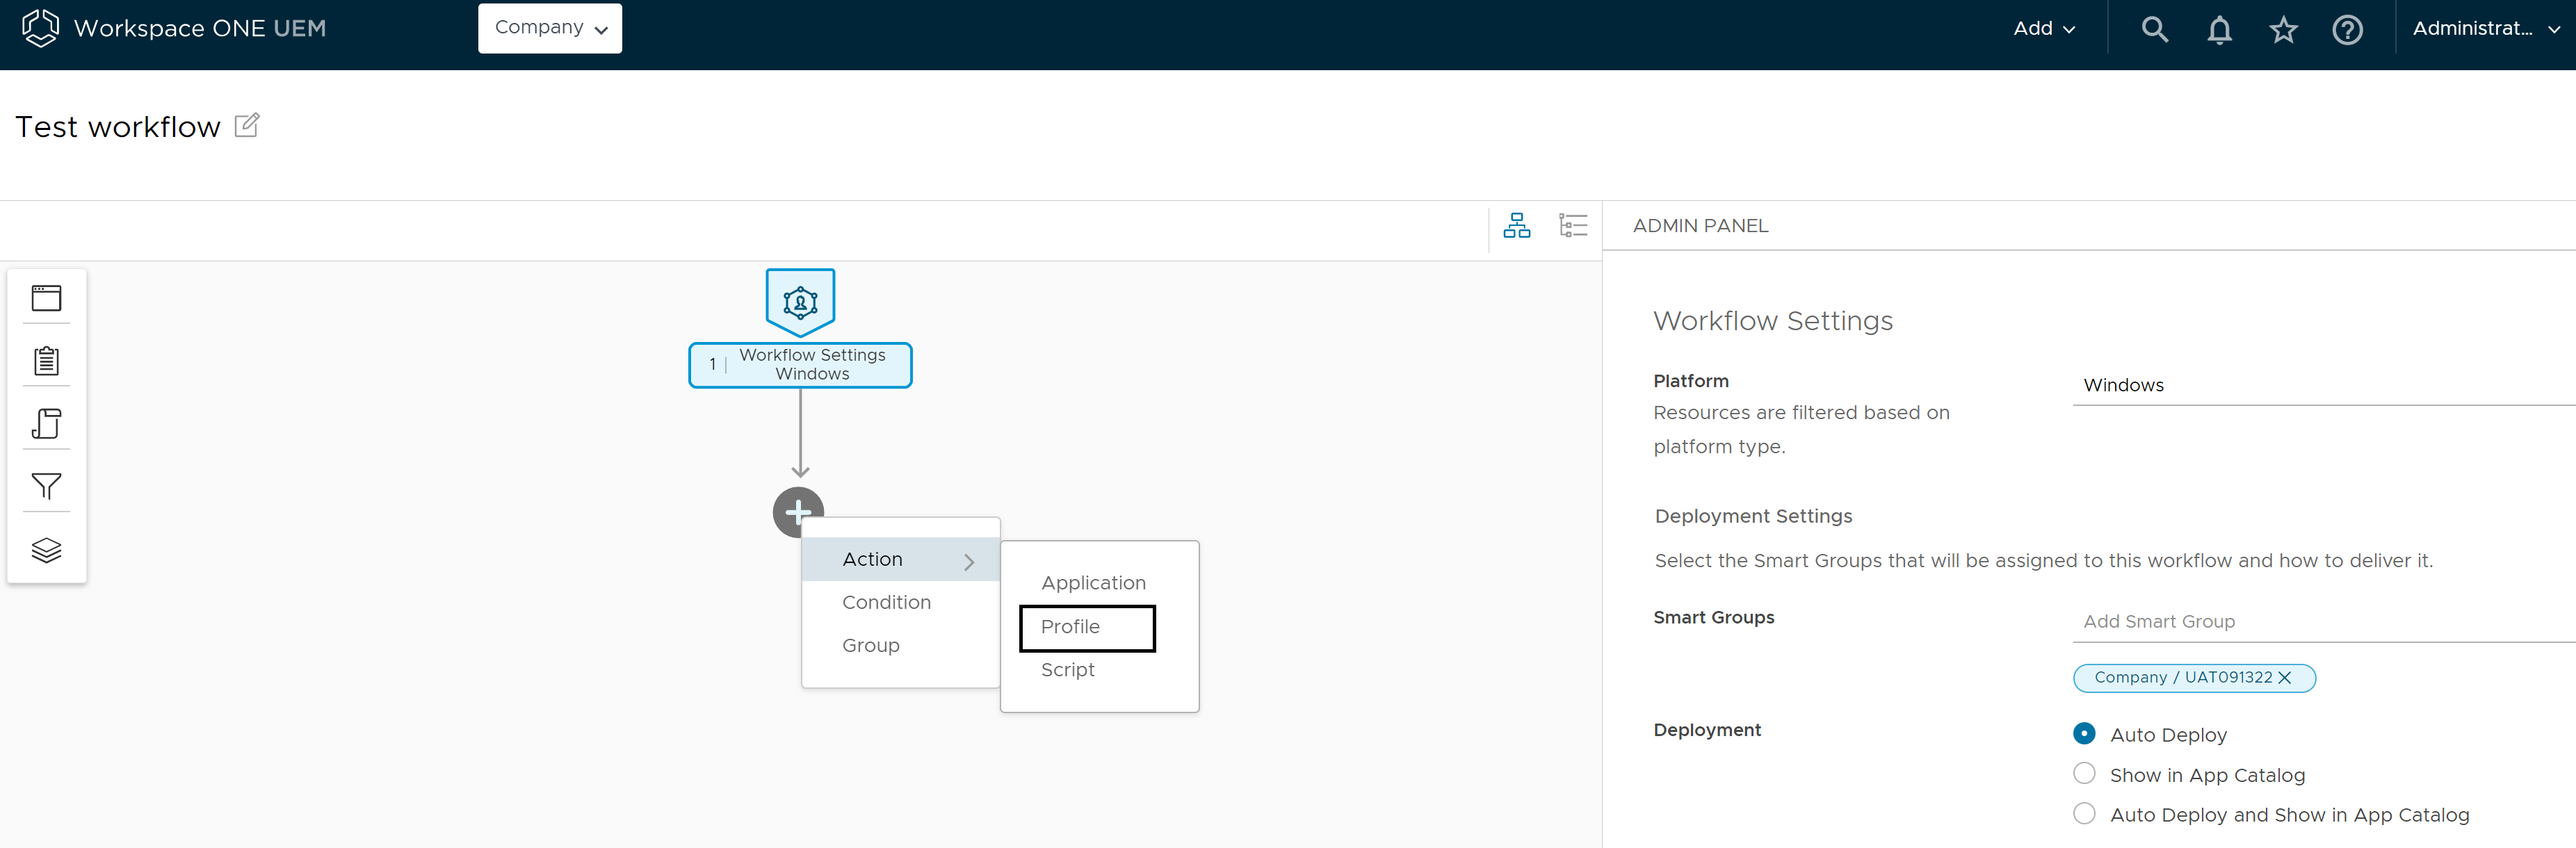
In the left pane, click + > Action > Profile to add a profile to the workflow.
-
In the right Admin Panel, under the Install Profile perform the following steps:
a. In Profile, click Search and Select, and enter passcode-policy-profile.
b. Select the passcode-policy-profile from the auto-populated list.
-
In the left pane, click + > Action > Profile to add another profile to the workflow.
-
In the right Admin Panel, under the Install Profile perform the following steps:
a. In Action, select Install.
b. In Profile, click Search and Select, and enter wifi-profile.
c. Select the wifi-profile from the auto-populated list.
-
Click Save to save your workflow.
-
Click Publish to publish the workflow to all selected devices upon device check-in.
The following profiles need additional steps for using them in workflows:
-
BIOS: To install a BIOS profile on a device, the Dell Command Monitor (DCM) app must be installed on the device. You must add the DCM app to your inventory, install the DCM app, and then install the BIOS profile. The workflow does not install the DCM app automatically unless the DCM app is added as an explicit step in the workflow.
-
OEM updates: To install an OEM profile on a device, the Dell Command Update (DCU) app must be installed on the device. You must add the DCU app to your inventory, install the DCU app, and then install the OEM profile. The workflow does not install the DCU app automatically unless the DCU app is added as an explicit step in the workflow.
-
Kiosk: To install the Kiosk profile and set up the Kiosk mode on your devices, you must add a workflow step to install the required apps in the Kiosk mode and then install the Kiosk profile.
Results
You can view the saved workflow in the Freestyle Orchestrator dashboard. When the workflow is assigned to the device, as per the order specified in the workflow the passcode-policy-profile is first installed and then the wifi-profile is installed. The sequential installation of profiles ensures that all the profiles are installed correctly.
Create a Workflow to Sequence the Installation of Scripts
As an administrator, you can create a workflow to run scripts based on specific condition rules or in sequential order with other resources. The following procedure describes the steps to create an example workflow to use a sensor condition to determine if a device's printer access is enabled. If the printer access is not enabled, run a script on the device to refresh the printer configuration.
For more information about creating scripts, see the Create a Script for macOS Devices topic in the macOS Device Management guide and the Create a Script for Windows Desktop Devices topic in the Windows Desktop Documentation guide.
Note: If you are publishing scripts to less than 2000 (default value) devices, the devices are notified immediately to fetch the resource. However, if the smart groups assigned have more than 2000 devices, then the devices will receive the resource the next time the devices checks-in with Workspace ONE UEM console.
Prerequisites
Before creating a workflow, you must first create the sensor to check the printer access. In this example, the macOS Bash sensor to check for printer access is named printer_status and the response data type is string.
/usr/bin/lpstat -p 2>/dev/null | awk '{print $5}' | sed '/^$/d'
If the printer is configured correctly, the sensor must return the string enabled. You can then create a script to refresh the printer service. For more information about creating scripts, see the Create a Script for macOS Devices topic in the macOS Device Management guide and the Create a Script for Windows Desktop Devices topic in the Windows Desktop Documentation guide.
In this example, the macOS Bash script to refresh the printer service is named refresh_printer.
do
	/usr/bin/cancel -ax
	/usr/sbin/cupsdisable $printer
	/usr/sbin/cupsenable $printer
	echo "Refreshed $printer"
done
If the script runs successfully, it must complete with an exit (return) code of 0, in which the workflow updates the status as successful.
Note: The scripts can be added in workflow and assigned to a smart group only after the scripts are created.
Procedure
The following procedure describes the steps to create a workflow with a sensor condition to check the printer status on all devices in the assigned smart group and then run a script on devices that cannot access the printer to refresh the configuration.
-
Log in to the Workspace ONE UEM console.
-
Click Orchestration > Freestyle > Freestyle Orchestrator and click New.
-
Enter a name for the workflow in the New Freestyle Workflow. You can add an optional description to your workflow.
-
In the right Admin Panel Workflow Settings, select the Platform from the drop-down menu, and select Smart Groups to which you want to assign this workflow.
-
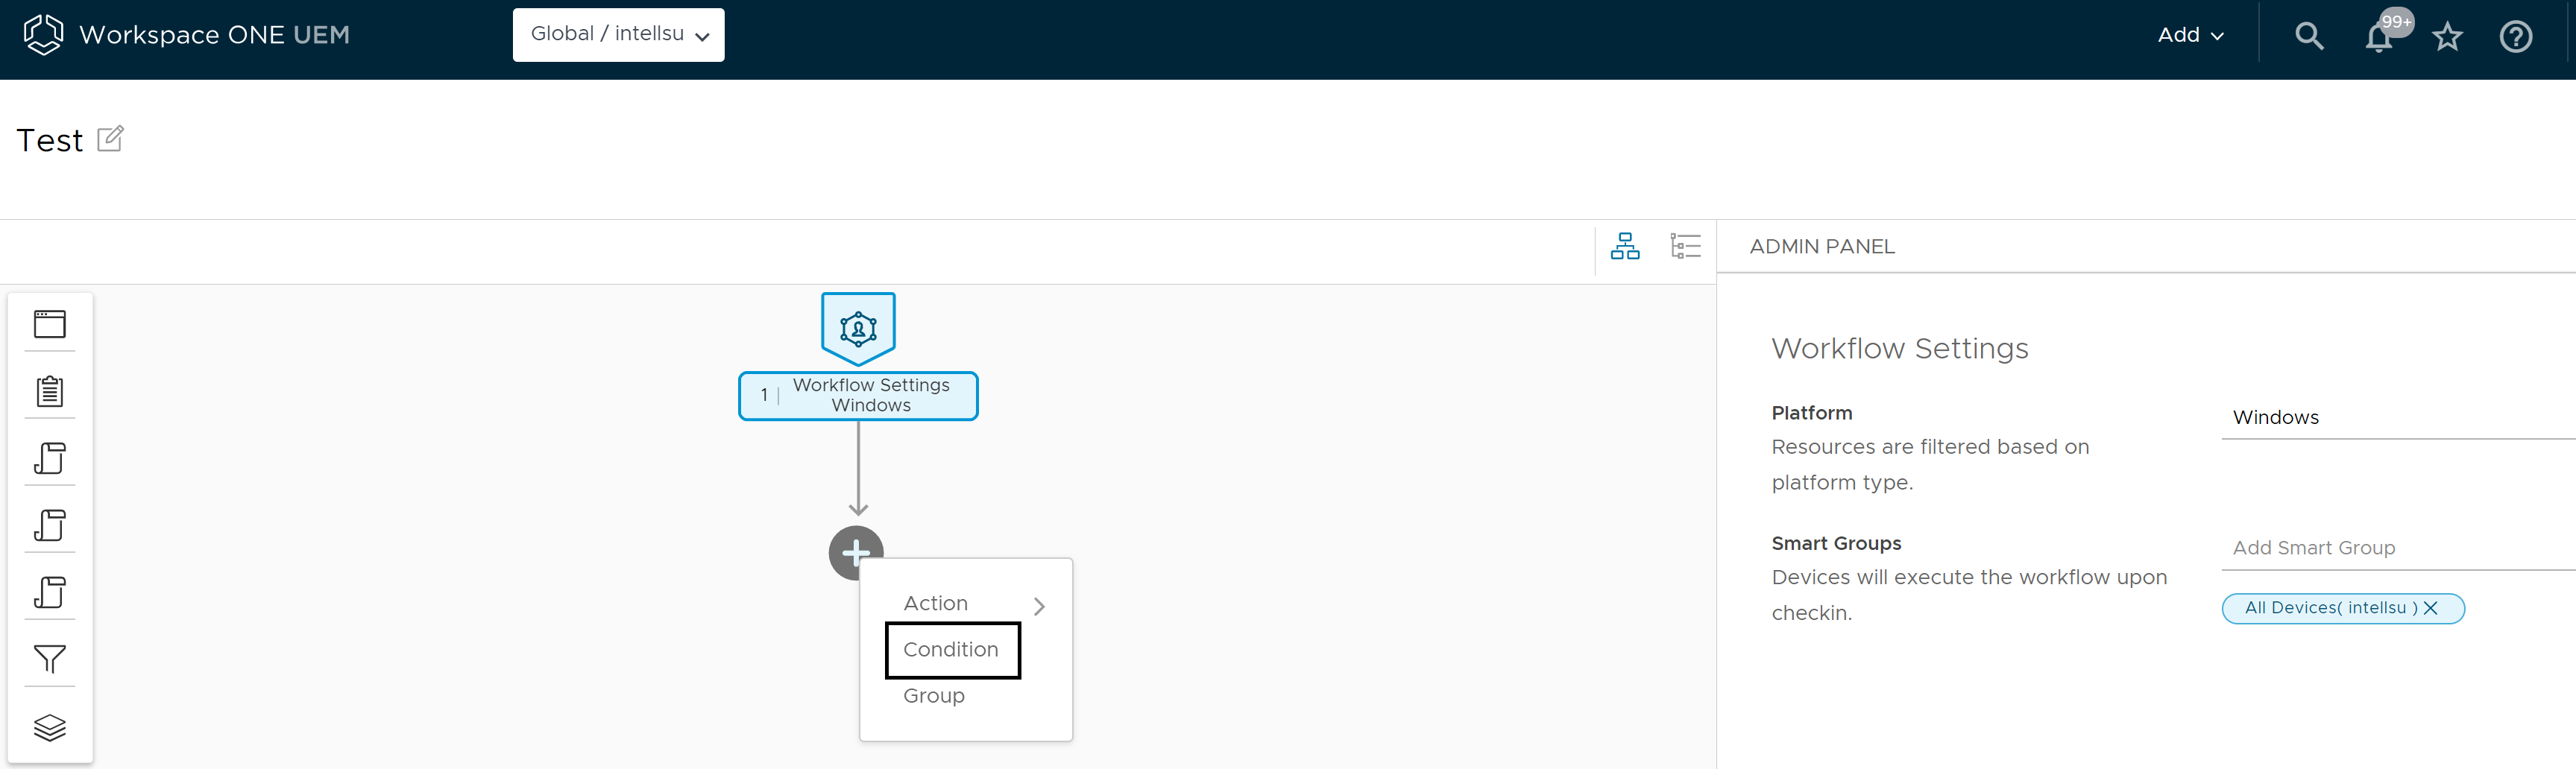
In the left panel, click +, and select Condition.
-
In the right Admin Panel, under Check Condition 1 enter a name for the condition - "Check Printer Status".
-
Click If > Sensor and click search in the Sensor screen.
Note: In the Filter (If) screen, you can click the Additional Settings tab and enable the Re-evaluate Condition option. If there is any change in the sensor value or change in the workflow itself, this setting re-evaluates the condition and retriggers the workflow steps if needed. If the workflow is paused, the workflow will not be retriggered until the workflow is resumed.
-
Enter the sensor name printer_status and Does Not Include from the drop-down and enter enabled in the required information field.
-
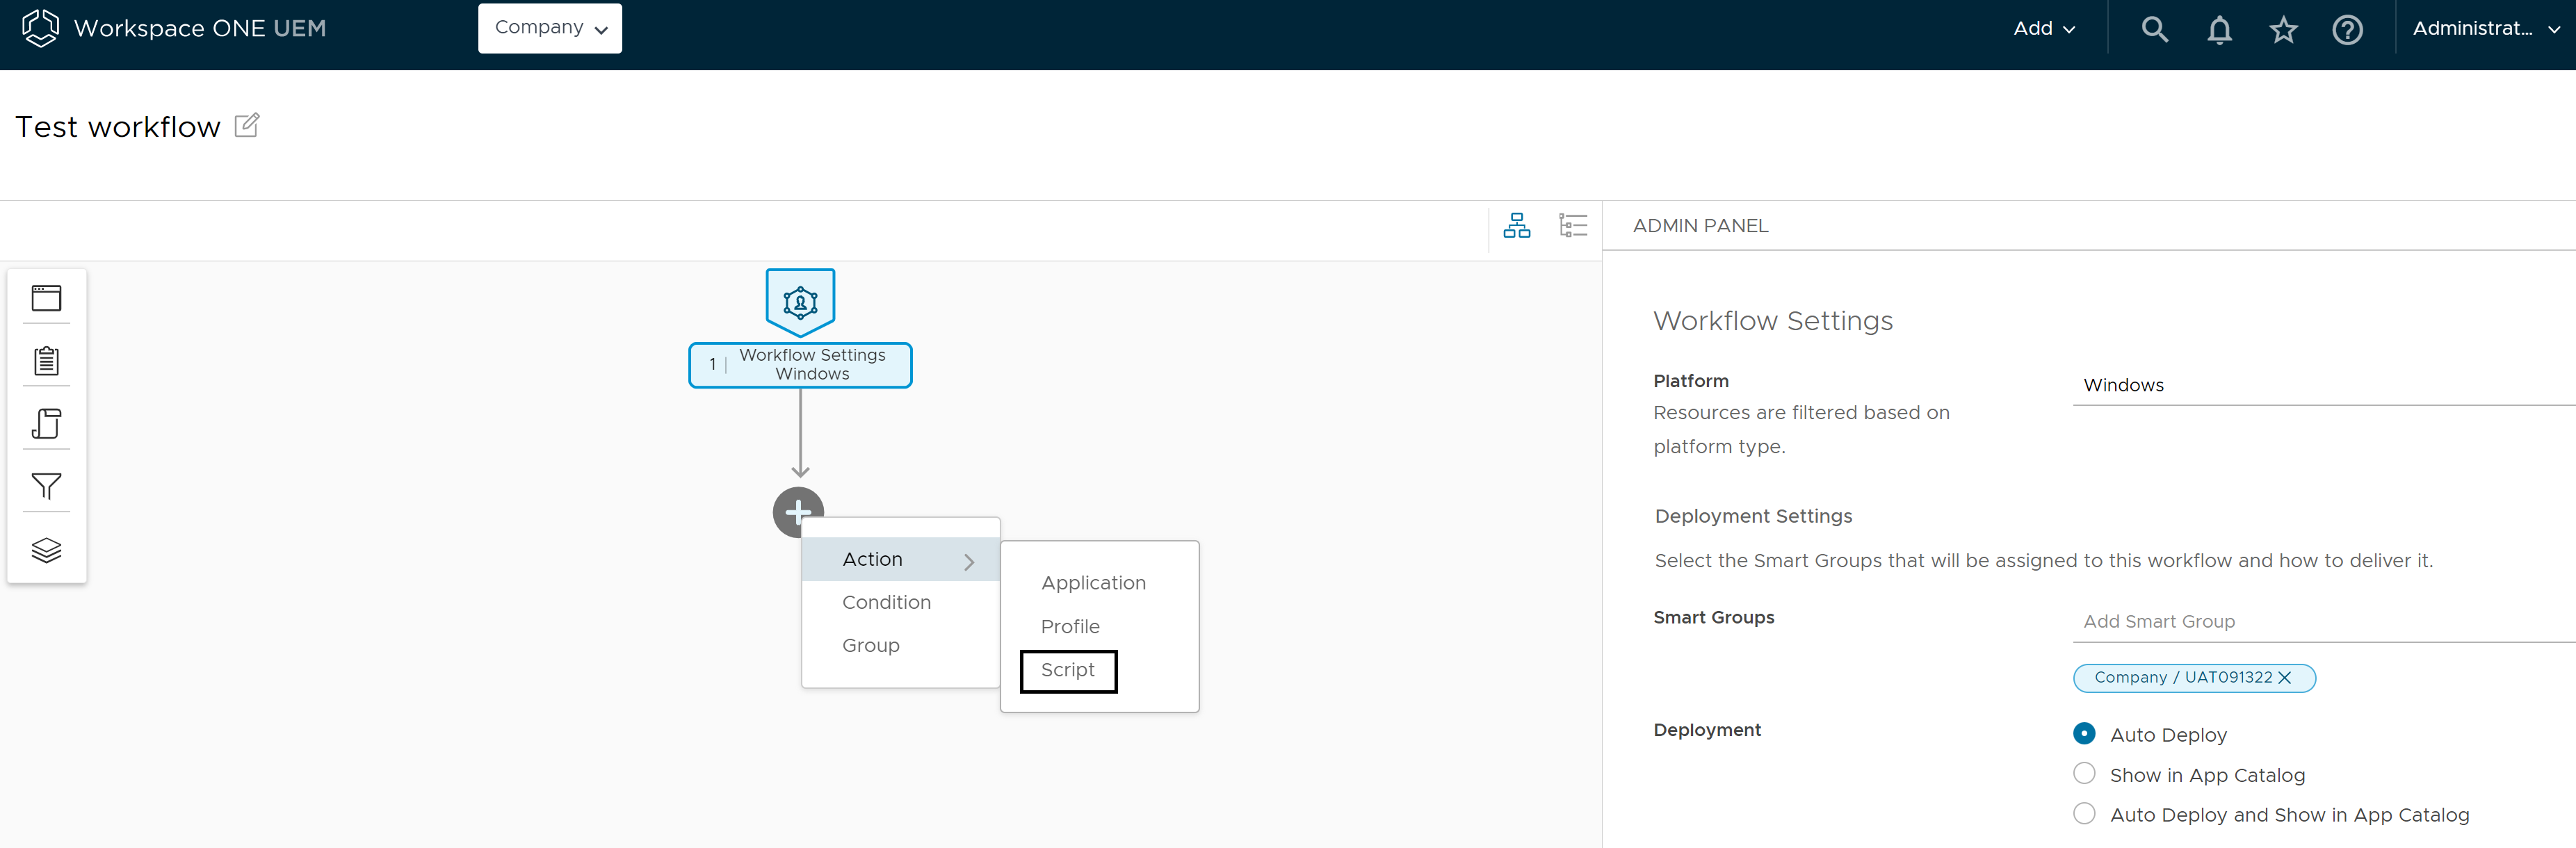
Click + Then > + > Action > Script.
-
In the right Admin Panel, click Search and Select under the Run Script > Script. All the available scripts are populated.
-
In the Results list, search for the refresh_printer script and click Select.
-
Click Save to save your workflow.
-
Click Publish to publish the workflow to all selected devices upon device check-in.
Results
You can view the saved workflow in the Freestyle Orchestrator dashboard. When the workflow is assigned to the device, as per the order specified in the workflow, first the sensor to check for the printer status printer_status is run, and then if needed, the script to refresh the printer configuration refresh_printer is run.
Create a Workflow to Install a Group of Resources
An administrator can create a group in a workflow and add all the required applications, profiles, and scripts to be installed on the devices to the workflow. The resources added to a group do not follow any sequence during the installation. A combination of applications, profiles, and or scripts can be installed at the same time on the device.
In this example, an admin creates a group to install the Wi-Fi profile, the Global Protect application, and install the Google Chrome application on the device.
Prerequisites
Before you begin creating workflows, the admin must create a Wi-Fi profile, add the Global protect application, and the Google Chrome application to the system inventory. In this example, the Wi-Fi profile is named wifi-profile, the Global protect application is named global-protect, and the Google Chrome application is named chrome.
Note: Only after the application and profile are created, the application and profile can be added in a workflow and assigned to a smart group.
Procedure
The following procedure describes the steps to create a workflow to add a group to the workflow and add all the resources into the group.
-
Log in to the Workspace ONE UEM console.
-
Click Orchestration > Freestyle > Freestyle Orchestrator and click New.
-
Enter a name in the New Freestyle Workflow. You can add an optional description to your workflow.
-
In the right Admin Panel Workflow Settings, select the Platform from the drop-down menu, and select Smart Groups to which you want to assign this workflow.
-
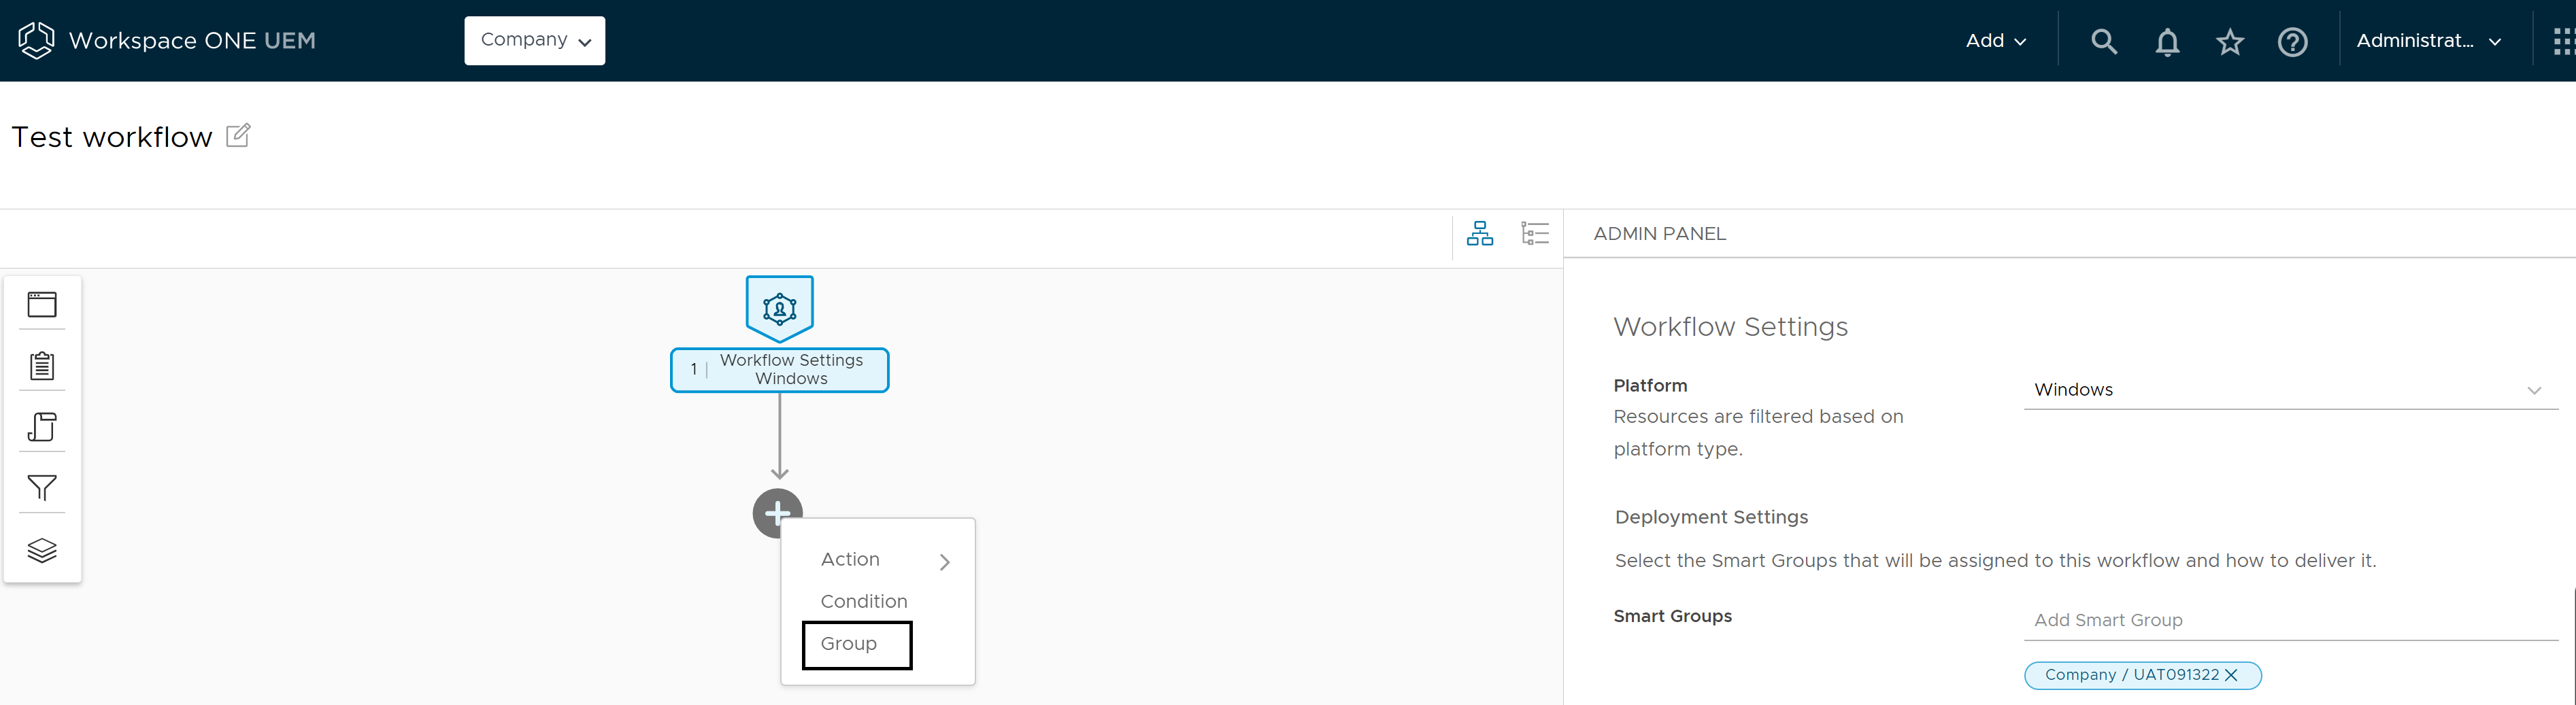
In the left pane, click + > Group to add a group to the workflow.
-
In the right Admin Panel, under the Group enter a name for the group.
-
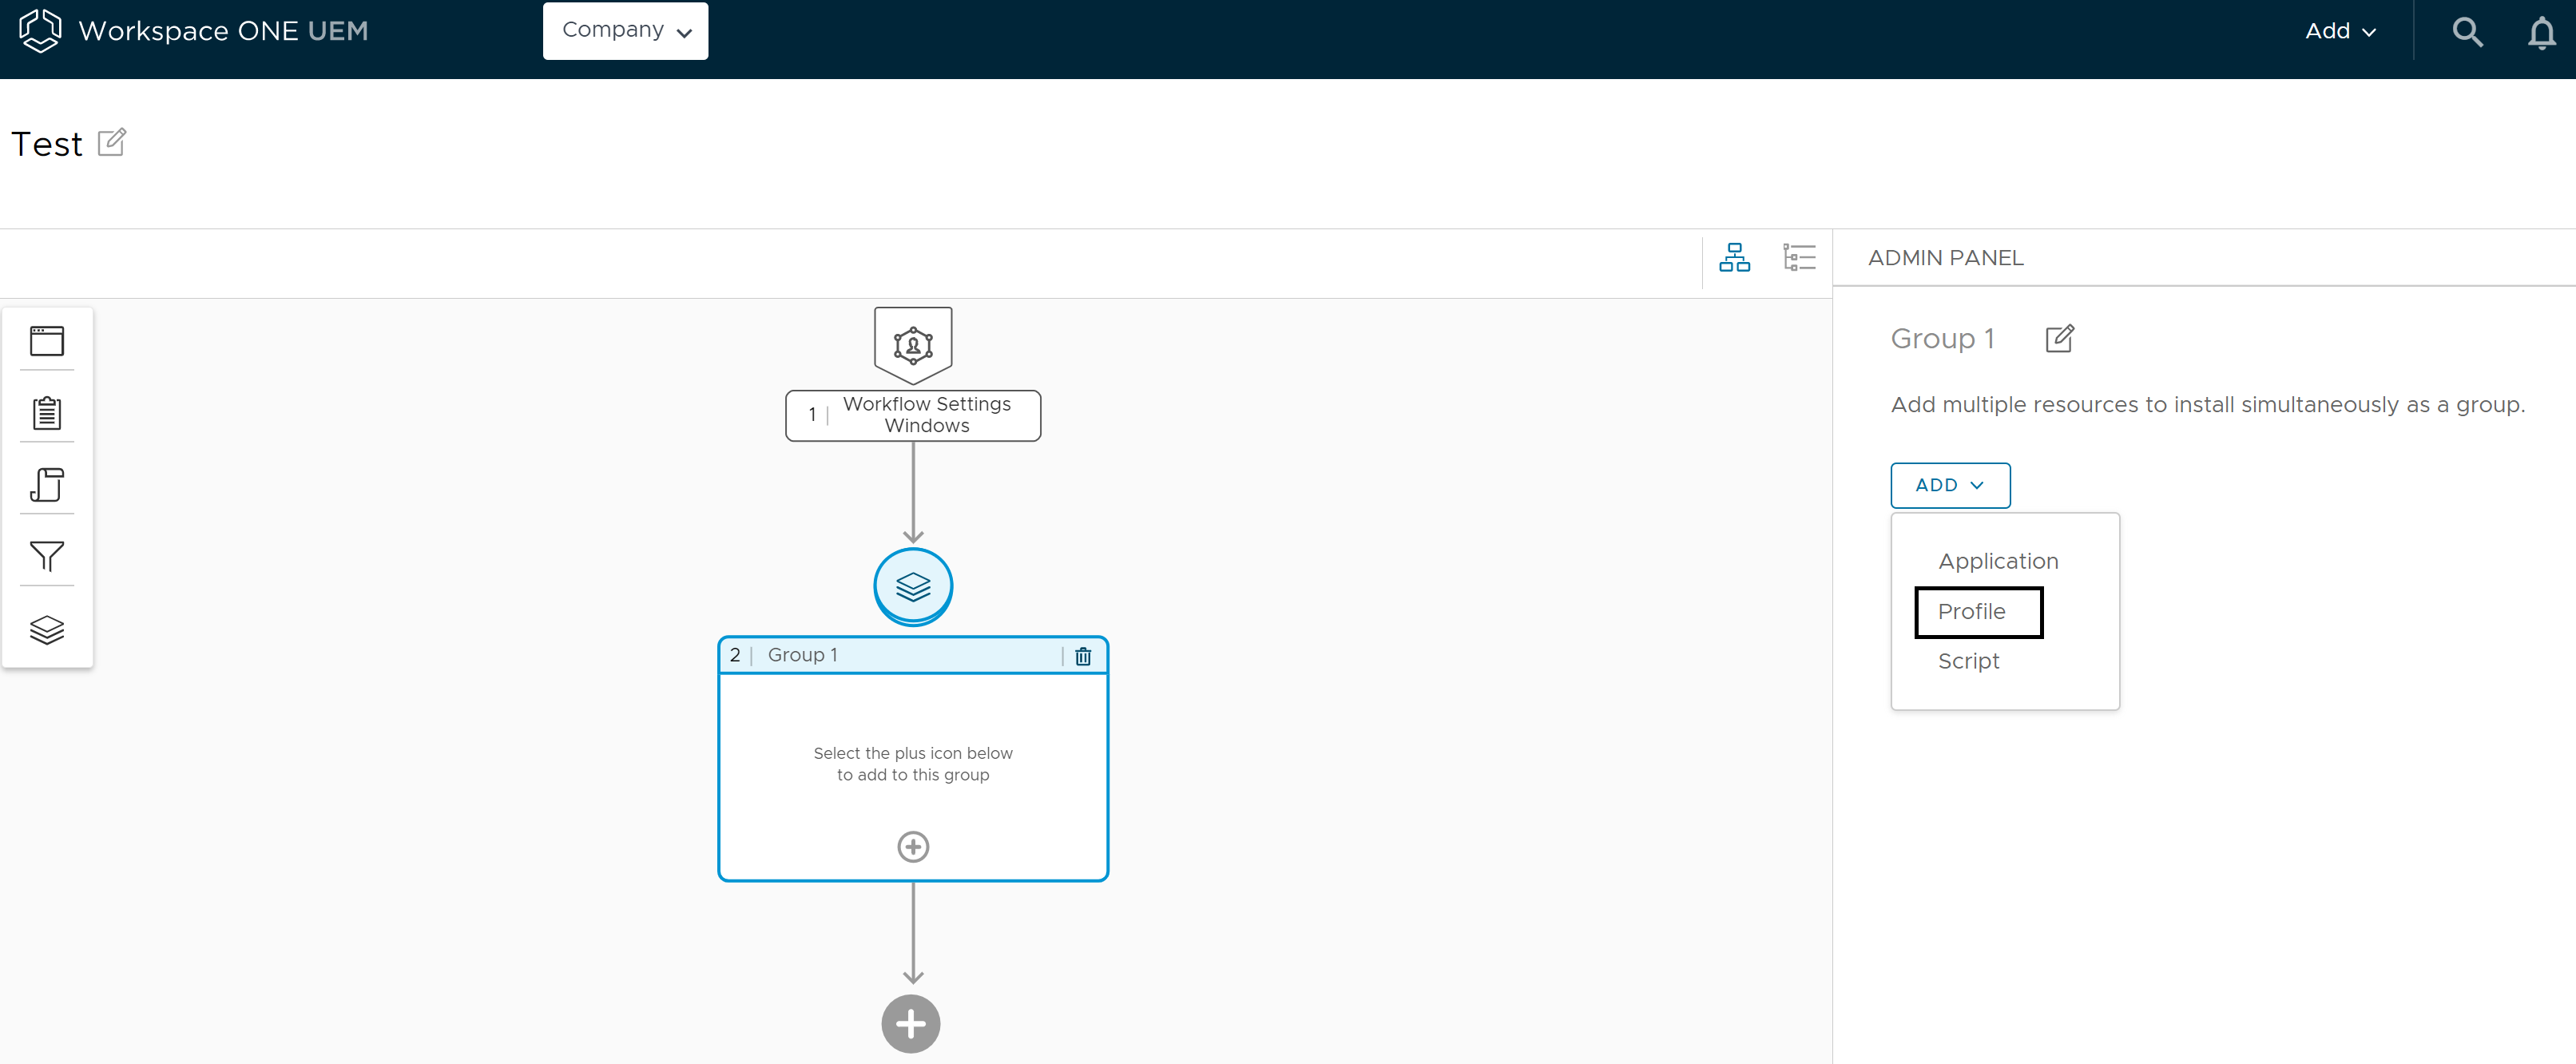
Click + > Profile.
-
In the Install Profile, click search and select, and enter the wifi-profile to be added to the group.
-
Select the wifi-profile from the auto-populated list.
-
In the right Admin Panel, under the Install Profile, click Add, and select Application from the auto-populated list.
-
In the Install application screen, perform the following actions to add the Global protect application.
a. In Application, click search and select the global-protect application to install. The Results section displays a list of all available applications.
b. In Version select the version of the application to be installed.
-
In the right Admin Panel, under the Install Application page click Add and select Application.
-
In the Install application screen, perform the following actions to add the Google Chrome application.
a. In Application, click search and select, enter chrome application to install. Select the chrome application from the auto-populated list.
b. In Version select the version of the application to be installed.
-
Click Save to save your workflow.
-
Click Publish to publish the workflow to all selected devices upon device check-in.
Results
You can view the saved workflow in the Freestyle Orchestrator dashboard. When the workflow is assigned to the devices, the resources in the workflow group start installing on device check-in.
Remove Applications and Profiles from Devices using Workflows
An admin can create a workflow for one-time removal of an application and/or profile from a device. After the workflow is deployed on the device, the app or profile is uninstalled. If there is any other source of installation of the same application or profile through another workflow or direct assignment, then the application and profile is reinstalled on the device. This feature is available only for Windows devices.
An admin can use the remove application workflow feature in the following scenarios:
- When an admin needs to install an app on a device to run a specific function, for a certain duration of time and later wants to remove the app after the task is complete.
- When an admin needs to replace an existing app on a device with a new app. For example, admin needs to replace Chrome with Firefox on all devices.
- When an admin needs to upgrade a lower version of an app to a higher version of the app. For example, admin needs to remove an older version of the Chrome app and install a new version of the Chrome app on all devices.
- When an admin needs to downgrade a higher version of an app to a lower version of an app. For example, admin needs to remove a higher version of Chrome app on all devices due to a vulnerability issue and install a lower version on all devices.
Note: For some operating systems, admins cannot install an older version of an app if a newer version is installed on the device. In such a scenario, admins can use this feature to first remove the newer version of the app and then install the older version.
Admins can use the remove profile workflow feature when an admin needs to update profiles in the following scenarios:
- When an admin needs to modify an existing profile, an admin can create a workflow to remove an existing profile and install a new profile.
- When an admin needs to remove a list of profiles in order to take some action. For example, an admin must remove all profiles on the device to perform an OS upgrade and then need to install the profiles on the device after the upgrade.
Create a Workflow to Remove Application from Devices
You can create a workflow for one-time removal of applications from devices. The following procedure describes the steps to create a workflow to remove applications from devices. In this procedure, the administrator creates a workflow to remove 7-Zip app from all devices assigned to an organization group (OG).
Prerequisites
Before you begin creating a workflow, you must ensure that the 7-Zip app is available in your system inventory. Navigate to Resources > Apps to check the available resources in your system inventory.
Procedure
The following procedure describes the steps to create a workflow to remove 7-Zip app from all devices assigned to an OG.
-
Log in to the Workspace ONE UEM console.
-
Click Orchestration > Freestyle > Freestyle Orchestrator and click New.
-
Enter a name in the New Freestyle Workflow. You can add an optional description to your workflow.
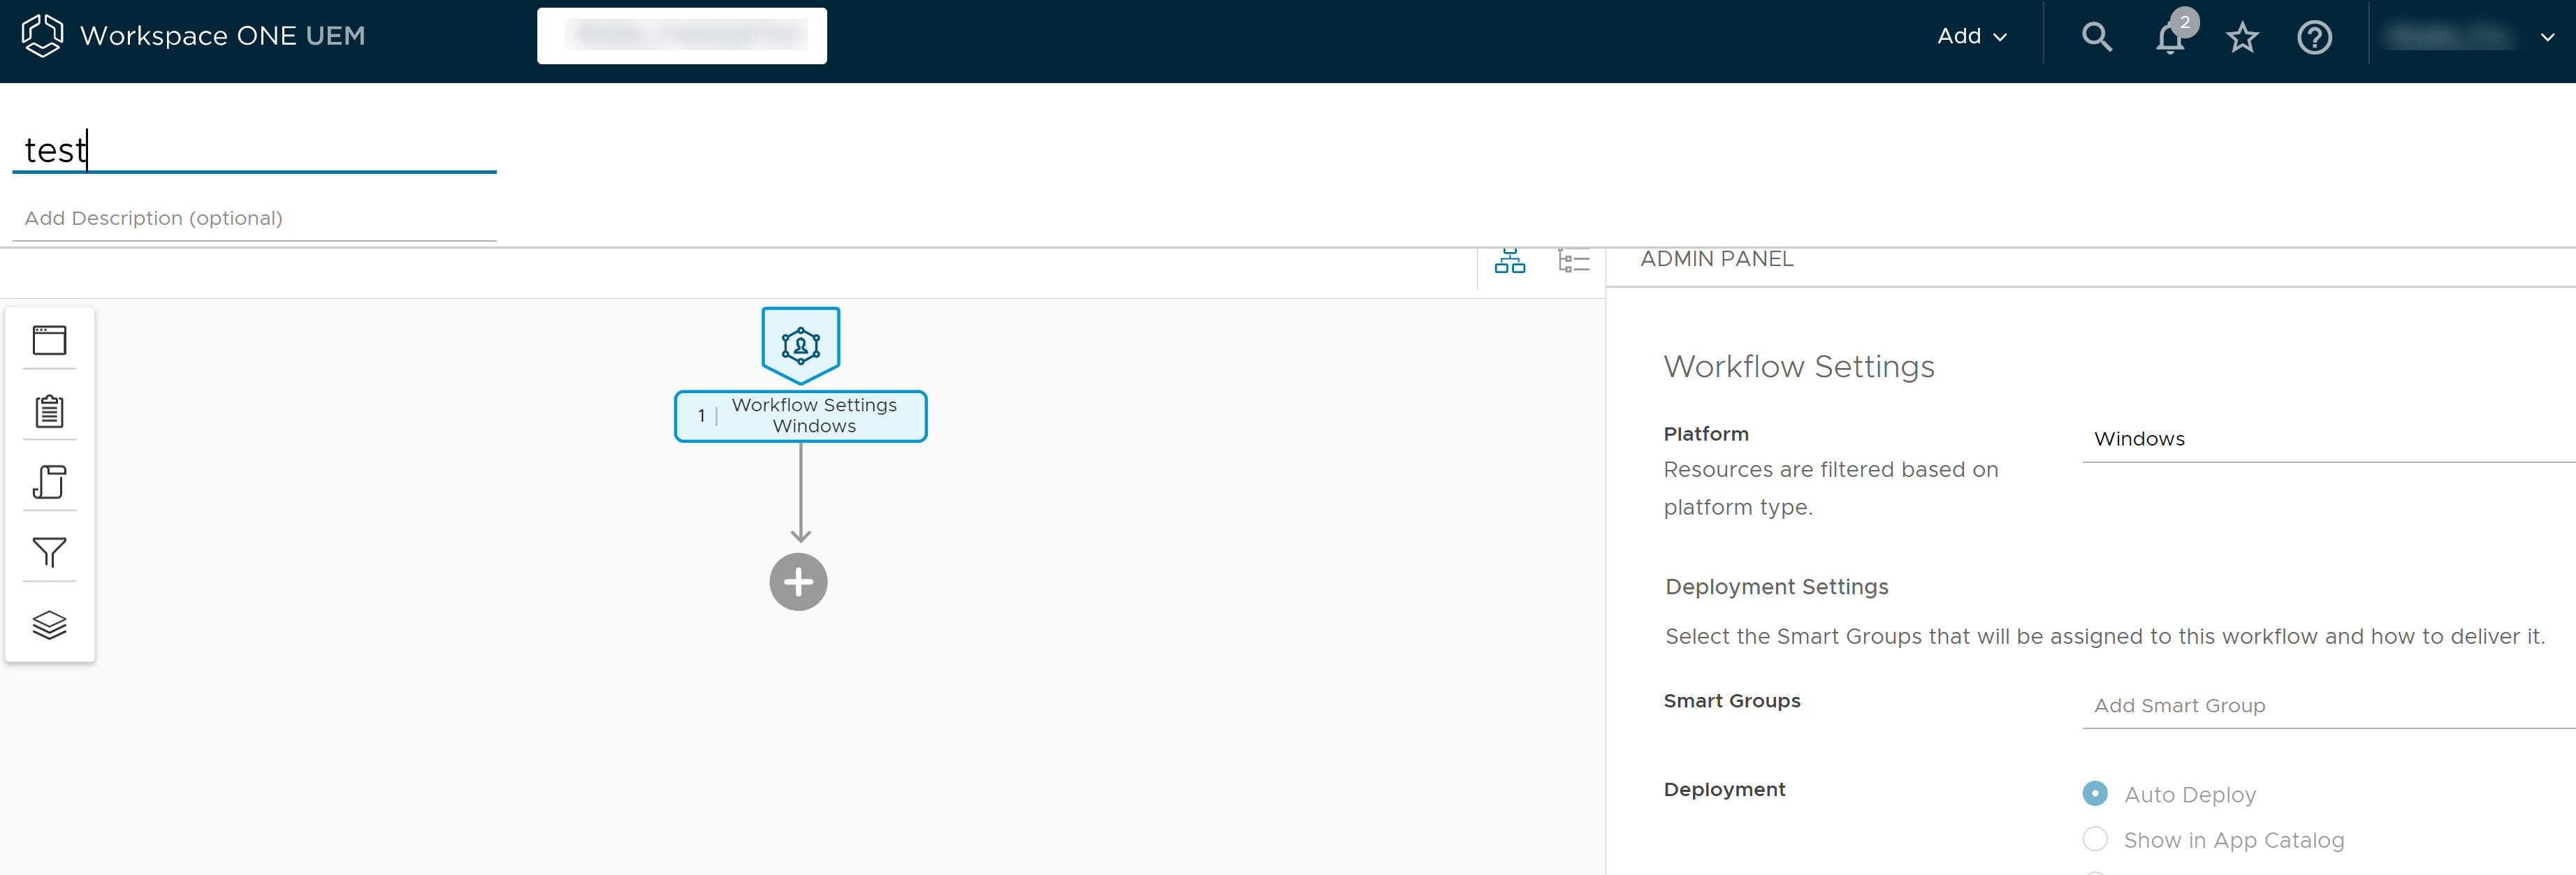
-
In the right Admin Panel Workflow Settings, select the Platform from the drop-down menu, and select Smart Groups to which you want to assign this workflow. This feature is available only for Windows devices.
-
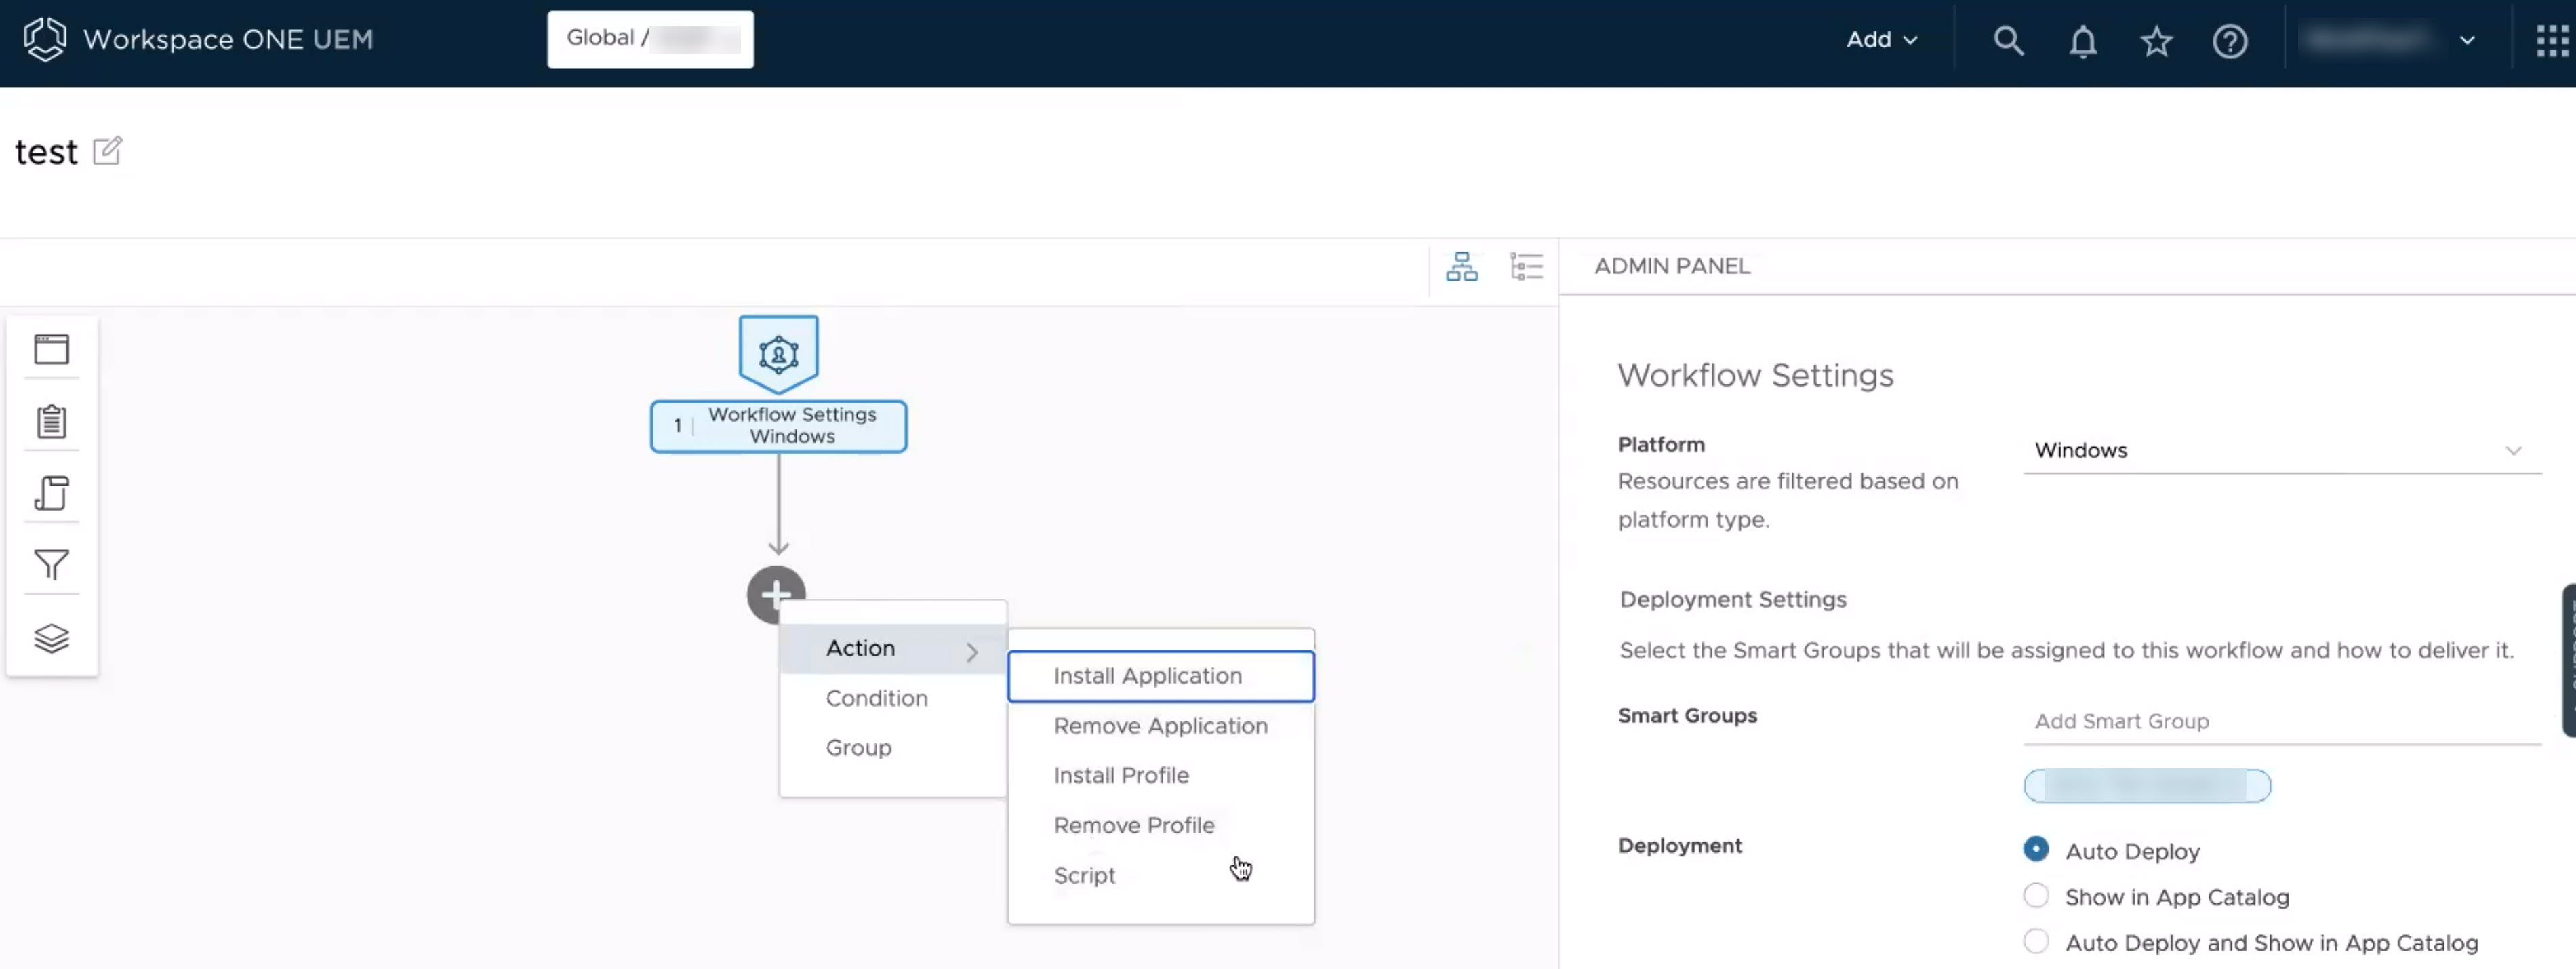
In the left pane, click + > Action > Remove Application.
-
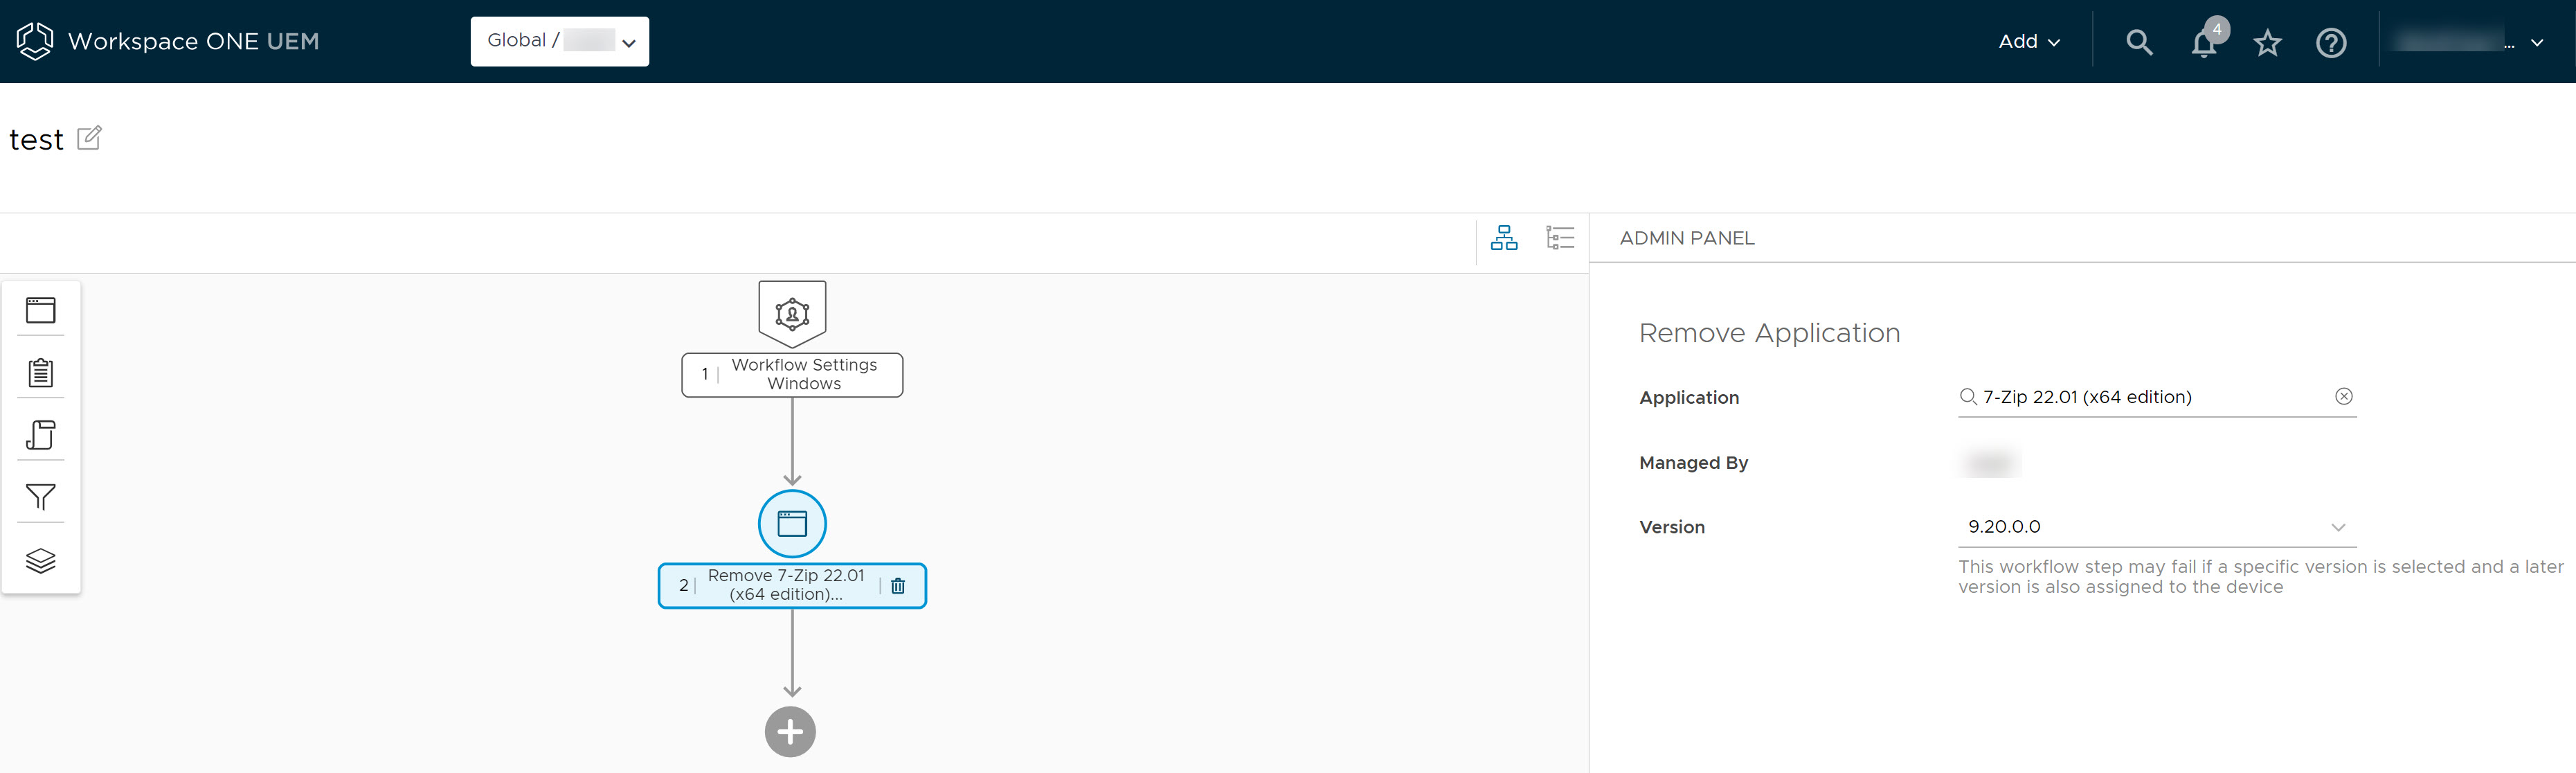
In the right Admin Panel, under the Remove Application perform the following steps:
a. In Application, click Search and Select, and enter 7-Zip in the Search for an existing application.
Note: A list of all the available applications is displayed in the Results section.
b. Navigate to the 7-Zip 22.01 (x64 edition) application and click Select to select the application.
c. In the Remove Application screen, click the Version to select the version of the 7-Zip application to be removed. Select 9.20.0.0.
-
Click Save to save your workflow.
-
Click Publish to publish the workflow to all selected devices upon device check-in.
Note: You can create and save your workflow anytime without publishing the workflow to your end user devices. You can return to the Workspace ONE UEM console later to publish a saved workflow.
Results
You can view the saved workflow in the Freestyle Orchestrator dashboard. When the workflow is deployed to the device, the 7-Zip app with version 22.1.0.0 gets uninstalled from the device. To view the uninstalled app, navigate to Devices > List View and click the device on which the app is uninstalled.
On the device Details View screen, click Apps. The App Installation status displays that the app has been removed.
Create a Workflow to Remove a Profile from a Device
You can create a workflow for one-time removal of profiles from devices. The following procedure describes the steps to create a workflow to remove a profile from a device. In this procedure, the administrator creates a workflow to remove VPN profile from all devices assigned to an organization group (OG).
Prerequisites
Before you begin creating a workflow, you must ensure that the VPN profile is available in your system inventory. Navigate to Resources > Apps to check the available resources in your system inventory.
Note: To remove profiles from devices, the profile assignment type must be set as optional.
Procedure
The following procedure describes the steps to create a workflow to remove the VPN profile from all devices assigned to an OG.
-
Log in to the Workspace ONE UEM console.
-
Click Orchestration > Freestyle > Freestyle Orchestrator and click New.
-
Enter a name in the New Freestyle Workflow. You can add an optional description to your workflow.
-
In the right Admin Panel Workflow Settings, select the Platform from the drop-down menu, and select Smart Groups to which you want to assign this workflow. This feature is available only for Windows devices.
-
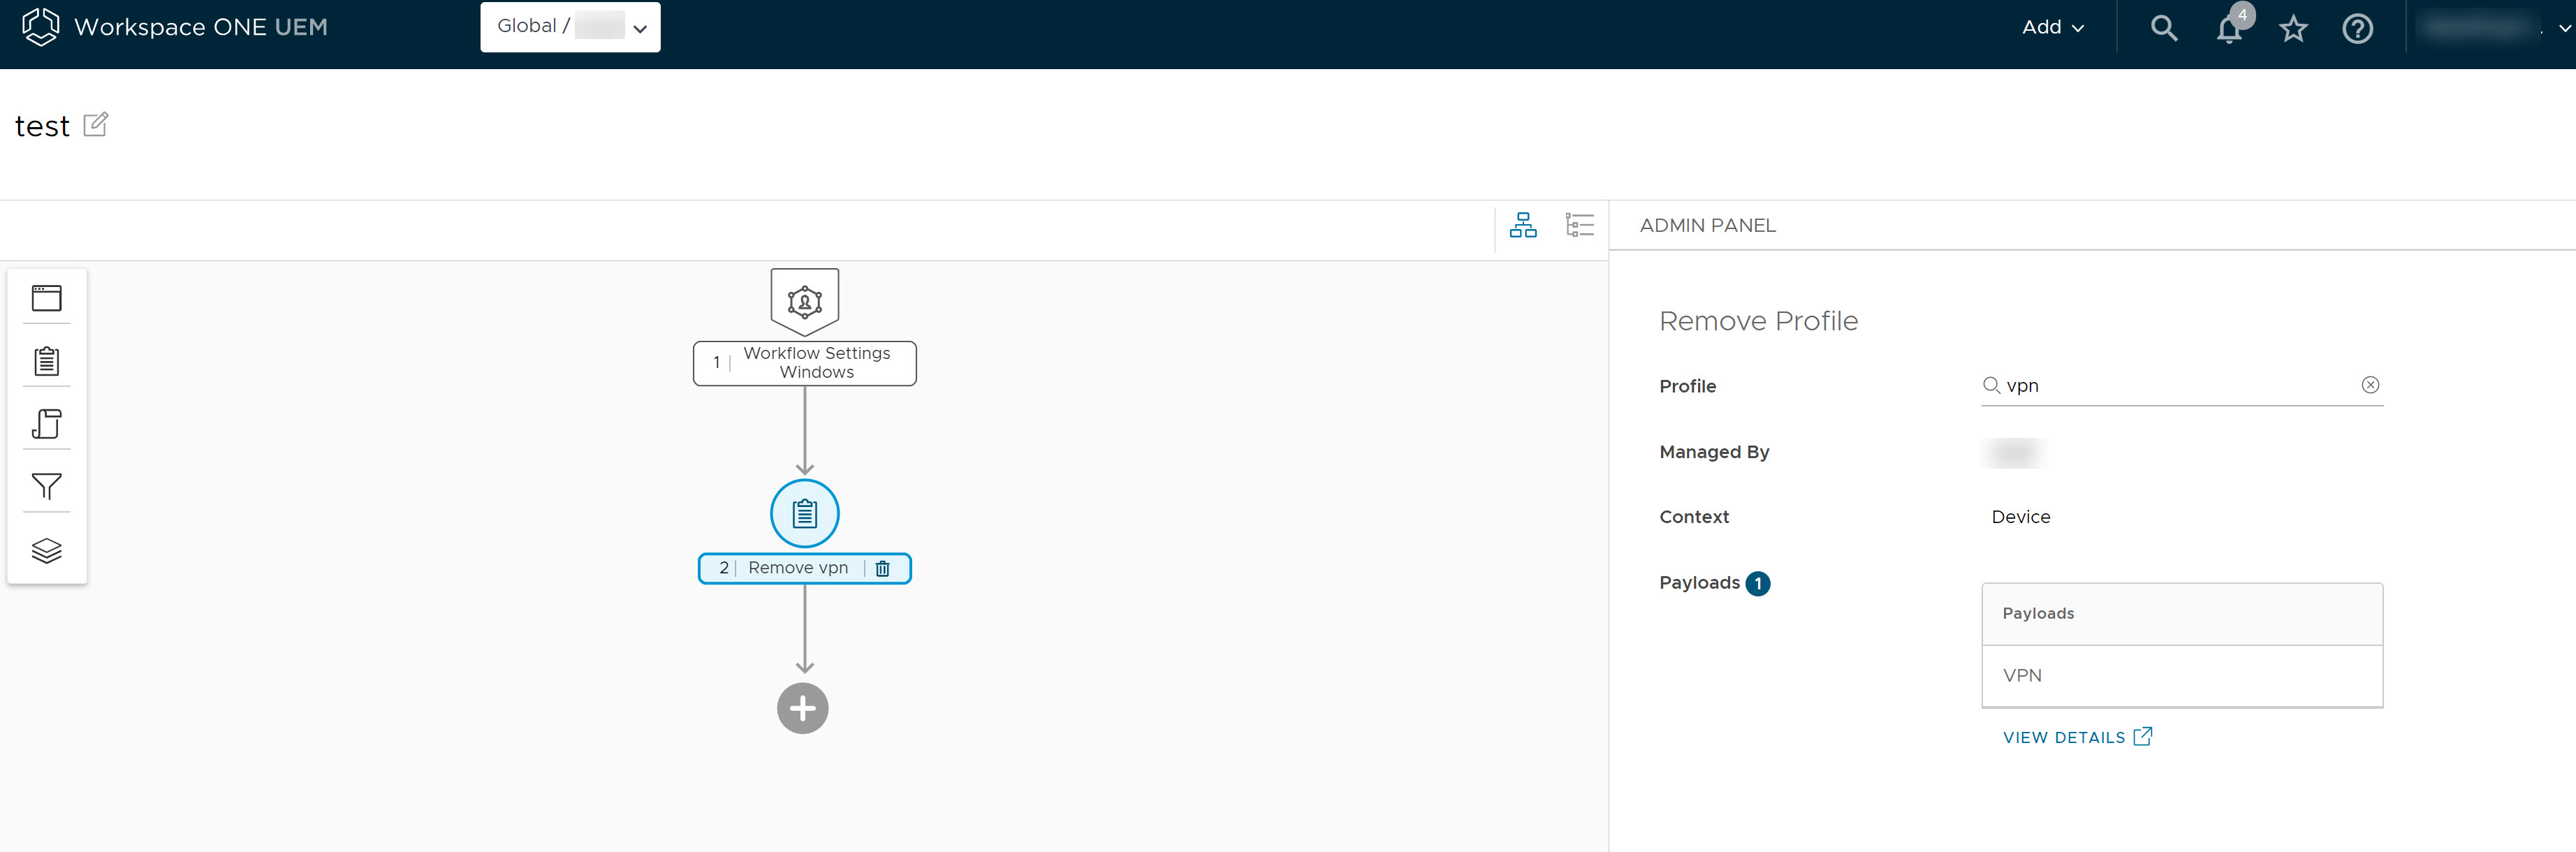
In the left pane, click + > Action > Remove Profile.
-
In the right Admin Panel, under the Remove Profile page perform the following steps:
a. In Profile, click Search and Select, and a list of all available profiles is displayed.
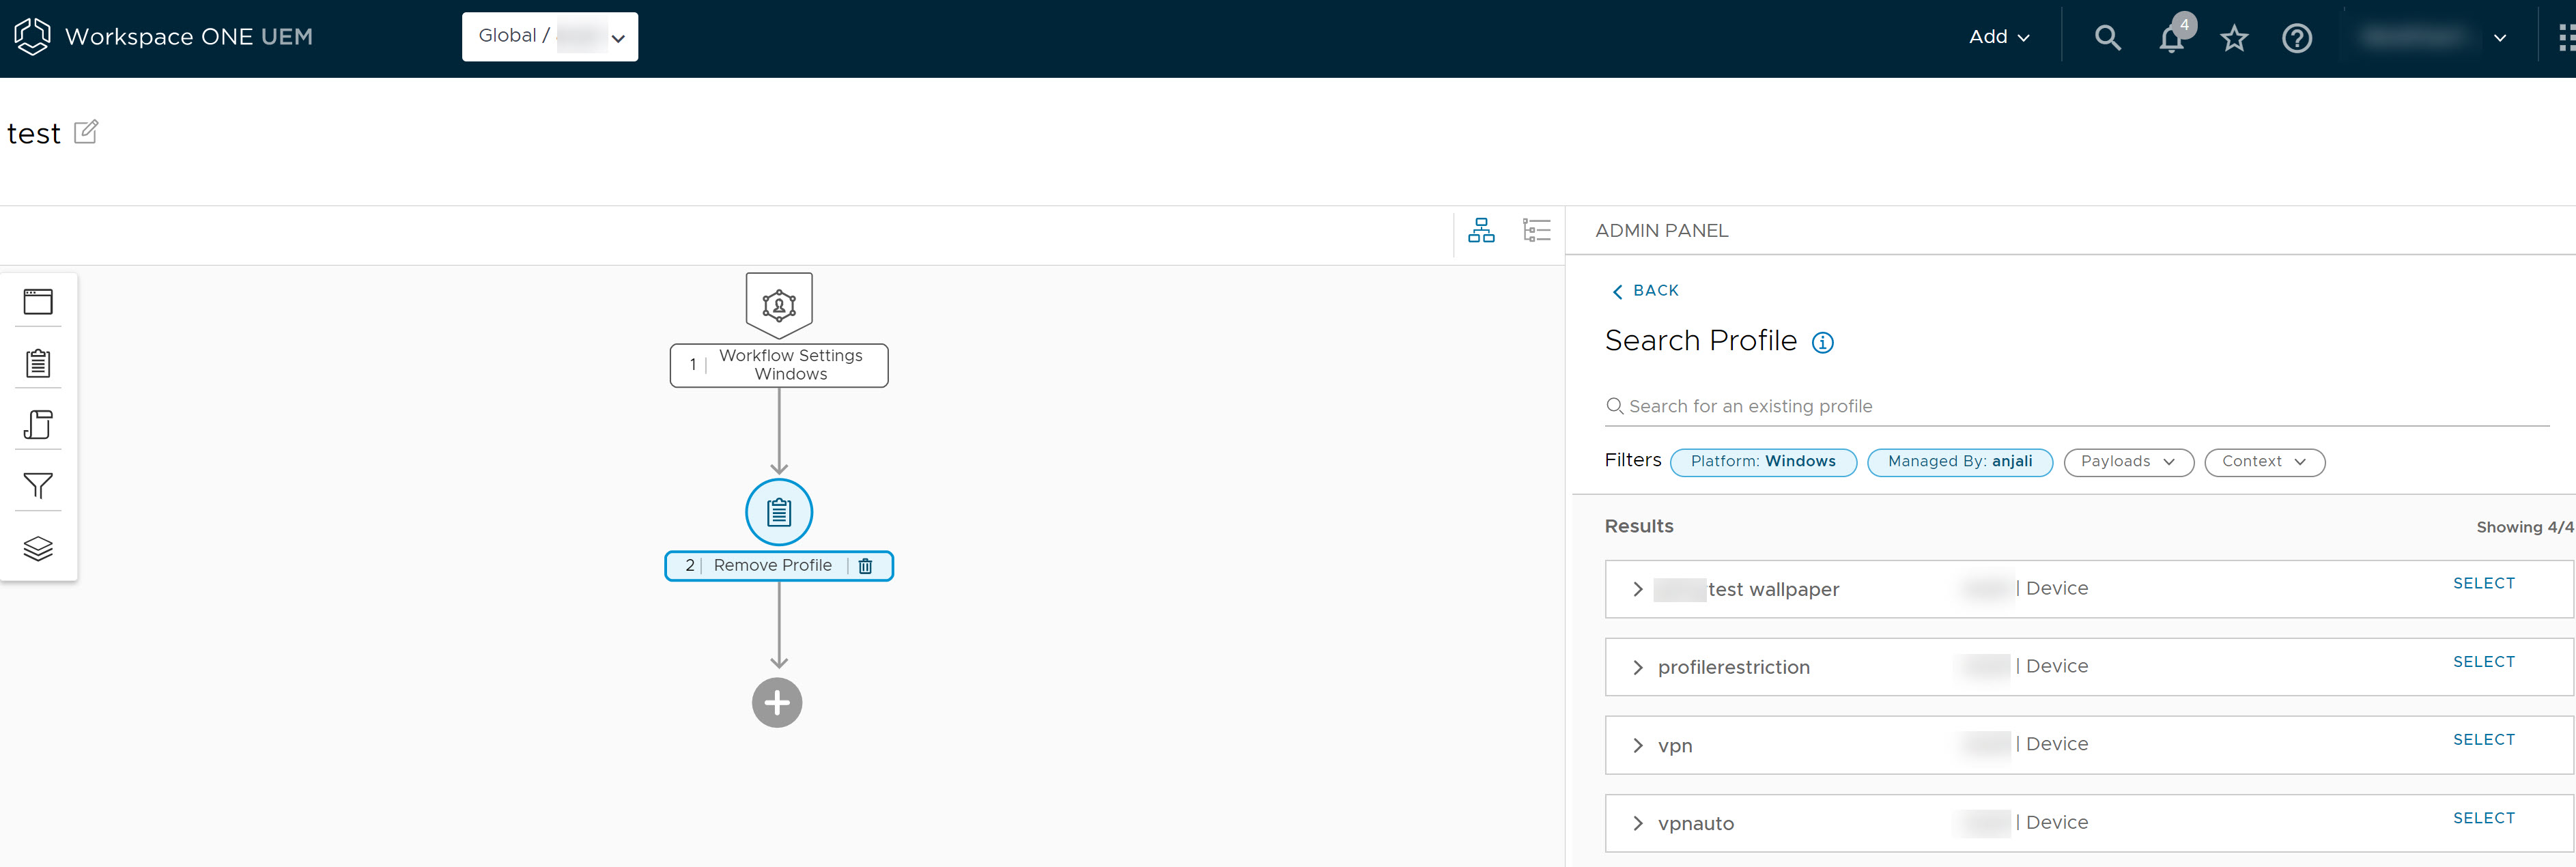
b. Enter VPN in the Search for an existing profile tab and select the VPN profile that is auto-populated.
-
Click Save to save your workflow.
-
Click Publish to publish the workflow to all selected devices upon device check-in.
Note: To remove profiles from devices, the profile assignment type must be set as optional.
Results
You can view the saved workflow in the Freestyle Orchestrator dashboard. When the workflow is assigned to the devices, the VPN profile is uninstalled from the device. To view the uninstalled profile, navigate to Devices > List View and click the device on which the app is uninstalled. On the Device Details page, click Profiles to view the status of the uninstalled profile.
Offline Domain Join in Workflows
Offline Domain Join (ODJ) is a Microsoft-supported feature that enables users to join remote systems to a domain without requiring a direct connection to a network with a domain controller. Offline domain join is useful in scenarios where network connectivity is limited or when deploying a large number of machines that must be domain-joined before distribution.
When integrated into onboarding workflows, ODJ allows administrators to automate and streamline the domain join process as part of initial device setup. This feature facilitates onboarding by allowing devices to join a domain before other resources are deployed, ensuring that domain joining is completed early in the workflow process.
Characteristics of Offline Domain Join
The following are characteristics of the Offline Domain Join:
-
Offline Domain Join is only applicable to devices that are not associated with any domain. If a domain join step is included in a workflow and assigned to a smart group with devices already joined to an online domain or offline domain, that step is automatically marked as Complete. The system will not attempt to rejoin those devices to the domain.
-
Offline Domain Join step is considered Complete when the ODJ is applied to the device, followed by a 1-minute wait. The device still requires a reboot to complete the domain join. When Offline Domain Join is not used for Out-of-Box Experience (OOBE) provisioning, an admin must add a step to the workflow to reboot the device later, allowing the admin to control when the reboot occurs.
-
The workflow will continue to the next step only when the ODJ step is marked as Complete.
Integrate Offline Domain Join in Workflows
You can create a workflow and join remote systems to a domain without requiring network connectivity to a domain controller using the Offline Domain Join feature. The following procedure describes the steps to create a workflow and add Offline Domain Join to a workflow.
Prerequisites
To add an Offline Domain Join to workflows, you must meet the following requirements.
- UEM console requirements: Workspace ONE UEM console version 2506 and later
- Device-side client requirements: Workspace ONE Intelligent Hub for Windows version 2506
- Enable modern stack in Workspace ONE UEM environment
- Admins must set up the Offline Domain Join configuration before using the configuration in a workflow. For more information on setting up the Offline Domain Join configuration, see the Deploying Domain Join Configurations for Windows Desktop topic in the Windows Desktop Management guide.
Note: Admins must only save the configuration to use the configuration as intended in a workflow. You must ensure that you do not Save & Assign the configuration to a device, as it will be assigned directly to the device.
Procedure
-
Log in to the Workspace ONE UEM console and navigate to your Organization Group where you want to create this workflow.
-
Click Orchestration > Freestyle > Freestyle Orchestrator and click New.
-
Enter a name in the New Freestyle Workflow. You can add an optional description to your workflow. In this example, Offline Domain Join is the name given to the workflow.
-
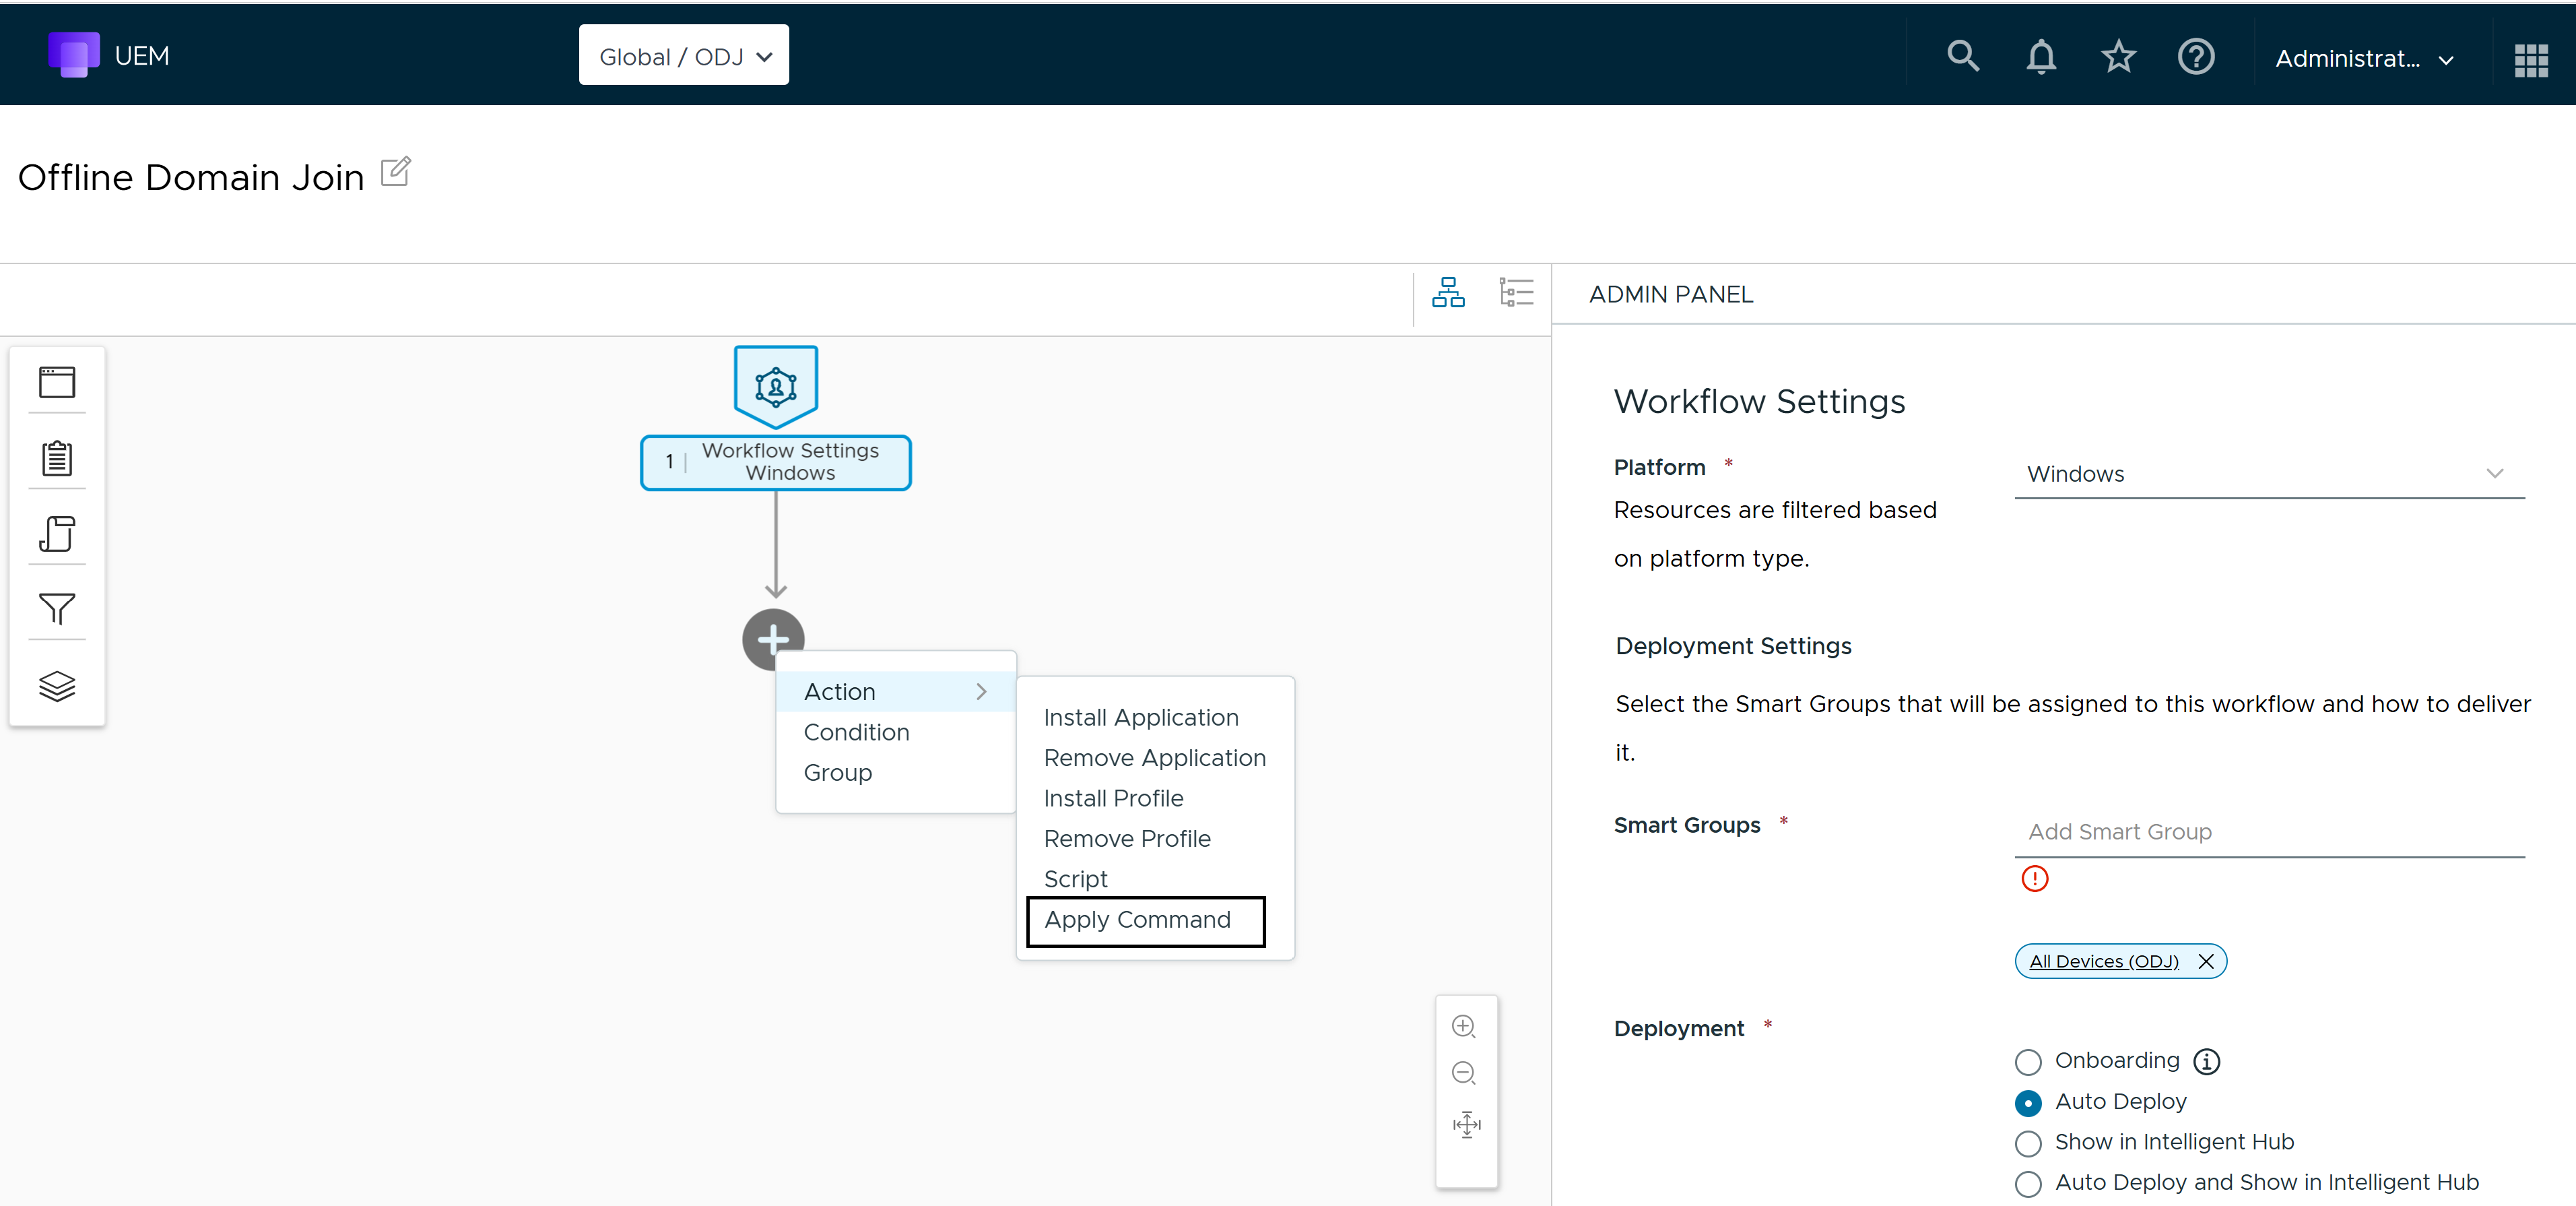
In the right Admin Panel Workflow Settings, select the Platform from the drop-down menu, and select Smart Groups to which you want to assign this workflow. In this example, the Windows platform and All Devices ODJ is the smart group assigned to this workflow.
-
In the left pane, click + > Action > Apply Command to add an Offline Domain Join configuration to the workflow.
-
In the right admin panel, under the Apply Command screen, enter the following details:
a. In the Command Type Configuration select OfflineDomainJoin.
b. In the Offline Domain Join Configuration search and select an existing Offline Domain Join Configuration. In this example, the new-domain configuration is selected.
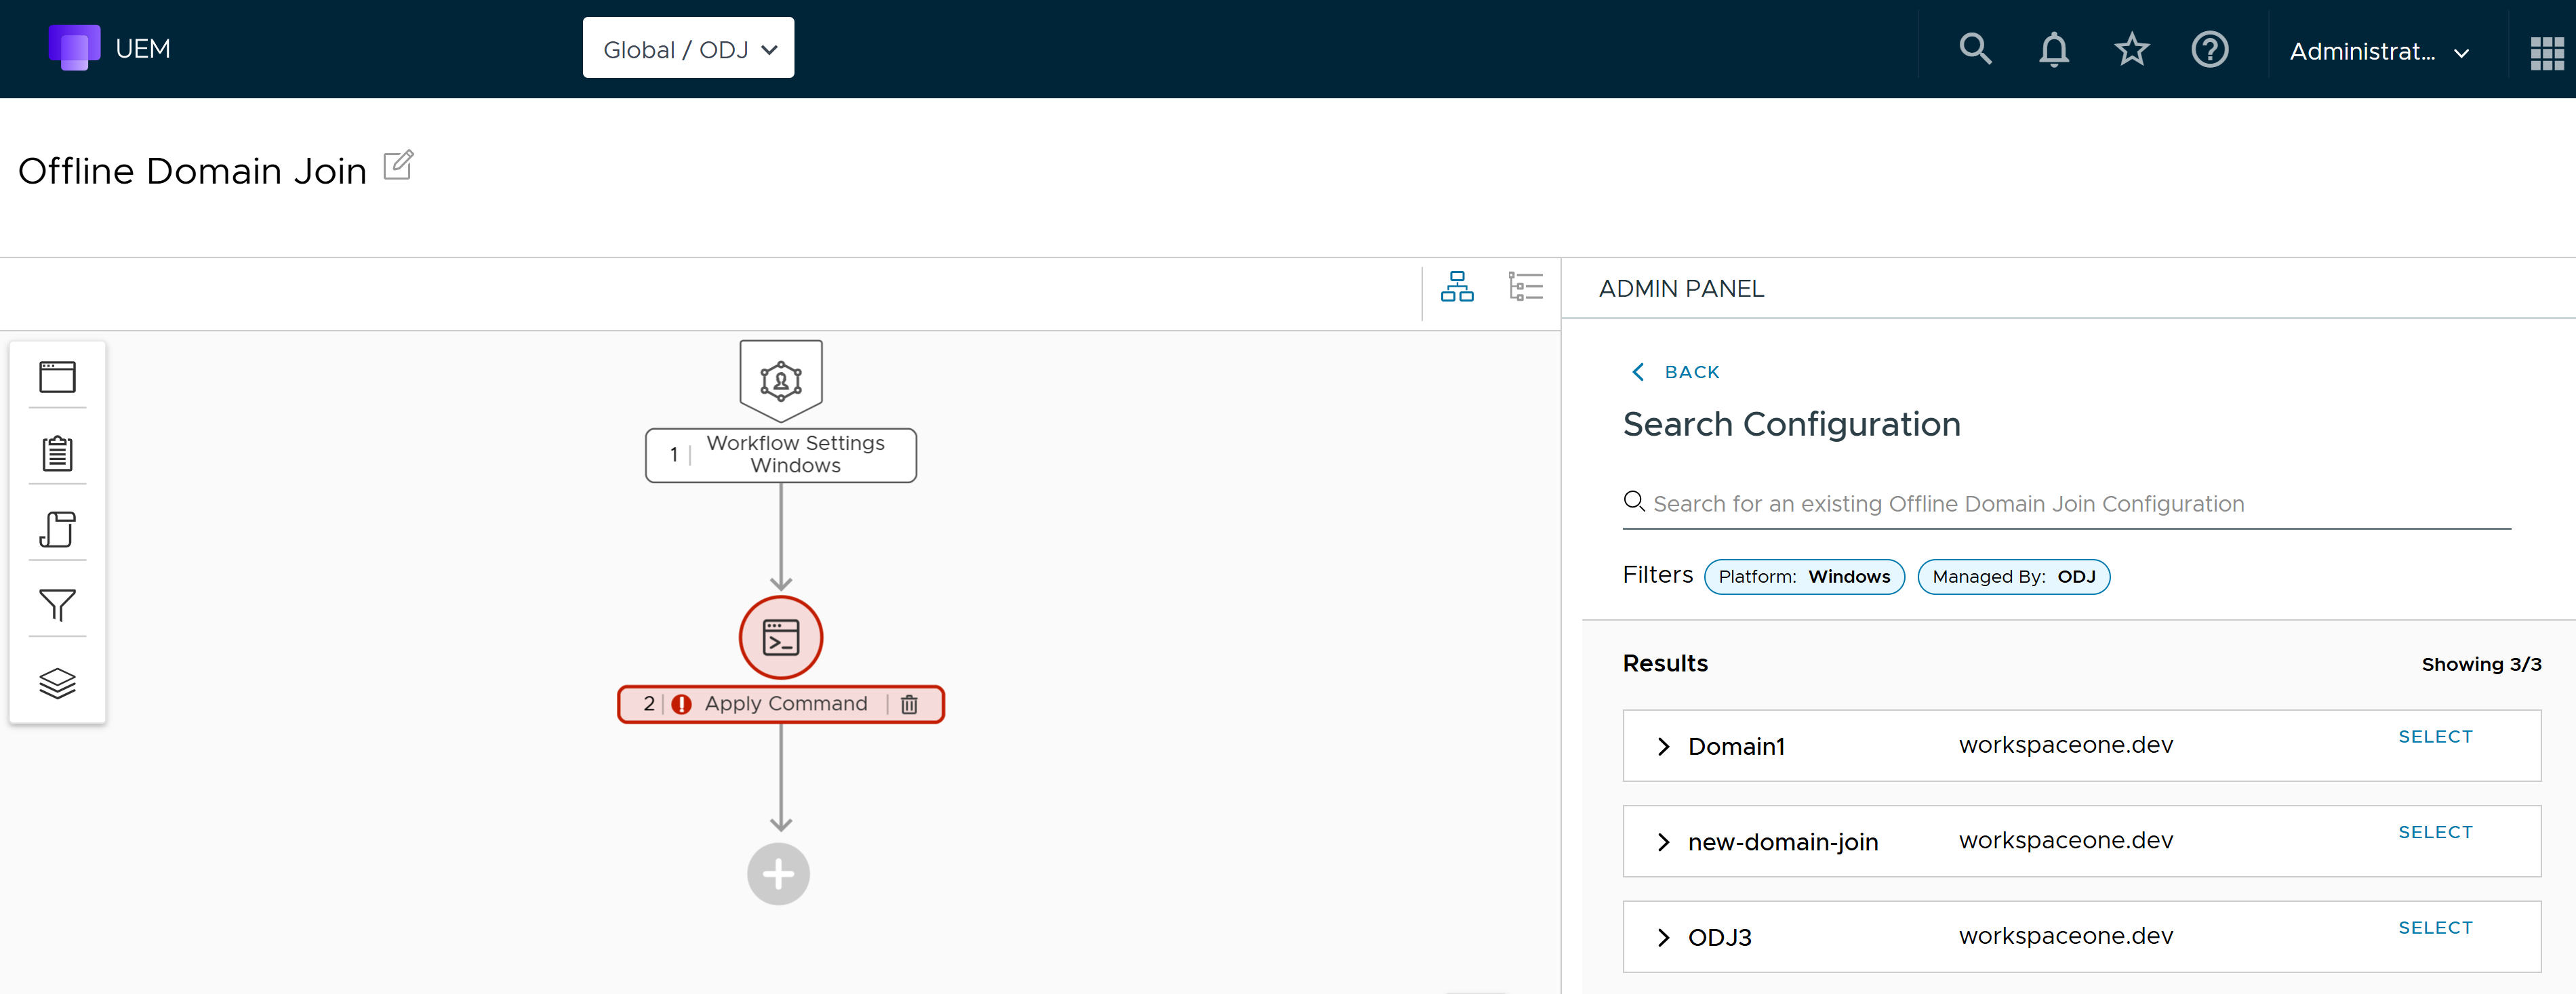
Note: When selecting a domain join configuration within workflows, all available configurations are displayed. Administrators must select a configuration that does not have any existing assignments. Configurations with existing assignments might already have been directly assigned to a device and might not function as intended when used in workflows.
-
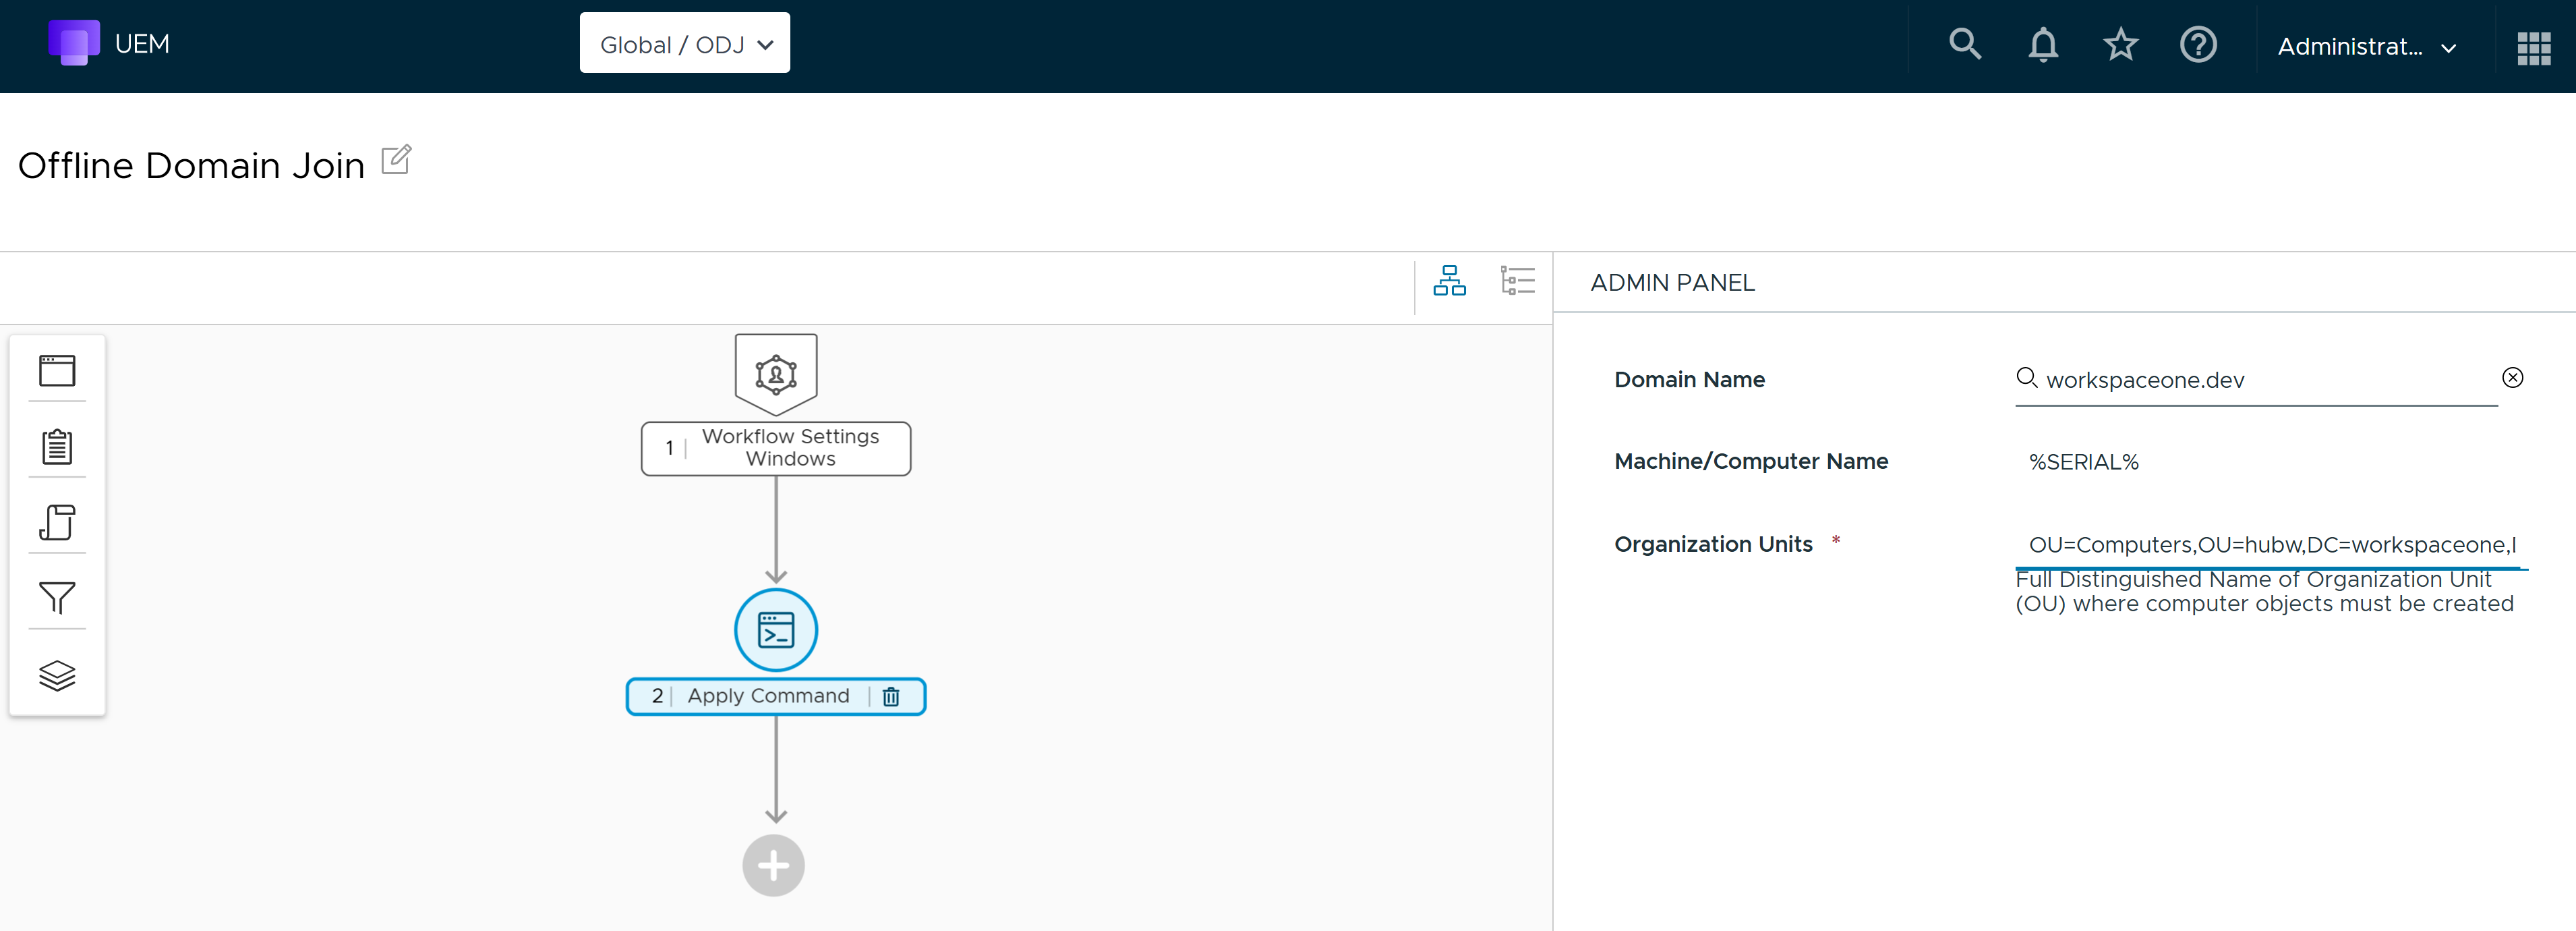
In the right admin panel, the Domain Name and the Machine/Computer Name fields are auto-populated. Enter the name of the Organization Units where the computer objects must be created.
-
Click Save to save the Offline Domain Join workflow configuration.
Results
Offline Domain Join depends on the Windows Hub cache timeout event to determine when the workflow step should transition from In Progress to Complete. By default, this timeout occurs after 10 minutes. While the ODJ process continues to run asynchronously in the background, the workflow step will time out and proceed based on this event.
In a few cases, if the Windows Hub cache timeout event is not triggered, the ODJ step may remain in the In Progress state until the device is restarted. After the reboot, the system detects that the device has successfully joined the domain, and the workflow step is then marked as Complete.
Sequence the Installation of Resources for Freestyle Orchestrator Mobile
For Freestyle Orchestrator mobile, the sequencing of the following resources is supported:
-
Application sequencing: An admin can sequence the installation of different applications during deployment. For example, install Outlook and then install Outlook plugins.
-
Profile sequencing: An admin can sequence the installation of profiles with other resources. For example, install the Wi-fi profile before any other resources.
Note: In a workflow, you can only select the resources that are available in the system inventory, and you cannot add resources from within the workflow. You can add resources into a workflow that is a part of your current organization group (OG) and your parent OG. However, you cannot view the resources managed at your child OG. To view the resources managed at your child OG, you must create a workflow at the child OG level. For more information about the usage of resources from various OGs, see the Working with Freestyle Orchestrator on Multiple Organization Groups topic.
Create a Workflow to Sequence the Installation of Applications
You can create a workflow to install all the applications in sequential order. The sequential installation of applications ensures that the installation of one application is successful before moving to the installation of another application.
The following procedure shows the steps to create a workflow to sequence the installation of applications. In this procedure, the administrator creates a workflow to install Boxer, Zoom, and Slack applications on the devices assigned to an organization group (OG). So, the administrator creates a workflow to first install the Boxer application and then install the Zoom and Slack plug-ins.
Prerequisites
Before you begin creating a workflow, you must add the Boxer, Zoom, and Slack applications to the app inventory. To add the required applications to the inventory, navigate to your organization group (OG), and follow the procedure at the Deploy Applications to Devices topic in the Application Lifecycle Management guide. You must also add default policies to each of these applications.
Procedure
The following procedure describes the steps to create a workflow to first install the Boxer application and then install the Zoom and Slack applications.
-
Log in to the Workspace ONE UEM console.
-
Click Orchestration > Freestyle > Freestyle Orchestrator and click New.
-
Enter a name in the New Freestyle Workflow. You can add an optional description to your workflow.
-
In the right Admin Panel Workflow Settings, select the Platform from the drop-down menu, and select Smart Groups to which you want to assign this workflow.
-
In the left pane, click + > Action > Application to add an application to the workflow.
-
In the right Admin Panel, under the Install Application perform the following steps:
a. In Application, click Search and Select, and enter Boxer in the Search for an existing application.
Note: A list of all the available applications are displayed in the Results section.
b. Navigate to the Boxer application and click Select to select the application.
c. In the Install Application screen, click the Version to select the version of the Boxer application to be installed.
-
In the left pane, click + > Action > Application to add the Zoom application to the workflow.
-
In the right Admin Panel, under the Install Application perform the following steps:
a. In Application, click Search and Select and enter Zoom in the Search for an existing application.
b. Click Select to select the Zoom application.
c. On the Install Application screen, click the Version to select the version of the Zoom application to be installed.
-
In the left pane, click + > Action > Application to add the Slack application to the workflow.
-
In the right Admin Panel, under the Install Application perform the following steps:
a. In Application, click Search and Select and enter Slack in the Search for an existing application.
b. Click Select to select the Slack application.
c. On the Install Application screen, click the Version to select the version of the Slack application to be installed.
-
Click Save to save your workflow.
-
Click Publish to publish the workflow to all selected devices upon device check-in.
Note: You can create and save your workflow anytime without publishing the workflow to your end user devices. You can return to the Workspace ONE UEM console later to publish a saved workflow.
Results
You can view the saved workflow in the Freestyle Orchestrator dashboard. When the workflow is assigned to the device, the Boxer application is installed first, followed by the Zoom and Slack applications, according to the order specified in the workflow. The sequential installation of applications ensures that all the applications are installed correctly.
Create a Workflow to Sequence the Installation of Profiles
The sequential installation of profiles ensures that a profile installation is complete before moving to the installation of another resource.
The following procedure shows the steps to create a workflow to sequence the installation of profiles. In this procedure, the administrator creates a workflow to first install the passcode policy profile and then install the Wi-fi profile on the devices assigned to a particular OG.
Prerequisites
Before you begin creating a workflow, you must first create the passcode policy profile and the Wi-fi profile. For more information about creating profiles, see the Device Profiles topic in the Device Management guide of the Omnissa Workspace ONE UEM product documentation.
In this example, the passcode policy profile is named passcode-policy-profile and the Wi-Fi profile is named wifi-profile.
Procedure
The following procedure describes the steps to first install the passcode policy profile and then install the Wi-fi profile.
-
Log in to the Workspace ONE UEM console.
-
Click Orchestration > Freestyle > Freestyle Orchestrator and click New.
-
Enter a name in the New Freestyle Workflow. You can add an optional description to your workflow.
-
In the right Admin Panel Workflow Settings, select the Platform from the drop-down menu, and select Smart Groups to which you want to assign this workflow.
-
In the left pane, click + > Action > Profile to add a profile to the workflow.
-
In the right Admin Panel, under the Install Profile perform the following steps:
a. In Profile, click Search and Select, and enter passcode-policy-profile.
b. Select the passcode-policy-profile from the auto-populated list.
-
In the left pane, click + > Action > Profile to add another profile to the workflow.
-
In the right Admin Panel, under the Install Profile perform the following steps:
a. In Action, select Install.
b. In Profile, click Search and Select, and enter wifi-profile.
c. Select the wifi-profile from the auto-populated list.
-
Click Save to save your workflow.
-
Click Publish to publish the workflow to all selected devices upon device check-in.
The following profiles need additional steps for using them in workflows:
- Launcher: To install the Launcher profile and set up the Launcher mode on your device, you must set up the profile in the Resources > Profiles, and add application files for the Launcher app, along with any apps intended to be displayed within Launcher, to Resources > Apps.
Create a Workflow to Install a Group of Resources
An administrator can create a group in a workflow and add all the required applications and profiles to be installed on the devices to the workflow. The resources added to a group do not follow any sequence during the installation. A combination of applications and or profiles can be installed at the same time on the device.
In this example, an admin creates a group to install the Wi-Fi profile, Global Protect application, and Google Chrome application on the device.
Prerequisites
Before you begin creating workflows, the admin must create a Wi-Fi profile, add the Global protect application, and the Google Chrome application to the system inventory. In this example, the Wi-Fi profile is named wifi-profile, the Global protect application is named global-protect, and the Google Chrome application is named chrome.
Note: The application and profile can only be added in a workflow and assigned to a smart group after the application and profile are added to the system inventory.
Procedure
The following procedure describes the steps to create a workflow to add a group to the workflow and add all the resources into the group.
-
Log in to the Workspace ONE UEM console.
-
Click Orchestration > Freestyle > Freestyle Orchestrator and click New.
-
Enter a name in the New Freestyle Workflow. You can add an optional description to your workflow.
-
In the right Admin Panel Workflow Settings, select the Platform from the drop-down menu, and select Smart Groups to which you want to assign this workflow.
-
In the left pane, click + > Group to add a group to the workflow.
-
In the right Admin Panel, under the Group enter a name for the group.
-
Click + > Profile.
-
In the Install Profile, click search and select, and enter the wifi-profile to be added to the group.
-
Select the wifi-profile from the auto-populated list.
-
In the right Admin Panel, under the Install Profile, click Add, and select Application from the auto-populated list.
-
In the Install application screen, perform the following actions to add the Global protect application.
a. In Application, click search and select the global-protect application to install. The Results section displays a list of all available applications.
b. In Version select the version of the application to be installed.
-
In the right Admin Panel, under the Install Application page click Add and select Application.
-
In the Install application screen, perform the following actions to add the Google Chrome application.
a. In Application, click search and select, enter chrome application to install. Select the chrome application from the auto-populated list.
b. In Version select the version of the application to be installed.
-
Click Save to save your workflow.
-
Click Publish to publish the workflow to all selected devices upon device check-in.
Results
You can view the saved workflow in the Freestyle Orchestrator dashboard. When the workflow is assigned to the devices, the resources in the workflow group start installing on device check-in.
Remove Applications and Profiles from Mobile Devices using Workflows
An admin can create a workflow for one-time removal of an application and/or profile from a device. After the workflow is deployed on the device, the app or profile is uninstalled. If there is any other source of installation of the same application or profile through another workflow or direct assignment, then the application and profile are reinstalled on the device. This feature is supported on Android and iOS devices. The following table describes the resource types supported on Android and iOS devices.
| Resource type | Android | iOS |
|---|---|---|
| Internal App | Yes | Yes |
| Public App | Yes | Yes |
| Purchased App | N/A | No |
| Unmanaged App | No | No |
| Profile | CDPC - Yes AMAPI - Yes | Imperative - Yes Declarative - No |
An admin can use workflows to remove applications or profiles in the following scenarios:
- Rollback to an older version - When there are problems with a current version of an app, the admin can remove or uninstall the current version and re-install the old version. Note: This action reinstalls the older version of the application and removes all user settings.
- Remove and replace an app - When an application needs to be replaced, an admin can create a workflow to uninstall the existing application and install the new app. For example, an organization may migrate from the Concur app to the Navan app by configuring a workflow to remove Concur and deploy Navan app.
- Remove unwanted or outdated apps - In some scenarios, applications previously deployed to devices may no longer be required, may be outdated, or may have been replaced by other solutions. To maintain a secure and efficient device environment, administrators can create workflows to remove these applications from user devices. For example, if Okta was originally deployed through a workflow for SSO but is no longer in use, a workflow can be configured to remove the application. Note: Only applications deployed through UEM can be removed. Due to MDM limitations, user-installed applications cannot be uninstalled using this method.
- Undo a deployment - If an application or a profile is incorrectly deployed to devices, or if the admin is unsure whether all devices are on the correct version, then the admins can resolve the issue by removing the profile in bulk and reinstalling the app or profile.
- Self-service workflows
- Quick Actions - Admins can streamline troubleshooting by creating workflows that remove a profile or application and then reinstall it on the device. For example, if users experience issues with a VPN, admins can configure a workflow to uninstall and reinstall both the VPN profile and the application.
- App catalog
- Location-specific resources - When a device requires temporary access to location-specific resources, admins can use on-demand workflows to manage them. For example, a frontline worker who typically operates in Warehouse B but is assigned to Warehouse A for a day can run an on-demand workflow to install the profiles and applications required for Warehouse A. Once the assignment ends, another on-demand workflow can be used to remove those resources.
Create a Workflow to Remove an Application from a Mobile Device
You can create a workflow for one-time removal of applications from devices. The following procedure describes the steps to create a workflow to remove applications from devices. In this procedure, the administrator creates a workflow to remove the Chrome app from all devices assigned to an organization group (OG).
Prerequisites
Before you begin creating a workflow, you must ensure that the Chrome app is available in your system inventory. Navigate to Resources > Apps to check the available resources in your system inventory.
Procedure
The following procedure describes the steps to create a workflow to remove the Chrome app from all devices assigned to an OG.
-
Log in to the Workspace ONE UEM console.
-
Click Orchestration > Freestyle > Freestyle Orchestrator and click New.
-
Enter a name in the New Freestyle Workflow. You can add an optional description to your workflow.
-
In the right Admin Panel Workflow Settings, select the Platform from the drop-down menu, and select Smart Groups to which you want to assign this workflow.
-
In the left pane, click + > Action > Remove Application.
-
In the right Admin Panel, under the Remove Application perform the following steps:
a. In Application, click Search and Select, and enter Chrome in the Search for an existing application.
Note: A list of all the available applications is displayed in the Results section.
b. Navigate to the Chrome application and click Select to select the application.
c. In the Remove Application screen, click the Version to select the version of the Chrome application to be removed.
-
Click Save to save your workflow.
-
Click Publish to publish the workflow to all selected devices upon device check-in.
Note: You can create and save your workflow anytime without publishing the workflow to your end-user devices. You can return to the Workspace ONE UEM console later to publish a saved workflow.
Results
You can view the saved workflow in the Freestyle Orchestrator dashboard. When the workflow is deployed to the device, the Chrome app is uninstalled from the device. To view the uninstalled app, navigate to Devices > List View and click the device on which the app is uninstalled.
On the device Details View screen, click Apps. The App Installation status displays that the app has been removed.
Create a Workflow to Remove a Profile from a Mobile Device
You can create a workflow for one-time removal of profiles from devices. The following procedure describes the steps to create a workflow to remove a profile from a device. In this procedure, the administrator creates a workflow to remove the VPN profile from all devices assigned to an organization group (OG).
Prerequisites
Before you begin creating a workflow, you must ensure that the VPN profile is available in your system inventory. Navigate to Resources > Apps to check the available resources in your system inventory.
Note: To remove profiles from devices, the profile assignment type must be set as optional.
Procedure
The following procedure describes the steps to create a workflow to remove the VPN profile from all devices assigned to an OG.
-
Log in to the Workspace ONE UEM console.
-
Click Orchestration > Freestyle > Freestyle Orchestrator and click New.
-
Enter a name in the New Freestyle Workflow. You can add an optional description to your workflow.
-
In the right Admin Panel Workflow Settings, select the Platform from the drop-down menu, and select Smart Groups to which you want to assign this workflow. This feature is available only for iOS and Android devices.
-
In the left pane, click + > Action > Remove Profile.
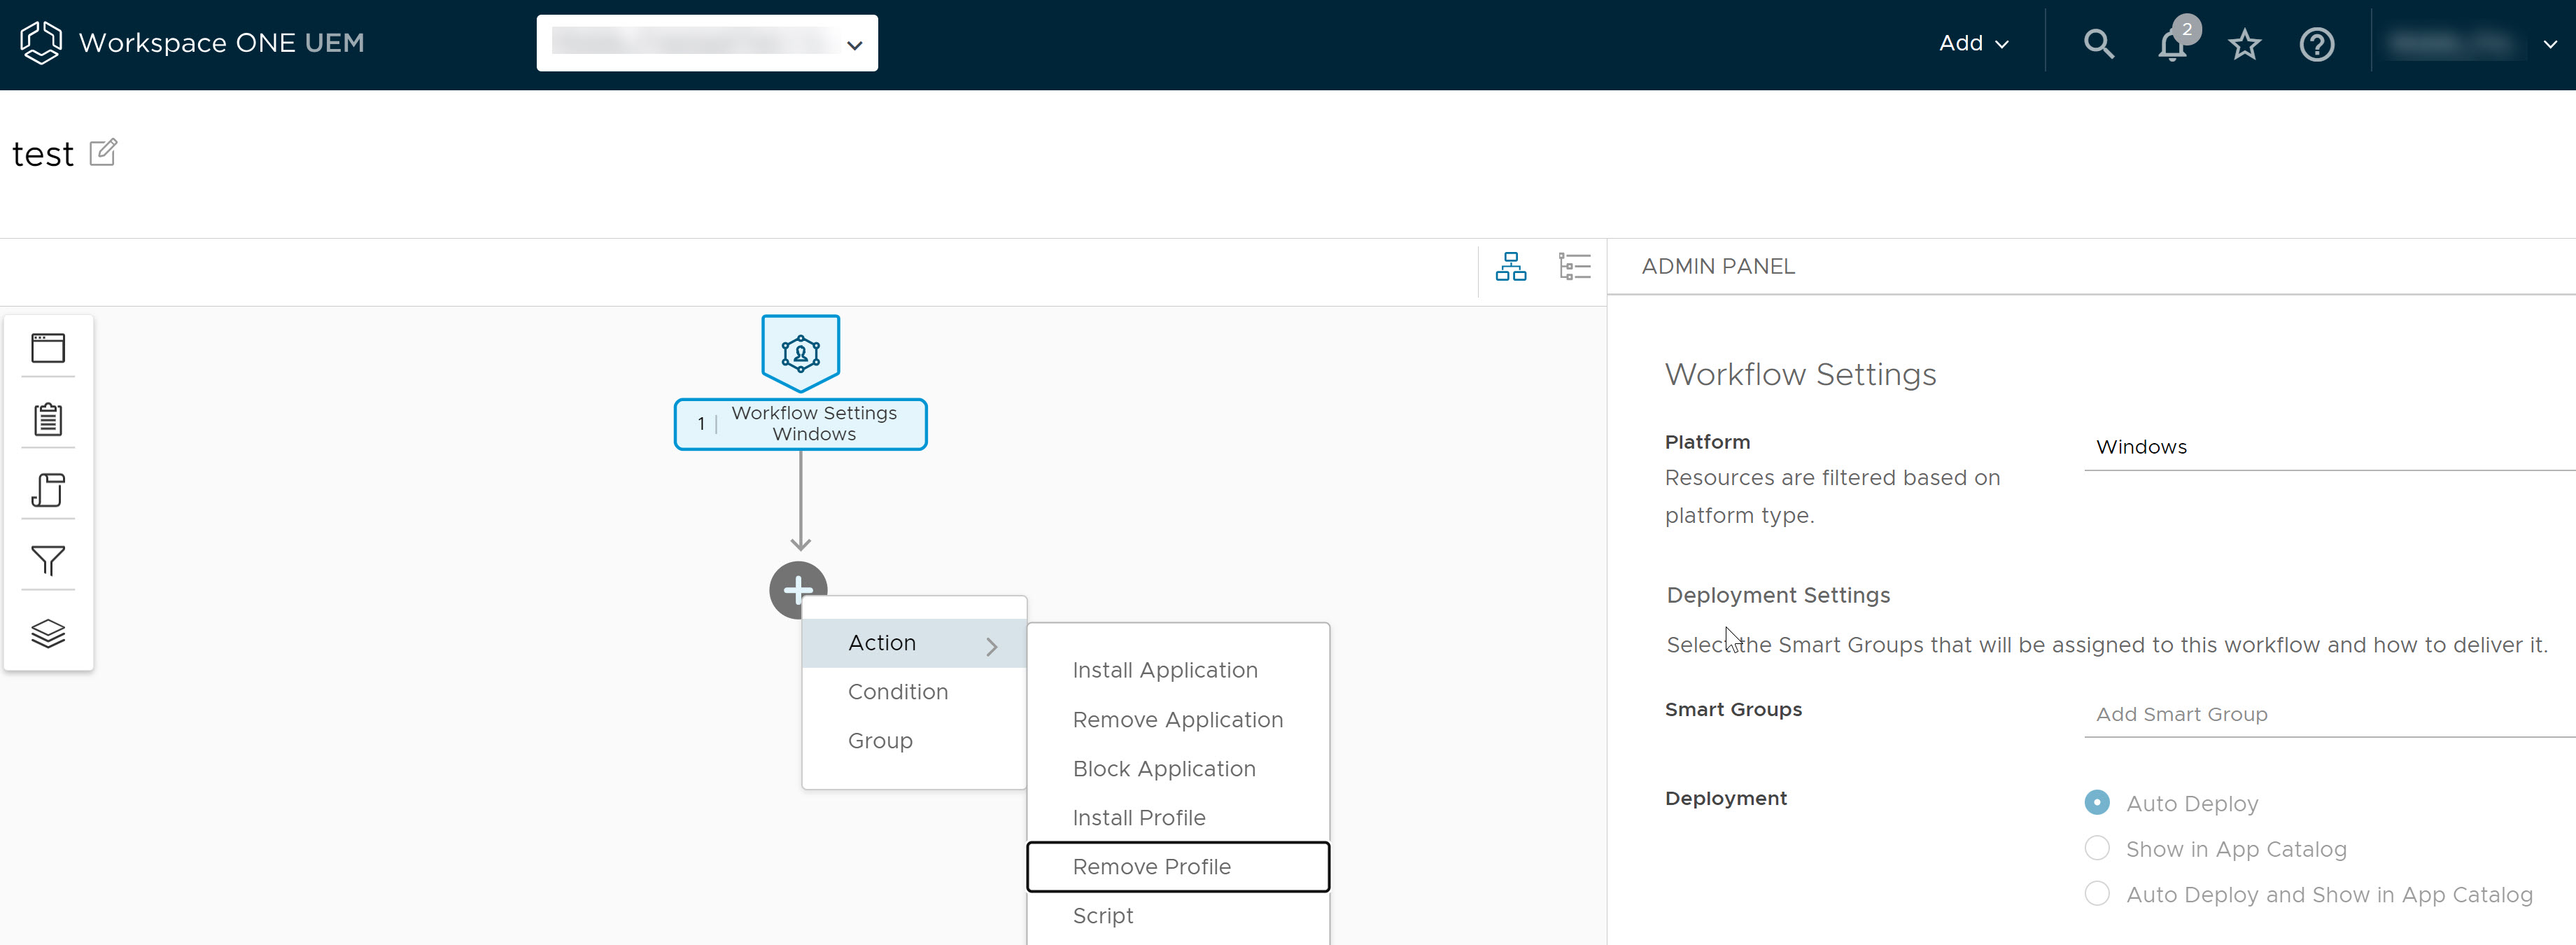
-
In the right Admin Panel, under the Remove Profile page perform the following steps:
a. In Profile, click Search and Select, and a list of all available profiles is displayed.
b. Enter VPN in the Search for an existing profile tab and select the VPN profile that is auto-populated.
-
Click Save to save your workflow.
-
Click Publish to publish the workflow to all selected devices upon device check-in.
Note: To remove profiles from devices, the profile assignment type must be set as optional.
Results
You can view the saved workflow in the Freestyle Orchestrator dashboard. When the workflow is assigned to the devices, the VPN profile is uninstalled from the device. To view the uninstalled profile, navigate to Devices > List View and click the device on which the app is uninstalled. On the Device Details page, click Profiles to view the status of the uninstalled profile.
Was this page helpful?