Freestyle Orchestrator workflows can be used with your direct resource deployments to meet your company's orchestration needs. Workflow management involves three main components as shown in the following illustration.
Figure 2-1. Freestyle Orchestrator Workflow Management
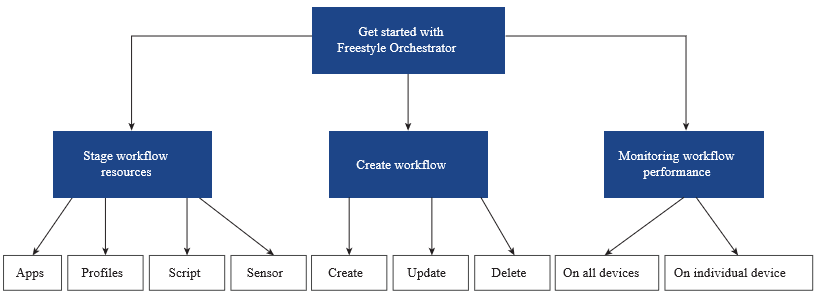
Getting Started with Freestyle Orchestrator Desktop
Learn how to create workflows with Freestyle Orchestrator for desktop devices in the following sections.
Stage Workflow Resources
Before you begin creating workflows, you must add the required resources to your system inventory. The resources can be applications, profiles, or scripts and they can be staged at your OG or the parent OG. However, you need not assign the resources to devices during the creation process.
When you add a script or sensor resource, identify the trigger, and stage your script or sensor. For information about creating your resources, see the following topics:
- To create an application, and for more details about default policy creation, see the Deploy Applications to devices topic in the Application Lifecycle Management guide.
- To create a profile, see the macOS Device Profiles topic in the macOS Device Management guide and Workspace ONE UEM Profiles for Windows topic in the Windows Desktop Documentation guide.
- To create a sensor, see the Collect Data with Sensors for macOS Devices topic in the macOS Device Management guide and the Collect Data with Sensors for Windows Desktop Devices topic in the Windows Desktop Documentation guide.
- To create a script, see the Scripts for macOS Devices topic in the macOS Device Management guide and the Create a Script for Windows Desktop Devices topic in the Windows Desktop Documentation guide.
Create your Workflow
When all the required resources are added to the system inventory, you can start creating workflows. The following list describes the high-level steps to create a basic workflow:
- Add a name to your workflow.
- Select the platform and smart group for your workflow. All devices in the smart group to which the workflow is assigned perform the actions specified in the workflow upon publish.
- Add the resources to the workflow in the order you want the resources to be installed on the devices.
- Save your workflow. At any time, you can open any saved workflow and modify the workflow as required.
- Publish your workflow.
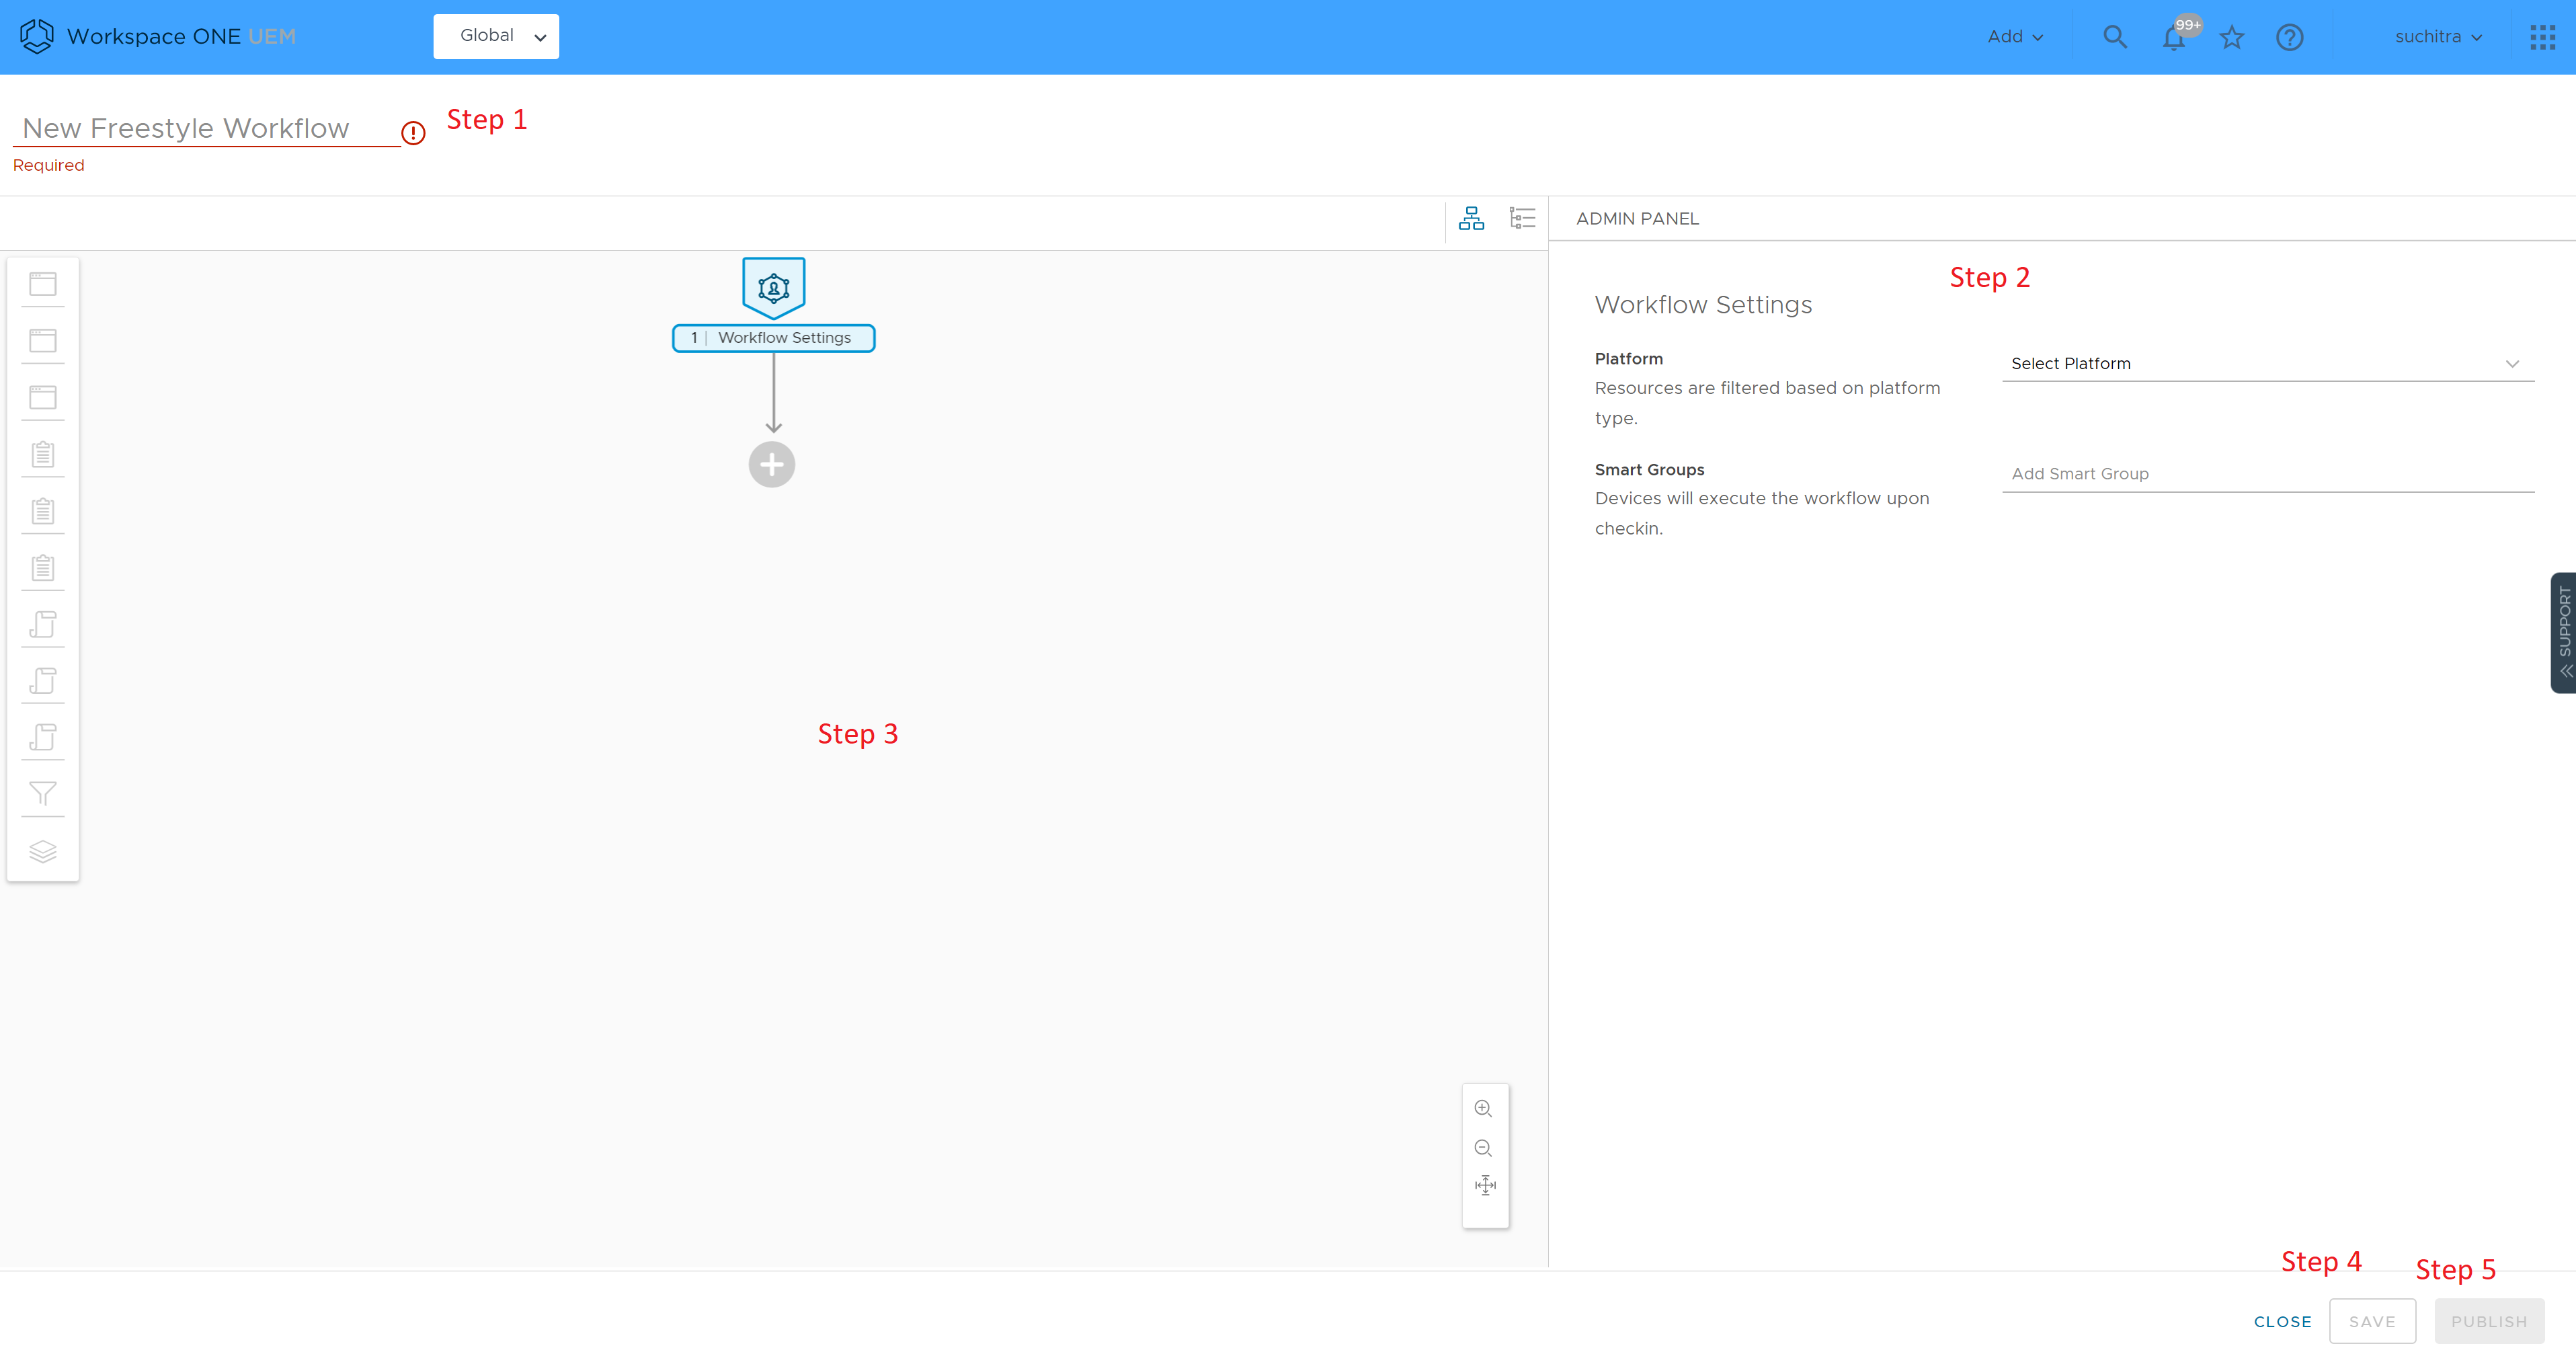
When you save and publish the workflow, the devices do not install the resources in the workflow immediately. When the device checks for any updates, the resources get installed only if the device is entitled to receive a workflow. The default device check-in interval time is 4 hours and can vary based on your configuration.
Note: After you save and publish a workflow, you cannot edit the Platform field of the workflow. If you try to change the platform associated with the workflow, the following warning message is displayed "Changing the platform will erase all the other resources, steps, actions you have entered into the workflow. Are you sure you want to continue?"
If you click Change Platform, then all the resources added to the workflow are deleted. However, the already selected Smart Group for the workflow is not impacted. Any number of smart groups can be added to the workflow at any time while creating the workflow.
For more information about creating workflows, see the following topics:
Note: New workflows can only be created at the customer OG or below. For additional information, see Freestyle workflows only at Customer Organization Group or below.
Build Workflows using Freestyle Orchestrator List Builder or Flow Builder
An admin can build workflows using a list builder or a flow builder. A list builder helps admins to build workflows using a structured list whereas a flow builder helps admins to build workflows using free-form flowchart tools.
If a workflow is created in the flow builder and the admin switches to the list builder, the same workflow appears in the list builder. The following figure shows the list builder and flow builder icons displayed on the flow builder workflow screen.
Figure 2-2. List Builder and Flow Builder Icons
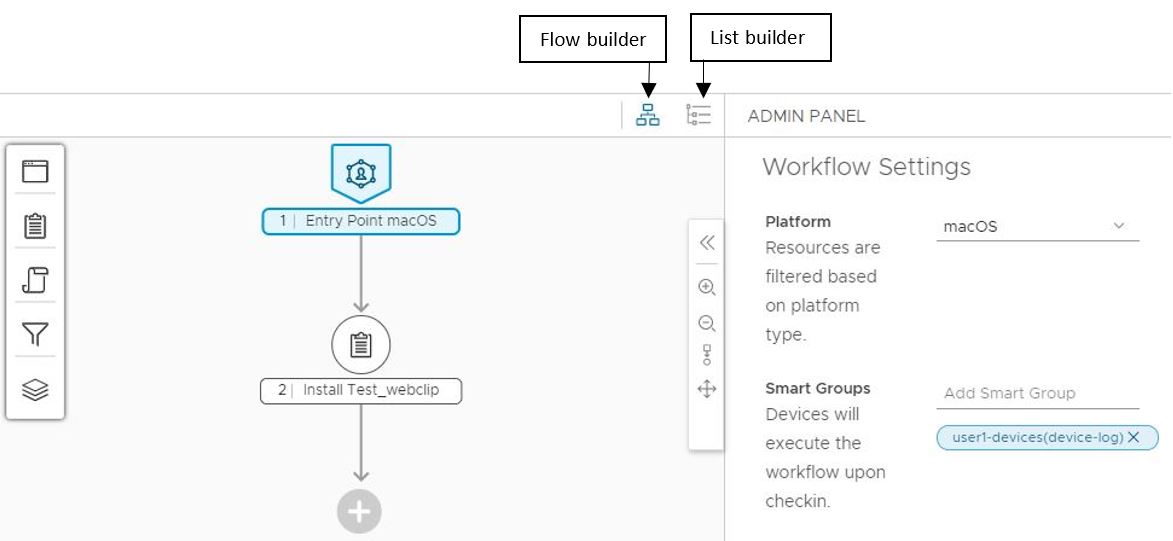
A flow builder provides an interaction pane for the admins to create and visualize complex workflows having multiple branches with nested conditions. In a flow builder the workflow steps are displayed in the form of a flow chart. An admin can drag and drop any workflow resources such as apps, profiles and so on the flow builder canvas.
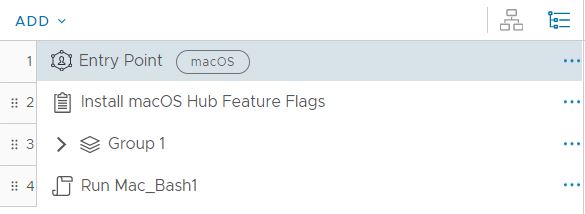
In a list builder all the steps in a workflow appear in the form of a list and the sub-steps in a workflow is indented within the steps. An admin can reorder the steps in a workflow after creating the steps in a workflow. The following figure shows an image of a list builder.
Figure 2-3. List Builder View
Monitor Workflow Performance
After you create and assign the workflows to the devices, you can monitor the progress of the workflow deployment. You can view the progress of the workflow for all the assigned devices, or you can view the progress of the workflow for individual devices. Navigate to the Device details page and check the workflow section for more details of individually targeted validations. Additional event logs for devices depict how the device is responding to the workflow.
Configure Default Settings for all Workflows
You can configure default settings for all your workflows and also override these settings in the individual workflows. To configure the default workflow settings, perform the following procedure:
- Navigate to Orchestration > Freestyle > Freestyle Orchestrator.
- Click the Settings option to open the workflow Settings page and enter the following fields.
Table 2-1. Freestyle Orchestrator Workflow Settings
| Field | Default Value | Description |
|---|---|---|
| Timeout | 720 minutes | The maximum time to wait for a workflow step to complete. Specify the value in minutes, days, or hours. |
| Retry After | 200 hours | The time interval after which the workflow steps with errors are retried. Specify the value in minutes, days, or hours. |
| Maximum Retries | 3 | The maximum number of retries a system can perform to reinstall a workflow step or the workflow itself. |
| Backoff rate | 1.5 | A multiplier that determines the interval between subsequent retries. |
| Retry Interval | NA | Product of Retry After, Retry Number, and Backoff Rate. |
- Click Save to save the workflow settings. If there are no validation errors, the workflow settings are saved.
Note: The Restore Defaults restores all the default values of the workflow.
Getting Started with Freestyle Orchestrator Mobile
Learn how to create workflows with Freestyle Orchestrator for mobile devices in the following sections.
Stage Workflow Resources
Before you begin creating workflows, you must add the required resources to your system inventory. The resources can be applications or profiles and they can be staged at your OG or the parent OG.
When staging application resources, you must create a default app policy in addition to the package and metadata. This default policy ensures that the app can be seamlessly used in any workflow across all devices. If an app without a default policy is selected in a workflow, an error may occur, and publishing the workflow is blocked until a default policy is assigned. The default policy can assign an empty (dummy) smart group to the app, and the app can be configured as On-Demand.
Applications
You can configure different application policies for different groups of users. However, this must be done by navigating to Resources > Apps > Assign. Policy configuration settings include application configuration, VPN or Tunnel configuration, email configuration for Boxer, and restrictions.
Devices with multiple assignments receive policies in priority order defined in the Assignment window. Adjusting the priority for a single assignment will automatically reprioritize other assignments. This applies to deployments through both workflows and direct assignments.
Profiles
Unlike apps, you need not set up a corresponding on-demand assignment for profiles. You need to create the profile, add payloads, and set the Assignment Type to Optional.
Create your Workflow
When all the required resources are added to the system inventory, you can start creating workflows. The following list describes the high-level steps to create a basic workflow:
-
Add a name to your workflow.
-
Select the platform and smart group for your workflow. All devices in the smart group to which the workflow is assigned perform the actions specified in the workflow upon publish.
-
Add the resources to the workflow in the order you want the resources to be installed on the devices. Note - The number of steps in a workflow is limited to 50.
-
Save your workflow. At any time, you can open any saved workflow and modify the workflow as required.
-
Publish your workflow.
Note: You can create a maximum of 50 steps in a workflow.
When you save and publish the workflow, the devices might not install the resources in the workflow immediately. For smaller deployments, that is, under 2,000 devices, the devices are invited to check in. However, larger deployments follow the new Pull model implemented with the Modern Stack. The next time the device is scheduled to check in for any updates, the entitled resources (through both direct assignment and workflow) get installed on the device. The default device check-in interval time is 4 hours and can vary based on your configuration.
Note: After you save and publish a workflow, you cannot edit the Platform field of the workflow. If you try to change the platform associated with the workflow, the following warning message is displayed "Changing the platform will erase all the other resources, steps, actions you have entered into the workflow. Are you sure you want to continue?"
If you click Change Platform, then all the resources added to the workflow are deleted. However, the already selected Smart Group for the workflow is not impacted. Any number of smart groups can be added to the workflow at any time while creating the workflow.
Applicability Criteria
For mobile devices, not all resources are compatible with all devices. When adding an internal or public Android application, the "Device Applicability", indicates which Enrollment Modes and Enrollment Targets are supported for that application. For devices that are not compatible with that application, the workflow will skip that step. In the step-level execution details, it will display as "Condition Not Met."
For full details about Applicability Criteria, please see : https://kb.omnissa.com/s/article/6000359
Was this page helpful?