Setting up an Omnissa Horizon 8 deployment for HTML Access involves installing the HTML Access component in Omnissa Horizon Connection Server and allowing inbound traffic on certain TCP ports.
End users access their remote desktops and published applications by opening a supported browser and entering the URL for a server. When an end user connects to a server, the Horizon web portal page appears. You can configure the appearance of the Horizon web portal page, and you can set group policies to control image quality, the ports used, and other settings.
Preparing Horizon Connection Server
Before end users can connect to a server and access a remote desktop or published application, an administrator must install and configure Horizon Connection Server.
Install the HTML Access Component in Horizon Connection Server
Install Horizon Connection Server with the Install HTML Access setting selected on the server, or servers, that comprise a Horizon Connection Server replicated group. This setting installs the HTML Access component. This setting is selected in the installer by default. For more information, see the Horizon 8 Installation and Upgrade document.
Configure the Omnissa Horizon Blast External URL
After the servers are installed, the Blast Secure Gateway setting is enabled on the applicable Horizon Connection Server instances in . Also, the Blast External URL setting is configured to use the Blast Secure Gateway on the applicable Horizon Connection Server instances.
By default, the URL includes the FQDN of the secure tunnel external URL and the default port number, 8443. The URL must contain the FQDN and port number that a client system can use to reach the Horizon Connection Server host.
For more information, see Set the External URLs for Horizon Connection Server Instances section in the Horizon 8 Installation and Upgrade document.
Configure Firewall Rules
If you use third-party firewalls, configure rules to allow inbound traffic to TCP port 8443 for all Horizon Connection Server hosts in a replicated group, and configure a rule to allow inbound traffic (from servers) to TCP port 22443 on remote desktop virtual machines and RDS hosts in the data center.
For more information, see Firewall Rules for Client Web Browser Access section.
Configure User Authentication
Use the following check list when setting up user authentication.
-
Verify that each Horizon Connection Server instance has a TLS certificate that can be fully verified by using the host name that you enter in the web browser. For more information, see the Horizon 8 Installation and Upgrade document.
-
To use two-factor authentication, such as RSA SecurID or RADIUS authentication, verify that this feature is enabled on Horizon Connection Server. You can customize the labels on the RADIUS authentication login page. You can configure two-factor authentication to occur after a remote session times out. For more information, see the topics about two-factor authentication in the Horizon 8 Administration document.
-
To hide the Domain drop-down menu in HTML Access, enable the Hide domain list in client user interface global setting. This setting is enabled by default. For more information, see the Horizon 8 Administration document.
-
To send the domain list to HTML Access, activate the Send domain list global setting. This setting is deactivated by default. For more information, see the Horizon 8 Administration document.
-
To provide unauthenticated access to published applications, enable this feature in Horizon Connection Server. For more information, see the Horizon 8 Administration document.
The following table shows how the Send domain list and Hide domain list in client user interface global settings determine how users can log in to the server from HTML Access.
| Send domain list setting | Hide domain list in client user interface setting | How users log in |
|---|---|---|
| Deactivated (default) | Activated (default) | The Domain drop-down menu is hidden. Users must enter one of the following values in the User name text box.
|
| Deactivated | Deactivated | If a default domain is configured on the client, the default domain appears in the Domain drop-down menu. If the client does not know a default domain, *DefaultDomain* appears in the Domain drop-down menu. Users must enter one of the following values in the User name text box.
|
| Activated | Activated | The Domain drop-down menu is hidden. Users must enter one of the following values in the User name text box.
|
| Activated | Deactivated | Users can enter a user name in the User name text box and then select a domain from the Domain drop-down menu. Alternatively, users can enter one of the following values in the User name text box.
|
Use HTML Access with Omnissa Workspace ONE
You can optionally use HTML Access with Workspace ONE. For information about installing Workspace ONE and configuring it for use with Horizon Connection Server, see the Workspace ONE documentation.
For information about pairing Horizon Connection Server with a SAML Authentication server, see the Horizon 8 Administration document.
Firewall Rules for Client Web Browser Access
To allow client web browsers to make connections to Horizon Connection Server instances, remote desktops, and published applications, your firewalls must allow inbound traffic on certain TCP ports.
HTML Access connections must use HTTPS. HTTP connections are not allowed.
By default, when you install a Horizon Connection Server instance, the Horizon View Horizon Connection Server (Blast-In) ruleis enabled in the Windows Firewall and the firewall is configured to allow inbound traffic to TCP port 8443.
| Source | Default Source Port | Protocol | Target | Default Target Port | Notes |
|---|---|---|---|---|---|
| Client web browser | TCP Any | HTTPS | Horizon Connection Server instance | TCP 443 | To make the initial connection, the web browser on a client device connects to a Horizon Connection Server instance on TCP port 443. |
| Client web browser | TCP Any | HTTPS | Blast Secure Gateway | TCP 8443 | After the initial connection is made, the web browser on a client device connects to the Blast Secure Gateway on TCP port 8443. The Blast Secure Gateway must be enabled on a Horizon Connection Server instance to allow this second connection to take place. |
| Blast Secure Gateway | TCP Any | HTTPS | HTML Access Agent | TCP 22443 | If the Blast Secure Gateway is enabled, after the user selects a remote desktop or published application, the Blast Secure Gateway connects to the HTML Access Agent on TCP port 22443 on the remote desktop virtual machine or RDS host. This agent component is included when you install Horizon Agent. |
| Client web browser | TCP Any | HTTPS | HTML Access Agent | TCP 22443 | If the Blast Secure Gateway is not enabled, after the user selects a remote desktop or published application, the web browser on a client device makes a direct connection to the HTML Access Agent on TCP port 22443 on the remote desktop virtual machine or RDS host. This agent component is included when you install Horizon Agent. |
Configure HTML Access Agents to Use New TLS Certificates
To comply with industry or security regulations, you can replace the default TLS certificates that the HTML Access Agent generates with certificates that a Certificate Authority (CA) signs.
When you install the HTML Access Agent on a remote desktop, the HTML Access Agent service creates default self-signed certificates. The service presents the default certificates to browsers that use HTML Access.
Note: In the guest operating system on the desktop virtual machine, this service is called the Horizon Blast service.
To replace the default certificates with signed certificates that you obtain from a CA, you must import a certificate into the Windows local computer certificate store on each remote desktop. You must also set a registry value that allows the HTML Access Agent to use the new certificate.
If you replace the default HTML Access Agent certificates with CA-signed certificates, configure a unique certificate on each remote desktop. Do not configure a CA-signed certificate on a parent virtual machine or template that you use to create a desktop pool. That approach results in hundreds or thousands of remote desktops that have identical certificates.
Add the Certificate Snap-In to MMC on a Remote Desktop
Before you can add certificates to the Windows local computer certificate store, you must add the Certificate snap-in to the Microsoft Management Console (MMC) on the remote desktops where the HTML Access Agent is installed.
Prerequisites
Verify that the MMC and Certificate snap-in are available on the Windows guest operating system where the HTML Access Agent is installed.
Procedure
-
On the remote desktop, click Start and type
mmc.exe. -
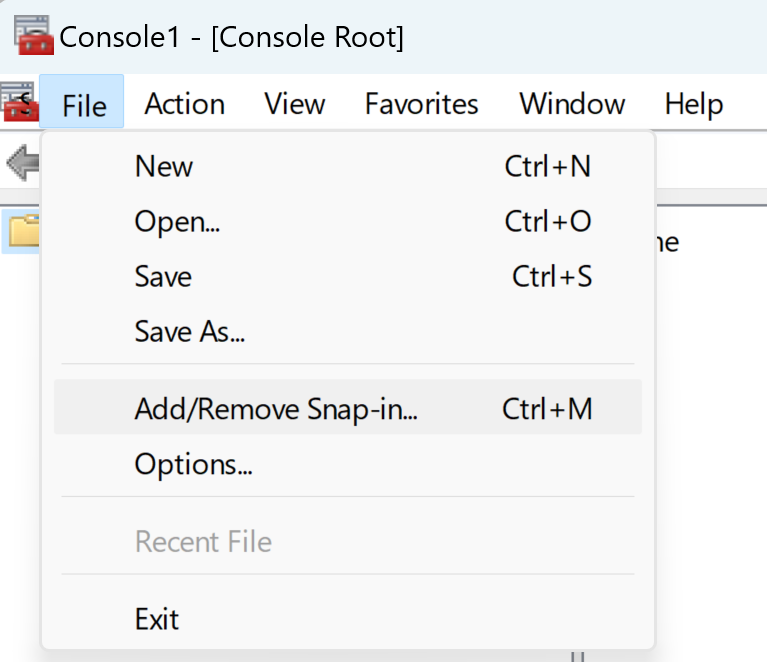
In the MMC window, go to File > Add/Remove Snap-in.
-
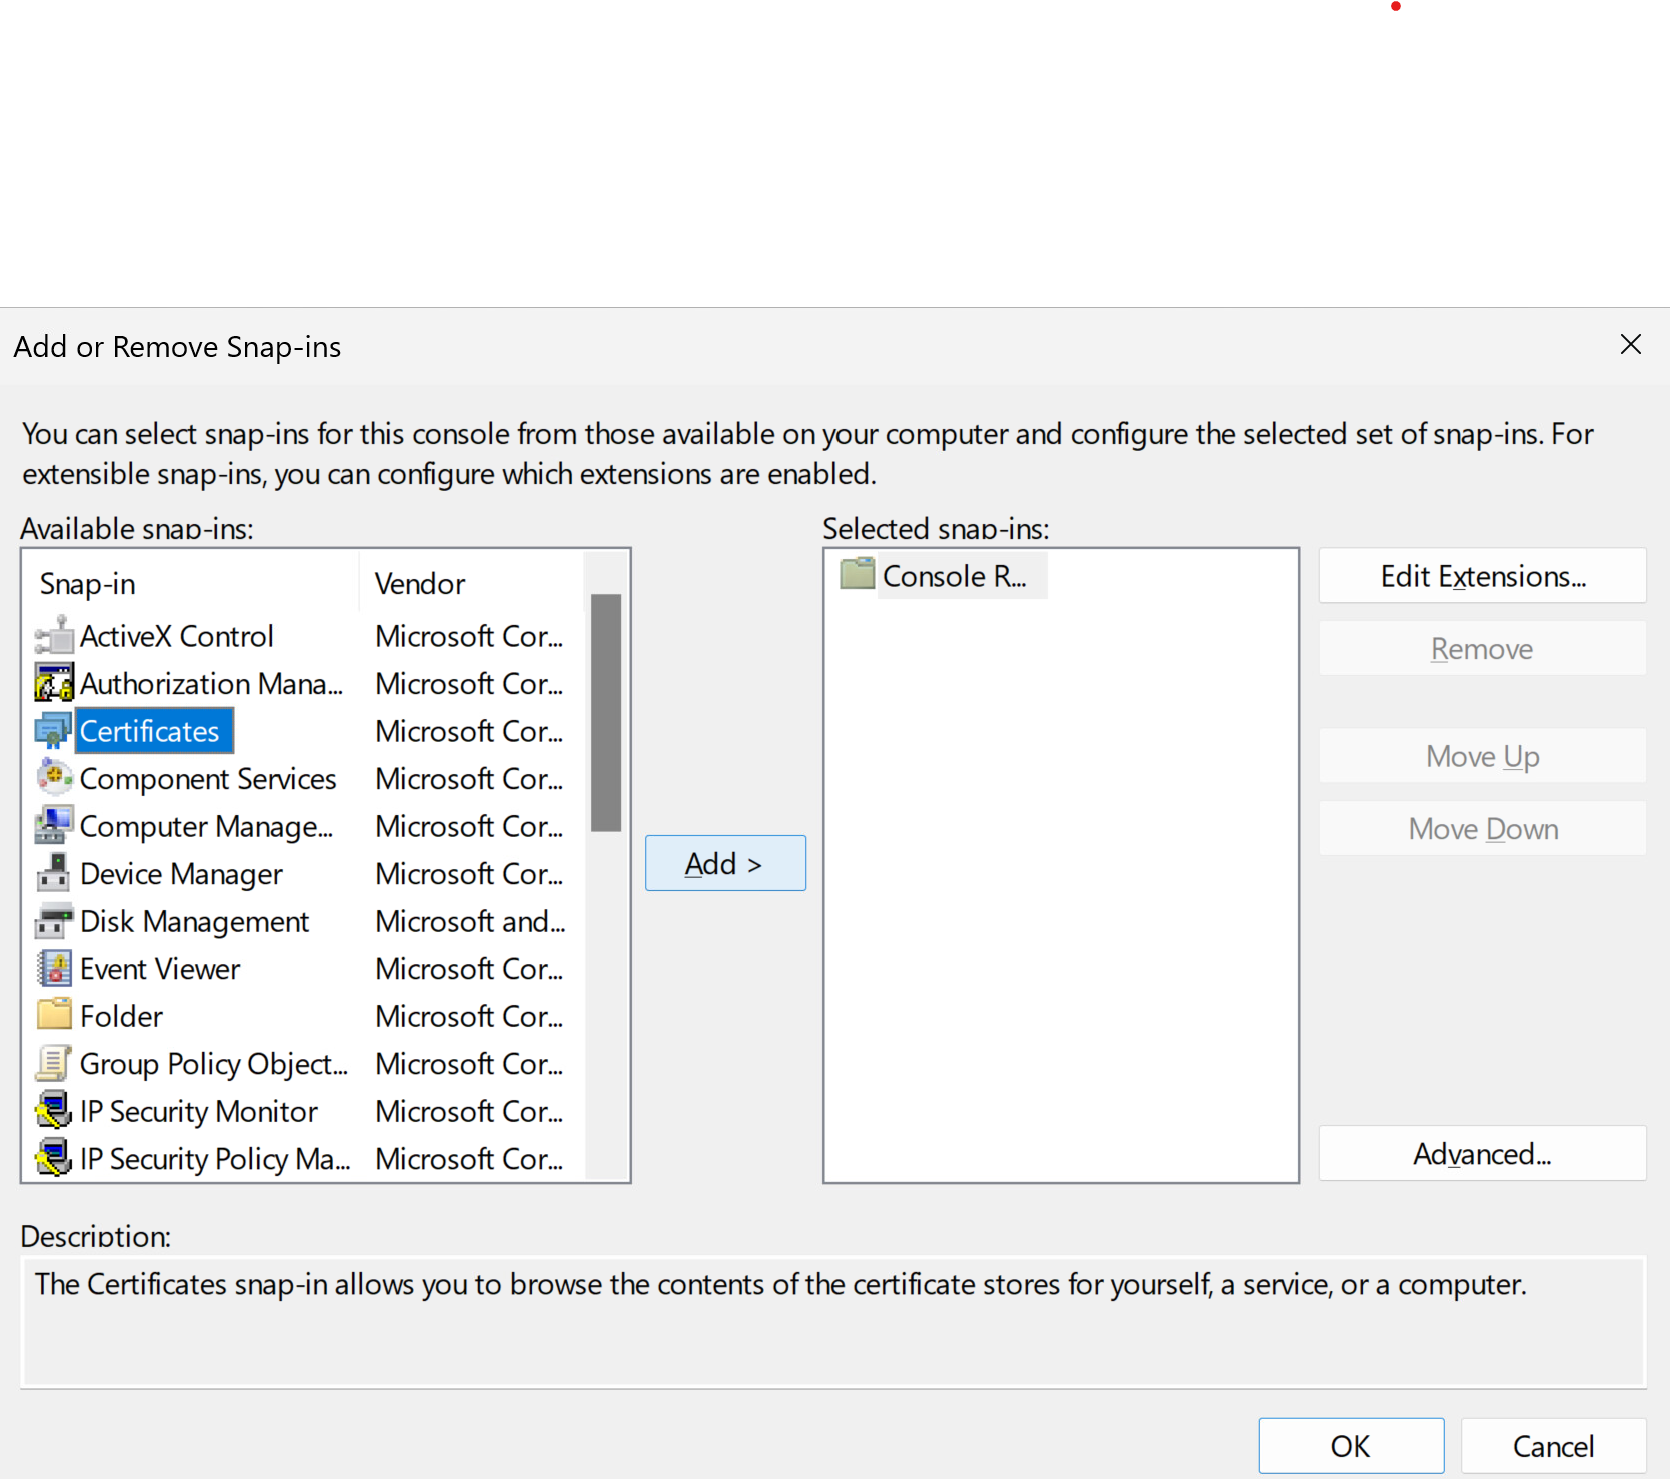
In the Add or Remove Snap-ins window, select Certificates and click Add.
-
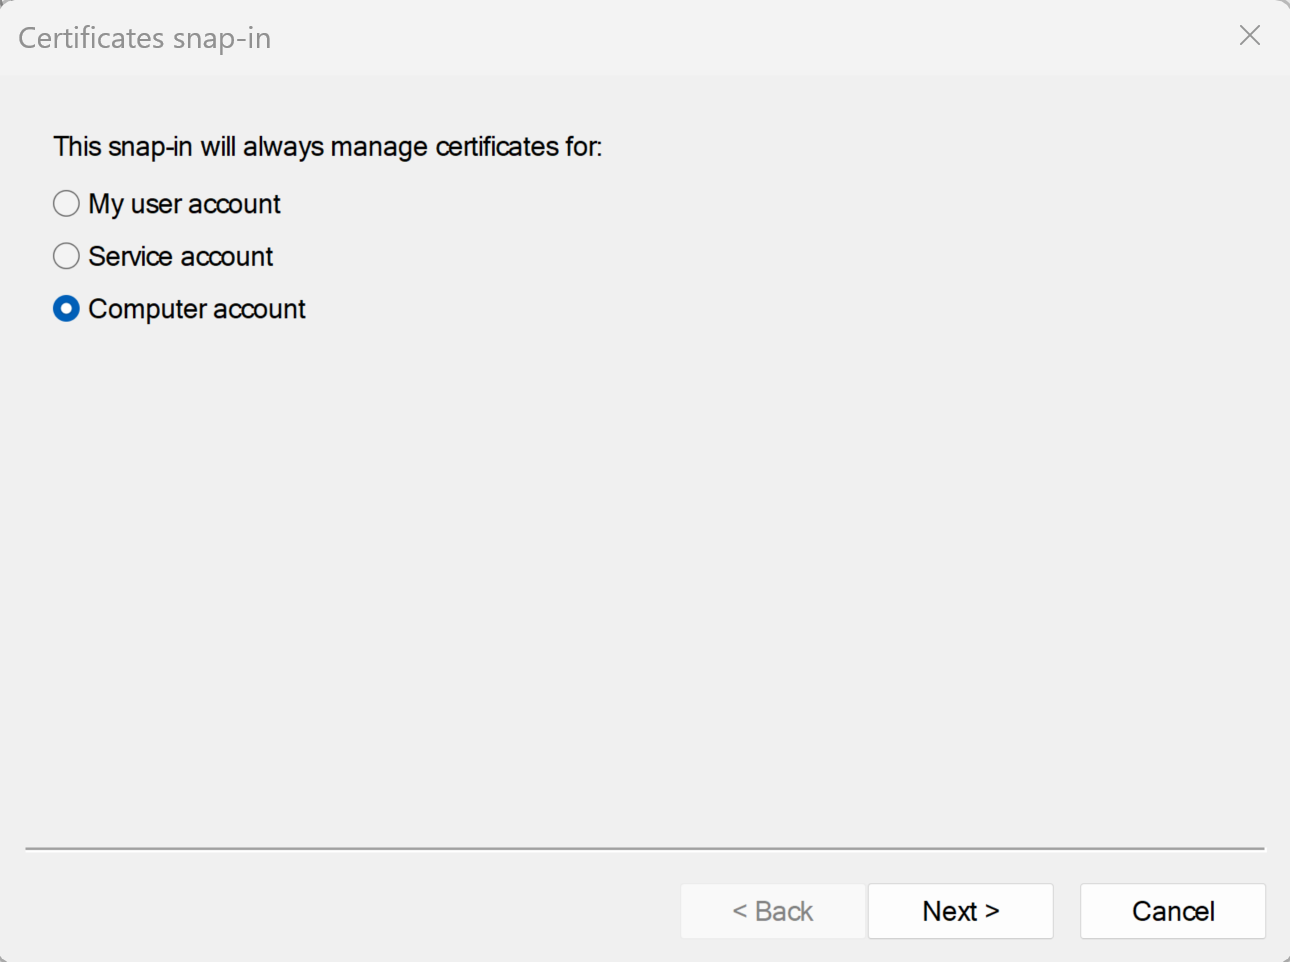
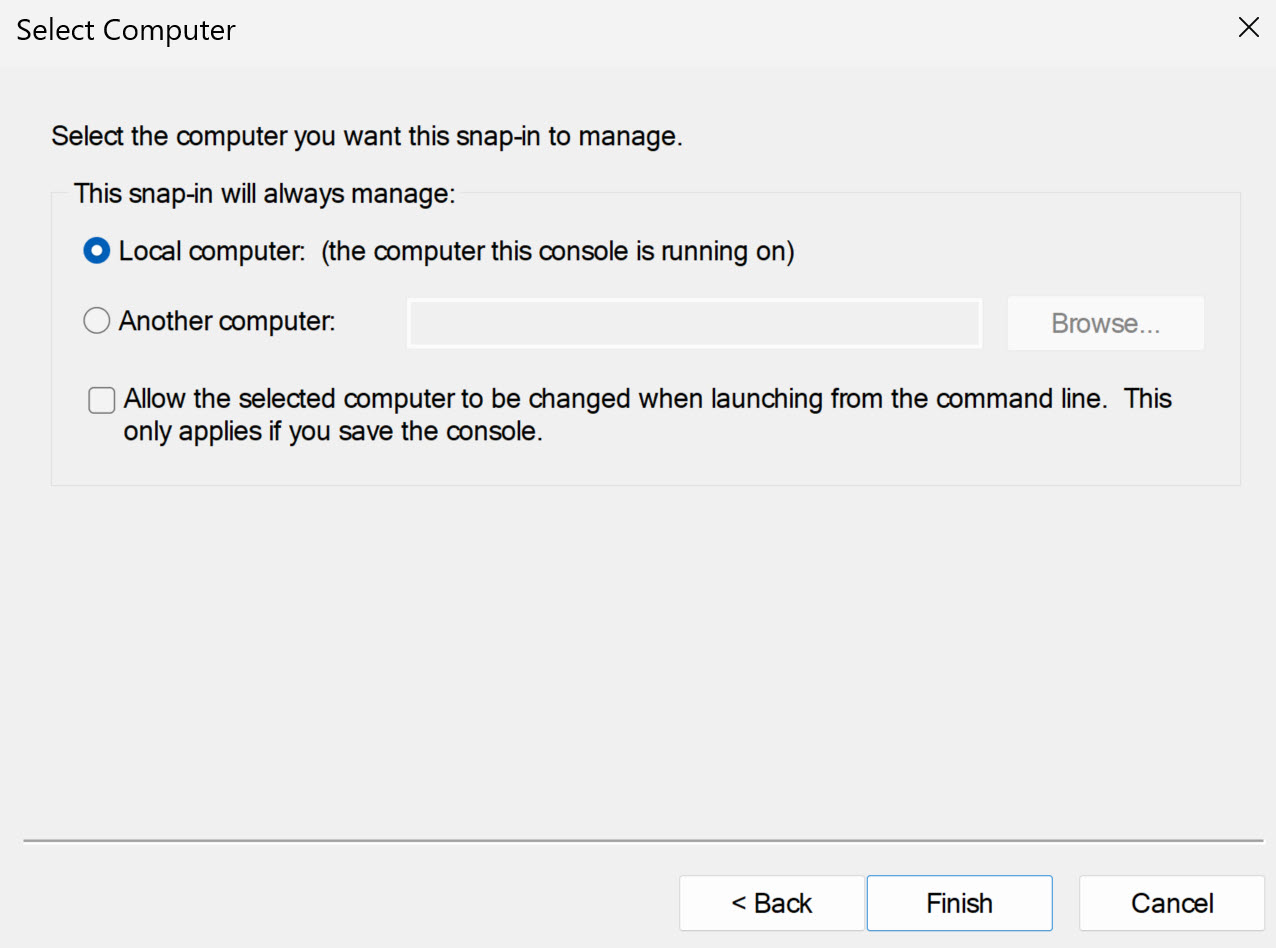
In the Certificates snap-in window, select Computer account, click Next, select Local computer, and click Finish.
-
In the Add or Remove snap-in window, click OK.
What to do next
Import the SSL certificate into the Windows local computer certificate store. See Import a Certificate for the HTML Access Agent into the Windows Certificate Store section.
Import a Certificate for the HTML Access Agent into the Windows Certificate Store
To replace a default HTML Access Agent certificate with a CA-signed certificate, you must import the CA-signed certificate into the Windows local computer certificate store. Perform this procedure on each remote desktop where the HTML Access Agent is installed.
Prerequisites
- Verify that the HTML Access Agent is installed on the remote desktop.
- Verify that the CA-signed certificate was copied to the remote desktop.
- Verify that the Certificate snap-in was added to MMC. See Add the Certificate Snap-In to MMC on a Remote Desktop section.
Procedure
-
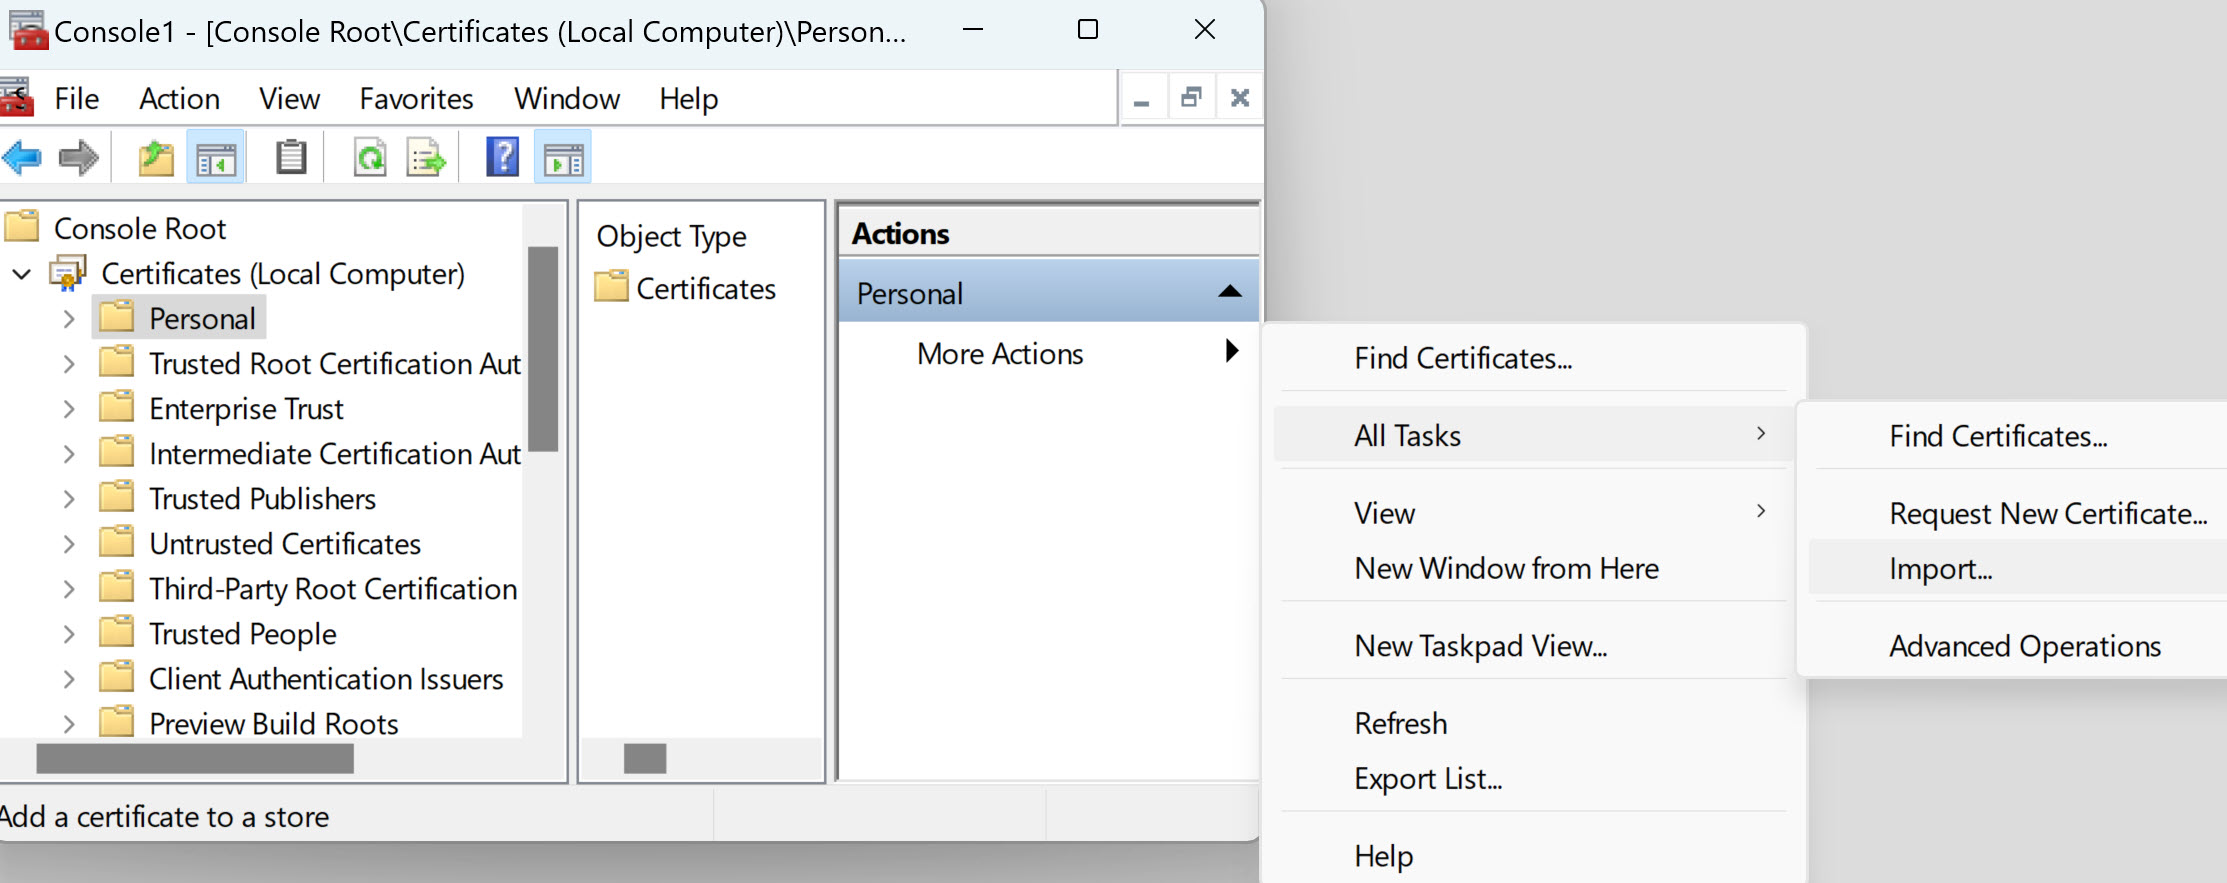
In the MMC window on the remote desktop, expand the Certificates (Local Computer) node and select the Personal folder.
-
In the Actions pane, go to MoreActions > All Tasks > Import.
-
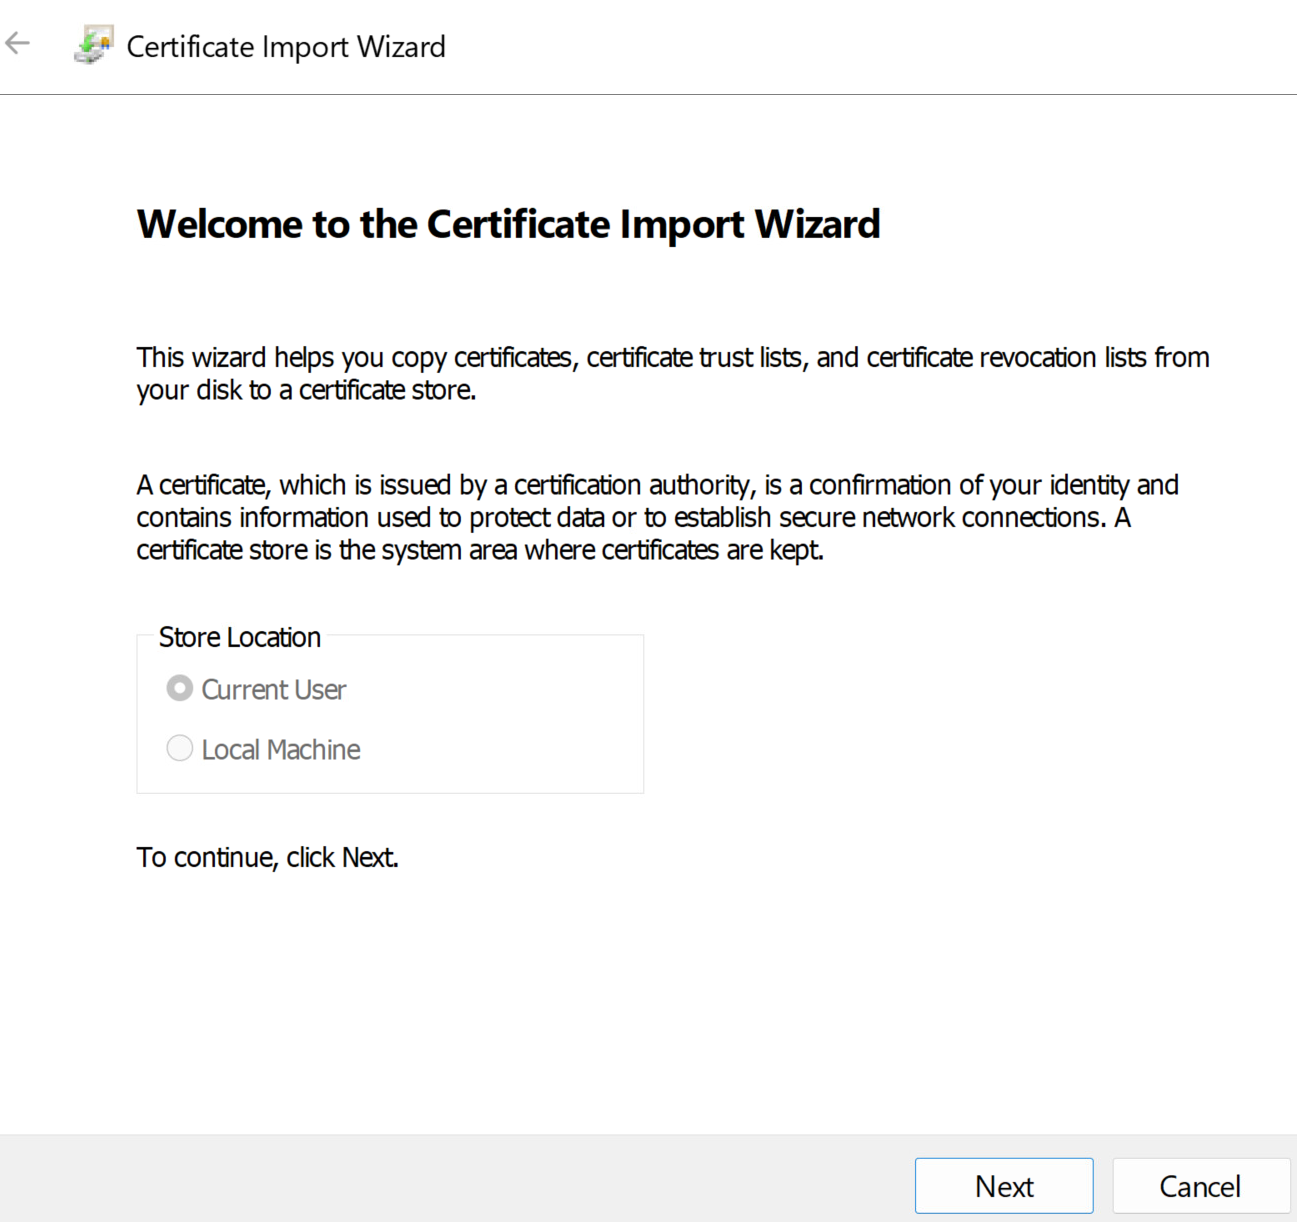
In the Certificate Import wizard, click Next and browse to the location where the certificate is stored.
-
Select the certificate file and click Open.
To display your certificate file type, you can select its file format from the File name drop-down menu.
-
Type the password for the private key that is included in the certificate file.
-
Select Mark this key as exportable.
-
Select Include all extendable properties.
-
Click Next and click Finish.
Result: The new certificate appears in the Certificates (Local Computer) > Personal > Certificates folder.
-
Verify that the new certificate contains a private key.
a. In the Certificates (Local Computer) > Personal > Certificates folder, double-click the new certificate.
b. In the General tab of the Certificate Information dialog box, verify that the following statement appears:
You have a private key that corresponds to this certificate.
What to do next
If necessary, import the root certificate and intermediate certificates into the Windows certificate store. See Import Root and Intermediate Certificates for the HTML Access Agent section.
Configure the appropriate registry key with the certificate thumbprint. See Set the Certificate Thumbprint in the Windows Registry section.
Import Root and Intermediate Certificates for the HTML Access Agent
If the root certificate and intermediate certificates in the certificate chain are not imported with the SSL certificate that you imported for the HTML Access Agent, you must import these certificates into the Windows local computer certificate store.
Procedure
-
In the MMC console on the remote desktop, expand the Certificates (Local Computer) node and go to the Trusted Root Certification Authorities > Certificates folder.
- If your root certificate is in this folder, and there are no intermediate certificates in your certificate chain, skip this procedure.
- If your root certificate is not in this folder, proceed to step 2.
-
Right-click the Trusted Root Certification Authorities > Certificates folder and click All Tasks > Import.
-
In the Certificate Import wizard, click Next and browse to the location where the root CA certificate is stored.
-
Select the root CA certificate file and click Open.
-
Click Next, click Next, and click Finish.
-
If an intermediate CA signed your server certificate, import all intermediate certificates in the certificate chain into the Windows local computer certificate store.
a. Go to the Certificates (Local Computer) > Intermediate Certification Authorities > Certificates folder.
b. Repeat steps 3 through 6 for each intermediate certificate that must be imported.
What to do next
Configure the appropriate registry key with the certificate thumbprint. See Set the Certificate Thumbprint in the Windows Registry section.
Set the Certificate Thumbprint in the Windows Registry
To allow the HTML Access Agent to use a CA-signed certificate that was imported into the Windows certificate store, you must configure the certificate thumbprint in a Windows registry key. You must take this step on each remote desktop on which you replace the default certificate with a CA-signed certificate.
Prerequisites
Verify that the CA-signed certificate is imported into the Windows certificate store. See Import a Certificate for the HTML Access Agent into the Windows Certificate Store section.
Procedure
-
In the MMC window on the remote desktop where the HTML Access Agent is installed, navigate to the Certificates (Local Computer) > Personal > Certificates folder.
-
Double-click the CA-signed certificate that you imported into the Windows certificate store.
-
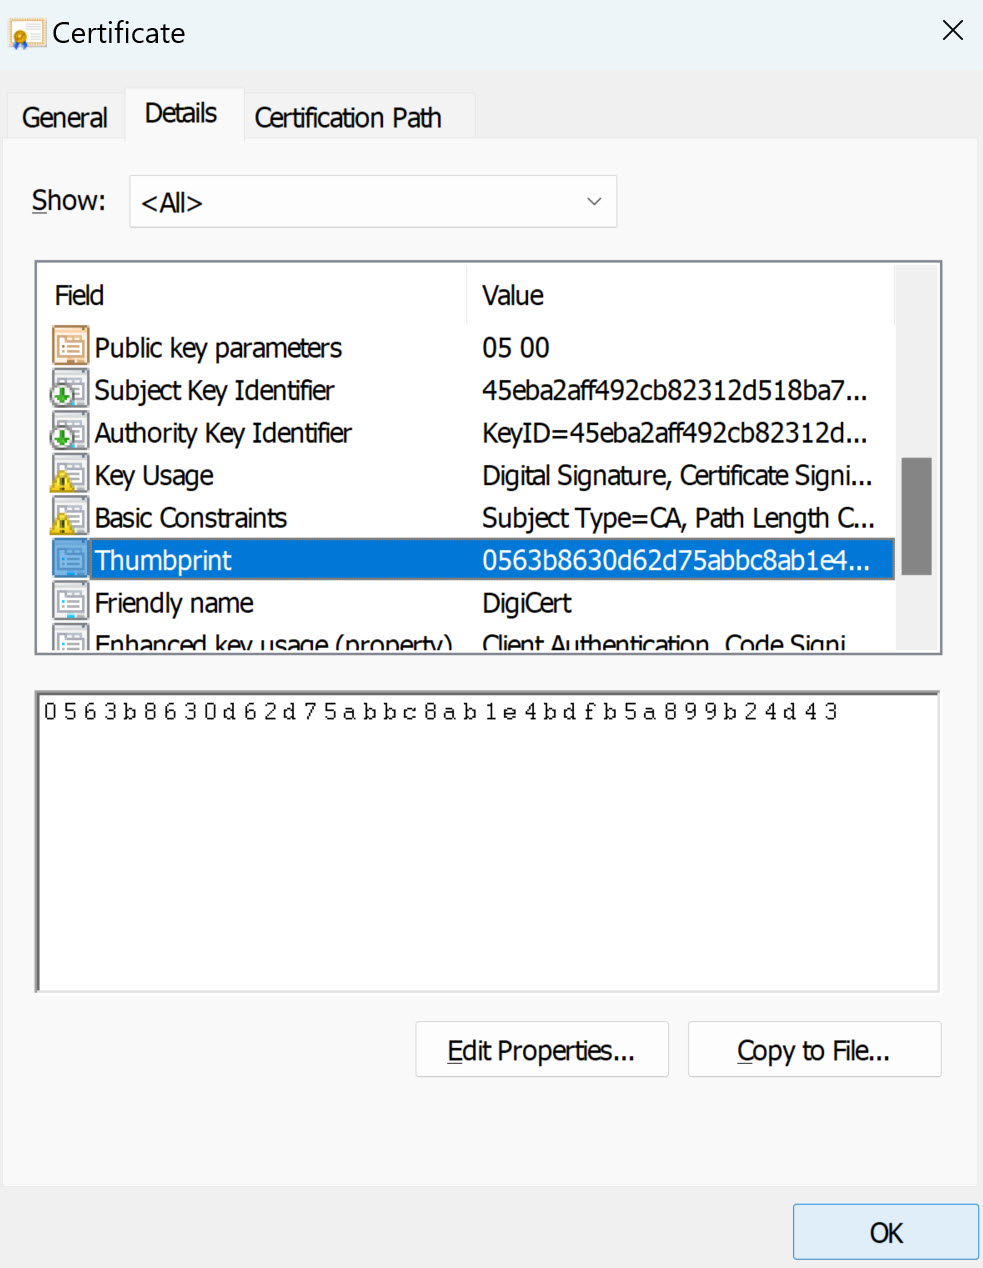
In the Certificates dialog box, click the Details tab, scroll down, and select the Thumbprint icon.
-
Copy the selected thumbprint to a text file. For example:
31 2a 32 50 1a 0b 34 b1 65 46 13 a8 0a 5e f7 43 6e a9 2c 3eNote: When you copy the thumbprint, do not to include the leading space. If you inadvertently paste the leading space with the thumbprint into the registry key (in Step 7), the certificate might not be configured successfully. This problem can occur even though the leading space is not displayed in the registry value text box.
-
Start the Windows Registry Editor on the desktop where the HTML Access Agent is installed.
-
Navigate to the
HKEY_LOCAL_MACHINE\SOFTWARE\Omnissa\Horizon Blast\Configregistry key. -
Modify the
SslHashvalue and paste the certificate thumbprint into the text box. -
Reboot Windows.
Results
When a user connects to a remote desktop through HTML Access, the HTML Access Agent presents the CA-signed certificate to the user's browser.
Configure HTML Access Agents to Use Specific Cipher Suites
You can configure the HTML Access Agent to use specific cipher suites instead of the default set of ciphers.
By default, the HTML Access Agent requires incoming TLS connections to use encryption based on certain ciphers that provide strong protection against network eavesdropping and forgery. You can configure an alternative list of ciphers for the HTML Access Agent to use. The set of acceptable ciphers is expressed in the OpenSSL format. To see the cipher list format, you can search for openssl cipher string in a web browser.
Procedure
- On the desktop where the HTML Access Agent is installed, start the Windows Registry Editor.
- Navigate to the
HKEY_LOCAL_MACHINE\SOFTWARE\Omnissa\Horizon Blast\Configregistry key. - Add a new String (REG_SZ) value, SslCiphers, and paste the cipher list in the OpenSSL format into the text box.
- To make your changes take effect, restart the Horizon Blast service.In the Windows guest operating system, the service for the HTML Access Agent is called Horizon Blast.
Results
To revert to using the default cipher list, delete the SslCiphers value and restart the Horizon Blast service. Do not simply delete the data part of the value because the HTML Access Agent will then treat all ciphers as unacceptable, in accordance with the OpenSSL cipher list format definition.
When the HTML Access Agent starts, it writes the cipher definition in the Horizon Blast service's log file. You can discover the current default cipher list by inspecting the logs when the Horizon Blast service starts with no SslCiphers value configured in the Windows Registry.
The HTML Access Agent default cipher definition might change from one release to the next to provide improved security.
Configuring iOS to Use CA-Signed Certificates
To use HTML Access on iOS devices, you must install TLS certificates that are signed by a Certificate Authority (CA). You cannot use the default TLS certificates that Horizon Connection Server or the HTML Access Agent generate.
For information, see Configure Omnissa Horizon Client for iOS to Trust Root and Intermediate Certificates section in the Horizon 8 Installation and Upgrade document.
Using a CA-Signed Certificate with Omnissa Unified Access Gateway
If you use a Unified Access Gateway appliance, you must install a CA-signed certificate that has a Subject Alternative Name (SAN) configured.
If you use a CA-signed certificate that does not have a SAN configured, or a self-signed certificate, users receive a "Your connection is not private" error and cannot connect with HTML Access.
Note:
If you use a Horizon Connection Server instance, users can still connect by clicking the Proceed to ip-address (unsafe) link.
For information about installing and configuring certificates, see the Horizon 8 Installation and Upgrade document. For information about configuring HTML Access agents to use TLS certificates, see Configure HTML Access Agents to Use New TLS Certificates section.
Upgrading HTML Access
Upgrading HTML Access involves upgrading Horizon Connection Server and Horizon Ahent.
When you upgrade HTML Access, make sure that the corresponding version of Horizon Connection Server is installed on all the instances in a replicated group.
When you upgrade Horizon Connection Server, HTML Access is installed or upgraded automatically.
To verify that the HTML Access component is installed, open the Uninstall a Program applet in the Windows operating system and look for HTML Access in the list.
Uninstall the HTML Access Component from Horizon Connection Server
You can remove the HTML Access component by using the same method that you use to remove other Windows software.
Procedure
- On the Horizon Connection Server instance where HTML Access is installed, open Uninstall a program in the Windows Control Panel.
- Select Horizon HTML Access and click Uninstall.
- (Optional) In the Windows Firewall for the host, verify that TCP port 8443 no longer allows inbound traffic.
What to do next
On third-party firewalls, if applicable, change the rules to disallow inbound traffic to TCP port 8443 for the Horizon Connection Server instance.
Was this page helpful?