This page describes how to install the Omnissa Horizon Windows OS Optimization Tool's MDT plugin's files and configure things for use with your existing Microsoft Deployment Toolkit (MDT) server.
Brief intro
Beginning with Omnissa Horizon Windows OS Optimization Tool version 1.2, you can create an optimized base image by using a Microsoft Deployment Tookit (MDT) server.
As described in this guide's main page, the Omnissa Horizon Windows OS Optimization Tool provides an MDT plugin that adds functionality to the MDT from Microsoft.
The added functionality allows you to add Horizon and Horizon Windows OS Optimization Tool specific tasks into a MDT task sequence. You can then use Microsoft Deployment Toolkit to automate the creation of your golden images and add in custom tasks that can be inserted into MDT task sequences.
These custom tasks include:
- Install and configure Hypervisor Tools.
- Install and configure the Omnissa Horizon Agent.
- Install and configure Omnissa Dynamic Environment Manager FlexEngine.
- Install and configure the Omnissa App Volumes Agent.
- Run a Windows OS Optimization Tool for Horizon optimize process.
- Run a Windows OS Optimization Tool for Horizon generalize process
- Run a Windows OS Optimization Tool for Horizon finalize process
Combining that functionality with the ability for MDT to PXE boot a machine, install an operating system, and install applications, you have the ability to fully automate the build and optimization of a Windows image that's ready for use with Horizon.
MDT installation and configuration
To set up and configure Microsoft Deployment Toolkit, see Using Automation to Create Optimized Windows Images for Horizon VMs.
If you don't already have an existing MDT server, you can get an MDT server up and running by following the Microsoft documentation Get started with MDT.
Additional guidance is provided at the Omnissa Tech Zone's location Manual Deployment Server Build and Configuration.
Even though Omnissa has a tool named Omnissa MDT Automation Tool, due to a known issue, that tool doesn't work and shouldn't be used. Therefore, the Omnissa MDT Automation Tool is not supported.
Prerequisites to installing the MDT plugin
The Omnissa MDT Plugin won't work where the Microsoft Deployment Toolkit (MDT) doesn't work.
Please be aware that Microsoft states official support for running Microsoft Deployment Toolkit only on specific Windows operating systems listed in this Microsoft MDT download page System Requirements list.
While you might find that you can install and run Microsoft Deployment Toolkit without problems on Windows operating systems not listed at Microsoft MDT download page.
However, if the Microsoft Deployment Toolkit doesn't function on the operating system you're using, then the Omnissa MDT Plugin also won't function on that operating system.
For example, Microsoft Deployment Toolkit doesn't function on Windows 11 24H2. Because Microsoft Deployment Toolkit doesn't function on Windows 11 24H2, the Omnissa MDT Plugin also won't function on Windows 11 24H2.
Ensure you have the following:
- An MDT server set up for this purpose, including a deployment share. The Omnissa Horizon Windows OS Optimization tool's files need to be copied into the MDT's deployment share.
- An MDT server that is functional.
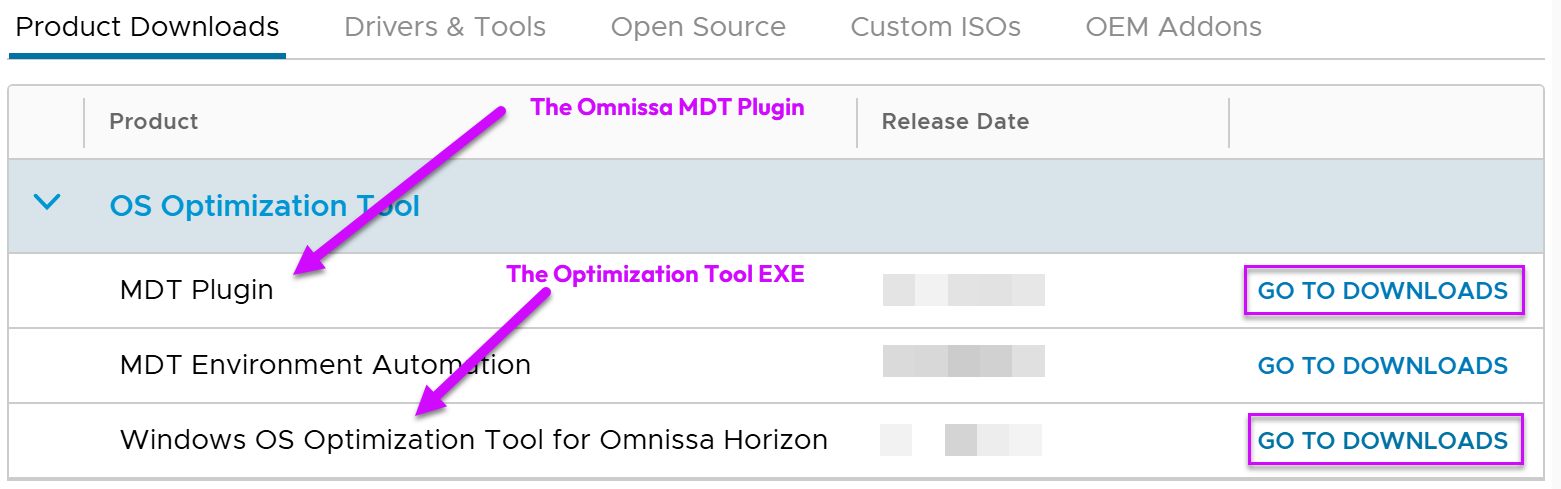
- The MDT plugin for the Omnissa Horizon Windows OS Optimization Tool. The MDT plugin is a zip file, downloaded from Omnissa Customer Connect at the same location where the Omnissa Horizon Windows OS Optimization Tool EXE resides.
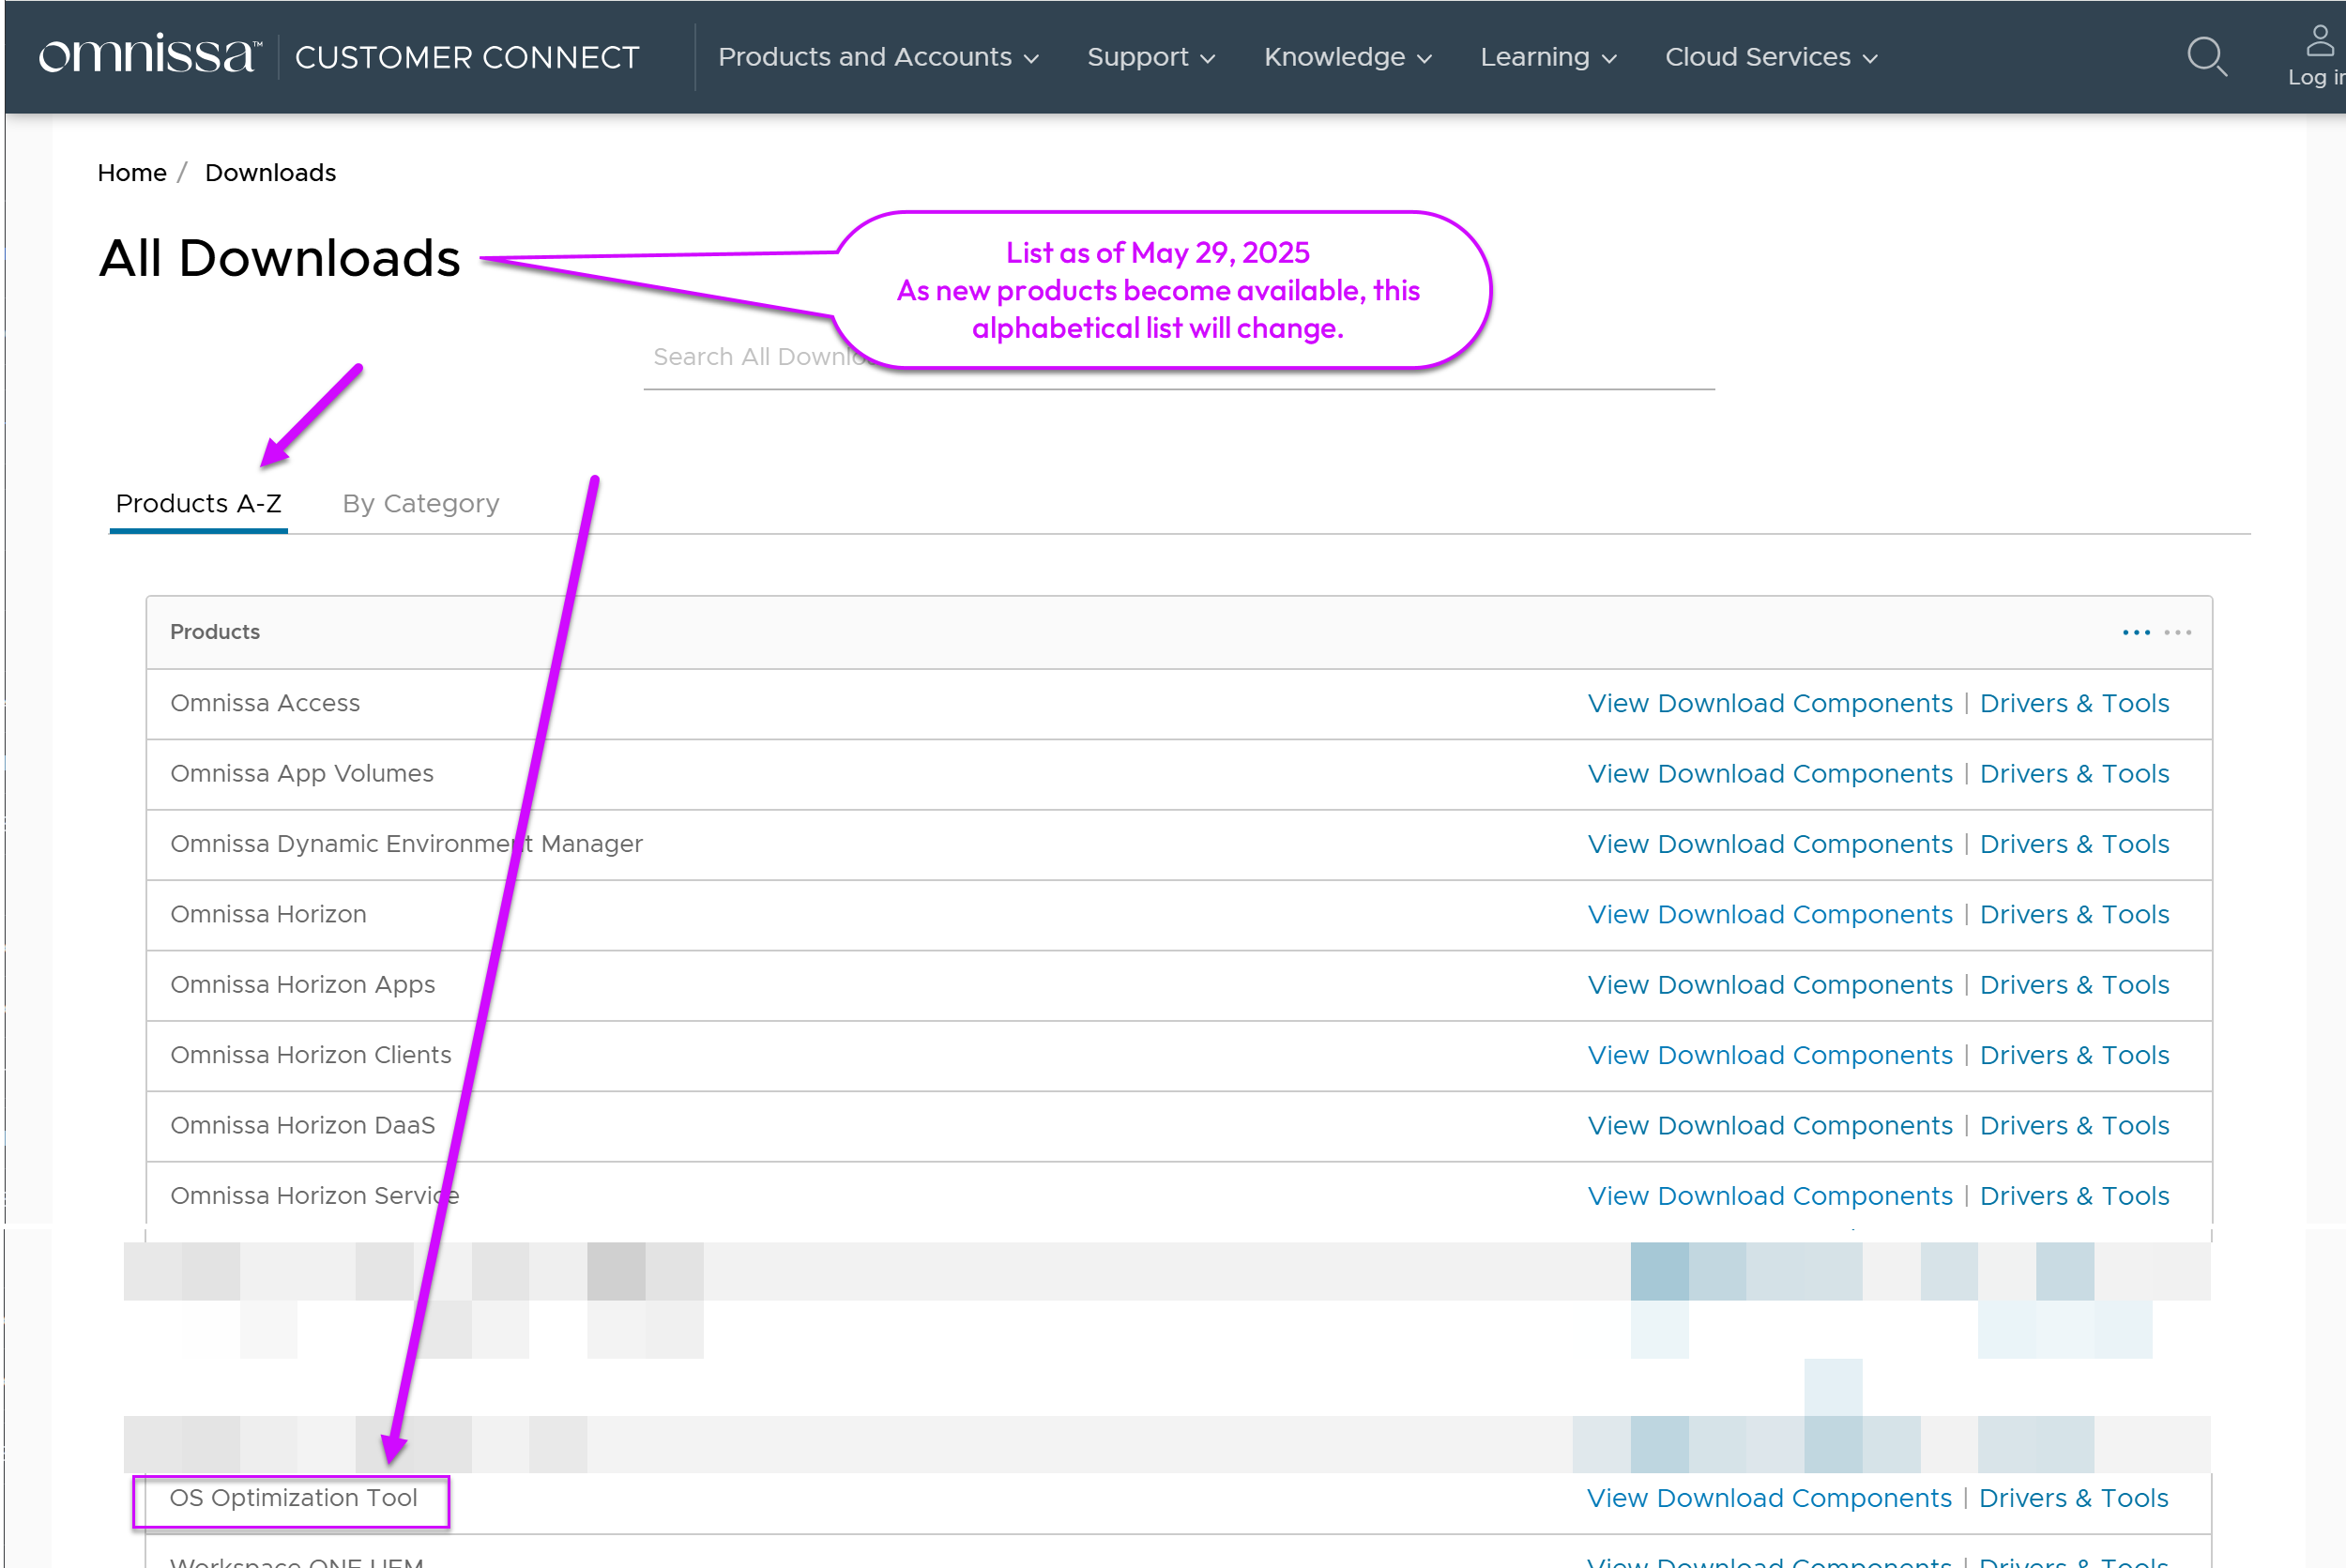
Log in to Customer Connect first using your Omnissa Customer Connect ID. For generally available versions, the tool has an entry in Products A - Z in Customer Connect, with name containing the words "OS Optimization Tool". Click through that entry's View Download Components, go to the downloads for the "Windows OS Optimization Tool for Omnissa Horizon", and download the tool's EXE file. The installer ZIP file name contains the string OmnissaHorizonOSOptimizationTool-MDT_PLugin followed by a string that contains the the tool version number, a Horizon 8 product version number, and the build number.
Example - May 29, 2025 download path
As of this writing, the Omnissa MDT plugin is available as one of the OS Optimization Tool components from Omnissa Customer Connect, after you click through into the 'OS Optimization Tool' download entry in the All Products A-Z list.
First locate the 'OS Optimization Tool' entry in All Products A-Z list:
Then click-through to view the 'OS Optimization Tool' entry's components:

As of this writing (May 29, 2025), the listed components are as depicted in the following screenshot:
Omnissa MDT Plugin installation and setup
The Windows OS Optimization Tool for Horizon Plugin for Microsoft Deployment Toolkit consists of a separate download zip file. The contents of this zip file need to be copied to certain locations on your Microsoft Deployment Toolkit server, along with the Windows OS Optimization Tool for Horizon files.
Note: Always verify the Windows operating systems on which the Omnissa MDT Plugin is supported. See Supported Windows versions for the various Omnissa components
Install the plugin
Extract the contents of the OmnissaHorizonOSOptimizationTool_MDT_Plugin_xxxx_yyyyyy.zip file and copy the files to the following locations on your Microsoft Deployment Toolkit server.
- Copy the contents of the Bin folder to
%ProgramFiles%\Microsoft Deployment Toolkit\Bin. - Copy the
osot.xmlfile in the Templates folder to the Templates directory within your Deployment share. - Copy the Omnissa and Other Tools folders, and their contents, to the root of your Deployment Share.
Install Windows OS Optimization Tool for Horizon files
The Windows OS Optimization Tool for Horizon files need to be copied into the Microsoft Deployment Toolkit Deployment share.
- Extract the contents of the
OmnissaHorizonOSOptimizationTool_xxxx_yyyyyy.zip file. - Copy the contents to the
Omnissa\OSOTfolder in your Deployment Share. - Check that the executable is not restricted by Windows security.
- Right-click on the
OmnissaHorizonOSOptimizationTool.exefile and select Properties. - If the General tab displays an Unblock box, tick it and select OK.
- Right-click on the
Install Horizon Agent and hypervisor tools files
The Windows OS Optimization Tool for Horizon MDT plugin can automate the installation of the Horizon Agent, the Dynamic Environment Manager FlexEngine, the App Volumes Agent, and the hypervisor tools as part of an MDT task sequence.
This requires the following files to be copied into the indicated locations within your Deployment Share:
Omnissa Agents and hypervisor tools for the MDT plugin
| Component | Files Required | Destination (in Deployment Share) |
|---|---|---|
| Horizon Agent | Omnissa-Horizon-Agent-x86_64-xxxx-yyyyyy.exe | \Omnissa\HorizonAgent |
| Dynamic Environment Manager FlexEngine | Omnissa Dynamic Environment Manager Enterprise xxxx x64.msi | \Omnissa\DEM |
| App Volumes Agent | App Volumes Agent.msi | \Omnissa\AppVolumesAgent |
| VMware Tools (for the vSphere VMware Tools) | VMware-tools-xx.x.x-yyyyyyyy-x86_64.exe | \Other Tools |
- Check that any executable copied is not restricted by Windows security.
- Right-click on the exe file and select Properties.
- If the General tab displays an Unblock box, tick it and select OK.
Install other tools
The Windows OS Optimization for Horizon tool's finalize task has two steps that use external tools: Zero empty disk space and Create Local Group Policy. To allow the MDT plugin to be able to execute these steps during a finalize task, the two executables need to be copied to the Deployment share.
- Download SDelete and the Microsoft Security Compliance Toolkit using the links provided in this guide's page Finalize Image.
- Extract the content of the downloaded zip files.
- Copy SDelete64.exe and LGPO.exe files to the
Omnissa\OSOTfolder in your Deployment Share. - Check that the executables are not restricted by Windows security.
- Right-click on the SDelete64.exe file and select Properties.
- If the General tab displays an Unblock box, tick it and select OK.
- Repeat steps a and b for the LGPO.exe file to ensure it is not blocked.
Using the MDT plugin
The MDT plugin allows you to add Omnissa specific steps to a task sequence in Microsoft Deployment Toolkit. These can either be added to an existing task sequence or added to a new task sequence when created, using the provided templates.
The custom steps include:
- Omnissa Horizon
- Horizon Agent
- Dynamic Environment Manager
- App Volumes Agent
- Windows OS Optimization Tool for Horizon
- Optimize
- Generalize
- Finalize
Adding to an existing task sequence
You can add the custom steps to an existing Microsoft Deployment Toolkit task sequence.
In the Microsoft Deployment Toolkit Workbench:
- Navigate to Task Sequences.
- Select the task sequence you want to add the tasks to, right-click, and select Properties.
- Select the Task Sequence tab.
- Select an existing task in the sequence (the new task will be created after this).
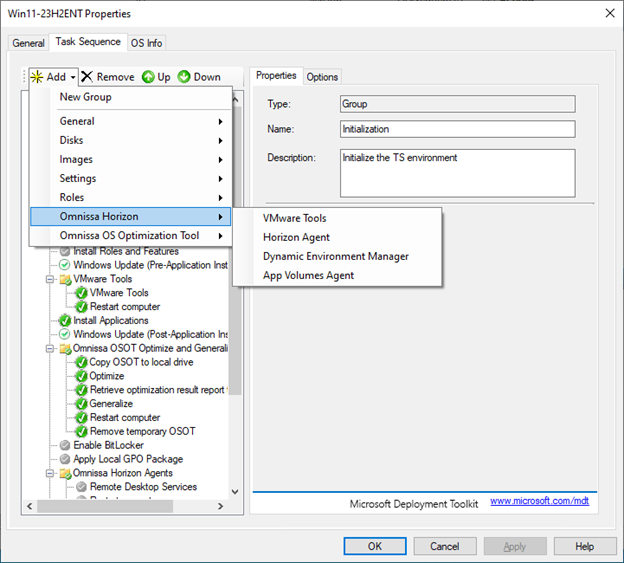
- Click the Add button at the top of the task sequence and select the desired step from the menu.
- If you are selecting a Tools or Horizon Agent task for the first time, you will see the executable getting extracted to an MSI before the task properties are displayed.
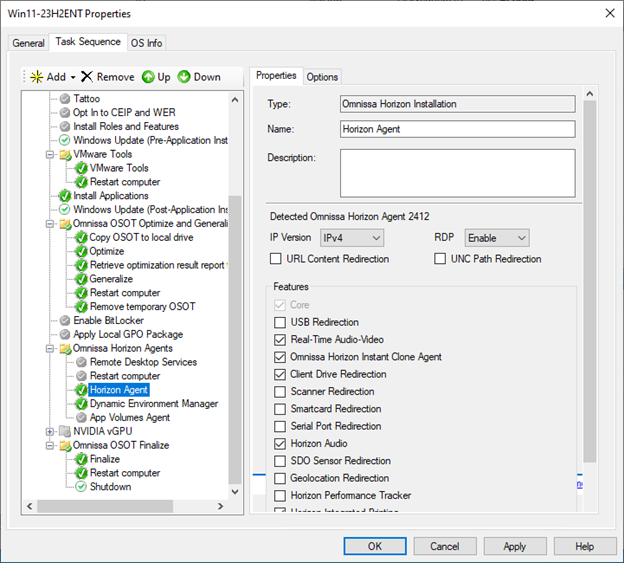
- Edit the step options and selections as desired. For example, change which Horizon Agent features are installed.
Creating a new task sequence
To simplify the creation of Microsoft Deployment Toolkit task sequences for use with Horizon and the Windows OS Optimization Tool for Horizon, a task sequence template has been provided. This template includes the custom tasks.
To create a new task sequence, in the Microsoft Deployment Toolkit Workbench:
- Browse to and right-click on Task Sequences and select New Task Sequence.
- Provide a Task sequence ID and a Task sequence name, and then click Next.
- From the list of task sequence templates select the Omnissa OSOT Task Sequence, and then click Next.
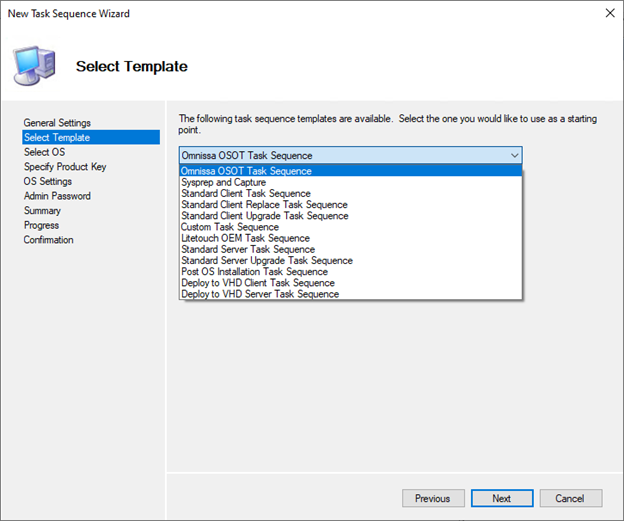
- Select an operating system version and edition, and then click Next.
- Click Next to leave product key as the default.
- Provide the Full Name and Organization, and then click Next.
- Select Do not specify an Administrator password at this time, and then click Next.
- Click Next, and then click Finish.
- Right-click the task sequence, select Properties, and change to the Task Sequence tab.
- Locate and select the following tasks:
- VMware Tools, Horizon Agent, Dynamic Environment Manager, Optimize, Generalize, App Volumes Agent, Finalize.
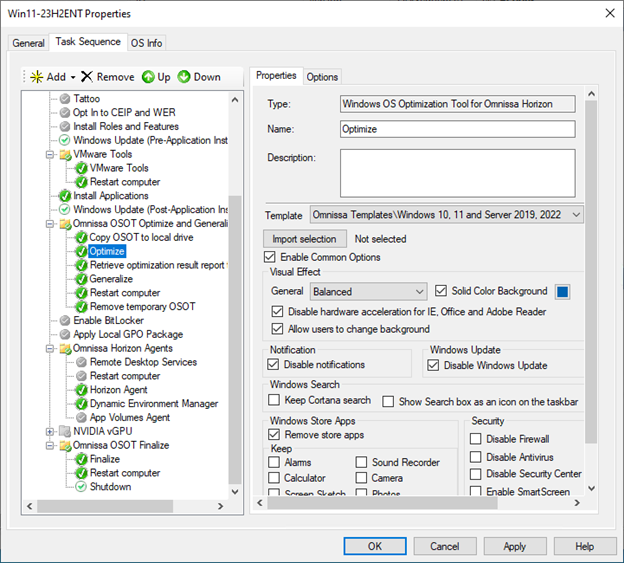
- Change the task options and selections as desired.
- If you are selecting Tools or Horizon Agent for the first time, you will see the executable getting extracted to an MSI before the task properties are displayed.
- Note that a task sequence created by a template has the App Volumes Agent task disabled by default. To enable this task, view its Properties, change the App Volumes Manager Address and then enable it using the tick box on the Options tab.
- If creating a Windows Server image to create an RDSH Farm, enable the two steps: Remote Desktop Services and Restart computer. Currently RDSH builds cannot be fully automated with the MDT plugin for the Windows OS Optimization Tool for Horizon. When the task sequence reaches the Restart computer step, you will have to manually logon as Administrator to allow the sequence to continue.
Modify the default unattend.xml for the task sequence. Follow the steps outlined in Create and Edit MDT Task Sequences in the Tech Zone guide Using Automation to Create Optimized Windows Images for Horizon VMs.
Using the SCCM Plugin with SCCM
You can use the Omnissa MDT Plugin with Microsoft System Center Configuration Manager (SCCD) to deploy a Windows base image using the providede OSOT task sequence. The following prodecure describes how to import the task sequence, link required packages, and deploy it through SCCM.
-
Prepare a Shared Folder for SCCM Imports
- Create a shared folder that will be used to import the task sequence and link all required packages in SCCM.
- Ensure that the SCCM service account has read/write access to this shared location.
Example:\\Server\Shared\TaskSequenceTemplates\
- Create a shared folder that will be used to import the task sequence and link all required packages in SCCM.
-
Extract the Provided SCCM Plugin Package
- The plugin package is provided as a
.zipfile that contains the task sequence and package data. - Unzip the package into the shared folder.
File contents:Omnissa_OSOT_Task_Sequence.zip– Task sequence fileOmnissa_OSOT_Task_Sequence_files– Folder containing required dependencies and configurations
- The plugin package is provided as a
-
Add Required Executables to Packages
If specific executables are required for deployment, place them in the appropriate package subfolder under<template_name>_files.
Example:\\Server\Shared\TaskSequenceTemplates\Omnissa_OSOT_Task_Sequence\Omnissa_OSOT_Task_Sequence_files\Package_Name
SCCM automatically associates these packages with the task sequence during import. There are six packages available underOmnissa_OSOT_Task_Sequence.
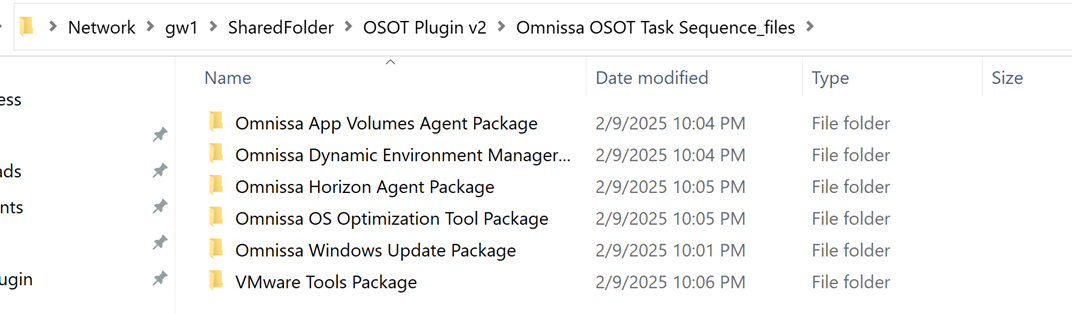
If certain executables are not available, you can disable the corresponding step in the task sequence.
Note: If you are importing the task sequence using the provided PowerShell script, skip following step (Import the Task Sequence into SCCM) and continue with Step 5, Update Packages, Edit the Task Sequence, and Add the OS Image.
- Import the Task Sequence into SCCM
- In the SCCM Console, go to Software Library > Operating Systems > Task Sequences.
- Right-click Task Sequences and select Import.
- Browse to the following file:
\\Server\Shared\TaskSequenceTemplates\Omnissa_OSOT_Task_Sequence\Omnissa_OSOT_Task_Sequence.zip
- Validate the selected import file.
If you have some packages already available, you will be given the option to Ignore Duplicate or Override. In the case of Boot image and OS image, select Ignore Duplicate. For Omnissa OS Installation Task Sequence, select Ignore Dependency.
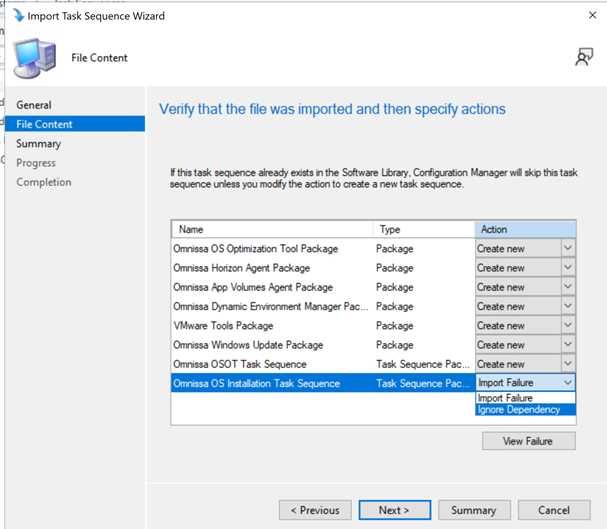
- Click Next and complete the import wizard.
All packages inside Omnissa_OSOT_Task_Sequence_files are automatically linked to the task sequence, and SCCM uses this shared folder as the package data source.
Any changes made in this shared folder will directly affect deployments.
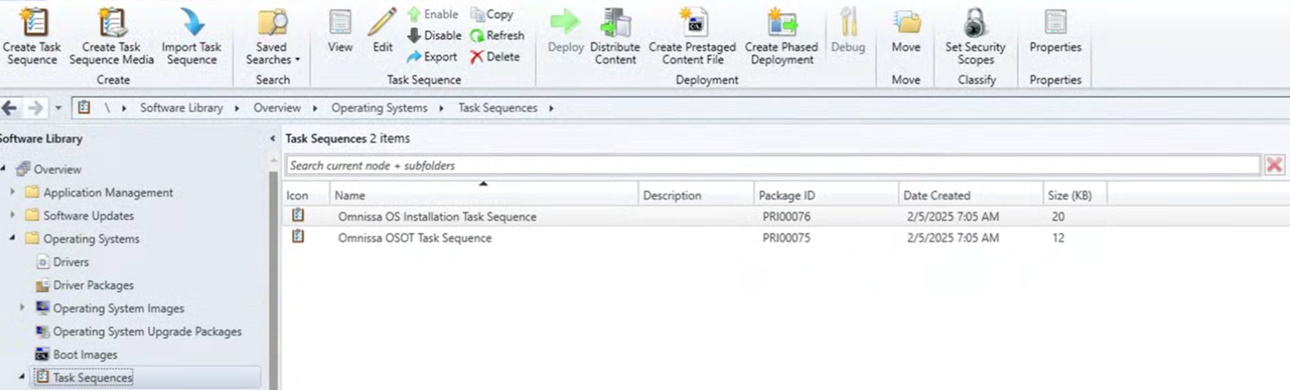
5. Update Packages, Edit the Task Sequence, and Add the OS Image
You must add your Windows OS image and the Windows Configuration Manager Client package to the imported task sequence.
- In the SCCM Console, navigate to Task Sequences, right-click
Omnissa_OSOT_Task_Sequence, and select Edit. - Enable and configure the Apply Operating System step to select your Windows OS image.
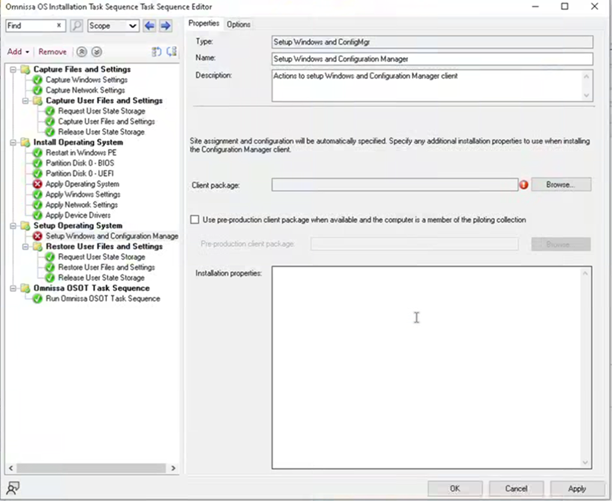
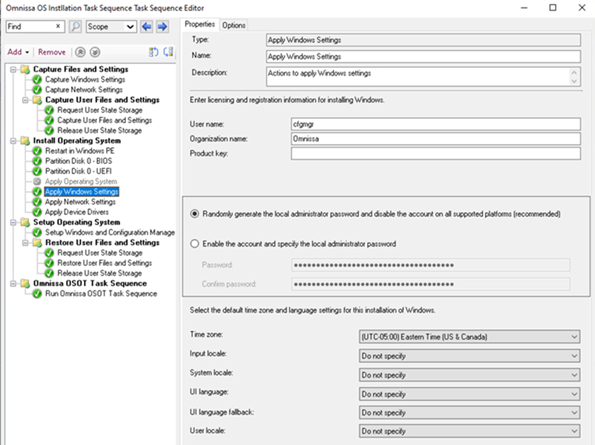
- In the Apply Windows Settings step, enable Use this account and specify the local administrator credentials.
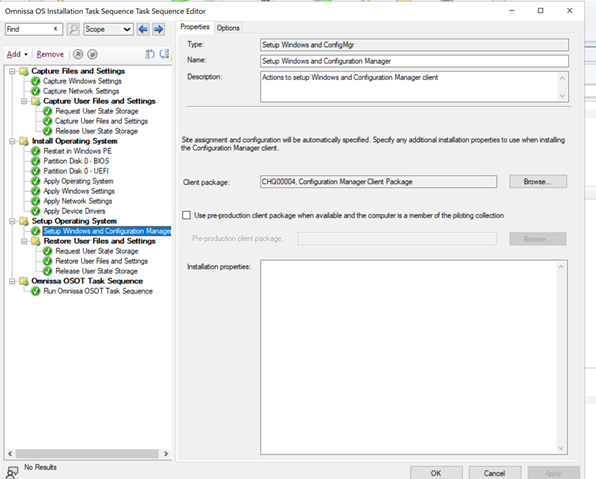
- Add the Windows and Configuration Manager Client package by clicking on Windows And Configuration Manager and browse to the associated package.
This package is typically available in SCCM by default.
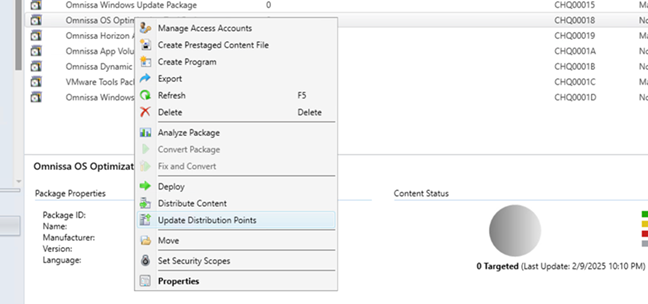
To ensure updated content is distributed, go to Software Library > Application Management > Packages, right-click each modified package, and select Update Distribution Point.
-
Add a Boot Image to the Task Sequence
- In the SCCM Console, right-click
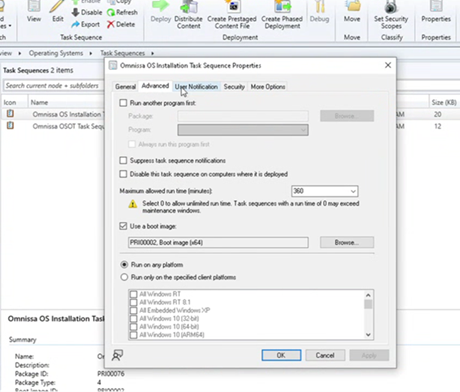
Omnissa_OSOT_Task_Sequenceand select Properties. - On the Advanced tab, select an available Boot Image from the SCCM server. This ensures that SCCM uses the correct boot environment during deployment.
- In the SCCM Console, right-click
- Distribute Content to the Distribution Point
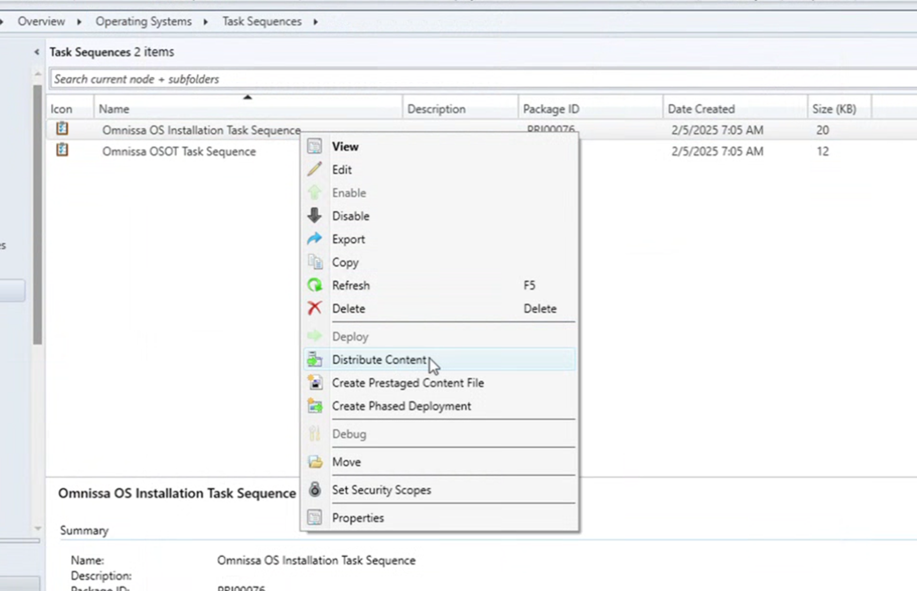
- Right-click the task sequence and select Distribute Content.
- Select the appropriate Distribution Point.
To verify distribution, go to Monitoring > Distribution Status > Content Status and confirm all packages are successfully distributed.
-
Deploy the Task Sequence
- After the content is distributed, right-click the task sequence and select Deploy.
- Choose the target collection (for example, Unknown Computers, All Workstations, or Windows 11 Devices).
- Configure deployment settings according to your organization’s policy.
Once deployment is complete, the task sequence is ready for execution on target devices.
Importing the Task Sequence Using the PowerShell Script (Optional)
The Omnissa SCCM Plugin also provides an automated import option using a PowerShell script. Use this method only if you prefer scripted imports instead of the standard SCCM Console workflow.
- Prepare a Shared Folder for SCCM Imports
Create or identify a shared folder that will store the task sequence.zipfile and its associated files. Example:\\Server\Shared\TaskSequenceTemplates\
Ensure the SCCM service account has read access to this folder.
- Extract the Provided SCCM Plugin Package
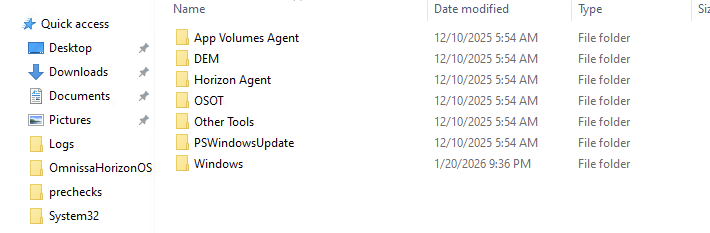
The plugin is provided as a.zipfile containing the task sequence and its package folder.
Contents:
-
OmnissaHorizonOSOptimizationCMTaskSequence.zip— Task sequence file -
OmnissaHorizonOSOptimizationCMTaskSequence_files— Required packages, dependencies, and configuration filesExtract these items into the shared folder.
Example:\\Server\Shared\TaskSequenceTemplates\OmnissaHorizonOSOptimizationCMTaskSequence\

- Add Required Executables to Package Folders
If your deployment requires additional executables, place them in the appropriate package subfolder: Example:
\\Server\Shared\TaskSequenceTemplates\OmnissaHorizonOSOptimizationCMTaskSequence_files\Package_Name
These files will be automatically associated with the task sequence during the script‑based import.
- Run the PowerShell Import Script
- Open PowerShell as Administrator
- Run the script:
Import-TaskSequence.ps1 -PackagePath "\\Server\Shared\TaskSequenceTemplates\OmnissaHorizonOSOptimizationCMTaskSequence\OmnissaHorizonOSOptimizationCMTaskSequence.zip" - If prompted, provide the network path to the task sequence
.zipfile.
This script automatically imports the task sequence and associates the package folder.
- Verify the Import in the Configuration Manager Console
- After the script completes, open the SCCM console and navigate to:
Software Library > Operating Systems > Task Sequences - Confirm that the task sequence and all associated packages appear as expected.

Using an Unattend XML File for Sysprep with SCCM (Optional)
You can optionally use a custom unattend.xml file during sysprep to configure language, locale, time zone, user accounts, and other Windows setup parameters. This method replaces the default Apply Windows Settings step in the task sequence.
Follow these steps to use an unattend.xml file with the OSOT‑based SCCM task sequence:
- Disable the “Apply Windows Settings” Step
In the SCCM task sequence editor, locate the Apply Windows Settings step and disable it. This prevents SCCM from injecting its own Windows configuration values. - Add the
unattend.xmlFile to the OSOT Package Source
Place theunattend.xmlfile inside the OSOT package directory that was imported into SCCM. You may use the providedunattend.xmlor replace it with your own.
Example:
<OSOT package folder>\unattend.xml
After modifying the package contents, update distribution points for the OSOT package. - Link the Unattend XML in the “Apply Operating System” Step
In the task sequence, open the Apply Operating System step and specify the path to the unattend.xml file from the OSOT package. SCCM will use this file during sysprep. - Deploy the Task Sequence
When deployed, the task sequence applies the OS image and runs sysprep using the providedunattend.xmlfile.
Additional references
See the Omnissa Tech Zone's guide Using Automation to Create Optimized Windows Images for Horizon VMs.
Familiarize yourself with the process by read its Overview section. Then when your MDT server is already configured, start with that guide's MDT Task Sequences and continue through the guide's sections.
Was this page helpful?