On-premises customers must install and configure the Workspace ONE Assist server (s).
There are two types of installations of Workspace ONE Assist.
- Standard (Basic), for all-in-one single server installations.
- Advanced (Custom), for medium installations with a separate Connection Proctor server and a separate CAP server, or multiple server installations where the Connection Proctor, Core, Application, and Portal services reside on separate servers. See On-Premises Hardware Scaling Requirements.
Before running the installer on the server(s), you must first Generate the Workspace ONE Assist T10 API Certificate.
Generate the Workspace ONE Assist T10 API Certificate
You must generate the T10 API root and intermediate certificates used during an on-premises installation, whether performing a Standard (Basic) or an Advanced (Custom) installation. These certificates are also required for an on-premises build of Workspace ONE UEM while using Workspace ONE Assist in a SaaS environment.
Download the installer package from Customer Connect.
The certificate generator is called RemoteManagementCertificateGenerator 22.03. This installer must be run on a machine with the same locale settings as the database server to ensure that the same date format is set in the SQL script. You must run this certificate generator as an administrator.
Note: To use RemoteManagementCertificateGenerator 22.03, your Workspace ONE UEM must be of version 9.3 or later.
- Extract all contents from the installer package ZIP file into c:\temp of the Workspace ONE Assist server. Do not move the files around inside the temp folder as the installer needs all the files in their extracted locations. Do not rename or move the temp folder.
- Run the Remote Management Certificate Generator included in the installer package.
- In the UEM console, switch to your primary organization group (OG). The OG you select must be of a 'customer' type.
- Navigate to Groups & Settings > All Settings > System > Advanced > Site URLs, scroll down to the Workspace ONE Assist section, and copy the string in the Remote Management CN text box. You cannot see a Remote Management CN option unless you are in a 'customer' type organization group (OG).
If the Remote Management CN text box is blank, then you must manually Create the Common Name from the Workspace ONE UEM Database.
-
Set the following values.
Setting Value Certificate Type Remote Management Deployment On-premises The deployment type must be on-premises when using an on-premises build of Workspace ONE UEM with Workspace ONE Assist in a SaaS environment. Certificate Common Name Paste the Remote Management CN copied from the preceding step (Step 4). Ensure the string you paste has 'CN'. -
Select Generate Certificates.
-
Set the Password for the certificates when prompted. Store this password for future use.
-
Navigate to the folder holding the Remote Management Certificate Generator.
-
Find the generated certificates file in the Artifacts\private folder called root_intermediate_chain.p7b. This is the T10 Certificate pair file that contains two major certificates that help Workspace ONE UEM communicate with the T10 portal. These certificates are the Workspace ONE UEM portal Root and Intermediate certificates.
-
Perform the action based on your environment.
- For On-Premises Environments – Copy the p7b file generated in step 9 to the c:\temp\certs folder on the Workspace ONE Assist Server and proceed to step 11.
- For SaaS Environments – Zip up the p7b file and email it to your account team or professional services team member. They will create a ticket for the Assist team with the certificate you provided.
-
In the Artifacts folder, find the "Certificate Seed Script.sql". Run this script against the Workspace ONE UEM Database to seed the generated certificates into the Workspace ONE UEM database.
If you receive the error message "The conversion of a varchar data type to a datetime data type resulted in an out-of-range value," then see Troubleshooting Workspace ONE Assist. Support for multiple Workspace ONE UEM environments is available. For details, see Configure Multi-Workspace ONE UEM Environment Support.
Install Site SSL Certificate, Assist On-Premises Only
You must incorporate a secure sockets layer (SSL) certificate into the Workspace ONE Assist on-premises installation process, whether you are performing a Standard (Basic) or Advanced (Custom) installation.
SSL certificates provide secure, encrypted communications between a website and an Internet browser. The SSL certificate secures HTTPS binding for the management website for port 443 and allows a secure connection. This secure connection is between the admin and Web services. Also, the SSL certificate secures the connection to the Connection Proctor on port 8443 (or port 443 when the Connection Proctor (CP) Service runs on a separate server). You must provide the SSL certificate as a wildcard or SAN certificate.
If you are installing Workspace ONE Assist for the first time or upgrading to a newer version, you do not need to bind the SSL certificate to a website or renew the site thumbprint. However, if you are renewing an expired SSL certificate in between Workspace ONE Assist releases, you must bind the SSL certificate to a website and update the renewed site's Thumbprint using AdminWebPortal. A link to each of those tasks appears directly after the following steps.
This process applies only to the SSL certificate. This process does not apply to the T10 API root and intermediate certificates.
-
Run the Microsoft Management Console (MMC).
Locate this application by typing 'mmc' into the search box found in the Start button.
-
In the File menu of the MMC application, select Add/Remove Snap-in.... The Add or Remove Snap-ins dialog box displays.
-
Under Available snap-ins on the left panel, select Certificates and then select the Addbutton in the middle. The Certificates snap-in dialog box displays.
-
Select Computer Account and then select the Next button.
-
Select Local Computer and then select the Finish button.
Now the Add or Remove Snap-ins screen displays Certificates (Local Computer) under the Console Root on the right panel.
-
Select OK to finish. The main MMC window displays.
-
Expand the Certificates (Local Computer) on the left panel by selecting the Greater Than symbol. Select Personal > Certificates.
- If you do not have a Certificates folder to select, select the Personal folder and a Certificates folder will be created automatically.
-
In the Action menu of the MMC application, select All Tasks followed by Import.... The Certificate Import Wizard displays.
-
Select Next to begin the Wizard.
-
Select Browse... to locate the SSL certificate in the PFX file format. You should familiarize yourself with the name of this file since you must identify it by name in the future. Once located, select Open to import it.
-
Enter the certificate's Password when prompted. Select only the box labeled Include all extended properties.
-
Select Next.
-
Select Place all certificates in the following store and set the Certificate store to 'Personal'.
-
Select Next.
-
Confirm that all the presented information is correct and then select Finish.
A new SSL certificate is installed.
If you are installing the Workspace ONE Assist, then you must decide whether you are running a Standard (Basic) Installation of Workspace ONE Assist or an Advanced (Custom) Installation of Workspace ONE Assist.
- Standard (Basic), for all-in-one single server installations.
- Advanced (Custom), for installations with advanced options such as multiple servers to accommodate high availability and horizontal scaling. If you are not installing Workspace ONE Assist but rather updating an expired SSL certificate, then you must Bind the SSL Certificate to a Management Site followed by Update the Renewed Site Thumbprint Using AdminWebPortal.
Bind the SSL Certificate to a Management Site
If you are renewing an expired SSL certificate in between Workspace ONE Assist releases, you must bind the renewed SSL certificate to the website and update the renewed site Thumbprint using AdminWebPortal. This task binds the SSL certificate.
You do not need to manually bind the SSL certificate each time you install it. During the normal course of installing or upgrading the Workspace ONE Assist server, you must also install the SSL certificate. But the Workspace ONE Assist installation or upgrade process takes care of binding the SSL certificate to the website for you. You only need to follow these steps to bind the SSL certificate if you are manually renewing an expired SSL certificate in between Workspace ONE Assist installations or upgrades.
**** To renew an expired SSL certificate automatically using the tool, see <a href = https://docs.omnissa.com/bundle/Workspace-ONE-AssistV24.03/page/InstallWorkspaceONEAssisttoanOn-PremisesEnvironment.html#install_and_configure_site_ssl_certificate_with_assist_ssl_cert_update_utility>Install and Configure Site SSL certificate with Assist SSL Cert Update Utility
If you are installing or upgrading the Workspace ONE Assist server, do not take these steps.
-
Open the Internet Information Services (IIS) on the Workspace ONE Assist server.
-
In the Connection pane on the left, expand the node of the server by selecting the triangle in front of the server name.
-
Expand the node of the Sites folder.
-
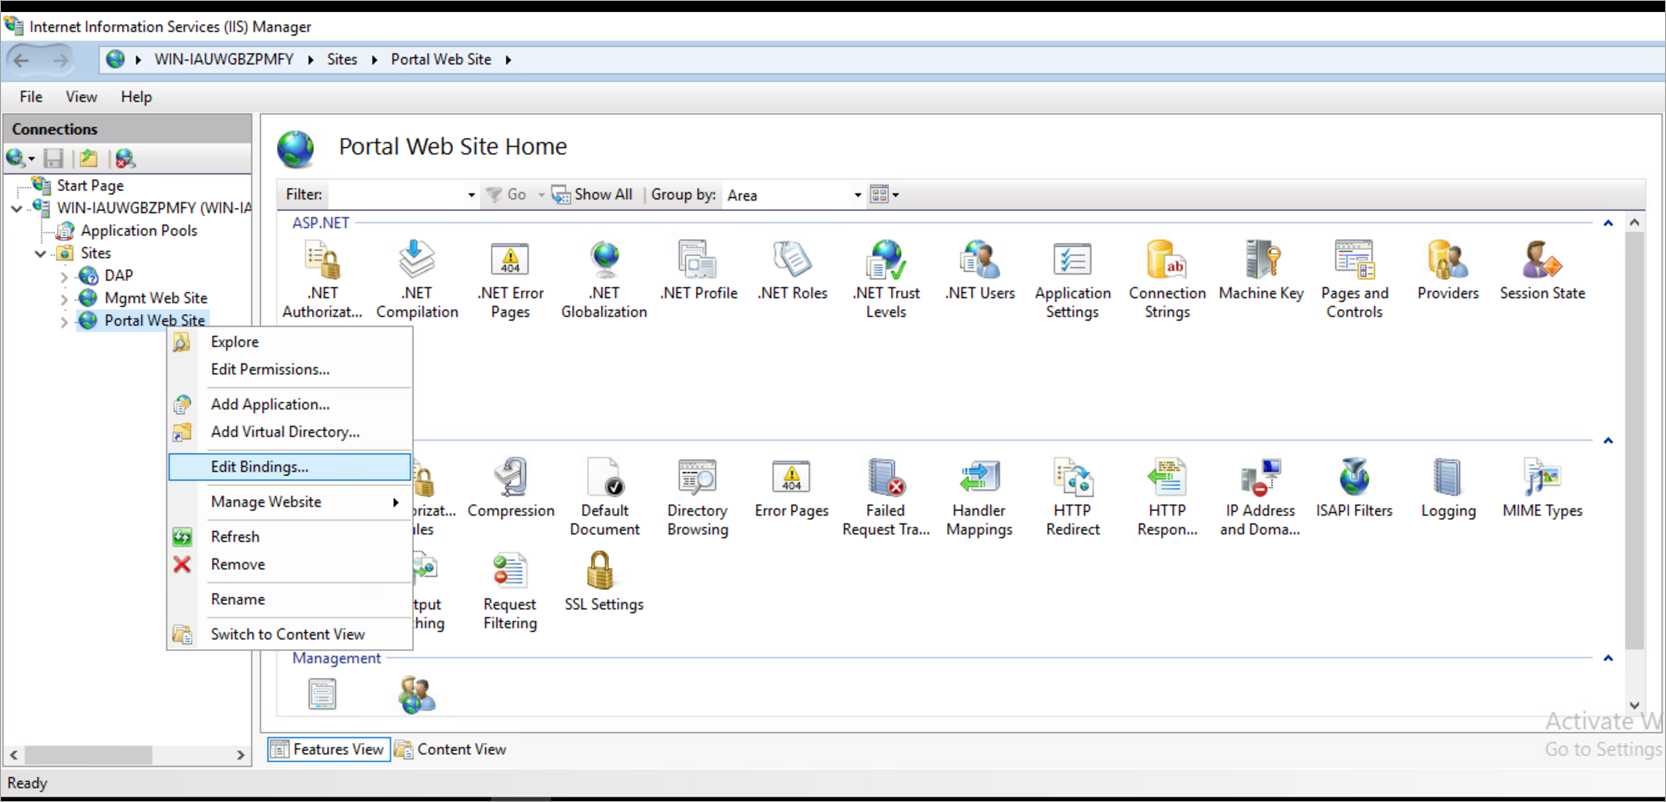
Right-click Portal Web Site and select Edit Bindings.... The Site Bindings screen displays.
-
Select https and then select the Editbutton. The Edit Site Binding screen displays.
-
Select the updated SSL certificate in the drop-down menu and then select OK.
The new SSL certificate is now bound to the website.
Update the Renewed Site Thumbprint Using AdminWebPortal
If you are renewing an expired SSL certificate in between Workspace ONE Assist releases, you must update the renewed site Thumbprint. This task updates the Thumbprint with AdminWebPortal. For information on enabling the Admin Web Portal, see Enable Admin Web Portal Access.
During the normal course of installing or upgrading the Workspace ONE Assist server, you must also update the site thumbprint. However, the Workspace ONE Assist installation or upgrade process takes care of updating the site thumbprint. , You only need to follow these steps to update the site thumbprint with AdminWebPortal if you are manually renewing an expired SSL certificate in between Workspace ONE Assist installations or upgrades and have already bound it to the website.
**** To renew an expired SSL certificate automatically using the tool, see Install and Configure Site SSL certificate with Assist SSL Cert Update Utility.
If you are installing or upgrading the Workspace ONE Assist server, do not take these steps.
-
Start the Microsoft Management Console (MMC) from the Workspace ONE Assist server.
-
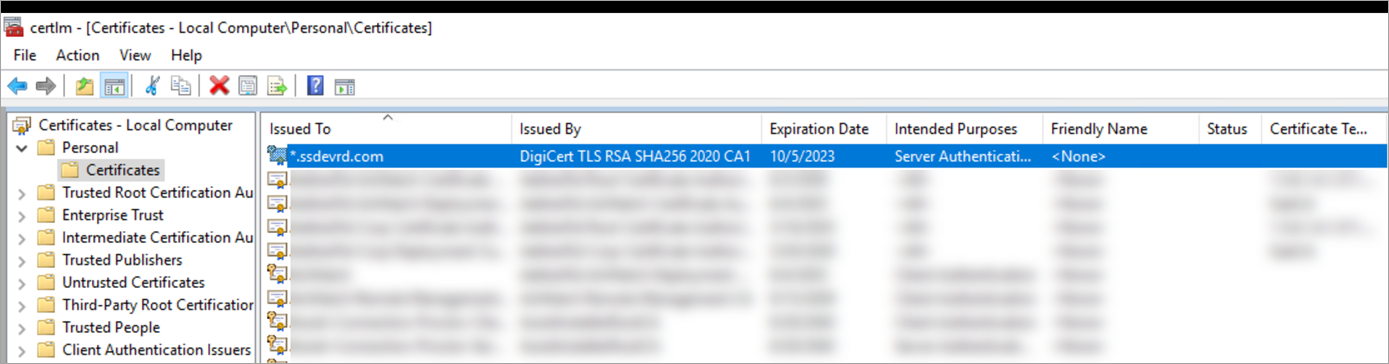
In the left-side panel, navigate to Console Root > Certificates (Local Computer) > Personal > Certificates and locate, by name, the SSL certificate you installed or updated recently.
-
To provide read access for the Network Service account, right-click the SSL certificate and select All tasks > Manage Private Keys. From the Security tab, select Network Service and then select the Allow check box for the Read network service.
-
Double-click the SSL certificate. The Certificate screen displays.
-
Select Details tab at the top.
-
In the Show drop-down menu, select Properties Only.
-
Click once on the text box Thumbprint. A series of number and letter pairs appear in the panel beneath the Show panel.
-
Select all these pairs of characters and copy them to the clipboard. Close the MMC console.
-
Open Notepad from the server desktop.
-
Paste the clipboard contents into the empty notepad screen.
**** The new thumbprint when you copy from the certificate is in lowercase. Ensure you change it to uppercase before pasting it in the AdminWebPortal. If unchanged, it can cause errors.
-
In Notepad, enter the keyboard shortcut Ctrl-H. The Replace screen displays.
-
Enter a single space in the Find what text box.
-
Click the Replace All button and then close the Replace screen by clicking the X.
All the spaces in between the number/letter pairs have been removed. Using Notepad also takes the ANSI text copied from the MMC console and converts it to ASCII text, which is the format we want when we go to paste that thumbprint in the AdminWebPortal.
-
In Notepad, select the newly formatted thumbprint and copy it to the clipboard with Ctrl-C. Close Notepad.
-
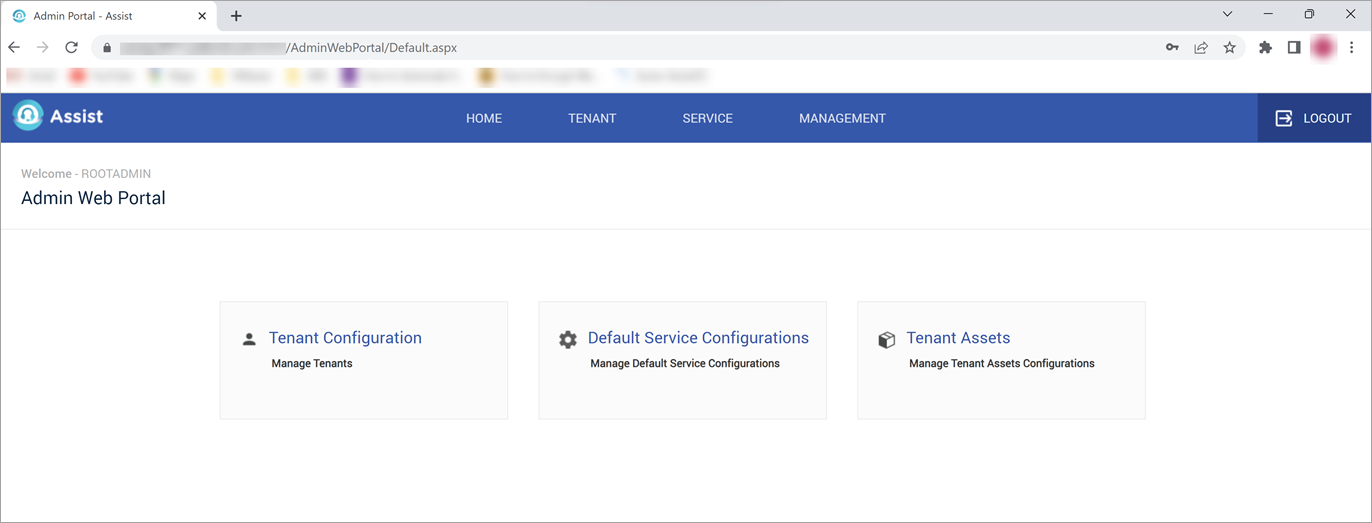
Open your browser and log in to the AdminWebPortal using your credentials.
For example, https://yourdomain.com/AdminWebPortal/login.aspx
-
Select the Default Service Configurations.
-
In the Search bar, enter
certid.To display the search results properly, you might need to scroll down to the page size modifier and maximize the number of pages it can display. Doing this sets a large enough playing field to display any search result.
-
Identify the certid in the Parameter Name column.
:ctl.svc.cnp.tch/certid. In the Options column of the same line, select the Edit icon ( ).
).Upon clicking the Edit icon, you might need to search for certid once again. Locate the certid Parameter Name and notice that the Parameter Value is now editable.
-
Select the existing string of characters in the Parameter Value for
:ctl.svc.cnp.tch/certidand replace it with the new Thumbprint string you have stored in your clipboard by applying the Ctrl-V keyboard shortcut.**** Before you paste the new thumbprint, ensure you change the thumbprint from lowercase to uppercase; if unchanged, it can cause errors.
-
Select the Save icon (
 ) .
) . -
Select Service Configuration.
-
Search for
ConnectionProctorServiceand review its Status column. -
For both Active status and Inactive status for
ConnectionProctorService, select the Edit icon () and update the :ctl.svc.cnp.tch/certidParameter Value with the new Thumbprint string (Ctrl-V). -
Select the Save icon (
) for each, as applicable. -
Select the Update button at the bottom of the page.
-
Restart all services (Core and IIS services). Select the Start menu and enter
runon your keyboard. In the Open text box, enterservices.mscThe Services application displays. -
Locate all services that are labeled Aetherpal.
-
Stop all these Aetherpal services.
-
Start all Aetherpal services.
The site Thumbprint has been updated.
Active Directory Integrations
Assist Installer has been enhanced to support Active Directory based accounts to be associated with Database Users, IIS and Core Service users, that are required for internal service communication and validation. Earlier, this required that default or custom local users be created and associated during the initial installation.
Prerequisites
-
All the Assist servers must be members of the same domain.
-
Create the following users on Active Directory without the User must change password at next logon option.
Component Users Database Apadminuser - This user, for example, is used for creating Workspace ONE Assist databases and administration purposes, specifically to manage only Workspace ONE Assist databases. The user name can be changed.Apdbuser - This user, for example, is used for Workspace ONE Assist applications, which internally access the Workspace ONE Assist databases with this user. The user name can be changed. Core server Core service logon user - A custom logon user is used to interact with Workspace ONE Assist databases from core Windows services internally (specifically the Workspace ONE Assist Service coordinator and DataTierProxy services).
IIS Application pool user - A custom IIS Application pool identity user is used to interact with Workspace ONE Assist databases internally from core webservices (specifically DAP & SystemAdminService). This user is a member of IIS_IUSRS group.
Secured SSL service user- A, SSL service user is used for securing inter-process communication among Workspace ONE Assist applications/services.Portal server UEM provisioning user - An UEM provisioning user is used for the T10 service. Note: The four users, Apadminuser, Apdbuser, Core service logon user, and the IIS Application pool user are created as Database logins and are used to access Workspace ONE Assist databases from core Windows services and the IIS web services.
-
Custom logon user account must be granted the 'Logon as a service' security policy user right on the local system to run the service. If not granted, the service does not start.
-
A custom logon user account must not be added to the 'Deny logon as a service' security policy on the local system, and the service does not start if it is configured in the policy.
-
The domain user support is configured during the first time installation, and this option must not be changed to non-domain or domain vice versa once installed.
Note:
- Assist does not support any third-party Active Directory services.
- Assist installer does not perform any create or update operations on the Active Directory server.
- Use the
CMD net user <username> /domainto check the password expiry of the user. For example, net user assistcoreuser /domain.
Single Server (Standard/Basic) Installation of Workspace ONE Assist
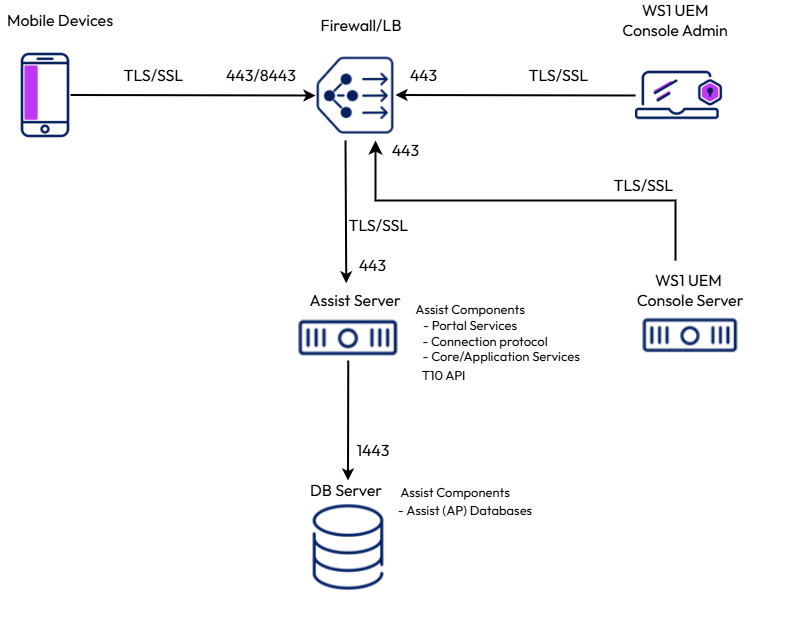
The Standard (Basic) method for installing Workspace ONE Assist in an on-premises environment involves the use of all-in-one single servers.
Prerequisites:
-
Generate a T10 certificate for UEM provisioning: Run the RemoteManagementCertificateGenerator utility, generate a T10 certificate, and run the certificate seeding script on the Workspace ONE UEM database. For details, see Generate the Workspace ONE Assist T10 API Certificate
-
Install SSL certificate: Procure and install an SSL/TLS certificate that matches with the FQDN assigned to the Assist system. For Single-Server Deployment and Multiple Server Deployment, see On-Prem Config: Fully Qualified Domain Name and Site SSL/TLS Certificate, Single-Server On-Prem Deployment and On-Prem Config: Fully Qualified Domain Name and Site SSL/TLS Certificate, Multiple Server On-Prem Deployment.
-
Disable Antivirus and Monitoring: Temporarily turn off antivirus and monitoring software during installation.
-
Disable IPv6: Turn off IPv6 on the server's network adapter.
-
Enable TLS 1.2: Make sure your system supports TLS 1.2 for secure communication and enable respective cipher suites.
-
System User Configuration: Ensure the system allows creating of local users, as the installer will create specific users for internal services.
-
Allow Required Ports: If you have a LoadBalancer/Firewall, permit necessary ports for communication.
-
Check Firewall Settings: Disable the firewall or ensure it allows necessary connections. For Single-Server Deployment, see On-Prem Config: Firewall Rules, Single-Server On-Prem Deployment and for Multiple Server Deployment, see On-Prem Config: Firewall Rules, Multiple Server On-Prem Deployment.
-
Configure DNS: Set up DNS if you are using forward lookup zones for service discovery. For more information, see Domain Name Service.
-
SSL Passthrough (If LoadBalancer Used): Configure SSL passthrough if LoadBalancer is used to forward SSL traffic to servers.
- Source IP Address Persistence: Set up TCP-based layer 4 'Source IP Address Persistence' for external ports.
- Session Persistence: Configure session persistence so that the same server handles the entire session. For information, see On-Prem Config: Persistence for Multiple Server On-Prem Deployment.
-
Remove HSTS Header configuration: The installer will handle the configuration of the HSTS header on the IIS. Manual configuration is not required.
-
Net.Tcp Listener Adapter: Ensure the 'Net.Tcp Listener Adapter' service is running.
-
SQL Server Collation: Use 'SQL_Latin1_General_CP1_CI_AS' collation for SQL server setup.
-
Update .NET Framework: Install .NET Framework 4.8 on the server where Assist is getting installed.
-
Minimize Latency: Ensure there is no network delay between Workspace ONE UEM and Workspace ONE Assist.
-
Screen resolution: Keep the system screen resolution at 1200 * 720 for the optimal visibility of the installation user interface.
Perform the following steps to install Workspace ONE Assist.
-
Download, extract, and save the Workspace ONE Assist installer into a temporary directory on the Workspace ONE Assist server. You can download the installer from the repository at https://my.workspaceone.com.
-
Right-click the installer file and select Run as administrator.
-
On the Welcome screen, select Next.
-
Select the installation directory for Assist and click Install.
-
Select Standard Installation (Basic) and then configure the listed settings for Secured Internal Service Communication.
- Enter a secured password to protect the certificate that is generated for the Assist internal services.
- Select the RSA key size for the self-signed certificate generated by Assist. By default, the key size is 2048.
- Enter the internal service port (For example, non-HTTP ports like 8446, 8083, and so on.). Click Next.
-
Select Connect to Existing SQL Server and enter the required parameters.
Setting Description SQL Server/Listener Name Define the SQL Server instance running on the server either as an IP address or a connection string (or listener name when High Availability configured for the Database). Authentication Select either Windows authentication to authenticate to SQL Server as a current Windows user OR select SQL Server Authentication to select an SQL server account, such as SA. User name If SQL Server Authentication was used, type in the user name that is used to authenticate against the SQL server. Password Type in the password for the user name selected. -
Select the …More button and enter the credentials of Assist DB system accounts. These DB accounts are created when Assist is installed and is used by Assist to authenticate against the database server.
Setting Description Replace the hyphen in the Tenant Identifier to underscore By default, this check box is not selected. During the installation, the tenant databases are created with the combination of database name_TenantIdentifier (For example, apops_xxxx-xxxx-xxxx-xxxx). The Identifier consists of a random number separated by a hyphen. If this option is selected, it creates the identifier with an underscore instead of a hyphen (For example, apops_.xxxx_xxxx_xxxx_xxxx). After the installation, this option cannot be edited for any upgrades further. Use Windows Authentication User Activates the use of Windows user accounts to access and authenticate with a database system. To use this option, see Active Directory Integrations. By default, this option is not selected. The installer creates and uses the SQL authenticated users for database and internal services access. This option cannot be edited for any further upgrades, once the first time installation is completed. Enforce password policy for SQL Server authentication Ensures strong and secure password management for user accounts authenticating using SQL Server authentication. By default, this option is not selected. The installer creates and uses the SQL authenticated users for database and internal services without applying any password rules and policies on the system. This option cannot be edited for any further upgrades, once the first time installation is completed. If the password expires or changes based on the password policies on the system, see Update Service Users Password with Assist Service User Configurations Utility. Core Service logon Username/Password IIS Application Pool Username/Password If Use Windows Authentication User option is selected, see Active Directory Integrations before configuring these accounts. Enter the newly/already created Active Directory users. DB Owner Username/Password DB Application Username/Password Enter the database account credentials to access and maintain SQL databases. By default, the usernames are apadminuser and apdbuser. Specify passwords for these accounts. Do not use the following special characters in passwords: - Ampersand - &
- Less Than - <
- Greater Than - >
- Single Quote - '
- Double Quotes - "
- Semicolon - ;
- Flower Brackets - {}
MDF Path LDF Path NDF Path Enter the directories on the SQL server where you want to store the MDF, LDF, and NDF database files. By default, the Assist database files are stored where the SQL server keeps the SQL system databases.
Note: FULL control permission is required for the logon account used for the SQL Server service to access the database file system location where database files are stored. For example, the default user NT SERVICE\MSSQLSERVER for a default instance or NT SERVICE\MSSQL$InstanceName for a named instance is used for the service accounts during SQL Server setup and must have FULL control permission for the database file system location where database files are stored.-
Click Save and then click Next to proceed.
-
In the Tenant FQDN text box, type in the FQDN for the Assist system.
A Fully Qualified Domain Name is the complete domain name for a specific computer, or host, on the Internet. It consists of two parts: the host and the domain. For example, myhost.thedomain.edu.
-
In the SSL Certificate text box, select the folder button or the pull-down arrow to select the SSL certificate for the Workspace ONE Assist system that corresponds to the FQDN.
The certificate is installed in the local system personal certificate store.
-
Select the certificate and then select OK. You may also click the View Certificate button to verify that the certificate is valid and that it is the correct certificate to be used for the Assist FQDN. Click OK to proceed.
-
For the Choose T10 Certificate, click the folder icon next to the T10 certificate and browse for the T10 certificate that was generated and seeded in the Workspace ONE UEM database. For more information, see Generate the Workspace ONE Assist T10 API Certificate.
This certificate is in the folder where the installer file was downloaded and moved to the …\RemoteManagementCertificateGenerator 22.03 > RemoteManagementCertificateGenerator > Artifacts folder. Browse to this folder and select the certificate.
-
Click the Openbutton. The FQDN, the SSL certificate corresponding to the FQDN, and the T10 certificate that corresponds to the UEM Console are displayed. The enrollment certificate should remain untouched.
-
Click the More… button to select additional settings for the Workspace ONE Assist system. Verify the parameters.
Settings Description HTTPS Port Defines the HTTPS port used by portal services for access from outside the network. By default, port 443 is selected. If port 443 is already being used in your environment for another purpose, then you can use a different port, such as 7443. IIS Site Binding IP address Defines from which interfaces/IP addresses portal services can be reached. By default, the setting is ‘All Unassigned’ to activate all interfaces/IPs. Internal Service HTTP (s) port Defines the internal secure service communication port. Enter the internal HTTPS port used by the core services. The default is 8083 but you can enter an alternate port number, such as 6443. The HTTP port indicates the port number you entered in step 5. SSL Enable Activates SSL/TLS protocol for portal services. By default, this check box is selected so that the portal services use SSL/TLS. You can leave the check box as is and not make changes to it. Use Windows authenticated users for services and sites Activates the use of Windows user accounts to configure services. By default, this option is not selected. If this option is selected, see Active Directory Integrations before configuring these accounts and enter the newly or already created Active Directory users to configure services.
Note: If the password expired or changed based on the password policies on the system, see Update Service Users Password with Assist Service User Configurations Utility.T10 user name and Auto Generated Defines T10 API user for connectivity between Workspace ONE UEM and Workspace ONE Assist system. By default, if the ‘Auto Generated’ check box is selected, the installer assigns a random user name to be created locally on the server. Leave this text box defaulted and the check box selected for the Installer to create the T10 API user. If you want to define the user, deselect the check box and type in the T10 user name you want to use.
Note:- If the Use Windows authenticated users for services and sites option is selected, see Active Directory Integrations before configuring these accounts and enter the newly or already created Active Directory users to configure services.
- If the password expired or changed based on the password policies on the system, see Update Service Users Password with Assist Service User Configurations Utility.
Secure SSL Service Username/Password Defines the internal service username and password for Assist Services. The user is created locally on the system and used for IIS client authentication configuration if Use Windows authenticated users for services and sites option is not selected.
Note:- If the 'Use Windows authenticated users for services and sites' option is selected, see Active Directory Integrations before configuring these accounts and enter the newly or already created Active Directory users to configure services.
- If the password expired or changed based on the password policies on the system, see Update Service Users Password with Assist Service User Configurations Utility.
CP FQDN/Port Defines the FQDN and port on which CP services can be reached. Enter the FQDN, which must be the same as the FQDN assigned for portal services. Enter port 8443, which is the default port for CP services. If port 8443 cannot be used, you can enter any other port. Be sure that network/security teams use this assigned port when assigning translation rules from the firewall/router to the RM Server for CP services. SQL Always ON This check box within the Show Optional settings must be enabled only when High Availability is configured for Database. Enable Portal Access The portal access is disabled by default. This option within the Show Optional settings is not required during the installation. It can be used only for Troubleshooting after the installation. For information about enabling the Admin Web Portal, see Enable Admin Web Portal Access. Password Management-Assist System Management (AdminWebPortal) This option within the Show Optional settings is not required during the installation. It can be used only for Troubleshooting after the installation. This can be used to reset the password of any existing Admin portal users. For information about Password Management, see Ability to reset password. Password Management-Assist System Management (MgmtWebPortal) This option within the Show Optional settings is not required during the installation. It can be used only for troubleshooting after the installation. This can be used to reset the password of any existing Operations portal users for the given tenant. For information about Password Management, see Ability to reset password. Culture Context By default, this setting is empty. Defines the specific language support such as Italian, Spanish, and so on. For example, Italian would be 'it-IT' or 'it'. For Turkish, the culture context should be set as 'en-US'. -
Click Save to continue.You are taken to the previous screen.
-
To configure the User Management Settings, enter a custom username and password for both Admin and Operations portal access. The Assist installer uses this account for the initial product installation. Use the same credentials to access the Admin and Operation portal for any troubleshooting requirements post installation. By default, the username is prepopulated with
RootAdminfor the Admin portal (AdminWebPortal) andOpsadminfor the Operations portal (wbc).Set the minimum password length to at least 8 characters with a combination of Alpha/Numeric/Uppercase/Special Characters.
Do not use special characters in passwords such as the plus sign (+), double quotes ("), and hash (#).
-
Click Next to continue.
The installer performs multiple pre-requisite checks to ensure that the product can be installed. After the installer performs the prerequisites check a summary report displays. Any missing installation parameters are indicated in the report.
-
If any of the prerequisites are missing and the check fails, do NOT select Install.
a. Select the Detailed Report link to see which prerequisites are missing.
b. To install missing prerequisite components, select the Install Components link. The installer installs the missing components.
You might need to reboot the server after the prerequisites are installed.c. After the reboot, relaunch the installer.
The installer pre-populates with your previous selections. -
If the initial prerequisite check comes back with all components passing, select Install.
Once the Install button is selected, the installer validates and begins the installation.
For IIS Client authentication, the installer checks for the presence of the 'ClientAuthTrustMode' windows registry key. If the key is absent, a pop-up window with a Yes/No option is shown.
- On selecting 'Yes', the installer automatically updates the registry on the system and the installation continues.
- On selecting 'No', the registry key is not added and the installation stops.
Note: The following DWORD key,HKEY_LOCAL_MACHINE\SYSTEM\CurrentControlSet\Control\SecurityProviders\SCHANNELis added with value nameClientAuthTrustMode, value typeREG_DWORD, and value data 2.
The installer first installs the database and then proceeds to install Core, Portal, Application, and CP Services.
Note: Database execution might take an extended period.
-
When the installation finishes, select Next to continue.
-
When prompted to run the Resource Pack that loads all available device profiles onto the Workspace ONE Assist system, leave the Execute Resource pack check box selected and then select the Finish button.
By default, the Resource Pack utility imports all device profiles by using a command-line window. After the Resource Pack utility completes, the command-line window closes. For information about importing device profiles, see Import Device Profiles with Resource Pack Utility.
Next, proceed to Configure Workspace ONE UEM Console with Assist On-Premises.
Single Server Model (Active/Passive) with Disaster Recovery
This deployment model describes the on-premises deployment of Workspace ONE Assist in an environment with two all-in-one single Assist servers. In this deployment model, one Assist server is active, and the other Assist server is passive. A load balancer manages network traffic to the active Assist server. Switching Assist services from one server to another within the Assist application is managed in the Assist Admin Web Portal or the Assist APAdmin database.
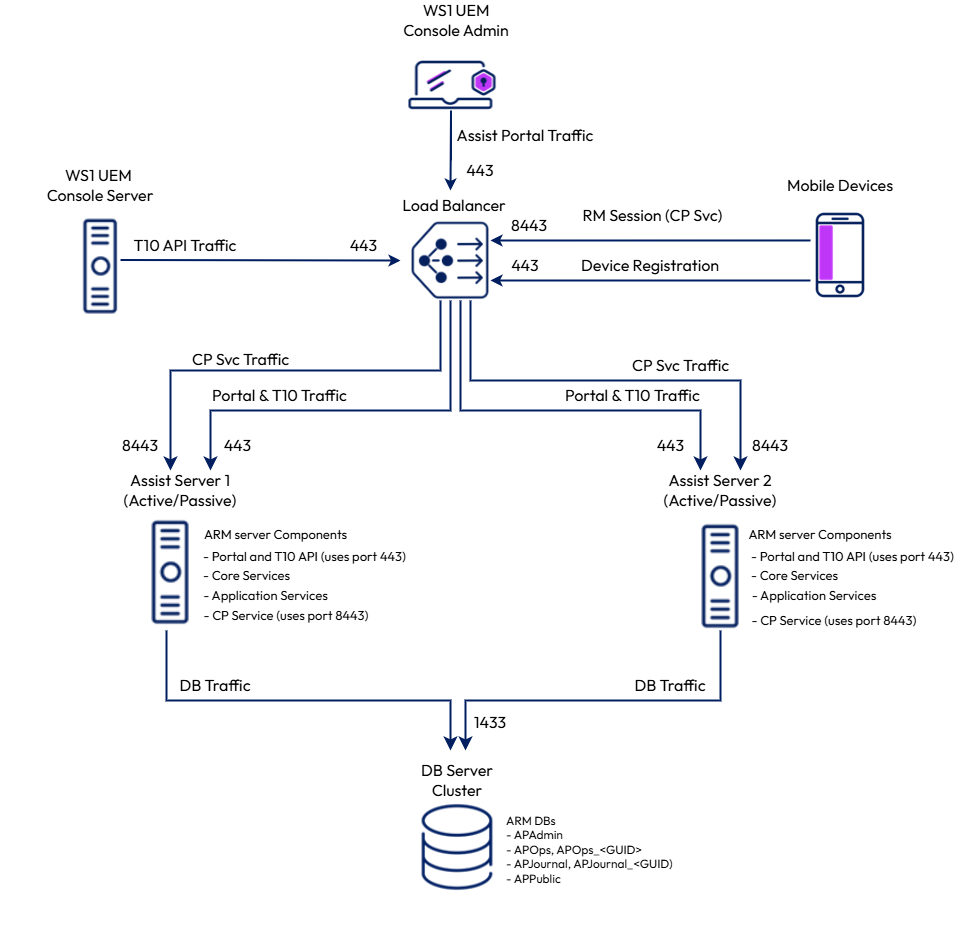
Consider a scenario where you have multiple data centers for disaster recovery purposes. One data center houses a primary active server, and the second data center houses the secondary passive server. Another scenario could be where you have two servers in one location, one server acts as the primary active server, and the second server acts as the secondary backup server. These environments are active-passive environments.
Both active and passive Assist servers share a common set of SQL databases for Assist. You can decide how to handle the database replication and SQL disaster recovery.
Prerequisites:
Before starting Assist installation, ensure the following prerequisites are complete on the servers where you install the Assist services.
-
Generate a T10 certificate for UEM provisioning: On the primary server, run the RemoteManagementCertificateGenerator utility, generate a T10 certificate, and run the certificate seeding script on the Workspace ONE UEM database. For details, see Generate the Workspace ONE Assist T10 API Certificate. After the seeding script has been run, copy the artifacts folder
…\RemoteManagementCertificateGenerator 22.03\RemoteManagementCertificateGenerator\Artifactsfrom the primary to the secondary server. The T10 certificate in the artifacts folder is required for the installation on the secondary server but there is no need to rerun the seeding script when Assist is installed on the secondary server. -
**Install SSL certificate:**Procure and install an SSL/TLS certificate that matches with the FQDN assigned to the Assist system. For Single-Server Deployment and Multiple Server Deployment, see On-Prem Config: Fully Qualified Domain Name and Site SSL/TLS Certificate, Single-Server On-Prem Deployment and On-Prem Config: Fully Qualified Domain Name and Site SSL/TLS Certificate, Multiple Server On-Prem Deployment.
-
Deactivate Antivirus and Monitoring: Temporarily turn off antivirus and monitoring software during installation.
-
Deactivate IPv6: Turn off IPv6 on the server's network adapter.
-
Activate TLS 1.2: Ensure your system supports TLS 1.2 for secure communication and enable respective cipher suites.
-
System User Configuration: Ensure the system allows creating local users, as the installer creates specific users for internal services.
-
Allow Required Ports: If you have a LoadBalancer/Firewall, permit necessary ports for communication.
-
Check Firewall Settings: Disable the firewall or ensure it allows necessary connections. For Single-Server Deployment, see On-Prem Config: Firewall Rules, Single-Server On-Prem Deployment and for Multiple Server Deployment, see On-Prem Config: Firewall Rules, Multiple Server On-Prem Deployment.
-
Configure DNS: Set up DNS if you are using forward lookup zones for service discovery. For more information, see Domain Name Service.
-
SSL Passthrough (If LoadBalancer Used): Configure SSL passthrough if LoadBalancer is used to forward SSL traffic to servers.
- Source IP Address Persistence: Set up TCP-based layer 4 'Source IP Address Persistence' for external ports.
- Session Persistence: Configure session persistence so that the same server handles the entire session. For information, see On-Prem Config: Persistence for Multiple Server On-Prem Deployment.
-
Remove HSTS Header configuration: The installer handles the configuration of the HSTS header on the IIS. Manual configuration is not required.
-
Net.Tcp Listener Adapter: Ensure the 'Net.Tcp Listener Adapter' service is running.
-
SQL Server Collation: Use 'SQL_Latin1_General_CP1_CI_AS' collation for SQL server setup.
-
Update .NET Framework: Install .NET Framework 4.8 on both servers where Assist is getting installed.
-
Minimize Latency: Ensure there is no network delay between Workspace ONE UEM and Workspace ONE Assist.
-
Screen resolution: Keep the system screen resolution at 1200 * 720 for the optimal visibility of the installation user interface.
Load Balancer
-
When using two all-in-one Assist servers, use a load balancer to point all Assist traffic to the active server.
-
Configure the load balancer to have a pool of two servers where one server is active and the other is passive.
-
You must also configure the load balancer to allow incoming network traffic to ports 443 and 8443 and for SSL passthrough. Hence, the SSL termination is on the Assist servers on ports 443 and 8443. The Load Balancer passes all traffic to the active server.
Note: Ports [L7] 443 and [L4] 8443 are cutomizable.
-
To install Assist software on the primary active server, the secondary server must be shut down and not detected by the load balancer in the server pool. Once you install and test the Assist software on the primary server, you must set the services on the primary server as inactive. After setting up the services as inactive, you must shut down the primary server and turn on the secondary server.
-
Now, the secondary server becomes the active server. When the load balancer detects the active secondary server in the server pool, you can install the Assist software on the secondary server. For more information about Load Balancer integration, see Load Balancer.
Switching Assist Services from Active to Inactive
In single-server environments with disaster recovery, you must set the status of services to active on the active server and inactive on the passive server for a successful installation. You can set the service statuses in the Admin Web Portal or the ApAdmin database if database access through MS SQL Studio is available.
After you install and perform the remote session on the primary active server, you must update the services to inactive on the same active server. After updating the services as inactive, you must shut down the primary server and turn on the secondary server. The secondary server now becomes the active server to properly install the services on the secondary server.
For information on enabling the Admin Web Portal, see Enable Admin Web Portal Access.
To change the status of services in the Admin Web Portal:
-
Log into the Admin Web Portal. The FQDN to the admin portal is
<Assist FQDN>/AdminWebPortal. -
Select Click to Default Service Configuration and then select Click here to view Service Configuration at the top left of the page.
Notice the SERVER NAME field and the STATUS field. The Server Name field indicates the server hostname of the primary server where you installed the Assist software. The Status field shows the Active status.
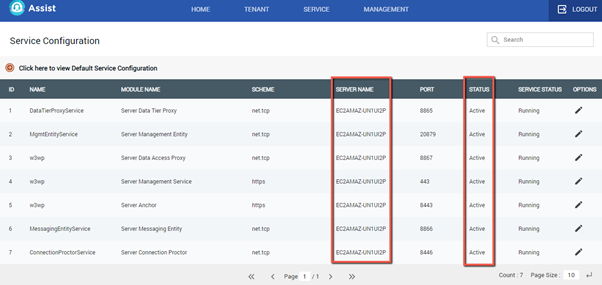
To set the services to inactive on the primary server:
-
Select the pencil icon corresponding to the server under the Options column. A window displays.
-
Select the Statusdrop-down menu and then select In-active.
-
Select the Update button to set the status of the service to inactive. The services are now marked as in-active.
Change the status of the other services for the server with the same server name.
You can also run multiple SQL statements to set the status of the services on the primary server to inactive.
-
Open the SQL Management Studio on the database server where the Assist databases are located. Run the following query on the ApAdmin database to get the server id:
select * from apadmin.dbo.ServerThis query provides all the server name (hostname) and the id that were deployed when the Assist software installation ran on the primary server.
-
Use the id of the server and run the following SQL statement. This sets all the services on server 1 to inactive.
update ApAdmin.dbo.Services
              set Active = 0
              where ServerId=1
Install Assist in an environment with two All-in-one Single Servers
To install Workspace ONE Assist in an environment with two all-in-one single servers, first, install Assist on the primary server, copy the
install.configfile from the primary server to the secondary server, and then install Assist on the secondary server.The
install.configis located in the Workspace ONE Assist temporary installation directory where the installer is placed.-
Download, extract, and save the Workspace ONE Assist installer into a temporary directory on the Workspace ONE Assist server. You can download the installer from the repository at https://my.workspaceone.com.
-
Right-click the installer file and select Run as administrator.
-
On the Welcome screen, select Next.
-
Select the installation directory for Assist and click Install.
-
Select Standard Installation (Basic) and then configure the settings for Secured Internal Service Communication.
- Enter a secured password to protect the certificate that is generated for the Assist internal services.
- Select the RSA key size for the self-signed certificate generated by Assist. By default, the key size is 2048.
- Enter the internal service port (For example, non-HTTP ports like 8446, 8083, and so on). Click Next.
-
Select Connect to Existing SQL Server and enter the required parameters.
Setting Description SQL Server/Listener Name Define the SQL Server instance running on the server either as an IP address or a connection string (or listener name when high availability is configured for the Database). Authentication Select either Windows authentication to authenticate to SQL Server as a current Windows user OR select SQL Server Authentication to select a SQL server account, such as SA. User name If SQL Server Authentication was used, type in the user name that is used to authenticate against the SQL server. Password Type in the password for the user name selected. -
Select the …Morebutton and enter the credentials of Assist DB system accounts. These DB accounts are created when Assist is installed and is used by Assist to authenticate against the database server.
Setting Description Replace the hyphen in the Tenant Identifier to underscore By default, this check box is not selected. During the installation, the tenant Databases are created with the combination of database name_TenantIdentifier (For example, apops_xxxx-xxxx-xxxx-xxxx). The Identifier consists of a random number separated by a hyphen. If this option is selected, it creates the identifier with Underscore instead of a hyphen. For example, apops_.xxxx_xxxx_xxxx_xxxx. After the installation, this option cannot be edited for any upgrades further. Use Windows Authentication User Activates the use of Windows user accounts to access and authenticate with a database system. To use this option, see Active Directory Integrations. By default this option is not selected, the installer creates and uses the SQL authenticated users for database and internal services access. This option cannot be edited for any further upgrades, once the first time installation is completed. Enforce password policy for SQL Server authentication Ensures strong and secure password management for user accounts authenticating using SQL Server authentication. By default, this option is not selected. The installer creates and uses the SQL-authenticated users for database and internal services without applying any password rules and policies on the system. This option cannot be edited for any further upgrades, once the first time installation is completed. If the password expires or is changed based on the password policies on the system, see Update Service Users Password with Assist Service User Configurations Utility. Core Service logon Username/Password IIS Application Pool Username/Password If Use Windows Authentication User option is selected, see Active Directory Integrations before configuring these accounts. Enter the newly or already created Active Directory users. DB Owner Username/Password DB Application Username/Password Enter the database account credentials to access and maintain SQL databases. By default, the usernames are apadminuser and apdbuser. Specify passwords for these accounts. Do not use the following special characters in passwords: - Ampersand - &
- Less Than - <
- Greater Than - >
- Single Quote - '
- Double Quotes - "
- Semicolon - ;
- Flower Brackets - {}
MDF Path LDF Path NDF Path Enter the directories on the SQL server where you want to store the MDF, LDF, and NDF database files. By default, the Assist database files are stored where the SQL server keeps the SQL system databases.
Note: FULL control permission is required for the logon account used for the SQL Server service to access the database file system location where database files are stored. For example, the default user NT SERVICE\MSSQLSERVER for a default instance or NT SERVICE\MSSQL$InstanceName for a named instance is used for the service accounts during SQL Server setup and must have FULL control permission for the database file system location where database files are stored.-
Click Save and then click Next to proceed.
-
In the Tenant FQDN text box, type in the FQDN for the Assist system.
A Fully Qualified Domain Name is the complete domain name for a specific computer, or host, on the Internet. It consists of two parts: the host and the domain. For example, myhost.thedomain.edu.
-
In the SSL Certificate text box, select the folder button or the pull-down arrow to select the SSL certificate for the Workspace ONE Assist system that corresponds to the FQDN.
The certificate is installed in the local system personal certificate store.
-
Select the certificate and then select OK. You may also click the View Certificate button to verify that the certificate is valid, and that it is the correct certificate to be used for the Assist FQDN. Click OK to proceed.
-
In the Choose T10 Certificate, click the folder icon next to the T10 certificate and browse for the T10 certificate that was generated and seeded in the Workspace ONE UEM database. For more information, see Generate the Workspace ONE Assist T10 API Certificate.
This certificate is in the folder where the installer file was downloaded and moved to the …\RemoteManagementCertificateGenerator 22.03 > RemoteManagementCertificateGenerator > Artifacts folder. Browse to this folder and select the certificate.
-
Click the Open button. The FQDN, the SSL certificate corresponding to the FQDN, and the T10 certificate that corresponds to the UEM Console are displayed. The enrollment certificate should remain untouched.
-
To configure the User Management Settings, enter a custom username and password for both Admin and Operations portal access. The Assist installer uses this account for the initial product installation. Use the same credentials to access the Admin and Operation portal for any troubleshooting requirements after installation. By default, the username is prepopulated with
RootAdminfor the Admin portal (AdminWebPortal) andOpsadmin for the Operations portal (wbc).Set the minimum password length to at least 8 characters with a combination of Alpha/Numeric/Uppercase/Special Characters.
Do not use special characters in passwords, such as the plus sign (+), double quotes ("), and hash (#).
-
Click the More… button to select additional settings for the Workspace ONE Assist system. Verify the parameters.
Settings Description HTTPS Port Defines the HTTPS port used by portal services for access from outside the network. By default, port 443 is selected. If port 443 is already being used in your environment for another purpose, then you can use a different port, such as 7443. IIS Site Binding IP address Defines from which interfaces/IP addresses portal services can be reached. By default, the setting is ‘All Unassigned’ to activate all interfaces/IPs. Internal Service HTTP(s) Port Defines the internal secure service communication port. Enter the internal HTTPS port used by the core services. The default is 8083 but you can enter an alternate port number, such as 6443. The HTTP port indicates the port number you entered in step 5. SSL Enable Activates SSL/TLS protocol for portal services. By default, this check box is selected so that the portal services use SSL/TLS. Leave this check box selected. Use Windows authenticated users for services and sites Activates the use of Windows user accounts to configure services. By default, this option is not selected. If the Use Windows authenticated users for services and sites option is selected, see Active Directory Integrations before configuring these accounts and enter the newly or already created Active Directory users to configure services.
Note: If the password expires or is changed based on the password policies on the system, see Update Service Users Password with Assist Service User Configurations Utility.T10 user name and Auto Generated Defines T10 API user for connectivity between Workspace ONE UEM and Workspace ONE Assist system. By default, if the ‘Auto Generated’ check box is selected the installer assigns a random user name to be created locally on the server. Leave this text box defaulted and the check box selected for the installer to create the T10 API user. If you want to define the user, deselect the check box and type in the T10 user name you want to use.
Note:- If the Use Windows authenticated users for services and sites option is selected, see Active Directory Integrations before configuring these accounts and enter the newly or already created Active Directory user to configure T10 service.
- If the password expires or is changed based on the password Policies on the system, see Update Service Users Password with Assist Service User Configurations Utility.
Secure SSL Service Username/Password Defines the internal service username and password for Assist Services. The user is created locally on the system and used for IIS client authentication configuration, if Use Windows authenticated users for services and sites option is not selected.
Note:- If the 'Use Windows authenticated users for services and sites' option is selected, see Active Directory Integrations before configuring these accounts and enter the newly or already created Active Directory users to configure services.
- If the password expires or is changed based on the password Policies on the system, see Update Service Users Password with Assist Service User Configurations Utility.
CP FQDN/Port Defines the FQDN and port on which CP services can be reached. Enter in the FQDN, which must be the same as the FQDN assigned for portal services. It should match on an all-in-one single-server deployment. Enter port 8443, which is the default port for CP services. If port 8443 cannot be used, you can enter any other port. Be sure that network/security teams use this assigned port when assigning translation rules from the firewall/router to the RM Server for CP services. SQL Always ON This check box within the Show Optional settings must be activated only when High Availability is configured for Database. Enable Portal Access The portal access is deactivated by default. This option within the Show Optional settings is not required during the installation. It can be used only for Troubleshooting after the installation. For information about enabling the Admin Web Portal, see Enable Admin Web Portal Access. Password Management-Assist System Management (AdminWebPortal) This option within the Show Optional settings is not required during the installation. It can be used only for Troubleshooting after the installation. This can be used to reset the password of any existing Admin portal users. For information about Password Management, see Ability to reset passwords. Password Management-Assist System Management (MgmtWebPortal) This option within the Show Optional settings is not required during the installation. It can be used only for Troubleshooting after the installation. This can be used to reset the password of any existing Operations portal users for the given tenant. For information about Password Management, see Ability to reset passwords. Culture Context By default, this setting is empty. Defines the specific language support such as Italian, Spanish, and so on. For example, Italian would be 'it-IT' or 'it'. For Turkish, the culture context should be set as 'en-US'. -
Click Save to continue.You are taken to the previous screen.
-
Click Next to continue.
The installer performs multiple pre-requisite checks to ensure that the product can be installed. After the installer performs the prerequisites check a summary report displays. Any missing installation parameters are indicated in the report.
-
If any of the prerequisites are missing and the check fails, do NOT select Install.
a. Select Detailed Report link to see which prerequisites are missing.
b. To install missing prerequisite components, select the Install Componentslink. The installer installs the missing components.
You might need to reboot the server after the prerequisites are installed.c. After the reboot, relaunch the installer.
The installer pre-populates with your previous selections. -
If the initial prerequisite check comes back with all components passing, select Install.
Once the Install button is selected, the installer validates and begins the installation.
For IIS Client authentication, the installer checks for the presence of the 'ClientAuthTrustMode' Windows registry key. If the key is absent, a pop-up window with a Yes/No option is shown.
- On selecting 'Yes', the installer automatically updates the registry on the system and the installation continues.
- On selecting 'No', the registry key is not added and the installation stops.
Note: The following DWORD key,
HKEY_LOCAL_MACHINE\SYSTEM\CurrentControlSet\Control\SecurityProviders\SCHANNELis added with value nameClientAuthTrustMode, value typeREG_DWORD, and value data 2.
The installer first installs the database and then proceeds to install Core, Portal, Application, and CP Services.
Note: Database execution might take an extended period.
-
When the installation finishes, select Next to continue.
-
When prompted to run the Resource Pack that loads all available device profiles onto the Workspace ONE Assist system, leave the Execute Resource pack check box selected and then select the Finish button.
By default, the Resource Pack utility imports all device profiles by using a command-line window. After Resource Pack utility completes, the command-line window closes. For information about importing device profiles, see Import Device Profiles with Resource Pack Utility.
To install the secondary server, copy the
install.configfile from the primary server to the secondary server to the same corresponding location. Theinstall.configfile must be in the same temporary folder where the installation executable file is, typically C:\Temp\WorkspaceONE Assist Installer.After you copy the file, use the installation procedure to mark the services on the primary server inactive. Then, shut down the primary server and make the appropriate changes on the load balancer, after which you can install the Assist services on the secondary server.
To know how to set the status of the services on the active and passive server, see Switching Assist Services from Active to Inactive.
Next, proceed to Configure Workspace ONE UEM Console with Assist On-Premises.
Medium Server (Advanced/Custom) Installation of Workspace ONE Assist
The Advanced (Custom) method of installing the Workspace ONE Assist server for on-premises environments is a multiple-phase process.
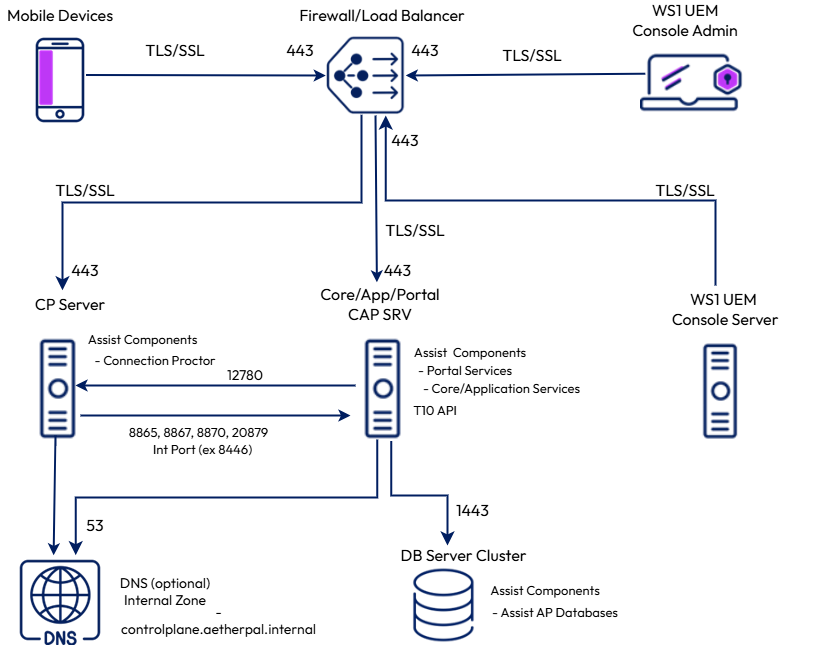
The advanced installation method involves the use of two servers for Assist services. One server is the CAP server where Core, Application, and Portal components are installed. The second server is the CP Server where the Connection Proctor services are installed. Assist databases are deployed on the database server.
The services on both servers perform service discovery. The service discovery may be done using an IP address of the CAP server or DNS entries that point to the CAP server. Use of DNS Server is OPTIONAL.
Note: A DNS forward lookup zone and respective records must be set up for using the DNS for service discovery.
Prerequisites:
-
Generate a T10 certificate for UEM provisioning: Run the RemoteManagementCertificateGenerator utility, generate a T10 certificate, and run the certificate seeding script on the Workspace ONE UEM database. For details, see Generate the Workspace ONE Assist T10 API Certificate.
-
Install SSL certificate: Procure and install an SSL/TLS certificate that matches with the FQDN assigned to the Assist system. This certificate must be installed on both the CAP and CP servers. For Single-Server Deployment and Multiple Server Deployment, see On-Prem Config: Fully Qualified Domain Name and Site SSL/TLS Certificate, Single-Server On-Prem Deployment and On-Prem Config: Fully Qualified Domain Name and Site SSL/TLS Certificate, Multiple Server On-Prem Deployment.
-
Deactivate Antivirus and Monitoring: Temporarily turn off antivirus and monitoring software during installation.
-
Deactivate IPv6: Turn off IPv6 on the server's network adapter.
-
Activate TLS 1.2: Ensure your system supports TLS 1.2 for secure communication and enable respective cipher suites.
-
System User Configuration: Ensure the system allows creating local users, as the installer creates specific users for internal services.
-
Allow Required Ports: If you have a LoadBalancer/Firewall, permit necessary ports for communication.
-
Check Firewall Settings: Disable the firewall or ensure it allows necessary connections. For Single-Server Deployment, see On-Prem Config: Firewall Rules, Single-Server On-Prem Deployment and for Multiple Server Deployment, see On-Prem Config: Firewall Rules, Multiple Server On-Prem Deployment.
-
Configure DNS: Set up DNS if you are using forward lookup zones for service discovery. For more information, see Domain Name Service.
-
SSL Passthrough (If LoadBalancer Used): Configure SSL passthrough if LoadBalancer is used to forward SSL traffic to servers.
- Source IP Address Persistence: Set up TCP-based layer 4 'Source IP Address Persistence' for external ports.
- Session Persistence: Configure session persistence so that the same server handles the entire session. For information, see On-Prem Config: Persistence for Multiple Server On-Prem Deployment.
-
Remove HSTS Header configuration: The installer handles the configuration of the HSTS header on the IIS. Manual configuration is not required.
-
Net.Tcp Listener Adapter: Ensure the 'Net.Tcp Listener Adapter' service is running.
-
SQL Server Collation: Use 'SQL_Latin1_General_CP1_CI_AS' collation for SQL server setup.
-
Update .NET Framework: Install .NET Framework 4.8 on both CAP and CP servers.
-
Minimize Latency: Ensure there is no network delay between Workspace ONE UEM and Workspace ONE Assist.
-
Screen resolution: Keep the system screen resolution at 1200 * 720 for the optimal visibility of the installation user interface.
Install Workspace ONE Assist services on the Core, Application, and Portal (CAP) Server
Perform the following steps to install Workspace ONE Assist services on the Core, Application, and Portal (CAP) Server.
-
On the CAP server, run the Workspace ONE Assist installer from the temporary directory and click Next. You can download the installer from the repository at https://my.workspaceone.com.
-
Select the installation directory for the Assist software and click Install.
-
Select Advanced Installation (Custom) and then configure the settings for Secured Internal Service Communication.
- Enter a secured password to protect the certificate that is generated for the Assist internal services.
- Select the RSA key size for the self-signed certificate generated by Assist. By default, the key size is 2048.
- Enter the internal service port (For example, non-http ports like 8446, 8083, and so on). Click Next.
-
Select the components that must be installed on the server and click Next.
- Database
- Core Services
- Portal Services
- Application Services
-
Configure the database settings. Select Connect to Existing SQL Server and complete the following settings.
Settings Description SQL Server / Listener Name Define the SQL Server instance running on the server either as an IP address or a connection string (or listener name when High Availability is configured for Database). Authentication Select the database account authentication. The authentication can be either Windows Authentication or SQL Authentication. Select either Windows Authentication to authenticate to SQL Server as current Windows user OR select SQL Server Authentication to select a SQL server account, such as SA. User name If SQL Server Authentication was used, type in the username that is used to authenticate against the SQL server. Password Enter the password of the database account. Note: When making user names and passwords, do not use the following special characters: - Ampersand - &
- Less Than - <
- Greater Than - >
- Single Quote - '
- Double Quotes - "
- Semicolon - ;
- Flower Brackets - {}
-
Click the ...More button to complete the Database Advanced Settings.
Settings Description DB Owner User name/ Password Set the user name and password for the Workspace ONE Assist database owner SQL account. This account does not have system-wide permissions. The account only has permissions within the Workspace ONE Assist databases. By default, the user name is apadminuser.
Note: If the Use Windows Authentication User option is selected, see Active Directory Integrations before configuring database accounts. Enter the newly or already created Active Directory users.DB Application User name/ Password Set the user name and password for the Workspace ONE Assist database application account. By default, the user name is apdbuser.
Note: If the Use Windows Authentication User option is selected, see Active Directory Integrations before configuring database accounts. Enter the newly or already created Active Directory users.MDF Path LDF Path NDF Path Enter the directories on the SQL server where you want to store the MDF, LDF, and NDF database files. By default, the Assist database files are stored where the SQL server keeps the SQL system databases.
Note: FULL control permission is required for the logon account used for the SQL Server service to access the database file system location where database files are stored. For example, the default user NT SERVICE\MSSQLSERVER for a default instance or NT SERVICE\MSSQL$InstanceName for a named instance is used for the service accounts during SQL Server setup and must have FULL control permission for the database file system location where database files are stored.Replace the hyphen in the Tenant Identifier to underscore By default, this check box is not selected. During the installation, the tenant Databases are created with the combination of database name_TenantIdentifier. For example, apops_xxxx-xxxx-xxxx-xxxx. The Identifier consists of a random number separated by a hyphen. If this option is selected, it creates the identifier with Underscore instead of a hyphen. For example, apops_.xxxx_xxxx_xxxx_xxxx. After the installation, this option can not be edited for any upgrades further. Use Windows Authentication User Activates the use of Windows user accounts to access and authenticate with a database system. To use this option, see Active Directory Integrations. By default this option is not selected, the installer creates and uses the SQL authenticated users for database and internal services access. This option cannot be edited for any further upgrades, once the first time installation is completed. Enforce password policy for SQL Server authentication Ensures strong and secure password management for user accounts authenticating using SQL Server authentication. By default, this option is not selected. The installer creates and uses the SQL authenticated users for database and internal services without applying any password rules and policies on the system. This option cannot be edited for any further upgrades, once the first time installation is completed. If the password expires or is changed based on the password policies on the system, see Update Service Users Password with Assist Service User Configurations Utility. Core Service logon Username/Password IIS Application Pool Username/Password If Use Windows Authentication User option is selected, see Active Directory Integrations before configuring these accounts. Enter the newly/already created Active Directory users. -
Click Save and then click Next.
-
Configure the Core settings.
Settings Description SQL Server/Listener Name Enter the database server hostname, IP address, or connection string (or listener name when High Availability is configured) that you have already configured. Service Discovery Configuration The IP Address and Port for the Core/Application server. If multiple core server is configured using Load Balancer then you have to provide Load Balancer IP address. You also have the option to switch to Forward Lookup Zone by choosing another configuration, typically controlplane.internal. You can select one or more Subject Alternative Name from the drop-down menu or add additional host names (sites, IP addresses, common names, and so on.) to be protected by a single SSL certificate such as a Multi-Domain (SAN) which the installer creates for each service secure communication. User Management Settings Enter a custom username and password for both Admin and Operations portal access. The Assist installer uses this account for the initial product installation. Use the same credentials to access the Admin and Operation portal for any troubleshooting requirements after installation. By default, the username is prepopulated with RootAdminfor Admin portal (AdminWebPortal) andOpsadminfor the Operations portal (wbc). Set the minimum password length to atleast 8 characters with a combination of Alpha/Numeric/Uppercase/Special Characters. Do not use special characters in passwords, such as the plus sign (+), double quotes ("), and hash (#). -
Click ...More to configure the CoreAdvancedExtn settings.
Settings Description Use windows authenticated users for services and sites Enables the use of Windows user accounts to configure services. By default, this option is not selected. If the 'Use windows authenticated users for services and sites' option is selected, see Active Directory Integrations before configuring these accounts and enter the newly or already created Active Directory users to configure services.
Note: If the password expires or is changed based on the password policies on the system, see Update Service Users Password with Assist Service User Configurations Utility.Core Service logon Username/Password If 'Use Windows Authentication User' option is selected, see Active Directory Integrations before configuring these accounts. Enter the newly or already created Active Directory users for Core Windows service custom logon.
Note: If the password expires or is changed based on the password policies on the system, see Update Service Users Password with Assist Service User Configurations Utility.IIS Application Pool Username/Password If the 'Use Windows Authentication User' option is selected, see Active Directory Integrations before configuring these accounts. Enter the newly or already created Active Directory user for the custom IIS Application Pool identity user. Note: If the password expires or is changed based on the password policies on the system, see Update Service Users Password with Assist Service User Configurations Utility. Secure SSL Service Username/Password Defines the internal service username and password for Assist Services. The mentioned user is created locally on the system and used for IIS client authentication configuration, if the Use Windows Authentication Useroption is not selected.
Note:- If the Use windows authenticated users for services and sites option is selected, see Active Directory Integrations before configuring these accounts and enter the newly or already created Active Directory users to configure services.
- If the password expired or is changed based on the password policies on the system, see Update Service Users Password with Assist Service User Configurations Utility.
SQL Always ON - Additional availability settings This check box within Show Optional settings must be activated only when HighAvailability configured for Database. Password Management - Assist System Management (AdminWebPortal) This option within Show Optional settings is not required during the installation. It can be used only for Troubleshooting after the installation and to reset the password of any existing Admin portal users. For information on Password Management, see Ability to reset passwords. Password Management-Assist System Management (MgmtWebPortal) This option within Show Optional settings is not required during the installation. It can be used only for Troubleshooting after the installation and to reset the password of any existing Operations portal users for the given tenant. For information about Password Management, see Ability to reset passwords. DB Application User name/ Password Enter the user name and password for the Workspace ONE Assist database application account. By default, the user name is apdbuser. If the Use Windows Authentication User option is selected, see Active Directory Integrations before configuring database accounts. Enter the newly or already created Active Directory user for database application use.
Note: If the password expires or is changed based on the password policies on the system, see Update Service Users Password with Assist Service User Configurations Utility.Internal Service HTTP(S) Port Enter the internal HTTPS port used by the core services. The HTTP port indicates the port number you entered in instruction 3. Culture Context By default, this setting is empty. This setting within the Show Optional settings defines the specific languages support such as Italian, Spanish, and so on. For example, Italian would be 'it-IT' or 'it'. For Turkish, the culture context should be set as 'en-US'. -
Click Save and then click Next to configure the Portal settings.
Settings Description Service Discovery Configuration The IP Address and Port for the Core/Application server. If multiple core servers are configured using the Load Balancer, then you must provide the Load Balancer IP address. You also have the option to switch to Forward Lookup Zone by choosing another configuration, typically controlplane.internal. You can select one or more Subject Alternative Name from the drop-down menu or add additional host names (sites, IP addresses, common names, and so on.) to be protected by a single SSL certificate such as a Multi-Domain (SAN) which the installer creates for each service secure communication. User Management Settings Enter a custom username and password for both Admin and Operations portal access. The Assist installer uses this account for the initial product installation. Use the same credentials to access the Admin and Operation portal for any troubleshooting requirements after installation. By default, the username is prepopulated with RootAdminfor Admin portal (AdminWebPortal) andOpsadminfor Operations portal (wbc). Set the minimum password length to atleast 8 characters with a combination of Alpha/Numeric/Uppercase/Special Characters. Do not use special characters in passwords, such as the plus sign (+), double quotes ("), and hash (#).Tenant FQDN Enter the server's fully qualified domain name. For example, "rmstage01.awmdm.com" SSL Certificate Select the folder icon and browse for the SSL Certificate already installed. For details, see Install an SSL Certificate. SQL Server / Listener Name Enter the database server hostname, IP address, or connection string (or listener name when High Availability is configured) that you have already configured. Apply Default Enrollment Certificate If required, select a different Enrollment Certificate provided by the Assist support team. Choose T10 Certificate Select the folder button to browse for and load the T10 certificate. For more information, see Generate the Workspace ONE Assist T10 API Certificate. -
Select the ...More button and complete the Custom Portal Advanced Settings.
Important: If you are using port numbers other than the defaults referenced in Network and Security Requirements, you must enter these non-default port numbers here.
Settings Description Secure SSL Service Username/Password Defines the internal service username and password for Assist services. The user is created locally on the system and used for IIS client authentication configuration, if the Use Windows Authentication User option is not selected.
Note:- If the Use windows authenticated users for services and sites option is selected, see Active Directory Integrations before configuring these accounts and enter the newly or already created Active Directory user to configure services.
- If the password expires or is changed based on the password Policies on the system, see Update Service Users Password with Assist Service User Configurations Utility.
Culture Context By default, this setting is empty. Defines the specific language support such as Italian, Spanish, and so on. For example, Italian would be 'it-IT' or 'it'. For Turkish, the culture context should be set as 'en-US'. Internal Service HTTP(S) Port Defines the internal service communication port. Enter the internal HTTPS port used by the core services. The default is 8083 but you can enter an alternate port number, such as 6443. The HTTP port indicates the port number you entered in step 3. IIS Site Binding IP Address Defines from which interfaces/IP addresses portal services can be reached. By default, the setting is ‘All Unassigned’ to activate all interfaces/IPs. HTTPS Port Enter the HTTPS port number. The default is 443. SSL Enable Activates SSL/TLS protocol for portal services. By default, this check box is selected so that the portal services use SSL/TLS. Leave this check box selected. Use windows authenticated users for services and sites Enables the use of Windows user accounts to configure services. By default, this option is not selected. If the Use Windows authenticated users for services and sites option is selected, see Active Directory Integrations before configuring these accounts and enter the newly or already created Active Directory users to configure services.
Note: If the password expires or is changed based on the password policies on the system, see Update Service Users Password with Assist Service User Configurations Utility.T10 user name And Auto Generated Defines T10 API user for connectivity between Workspace ONE UEM and Workspace ONE Assist system. By default, if ‘Auto Generated’ check box is selected, the installer assigns a random user name to be created locally on the server. Leave this text box defaulted and the check box selected for the Installer to create the T10 API user. If you want to define the user, deselect the check box and type in the T10 user name you want to use.
Note:- If the Use windows authenticated users for services and sites option is selected, see Active Directory Integrations before configuring these accounts and enter the newly or already created Active Directory user to configure T10 service.
- If the password expires or is changed based on the password Policies on the system, see Update Service Users Password with Assist Service User Configurations Utility.
-
Click Save. You are taken to the previous screen.
-
Click Next.
-
Review your selections at the Selected Components screen.
The installer performs multiple pre-requisite checks to ensure that the product can be installed. After the installer performs the prerequisites check, a summary report displays. Any missing installation parameters are indicated in the report.
-
If any of the prerequisites are missing and the check fails, do not select Install.
a. Select Detailed Report link to see which prerequisites are missing.
b. To install missing prerequisite components, select the Install Componentslink. The installer installs the missing components.
You might need to reboot the server after the prerequisites are installed.c. After the reboot, relaunch the installer.
The installer pre-populates with your previous selections. -
If the initial prerequisite check comes back with all components passing, select Install.
Once the Install button is selected, the installer validates and begins the installation.
For IIS Client authentication, the installer checks for the presence of the 'ClientAuthTrustMode' windows registry key. If the key is absent, a pop-up window with a Yes/No option is shown.
- On selecting 'Yes', the installer automatically updates the registry on the system and the installation continues.
- On selecting 'No', the registry key is not added and the installation stops.
Note: The following DWORD key,
HKEY_LOCAL_MACHINE\SYSTEM\CurrentControlSet\Control\SecurityProviders\SCHANNELis added with value nameClientAuthTrustMode, value typeREG_DWORD, and value data2.
The installer first installs the database and then proceeds to install Core, Portal, and Application services.
Note: Database execution might take an extended period.
-
Click Next after the installation completes.
-
Ensure that the check box Execute Resource Pack is selected and select the Finish button.
The Assist installation is complete on the CAP server. However, the resource pack must run in the background. Do not close the command line window. The command line window closes automatically when the resource pack execution is complete. If there is a failure while executing the resource pack for importing device profiles, see Import Device Profiles with Resource Pack Utility.
Install Workspace ONE Assist services on the Connector Proctor (CP) Server
After you have installed the Core, Application, and Portal (CAP) services on the CAP server, proceed to install the Connection Proctor (CP) services on the CP server.
-
On the Connection Proctor (CP) server, run the Workspace ONE Assist installer from the temporary directory and click Next.
-
Select the installation directory for the Assist software and click Install.
-
Select Advanced Installation (Custom) and then configure the settings for Secured Internal Service Communication.
- Enter a secured password to protect the certificate that is generated for the Assist internal services.
- Select the RSA key size for the self-signed certificate generated by Assist. By default, the key size is 2048.
- Enter the internal service port (For example, non-http ports like 8446, 8083, and so on). Click Next.
-
Select Connection Proctor component for installation on the server and click Next.
-
Configure the Connection Proctor settings.
Settings Description Service Discovery Configuration The IP Address and Port for the Core/Application server. If multiple core servers are configured using the Load Balancer, then you must provide the Load Balancer IP address. You also have the option to switch to Forward Lookup Zone by choosing another configuration, typically controlplane.internal. You can select one or more Subject Alternative Name from the drop-down menu or add additional host names (sites, IP addresses, common names, and so on.) to be protected by a single SSL certificate such as a Multi-Domain (SAN) which the installer creates for each service secure communication. User Management Settings Enter the existing Admin portal username and password. The Assist installer uses this account for the initial product installation to configure the Assist Connection Proctor service. By default, the username is prepopulated with RootAdminfor Admin portal (AdminWebPortal)Connection Proctor FQDN Defines the Fully Qualified Domain Name (FQDN) on which CP services can be reached. Enter the FQDN, which must be the same as the FQDN assigned for portal services. Port Enter the port number for CP services. The default is 443 in multiple server environments but you can enter your preferred port number. Whatever port you select, ensure that network/security teams use this port when assigning translation rules from the firewall/router to the Server for CP services. SSL Certificate Select the folder icon and browse for the SSL Certificate already installed. For details, see Install an SSL Certificate.
You may also click View Certificate to verify if the selected certificate is the one you want to use for the CP server.
SAN (subject alternative name) certificates are supported. The implementation of SAN certificates depends upon your server arrangement.- The SAN certificate must have an FQDN defined for each connection proctor server and Workspace ONE Assist server.
- For example, presume you have 2 connection proctor servers and 2 Workspace ONE Assist servers. The 2 Workspace ONE Assist servers host portal services, which require TLS/SSL traffic terminated at the load balancer. The FQDN for the SAN certificate must reflect the fully qualified domain name, for instance, "rmstage01.awmdm.com".
- Meanwhile, for each of the 2 CP servers, TLS/SSL traffic terminates at the connection proctor, and therefore, you must have 2 FQDNs defined in the SAN certificate, for instance, "rmstage01.awmdm.com' and "rmstage02.awmdm.com'.
SQL Server/Listener Name Enter the database server hostname, IP address, or connection string (or listener name when High Availability is configured for Database) that you have already configured. - The SAN certificate must have an FQDN defined for each connection proctor server and Workspace ONE Assist server.
-
Select the ...More button and complete the Custom Connection Proctor Advanced settings.
Important: If you are using port numbers other than the defaults referenced in Network and Security Requirements, you must enter these non-default port numbers here.
Settings Description CP Internal IP Address/Port Defines from which internal IP addresses the connection proctor can be reached. By default, the setting is ‘All Unassigned’ to allow all addresses. Enter the port number for the Connection Proctor component. The default is 8443 but you can enter your preferred port number. Culture Context By default, this setting is empty.This setting within the Show Optional settings defines the specific languages support such as Italian, Spanish, and so on. For example, Italian would be 'it-IT' or 'it'. For Turkish, the culture context should be set as 'en-US'. -
Click Save and then click Next.
-
At the Selected Components screen, review your selections. Once you have verified your configuration, select Install.
The installer performs multiple pre-requisite checks to ensure that the product can be installed. After the installer performs the prerequisites check a summary report displays. Any missing installation parameters are indicated in the report. See step 15 of the Install Workspace ONE Assist services on the Core, Application, and Portal (CAP) Server procedure, if the report indicates of any missing parameters.
DNS Configuration
The service discovery of core services on the CAP server can be performed using the DNS parameters that point to the CAP server. The DNS parameters such as the zone, host records, and service records must be configured for this purpose.
Listed are the values for the DNS parameters.
Forward Lookup Zone Host Record Service Record Zone Name: controlplane.aetherpal.internal Name: Admin FQDN: admin.controlplane.aetherpal.internal IP Address:<IP address of the CAP server> SVC (Service Coordinator) - Record type: SRV
- Domain: controlplane.aetherpal.internal
- Service: _svc
- Protocol: _tcp
- Priority: 0
- Weight: 0
- Port number: 8870
- Host Offering this service: admin.controlplane.aetherpal.internal
- Record type: SRV
- Domain: controlplane.aetherpal.internal
- Service: _dtp
- Protocol: _tcp
- Priority: 0
- Weight: 0
- Port number: 8865
- Host Offering this service: admin.controlplane.aetherpal.internal
Proceed to Configure Workspace ONE UEM Console with Assist On-Premises.
Medium Server High Availability (HA) Deployment
This deployment model describes High Availability Assist installation with two redundant independent environments or control planes.
In this deployment model, there are two servers in each control plane environment for Assist services. The two servers in each environment are CAP server, where Core, Application, and Portal components are installed, and the CP server, where Connection Proctor services are installed.
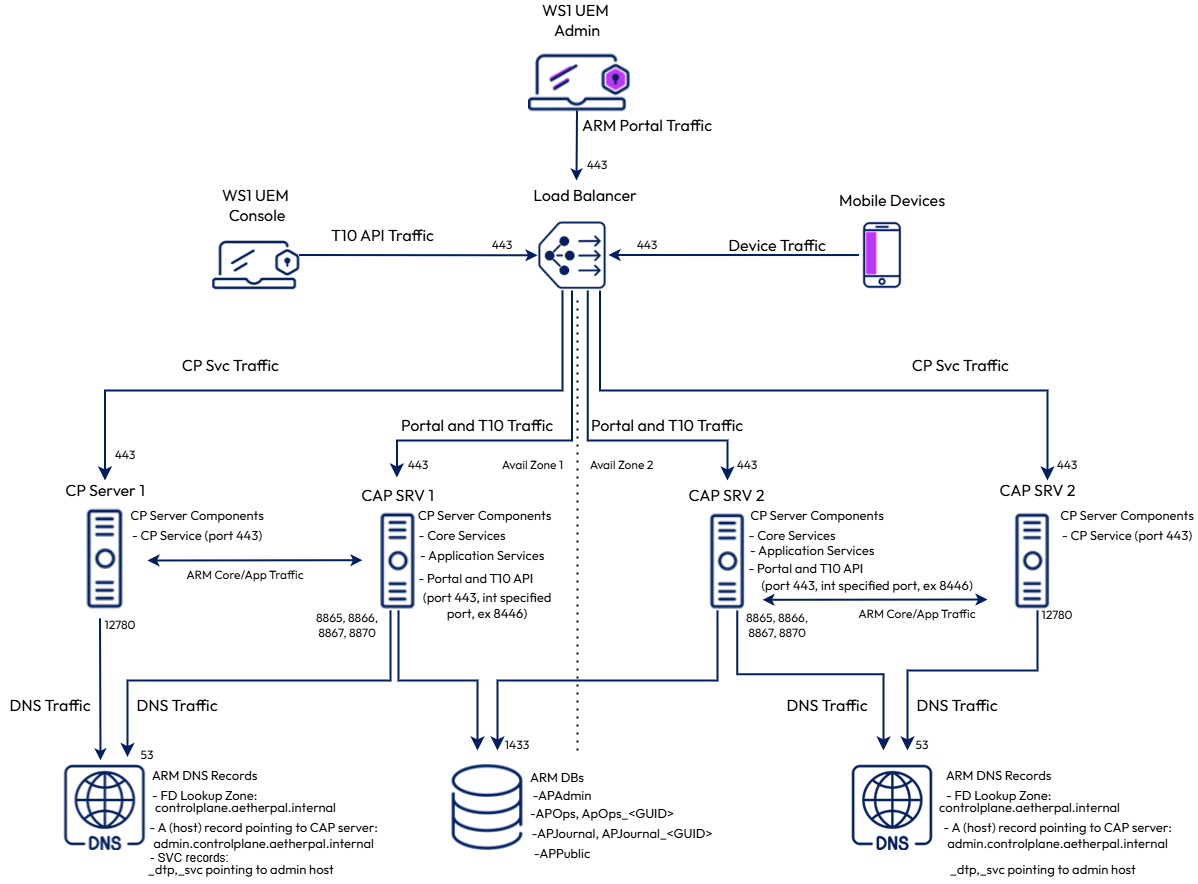
Assist databases are deployed on the database server that is shared amongst the two control plane environments. When the Assist application is functioning, the user and device session are handled entirely by either control plane environment. So, if the Workspace ONE console admin establishes a user session to the CAP server 1 on control plane 1 through the load balancer, CP 1 handles the device sessions. If the Workspace ONE console admin establishes the connection to CAP server 2 on control plane 2, CP 2 handles the device session.
In each environment, the services on both servers perform service discovery. This discovery can be done using the IP address of the CAP server or DNS entries that point to the CAP server. The use of the DNS Server is OPTIONAL.
Note: If you use DNS for service discovery, you must set up a DNS forward lookup zone and respective records. To know how to configure DNS, see DNS Configuration.
Prerequisites:
-
Generate a T10 certificate for UEM provisioning: On the primary CAP server, run the RemoteManagementCertificateGenerator utility, generate a T10 certificate, and run the certificate seeding script on the Workspace ONE UEM database. For details, see Generate the Workspace ONE Assist T10 API Certificate. After the seeding script has been run, copy the artifacts folder
…\RemoteManagementCertificateGenerator 22.03\RemoteManagementCertificateGenerator\Artifactsfrom the primary CAP to the secondary CAP server. The T10 certificate in the artifacts folder is required for the installation on the secondary server but there is no need to rerun the seeding script when Assist is installed on the secondary server. -
Install SSL certificate: Procure and install an SSL/TLS certificate that matches with the FQDN assigned to the Assist system. This certificate must be installed on both the CAP and CP servers. For Single-Server Deployment and Multiple Server Deployment, see On-Prem Config: Fully Qualified Domain Name and Site SSL/TLS Certificate, Single-Server On-Prem Deployment and On-Prem Config: Fully Qualified Domain Name and Site SSL/TLS Certificate, Multiple Server On-Prem Deployment.
-
Deactivate Antivirus and Monitoring: Temporarily turn off antivirus and monitoring software during installation.
-
Deactivate IPv6: Turn off IPv6 on the server's network adapter.
-
Activate TLS 1.2: Ensure your system supports TLS 1.2 for secure communication and enable respective cipher suites.
-
System User Configuration: Ensure the system allows creating local users, as the installer creates specific users for internal services.
-
Allow Required Ports: If you have a LoadBalancer/Firewall, permit necessary ports for communication.
-
Check Firewall Settings: Disable the firewall or ensure it allows necessary connections. For Single-Server Deployment, see On-Prem Config: Firewall Rules, Single-Server On-Prem Deployment and for Multiple Server Deployment, see On-Prem Config: Firewall Rules, Multiple Server On-Prem Deployment.
-
Configure DNS: Set up DNS if you are using forward lookup zones for service discovery. For more information, see Domain Name Service.
-
SSL Passthrough (If LoadBalancer Used): Configure SSL passthrough if LoadBalancer is used to forward SSL traffic to servers.
- Source IP Address Persistence: Set up TCP-based layer 4 'Source IP Address Persistence' for external ports.
- Session Persistence: Configure session persistence so that the same server handles the entire session. For information, see On-Prem Config: Persistence for Multiple Server On-Prem Deployment.
-
Remove HSTS Header configuration: The installer handles the configuration of the HSTS header on the IIS. Manual configuration is not required.
-
Net.Tcp Listener Adapter: Ensure the 'Net.Tcp Listener Adapter' service is running.
-
SQL Server Collation: Use 'SQL_Latin1_General_CP1_CI_AS' collation for SQL server setup.
-
Update .NET Framework: Install .NET Framework 4.8 on all the CAP and CP servers.
-
Minimize Latency: Ensure there is no network delay between Workspace ONE UEM and Workspace ONE Assist.
-
Screen resolution: Keep the system screen resolution at 1200 * 720 for the optimal visibility of the installation user interface.
After you have the prerequisites in place, you must begin the installation steps on the first and the second availability zones.
Installation steps on the first availability zone
- Install the CAP server first, followed by the CP server.
- After installing the CAP server and CP server on the first availability zone, test the environment with UEM to ensure the Assist application is functioning correctly.
- After successful testing, proceed to install Assist on the second availability zone, after deactivating the first availability zone in the load balancer pool to ensure the second availability zone is active now.
Installation steps on the second availability zone
-
Install the CAP server first, followed by the CP server.
-
After installing the CAP server and CP server on the second availability zone, test the environment with UEM to ensure the Assist application is functioning correctly.
-
After successful testing, add or remove either the first or second availability zone in the load balancer pool based on Active/Active or Active/Passive configuration.
Note: Ensure the DB FQDN records for the servers are correctly mapped to LoadBalancer internal VIP or DNS name based on the deployment. See Modify Database Record for Multi-Node Configurationfor modifying existing FQDN records. For details on integrating LoadBalancer, see Load Balancer.
Install Workspace ONE Assist services on the Core, Application, and Portal (CAP) Server
Perform the following steps to install Workspace ONE Assist services on the Core, Application, and Portal (CAP) Server.
-
On the CAP server, run the Workspace ONE Assist installer from the temporary directory and click Next. You can download the installer from the repository at https://my.workspaceone.com.
-
Select the installation directory for the Assist software and click Install.
-
Select Advanced Installation (Custom) and then configure the settings for Secured Internal Service Communication.
- Enter a secure password to protect the certificate that is generated for the Assist internal services.
- Select the RSA key size for the self-signed certificate generated by Assist. By default, the key size is 2048.
- Enter the internal service port (For example, non-HTTP ports like 8446, 8083, and so on). Click Next.
-
Select the components that must be installed on the server and click Next.
- Database
- Core Services
- Portal Services
- Application Services
-
Configure the database settings. Select Connect to Existing SQL Server and complete the following settings.
Settings Description SQL Server / Listener Name Enter the SQL instance name, IP address, or connection string (or listener name when High Availability is configured for Database). Authentication Select the database account authentication. The authentication can be either Windows Authentication or SQL Authentication. User name Enter the user name of the database account. This user name is used by the installer to create all the databases required to install Workspace ONE Assist. Password Enter the password of the database account. Note: When making user names and passwords, do not use the following special characters: - Ampersand - &
- Less Than - <
- Greater Than - >
- Single Quote - '
- Double Quotes - "
- Semicolon - ;
- Flower Brackets - {}
-
Click the ...More button to complete the Database Advanced Settings.
Settings Description Core Service logon Username/Password If Use Windows Authentication User option is selected, see Active Directory Integrations before configuring these accounts. Enter the newly created or already created Active Directory users for the core Windows service custom logon.
Note: If the password expires or is changed based on the password policies on the system, see Update Service Users Password with Assist Service User Configurations Utility.IIS Application Pool Username/Password If Use Windows Authentication User option is selected, see Active Directory Integrations before configuring these accounts. Enter the newly created or already existing Active Directory users for the custom IIS application pool identity user.
Note: If the password expires or is changed based on the password policies on the system, see Update Service Users Password with Assist Service User Configurations Utility.DB Owner User name/ Password Set the user name and password for the Workspace ONE Assist database owner SQL account. This account does not have system-wide permissions. The account only has permissions within the Workspace ONE Assist databases. By default, the user name is apadminuser.
Note:- If the Use Windows Authentication User option is selected, see Active Directory Integrations before configuring database accounts. Enter the newly or already created Active Directory users.
- If the password expires or is changed based on the password Policies on the system, see Update Service Users Password with Assist Service User Configurations Utility.
DB Application User name/ Password Set the user name and password for the Workspace ONE Assist database application account. By default, the user name is apdbuser.
Note:- If the Use Windows Authentication User option is selected, see Active Directory Integrations before configuring database accounts. Enter the newly or already created Active Directory users.
- If the password expires or is changed based on the password Policies on the system, see Update Service Users Password with Assist Service User Configurations Utility.
MDF Path LDF Path NDF Path Enter the path of the primary data file (MDF), transaction log file (LDF), and the secondary data file (NDF).
Note: FULL control permission is required for the logon account used for the SQL Server service to access the database file system location where database files are stored. For example, the default user NT SERVICE\MSSQLSERVER for a default instance or NT SERVICE\MSSQL$InstanceName for a named instance is used for the service accounts during SQL Server setup and must have FULL control permission for the database file system location where database files are stored. -
Click Save and then click Next.
-
Configure the Core settings.
Settings Description SQL Server/Listener Name Enter the database server hostname, IP address, or connection string (or listener name when High Availability is configured for Database) that you have already configured. Service Discovery Configuration The IP Address and Port for the Core/Application server (If multiple core servers are configured using load balance, then you must provide the load balancer IP address). You also have the option to switch to Forward Lookup Zone by choosing another configuration, typically controlplane.internal. You can select one or more Subject Alternative Name from the drop-down menu or add additional host names (sites, IP addresses, common names, and so on.) to be protected by a single SSL certificate such as a Multi-Domain (SAN) which the installer creates for each service secure communication. User Management Settings Enter a custom username and password for both Admin and Operations portal access. The Assist installer uses this account for the initial product installation. Use the same credentials to access the Admin and Operation portal for any troubleshooting requirements after installation. By default, the username is prepopulated with RootAdminfor the Admin portal (AdminWebPortal) andOpsadminfor the Operations portal (wbc). Set the minimum password length to atleast 8 characters with a combination of Alpha/Numeric/Uppercase/Special Characters. Do not use special characters in passwords, such as the plus sign (+), double quotes ("), and hash (#). -
Click ...More to configure the CoreAdvancedExtn settings.
Settings Description DB Application User name/ Password Enter the user name and password for the Workspace ONE Assist database application account. By default, the user name is apdbuser. Note: - If 'Use Windows Authentication User' option is selected, see Active Directory Integrations before configuring database accounts. Enter the newly or already created Active Directory users.
- If the password expires or is changed based on the password Policies on the system, see Update Service Users Password with Assist Service User Configurations Utility.
Secure SSL Service Username/ Password Defines the internal service username and password for Assist services. The mentioned user is created locally in the system and used for IIS client authentication configuration, if 'Use Windows authenticated users for services and sites' option is not selected.
Note:- If 'Use windows authenticated users for services and sites' option is selected, see Active Directory Integrations before configuring these accounts and enter the newly or already created Active Directory users to configure services.
- If the password expires or is changed based on the password Policies on the system, see Update Service Users Password with Assist Service User Configurations Utility.
SQL Always ON This check box within the Show Optional settings must be selected only when High Availability is configured for Database. Password Management-Assist System Management (AdminWebPortal) This option within the Show Optional settings is not required during the installation. It can be used only for Troubleshooting after the installation. This can be used to reset the password of any existing Admin portal users. For information about Password Management, see Ability to reset passwords. Password Management-Assist System Management (MgmtWebPortal) This option within the Show Optional settings is not required during the installation. It can be used only for Troubleshooting after the installation. This can be used to reset the password of any existing Operations portal users for the given tenant. For information about Password Management, see Ability to reset passwords. Culture Context By default, this setting is empty.Defines the specific languages support such as Italian, Spanish, and so on. For example, Italian would be 'it-IT' or 'it'. For Turkish, the culture context should be set as 'en-US'. Internal HTTP(S) Port Defines the internal secure service communication port. Enter the internal HTTPS port used by the core services. The default is 8083 but you can enter an alternate port number, such as 6443. The HTTP port indicates the port number you entered in step 3. -
Click Save and then click Next to configure the Portal settings.
Settings Description Service Discovery Configuration The IP Address and Port for the Core/Application server. If multiple core servers are configured using the Load Balancer, then you must provide the Load Balancer IP address. You also have the option to switch to Forward Lookup Zone by choosing another configuration, typically controlplane.internal. In the select one or more Subject Alternative Names from the list, lets you choose or add additional hostnames (sites, IP addresses, common names, and so on.) to be protected by a single SSL certificate such as a Multi-Domain (SAN) which is created by the installer for each service secure communications. User Management Settings Enter a custom username and password for both Admin and Operations portal access. The Assist installer uses this account for the initial product installation. Use the same credentials to access the Admin and Operation portal for any troubleshooting requirements after installation.
By default, the username is prepopulated withRootAdminfor Admin portal (AdminWebPortal) andOpsadminfor the Operations portal (wbc).
Set the minimum password length to at least 8 characters with a combination of Alpha/Numeric/Uppercase/Special Characters.
Do not use special characters in passwords, such as the plus sign (+), double quotes ("), and hash (#).Tenant FQDN Enter the server's fully qualified domain name. For example, "rmstage01.awmdm.com" SSL Certificate Select the folder icon and browse for the SSL Certificate already installed. For details, see Install an SSL Certificate. SQL Server Name Enter the database server hostname that you have already configured. Apply Default Enrollment Certificate If required, select a different Enrollment Certificate provided by the Assist support team. Choose T10 Certificate Select the folder button to browse for and load the T10 certificate. This certificate is in the folder where the installer file was downloaded and moved to in the …\RemoteManagementCertificateGenerator 22.03\RemoteManagementCertificateGenerator\Artifactsfolder. For more information, see Generate the Workspace ONE Assist T10 API Certificate. -
Select the ...More button and complete the Custom Portal Advanced Settings.
Important: If you are using port numbers other than the defaults referenced in Network and Security Requirements, you must enter these non-default port numbers here.
Settings Description Use Windows Authentication Users for services and sites Activates the use of Windows user accounts to configure services. By default, this option is not selected. If the Use Windows Authentication Users for services and sites option is selected, see Active Directory Integrations before configuring these accounts and enter the newly or already created Active Directory users to configure services. Note: If the password expires or is changed based on the password policies on the system, see Update Service Users Password with Assist Service User Configurations Utility. Secure SSL Service Username/Password Defines the internal service username and password for Assist services. The user is created locally on the system and user for IIS client authentication configuration, if Use Windows Authentication User option is not selected. Note: - If the Use Windows Authentication User option is selected, see Active Directory Integrations before configuring these accounts and enter the newly or already created Active Directory users to configure services.
- If the password expires or is changed based on the password Policies on the system, see Update Service Users Password with Assist Service User Configurations Utility.
Culture Context By default, this setting is empty. Defines the specific language support such as Italian, Spanish, and so on. For example, Italian would be 'it-IT' or 'it'. For Turkish, the culture context should be set as 'en-US'. Internal Service HTTP (S) Port Defines the internal secure service communication port. Enter the internal HTTPS port used by the core services. The default is 8083 but you can enter an alternate port number, such as 6443. The HTTP port indicates the port number you entered in step 3. IIS Site Binding IP Address Defines from which interfaces/IP addresses portal services can be reached. By default, the setting is ‘All Unassigned’ to activate all interfaces/IPs. HTTPS Port Enter the HTTPS port number. The default is 443. SSL Enable Activates SSL/TLS protocol for portal services. By default, this check box is selected so that the portal services use SSL/TLS. Leave this check box selected. T10 user name And Auto Generated Defines T10 API user for connectivity between Workspace ONE UEM and Workspace ONE Assist system. By default, if the ‘Auto Generated’ check box is selected, the installer assigns a random user name to be created locally on the server. Leave this text box defaulted and the check box selected for the Installer to create the T10 API user. If you want to define the user, deselect the check box and type in the T10 user name you want to use.
Note:- If the 'Use windows authenticated users for services and sites' option is selected, see Active Directory Integrations before configuring these accounts and enter the newly or already created Active Directory user for UEM provisioning.
- If the password expires or is changed based on the password Policies on the system, see Update Service Users Password with Assist Service User Configurations Utility.
-
Click Save. You are taken to the previous screen.
-
Click Next.
-
Review your selections at the Selected Components screen.
The installer performs multiple pre-requisite checks to ensure that the product can be installed. After the installer performs the prerequisites check, a summary report displays. Any missing installation parameters are indicated in the report.
-
If any of the prerequisites are missing and the check fails, do not select Install.
a. Select Detailed Report link to see which prerequisites are missing.
b. To install missing prerequisite components, select the Install Componentslink. The installer installs the missing components.
You might need to reboot the server after the prerequisites are installed.c. After the reboot, relaunch the installer.
The installer pre-populates with your previous selections. -
If the initial prerequisite check comes back with all components passing, select Install.
Once the Install button is selected, the installer validates and begins the installation.
For IIS Client authentication, the installer checks for the presence of the
ClientAuthTrustModewindows registry key. If the key is absent, a pop-up window with a Yes or No option is shown.- On selecting 'Yes', the installer automatically updates the registry on the system and the installation continues.
- On selecting 'No', the registry key is not added and the installation stops.
Note: The following DWORD key,HKEY_LOCAL_MACHINE\SYSTEM\CurrentControlSet\Control\SecurityProviders\SCHANNELis added with value nameClientAuthTrustMode, value typeREG_DWORD, and value data2.
The installer first installs the database and then proceeds to install Core, Portal, and Application services.
Note: Database execution might take an extended period.
-
Click Next after the installation completes.
-
Ensure that the check box Execute Resource Pack is selected and select the Finish button.
The Assist installation is complete on the CAP server. However, the resource pack must run in the background. Do not close the command line window. The command line window closes automatically when the resource pack execution is complete. If there is a failure while executing the resource pack for importing device profiles, you can manually run the resource pack. For information about manual resource pack execution, see Import Device Profiles with Resource Pack Utility.
Install Workspace ONE Assist services on the Connector Proctor (CP) Server
After you have installed the Core, Application, and Portal (CAP) services on the CAP server, proceed to install the Connection Proctor (CP) services on the CP server.
-
On the Connection Proctor (CP) server, run the Workspace ONE Assist installer from the temporary directory and click Next.
-
Select the installation directory for the Assist software and click Install.
-
Select Advanced Installation (Custom) and then configure the settings for Secured Internal Service Communication.
-
Enter a secured password to protect the certificate that is generated for the Assist internal services.
-
Select the RSA key size for the self-signed certificate generated by Assist. By default, the key size is 2048.
-
Enter the internal service port (For example, non-http ports like 8446, 8083, and so on). Click Next.
-
-
Select Connection Proctor component for installation on the server and click Next.
-
Configure the Connection Proctor settings.
Settings Description Connection Proctor FQDN Defines the Fully Qualified Domain Name (FQDN) on which CP services can be reached. Enter in the FQDN, which must be the same as the FQDN assigned for portal services. User Management Settings Enter an existing Admin portal username and password. The Assist installer uses this account for the initial product installation to configure the Assist Connection Proctor service. By default, the username is prepopulated with RootAdminfor Admin portal (AdminWebPortal).Service Discovery Configuration The IP Address and Port for the Core/Application server. If multiple core servers are configured using the Load Balancer, then you must provide the Load Balancer IP address. You also have the option to switch to Forward Lookup Zone by choosing another configuration, typically controlplane.internal. You can select one or more Subject Alternative Name from the drop-down menu or add additional host names (sites, IP addresses, common names, and so on.) to be protected by a single SSL certificate such as a Multi-Domain (SAN) which the installer creates for each service secure communication. Port Enter the port number for CP services. The default is 443 in multiple server environments but you can enter your preferred port number. Whatever port you select, ensure that network/security teams use this port when assigning translation rules from the firewall/router to the Server for CP services. SSL Certificate Select the folder icon and browse for the SSL Certificate already installed. For details, see Install an SSL Certificate. You may also click View Certificate to verify if the selected certificate is the one you want to use for the CP server. SAN (subject alternative name) certificates are supported. The implementation of SAN certificates depends upon your server arrangement. - The SAN certificate must have an FQDN defined for each connection proctor server and Workspace ONE Assist server.
- For example, presume you have 2 connection proctor servers and 2 Workspace ONE Assist servers. The 2 Workspace ONE Assist servers host portal services, which require TLS/SSL traffic terminated at the load balancer. The FQDN for the SAN certificate must reflect the fully qualified domain name, for instance, "rmstage01.awmdm.com".
- Meanwhile, for each of the 2 CP servers, TLS/SSL traffic terminates at the connection proctor, and therefore, you must have 2 FQDNs defined in the SAN certificate, for instance, "rmstage01.awmdm.com' and "rmstage02.awmdm.com'.
SQL Server/Listener Name Enter the database server hostname, IP address, or connection string (or listener name when High Availability is configured) that you have already configured. - The SAN certificate must have an FQDN defined for each connection proctor server and Workspace ONE Assist server.
-
Select the ...More button and complete the Custom Connection Proctor Advanced settings.
Important: If you are using port numbers other than the defaults referenced in Network and Security Requirements, you must enter these non-default port numbers here.
Settings Description CP Internal IP Address/Port Defines from which internal IP addresses the connection proctor can be reached. By default, the setting is ‘All Unassigned’ to allow all addresses. Enter the port number for the Connection Proctor component. The default is 8443 but you can enter your preferred port number. Culture Context By default, this setting is empty.This setting within the Show Optional settings, defines the specific languages support such as Italian, Spanish, and so on. For example, Italian would be 'it-IT' or 'it'. For Turkish, the culture context should be set as 'en-US'. -
Click Save. You are taken to the previous screen.
-
Click Next.
-
At the Selected Components screen, review your selections. Once you have verified your configuration, select Install.
The installer performs multiple pre-requisite checks to ensure that the product can be installed. After the installer performs the prerequisites check a summary report displays. Any missing installation parameters are indicated in the report. See step 15 of the Install Workspace ONE Assist services on the Core, Application, and Portal (CAP) Server procedure, if the report indicates of any missing parameters.
DNS Configuration
This section covers the configuration of DNS parameters if DNS is used for service discovery of core services. The zone, host record, and service records all point to the CAP server.
The following parameters need to be defined:
Listed are the values for the DNS parameters.
Forward Lookup Zone Host Record Service Record Zone Name: controlplane1.internal Name: Admin FQDN: admin.controlplane1. internal Address:<IP address of the CAP server> SVC (Service Coordinator) - Record type: SRV
- Domain: controlplane1.internal
- Service: _svc
- Protocol: _tcp
- Priority: 0
- Weight: 0
- Port number: 8870
- Host Offering this service: admin.controlplane1.internal
- Record type: SRV
- Domain: controlplane1.internal
- Service: _dtp
- Protocol: _tcp
- Priority: 0
- Weight: 0
- Port number: 8865
- Host Offering this service: admin.controlplane1.internal
Proceed to Configure Workspace ONE UEM Console with Assist On-Premises.
Multiple Server Installation of Workspace ONE Assist
The multiple server installation method involves installing Assist on multiple servers where there is a high number of enrollments and concurrent remote control sessions.
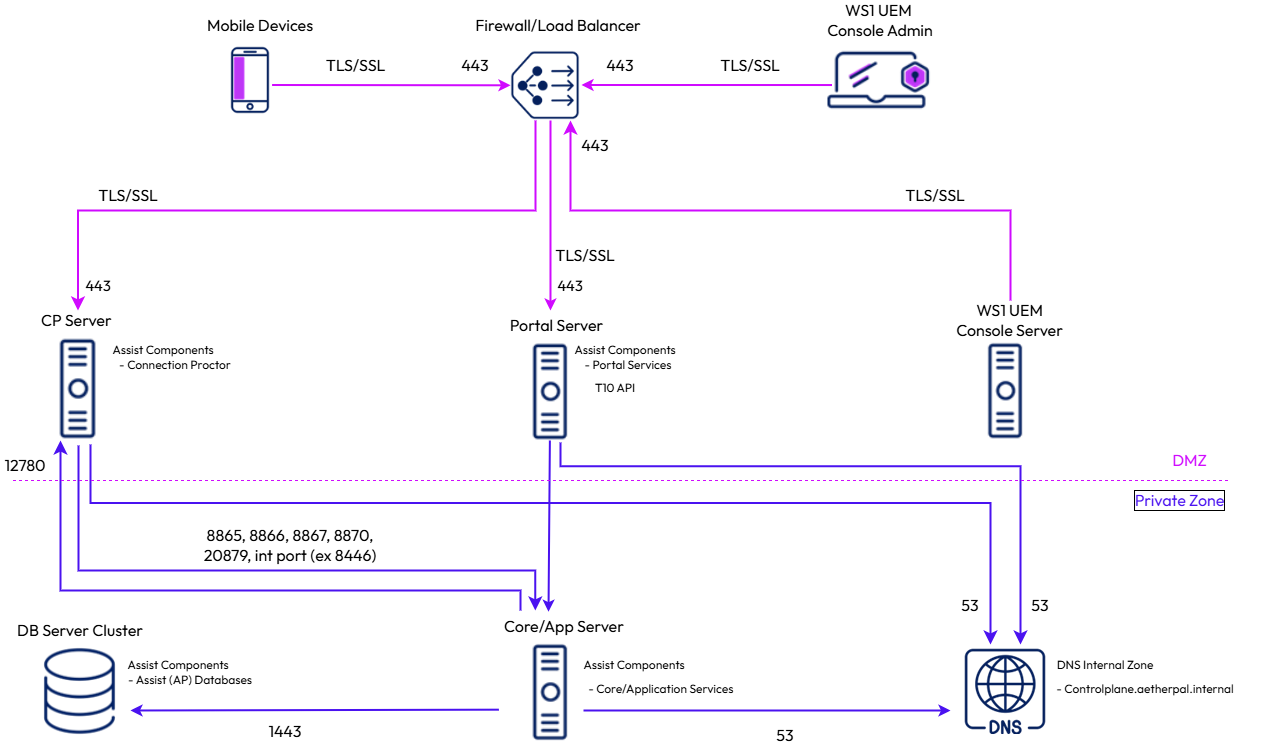
In this installation method, two security zones are utilized. One zone is the public/DMZ, where public-facing servers are deployed. These servers are the Portal server and Connection Proctor server. The other zone is the private zone where the core/application server is deployed. You must deploy the database in the private zone, so that the Core/Application server is able to easily communicate with it.
With this installation method, the services in the public zone on the portal and connection proctor servers can perform service discovery and communicate with the Core/Application server, which in turn communicates with the database. This discovery can be done using the IP address of the Core/Application server or the DNS entries that point to the Core/Application server. Use of the DNS Server is OPTIONAL.
Note: If you are using DNS for service discovery, you must set up a DNS forward lookup zone and respective records.
Prerequisites:
-
Generate a T10 certificate for UEM provisioning: Run the RemoteManagementCertificateGenerator utility, generate a T10 certificate, and run the certificate seeding script on the Workspace ONE UEM database. For details, see Generate the Workspace ONE Assist T10 API Certificate. After the seeding script has been run, copy the artifacts folder
…\RemoteManagementCertificateGenerator 22.03\RemoteManagementCertificateGenerator\Artifactsfrom the primary CAP to the secondary CAP server. The T10 certificate in the artifacts folder is required for the installation on the secondary server but there is no need to rerun the seeding script when Assist is installed on the secondary server. -
Install SSL certificate: Procure and install an SSL/TLS certificate that matches with the FQDN assigned to the Assist system. This certificate must be installed on the Portal and CP servers. For Single-Server Deployment and Multiple Server Deployment, see On-Prem Config: Fully Qualified Domain Name and Site SSL/TLS Certificate, Single-Server On-Prem Deployment and On-Prem Config: Fully Qualified Domain Name and Site SSL/TLS Certificate, Multiple Server On-Prem Deployment.
-
Deactivate Antivirus and Monitoring: Temporarily turn off antivirus and monitoring software during installation.
-
Deactivate IPv6: Turn off IPv6 on the server's network adapter.
-
Activate TLS 1.2: Ensure your system supports TLS 1.2 for secure communication and enable respective cipher suites.
-
System User Configuration: Ensure the system allows creating local users, as the installer creates specific users for internal services.
-
Allow Required Ports: If you have a LoadBalancer/Firewall, permit necessary ports for communication.
-
Check Firewall Settings: Disable the firewall or ensure it allows necessary connections. For Single-Server Deployment, see On-Prem Config: Firewall Rules, Single-Server On-Prem Deployment and for Multiple Server Deployment, see On-Prem Config: Firewall Rules, Multiple Server On-Prem Deployment.
-
Configure DNS: Set up DNS if you are using forward lookup zones for service discovery. For more information, see Domain Name Service.
-
SSL Passthrough (If LoadBalancer Used): Configure SSL passthrough if LoadBalancer is used to forward SSL traffic to servers.
- Source IP Address Persistence: Set up TCP-based layer 4 'Source IP Address Persistence' for external ports.
- Session Persistence: Configure session persistence so that the same server handles the entire session. For information, see On-Prem Config: Persistence for Multiple Server On-Prem Deployment.
-
Remove HSTS Header configuration: The installer handles the configuration of the HSTS header on the IIS. Manual configuration is not required.
-
Net.Tcp Listener Adapter: Ensure the 'Net.Tcp Listener Adapter' service is running.
-
SQL Server Collation: Use 'SQL_Latin1_General_CP1_CI_AS' collation for SQL server setup.
-
Update .NET Framework: Install .NET Framework 4.8 on all the servers where Assist is getting installed.
-
Minimize Latency: Ensure there is no network delay between Workspace ONE UEM and Workspace ONE Assist.
-
Screen resolution: Keep the system screen resolution at 1200 * 720 for the optimal visibility of the installation user interface.
Install the Workspace ONE Assist services on the Core and Application Server
Perform the steps to install the Assist database on the database server and the core/application services on the Core and Application server.
-
On the Core/Application server, run the Workspace ONE Assist installer from the temporary directory and click Next. You can download the installer from the repository at https://my.workspaceone.com.
-
Select the installation directory for the Assist software and click Install.
-
Select Advanced Installation (Custom) and then configure the settings for Secured Internal Service Communication.
- Enter a secured password to protect the certificate that is generated for the Assist internal services.
- Select the RSA key size for the self-signed certificate generated by Assist. By default, the key size is 2048.
- Enter the internal service port (For example, non-http ports like 8446, 8083, and so on). Click Next.
-
Select the components that must be installed on the server and click Next.
- Database
- Core Services
- Application Services
-
Configure the database settings. Select Connect to Existing SQL Server and complete the following settings.
Settings Description SQL Server/Listener Name Enter the SQL instance name, IP address, or connection string (or listerner name when High Availability is configured for the Database). Authentication Select the database account authentication. The authentication can be either Windows Authentication or SQL Authentication. User name Enter the user name of the database account. This user name is used by the installer to create all the databases required to install Workspace ONE Assist. Password Enter the password of the database account. Note: When making user names and passwords, do not use the following special characters: - Ampersand - &
- Less Than - <
- Greater Than - >
- Single Quote - '
- Double Quotes - "
- Semicolon - ;
- Flower Brackets - {}
-
Click the ...More button to complete the Database Advanced Settings.
Settings Description Core Service logon Username/Password If the 'Use Windows Authentication User' option is selected, see Active Directory Integrations before configuring these accounts. Enter the newly or already created Active Directory users for core Windows service custom logon. Note: If the password expires or is changed based on the password policies on the system, see Update Service Users Password with Assist Service User Configurations Utility. IIS Application Pool Username/Password If the 'Use Windows Authentication User' option is selected, see Active Directory Integrations before configuring these accounts. Enter the newly or already created Active Directory users for custom Application Pool identity user. Note: If the password expires or is changed based on the password policies on the system, see Update Service Users Password with Assist Service User Configurations Utility. DB Owner User name/ Password Set the user name and password for the Workspace ONE Assist database owner SQL account. This account does not have system-wide permissions. The account only has permissions within the Workspace ONE Assist databases. By default, the user name is apadminuser. Note: - If the 'Use Windows Authentication User' option is selected, see Active Directory Integrations before configuring database accounts. Enter the newly or already created Active Directory users.
- If the password expires or is changed based on the password Policies on the system, see Update Service Users Password with Assist Service User Configurations Utility.
DB Application User name/ Password Set the user name and password for the Workspace ONE Assist database application account. By default, the user name is apdbuser. Note: - If the 'Use Windows Authentication User' option is selected, see Active Directory Integrations before configuring database accounts. Enter the newly or already created Active Directory users.
- If the password expires or is changed based on the password Policies on the system, see Update Service Users Password with Assist Service User Configurations Utility.
MDF Path LDF Path NDF Path Enter the path of the primary data file (MDF), transaction log file (LDF), and the secondary data file (NDF).
Note: FULL control permission is required for the logon account used for the SQL Server service to access the database file system location where database files are stored. For example, the default user NT SERVICE\MSSQLSERVER for a default instance or NT SERVICE\MSSQL$InstanceName for a named instance is used for the service accounts during SQL Server setup and must have FULL control permission for the database file system location where database files are stored. -
Click Save and then click Next.
-
Configure the Core settings.
Settings Description SQL Server/Listener Name Enter the SQL instance name, IP address, or connection string (or listener name when High Availability is configured for the Database). Service Discovery Configuration The IP Address and Port for the Core/Application server. (If multiple core server is configured using Load Balancer, then you must provide the Load Balancer IP address.)
You also have the option to switch to Forward Lookup Zone by choosing another configuration, typically controlplane.internal.
You can select one or more Subject Alternative Names from the drop-down menu or add additional host names (sites, IP addresses, common names, and so on.) to be protected by a single SSL certificate such as a Multi-Domain (SAN) which the installer creates for each service secure communication.User Management Settings Enter a custom username and password for both Admin and Operations portal access. The Assist installer uses this account for the initial product installation. Use the same credentials to access the Admin and Operation portal for any troubleshooting requirements after installation.
By default, the username is prepopulated with RootAdmin for the Admin portal (AdminWebPortal) and Opsadmin for the Operations portal (wbc).
Set the minimum password length to at least 8 characters with a combination of Alpha/Numeric/Uppercase/Special Characters. Do not use special characters in passwords, such as the plus sign (+), double quotes ("), and hash (#). -
Click ...More to configure the CoreAdvancedExtn settings.
Settings Description DB Application User name/ Password Enter the user name and password for the Workspace ONE Assist database application account. By default, the user name is apdbuser. Note: - If the 'Use Windows Authentication User' option is selected, see Active Directory Integrations before configuring database accounts. Enter the newly or already created Active Directory users.
- If the password expires or is changed based on the password Policies on the system, see Update Service Users Password with Assist Service User Configurations Utility.
Internal service HTTP(S) Port Defines the internal secure service communication port. Enter the internal HTTPS port used by the core services. The default is 8083 but you can enter an alternate port number, such as 6443. The HTTP port indicates the port number you entered in step 3. Secure SSL Service Username/Password Defines the internal service username and password for Assist Services. The mentioned user is created locally on the system and used for IIS client authentication configuration if the ''Use windows authenticated users for services and sites' option is not selected. Note: - If the 'Use Windows authenticated users for services and sites' option is selected, see Active Directory Integrations before configuring database accounts. Enter the newly or already created Active Directory users.
- If the password expires or is changed based on the password Policies on the system, see Update Service Users Password with Assist Service User Configurations Utility.
Culture Context By default, this setting is empty. This setting within the Show Optional settings, defines the specific languages support such as Italian, Spanish, and so on. For example, Italian would be 'it-IT' or 'it'. For Turkish, the culture context should be set as 'en-US'. SQL Always ON This check box within the Show Optional settings must be enabled only when High Availability is configured for Database. Password Management-Assist System Management (AdminWebPortal) This option within the Show Optional settings is not required during the installation. It can be used only for Troubleshooting after the installation. This can be used to reset the password of any existing Admin portal users. For information about Password Management, see Ability to reset passwords. Password Management-Assist System Management (MgmtWebPortal) This option within the Show Optional settings is not required during the installation. It can be used only for Troubleshooting after the installation. This can be used to reset the password of any existing Operations portal users for the given tenant. For information about Password Management, see Ability to reset passwords. -
Click Save. You are taken to the previous screen.
-
Click Next.
The installer performs multiple pre-requisite checks to ensure that the product can be installed. After the installer performs the prerequisites check a summary report displays. Any missing installation parameters are indicated in the report.
-
If any of the prerequisites are missing and the check fails, do not select Install.
1a. Select the Detailed Report link to see which prerequisites are missing.
b. To install missing prerequisite components, select the Install Componentslink. The installer installs the missing components.
You might need to reboot the server after the prerequisites are installed.c. After the reboot, relaunch the installer.
The installer pre-populates with your previous selections. -
If the initial prerequisite check comes back with all components passing, select Install.
Once the Install button is selected, the installer validates and begins the installation.
For IIS Client authentication, the installer checks for the presence of the
ClientAuthTrustModewindows registry key. If the key is absent, a pop-up window with a Yes or No option is shown.- On selecting 'Yes', the installer automatically updates the registry on the system and the installation continues.
- On selecting 'No', the registry key is not added and the installation stops.
Note: The following DWORD key,
HKEY_LOCAL_MACHINE\SYSTEM\CurrentControlSet\Control\SecurityProviders\SCHANNELis added with value nameClientAuthTrustMode, value typeREG_DWORD, and value data2.
The installer first installs the database on the database server and then proceeds to install Core and Application services on the Core/Application server.
When the installer completes, proceed with the installation of Portal services on the Portal Server.
Install the Workspace ONE Assist portal services on the Portal Server
After you install the database and core/application services, perform the following steps to install the portal services on the Portal server.
-
On the Portal server, run the Workspace ONE Assist installer from the temporary directory and click Next.
-
Select the installation directory for the Assist software and click Install.
-
Select Advanced Installation (Custom) and then configure the settings for Secured Internal Service Communication.
- Enter a secured password to protect the certificate that is generated for the Assist internal services.
- Select the RSA key size for the self-signed certificate generated by Assist. By default, the key size is 2048.
- Enter the internal service port (For example, non-http ports like 8446, 8083, and so on). Click Next.
-
Select Portal Services and click Next.
Settings Description User Management Settings Enter a custom username and password for both Admin and Operations portal access. The Assist installer uses this account for the initial product installation. Use the same credentials to access the Admin and Operation portal for any troubleshooting requirements after installation. By default, the username is prepopulated with RootAdminfor the Admin portal (AdminWebPortal) andOpsadminfor the Operations portal (wbc). Set the minimum password length to at least 8 characters with a combination of Alpha/Numeric/Uppercase/Special Characters. Do not use special characters in passwords, such as the plus sign (+), double quotes ("), and hash (#).Tenant FQDN Enter the server's fully qualified domain name. For example, "rmstage01.awmdm.com" SSL Certificate Select the folder icon and browse for the SSL Certificate already installed. For details, see Install an SSL Certificate. SQL Server/Listener Name Enter the Database server hostname, IP address, or connection string (or listener name when High Availability is configured for the Database) that you have already configured. Apply Default Enrollment Certificate If required, select a different Enrollment Certificate provided by the Assist support team. Choose T10 Certificate Select the folder button to browse for and load the T10 certificate. For more information, see Generate the Workspace ONE Assist T10 API Certificate. Service Discovery Configuration The IP Address and Port for the Core/Application server. If multiple core servers are configured using a Load Balancer, then you must provide the Load Balancer IP address. You also have the option to switch to Forward Lookup Zone by choosing another configuration, typically controlplane.internal. You can select one or more Subject Alternative Name from the drop-down menu or add additional host names (sites, IP addresses, common names, and so on.) to be protected by a single SSL certificate such as a Multi-Domain (SAN) which the installer creates for each service secure communication. -
Select the ...More button and complete the advanced Portal parameters.
Important: If you are using port numbers other than the defaults referenced in Network and Security Requirements, you must enter these non-default port numbers here.
Settings Description Use windows authenticated users for services and sites Activates the use of Windows user accounts to configure services. By default, this option is not selected. If the 'Use windows authenticated users for services and sites' option is selected, see Active Directory Integrations before configuring these accounts and enter the newly or already created Active Directory users to configure services. Note: If the password expires or is changed based on the password policies on the system, see Update Service Users Password with Assist Service User Configurations Utility. Secure SSL Service Username/Password Defines the internal service username and password for Assist Services. The mentioned user is created locally on the system and used for IIS client authentication configuration if the 'Use windows authenticated users for services and sites' option is not selected.
Note:- If the 'Use windows authenticated users for services and sites' option is selected, see Active Directory Integrations before configuring these accounts and enter the newly or already created Active Directory users to configure services.
- If the password expires or is changed based on the password Policies on the system, see Update Service Users Password with Assist Service User Configurations Utility.
Culture Context By default, the setting is empty.This setting within the Show Optional settings, defines the specific languages support such as Italian, Spanish, and so on. For example, Italian would be 'it-IT' or 'it'. For Turkish, the culture context should be set as 'en-US'. Internal Service HTTP(S) Port Defines the internal secure service communication port. Enter the internal HTTPS port used by the core services. The default is 8083 but you can enter an alternate port number, such as 6443. The HTTP port indicates the port number you entered in step 3. IIS Site Binding IP Address Defines from which interfaces/IP addresses portal services can be reached. By default, the setting is ‘All Unassigned’ to activate all interfaces/IPs. HTTPS Port Enter the HTTPS port number. The default is 443 but you can enter your preferred port number. SSL Enable Activates SSL/TLS protocol for portal services. By default, this check box is selected so that the portal services use SSL/TLS. Leave this check box selected. T10 user name And Auto Generated Defines T10 API user for connectivity between Workspace ONE UEM and Workspace ONE Assist system. By default, if ‘Auto Generated’ check box is selected, the installer assigns a random user name to be created locally on the server. Leave this text box defaulted and the check box selected for the Installer to create the T10 API user. If you want to define the user, deselect the check box and type in the T10 user name you want to use.
Note:- If the 'Use windows authenticated users for services and sites' option is selected, see Active Directory Integrations before configuring these accounts and enter the newly or already created Active Directory user for UEM provisioning.
- If the password expires or is changed based on the password Policies on the system, see Update Service Users Password with Assist Service User Configurations Utility.
-
Click Save. You are taken to the previous screen.
-
Click Next.
-
At the Selected Components screen, review your selections. Once you have verified your configuration, select Install.
Once the Install button is selected, the installer validates and begins the installation.
For IIS Client authentication, the installer checks for the presence of the
ClientAuthTrustModeWindows registry key. If the key is absent, a pop-up window with a Yes or No option is shown.- On selecting 'Yes', the installer automatically updates the registry on the system and the installation continues.
- On selecting 'No', the registry key is not added and the installation stops.
Note: The following DWORD key,HKEY_LOCAL_MACHINE\SYSTEM\CurrentControlSet\Control\SecurityProviders\SCHANNELis added with value nameClientAuthTrustMode, value typeREG_DWORD, and value data2.
The installer performs multiple pre-requisite checks to ensure that the product can be installed. After the installer performs the prerequisites check a summary report displays. Any missing installation parameters are indicated in the report. See step 12 of the Install Workspace ONE Assist services on the Core and Application Server procedure, if the report indicates any missing parameters.
-
Click Next after the installation completes.
-
Ensure that the check box Execute Resource Pack is selected and select the Finish button.
The Portal services installation is complete on the Portal server. However, the resource pack must run in the background. Do not close the command line window. The command line window closes automatically when the resource pack execution is complete. If there is a failure while executing the resource pack for importing device profiles, you can manually run the resource pack. For information about manual resource pack execution, see Import Device Profiles with Resource Pack Utility.
Proceed to install the Connection Proctor Service on the Connection Proctor server.
Install Workspace ONE Assist services on the Connector Proctor (CP) Server
After you have installed the Portal services on the Portal server, proceed to install the Connection Proctor (CP) services on the CP server.
-
On the Connection Proctor (CP) server, run the Workspace ONE Assist installer from the temporary directory and click Next.
-
Select the installation directory for the Assist software and click Install.
-
Select **Advanced Installation (Custom)**and then configure the settings for Secured Internal Service Communication.
- Enter a secured password to protect the certificate that is generated for the Assist internal services.
- Select the RSA key size for the self-signed certificate generated by Assist. By default, the key size is 2048.
- Enter the internal service port (For example, non-HTTP ports like 8446, 8083, and so on). Click Next.
-
Select Connection Proctor component for installation on the server and click Next.
-
Configure the Connection Proctor settings.
Settings Description User Management Settings Enter an existing Admin portal username and password. The Assist installer uses this account for the initial product installation to configure the Assist Connection Proctor service. By default, the username is prepopulated with RootAdminfor Admin portal (AdminWebPortal)Connection Proctor FQDN Defines the Fully Qualified Domain Name (FQDN) on which CP services can be reached. Enter in the FQDN, which must be the same as the FQDN assigned for portal services. Port Enter the port number for CP services. The default is 443 in multiple server environments but you can enter your preferred port number. Whatever port you select, ensure that network/security teams use this port when assigning translation rules from the firewall/router to the Server for CP services. SSL Certificate Select the folder icon and browse for the SSL Certificate already installed. For details, see Install an SSL Certificate. You may also click View Certificate to verify if the selected certificate is the one you want to use for the CP server. SAN (subject alternative name) certificates are supported. The implementation of SAN certificates depends upon your server arrangement. - The SAN certificate must have an FQDN defined for each connection proctor server and Workspace ONE Assist server.
- For example, presume you have 2 connection proctor servers and 2 Workspace ONE Assist servers. The 2 Workspace ONE Assist servers host portal services, which require TLS/SSL traffic terminated at the load balancer. The FQDN for the SAN certificate must reflect the fully qualified domain name, for instance, "rmstage01.awmdm.com".
- Meanwhile, for each of the 2 CP servers, TLS/SSL traffic terminates at the connection proctor, and therefore, you must have 2 FQDNs defined in the SAN certificate, for instance, "rmstage01.awmdm.com' and "rmstage02.awmdm.com'.
SQL Server/Listener Name Enter the database server hostname, IP address, or connection string (or listener name when High Availability is configured) that you have already configured. Service Discovery Configuration The IP Address and Port for the Core/Application server (If mutliple core servers are configured using the Load Balancer, then you must provide the Load Balancer IP address). The IP Address and Port for the Core server. You also have the option to switch to Forward Lookup Zone by choosing another configuration, typically controlplane.internal. You can select one or more Subject Alternative Names from the drop-down menu or add additional host names (sites, IP addresses, common names, and so on.) to be protected by a single SSL certificate such as a Multi-Domain (SAN) which the installer creates for each service secure communication. - The SAN certificate must have an FQDN defined for each connection proctor server and Workspace ONE Assist server.
-
Select the ...More button and complete the Custom Connection Proctor Advanced settings.
Important: If you are using port numbers other than the defaults referenced in Network and Security Requirements, you must enter these non-default port numbers here.
Settings Description Culture Context By default, the setting is empty.This setting within the Show Optional settings, defines the specific languages support such as Italian, Spanish, and so on. For example, Italian would be 'it-IT' or 'it'. For Turkish, the culture context should be set as 'en-US'. CP Internal IP Address/Port Defines from which internal IP addresses the connection proctor can be reached. By default, the setting is ‘All Unassigned’ to allow all addresses. Enter the port number for the Connection Proctor component. The default is 8443 but you can enter your preferred port number. -
Click Save. You are taken to the previous screen.
-
Click Next.
-
At the Selected Components screen, review your selections. Once you have verified your configuration, selectInstall. The Connector Proctor services are installed on the CP server.
The installer performs multiple pre-requisite checks to ensure that the product can be installed. After the installer performs the prerequisites check, a summary report displays. Any missing installation parameters are indicated in the report. See step 12 of the Install Workspace ONE Assist services on the Core and Application Server procedure, if the report indicates of any missing parameters.
DNS Configuration
This section covers configuration of DNS parameters if DNS is used for service discovery of core services. The zone, host record, and service records all point to the CAP server.
The following parameters need to be defined:
Listed are the values for the DNS parameters.
Forward Lookup Zone Host Record Service Record Zone Name: controlplane1.internal Name: Admin FQDN: admin.controlplane1. internal Address:<IP address of the CAP server> SVC (Service Coordinator) - Record type: SRV
- Domain: controlplane1.internal
- Service: _svc
- Protocol: _tcp
- Priority: 0
- Weight: 0
- Port number: 8870
- Host Offering this service: admin.controlplane1.internal
- Record type: SRV
- Domain: controlplane1.internal
- Service: _dtp
- Protocol: _tcp
- Priority: 0
- Weight: 0
- Port number: 8865
- Host Offering this service: admin.controlplane1.internal
Proceed to Configure Workspace ONE UEM Console with Assist On-Premises.
Multiple Server High Availability (HA) Deployment
This deployment model describes High Availability Assist installation on multiple servers in a fully redundant environment with multiple availability and security zones.
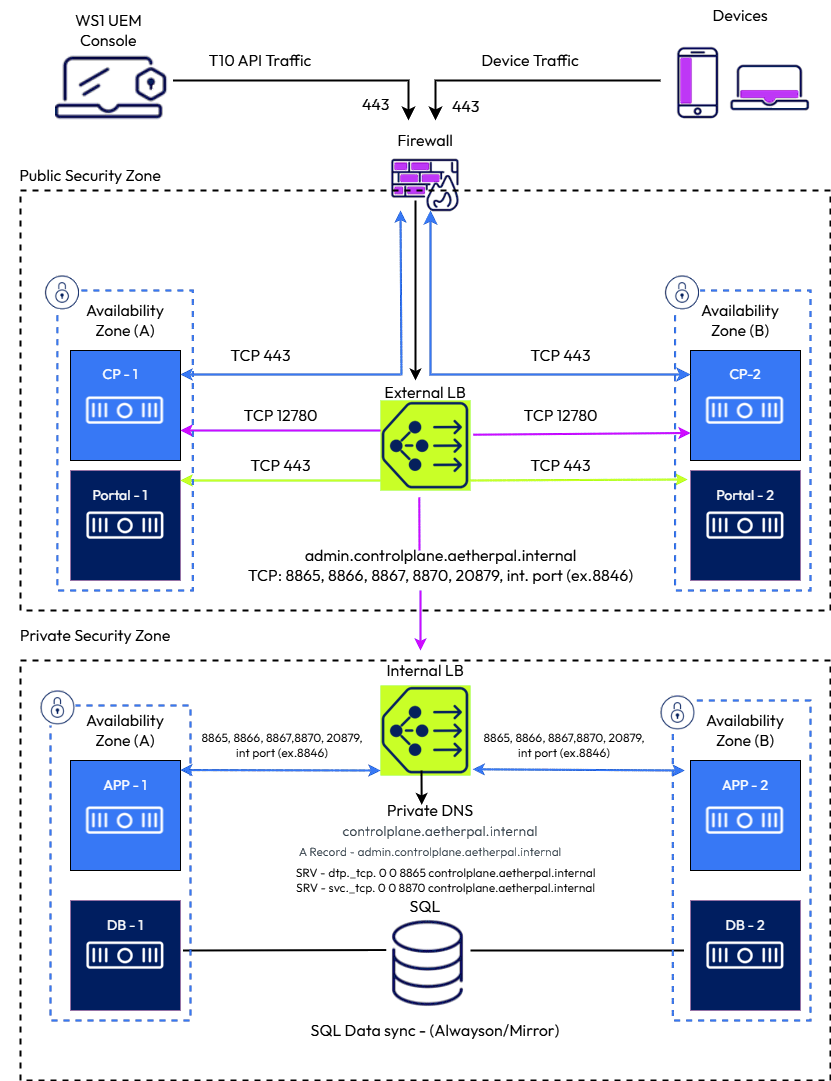
In this deployment, two availability zones mirror each other. In each availability zone, there are two security zones, public and private. The public zone consists of a Portal server that hosts portal services and a CP server that hosts the CP service. The private zone consists of a Core/Application server that will have access to the database server. Assist databases are deployed on the database server that is shared amongst the two availability zones. The customer handles the Database replication.
The Core/Application servers are load-balanced in HA multiple server deployments, just like the portal servers. Assist application handles CP load balancing within the Assist application itself.
Load Balancers are configured for session persistence so that once a session is established to utilize one availability zone, the session is entirely handled within that availability zone.
In each availability zone, all servers perform service discovery so that all the services on the CP, Portal, and Core/Application server may be able to resolve services on the core/application server itself. This discovery is done using an IP address of the core/application server or DNS entries that point to the core/application server. The use of a DNS Server is OPTIONAL.
Note: If you use DNS for service discovery, you must set up a DNS forward lookup zone and respective records. To know about the DNS parameters, see DNS Configuration.
Prerequisites:
-
Generate a T10 certificate for UEM provisioning: On the primary Portal server, run the RemoteManagementCertificateGenerator utility, generate a T10 certificate, and run the certificate seeding script on the Workspace ONE UEM database. For details, see Generate the Workspace ONE Assist T10 API Certificate. After the seeding script has been run, copy the artifacts folder
…\RemoteManagementCertificateGenerator 22.03\RemoteManagementCertificateGenerator\Artifactsfrom the primary Portal to the secondary Portal server. The T10 certificate in the artifacts folder is required for the installation on the secondary server but there is no need to rerun the seeding script when Assist is installed on the secondary server. -
Install SSL certificate: Procure and install an SSL/TLS certificate that matches with the FQDN assigned to the Assist system. This certificate must be installed on all the Portal and CP servers. For Single-Server Deployment and Multiple Server Deployment, see On-Prem Config: Fully Qualified Domain Name and Site SSL/TLS Certificate, Single-Server On-Prem Deployment and On-Prem Config: Fully Qualified Domain Name and Site SSL/TLS Certificate, Multiple Server On-Prem Deployment.
-
Deactivate Antivirus and Monitoring: Temporarily turn off antivirus and monitoring software during installation.
-
Deactivate IPv6: Turn off IPv6 on the server's network adapter.
-
Activate TLS 1.2: Ensure your system supports TLS 1.2 for secure communication and enable respective cipher suites.
-
System User Configuration: Ensure the system allows creating local users, as the installer creates specific users for internal services.
-
Allow Required Ports: If you have a LoadBalancer/Firewall, permit necessary ports for communication.
-
Check Firewall Settings: Disable the firewall or ensure it allows necessary connections. For Single-Server Deployment, see On-Prem Config: Firewall Rules, Single-Server On-Prem Deployment and for Multiple Server Deployment, see On-Prem Config: Firewall Rules, Multiple Server On-Prem Deployment.
-
Configure DNS: Set up DNS if you are using forward lookup zones for service discovery. For more information, see Domain Name Service.
-
SSL Passthrough (If LoadBalancer Used): Configure SSL passthrough if LoadBalancer is used to forward SSL traffic to servers.
- Source IP Address Persistence: Set up TCP-based layer 4 'Source IP Address Persistence' for external ports.
- Session Persistence: Configure session persistence so that the same server handles the entire session. For information, see On-Prem Config: Persistence for Multiple Server On-Prem Deployment.
-
Remove HSTS Header configuration: The installer handles the configuration of the HSTS header on the IIS. Manual configuration is not required.
-
Net.Tcp Listener Adapter: Ensure the 'Net.Tcp Listener Adapter' service is running.
-
SQL Server Collation: Use 'SQL_Latin1_General_CP1_CI_AS' collation for SQL server setup.
-
Update .NET Framework: Install .NET Framework 4.8 on all the servers.
-
Minimize Latency: Ensure there is no network delay between Workspace ONE UEM and Workspace ONE Assist.
-
Screen resolution: Keep the system screen resolution at 1200 * 720 for the optimal visibility of the installation user interface.
After you have the prerequisites in place, begin the installation steps on the first and second availability zones.
Installation steps for the first availability zone
- Install the Assist Database, Application, and Core services first, followed by the portal services, and finally the CP server.
- After installing the first availability zone, test the environment with UEM to ensure the Assist application is functioning correctly.
- After successful testing, proceed to install Assist on the second availability zone after deactivating the first availability zone in the LoadBalancer pool to ensure the second availability zone is active now.
Installation steps for the second availability zone
- Install the Assist Database, Application, and Core services first, followed by the portal services, and finally the CP server.
- After installing the second availability zone, test the environment with UEM to ensure the Assist application is functioning correctly.
- After successful testing, now add or remove either the first or second availability zone in the LoadBalancer pool based on Active/Active or Active/Passive configuration.
Note: Ensure the DB FQDN records for the servers are correctly mapped to LoadBalancer internal VIP or DNS name based on the deployment. See Modify Database Record for Multi-Node Configuration for modifying existing FQDN records. For information about integrating LoadBalancer, see Load Balancer.
Load Balancer
There are two load balancers in this deployment. One load balancer is in the DMZ/Public zone, and the second is in the Private zone.
Configure the load balancer in the public zone to allow all incoming traffic on port 443 destined to each Portal server and CP server on the same port 443, respectively. Session persistency is required so that once a UEM admin establishes a session to a portal server in Availability Zone A, Availability Zone A must contain the session.
Configure the load balancer in the private zone to allow incoming traffic on ports 8865-8870, 20879, and 80/8080 to each Core/Application server on the same ports, respectively. Session persistency is required so that once a session is established to the core/application server in Availability Zone A, Availability Zone A must contain the session.
Install the Workspace ONE Assist services on the Core and Application Server
Follow the procedure to install Assist databases on the database server and core/application services on the Core/Application server.
-
On the Core/Application server, run the Workspace ONE Assist installer from the temporary directory and click Next. You can download the installer from the repository at https://my.workspaceone.com.
-
Select the installation directory for the Assist software and click Install.
-
Select Advcaned Installation (Custom) and then configure the settings for Secured Internal Service Communication.
- Enter a secured password to protect the certificate that is generated for the Assist internal services.
- Select the RSA key size for the self-signed certificate generated by Assist. By default, the key size is 2048.
- Enter the internal service port (For example, non-http ports like 8446, 8083, and so on). Click Next.
-
Select the components that must be installed on the server and click Next.
- Database
- Core Services
- Application Services
-
Configure the database settings. Select Connect to Existing SQL Server and complete the following settings.
Settings Description SQL Server/Listener Name Enter the SQL instance name, IP address, or connection string (or listener name when High Availability is configured for the Database). Authentication Select the database account authentication. The authentication can be either Windows Authentication or SQL Authentication. User name Enter the user name of the database account. This user name is used by the installer to create all the databases required to install Workspace ONE Assist. Password Enter the password of the database account.
Note: When making user names and passwords, do not use the following special characters:- Ampersand - &
- Less Than - <
- Greater Than - >
- Single Quote - '
- Double Quotes - "
- Semicolon - ;
- Flower Brackets - {}
-
Click the ...More button to complete the Database Advanced Settings.
Settings Description Replace the hyphen in the Tenant Identifier to underscore By default, this check box is not selected. During the installation, the tenant Databases are created with the combination of database name_TenantIdentifier. For example, apops_xxxx-xxxx-xxxx-xxxx. The Identifier consists of a random number separated by a hyphen. If this option is selected, it creates with Underscore instead of a hyphen. For example, apops_.xxxx_xxxx_xxxx_xxxx. After the installation, this option can not be edited for any upgrades further.Use Windows Authentication User Activates the use of Windows user accounts to access and authenticate with a database system. To use this option, see Active Directory Integrations. By default this option is not selected, the installer creates and uses the SQL authenticated users for database and internal services access. This option cannot be edited for any further upgrades, once the first time installation is completed. Enforce password policy for SQL Server authentication Ensures strong and secure password management for user accounts authenticating using SQL Server authentication. By default this option is not selected. The installer creates and uses the SQL authenticated users for database and internal services without applying any password rules and policies on the system. This option cannot be edited for any further upgrades, once the first time installation is completed. If the password expires or is changed based on the password policies on the system, see Update Service Users Password with Assist Service User Configurations Utility. Core Service logon Username/Password If the 'Use Windows Authentication User' option is selected, see Active Directory Integrations before configuring these accounts. Enter the newly or already created Active Directory user for core windows service custom logon.
Note: If the password expires or is changed based on the password policies on the system, see Update Service Users Password with Assist Service User Configurations Utility.IIS Application Pool Username/Password If the 'Use Windows Authentication User' option is selected, see Active Directory Integrations before configuring these accounts. Enter the newly or already created Active Directory user for custom IIS Application Pool identity user.
Note: If the password expires or is changed based on the password policies on the system, see Update Service Users Password with Assist Service User Configurations Utility.DB Owner User name/ Password Set the user name and password for the Workspace ONE Assist database owner SQL account. This account does not have system-wide permissions. The account only has permissions within the Workspace ONE Assist databases. By default, the user name is apadminuser.
Note:- If the 'Use Windows Authentication User' option is selected, see Active Directory Integrations before configuring database accounts. Enter the newly or already created Active Directory users.
- If the password expires or is changed based on the password Policies on the system, see Update Service Users Password with Assist Service User Configurations Utility.
DB Application User name/ Password Set the user name and password for the Workspace ONE Assist database application account. This user name is apdbuser. MDF Path LDF Path NDF Path Enter the path of the primary data file (MDF), transaction log file (LDF), and the secondary data file (NDF).
Note: FULL control permission is required for the logon account used for the SQL Server service to access the database file system location where database files are stored. For example, the default user NT SERVICE\MSSQLSERVER for a default instance or NT SERVICE\MSSQL$InstanceName for a named instance is used for the service accounts during SQL Server setup and must have FULL control permission for the database file system location where database files are stored.-
Click Save and then click Next.
-
Configure the Core settings.
Settings Description User Management Settings Enter a custom username and password for both Admin and Operations portal access. The Assist installer uses this account for the initial product installation. Use the same credentials to access the Admin and Operation portal for any troubleshooting requirements after installation. By default, the username is prepopulated with RootAdminfor the Admin portal (AdminWebPortal) andOpsadminfor the Operations portal (wbc). Set the minimum password length to at least 8 characters with a combination of Alpha/Numeric/Uppercase/Special Characters. Do not use special characters in passwords, such as the plus sign (+), double quotes ("), and hash (#).SQL Server/Listener Name Enter the SQL instance name, IP address, or connection string (or listener name when High Availability is configured for the Database). Service Discovery Configuration The IP Address and Port for the Core/Application server (If multiple core servers are configured using a Load Balancer, then you must provide the Load Balancer IP address.)
You also have the option to switch to Forward Lookup Zone by choosing another configuration, typicallycontrolplane.internal. You can select one or more Subject Alternative Name from the drop-down menu or add additional host names (sites, IP addresses, common names, and so on.) to be protected by a single SSL certificate such as a Multi-Domain (SAN) which the installer creates for each service secure communication. -
Click ...More to configure the CoreAdvancedExtn settings.
Settings Description Use windows authenticated users for services and sites Activates the use of Windows user accounts to configure services. By default this option is not selected. If the 'Use windows authenticated users for services and sites' option is selected, see Active Directory Integrations before configuring these accounts and enter the newly or already created Active Directory users to configure services.
Note: If the password expires or is changed based on the password policies on the system, see Update Service Users Password with Assist Service User Configurations Utility.Core Service logon Username/Password If the 'Use Windows Authentication User' option is selected, see Active Directory Integrations before configuring these accounts. Enter the newly or already created Active Directory user for core windows service custom logon.
Note: If the password expires or is changed based on the password policies on the system, see Update Service Users Password with Assist Service User Configurations Utility.IIS Application Pool Username/Password If the 'Use Windows Authentication User' option is selected, see Active Directory Integrations before configuring these accounts. Enter the newly or already created Active Directory user for custom IIS Application Pool identity user.
Note: If the password expires or is changed based on the password policies on the system, see Update Service Users Password with Assist Service User Configurations Utility.DB Application User name/ Password Enter the user name and password for the Workspace ONE Assist database application account. By default, the user name is apdbuser. Note: - If the 'Use Windows Authentication User' option is selected, see Active Directory Integrations before configuring these accounts. Enter the newly or already created Active Directory user for the custom IIS Application Pool identity user.
- If the password expires or is changed based on the password Policies on the system, see Update Service Users Password with Assist Service User Configurations Utility.
Secure SSL Service Username/Password Defines the internal service username and password for Assist Services. The mentioned user is created locally on the system and used for IIS client authentication configuration if the 'Use windows authenticated users for services and sites' option is selected.
Note:- If the 'Use windows authenticated users for services and sites' option is selected, see Active Directory Integrations before configuring these accounts and enter the newly or already created Active Directory user to configure services.
- If the password expires or is changed based on the password Policies on the system, see Update Service Users Password with Assist Service User Configurations Utility.
Culture Context By default, this setting is empty.This setting within the Show Optional settings, defines the specific languages support such as Italian, Spanish, and so on. For example, Italian would be 'it-IT' or 'it'. For Turkish, the culture context should be set as 'en-US'. SQL Always ON This check box within the Show Optional settings must be selected only when High Availability is configured for Database. Password Management-Assist System Management (AdminWebPortal) This option within the Show Optional settings is not required during the installation. It can be used only for Troubleshooting after the installation. This can be used to reset the password of any existing Admin portal users. For information about Password Management, see Ability to reset passwords. Password Management-Assist System Management (MgmtWebPortal) This option within the Show Optional settings is not required during the installation. It can be used only for Troubleshooting after the installation. This can be used to reset the password of any existing Operations portal users for the given tenant. For information about Password Management, see Ability to reset passwords. Internal Service HTTP(S) Port Defines the internal secure service communication port.Enter the internal HTTP(S) port used by the core services. The default is 8083 but you can enter an alternate port number, such as 6443. The HTTP port indicates the port number you entered in step 3. -
Click Save. You are taken to the previous screen.
-
Click Next.
-
Review your selections at the Selected Components screen.
The installer performs multiple pre-requisite checks to ensure that the product can be installed. After the installer performs the prerequisites check, a summary report displays. Any missing installation parameters are indicated in the report.
-
If any of the prerequisites are missing and the check fails, do not select Install.
a. Select the Detailed Report link to see which prerequisites are missing.
b. To install missing prerequisite components, select the Install Componentslink. The installer installs the missing components.
You might need to reboot the server after the prerequisites are installed.c. After the reboot, relaunch the installer.
The installer pre-populates with your previous selections. -
If the initial prerequisite check comes back with all components passing, select Install.
Once the Install button is selected, the installer validates and begins the installation.
For IIS Client authentication, the installer checks for the presence of the
ClientAuthTrustModeWindows registry key. If the key is absent, a pop-up window with a Yes or No option is shown.- On selecting 'Yes', the installer automatically updates the registry on the system and the installation continues.
- On selecting 'No', the registry key is not added and the installation stops.
Note: The following DWORD key,
HKEY_LOCAL_MACHINE\SYSTEM\CurrentControlSet\Control\SecurityProviders\SCHANNELis added with value nameClientAuthTrustMode, value typeREG_DWORD, and value data2.
The installer first installs the database and then proceeds to install Core and Application services.
Note: Database execution might take an extended period.
-
Click Next after the installation completes.
-
Ensure that the check box Execute Resource Pack is selected and select the Finish button.
The Assist installation is complete on the CAP server. However, the resource pack must run in the background. Do not close the command line window. The command line window closes automatically when the resource pack execution is complete.
Install Workspace ONE Assist services on the Portal Server
After you have installed the Core and Application services on the CAP server, proceed to install the portal services on the Portal server.
-
On the Portal server, run the Workspace ONE Assist installer from the temporary directory and click Next.
-
Select the installation directory for the Assist software and click Install.
-
Select Advanced Installation (Custom) and then configure the settings for Secured Internal Service Communication.
- Enter a secured password to protect the certificate that is generated for the Assist internal services.
- Select the RSA key size for the self-signed certificate generated by Assist. By default, the key size is 2048.
- Enter the internal service port (For example, non-HTTP ports like 8446, 8083, and so on). Click Next.
-
Select Portal Services and click Next.
Settings Description User Management Settings Enter a custom username and password for both Admin and Operations portal access. The Assist installer uses this account for the initial product installation. Use the same credentials to access the Admin and Operation portal for any troubleshooting requirements after installation. By default, the username is prepopulated with RootAdmin for the Admin portal (AdminWebPortal) and Opsadmin for the Operations portal (wbc). Set the minimum password length to at least 8 characters with a combination of Alpha/Numeric/Uppercase/Special Characters. Do not use special characters in passwords, such as the plus sign (+), double quotes ("), and hash (#). Tenant FQDN Enter the server's fully qualified domain name. For example, "rmstage01.awmdm.com" SSL Certificate Select the folder icon and browse for the SSL Certificate already installed. For details, see Install an SSL Certificate. SQL Server/Listener Name Enter the database server hostname, IP address, or connection string (or listener name when High Availability is configured) that you have already configured. Apply Default Enrollment Certificate If required, select a different Enrollment Certificate provided by the Assist support team. Choose T10 Certificate Select the folder button to browse for and load the T10 certificate. For more information, see Generate the Workspace ONE Assist T10 API Certificate. Service Discovery Configuration The IP Address and Port for the Core/Application server server (If you have multiple core servers configured using the Load Balancer, then you must provide the Load Balancer IP address.)
You also have the option to switch to Forward Lookup Zone by choosing another configuration, typically controlplane.internal. You can select one or more Subject Alternative Name from the drop-down menu or add additional host names (sites, IP addresses, common names, and so on.) to be protected by a single SSL certificate such as a Multi-Domain (SAN) which the installer creates for each service secure communication. -
Select the ...More button and complete the advanced Portal parameters.
Important: If you are using port numbers other than the defaults referenced in Network and Security Requirements, you must enter these non-default port numbers here.
Settings Description Use windows authenticated users for services and sites Activates the use of Windows user accounts to configure services. By default this option is not selected. If the 'Use windows authenticated users for services and sites' option is selected, see Active Directory Integrations before configuring these accounts and enter the newly or already created Active Directory users to configure services. If the password expires or is changed based on the password policies on the system, see Update Service Users Password with Assist Service User Configurations Utility. Secure SSL Service Username/Password Defines the internal service username and password for Assist Services. The mentioned user is created locally on the system and used for IIS client authentication configuration if the 'Use windows authenticated users for services and sites' option is not selected.
Note:- If the 'Use windows authenticated users for services and sites' option is selected, see Active Directory Integrations before configuring these accounts and enter the newly or already created Active Directory user to configure services.
- If the password expires or is changed based on the password Policies on the system, see Update Service Users Password with Assist Service User Configurations Utility.
Culture Context By default, this setting is empty. This setting within the Show Optional settings, defines the specific languages support such as Italian, Spanish, and so on. For example, Italian would be 'it-IT' or 'it'. For Turkish, the culture context should be set as 'en-US'. Internal Service HTTP(S) Port Defines the internal secure service communication port. Enter the internal HTTPS port used by portal services. The default is 8083 but you can enter an alternate port number, such as 6443. The HTTP port indicates the port number you entered in step 3. IIS Site Binding IP Address Defines from which interfaces/IP addresses portal services can be reached. By default, the setting is ‘All Unassigned’ to activate all interfaces/IPs. HTTPS Port Enter the HTTPS port number. The default is 443 but you can enter your preferred port number. SSL Enable Activates SSL/TLS protocol for portal services. By default, this check box is selected so that the portal services use SSL/TLS. Leave this check box selected. T10 user name And Auto Generated Defines T10 API user for connectivity between Workspace ONE UEM and Workspace ONE Assist system. By default, if the ‘Auto Generated’ check box is selected, the installer assigns a random user name to be created locally on the server. Leave this text box defaulted and the check box selected for the Installer to create the T10 API user. If you want to define the user, deselect the check box and type in the T10 user name you want to use.
Note:- If the 'Use windows authenticated users for services and sites' option is selected, see Active Directory Integrations before configuring these accounts and enter the newly or already created Active Directory user to configure services.
- If the password expires or is changed based on the password Policies on the system, see Update Service Users Password with Assist Service User Configurations Utility.
-
Click Save. You are taken to the previous screen.
-
Click Next.
-
At the Selected Components screen, review your selections. Once you have verified your configuration, select Install.
Once the Install button is selected, the installer validates and begins the installation.
For IIS Client authentication, the installer checks for the presence of the
ClientAuthTrustModewindows registry key. If the key is absent, a pop-up window with a Yes or No option is shown.- On selecting 'Yes', the installer automatically updates the registry on the system and the installation continues.
- On selecting 'No', the registry key is not added and the installation stops.
Note: The following DWORD key,
HKEY_LOCAL_MACHINE\SYSTEM\CurrentControlSet\Control\SecurityProviders\SCHANNELis added with value nameClientAuthTrustMode, value typeREG_DWORD, and value data2.
The installer performs multiple pre-requisite checks to ensure that the product can be installed. After the installer performs the prerequisites check, a summary report displays. Any missing installation parameters are indicated in the report. See step 13 of the Install Workspace ONE Assist services on the Core and Application Server procedure, if the report indicates of any missing parameters.
-
Click Next after the installation completes.
-
Ensure that the check box Execute Resource Pack is selected and select the Finish button.
The Portal services installation is complete on the Portal server. However, the resource pack must run in the background. Do not close the command line window. The command line window closes automatically when the resource pack execution is complete. If there is a failure while executing the resource pack for importing device profiles, you can manually run the resource pack. For information about manual resource pack execution, see Import Device Profiles with Resource Pack Utility.
Proceed to install the Connection Proctor Service on the Connection Proctor server.
Install Workspace ONE Assist services on the Connector Proctor (CP) Server
After you have installed the Portal services on the Portal server, proceed to install the Connection Proctor (CP) services on the CP server.
-
On the Connection Proctor (CP) server, run the Workspace ONE Assist installer from the temporary directory and click Next.
-
Select the installation directory for the Assist software and click Install.
-
Select Advanced Installation (Custom) and then configure the settings for Secured Internal Service Communication.
- Enter a secured password to protect the certificate that is generated for the Assist internal services.
- Select the RSA key size for the self-signed certificate generated by Assist. By default, the key size is 2048.
- Enter the internal service port (For example, non-HTTP ports like 8446, 8083, and so on). Click Next.
-
Select Connection Proctor component for installation on the server and click Next.
-
Configure the Connection Proctor settings.
Settings Description User Management Settings Enter an existing Admin portal username and password. The Assist installer uses this account for the initial product installation to configure the Assist Connection Proctor service. By default, the username is prepopulated with RootAdminfor Admin portal (AdminWebPortal).Connection Proctor FQDN Defines the Fully Qualified Domain Name (FQDN) on which CP services can be reached. Enter in the FQDN, which must be the same as the FQDN assigned for portal services. Port Enter the port number for CP services. The default is 443 in multiple server environments but you can enter your preferred port number. Whatever port you select, ensure that network/security teams use this port when assigning translation rules from the firewall/router to the Server for CP services. SSL Certificate Select the folder icon and browse for the SSL Certificate already installed. For details, see Install an SSL Certificate. You may also click View Certificate to verify if the selected certificate is the one you want to use for the CP server. SAN (subject alternative name) certificates are supported. The implementation of SAN certificates depends upon your server arrangement. - The SAN certificate must have an FQDN defined for each connection proctor server and Workspace ONE Assist server.
- For example, presume you have 2 connection proctor servers and 2 Workspace ONE Assist servers. The 2 Workspace ONE Assist servers host portal services, which require TLS/SSL traffic terminated at the load balancer. The FQDN for the SAN certificate must reflect the fully qualified domain name, for instance, "rmstage01.awmdm.com".
- Meanwhile, for each of the 2 CP servers, TLS/SSL traffic terminates at the connection proctor, and therefore, you must have 2 FQDNs defined in the SAN certificate, for instance, "rmstage01.awmdm.com' and "rmstage02.awmdm.com'.
SQL Server/Listener Name Enter the database server hostname, IP address, or connection string (or listener name when High Availability is configured) that you have already configured. Service Discovery Configuration The IP Address and Port for the Core/Application server (If multiple core servers are configured using the Load Balancer, then you must provide the Load Balancer IP address.).
You also have the option to switch to Forward Lookup Zone by choosing another configuration, typically controlplane.internal. You can select one or more Subject Alternative Name from the drop-down menu or add additional host names (sites, IP addresses, common names, and so on.) to be protected by a single SSL certificate such as a Multi-Domain (SAN) which the installer creates for each service secure communication. - The SAN certificate must have an FQDN defined for each connection proctor server and Workspace ONE Assist server.
-
Select the ...More button and complete the Custom Connection Proctor Advanced settings.
Important: If you are using port numbers other than the defaults referenced in Network and Security Requirements, you must enter these non-default port numbers here.
Settings Description Culture Context By default, this setting is empty.This setting within the Show Optional settings, defines the specific languages support such as Italian, Spanish, and so on. For example, Italian would be 'it-IT' or 'it'. For Turkish, the culture context should be set as 'en-US'. CP Internal IP Address/Port Defines from which internal IP addresses the connection proctor can be reached. By default, the setting is ‘All Unassigned’ to activate all addresses. Enter the port number for the Connection Proctor component. The default is 8443 but you can enter your preferred port number. -
Click Save. You are taken to the previous screen.
-
Click Next.
-
At the Selected Components screen, review your selections. Once you have verified your configuration, select Install. The Connector Proctor services are installed on the CP server.
The installer performs multiple pre-requisite checks to ensure that the product can be installed. After the installer performs the prerequisites check a summary report displays. Any missing installation parameters are indicated in the report. See step 13(#LI_596D7F0C-1427-46D5-A5D0-9F6C79D46D13) of the Install Workspace ONE Assist services on the Core and Application Server procedure, if the report indicates any missing parameters.
DNS Configuration
This section covers the configuration of DNS parameters if DNS is used for service discovery of core services. The zone, host record, and service records all point to the CAP server.
The following parameters need to be defined:
Listed are the values for the DNS parameters.
Forward Lookup Zone Host Record Service Record Zone Name: controlplane1.internal Name: Admin FQDN: admin.controlplane1. internal Address:<IP address of the CAP server> SVC (Service Coordinator) - Record type: SRV
- Domain: controlplane1.internal
- Service: _svc
- Protocol: _tcp
- Priority: 0
- Weight: 0
- Port number: 8870
- Host Offering this service: admin.controlplane1.internal
- Record type: SRV
- Domain: controlplane1.internal
- Service: _dtp
- Protocol: _tcp
- Priority: 0
- Weight: 0
- Port number: 8865
- Host Offering this service: admin.controlplane1.internal
Proceed to Configure Workspace ONE UEM Console with Assist On-Premises.
Configure the Workspace ONE UEM console with Assist On-Premises
After installing the Workspace ONE Assist server and all its components, configure the UEM console to communicate with the Workspace ONE Assist server.
-
In the UEM console, ensure that you are in the Global OG.
-
Navigate to Settings > System > Advanced > Site URLs > Workspace ONE Assist.
-
Complete the Workspace ONE Assist settings.
Settings Description Console Connection Hostname Enter the Workspace ONE Assist server fully qualified domain name (FQDN) plus "/t10". For example: https://rmstage01.awmdm.com/t10Device Connection Name Enter the Workspace ONE Assist server fully qualified domain name (FQDN). For example: https://rmstage01.awmdm.com -
Select Save.
The Workspace ONE Assist server is now ready to handle remote management sessions with end-user devices.
Integrate Deployment Model, On-Prem UEM With SaaS Assist
You can integrate an on-premises Workspace ONE UEM environment with a SaaS build of Workspace ONE Assist, in either single-customer or multi-customer deployments.
You must have a working on-prem Workspace ONE UEM installation to integrate it with a Workspace ONE Assist SaaS environment.
The typical use case is that a partner with multiple on-premises Workspace ONE UEM environments (with single-customer or multi-customer deployments) wants to add Workspace ONE Assist service. It is simple to integrate a SaaS build of Workspace ONE Assist to your on-prem Workspace ONE UEM build.
-
Update the Site URL of the External Remote Management in Settings.
a. In the UEM console, ensure that you are in the Global OG.
b. Navigate to Settings > System > Advanced > Site URLs > Workspace ONE Assist.
c. Complete the Workspace ONE Assist settings.
The Workspace ONE Assist server can now communicate with Workspace ONE UEM.Locale Console Connection / Device Connection USA Console Connection Hostname:
Device Connection Name:https://rm01.awmdm.com/t10https://rm01.awmdm.comCanada Console Connection Hostname:
Device Connection Name:https://rmca01.awmdm.com/t10https://rmca01.awmdm.comGermany Console Connection Hostname:
Device Connection Name:https://rmde01.awmdm.com/t10https://rmde01.awmdm.comUnited Kingdom Console Connection Hostname:
Device Connection Name:https://rmuk01.awmdm.com/t10https://rmuk01.awmdm.comAustralia Console Connection Hostname:
Device Connection Name:https://rmau01.awmdm.com/t10https://rmau01.awmdm.comJapan Console Connection Hostname:
Device Connection Name:https://rmjp01.awmdm.com/t10https://rmjp01.awmdm.comSingapore Console Connection Hostname:
Device Connection Namehttps://rmsg01.awmdm.com/t10https://rmsg01.awmdm.com -
Generate the Workspace ONE Assist T10 API Certificate. This step must be finished no matter what deployment model you are using, but it is the first set of certificates you generate for multi-Workspace ONE UEM environments. See Generate the Workspace ONE Assist T10 API Certificate and Supported Deployment Models.
- If you are deploying a single customer Workspace ONE UEMWorkspace ONE UEM environment, then proceed to step 3.
- If you are deploying a multi-customer Workspace ONE UEMWorkspace ONE UEM environment, then you must.
-
Select Save.
The Workspace ONE Assist is now ready to handle remote management sessions with end-user devices.
-
While logged into the Workspace ONE UEM console, navigate to Devices > List View and locate a suitable device to remotely manage. See Supported Platforms.
-
Select that device's Friendly Name to display Device Details.
-
Initiate a Workspace ONE Assist session on this device by selecting the More Actions button and then selecting Remote Management.
The single customer or multi-customer on-premises deployment of Workspace ONE UEM is now connected to the Shared SaaS build of Workspace ONE Assist.
Migrate Workspace ONE Assist from On-Premises to SaaS
Migrating your on-prem installation of Workspace ONE Assist to a SaaS environment takes place seemlessly without having to uninstall and reinstall the Assist agent on the devices. However, for certain versions of Assist, there might be a need to uninstall and reinstall the agent.
Prerequisites:
Before you can migrate your Workspace ONE Assist to a SaaS environment, Workspace ONE UEM must already be in a dedicated SaaS environment. This Workspace ONE Assist migration cannot be applied to an on-premises build of Workspace ONE UEM.
Minimum Requirements
Make note of the minimum requirements for migrating Assist seamlessly from on-prem to SaaS.
- Workspace ONE UEM console 2008
- Workspace ONE Intelligent Hub 2008
- Workspace ONE Assist console - N/A
- Workspace ONE Assist Agent 20.11 or later
If the Assist version you want to migrate does not meet the requirements, follow the migration steps provided in Migrate Assist versions earlier to 20.11.
Migrate Assist versions 20.11 or later
The steps to migrate Assist 20.11 or later involve updating the site URLs and re-pushing the Intelligent Hub settings to all the enrolled devices. The end users are not required to perform any actions on their devices.
-
Follow the instructions for Step 1 Only of Integrate Deployment Model, On-Prem UEM With SaaS Assist to configure the site URLs. Then return to this task to commence migration.
-
You must re-push the Intelligent Hub settings to all enrolled devices per the following substeps.
a. Android – Navigate to Groups & Settings > All Settings > Devices & Users > Android > Intelligent Hub Settings. No changes need to be made to this settings page, select Save.
b. iOS – Navigate to Groups & Settings > All Settings > Devices & Users > Apple > Apple iOS > Intelligent Hub Settings. No changes need to be made to this settings page, select Save.
c. macOS – Navigate to Groups & Settings > All Settings > Devices & Users > Apple > Apple macOS > Intelligent Hub Settings. No changes need to be made to this settings page, select Save.
d. Windows Desktop – Navigate to Groups & Settings > All Settings > Devices & Users > Windows Desktop > Intelligent Hub Settings. No changes need to be made to this settings page, select Save. The device is silently re-enrolled into Workspace ONE Assist. The device end user is not prompted.
Migrate Assist versions earlier to 20.11
The steps to migrate the Workspace ONE Assist version earlier to 20.11 involve updating the site URLs, re-pushing the Intelligent Hub settings to all the enrolled devices, and also requiring you to uninstall and reinstall the Assist agent on the devices.
-
Follow the instructions for Step 1 Only of Integrate Deployment Model, On-Prem UEM With SaaS Assist to configure the site URLs. Then return to this task to commence migration.
-
Take action on the Assist agent installed on the enrolled devices by performing the following substeps.
a. Upgrade the Assist agent version to 20.11 or later in all the enrolled Windows mobile, Android, Windows desktop, and macOS devices.
b. On iOS devices, upgrade the Intelligent Hub to version 2101 or above.
c. On Android devices only, if the Assist service application version is earlier to 2.3 version, upgrade the service application to 2.3 or later versions.
-
After the Assist agents are upgraded to the required versions as mentioned in the previous step, re-push the Intelligent Hub settings to all the enrolled devices so that the Hub receives the updated site URLs.
a. Android - Navigate to Groups & Settings > All Settings > Devices & Users > Android > Intelligent Hub Settings. No changes need to be made to this settings page, just select Save.
b. iOS - Navigate to Groups & Settings > All Settings > Devices & Users > Apple > Apple iOS > Intelligent Hub Settings. No changes need to be made to this settings page, just select Save.
c. macOS - Navigate to Groups & Settings > All Settings > Devices & Users > Apple > Apple macOS > Intelligent Hub Settings. No changes need to be made to this settings page, just select Save.
d. Windows Desktop – Navigate to Groups & Settings > All Settings > Devices & Users > Windows Desktop > Intelligent Hub Settings. No changes need to be made to this settings page, just select Save.
Configure Multi-Workspace ONE UEM Environment Support
If you want to operate the Workspace ONE Assist server across multiple Workspace ONE UEM environments (not multiple organization groups), then take the following steps.
You must have already completed all the steps in Generate the Workspace ONE Assist T10 API Certificate.
Do not follow this procedure if you want Workspace ONE Assist to work with a single Workspace ONE UEM environment.
-
Log in to the secondary or other Workspace ONE UEM environment.
Do not log into the same environment you selected in Step 4 of the topic Generate the Workspace ONE Assist T10 API Certificate.
-
In the UEM console of this secondary environment, switch to your primary OG.
The OG you select must be of a 'customer' type. For more information about organization groups, see the topic Organization Group Type Functions from the Workspace ONE UEM Console Basics Documentation.
-
Navigate to Groups & Settings > All Settings > System > Advanced > Site URLs, scroll down to the External Remote Management section, and copy the string in the Remote Management CN text box.
Note: If this text box is blank, then you must manually Create the Remote Management CN from the Workspace ONE UEM Database.
-
Switch back to the Workspace ONE Assist server. Run the Remote Management Certificate Generator, which includes the Remote Management Installer, using the following values.
Setting Value Certificate Type Remote Management Deployment Upload Intermediate Certificate Common Name Paste the Remote Management CN from Step 3 preceding -
Select the Generate Certificates button.
-
When prompted, you must select the intermediate private cert.
This certificate and password are the same one you originally generated in Step 8 of Generate the Workspace ONE Assist T10 API Certificate. This certificate is located in
c:\temp\certsof the Workspace ONE Assist server. -
On the Workspace ONE Assist server, locate the 'artifacts' folder, and run the SQL script file
Certificate Seed Script.sqlagainst the Workspace ONE UEM Database to seed the generated certificates into the Workspace ONE UEM database. -
Repeat this entire task for each additional Workspace ONE UEM environment you want Workspace ONE Assist to work with.
Example: If you want to add two additional environments to the environment you configured originally, then you must follow the steps of this task twice.
After you have finished installing the client certificate for each Workspace ONE UEM environment, proceed to Configure the Workspace ONE UEM console with Assist On-Premises.
Upgrade to a New Version
Upgrading to a new version of Workspace ONE Assist is simple. Install a new version of Workspace ONE Assist on top of an existing, older version by taking the following steps.
Read through this entire section BEFORE you begin the installation process.
-
To ensure that you do not run the old installer file in error, replace the previous version of the installer with the new version in the same folder. All certificates and the install.config file remain the same.
-
Right-click the installer file and select Run as administrator. The installer prompts you to remove the currently installed components, excluding the database.
-
Select OK and allow the installer to remove the installed components.
The Workspace ONE Assist Uninstall Components screen appears.
-
Select Next and proceed with the uninstall process.
The Uninstall Components dialog box displays, listing each component it finds of the old version. Each of these components is selected with a green check mark. Notice that the database does not appear on this screen. This absence is because the old database is used during the upgrade process, which means everything on the database is kept intact in the new version of Workspace ONE Assist.
-
Select Uninstall and commence uninstalling the old components.
The uninstallation begins in earnest, displaying each component as it is removed.
-
Once all the old components are uninstalled, the Workspace ONE Assist Setup prompts you to install new versions of the same components. Select Next to begin.
-
The Choose Install Location prompt appears. The default installation location appears prepopulated in the text box, which it got from the install.config file. Proceed by selecting Install.
-
The Get Started with Workspace ONE Assist screen displays, prompting you to select between Standard Installation (Basic) and Advanced Installation (Custom).
For details about each installation method, including all steps, screens, text boxes, and options, see Standard (Basic) Installation of Workspace ONE Assist or Advanced (Custom) Installation of Workspace ONE Assist.
-
The installer reads from the install.config file, applying all the original configurations it finds to the options screens, including SQL server details, user names, Tenant FQDN, certificates, database configurations, and many other configurations. You might not need to modify any of the settings it pulls from this install.config file with the following possible exceptions.
Note:
-
Sensitive information like passwords are not prepopulated when the installer reads the install.config file. Therefore, the admin should have the necessary passwords in place before upgrading to the new version of Assist. For information about enabling the Admin Web Portal, see Enable Admin Web Portal Access.
-
By default, the User Portal and the Admin Portal (wbc and adminwebportal) are disabled. For information about enabling the Admin Web Portal, see Enable Admin Web Portal Access.
-
Check Database Accounts - Depending upon your configuration and the existing permissions in your environment, the install.config settings might not be populated correctly. For this reason, review the database accounts to ensure that they are correct. Do this review at the first screen, Installer - Basic or Custom - Database by clicking the ...More button which displays the Database Advanced Settings dialog box. Review the apadminuser and apdbuser accounts and respective passwords for accuracy and select Save. Ensuring these accounts are correct now saves you trouble later.
-
SSL Certificate - If you installed a new SSL certificate before running this upgrade, ensure that you integrate it with the upgrade. Review the certificate at the second screen, Installer - Basic or Custom - Application or Portal Services or Connection Proctor by selecting the SSL Certificate drop-down menu and reviewing the name of the new SSL Certificate. If you have not installed a new SSL certificate before running this upgrade, then just ensure that the existing SSL cert is selected.
-
T10 Certificate - When upgrading from an older version of Workspace ONE Assist to a newer version, review the T10 certificate to make sure it is the correct one. If you are in doubt about this certificate's validity, on the Installer - Basic or Custom - Application or Portal Services screen, deselect the check box Apply Default Settings, select the folder button that corresponds to the T10 Certificate, and select the correct certificate file in P7B format.
-
To configure the User Management settings, enter a custom username and password for both Admin and Operations portal access. The Assist installer uses this account for the initial product installation. Use the same credentials to access the Admin and Operation portal for any troubleshooting requirements after installation.
By default, the username is prepopulated with
RootAdminfor the Admin portal (AdminWebPortal) andOpsadminfor the Operations portal (wbc). Set the minimum password length to atleast 8 characters with a combination of Alpha/Numeric/Uppercase/Special Characters.Do not use special characters in passwords, such as the plus sign (+), double quotes ("), and hash (#).
-
Check the Ports - At the Installer - Basic or Custom - Application, Core Services, Connection Proctor, or Portal Services screen, select the ...More button which displays the Advanced Settings screen.
-
Ensure all the ports it pulls from install.config are correct for your environment. You should know whether your environment is using port 8443, which is the default connection proctor port for Workspace ONE Assist.
-
If 8443 is not used by your environment, then ensure the CP Port text box is 8443.
-
If 8443 is being used by your environment, then you must select another CP Port in order for Workspace ONE Assist to function. Consider using port 8446 in such a case.
-
Select Save if you have made changes.
-
-
-
After you have reviewed all the settings above and made all applicable adjustments, proceed with the remainder of the installation by selecting the Next button.
The Installer - Selected Components screen displays.
-
The Installer - Selected Components page confirms all the installer settings it plans to use for the upgrade. If you want to make changes, you can use the < Prev button to revisit config pages. Otherwise, select Install to begin the upgrade. The installer prompts you again for the installation location. Select Install.
- The database account is validated against the apdbuser and apadminuser accounts. During the upgrade, the Installing Database process displays "Error Message: DBAlreadyExists". This simply means it found the existing database and it has begun to upgrade it.
-
When the installation finishes, select Next.
-
The last step is to run the resource pack which consists of configuration files for hundreds of different devices. Ensure that the Execute Resource pack check box is selected and click Finish.
The Workspace ONE Assist server has been upgraded.
Create the Remote Management CN from the Workspace ONE UEM Database
If the Remote Management CN text box is empty from step 5 of Generate Workspace ONE Assist Certificates or Step 3 of Configure Multi-Workspace ONE UEM Environment Support, you can run an SQL script against the database to create the Remote Management CN manually.
-
Open the Remote Management Certificate Generator.
You must run this generator as an administrator.
-
Select the Question Mark button.
-
Copy the displayed text.
This text is the SQL script to run against the Workspace ONE UEM Database.
-
Switch to the Workspace ONE UEM Database server and open SQL Server Management Studio.
-
Create a query with the copied text.
-
On the first line of the query, replace the NULL value with the GroupID for the customer type OG that you want to use.
The OG you select must be a customer type, it cannot be of any other type including global, partner, container, and so on.
DECLARE @GroupID NVARCHAR(20) = NULL;becomes
DECLARE @GroupID NVARCHAR(20) = 'RemoteManagement'; -
In the Results, copy the created Remote Management CN.
The Remote Management CN is used to generate the root and intermediate certificates for Remote Management. Return to Step 5 of Generate the Workspace ONE Assist T10 API Certificates or Step 3 of Configure Multi-Workspace ONE UEM Environment Support.
Import Device Profiles with Resource Pack Utility
Device profiles contain the key mapping, device skin, and Workspace ONE Assist service signatures for full remote control. You can perform a bulk import of these device profiles onto your Workspace ONE Assist Server.
-
Run the Resource Pack Utility file provided. The file is called
AW RM Resource Pack Version - v0xx.exe. -
Complete the Authentication step.
-
Enter the Target Tenant URL specific to your environment. For example, https://rmstage01.awmdm.com
-
Enter the user name and password for Mgmt Web Portal access.
-
Enter the Admin URL based on the deployment model:
-
If it is a single server [all-in-one] deployment, the Admin URL is
http://localhost:<internal service port used during the installation for secured SSL connection>. For example,https://localhost:8083 -
If it is a medium/large deployment, the Admin URL is
a. If Service discovery is based on IP, then
http://<IP address of the Core server>:<internal service port used during the installation for secured SSL connection>.For example,https://xxx.xx.xx.xx:8083b. If Service discovery is based on the Forward lookup zone, then
http://<Control Plane domain>:<internal service port used during the installation for secured SSL connection>. For example,https://admin.controlplane.internal:8083
-
-
Enter the user name and password for Admin web portal access.
-
-
Complete the Resource Import step.
You can select one or more device profiles from the list or you can select the Select Allcheck box to initiate a full importation of all available device profiles.
-
Select the Import button to continue. The log panel on the right side fills up with confirmation messages which you can review.
The device profiles you selected are installed onto the Workspace ONE Assist server.
-
When finished importing device profiles, select the Exit button.
Update Service Users Password with Assist Service User Configurations Utility
The configurations utility tool is used to reset the assist service user's configurations.
It updates the following details based on the installed modules or components such as the Database server, Core server, and Portal server.
- Database user credentials - Assist database user passwords. For example, apdbuser and apadminuser.
- If Windows or Domain authenticated users are used during the installation:
- Windows service custom logon user credentials - Custom logon account for ServiceCoordinator and DataTierProxy services.
- Custom IIS application pool identity user credentials - Custom IIS apppool identity for DataWebSite and MgmtWebSite apppools.
- IIS client certificate mapping authentication user credentials for ProtectedUserMgmt, TenantService, and T10 services.
- ConnectionString update for the ServiceCoordinator service, DAP website, and the SystemAdminService webservice.
Prerequisites
- If Windows or Domain authenticated users are used during the installation, then passwords must be reset on the Active Directory for domain users configured for assist services before running this tool.
- If the Assist service is distributed (Multi-Node), then update the specific server configurations on the respective server. For Database updates, update the Database server. Similarly, for Core service and Portal service updates, update the Core and Portal servers.
- If the assist service is installed on a single server, then run the tools one by one starting with the Database update, then the Core service update, and finally the Portal service update.
Procedure
- Copy the AssistServiceUserConfigurations tool to the Database server, Core server, and Portal server. Extract the zip.
- Open the
AssistServiceUserConfigurations.exe.configfile and update the assist product installation path in the key<add key="ProductInstallationPath" value="C:\Program Files\Omnissa\WorkspaceOneAssist" />. - Open the
AssistServiceUserConfigurations.exeon the respective server.-
Database Server
- Click DB Update (DB Server only).
- Enter the Database credentials such as the SQL Server name, Authentication mode, SQL server username, and password.
- Enter the existing Assist database username and new password to reset the credentials of the existing Assist database user.
Password field must not contain any non-supported characters { < } > ' " ; &]. - Click Reset. A success or failure alert appears and you can view the logs in the same folder to check the error details.
-
Core server
-
SQL authenticated user
- Click Core Service Update.
- Enter the existing Assist database application username and new password to reset the connection string credentials of the existing connection string.
Password field must not contain any non-supported characters { < } > ' " ; &]. - Click Update. A success or failure alert appears and you can view the logs in the same folder to check the error details.
-
Windows authenticated user (If the assist system is installed with ActiveDirectory Domain users)
As a prerequisite, reset assist service users configured in the Active Directory if the domain users password expired.
- Click Core Service Update.
- Click Windows authenticated user update.
- Enter the Assist existing custom logon username and new password, custom IIS application pool identity username and new password, Secured SSL service username and new password, T10 username and new password.
Password field must not contain any non-supported characters { < } > ' " ; &]. - Click Update. A success or failure alert appears and you can view the logs in the same folder to check the error details.
-
-
Portal server
-
Windows authenticated user (If the assist system is installed with ActiveDirectory Domain users)
As a prerequisite, reset assist service users configured in the Active Directory if the domain users password expired.
- Click Portal Service Update.
- Enter the Assist existing Secured SSL service username and new password, T10 username and new password.
Password field must not contain any non-supported characters { < } > ' " ; &]. - Click Update. A success or failure alert appears and you can view the logs in the same folder to check the error details.
-
-
Install and Configure Site SSL certificate with Assist SSL Cert Update Utility
This utility is used to install the SSL certificate and configure the required settings for the service to run without any issues.
It installs and updates the following details based on the installed modules or components such as the Portal server and ConnectionProctor [CP] server.
- Imports the new SSL certificates to the local computer certificate store.
- Assign 'Read' permission for the certificate to the NETWORK SERVICE account.
- In Portal server:
- Create or update the certificate thumbprint to the default service configuration and service configuration tables [parameter - ":ctl.svc.cnp.tch/certid"].
- Update 'Portal Web Site' binding with the new certificate.
- In Connection Proctor [CP] server:
- Create or update the certificate thumbprint to the service configuration table [parameter - ":ctl.svc.cnp.tch/certid"].
- Restart the assist-related services [ServiceCoordinatorService, DataTierProxyService,ManagementEntityService,MessagingEntityService,AetherPalToolControllerService,TokenService,ConnectionProctorService"].
Procedure:
-
If multiple server deployment model, copy the AssistSSLCertUpdate tool to the Portal server and ConnectionProctor [CP] server and extract the zip.
-
If single server deployment model, copy the AssistSSLCertUpdate tool to the same assist server and extract the zip.
-
Open the
AssistSSLCertUpdate.exe.configfile.a. Update the Tenant URL, Admin (AdminWebPortal) User name.
b. Update the Admin URL based on the server deployment models. - For example, "https://admin.controlplane.aetherpal.internal:8083" (or) "https://<core server IP>:8083" for multiple server deployment and "https://localhost:8083" for single server deployment.
Note: Update the Port [Internal service HTTPS port] based on the installation.
c. Update the certificate full path in the
CertPathkey.d. Update 'true' or 'false' for
IsCPServerkey based on the server or components. If running on the CP server or component alone then set to 'true' otherwise set to 'false'.e. Update 'true' or 'false' for the
ValidateServiceStatuskey based on the CP service status when running on CP server alone.f. Update assist service names separated by a comma in the
AssistServiceskey to restart the assist services. -
Run the
AssistSSLCertUpdate.exewith Administrator privilege on the respective servers.a. If multiple server deployment model, run the tool on both Portal and ConnectionProctor [CP] servers.
b. If single server deployment model, run the tool on the same assist server.
-
Provide the Admin (AdminWebPortal) user password.
-
Provide the SSL certificate password and press Enter.
-
Success or failure information is logged, and you can view the logs in the same folder to check the error details.
Uninstall or Decommission Workspace ONE Assist
Workspace ONE Assist can be deployed in various configurations to suit diverse business requirements.
Follow the procedure to uninstall or decommission Workspace ONE Assist.
- Delete the Workspace ONE Assist servers or uninstall the Workspace ONE Assist package using uninstaller.
- Uninstall the Workspace ONE Assist agent and services on the devices.
- Deactivate Assist from the Workspace ONE UEM user role.
- Remove the Site URL from the Workspace ONE UEM console.
- Delete the Assist-related databases and users. For information, see <a href = https://docs.omnissa.com/bundle/Workspace-ONE-AssistV24.03/page/GeneralandHardwareRequirements.html#databases_and_settings_created_automatically_during_installation>Databases and Settings Created Automatically During Installation..
Was this page helpful?