The following profile settings and options apply to most platforms under Workspace ONE UEM and can be used as a general reference. However, some platforms can offer different selections.
To Add a Device Profile, take the following steps.
-
Navigate to Devices > Profiles & Resources > Profiles > Add > Add Profile then select the platform. If you see something different than the following screenshot, then you must follow the Add a General Device Profile in the next section.
-
Configure the settings.
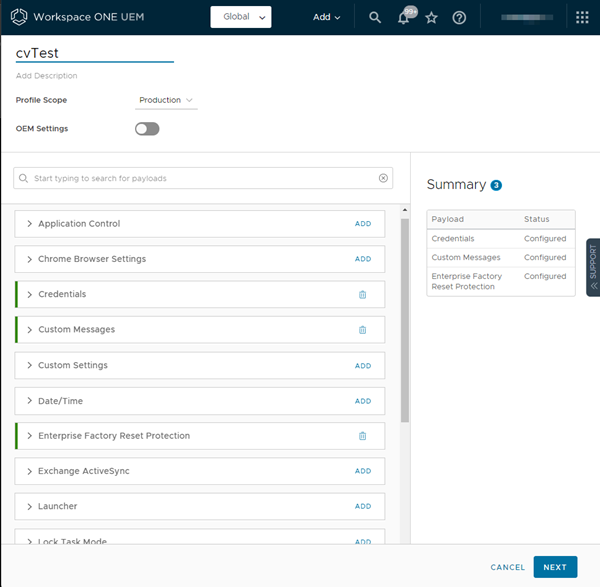
Setting Description Name Name your profile and add a description that is easily recogizable to you. Profile Scope Set how the profile is used in your enviroment, either Production, Staging, or Both. OEM Settings Turn on OEM settings to configure specific settings for Samsung or Zebra devices. Once you select the OEM, additional profiles and settings display that are unique to either OEM. -
Select the ADD link to the right of the desired profile label and configure the settings as desired. You can use the drop-down and preview profile settings before selecting add.
-
Select Next to configure the general Assignment and Deployment profile settings as appropriate.
-
Configure the following settings.
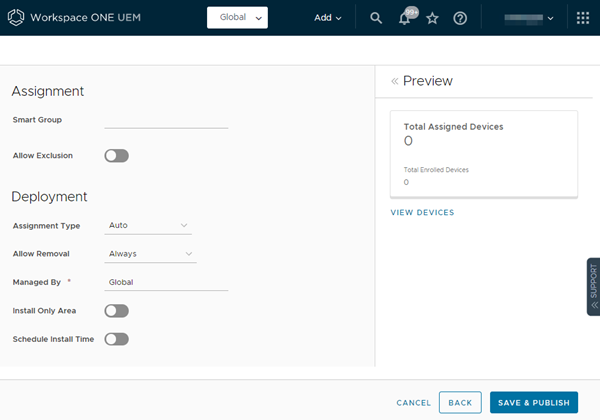
Setting Description Smart Group Select a smart group from the drop-down list, which is visible to you once you click this text box. Devices assigned with the smart group you select here will get your device profile installed. Allow Exclusion When enabled, a new text box Exclude Group displays. This text enables you to select those groups you want to exclude from the assignment of the device profile. Assignment Type Determines how the profile is deployed to devices.
Auto – The profile is deployed to all devices.
Optional – An end user can optionally install the profile from the Self-Service Portal (SSP), or it can be deployed to individual devices at the administrator’s discretion. End users can also install profiles representing Web applications, using a Web Clip or a Bookmark payload. If you configure the payload to show in the App Catalog, then you can install it from the App Catalog.
If you update an optional profile that is already installed to the device, then you must either change the assignment type from optional to auto or you must reinstall the optional profile manually, otherwise, the update will not process. For details, see Ensure That Devices Get Updates to Optional Profiles.
Compliance – The profile is applied to the device by the Compliance Engine when the user fails to take corrective action toward making their device compliant.Managed By Select a customer type organization group with administrative access. Selecting non-customer type OGs is not an option. Install Only Area (Android and iOS only) Enable to display geofencing option which means install only on devices inside selected areas. Enter an address anywhere in the world and a radius in kilometers or miles to make a ‘perimeter of profile installation’. Schedule Install Time Enable to configure time schedule settings which means install only during selected time periods. Specify a configured time schedule in which devices receive the profile only within that time-frame. -
Select Save and Publish.
Search Device Profile Settings
You can search for device profile information in multiple ways. You can search for the name of the setting, the setting description, tooltips, payload subcategory labels, and platform qualifiers which appear in bubbles to the right of the settings.
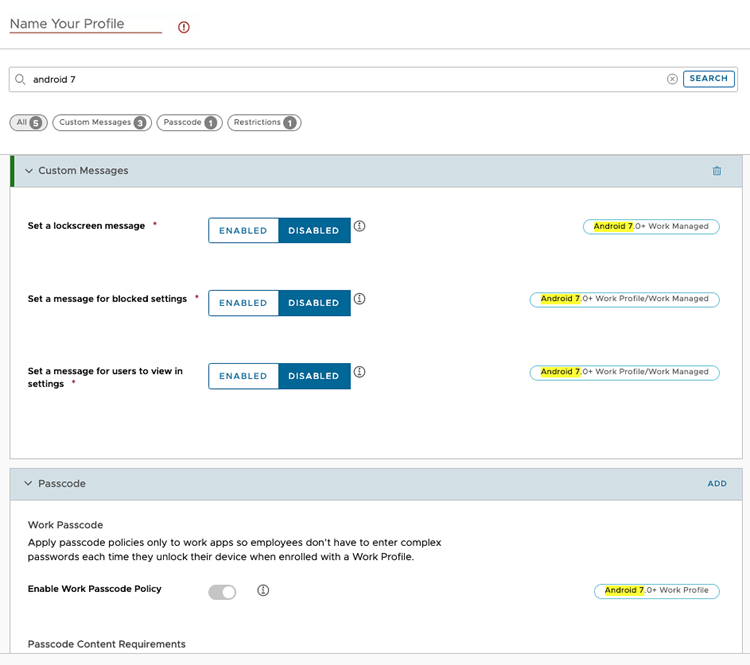
If your search keywords are found in multiple subcategories, the results are summarized showing you how many hits each subcategory has. You can click these subcategories to jump directly to the setting.
Add a General Device Profile
The following profile settings and options apply to some platforms under Workspace ONE UEM and can be used as a general reference.
-
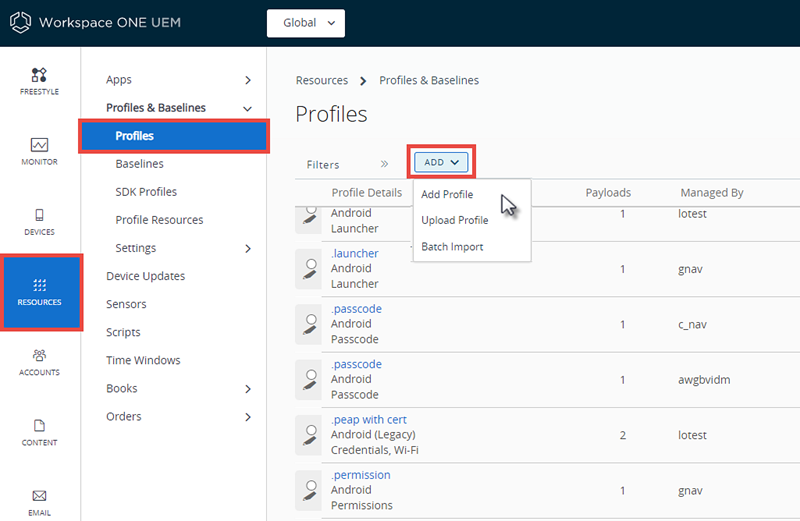
Navigate to Resources > Profiles & Baselines > Profiles > ADD.
You can select from among the following options to add a profile.
- Add Profile – Perform a one-off addition of a new device profile.
- Upload Profile – Upload a signed profile on your device.
- Batch Import – Import new device profiles in bulk by using a comma-separated values (CSV) file. Enter a unique name and description to group and organize multiple profiles at a time.
-
Select Add Profile.
-
Select the appropriate platform for the profile you want to deploy. Depending on the platform, the payload settings vary. For more information, see the Tech Preview: Add a Device Profile in the next section.
-
Complete the General tab by completing the following settings.
Setting Description Name Name of the profile to be displayed in the Workspace ONE UEM console. Version Read-only text box that reports the current version of the profile as determined by the Add Version. Description A brief description of the profile that indicates its purpose. OEM Settings (Android Only) Enable to configure profiles specific to Zebra and Samsung devices. When enabled, the profiles are noted with a Knox symbol to indicate available settings specific to Knox. Two new profiles appear: Date/Time and APN and are specific to Knox. This option only appears when configuring Android profiles. Select OEM (Android Only) Select the OEM Samsung or Zebra. This option only appears when configuring Android profiles. Deployment Determines if the profile is automatically removed upon unenrollment (does not apply to Android profiles). - Managed – The profile is removed. - Manual – The profile remains installed until removed by the end user. Profile Scope (Android or Windows Rugged Only Determines how the profile is used. Select from the following. - Production – The profile is to be used as part of product provisioning. - Staging – The profile is to be used in staging configurations. - Both – The profile is to be used in both staging and provisioning. Assignment Type Determines how the profile is deployed to devices. - Auto – The profile is deployed to all devices. - Optional – An end user can optionally install the profile from the Self-Service Portal (SSP), or it can be deployed to individual devices at the administrator's discretion.
End users can also install profiles representing Web applications, using a Web Clip or a Bookmark payload. And if you configure the payload to show in the App Catalog, then you can install it from the App Catalog.
If you update an optional profile that is already installed to the device, then you must either change the assignment type from optional to auto or you must reinstall the optional profile manually, otherwise, the update will not process. For details, see Ensure That Devices Get Updates to Optional Profiles.- Interactive – (Does not apply to iOS or Android). This profile is of a unique type that end users install with the Self Service Portal. When installed, these special types of profiles interact with external systems to generate data meant to be sent to the device. This option is only available if enabled in Groups & Settings > All Settings > Devices & Users > Advanced > Profile Options. - Compliance – The profile is applied to the device by the Compliance Engine when the user fails to take corrective action toward making their device compliant. For more information, see Compliance Profiles. Allow Removal (iOS 7 and below only) Determines whether the end user can remove the profile. - Always – The end user can manually remove the profile at any time. - With Authorization – The end user can remove the profile with the authorization of the administrator. Selecting this option adds an account Password text box. - Never – The end user cannot remove the profile from the device. Managed By The organization group with administrative access to the profile. Assigned Groups Refers to the group to which you want the device profile added. Includes an option to create a new smart group which can be configured with specs for minimum OS, device models, ownership categories, organization groups and more.
While Platform is a criterion within a smart group, the platform configured in the device profile or compliance policy always takes precedence over the smart group's platform. For instance, if a device profile is created for the iOS platform, the profile is only assigned to iOS devices even if the smart group includes Android devices.Exclusions If Yes is selected, a new text box Excluded Groups displays. This text box enables you to select those groups you want to exclude from the assignment of the device profile. View Device Assignment After you make an Assigned Group selection, you can preview a list of all assigned devices, taking the smart group assignments and exclusions into account. Additional Assignment Criteria These check boxes enable additional restrictions for the profile. - Install only on devices inside selected areas. – Enter an address anywhere in the world and a radius in kilometers or miles to make a 'perimeter of profile installation'. For more information, see Geofence Areas. - Enable Scheduling and install only during selected time periods – Specify a configured time schedule in which devices receive the profile only within that time-frame. Selecting this option adds a required text box Assigned Schedules. For more information, see Time Schedules. Removal Date The date in the future when the profile is removed from the device, formatted as MM/DD/YYYY. -
Configure a Payload for the device platform. You can search for a payload by name by entering keywords in the Find Payload text box above the Payload listing.
For step-by-step instructions on configuring a specific Payload for a particular platform, refer to the applicable Platform Guide, available on docs.omnissa.com.
-
Select Save and Publish.
Was this page helpful?