If your environment's networking is not configured properly for use with the first-gen Horizon Cloud pod in Microsoft Azure, the process to build out the pod can get stuck in PENDING state or the post-deployment action to domain bind to your Active Directory environment might fail. The two most common network-related causes are failing to open the required outbound ports and failing to enable the DNS to resolve both internal and external addresses. By following the troubleshooting steps here, you can run some tests to verify the required outbound ports are open and the DNS can resolve both internal and external addresses.
Important: Use this page solely when you have access to a first-gen tenant environment in the first-gen control plane. As described in KB-92424, the first-gen control plane has reached end of availability (EOA). See that article for details.
The overall networking requirements for successfully deploying a pod are stated in the prerequisites checklist and described in First-Gen Tenants - Configure the DNS Server Settings Needed by the VNet Topology and First-Gen Tenants - Horizon Cloud on Microsoft Azure Deployments - Host Name Resolution Requirements, DNS Names. If your environment's networking does not meet those requirements, you will encounter one or both of these two issues:
| Issues | Common causes |
|---|---|
|
|
To run some tests that will check that the DNS configuration can resolve internal and external names and check that the required outbound ports are open, you deploy a small test virtual machine (VM) into your Microsoft Azure subscription and then use that VM to run these networking tests. The high-level sequence of troubleshooting steps is:
- Create an SSH key pair.
- Create the test VM in your Microsoft Azure subscription.
- Connect to that test VM.
- Run the networking tests.
- When the testing is done, delete the test VM and all the test-related artifacts that were created in your Microsoft Azure environment for doing this troubleshooting.
Note: If you do not delete the test-related artifacts and you later use the console's Delete action to delete the pod, unexpected results can occur. When deleting a pod, the system checks the pod's subnets to verify that everything connected to the subnets belongs to the pod itself, according to the pod's ID. If the system determines additional VMs, VM disks, IPs, or other artifacts are connected to the pod's subnets, the system cannot cleanly delete the pod.
For details about running the troubleshooting tests, see the following sections.
Important: Even though all of these manual tests succeed, if you are directing all traffic out through your on-premises network and only allowing authenticated traffic to pass, but you did not provide values for using a proxy in the pod deployment wizard, the pod deployment can get stuck in pending state. If this description matches your situation, you must delete the pod from the Getting Started page, re-run the pod deployment wizard, and specify the required proxy information.
Horizon Cloud Pod Deployment Troubleshooting - Create an SSH Key Pair
As part of this troubleshooting, a test Linux VM is deployed into your Microsoft Azure subscription. To authenticate to the test Linux VM, you need an SSH key pair. You create the key pair on the system you use to SSH connect to the test VM. This step is optional if you already have a key pair on that system.
To create this SSH key pair, you can use either a Microsoft Windows or a Linux system. The steps for both types of systems are described here. Select the steps most suitable for your situation.
Create an SSH Key Pair on a Microsoft Windows System
Use these steps when you will be using a Microsoft Windows system to SSH connect to the test Linux VM that you will be deploying into your Microsoft Azure subscription.
When you create the test VM in Microsoft Azure, you will use the contents of the generated public key file. If you already have an existing SSH key pair on the Microsoft Windows system that you will use to connect with the test VM, then you can skip this step and proceed with creating the test VM, as described in Create the Test Virtual Machine in Your Microsoft Azure Subscription.
By following these steps, you generate the SSH key pair, copy the public key file's contents so you can use it when creating the test VM, and load the private key into the PuTTY Pageant tool. Pageant is an SSH authentication agent that can hold your private keys in memory. By holding the private key in memory, the private key is automatically applied against any SSH session from that Microsoft Windows system, making it easier to use.
Prerequisites
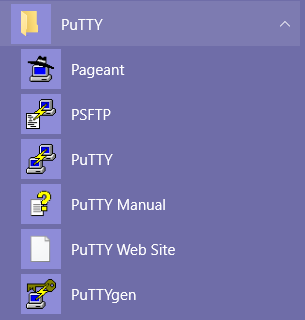
A Microsoft Windows system does not have SSH key-pair software installed on it by default. Verify that SSH key-pair generating software is installed on the system you are planning to use. You can use any SSH key-pair generating software. The steps below describe using the PuTTY software on Microsoft Windows to create the SSH key pair. You can obtain the PuTTY software from www.putty.org. After the installation, the PuTTY suite of tools is available. The following screenshot shows an example of the PuTTY tools in the Start menu.
Procedure
-
On your Microsoft Windows system, launch PuTTYgen (the PuTTY key generator).
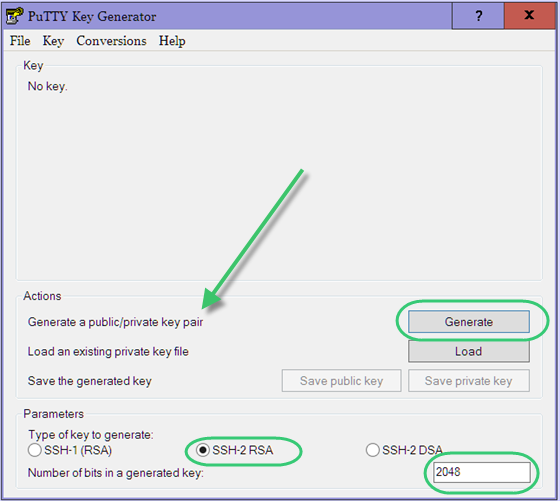
The PuTTY Key Generator window displays. As highlighted in the following screenshot, the goal is to generate a public-private key pair, of type SSH-2 RSA, and having 2048 bits.
-
Verify that SSH-2RSA is selected,
2048is set for the number of bits, and then click Generate. The window changes to the Key window that displays a progress bar. -
Follow the on-screen guidance to move your cursor around randomly in the blank area underneath the progress bar. As the PuTTY user interface say, moving your cursor around in the area adds required randomness into the process.
-
Save the private key to the system by entering a key passphrase and click Save private key.
Note: Using a key passphrase is an optional best practice. However, if you click Save private key without entering a key passphrase, a pop-up window asks you to confirm whether you want to save the private key without a key passphrase.
The private key is saved as a PPK file. After you click Save private key, you can browse to a directory in the local system, type a file name, and save the file.
-
Use the Save public key button to save the public key to a location where you can copy it from when you create the test VM.
-
Launch Pageant, the PuTTY SSH authentication agent.
On a Windows 10 system, the Pageant icon will be loaded into the system tray.
-
Add your private key to Pageant by right-clicking that system tray icon, clicking Add Key, and using the file selection window to navigate to and select your saved private key (PPK) file.
Note: If you specified a key passphrase when you saved the private key file earlier, a box is displayed for you to type that passphrase.
Results
At this point, the private key is loaded into Pageant. You can use the View Keys choice on the action menu to see the key in the list of loaded keys. When you start an SSH session using PuTTY, PuTTY will retrieve the key automatically from Pageant and use the key to authenticate without you having to type your passphrase. Later, when you are finished running SSH sessions and want to shut down Pageant, use the Exit choice from the Pageant system tray icon's right-click menu.
What to do next
Create the test VM by following the steps in Create the Test Virtual Machine in Your Microsoft Azure Subscription.
Create an SSH Key Pair on a Linux System
Use these steps when you will be using a Linux system to SSH connect to the test Linux VM that you will be deploying into your Microsoft Azure subscription.
In the steps to create the test VM in Microsoft Azure, you will use the contents of the generated public key file. If you already have an existing SSH key pair on the Linux system that you will use to connect with the test VM, then you can skip this step and proceed with creating the test VM, as described in Create the Test Virtual Machine in Your Microsoft Azure Subscription.
Prerequisites
Before performing these steps, ensure that you will not overwrite an existing SSH key pair that you want to keep for other purposes. On a Linux system, the SSH public and private key files are created in the Linux ~/.ssh/id_rsa directory by default. If an SSH key pair exists in that directory and you use the same file name when running this command, or if you specify a different location in the command and an SSH key pair already exists in that location, that existing one is overwritten.
Procedure
-
On your Linux system, open a bash shell.
-
In the bash shell, type the following command:
ssh-keygen -t rsa -b 2048 -
Follow the on-screen instructions about entering a file in which to save the key, entering a passphrase, and confirming the passphrase.
Here is a sample of the on-screen instructions, where
mykeywas entered as the file in which to save the key.-bash-4.1$ ssh-keygen -t rsa -b 2048 Generating public/private rsa key pair. Enter file in which to save the key (/mts-cm/home/user1/.ssh/id_rsa): mykey Enter passphrase (empty for no passphrase): Enter same passphrase again:Note: Using a key passphrase is an optional best practice.
The private key is saved in the file that you specify and the public key is saved to a file with that same name and a .pub extension. Using the example above of entering
mykeyas the file, the sample output would be:Your identification has been saved in mykey. Your public key has been saved in mykey.pub.
What to do next
Create the test VM by following the steps in Create the Test Virtual Machine in Your Microsoft Azure Subscription.
Create the Test Virtual Machine in Your Microsoft Azure Subscription
You will use a test Linux virtual machine (VM) in your Microsoft Azure environment to run the tests that check the network connectivity that is configured for your Horizon Cloud pod.
Prerequisites
Verify that you have the SSH public key that you created as described in Horizon Cloud Pod Deployment Troubleshooting - Create an SSH Key Pair. You will provide that public key in the VM creation wizard so that the VM will trust SSH connections coming from the system that has the corresponding private key.
Verify you have the name of the virtual network (VNet) that is the same one that you are using to deploy your pod, as described in First-Gen Horizon Cloud - Configure the Required Virtual Network in Microsoft Azure.
If you did not use the Add Pod wizard's option to use your own named subnets for the pod and instead entered the CIDRs for the subnets, the pod deployer creates the pod's management subnet. At the point that the deployment process failed, the process might already have created the pod's management subnet in the VNet.
- If the deployer already has created that management subnet, it is recommended you deploy the test VM on to that subnet. To identify if the pod's management subnet exists on the VNet, log in to the Microsoft Azure portal, navigate to that VNet, and examine the list of subnets it has. If you had the pod deployer automatically create the pod's subnets (you did not use the option to use your own named subnets for the pod) the pod's management subnet will have a name containing the string
hcs-podID-net-management, where podID is the pod's UUID. Otherwise, the pod's management subnet is the one that you created for the pod deployment. - If the failed deployment process did not create the pod's management subnet on the VNet, you can choose any available subnet on the VNet or create a new subnet for the test VM to use.
Procedure
-
Log in to the Microsoft Azure portal.
-
In the portal, create a compute VM from the Azure Martketplace and base that VM on an Ubuntu Server LTS model type.
At the time of this writing, the Ubuntu Server 20.04 LTS was available to choose from the Azure Marketplace.
-
When creating this test Linux VM, follow the wizard UI and to configure its required options. Ensure that you configure the following items as indicated below.
Option Description Subscription Match the one you selected in the Add Pod wizard for your pod. Resource group The recommended choice is to create a new resource group for the test VM. Follow the on-screen prompt to create a new resource group. Even though you can use an existing resource group with this test VM, a resource group specific for the test VM is recommended because it is easier to delete the VM and its related artifacts simply by deleting the whole resource group when you are finished running the tests. Region Match the one you selected in the Add Pod wizard for your pod. Size Because this is expected to be a short-lived VM, used only to complete the verification tests, you can pick any size. However, because smaller sizes usually have lower associated costs in Microsoft Azure, choosing a small size for the test VM is typical, such as a 2 vCPU model. Username Make a note of this name because you will need to use it later. Authentication type Select SSH public key. SSH public key source Select Use existing public key. The SSH public key field will appear with that selection, and you can paste in your SSH public key. SSH public key In this field, paste your SSH public key that you created when you created the SSH key pair. The pasted-in contents must start with the line ---- BEGIN SSH2 PUBLIC KEY ----and end with the line---- END SSH2 PUBLIC KEY ----from your public key.Public inbound ports Allow the selected SSH (22) port so that you can perfom the testing with this test VM. Virtual network Select the same VNet that was used for the failed pod deployment. Subnet If you already tried to deploy the pod and the process failed, the pod's management subnet might have been created in the virtual network. If the subnet is there, it is recommended to select that subnet for this test VM. Click the Subnet choice to navigate to the subnets that exist on the selected virtual network. You might have to hover over the subnet to see its full name in the tooltip. If the pod deployment process did not create the pod's management subnet on the VNet, select the subnet on your VNet that you identified to use for the test VM (as described in the prerequisites above). Note: If the pod was successfully deployed, but you are troubleshooting domain-join issues, you might select the pod's desktop subnet for the test VM instead of the management subnet, because domain-join operations are used with the desktop images that get connected to that desktop subnet. Public IP Select this choice so that the created test VM will have a public IP address assigned to it. Having a public IP address enables you to connect to it over the wide area network (WAN). Note: Using a public IP might not be technically feasible in your networking configuration. If you cannot create the test VM with a public IP, you will need to have network connectivity from your local system to the subnet you selected in the Subnet field or will need to connect to some other machine on your network and then inbound connect to the test VM. -
In the wizard's final step, verify that the key pieces of information (subscription, regional location, virtual network, and subnet) match the ones that you are using for your pod, and then submit to create the VM.
Use SSH to Connect to the Test VM
Make a SSH (Secure Shell) connection to the test VM so that you can run the network connectivity tests in your Microsoft Azure environment.
SSH Connect to the Test VM from a Microsoft Windows System
You make this connection from the Microsoft Windows system that has the private key that corresponds to the public key you specified when you created the test VM.
Prerequisites
Verify you have the test VM's IP address and the user name you specified when you created the VM.
On a Microsoft Windows system, PuTTY is typically used. To make it easy for PuTTY to load your private key when you start the SSH session, before starting PuTTY, start Pageant as described in Create an SSH Key Pair on a Microsoft Windows System and add the SSH private key to the Pageant key list. The SSH private key must match the public key you specified when creating the test VM. When the private key is loaded into Pageant, the PuTTY SSH session will use that private key automatically.
Procedure
-
Launch PuTTY (
 ).
).The PuTTY Configuration window opens.
-
In the PuTTY Configuration window, specify the host name, select SSH, and then click Open.
In the PuTTY Configuration window's Host Name field, type a string in the pattern
testvm_username@testvmipsubstituting the test VM's user name and IP address for testvm_username and testvmip in the string.
Important: After you click Open, when this is the first time you connect to the test VM, a PuTTY security message displays stating that the server's host key is not cached and displays the server's rsa2 key fingerprint. You can continue to make the connection by either clicking Yes to add the server's host key into PuTTY's cache or No to connect without adding the key to PuTTY's cache. If you suspect the connection might not be going to your test VM, click Cancel to abandon the connection and return to the PuTTY Configuration window to verify your host name entry.
The following screenshot is an illustration of the window using this sample:
testvmadmin@40.121.180.132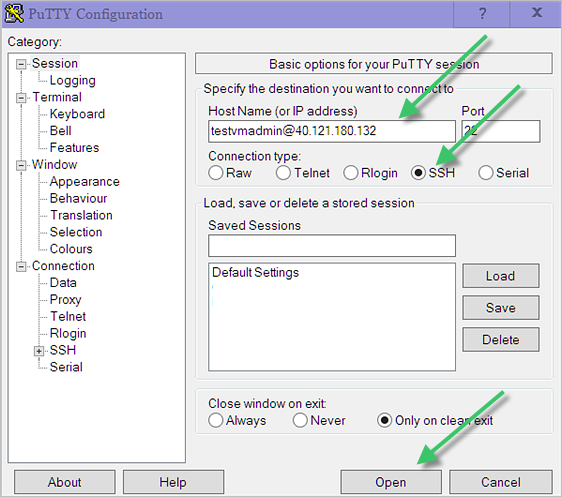
Results
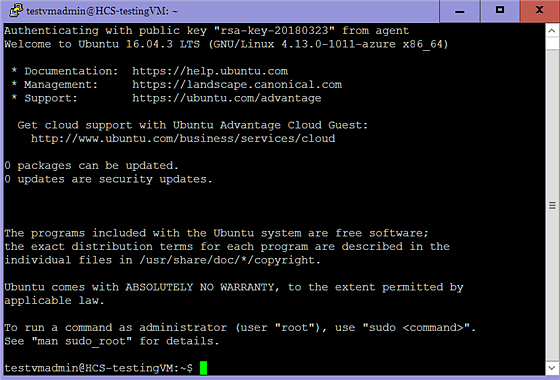
When the SSH connection is established, a command-line window displays.
What to do next
Now that you are connected to the test VM, you can run the tests to check network connectivity within your Microsoft Azure environment. Follow the steps described in Run the Tests to Check Networking in Your Microsoft Azure Environment.
SSH Connect to the Test VM from a Linux System
You make this connection from the Linux system that has the private key that corresponds to the public key you specified when you created the test VM.
Prerequisites
Verify you have the test VM's IP address and the user name you specified when you created the VM.
Procedure
-
Open a bash shell.
-
At the bash shell
$prompt, enter the ssh command as below, substituting the test VM's IP address and the user name for testvmip and testvm_username in the command:ssh testvm_username@testvmipFor example, using the test VM details from the examples in Create the Test Virtual Machine in Your Microsoft Azure Subscription, the sample command would look like:
ssh testvmadmin@40.121.180.132
Results
When the SSH connection is established, a command-line window displays that looks similar to the following screenshot.
What to do next
Now that you are connected to the test VM, you can run the tests to check network connectivity within your Microsoft Azure environment. Follow the steps described in Run the Tests to Check Networking in Your Microsoft Azure Environment.
Run the Tests to Check Networking in Your Microsoft Azure Environment
You run these tests to verify these two network-related areas are configured properly: that the DNS can resolve both internal and external addresses and that the required outbound ports are open. You run these tests using your test VM.
The pod relies on DNS to resolve both internal and external addresses. The first two tests here check whether the DNS configured in your network environment can resolve known FQDNs for internal and external addresses.
Important: Even though all of these manual tests succeed, if you are directing all traffic out through your on-premises network and only allowing authenticated traffic to pass, but you did not provide values for using a proxy in the pod deployment wizard, the pod deployment can get stuck in pending state. If this description matches your situation, you must delete the pod from the Getting Started page, re-run the pod deployment wizard, and specify the required proxy information.
Prerequisites
Before running these tests, verify that you created a test VM in your Microsoft Azure subscription and have an SSH connection to it, as described in Create the Test Virtual Machine in Your Microsoft Azure Subscription and Use SSH to Connect to the Test VM.
Obtain the IP addresses and fully qualified domain names (FQDNs) for servers that are internal to your network that you expect to be reachable from the VNet, such as your Active Directory Domain Controller. You will use this information in the DNS verification test.
Procedure
-
Check that DNS is working in your environment to resolve internal FQDNs by using the
digcommand to query a known domain name that is internal to your VNet in Microsoft Azure.In the SSH connection window, issue the
digcommand to query the domain name of a server that you know is internal to your network, such as your Active Directory Domain Controller.dig internal-domain-nameWhere internal-domain-name is the fully qualified domain name of a server that you know is internal to your network.
dig (Domain Information Groper) is a command-line tool for network troubleshooting. By running this command using an internal host name, the result verifies that your DNS configuration can resolve internal addresses properly. If your DNS configuration can resolve the internal-domain-name used in the command, the command output will return the correct IP address associated with that domain name.
For example, assume the VNet is configured with an internal Active Directory server having Active Directory Domain Controller with a DNS entry of
skylo.localand an IP address of192.168.0.15. Issuingdig skylo.localwould check whether the VNet's DNS configuration can resolve that internalskylo.localserver name:testvmadmin@HCS-testingVM:~$ dig skylo.local ; <<>> DiG 9.10.3-P4-Ubuntu <<>> skylo.local ;; global options: +cmd ;; Got answer: ;; ->>HEADER<<- opcode: QUERY, status: NOERROR, id: 64899 ;; flags: qr aa rd ra; QUERY: 1, ANSWER: 1, AUTHORITY: 0, ADDITIONAL: 1 ;; OPT PSEUDOSECTION: ; EDNS: version: 0, flags:; udp: 4000 ;; QUESTION SECTION: ;skylo.local. IN A ;; ANSWER SECTION: skylo.local. 600 IN A 192.168.0.15 ;; Query time: 1 msec ;; SERVER: 192.168.0.15#53(192.168.0.15) ;; WHEN: Mon Mar 26 20:58:01 UTC 2018 ;; MSG SIZE rcvd: 56 testvmadmin@HCS-testingVM:~$The test is successful when the ANSWER SECTION indicates the provided host name was resolved to the IP address that you expect for that host name.
Note: Sometimes DNS is not 100% reliable, and some requests resolve fine while others fail. If issuing the command fails the first time, run the command for ten to twenty iterations and see whether you get reliable responses each time.
-
Check that DNS is working in your environment to resolve external FQDNs by using the
digcommand to query a known external domain name.In the SSH connection window, issue the
digcommand to query an external industry-standard domain name, such asomnissa.comormicrosoft.com.dig external-domain-nameWhere external-domain-name is a fully qualified domain name that is external to your VNet. For example, issuing
dig microsoft.comwould check whether the VNet's DNS configuration could resolve that external name:testvmadmin@HCS-testingVM:~$ dig microsoft.com ; <<>> DiG 9.10.3-P4-Ubuntu <<>> microsoft.com ;; global options: +cmd ;; Got answer: ;; ->>HEADER<<- opcode: QUERY, status: NOERROR, id: 38655 ;; flags: qr rd ra; QUERY: 1, ANSWER: 2, AUTHORITY: 0, ADDITIONAL: 1 ;; OPT PSEUDOSECTION: ; EDNS: version: 0, flags:; udp: 4000 ;; QUESTION SECTION: ;microsoft.com. IN A ;; ANSWER SECTION: microsoft.com. 150 IN A 107.154.105.19 microsoft.com. 150 IN A 107.154.106.19 ;; Query time: 28 msec ;; SERVER: 192.168.0.15#53(192.168.0.15) ;; WHEN: Mon Mar 26 21:14:29 UTC 2018 ;; MSG SIZE rcvd: 71 testvmadmin@HCS-testingVM:~In the above example, the ANSWER SECTION indicates the external domain name
microsoft.comwas properly resolved to two IP addresses.Note: You can repeat this test using various external domain names, such as
azure.comormicrosoft.com, to verify that your DNS can resolve different external names.If the DNS tests do not work, verify your network configurations and your DNS server. Check that you added your DNS server to your VNet.
Important: If you find that you need to add your DNS server to your VNet or you have to change the VNet's DNS server configuration, you must restart all VMs that are connected to that VNet for them to pick up the change. If you change the VNet's DNS server configuration and do not restart all of the VMs connected to that VNet, the changes will not propagate correctly on the VNet.
-
Check that the required outbound ports are available by using the
netcatcommand.Horizon Cloud requires some outbound ports to be opened, so that the pod software can be securely downloaded into your Microsoft Azure environment and so that the pod can connect back to the Horizon Cloud control plane. As described in First-Gen Tenants - Horizon Cloud on Microsoft Azure Deployments - Host Name Resolution Requirements, DNS Names, the following outbound TCP ports are required to be open from the pod's management subnet: port 80, 443, and 11371. By running the
netcatcommand as indicated in the command below, you can verify that those outbound ports are open as required.In the SSH connection window, issue the following commands (one per port).
Note: The command below to test port 11371 specifies
packages.microsoft.comto test that connection, while the other two lines test the outbound connection to the Horizon Cloud control plane.testvmadmin@HCS-testingVM:~$ netcat -v -w 3 cloud.horizon.omnissa.com 80 Connection to cloud.horizon.omnissa.com 80 port [tcp/http] succeeded! testvmadmin@HCS-testingVM:~$ netcat -v -w 3 cloud.horizon.omnissa.com 443 Connection to cloud.horizon.omnissa.com 443 port [tcp/https] succeeded! testvmadmin@HCS-testingVM:~$ netcat -v -w 3 packages.microsoft.com 11371 Connection to packages.microsoft.com 11371 port [tcp/hkp] succeeded!When a port is properly open, the
netcatcommand returns thesucceeded!line for its test.If the netcat commands return failures, check your Microsoft Azure network connections, your Network Security Groups in your subscription, and any firewalls you might have in place. Ensure your network configuration meets the DNS, ports, and protocol requirements that the pod needs for deployment, as described in First-Gen Tenants - Horizon Cloud on Microsoft Azure Deployments - Host Name Resolution Requirements, DNS Names.
Results
If the above tests succeed, you will be able to successfully deploy your pod.
Note: If you will be configuring optional features for use with your pod, such as True SSO or two-factor authentication with an authentication server, additional ports might be needed for those purposes. You can use the above outbound port testing techniques to verify such ports are properly open.
What to do next
When you have completed the test, you should delete the test VM and all of its related artifacts, such as its VM disk, IP address, NIC, from your Microsoft Azure environment. Ideally you would have created a resource group for the test VM and can simply delete that resource group to delete all of the VM's artifacts. Follow the steps in Delete the Test VM After You Complete the Tests.
Important: If you do not delete all of the test VM's artifacts from your Microsoft Azure environment and you connected the VM to one of the pod's subnets, if you later try to delete the pod from your Horizon Cloud environment using the Delete action on the pod, the system might not be able to fully delete the pod due to those remaining connected artifacts. By default, when you use the Delete action to delete a pod, Horizon Cloud deletes those resource groups and subnets that it created for the pod. Microsoft Azure will prevent deletion of subnets that are still in use. If your test VM's artifacts are connected to the pod's subnets, then those subnets cannot be deleted and the pod deletion will be incomplete. To prevent this situation, ensure all of the test VM's artifacts are deleted after you have successfully deployed your pod.
Delete the Test VM After You Complete the Tests
When you have finished the tests to check your Microsoft Azure network configuration and no longer need the test VM, you should delete it and all of its related artifacts from your Microsoft Azure environment.
Important: If you do not delete all of the test VM's artifacts from your Microsoft Azure environment and you connected the VM to one of the pod's subnets, if you later try to delete the pod from your Horizon Cloud environment using the Delete action on the pod, the system might not be able to fully delete the pod due to those remaining connected artifacts. By default, when you use the Delete action to delete a pod, Horizon Cloud deletes those resource groups and subnets that it created for the pod. Microsoft Azure will prevent deletion of subnets that are still in use. If your test VM's artifacts are connected to the pod's subnets, then those subnets cannot be deleted and the pod deletion will be incomplete. To prevent this situation, ensure all of the test VM's artifacts are deleted after you have successfully deployed your pod.
Procedure
-
Log in to the Microsoft Azure portal.
-
Use one of the following methods to delete the test VM, depending on how you deployed it.
-
If you deployed the test VM into its own resource group and you are not using that group for any other purpose, you can delete the entire resource group.
CAUTION:
To avoid inadvertently deleting other items, make sure that the resource group contains only your test VM and its associated objects such as its disk and network adapters before deleting the resource group.
-
If you need to delete the test VM without deleting an entire resource group, you can use the portal's search box to search for the test VM's name. The results of this search will list the VM and all of its associated objects (disk, network interfaces, public IP address, and so on). Then delete each object individually.
-
Was this page helpful?