This page describes the ingredients and step-by-step recipe for a pod to use in a simplified, kick-the-tires exploration of first-gen Horizon Cloud on Microsoft Azure deployment.
Important: Use this page solely when you have access to a first-gen tenant environment in the first-gen control plane. As described in KB-92424, the first-gen control plane has reached end of availability (EOA). See that article for details.

Brief Introduction
The intent of this page is to provide a step-by-step recipe that creates a smooth, simplified pod deployment suitable for kick-the-tires environments such as proof of concepts, home labs, pilots, trial environments, and the like.
Such environments are expected to be torn down after the kick-the-tires exploration is over.
This recipe here is solely for use with a single subscription, one basic VNet, and a local PoC Active Directory VM — anything else is out of scope.
Ingredients for a Simplified Initial Deployment
This step-by-step recipe as written in this page was proved out by a college graduate using these minimal essential ingredients.
-
Ingredients
- One pay-as-you-go Azure subscription backed by an industry-standard credit card.
West US 3Azure regional location in that subscription.- One basic, single VNet in that subscription, configured for 512 addresses (10.0.0.0/23).
- A local PoC Active Directory VM on that VNet, to satisfy the register Active Directory flow.
- Use the Azure built-in
Contributorrole for the app registration that we set up for Horizon Cloud for making its Azure API calls. TheWest US 3region was used in this recipe because, at the time of this writing, theWest US 3region satisfied these two goals of the PoC deployment: that region is geographically closest to the intended VDI end users and that region satisfied the deployment's Azure Managed PostgreSQL service and VM Family vCPUs requirements using the pay-as-you-go subscription.
-
Simplifications
-
Because the gateway feature can be added onto the deployed pod later using Edit Pod, we simplified our recipe here by initially deploying with the gateway configuration toggles switched off.
Doing this allows for successfully completing the initial deployment in parallel with obtaining the SSL certificate needed for the gateway configuration.
-
To simplify the quota checking step, we omit checking for quota for the VM families that the system requires for golden images that use Windows 11 operating systems (OSes). The system requires a different VM model for Windows 11 golden images than for Windows 10 ones. To simplify, we omit the Windows 11 use case from our quota check.
-
When You Use the Azure Portal
The activities involved in preparing Microsoft Azure rely on the Azure Portal.

Wherever our recipe here refers to the Azure Portal, please understand that:
- Microsoft updates their interfaces occasionally over time.
- Microsoft also personalizes everyone's portal experience according to their account access and their portal settings.
- We do our best to keep both the screenshots here and the labels and names displayed in the Azure Portal up-to-date with Microsoft's changes.
- The screenshots in this page and the labels and names might not perfectly match what you see in the Azure Portal at a given point in time, due to how Microsoft rolls out updates and personalizes your portal experience.
This PoC page uses the term pane to refer to an area of the Azure Portal.
Prepare Microsoft Azure Cloud
 | For this PoC recipe, we must prepare our Microsoft Azure subscription with elements that the PoC Horizon Cloud on Microsoft Azure deployment needs before running the Add Pod wizard. |
The screenshots contained in these sections illustrate what we saw for our pay-as-you-go subscription used to prove out this page's steps.
Details that you see in your specific Azure environment will look different, because Microsoft personalizes what you see and have access to.

 Obtain Azure Subscription
The first activity for the PoC is obtaining an Azure subscription for the PoC deployment.
By its definition, a Horizon Cloud on Microsoft Azure deployment resides in a Microsoft Azure subscription that you provide.
As of this writing, Microsoft makes available these main types of Azure subscriptions: free types, pay-as-you-go, and enterprise-type subscriptions.
Currently, the pay-as-you-go and enterprise-type subscriptions are the ones that support having the quota levels that a Horizon Cloud on Microsoft Azure deployment needs.
Microsoft does not typically allow increasing quota levels in a free type of account. Therefore, a free account cannot be made to align with the requirements to support the Horizon Cloud deployment.
- A PoC deployment might consider taking the following approach:
- Sign up for the free Azure account that provides use of $200 Azure credits for 30 days from sign up.
- Immediately convert that free Azure account to a pay-as-you-go account. The $200 Azure credits become available in that pay-as-you-go account for 30 days.
- Sign up for the Horizon Universal Subscription License 60-day trial (a requirement if you do not already have a Horizon Cloud tenant).
- Continue completing the Azure preparation items 2 - 6 during the time that your Horizon Cloud tenant is being configured.
- When the Welcome to Horizon Cloud email is received, log in and run the Add Pod wizard.
This way, the Azure subscription is already prepared and ready at the same time the Horizon Cloud tenant account is ready to log in and run the Add Pod wizard.
When you have obtained an Azure subscription in which you can perform the remaining five preparation activities, then you can log in to the Azure portal and begin those preparations.
The remaining Microsoft Azure preparation activities (2 - 5) all take place using the Azure portal, within your Azure subscription. Log in to the Azure Portal using the credentials for your subscription.
 Register Essential Resource Providers
Now let's register all the essential resource providers that will be needed for the PoC pod deployment.
Before the next PoC activity of confirming the availability of required items in a specific Azure regional location, the Microsoft.DBforPostgreSQL, Microsoft.Sql, and Microsoft.Compute resource providers must be in Registered status, to make the Azure Portal display the right data.
By registering now all of the additional resource providers that the Add Pod wizard needs, it saves time for later. The ones needed by the Add Pod wizard will already be registered when you start running the Add Pod wizard.
In the Azure Portal, it can take up to 10 minutes for each resource provider to move from Unregistered to Registered status.
- Steps
-
Log in to the Azure Portal at https://portal.azure.com using your Azure credentials.
-
Into the portal's upper search bar, start typing
subscriptionsto see a Subscriptions icon. Click that Subscriptions icon.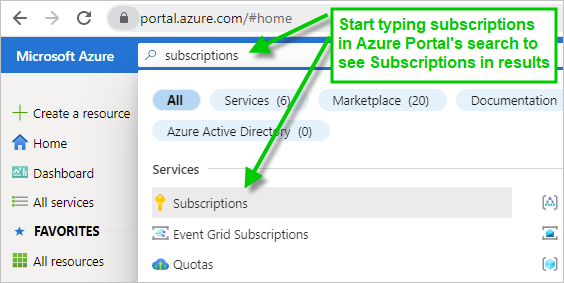
When you click Subscriptions, the portal displays the Subscriptions pane, and lists those subscriptions that are associated with your login credentials.
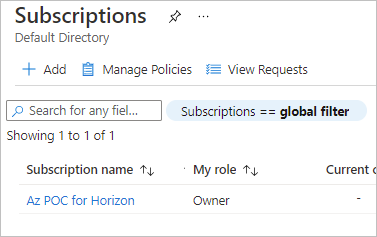
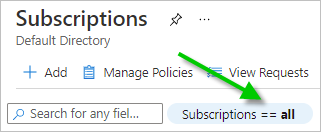
If you do not see the name of the subscription that you obtained to use for this PoC, click on the Subscriptions == global filter. Then in the subsequent box that appears, clear the Show only subscriptions selected in box and click Apply so that the filter says Subscriptions == all.
-
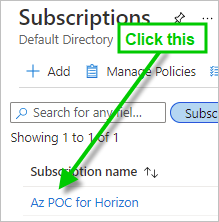
Click the subscription you want to use for this PoC.
-
On the subscription's pane, scroll down to locate Resource providers.
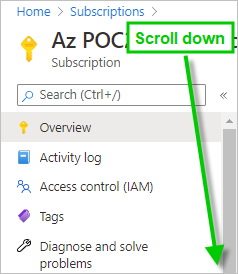
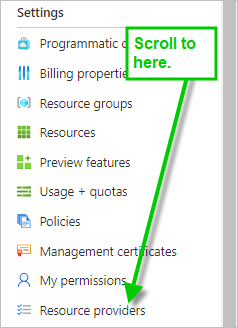
-
Click on that Resource providers, which opens the Resource providers pane.
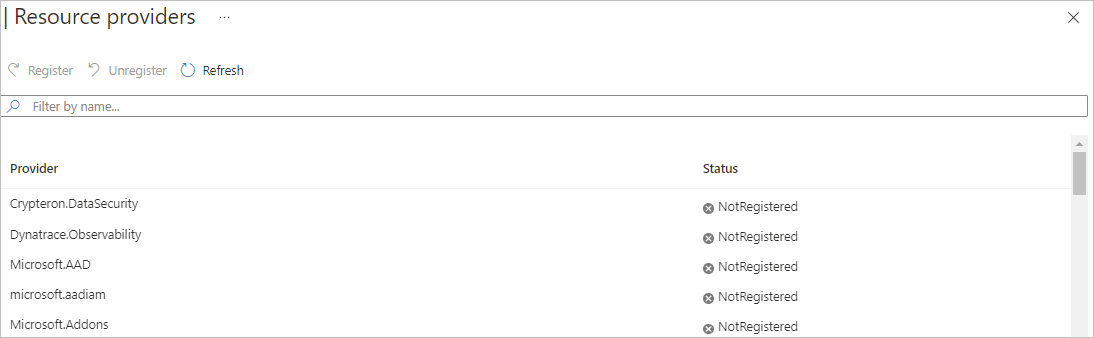
-
For each one of the essential resource providers in the following table, scroll through the Resource providers pane and check if
Registeredis displayed next to that resource provider.This screenshot depicts where to see the
Registeredstatus.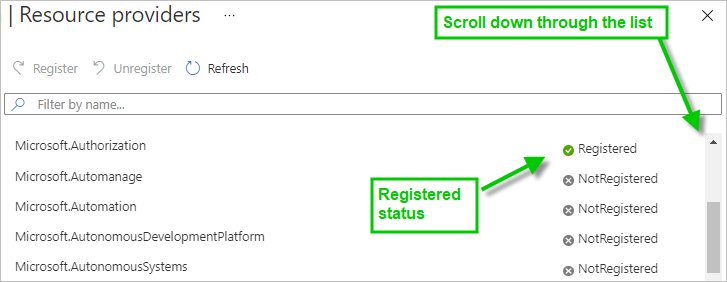
You will likely see some resource providers already display
Registeredstatus in a brand new Azure subscription because of Microsoft Azure standard behavior. For example, a new Azure subscription usually hasMicrosoft.MarketplaceOrderinginRegisteredstatus already, because Azure assumes that anyone with an Azure subscription would want to use the Azure Marketplace. -
If anything along the lines of
NotRegisteredis displayed for one of these essential resource providers, then select that one and click the Register button at the top of the pane to move that one intoRegisteredstatus.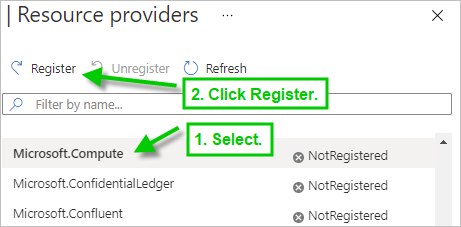
After you click Register, the pane will display
Registering, as in the following example screenshot.
Please note that the portal's Resource providers pane does not automatically refresh when the registering process is done. You must clickRefresh to see the up-to-the-moment status. For each resource provider, it might take up to 10 minutes for its status to change from
RegisteringtoRegistered. -
Repeat the steps of checking and registering for the resource providers in the following table until they all display
Registeredstatus in the Resource providers pane for the subscription.
-
| Resource Provider |
|---|
Microsoft.Authorization |
Microsoft.Compute |
Microsoft.DBforPostgreSQL |
microsoft.insights |
Microsoft.KeyVault |
Microsoft.MarketplaceOrdering |
Microsoft.Network |
Microsoft.ResourceGraph |
Microsoft.ResourceHealth |
Microsoft.Resources |
Microsoft.Security |
Microsoft.Sql |
Microsoft.Storage |
 Check Availability and Quota Limits, Increase as Needed
In a Horizon Cloud on Microsoft Azure deployment, you decide on the specific Azure regional location in which to situate the deployment.
For low latency, one typically situates a Horizon Cloud on Microsoft Azure deployment in an Azure location that is geographically closest to the intended VDI end users.
However, because Microsoft can restrict specific Azure services and quota in a specific regional location at any point in time, it is important to have a short list of candidate locations that you will consider using for your PoC deployment.
As an example, see the following screenshot taken on the day when we checked the availability of Standard Dv3 Family vCPUs for France Central in our pay-as-you-go subscription. This screenshot depicts how Microsoft Azure did not have this key VM family available in that region for our subscription.

- Best Practice Recipe
- For each candidate region on your short list, verify availability of the Horizon Cloud on Microsoft Azure deployment's required Azure Database for PostgreSQL Service and specific VM families.
- When you see that one of those regions meets the availability of both the PostgreSQL database and the VM families, make that your region for this PoC deployment,
- Increase that region's VM Family vCPUs and Total Regional vCPUs enough to accommodate both the initial pod and day-2 items of adding a gateway, creating a few golden images, desktop pools, and multi-session farms.
| Item | Used for |
|---|---|
| Azure Database for PostgreSQL -Generation 5, memory optimized, 2 vCores, 10 GB storage. | Pod itself |
| Standard Dv3 Family vCPUs - 10 vCPUs | 8 vCPUs for the pod's management VMs, plus 2 vCPUs for one RDS golden image (images added post-deployment) |
| Standard DSv2 Family vCPUs - 4 vCPUs | 2 vCPUs for one single-session Windows 10 golden image and 2 vCPUs for one Windows 10 Enterprise multi-session golden image. (These images are created using the system's automated Import VM from Marketplace wizard.) |
| Standard Av2 Family vCPUs - 9 vCPUs | The pod's external gateway configuration (gateway added post-deployment) requires 8 vCPUs. Then for our PoC recipe, we are going to use a 1 vCPU VM from this Av2 family for our Active Directory domain and domain controller machine. That estimate calculates to 9 vCPUs (8 plus 1). |
| Optional: Standard NVSv3 Family vCPUs - 12 vCPUs * (1 + number of desktops) | If you want to try a GPU-enabled golden image and desktops in your PoC. From this NVSv3 family, 12 vCPUs for the golden image, plus additional 12 vCPUs times the number of desktops you want to try based on that image. |
| VM families for PoC single-session virtual desktops and multi-session farms | The virtual desktops and remote apps served by the pod. A Horizon Cloud on Microsoft Azure deployment supports using a variety of VM families for these. A minimum of 2 vCPUs is recommended for each single-session or multi-session virtual instance. For a PoC recipe, we estimate using the Standard Dv3 Family vCPUs and 20 single-session Windows desktops, 2 multi-session Windows desktops, and 2 multi-session RDSH servers. That estimate calculates to 48 vCPUs from that family (24 x 2 vCPUs). |
Please note that the above numbers reflect only those for a simple PoC recipe, as described in this page's introduction. These numbers cannot be construed to accommodate complex pod deployments nor desktops or remote apps at scale nor upgrades of the initial deployment nor the service's Windows 11 OS support.
Example of Checking Availability and Quota Limits
First check if the Azure Portal prevents you from creating an Azure Database for PostgreSQL server - Single Server in your first selected candidate location. Then check the availability of the required VM Family vCPUs in that candidate.
Before performing these steps, ensure that PoC activity two is completed to have the Microsoft.DBforPostgreSQL, Microsoft.Sql, and Microsoft.Compute resource providers in Registered status.
The screenshots in this example illustrate what we saw for our pay-as-you-go subscription used to prove out this page's steps. Your display will be different, because Microsoft personalizes what you see and have access to.
-
Step 1 - Initiate creation of the Azure Database for PostgreSQL in the location to identify the top contender.
If Microsoft Azure prevents you from creating a single-server type of Azure Database for PostgreSQL instance in a specific regional location, that will block pod deployment also. So it's best to prove this database requirement first.
-
Into the Azure Portal's upper search bar, start typing
Azure Database for PostgreSQL serversto see a Azure Database for PostgreSQL servers icon. Click that icon.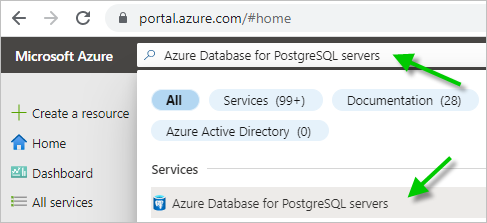
-
On the portal's Azure Database for PostgreSQL servers pane, click Create. This step initiates the wizard process in which we can check if Microsoft Azure will allow creation in our candidate location.
-
In the Single server option, click Create. The pod deployer uses the Single server type and for verifying availability in a location, we need to compare like with like.
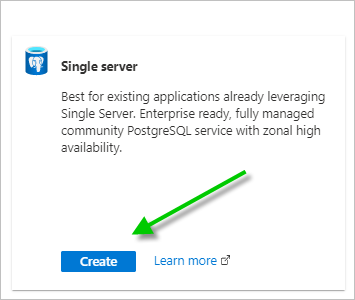
Even if the Azure Portal prompts you to create Flexible server, choose the Create Single Server path.
-
In the Single server pane, scroll to the Location menu and select your candidate regional location.
If the Azure Portal displays a message saying the service is not available in this location for your subscription, then try the next candidate on your short list of locations.
For example, on the day we did these steps in our pay-as-you-go subscription and selected
(Asia Pacific) Southeast Asia, the messageCurrently, the service is not available in this location for your subscription.appeared.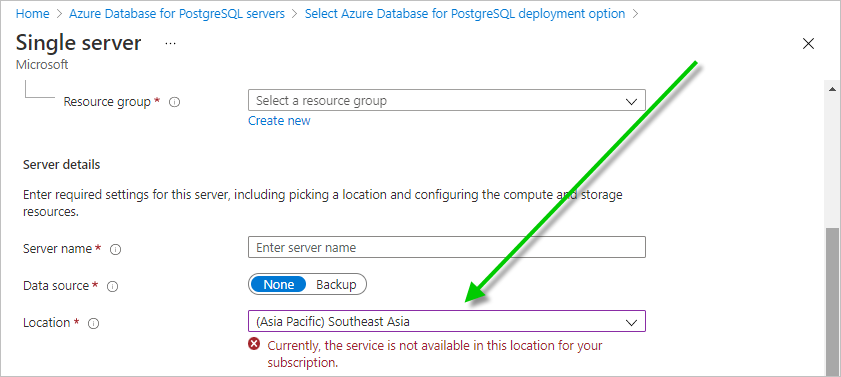
Microsoft has total control over which locations it makes its services available, on a region-by-region basis and on a subscription-by-subscription basis.
On the same day, when we selected our next candidate of
(Asia Pacific) East Asia, no message displayed.When you see no message displayed under the Location menu about the selected location, that location is a viable candidate to move on to the next verification, to verify the VM families in that candidate location.
-
Close the Single server pane by clicking the X to close the pane. Allow the portal to discard unsaved edits.
-
-
Step 2 - Using the location identified in Step 1, check the availability of the VM Family vCPUs in that location.
-
Into the Azure Portal's upper search bar, start typing
quotato see a Quotas icon. Click that Quotas icon.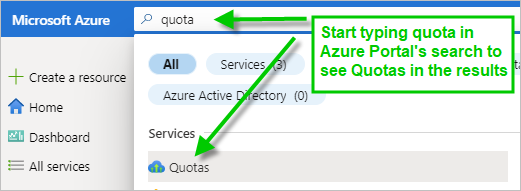
When you click Quotas, the portal displays the Quotas pane.
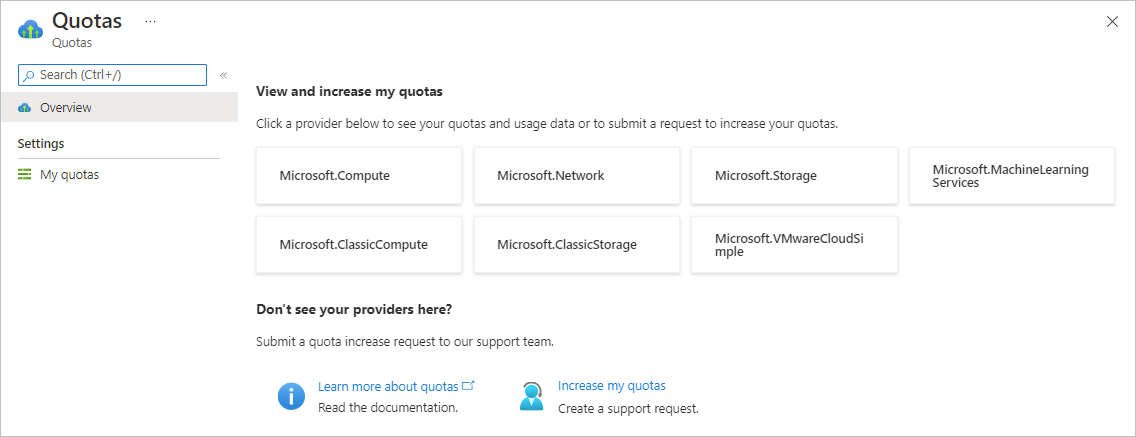
-
Click Microsoft.Compute.
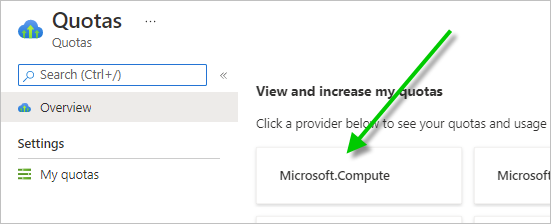
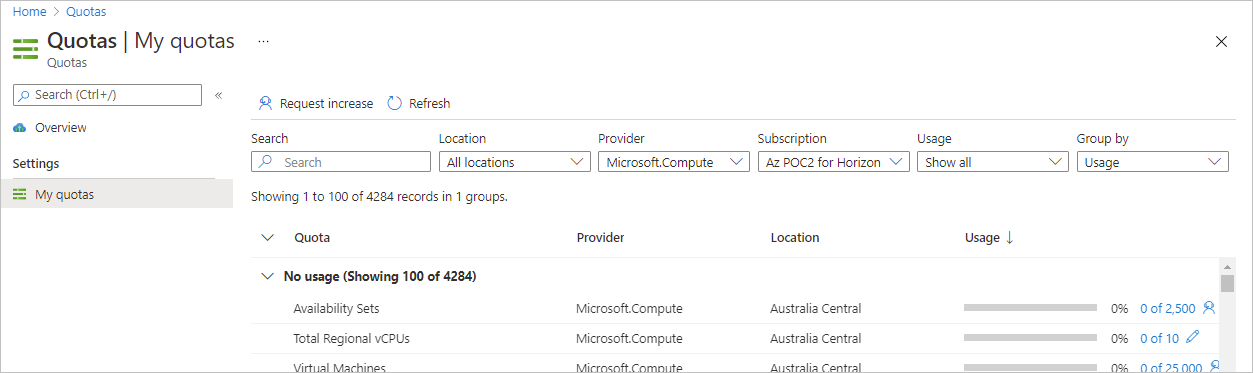
The My quotas pane appears with its filtering boxes at the top, with the Provider filter set to Microsoft.Compute.
-
Select your candidate location in the Location menu and check that the Subscription menu has selected the subscription you are using for this PoC.
This screenshot illustrates selecting the location
West US 3and our PoC subscription.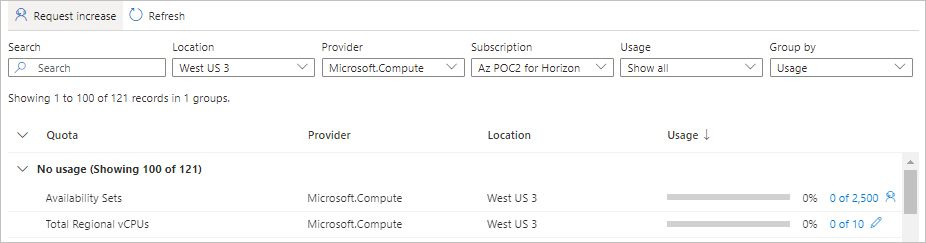
-
For your candidate location, check the VM Family vCPUs levels of availability for each of the following families, and increase the quota of that family if needed.
Family vCPUs for Pod Deployment and Post-Deployment VDI VM Family Available vCPUs Needed Standard Dv3 Family vCPUs 10 vCPUs total (8 vCPUs for the PoC pod itself, plus 2 vCPUs to use for post-deployment creation of one RDSH golden image post-deployment) Standard DSv2 Family vCPUs 4 vCPUs total (for post-deployment creation of one single-session Windows 10 golden image and one Windows 10 Enterprise multi-session golden image) Standard Av2 Family vCPUs 9 vCPUs total (8 vCPUs for a gateway on the pod and 1 vCPU for our PoC local Active Directory) Optional: Standard NVSv3 Family vCPUs 12 vCPUs for the golden image plus 12 x number of desktops you intend to try out Your desired VM families for PoC single-session VDI desktops and multi-session farms For our PoC recipe, we planned on using the Standard Dv3 Family vCPUs and have 20 single-session Windows desktops, 2 multi-session Windows desktops, and 2 multi-session RDSH servers. For us, that calculates to 48 vCPUs from that Standard Dv3 Family vCPUs (24 x 2 vCPUs). -
If for any of the VM families in step 3, you see the ⓘ symbol (circle lowercase I) next to the VM family name, click that symbol. If you see a
VM size currently unavailablemessage, you will have to strike that candidate from your list. If that happens, repeat the Step 1 - PostgreSQL database verification to identify a new viable candidate, and then repeat this check on the VM families.For example, see the following screenshot taken on the day when we checked the availability of Standard Dv3 Family vCPUs for
France Centralin our pay-as-you-go subscription. This screenshot depicts how Microsoft Azure did not have this VM family available in that region for our subscription.Your display will have different details, because Microsoft personalizes what you see and have access to.
-
When a family has less capacity available than the numbers in the table above, increase that family's quota in that region.
For example, this screenshot illustrates that our subscription has zero percent of Standard Dv3 Family vCPUs currently in use in the
West US 3location (0% Usage). However, this screenshot also indicates our current quota accommodates usage only to a maximum of 10 (ten), which is too low a number. Because our PoC will require usage of more than 10 from Standard Dv3 Family vCPUs, we will need to increase that quota maximum number.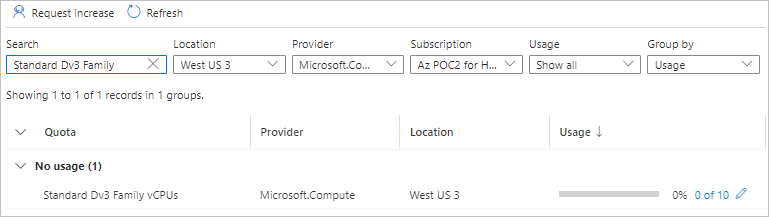
Microsoft provides multiple ways of requesting an increase in individual VM Family vCPU quotas. In our pay-as-you-go subscription, in the screen depicted above, we clicked the pencil icon to the right of the usage numbers.
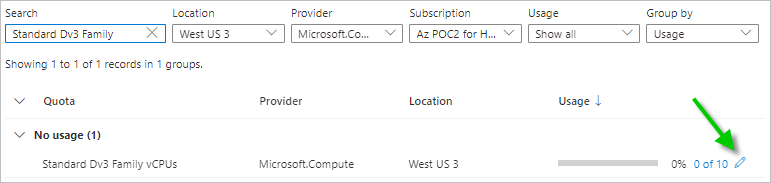
Clicking that pencil icon opens a form to specify a request to increase the quota to a new maximum number of vCPUs for that VM family within your selected location and subscription.
Note: Microsoft itself decides whether your request will be approved or rejected. If your request is rejected, a link will display where you can open a support request to Microsoft so that they can assist you with the increase.
-
After using the above steps to identify a location that satisfies the availability requirements for both the single-server Azure Database for PostgreSQL and the VM Family vCPUs, then check that regional location's Total Regional vCPUs level to see how many vCPUs are available, unused.
For example, this screenshot points out that for the
West US 3location in our subscription, the Total Regional vCPUs total quota is a maximum of 10, which is far less than the 71 that our PoC recipe requires.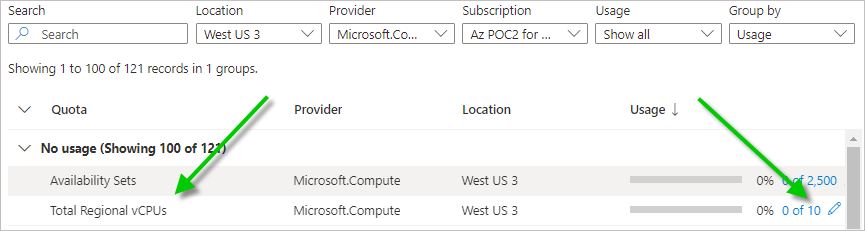
If you see that in your subscription the region's Total Regional vCPUs quota level indicates that there are not enough unused vCPUs out of the total usage to fulfill the total available vCPUs needed for the PoC deployment, then you must also increase the Total Regional vCPUs level.
-
-
Step 3 - Verify the Total Regional vCPUs in the candidate region, and increase if needed.
Do these steps after increasing the quota limits for the individual VM Family vCPUs.
For the purposes of our PoC recipe, we want to accommodate at least 71 new total vCPUs in our desired Azure regional location. In Azure, the Total Regional vCPUs is the quota to check. (This 71 count includes the 16 vCPUs for the pod itself and one external gateway plus our local Active Directory domain server plus an estimated three golden images, and approximately 20 virtual desktops. This number does not cover use of GPU-enabled NV family images or desktops. To include those would add an additional 12 vCPUs plus 12 times the number of GPU desktops.)
-
In the same My quotas pane as in the preceding steps, select the location and subscription you will use for the deployment and find the row for the Total Regional vCPUs.
As an example, the following screenshot depicts Total Regional vCPUs for the
West US 3location and the subscription we will use for our deployment. -
When the
X of Ynumber displayed in the Usage column indicates that the number of available (unused) vCPUs is less than what is needed for the PoC, click the pencil icon at the right of theX of Ynumber to increase the maximum number (increase theY).Your specific numbers will look different from the ones in our screenshot, because your numbers will reflect what is up-to-the-minute in your own subscription and locations.
Look at the delta (
Y - X = Z) to verify how many vCPUs are still remaining available in the location for use. For example, if the Usage displays10 of 15, the delta would be only 5 available (15 - 10 = 5). That low number would need to be increased to accommodate the PoC.For our brand new pay-as-you-go subscription, we have no VMs in our subscription yet, and so our initial usage shows
0 of 10and we need to set our maximum to 71 to accommodate our estimate of having the pod, its external gateway, our Active Directory domain machine, three golden images, and 20 virtual desktops.After clicking the pencil icon in our subscription, in Request quota increase, we enter 71 for the new maximum limit and submit the request.
Note: Microsoft itself decides whether your request will be approved or rejected. If your request is rejected, a link will display where you can open a support request to Microsoft so that they can assist you with the increase.
-
-
Specific example of checking the Standard Dv3 Family vCPUs availability in
West US 3location and increasing its quota in the subscriptionFor our PoC recipe, we plan on using the Standard Dv3 Family vCPUs family for our single-session virtual Windows desktops, multi-session Windows desktops, and multi-session RDSH servers. To accommodate those plus the pod itself, we needed to check that family's quota to have at least 58 vCPUs of that family (summed from the data in the previous table)
Checking for this number and increasing if needed will ensure we will not run short of Standard Dv3 Family vCPUs when we start to create virtual desktops.
-
In the My quotas pane, in the Search filter, type
Standard Dv3 Familyand set Location toWest US 3. This search will reveal the available quotas for the Standard Dv3 Family vCPUs inWest US 3for our subscription. -
Check the Usage column and confirm that the percent available has at least 58 remaining (unused) out of the total.
For example, if our Usage column says 8 of 10, that would mean that 8 out of the 10 are in use, and there are only 2 vCPUs remaining available in that quota level (10 minus 8 equals 2 unused). In that case, we must increase that quota by at least 56 vCPUs to accommodate the total 58 vCPUs available that we want for that Standard Dv3 Family vCPUs.
We then repeated a similar quota check for the other required VM families in the above table, and increased as needed.
-
 Create App Registration
This app registration is a significant element in enabling a Horizon Cloud on Microsoft Azure deployment.
The app registration in your Azure subscription provides the ability for Horizon Cloud to use its API calls to create the Horizon Cloud service on Microsoft Azure deployment in that subscription.
The service uses API calls to initially stand up the deployment in the subscription. The service also uses API calls for day-2 operations of creating golden images, VDI desktops, and so on — all of the VDI administration tasks.
| Item for the Add Pod wizard | Your value |
|---|---|
| Subscription ID in Step 2 below | |
| Application (client) ID in Step 5 below | |
| Directory (tenant) ID in Step 5 below | |
| Value of the client secret in Step 6 below |
- Steps
-
In the Azure Portal, navigate to the details for the subscription you are preparing to use in the PoC. search for
Subscriptions, and click on Subscriptions when you see it appear in the results list.For example, using the Azure Portal's search bar, search for
Subscriptions. click on Subscriptions when you see it in the results list, then click on your specific subscription.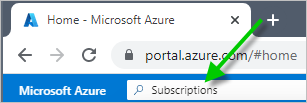
-
From the subscription details, copy the Subscription ID and save it where you can retrieve it later for the Add Pod wizard.
The following screenshot shows where we copied the Subscription ID for our subscription named
Az POC for Horizon. Our specific ID is redacted here to protect our values.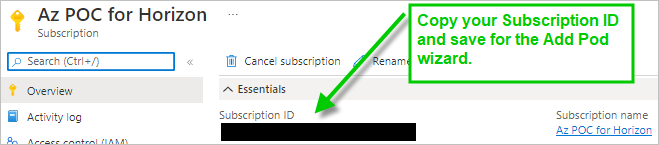
-
Then in the Azure Portal's search bar, search for
App registrations, and click App registrations when you see it appear in the results list.
When you click App registrations from the search results, the portal displays the App registrations page.
-
On the App registrations page, click New registration.
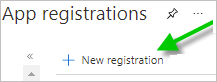
Azure portal displays its UI for creating the app registration.
-
In the UI form, specify these items:
- A display name that will remind you this registration is for Horizon Cloud use.
- Select the single tenant choice for who can use this app registration (as of this writing, that choice is labeled Accounts in this organizational directory only).
-
Leave the optional items alone and click Register.
The newly created app registration is displayed on screen.
-
From the displayed app registration, copy the Application (client) ID and Directory (tenant) ID and save them where you can retrieve them later for the Add Pod wizard.
The following screenshot illustrates our app registration's essential details. Ours has display name
hcs-poc1. Our specific Application (client) ID and Directory (tenant) ID are redacted here to protect our values.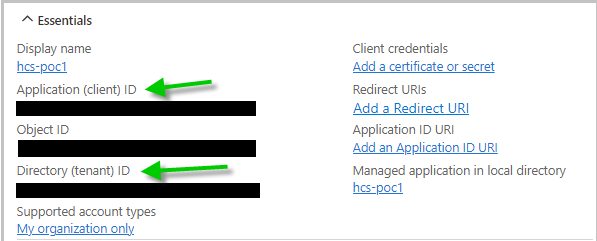
-
Now create a client secret key for this app registration.
-
From the app registration display in Step 5, click the text Add a certificate or secret.
The portal displays the Certificates & secrets pane for that app registration.
For our app registration named
hcs-poc1, we saw:
-
Click New client secret in that pane.

-
The portal displays the Add a client secret screen.
Type a description and select an expiration that aligns with a length of time to cover this Horizon Cloud on Microsoft Azure PoC.
For us, we set a 12 months (one year) expiration. However, we will have to remember to return before it expires if we want to continue to use this same client secret with a new Horizon Cloud on Microsoft Azure deployment.
We named our client secret
hcspoc1.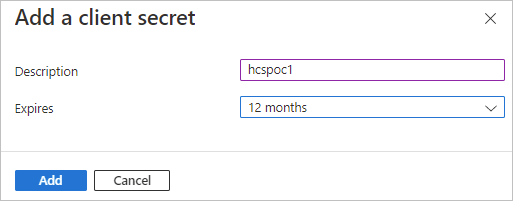
-
Click Add.
Immediately when you see the entry on the Certificates & secrets pane, locate the Value column, copy that value, and save where you can retrieve it later for the Add Pod wizard.
Important: Keep this screen open until you copy the Value and save the value into a location where you can ensure you can retrieve it later. If you click away from this UI, the portal will obfuscate the Value and you will have to repeat creating a client secret to get a value to copy and save.
The following screenshot illustrates the client secret that we created. Our specific values are redacted here to protect our data.

-
-
Now assign the Azure built-in
Contributorrole to this app registration.This role assignment provides for the Horizon Cloud service's ability to use its API calls for the PoC deployment in the subscription.
-
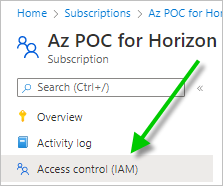
Again navigate back to the subscription details (try using the Azure Portal's search bar, search for
Subscriptions, click on Subscriptions when you see it, and then in the Subscriptions pane, click on the subscription). -
Click Access control (IAM).
-
In the Access control (IAM) pane, click Add > Add role assignment
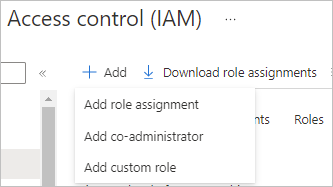
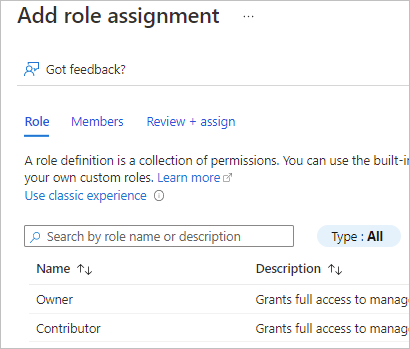
That action displays the Add role assignment pane.
-
In that Add role assignment pane, select
Contributorand then click Members to move to the Members tab.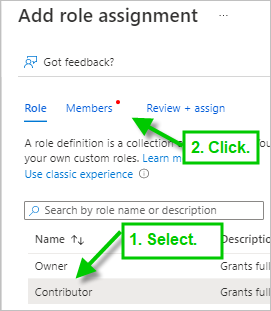
-
On the Members tab, keep User, group, or service principal selected and click Select members.
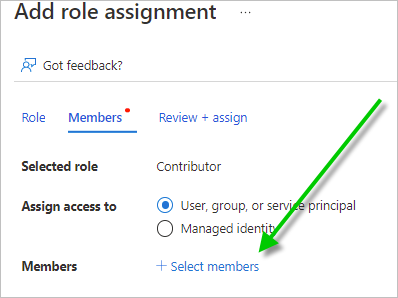
-
In the selection window, search for the name of the app registration that you created in Step 5.
When you created the app registration in Step 6, Azure also created an associated service principal of the same name as the app registration. Technically speaking, Horizon Cloud API calls use both the app registration and its associated service principal to create and work with the Horizon Cloud on Microsoft Azure deployment.
We search for the name we used for our app registration,
hcs-poc1.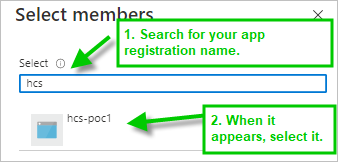
-
When you click the name, it becomes listed as selected member. Then click Select to finalize that selection.
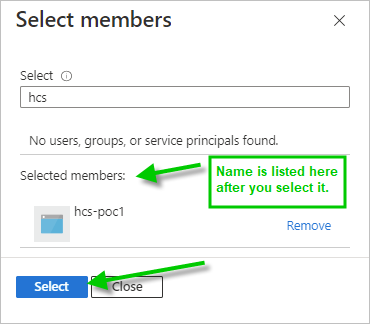
-
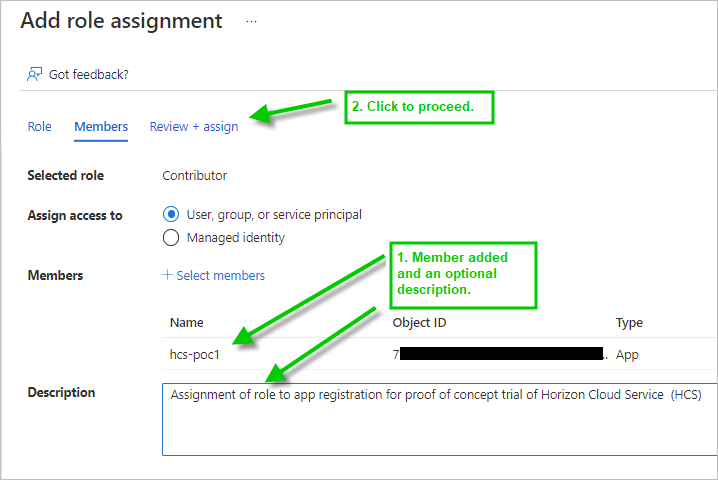
The app registration's name is added to the Members tab. Add an optional description if you like, and then click Review + assign to move to the Review + assign tab.
This screenshot depicts our PoC choices, with the Object ID redacted.
-
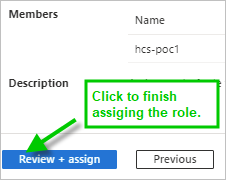
On the Review + assign tab, complete these steps by clicking the button also labeled Review + assign.
-
-
 Set Up Networking
Now let's create the virtual network (VNet) and subnets we'll use in our PoC.
For our PoC recipe, we will define the following address spaces and subnets.
Please note that Azure always reserves 5 addresses from every subnet for itself.
| Address Space | Name | Purpose |
|---|---|---|
| 10.0.0.0/23 | vnet-hcspoc | The overall VNet that we're creating for our PoC. The /23 starts the VNet's address space with 512 addresses. This CIDR allows us to accommodate the pod, its gateways, and the golden images and virtual desktops for our PoC with the following subnets. Feel free to choose a larger space as you prefer for your PoC. |
| 10.0.0.0/29 | poc-adsubnet | We will place our local PoC Active Directory server machine on this subnet. We use /29 here because that's the smallest range we can use and still accommodate the 5 addresses that Azure always reserves for itself from every subnet. |
| 10.0.0.32/27 | hcspoc-mgmt | For the Add Pod wizard's pod management subnet. The Add Pod wizard enforces a minimum of /27 for this subnet. A Horizon Cloud on Microsoft Azure deployment requires that only the deployment's VMs are to reside on this subnet, and no other pre-existing or post-deployment machines. Therefore, we must define this subnet and the following two subnets as distinct subnets.
The Add Pod wizard also requires this subnet to have the service endpoint named Microsoft.Sql configured on it. We add that in the last step of this Activity . |
| 10.0.0.64/28 | hcspoc-uag-ext | For the Add Pod wizard's external gateway subnet. The Add Pod wizard enforces a minimum of /28 for this subnet. |
| 10.0.1.0/25 | hcspoc-vdi | For the Add Pod wizard's VM subnet. We use /25 here to provide for 128 addresses, which we use for the golden images and the VDI desktops that we planning for in our recipe here. |
- Steps
-
In the Azure Portal, in the portal's upper search bar, start typing
Virtual networksto see a Virtual networks icon. Click that Virtual networks icon.When you click Virtual networks, the portal displays the Virtual networks pane.
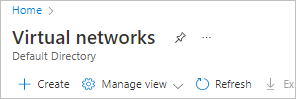
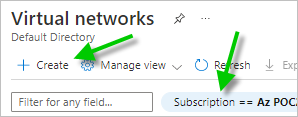
Verify the Subscription filter is set to your subscription for this PoC and click Create.
-
In the displayed Create virtual network wizard, use Create new to name and create a resource group to hold the VNet object in Azure.
In our case, we named this resource group
hcsvnet-RG.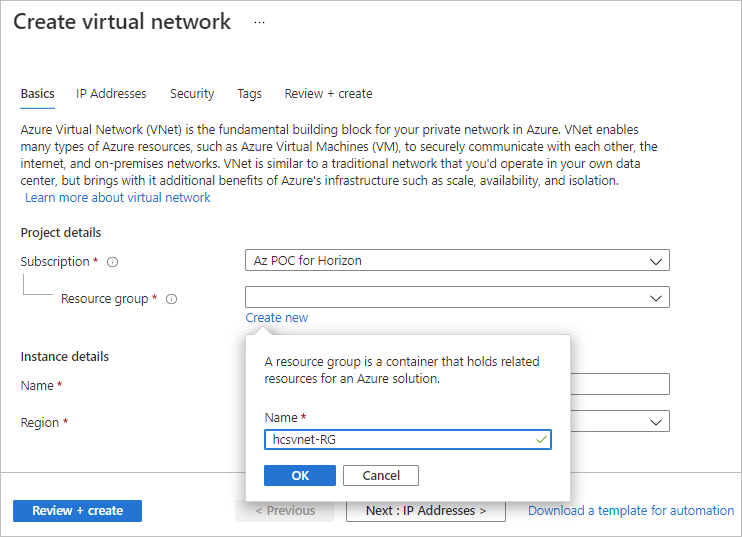
-
Type a name for your VNet and for the region, select the same Azure regional location that you verified using Activity
, the one that meets the PoC's availability and quota needs.For our PoC, we name our VNet as
vnet-hcspocand have chosen to use regionWest US 3in our subscription, which is the region that we verified and increased quota from of Activity.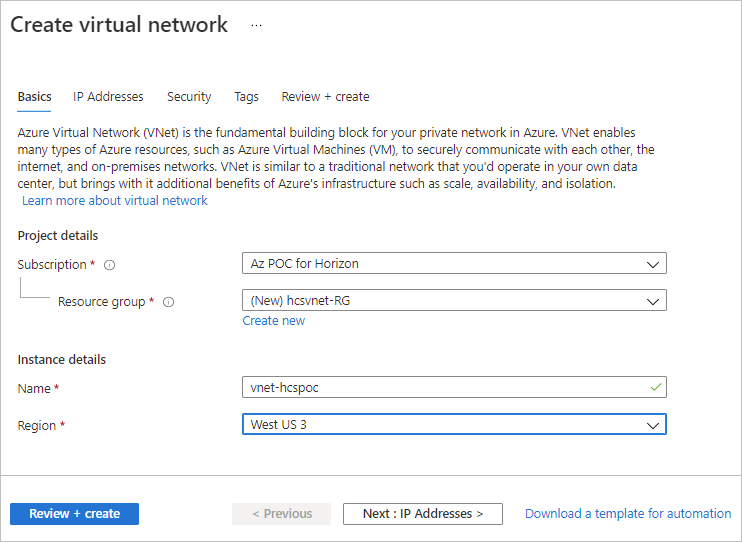
-
Move to the IP Addresses tab.
-
Azure pre-populates the IPv4 address space with a large value. Click on that pre-populated value and change the value to the CIDR you want to use for the VNet's initial address space.
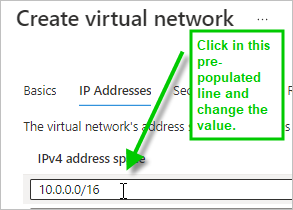
For our PoC, we choose to use
10.0.0.0/23, a CIDR that provides for 512 IP addresses (10.0.0.0 – 10.0.1.255). As of this writing, when we click into the space below that value, the Azure Portal displays the address range.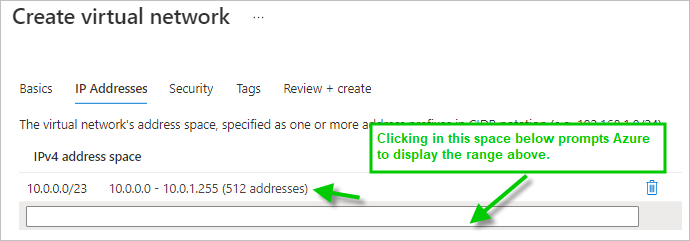
Feel free to choose a larger address space here as you prefer for your PoC.
-
Now we specify the four subnets that we need for this PoC.
For each of these subnets, you:
-
Click Add subnet.
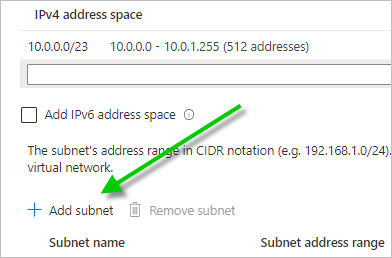
Fill out the Add subnet UI, which at the time of this writing looks like the following screenshot. Type the subnet name and its address range and click Add.
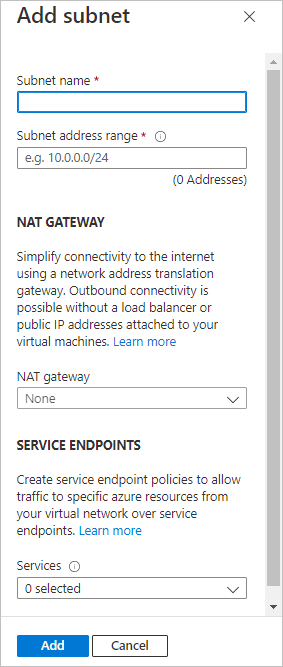
With each click of Add, a subnet gets added to the IP Addresses tab.
Repeat until all four subnets are listed on the IP Addresses tab.
Subnet name Subnet address range poc-adsubnet 10.0.0.0/29 hcspoc-mgmt 10.0.0.32/27 hcspoc-uag-ext 10.0.0.64/28 hcspoc-vdi 10.0.1.0/25 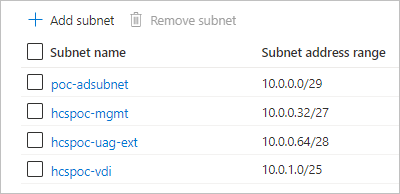
-
-
Now the wizard has enough information to be submitted to create the VNet. Move to the Review + create tab.
Azure runs its validation checks.
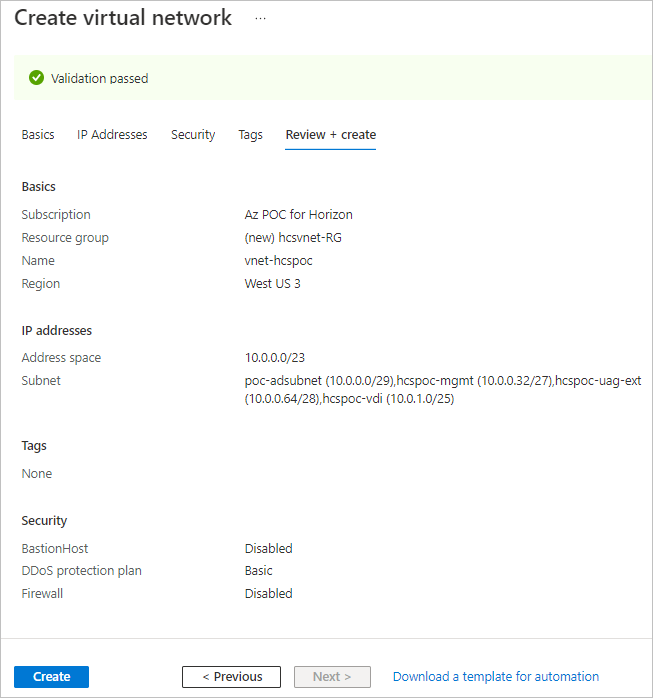
-
When you see a successful validation, click Create.
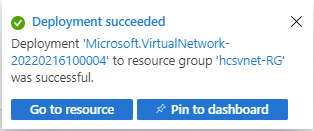
Azure begins deploying the VNet and subnets. When its deployment succeeds, the portal displays a notification similar to this one:
-
Now we need to add a service endpoint named
Microsoft.Sqlto ourhcspoc-mgmtsubnet that we created in the Create virtual network wizard.-
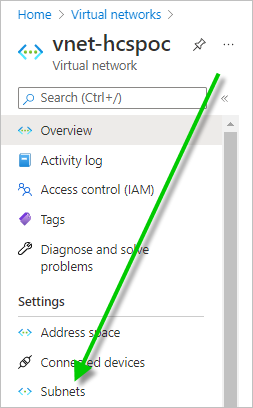
In the portal, go to the newly created VNet (in our case, vnet-hcspoc).
-
Go to its list of subnets.
-
Click the
hcspoc-mgmtsubnet. The portal displays that subnet's details UI.We're going to add the service endpoint named
Microsoft.Sql.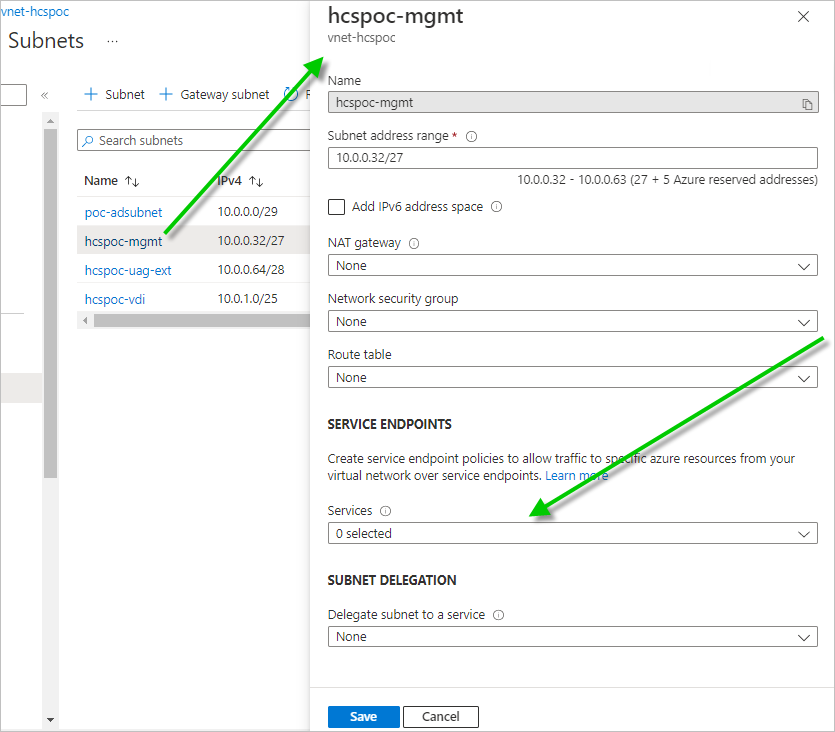
-
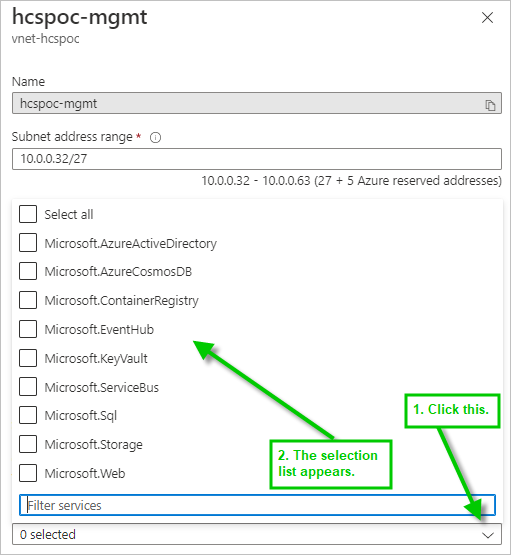
Click the Service Endpoints menu to get the list of services.
-
Select Microsoft.Sql and then at the bottom of that UI, click Save.
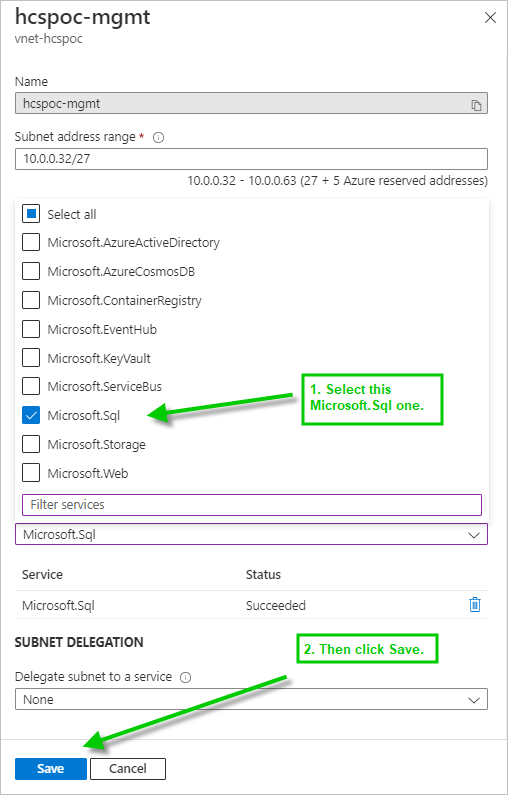
-
-
 Set Up a Local Active Directory VM on the VNet
Now we shall create a VM and configure it as a local Active Directory domain and domain controller to use with our PoC.
Why does our Horizon Cloud on Microsoft Azure PoC deployment need an Active Directory domain? Because:
- At core, VDI solutions are meant to provide virtual Windows desktops to end users.
- Historically, IT has used Microsoft Active Directory to hold the information about an organization's users and their IT-issued Windows computers (desktops).
- Therefore, having an Active Directory domain is a critical piece of a VDI solution like Horizon Cloud on Microsoft Azure.
By creating a local PoC Active Directory machine in our PoC's VNet, we will also have this machine provide the DNS (domain name services) that our PoC deployment needs for name resolution in the VNet.
- Steps
-
In the Azure Portal, in the portal's upper search bar, start typing
Virtual machinesto see a Virtual machines icon. Click that Virtual machines icon.When you click Virtual machines, the portal displays the Virtual machines pane.
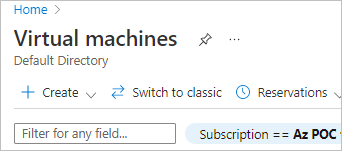
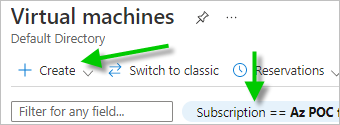
We verify that the Subscription filter is set to the subscription for our PoC and click Create.
-
Choose Azure virtual machine.
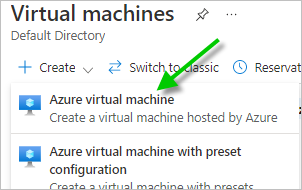
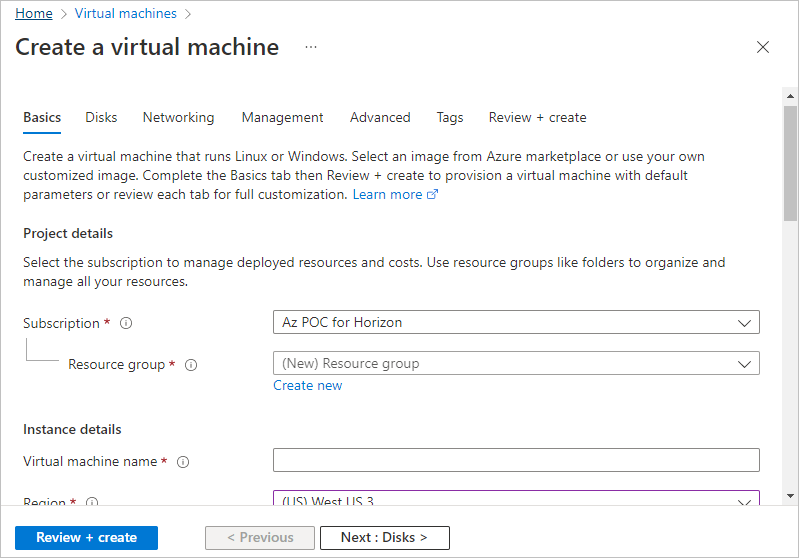
That action starts the Create a virtual machine wizard.
The following screenshot depicts what we saw at this point, at the time of this writing. As you can see from the side scroll bar, there are additional items further down in the wizard UI.
-
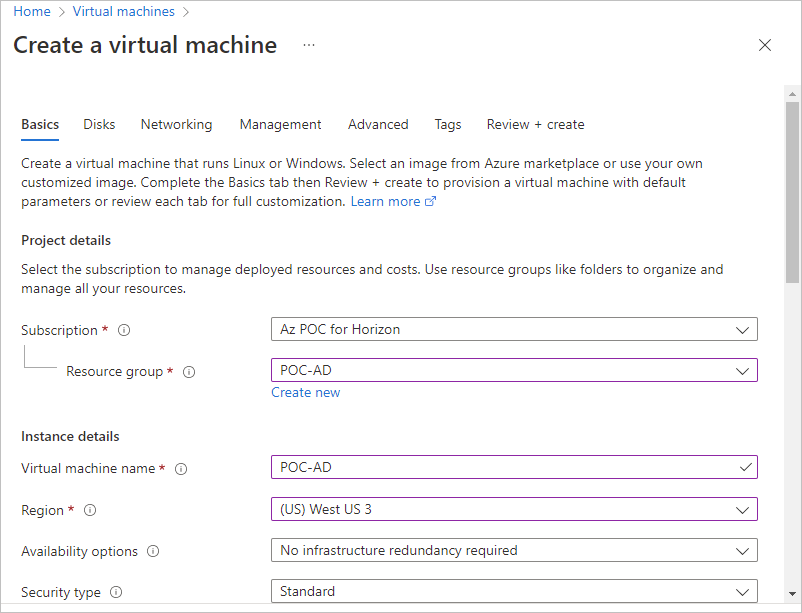
For our PoC Active Directory server, we select the following choices for the fields marked required (those with asterisks in the portal), and leave the optional ones at the defaults that the portal used.
-
Subscription - We make sure this is set to the subscription for our PoC deployment.
-
Resource group - We click the Create new and type our chosen name
POC-AD. -
Virtual machine name - We type
POC-AD. -
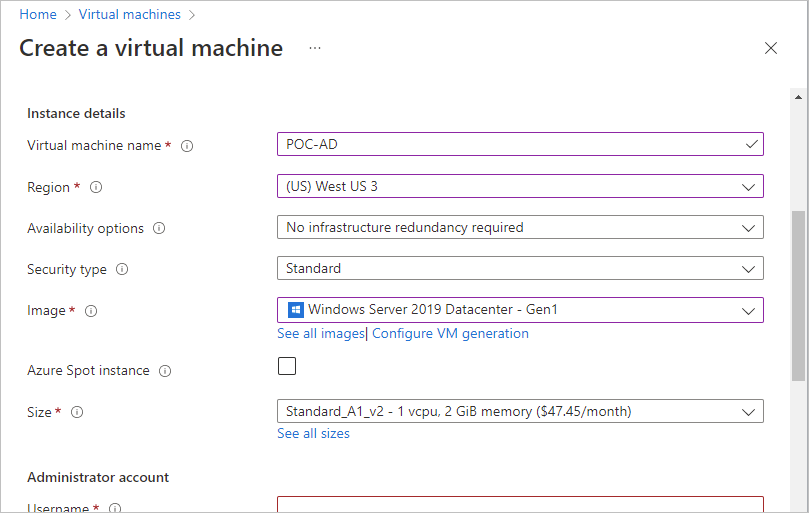
Region - We select the same region as our PoC VNet (
West-US3for us).Below is a picture of our selections to this point. We must continue scrolling down to make choices for the next set of items.
-
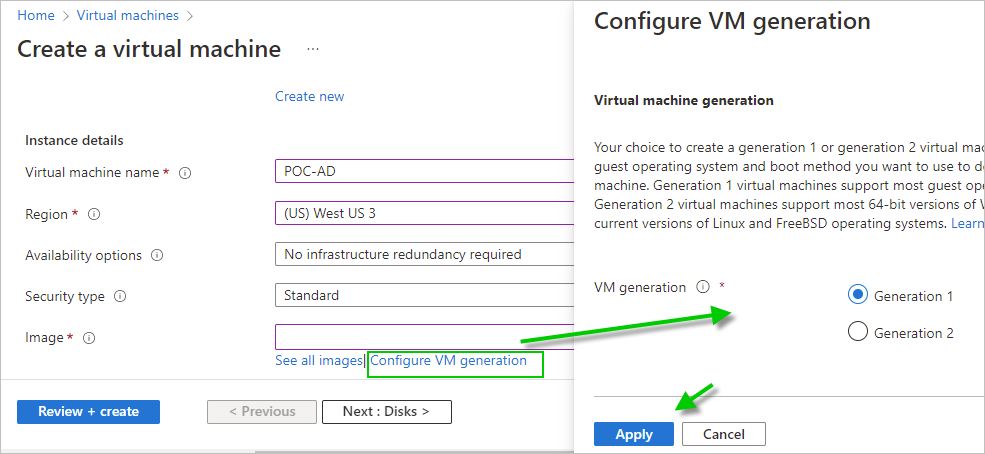
Image - At the time of this writing, we can specify Generation 1 for our VM. Because this is a PoC and will be relatively short-lived, we want to go with a low generation VM which will allow us to choose a lower-cost VM size in the Size menu.
First we click Configure VM generation to get the UI in which we can select Generation 1 and apply our choice to the Image field.
After we apply Generation 1, we now click the See all images to navigate to the portal's Select an image pane, locate the Windows Server tile there, and use that tile's Select menu to look for Windows Server 2019 Datacenter - Gen1.
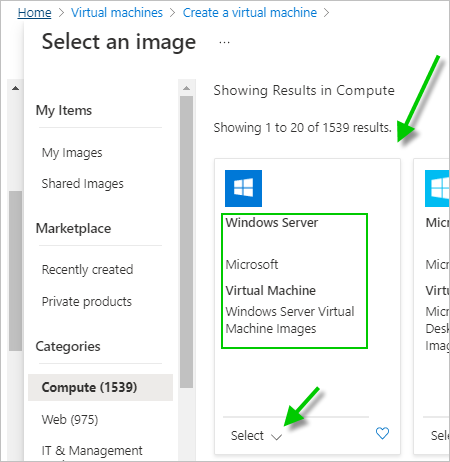
The following screenshot shows the list that we saw at the time of this writing.
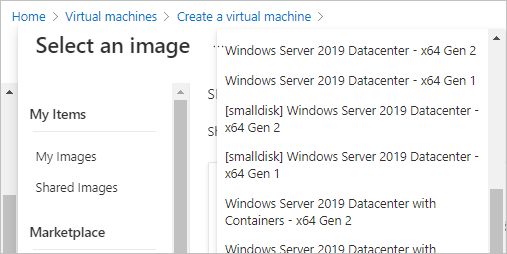
From the list, we choose Windows Server 2019 Datacenter - x64 Gen 1 for our PoC Active Directory server VM. Our reason for choosing this is because we have used this Windows Server 2019 Datacenter choice in the past for other situations and it seems good enough for our PoC purposes.
-
Size - We choose Standard_A1_v2. As of this writing, Microsoft Azure has this available for its Gen 1 images for our subscription and region. One reason why we choose this VM size this is because this is a PoC and as of this writing, this VM size will cost us less per month than larger sizes. Another reason is because we've used this size before in other PoCs and it was fine in those other PoCs.
Below is an illustration of our selections for the preceding fields that the portal refers to as the instance details. Naturally we must continue scrolling down to make choices for the next set of items.
Please note that the displayed cost per month will vary depending on what Azure calculates for your subscription type, the selected region, and what Azure makes available for you.
-
Administrator account - We enter the information for what will be the admin account to log in to the server operating system when the VM is created.
Follow the on-screen prompts. The Azure Portal will guide you on what conditions the admin name and password need to adhere to.
-
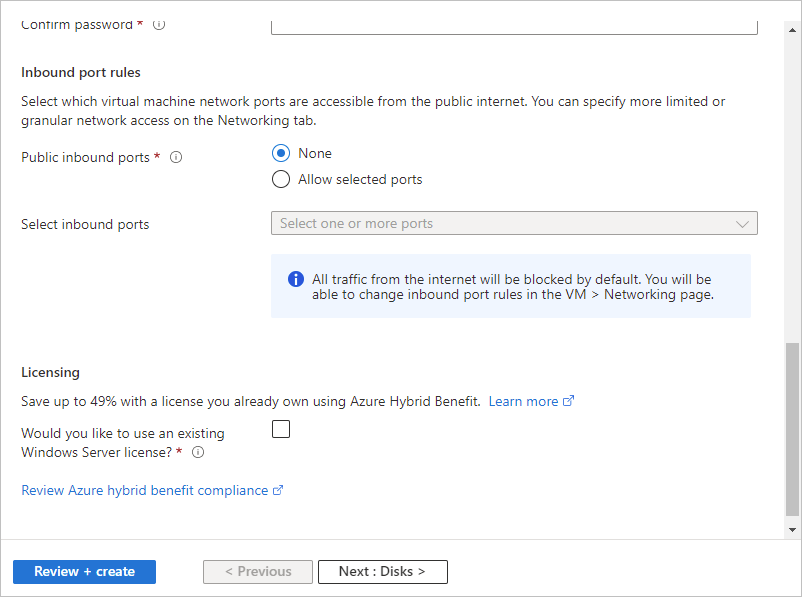
Inbound port rules - We select None. Later on, we will configure the use of Azure Bastion to enable us to log in to the VM's system to configure the Active Directory domain.
-
Licensing - If you have an eligible Windows Server license, then you could select to use it. We do not have use of that for this PoC, so we left this unchecked.
Below is a picture of the fields we just completed, before moving to the next step.
-
-
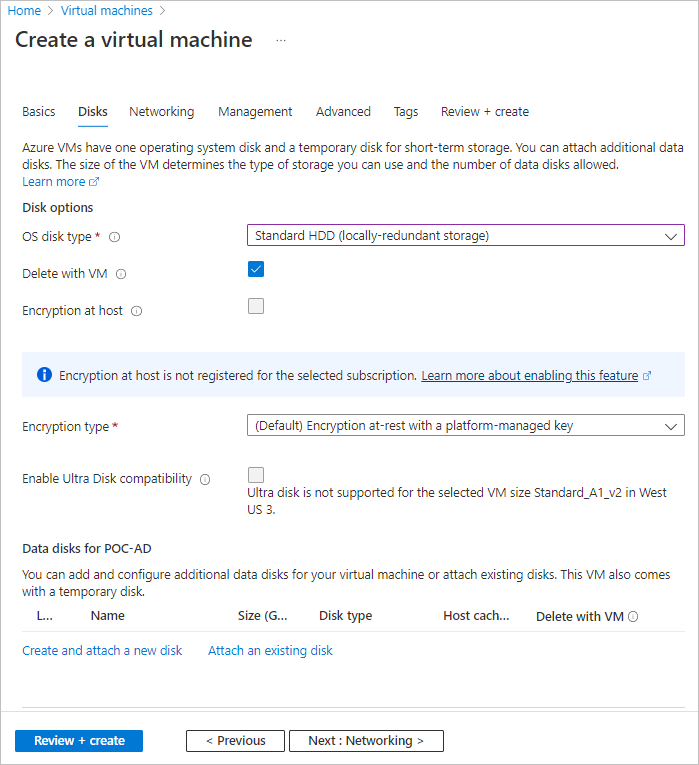
Move on to Next: Disks >. On this Disks tab, we select OS disk type as Standard HDD. As of this writing, Standard HDD costs the least in Azure and because we are only using this machine for a PoC, we do not need a higher level disk.
Except for changing that OS disk type, we leave the other options as the defaults.
-
Move on to the Next: Networking >.
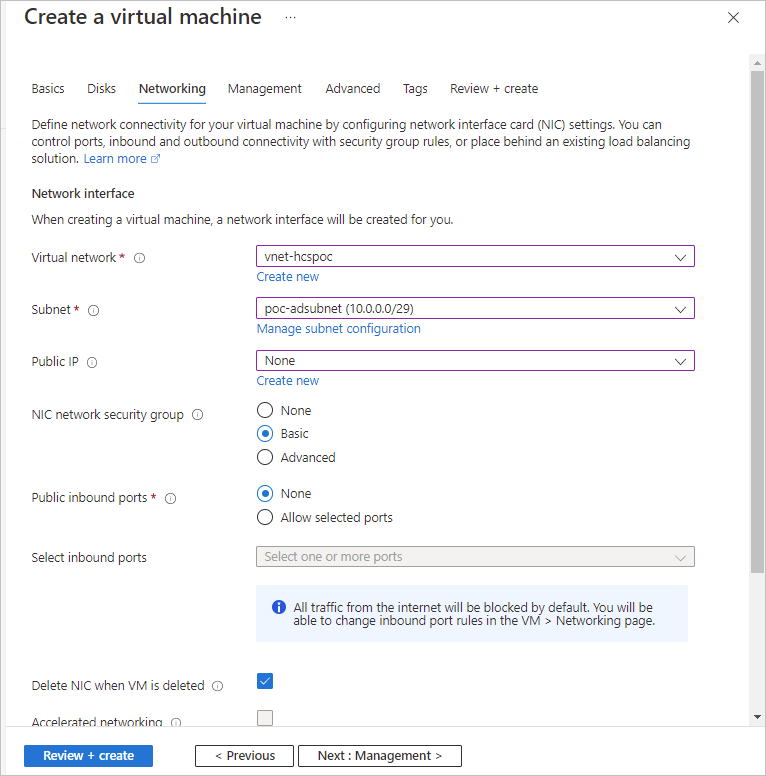
On the Networking tab we made the following selections, based on our PoC VNet and the specific subnet that we prepared for our PoC Active Directory in Activity
- Virtual network - We select our
vnet-hcspoc. - Subnet - We select our
poc-adsubnet. - Public IP - We select None, because later we will use the Azure Bastion method of connecting to a VM. When using Azure Bastion, a public IP on the VM is unnecessary.
- NIC network security group - At the time of this writing, Azure had a default selected of Basic. We keep this for our PoC.
- Public inbound ports - At the time of this writing, Azure reflects the None choice we made earlier in this Create a virtual machine wizard. Therefore, we keep this setting.
- Delete NIC when VM is deleted - We choose this option. The reason why we select this is because this is a PoC for us and when we delete the VM at the end of our PoC, we want all of the VM's artifacts also deleted at the same time. Other than the preceding list, we made no additional choices on this Networking tab.
Below is a picture of the fields we just completed, before moving to the next step.
- Virtual network - We select our
-
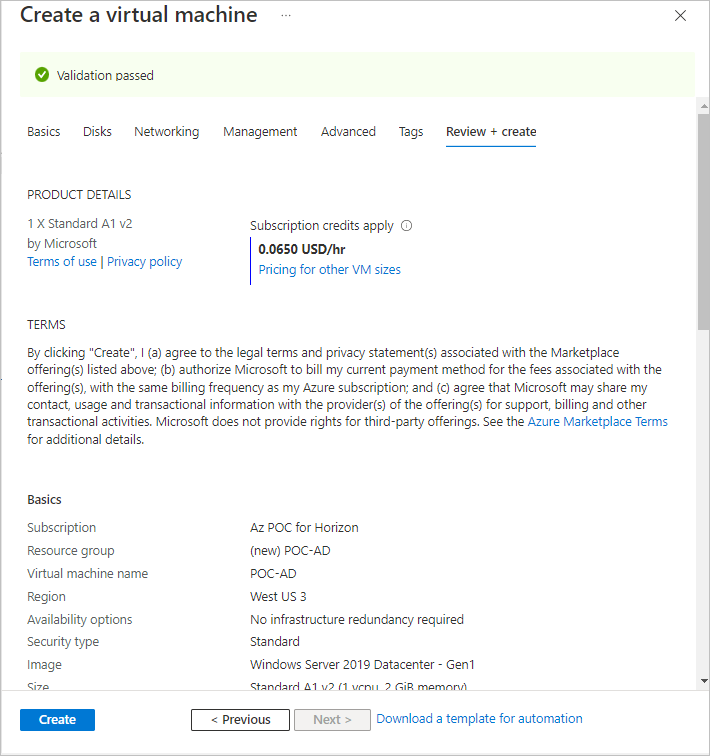
Now we click the Review + create button, because we are keeping the defaults on the remaining tabs and not making any new selections.

Azure runs its validation checks and, if validation passes, displays the final information for review. Use the scroll bar to review all the information of what will be created.
This screenshot depicts what was displayed for our situation and choices.
-
Then click Create.
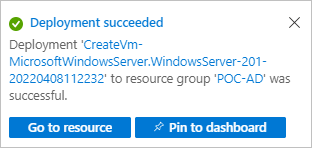
Azure begins deploying the VM and all the related artifacts. When its deployment succeeds, the portal displays a notification similar to this one.
-
Now we need to log in to this new VM and configure it as our PoC Active Directory domain for our PoC Horizon Cloud on Microsoft Azure deployment.
-
In the portal, go to the newly created VM (in our case,
POC-AD). -
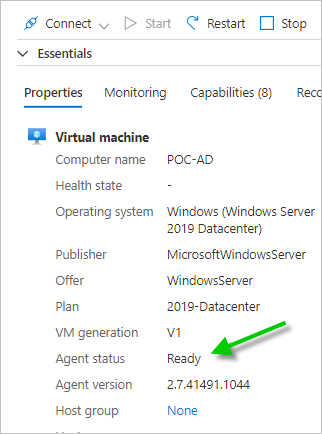
Ensure that the VM's Agent status shows Ready.
We will not be able to log in until this agent is ready. This agent is the Azure agent that Azure uses to manage the VM. Because the agent gets installed and runs in the VM's operating system, it can take several minutes for the agent to reach its ready state. You might have to use the Refresh button to refresh the values.
In this example, the agent is not ready yet.
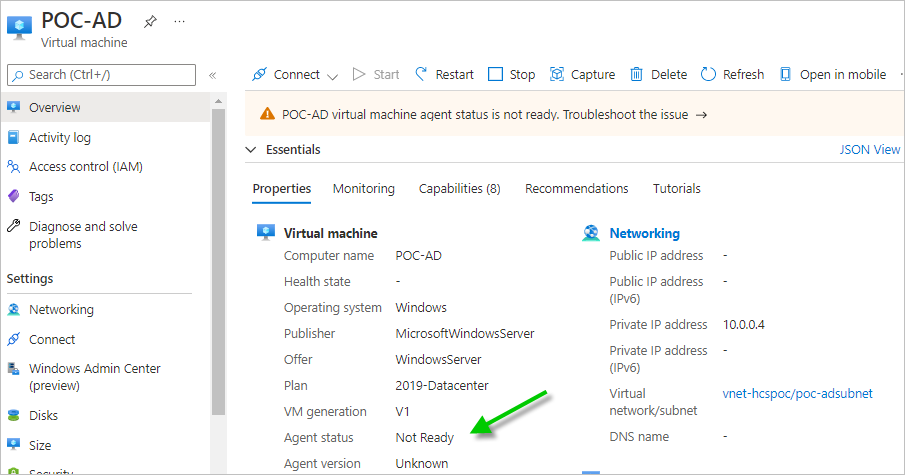
In this example, the agent is ready and we can connect to the VM and log in.
-
-
Now we connect to the VM. We are going to use the Azure Bastion feature to connect to this VM and configure the features we need.
-
In the Connect menu, click Bastion.
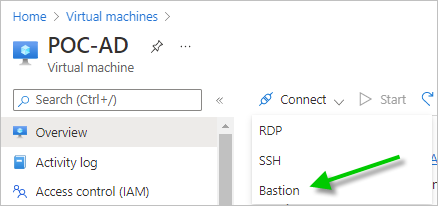
After clicking Bastion, the portal will display a screen for you to select deploying Bastion. This screenshot is an example, based on our PoC values for our VNet.
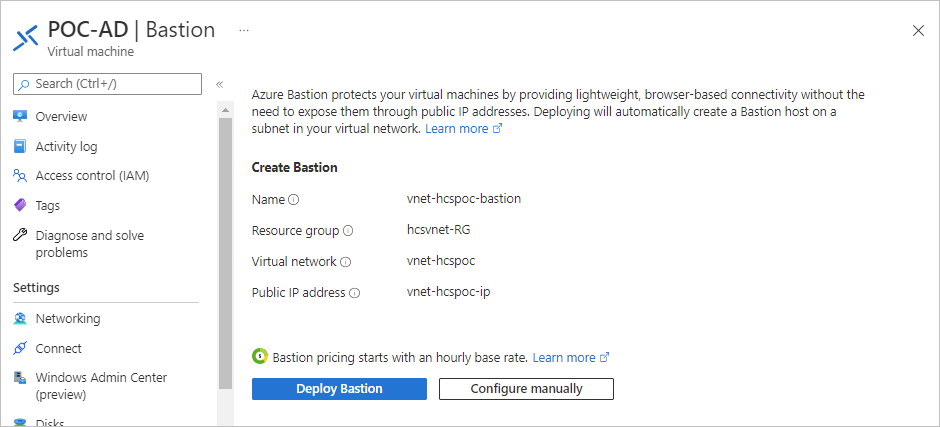
From this point, when we click the button Deploy Bastion, the Azure Bastion will be created in the listed VNet and resource, which is our PoC's VNet and VNet's resource group.
In the Bastion deployment process, Azure will add a subnet for the Bastion to the VNet and create the Bastion in the indicated resource group.
-
Click Deploy Bastion.
Azure adds the subnet for the Bastion, followed by creating the Bastion. The following screenshot illustrates the notification activity for our PoC when we took this step.
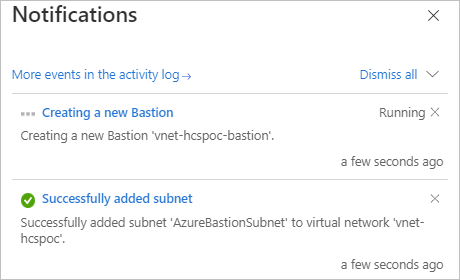
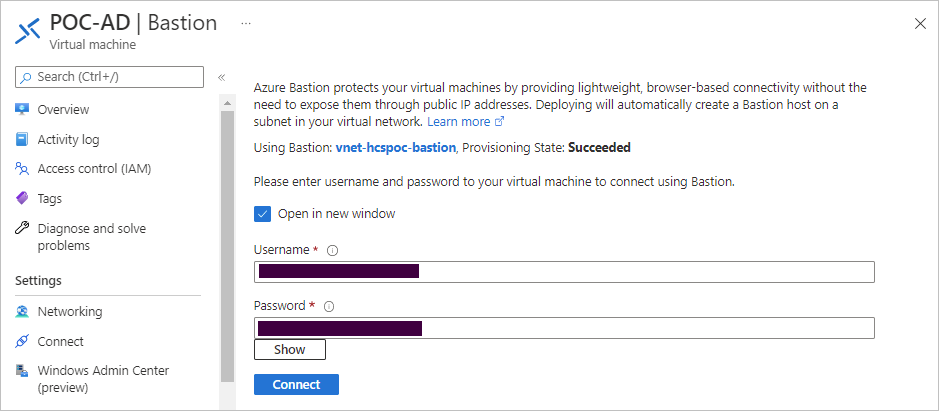
When the Azure Bastion is ready to use, the portal's display refreshes to show the UI to log in to Bastion for the VM.
-
Enter the admin credentials that you specified for the VM back in the Create a virtual machine wizard and click Connect.
Unless you clear the box about opening in a new window, Azure will start the connection in the same browser window. Our values are redacted here for privacy.
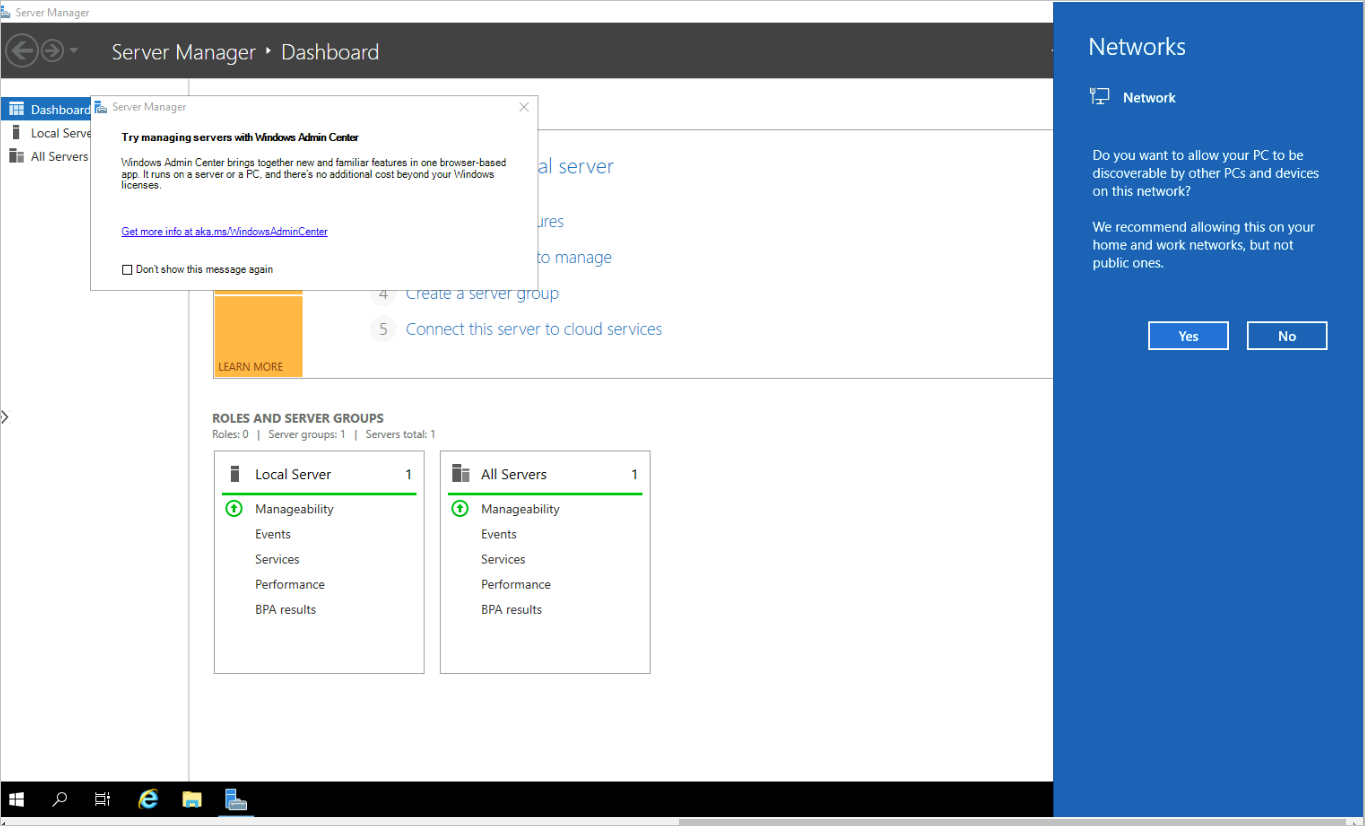
At this point, we are logged in to the VM's Windows Server 2019 operating system and presented with its standard desktop.
This screenshot is what we saw in our PoC at this point.
-
-
Now we configure this Windows Server 2019 as an Active Directory domain and domain controller for our PoC, and add in the admin accounts that the Horizon Cloud on Microsoft Azure PoC deployment needs.
-
First we use the Add Roles and Features wizard to add the Active Directory Domain Services role and its required features.
Note: These steps are the same for configuring a Windows Server 2019 Datacenter to be an Active Directory domain and domain controller as you would find in many Internet articles and in the Microsoft documentation. Being a VM in the Azure cloud makes no difference in these steps.
-
In that right hand blue Networks box about being discoverable, we choose No. For our PoC, we do not need this VM to be discoverable.
-
In the Server Manager - Dashboard, from the upper right Manage menu, click Add Roles and Features.
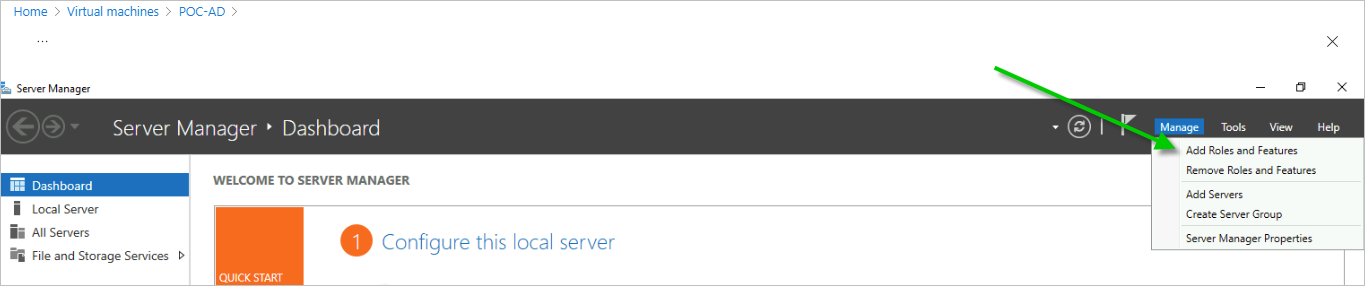
The Add Roles and Features wizard is displayed.
-
Proceed through the wizard making the selections to configure the server with the Active Directory Domain Services role and its required features.
-
Select Role-based or feature-based installation.
-
Select Select a server from the server pool and check that this step has the PoC VM selected. Ours is named
POC-AD. -
Select the Active Directory Domain Services role.
-
When the wizard displays a prompt about installing a list of role services or features that are also needed, use Add Features to include those also.
-
When the wizard displays a step about installing additional features, keep the default selections and proceed to the next wizard step (Next).
-
At the wizard's AD DS step, continue proceeding to the next confirmation step (Next).
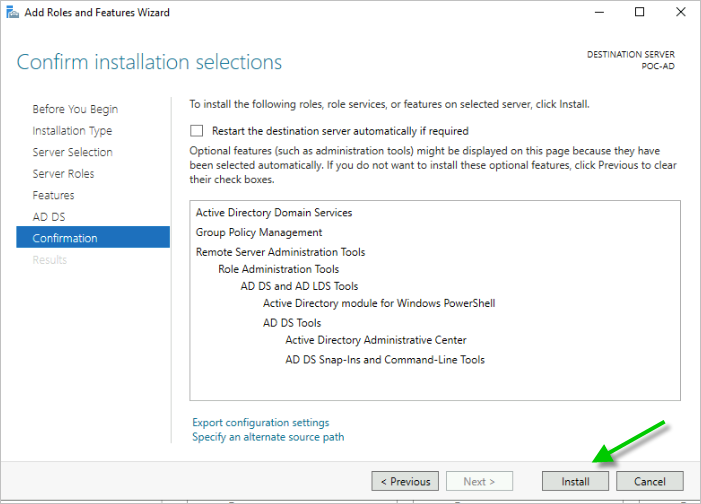
The following screenshot depicts what we saw at our Confirmation step of the wizard. The left side shows the wizard steps that we went through and made our choices.
In this screen, we deselect the box about restarting so that we can continue with our connection to the VM and watch the installation run.
-
Click Install.
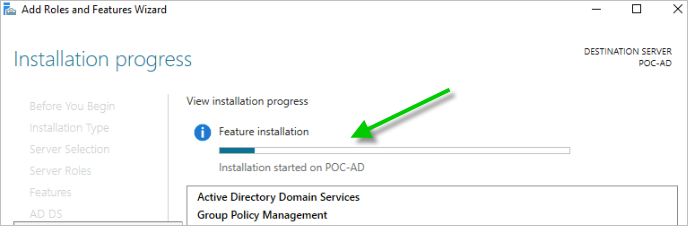
The role installation activity starts running.
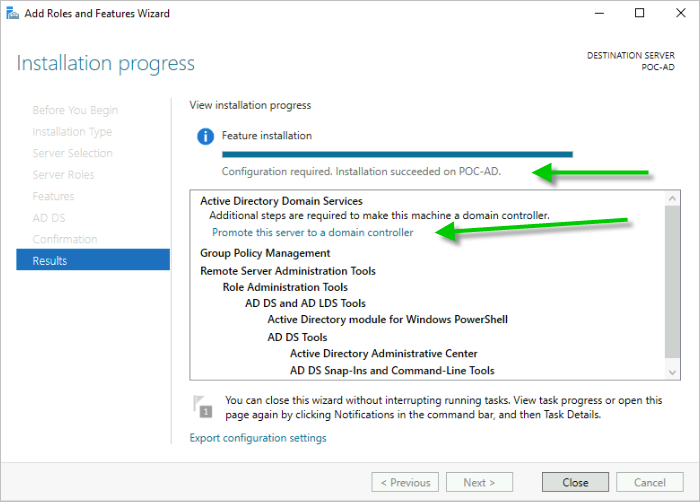
These screenshots depict what we saw.
-
-
Now promote the server to a domain controller. Click Promote this server to a domain controller.
-
-
Now complete the steps to promote the server to a domain controller.
After closing the Add Roles and Features wizard, the Active Directory Domain Services Configuration Wizard starts for getting the values to make this server a domain controller.
-
In the deployment configuration, select Add a new forest and then type in the root domain name you want for your PoC domain.
For our PoC, we use
hcspoc.local.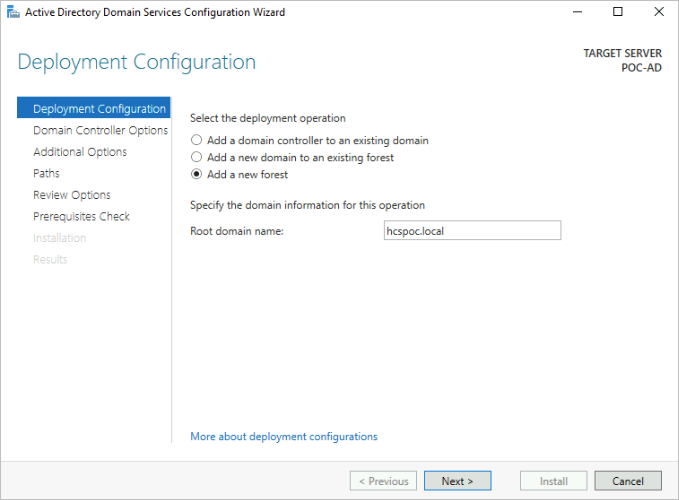
-
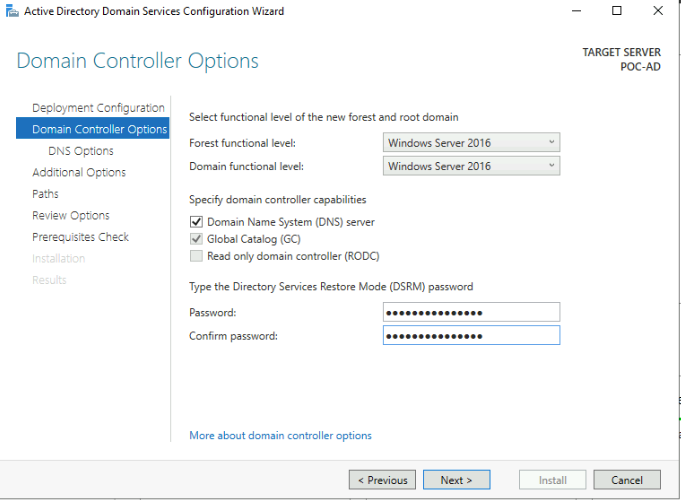
Proceed to the next wizard step for the Domain Controller Options.
Here, we keep the defaults as presented to us in the wizard for the forest and domain functional levels and we ensure that Domain Name System (DNS) server and Global Catalog (GC) are selected. (From the Microsoft documentation, Microsoft requires a Global Catalog for the first domain controller, and naturally this is our first one here.)
We also specify a DSRM password as the wizard prompts for it.
-
Proceeding to the next wizard step, a yellow message appears about how a delegation cannot be created. Click
Show moreto read the full message.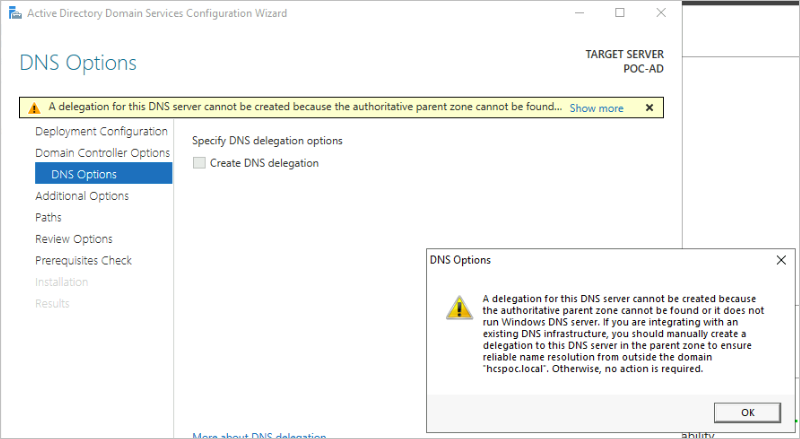
The reason for this message does not pertain to our PoC domain, because we know we have invented the domain name. So we ignore this yellow message and click Next to proceed.
-
Verify the NetBIOS name that the wizard defaults to based on your typed domain name and change if you want.
For our PoC domain, we keep the
HCSPOCname that the wizard derived from our entered hcspoc.local name.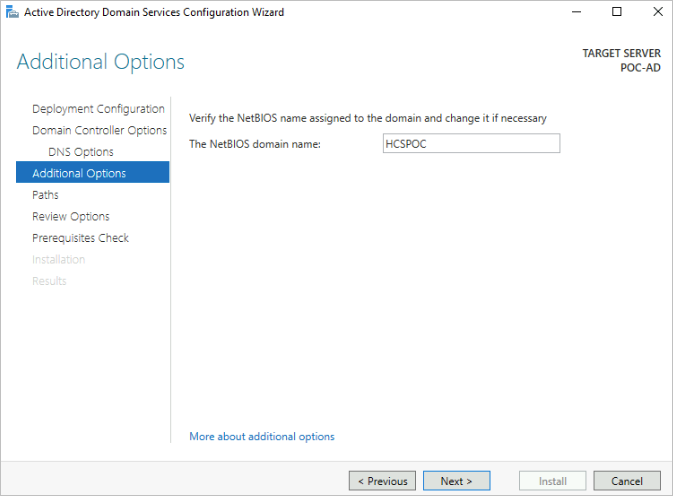
-
Proceed through the wizard.
For the Paths step, we kept the defaults.
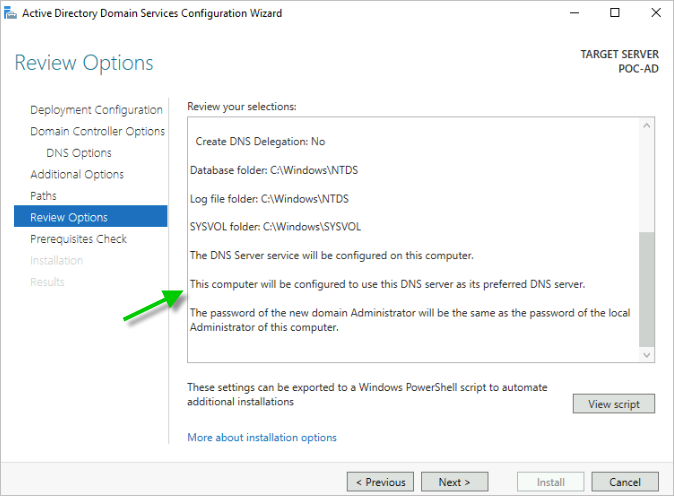
On Review Options step, we reviewed that the wizard will configure this server as the first Active Directory domain controller in a new forest.
We also note that the Review Options states that this computer will be configured to use itself as its preferred DNS server. We decided that was fine for our PoC.
-
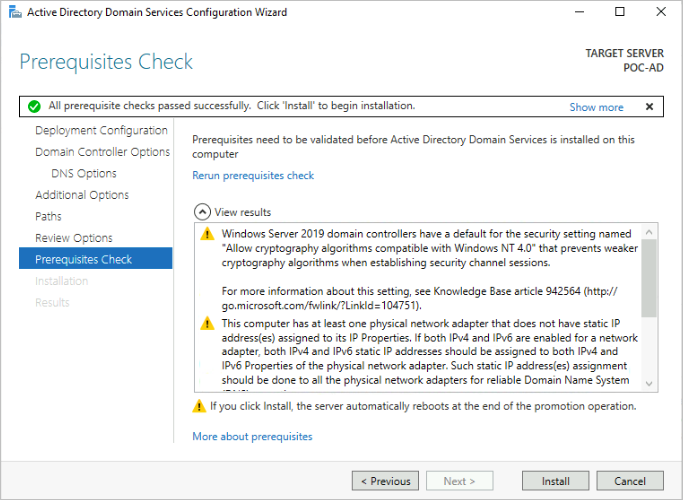
Click Next to proceed to Prerequisites Check.
The following screenshot depicts what we saw. All prerequisite checks passed successfully. All of the yellow items are FYI for us, because they do not matter in our PoC.
-
Click Install.
When the system reaches the point where the machine needs to be restarted, the message You're about to be signed out is displayed. In the background, you can see the Results screen that the server was successfully configure.
Click Close on this message.
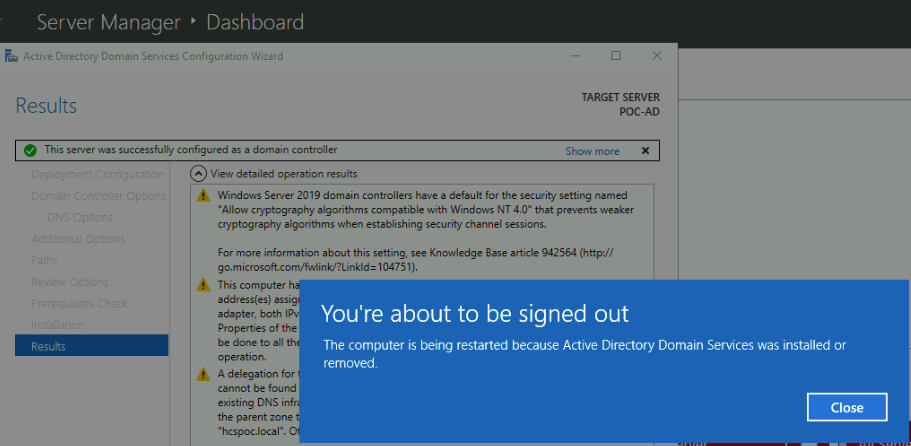
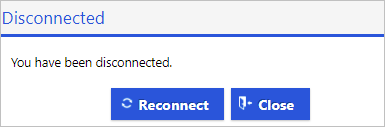
Then on the You have been disconnected message, click Close again to close the Bastion connection until the machine is back up and you see the Azure agent is ready.
-
-
Reconnect to the VM and configure the admin accounts that our PoC needs
Now that we have created our PoC Active Directory domain controller, we need to create three accounts that we can use in our PoC.
-
Reconnect to the VM's operating system using Connect > Bastion.
When the Server Manager - Dashboard appears, we can see the dashboard reflects the just-configured AD DS and DNS.
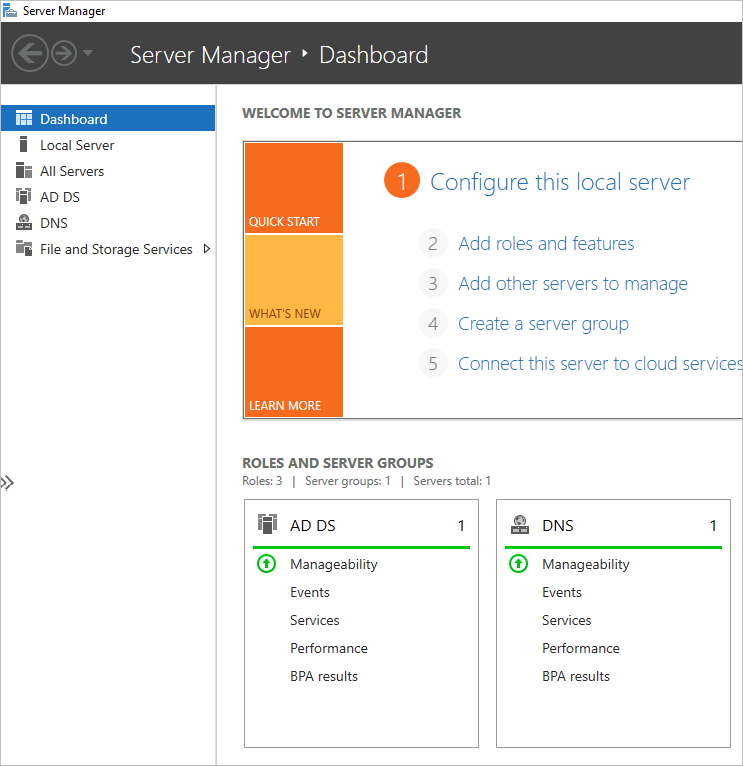
-
Now we need to add three user accounts to the domain.
These users accounts will be used in the steps in the section below Register the PoC Active Directory with the Horizon Cloud TenantRegister the PoC Active Directory with the Horizon Cloud Tenant.
For simplicity, because this is only a PoC, we will add all three of these accounts to the standard Domain Admins group in our PoC Active Directory.
For our PoC, we named our three accounts as:
- hcsbind1
- hcsbind2
- hcsjoin To start adding the users to the Active Directory domain, from Server Manager - Dashboard, click Tools > Active Directory Users and Computers.

-
In that Active Directory Users and Computers tool, click Action > New > User.
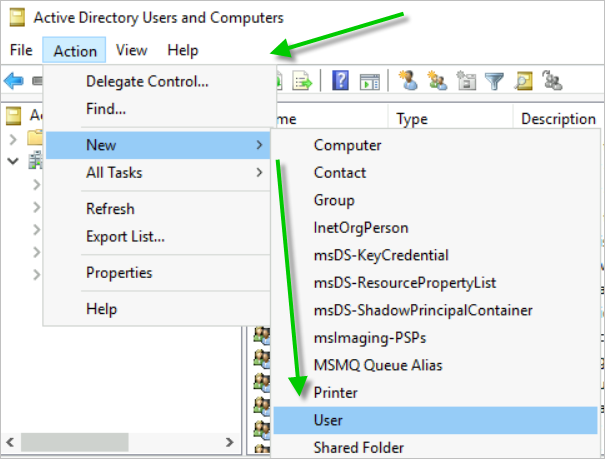
-
Complete the fields for the first new user account.
We named our first user hcsbind1 and chose User cannot change password and Password never expires.
-
After you see that user listed, make it a member of the Domain Admins group.
-
Repeat step d to add two more users.
We named ours hcsbind2 and hcsjoin.
-
-
-
After the three user accounts are added, you can disconnect from the PoC Active Directory domain VM.
-
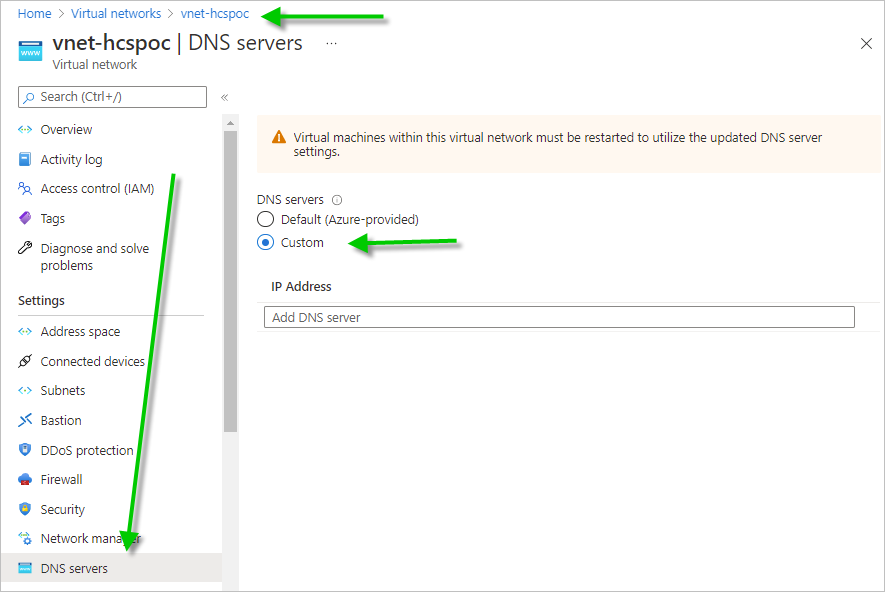
Now, because we have this VM as a DNS server, we must add its private IP address to the VNet's DNS Server configuration.
-
In the VM's overview details, make a note of the Private IP Address.
For our PoC VM, the address was
10.0.0.4.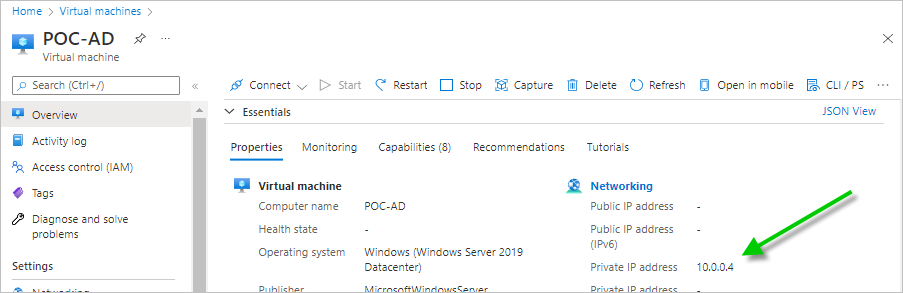
-
Now go to the VNet's settings and its DNS servers pane and click Custom.
-
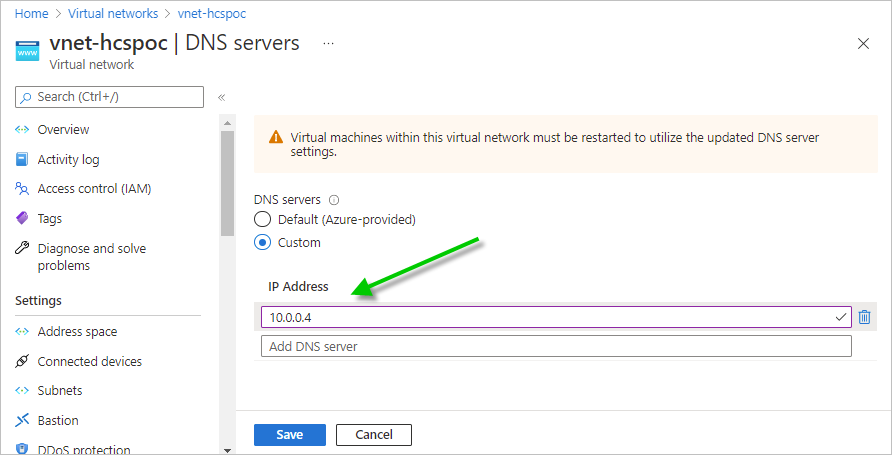
Enter the private IP address from your PoC Active Directory VM and click Save.
-
Then go to your PoC Active Directory VM and restart it, as the on-screen message said to do.
-
-
Lastly, because we are finished needing to connect to the AD VM for the time being, we delete the Azure Bastion to prevent being charged for its hourly cost.
This is an optional step. If you don't mind the hourly cost incurred for the Azure Bastion, it can be your own choice to keep it around. We decided to delete it for the savings.
Go to the resource group in which the Bastion was created and delete the bastion item.
This screenshot shows where the Azure Bastion existed in our VNet's resource group. We clicked into that Bastion and deleted it.
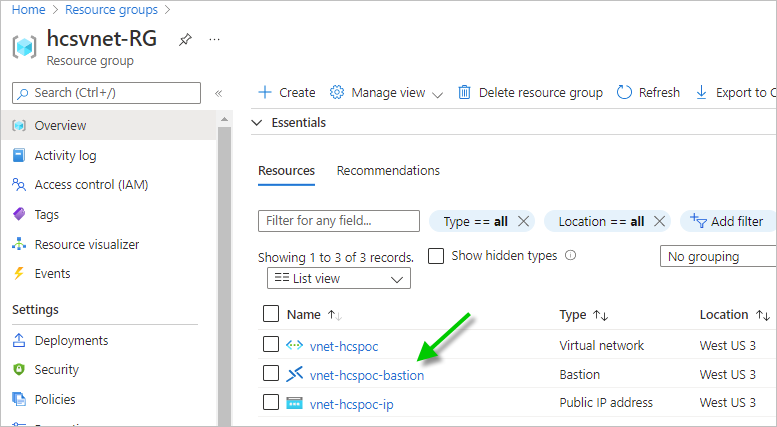
Deletion of the Azure Bastion can take around 10 minutes.
-
Obtain Horizon Cloud Tenant Account
 | Before you can log in and run the Add Pod wizard, you must have a cloud tenant account already set up and associated with your Customer Connect account. |
Prerequisites to getting a tenant account set up are:
-
A Customer Connect account or a Cloud services account.
-
A subscription that provides for access to the cloud-hosted services, such as the Horizon Universal Subscription. Refer to this Horizon Subscription table a comparison of the various types.
-
Getting an account
Use the Register action in the header at https://connect.omnissa.com.
-
Obtaining the subscription
If you know that you do not already have a subscription that provides access to the cloud-hosted services, one way to get a tenant account for your PoC is to sign up for a 60-day trial.
As of this writing, the known way to ask about a 60-day trial Horizon license is to complete the form at Omnissa Contact Us.
If you know that you already have a subscription or you know you are part of an enterprise account that has a subscription, then you might already have access to a cloud tenant account that is already set up.
To find out your current status, file a service request (SR) following the steps in KB article 2006985. You will need your current Customer Connect account information.
-
Notification when your tenant is set up
When your account credentials are associated with the Horizon Cloud tenant account, an email is sent to the email address which is in the profile of that Customer Connect account or Cloud services account.
You will know that you have access to the tenant account when you see that email. Make sure to check your spam folder for emails from Workspace ONE or Horizon Service.
Log In and Run the Add Pod Wizard
 | When you have the email stating that your tenant account is ready, you can log in and run the Add Pod wizard. |
Make sure that your PoC Active Directory domain VM is running in the Azure Portal. After the previous steps, that VM is providing DNS services for the VNet which the Add Pod process will need.
Collect the following pieces of information and have them handy as you perform these steps. This information includes the pieces that you set up in the preceding activities.
| Item | Your Values |
|---|---|
Your Customer Connect account, like name@example.com. | |
| Password for your Customer Connect account | |
| Subscription ID from Prepare Azure Activity | |
| Directory (tenant) ID from Prepare Azure Activity | |
| Application (client) ID from Prepare Azure Activity | |
| Value of the client secret from Prepare Azure Activity Create App Registration.
In the steps below, the Manage Subscriptions UI will refer to this as the Application Key. | |
| VNet name from Activity | |
| mgmt subnet name from Activity | |
| vdi subnet name from Activity |
-
1. Log in to Horizon Universal Console using your Customer Connect account credentials.
-
Log in to Horizon Universal Console using your Customer Connect or Cloud services credentials.
In a browser, go to https://cloud.horizon.omnissa.com.
The login screen will automatically redirect to the Cloud Services login UI at
https://connect.omnissa.com.Sign in using either your Cloud services or your Customer Connect credentials, following the on-screen prompts.
After you accept the terms of service, the main console displays the Getting Started page.
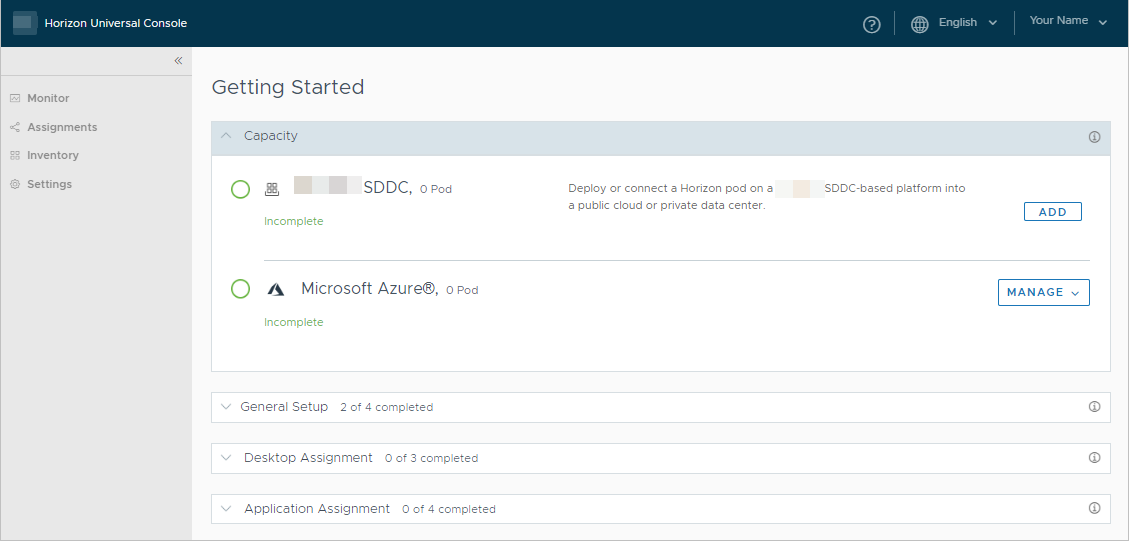
This page is the starting point for all new tenants.
Until you add a pod deployment, most of the console is locked to you.
So now we will start creating our PoC Horizon Cloud on Microsoft Azure deployment.
-
-
2. Add your Azure subscription information into the console.
As stated in Activity
, this information is needed so that the service can use API calls to initially stand up the deployment in the subscription.-
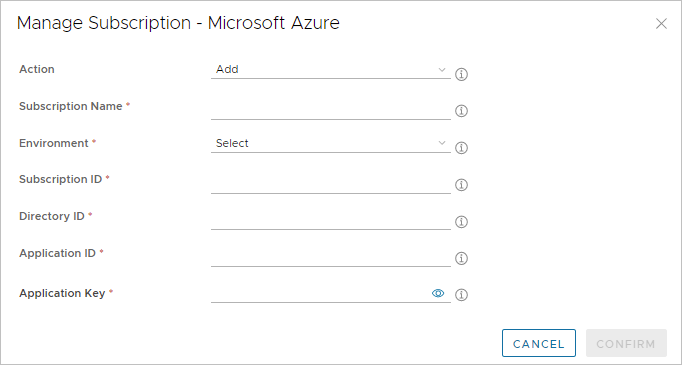
Click Manage > Manage Subscriptions.

Displays this UI window.
-
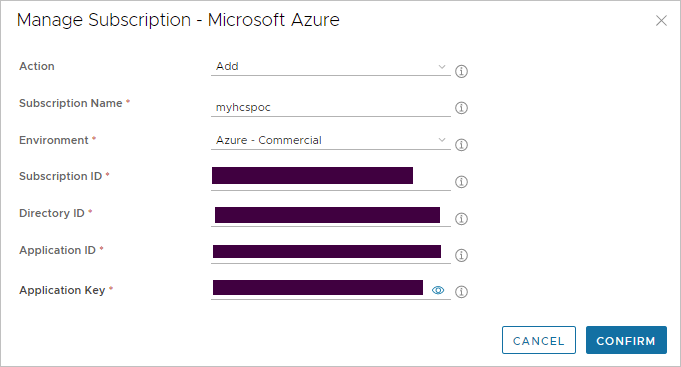
Keep the default Add action, because you're adding in your subscription information for the first time, and type in a name you want used to refer to the subscription in the console.
This name is solely to distinguish this subscription's values from another one if you were going to use multiple Azure subscriptions with this Horizon Cloud tenant. We used
myhcspoc.For Environment, select Azure - Commercial.
Now copy into the four remaining fields the values that you collected in Activity
.Note: Please note that this Manage Subscriptions UI's Application Key field means the value of the client secret that you copied during Activity
Create App Registration.The labels you'll see in the Manage Subscriptions UI compared to the Azure Portal names from Activity 4 Manage Subscription UI Name in Azure Portal Your Value Subscription ID Subscription ID Directory ID Directory (tenant) ID Application ID Application (client) ID Application Key Value of the client secret key This screenshot shows our choices for our PoC. Our values are redacted for privacy.
-
When you have specified the required items, click Confirm.
The system starts to verify that all of the values are satisfactory, that they tie together as they are meant to from Activity
.When the system verification is successful that all of the values tie together satisfactorily, a blue success message briefly displays. We saw this message after we added our values.

At this point, you are back on the Getting Started page and can start the Add Pod wizard.
-
-
3. Run the Add Pod wizard.
-
Click Manage > Add Pod.
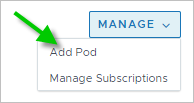
In this first wizard step, because you've already entered the subscription information, you can select your subscription name in Apply Subscription.
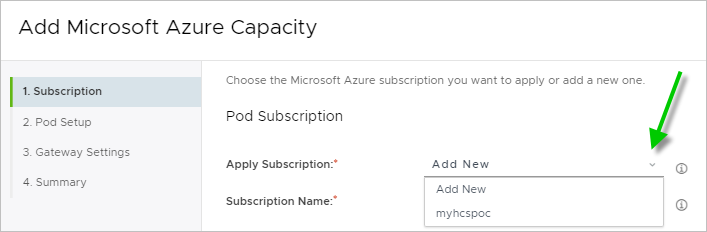
This screenshot depicts the wizard when we select our
hcspocsubscription name from Apply Subscription. Our values are redacted in this screenshot.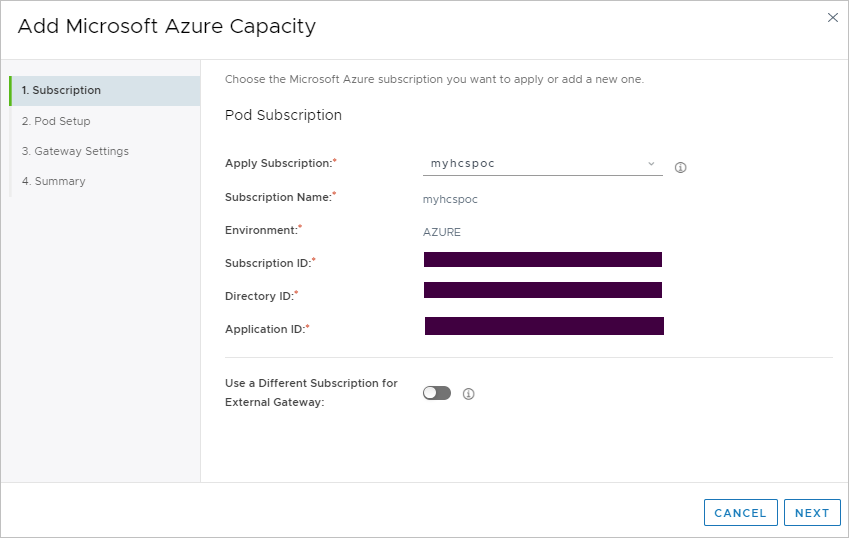
Click Next.
-
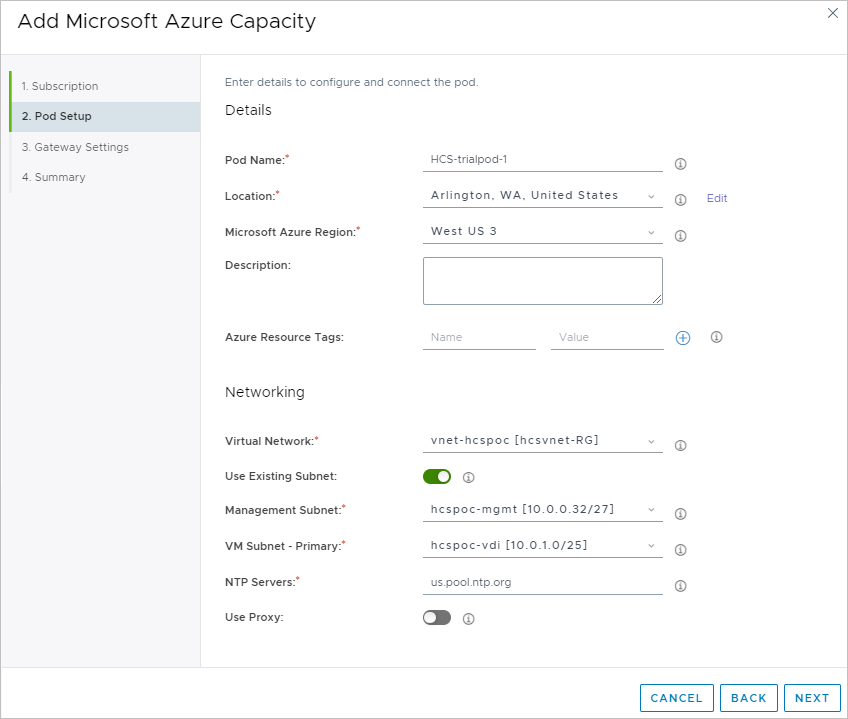
On the wizard's Pod Setup step, complete the two main areas — Details and Networking.
-
Details
-
Pod Name - Type the name that you want for this pod when you see it in the console. (We used
HCS-trialpod-1for ours.) -
Location - Click Add, and then in the City Name field, start typing the name of a city.
For ours, we started typing
Arlto seeArlingtonnames.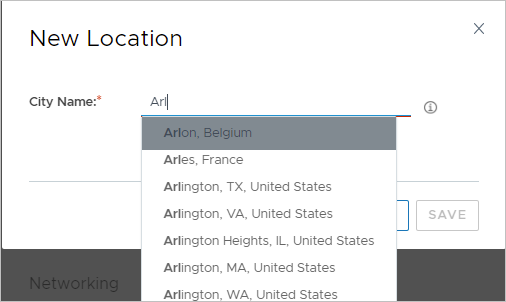
After a few letters, the system will start displaying names that match the letters you typed and click one of those cities that seems closest to what you want. (We chose
Arlington, WA, United States.) -
Microsoft Azure Region - Select the same region in which you set all the quota, created the VNet, and the PoC Active Directory domain VM. (We are using
West US 3.) We left the rest of the items as-is in Details and then completed Networking.
-
-
Networking
- Virtual Network - Select your VNet. (Ours is
vnet-hcspoc.) - Switch Use Existing Subnet to on position (green) and select the subnets that you created in that VNet.
- Management Subnet - Select the
mgmtsubnet that you created in Activity. (Ours is hcspoc-mgmt.) - VM Subnet - Primary - Select the
vdisubnet that you created in Activity. (Ours is hcspoc-vdi.) - NTP Servers - Enter a list of one of more NTP servers to use for time synchronization with the pod's VMs. If you enter multiple names, separate them with commas. (We are using one named
us.pool.ntp.org.) The aforementioned items are the ones that we specifically set in this wizard step. The remainder we leave as-is, the defaults.
- Virtual Network - Select your VNet. (Ours is
This screenshot illustrates our example.
Click Next.
-
-
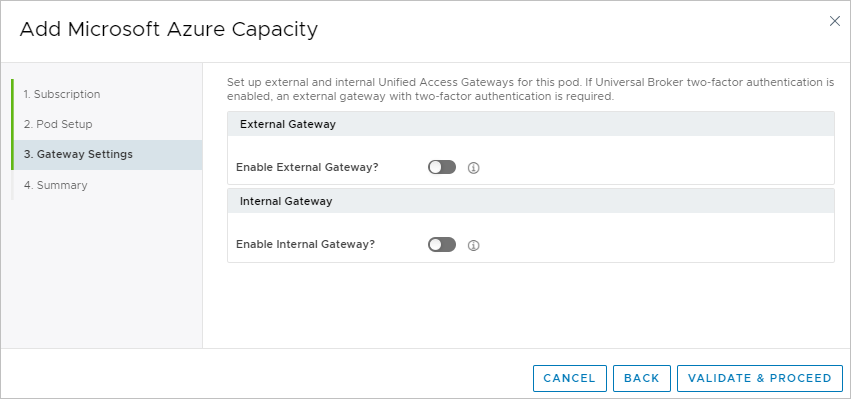
On the wizard's Gateway Settings step, switch Enable External Gateway? to off position.
Remember that in this PoC recipe's ingredients for this PoC section, we stated that this gateway can be added later after the pod is deployed. So we turn off these choices for now.
-
Click Validate & Proceed.
The system performs its validation checks based on what you entered into the wizard. When it all checks out, a blue message displays briefly.

The message text will mention the gateway even though we have switched off the gateway toggles for this deployment. This is to be expected.
-
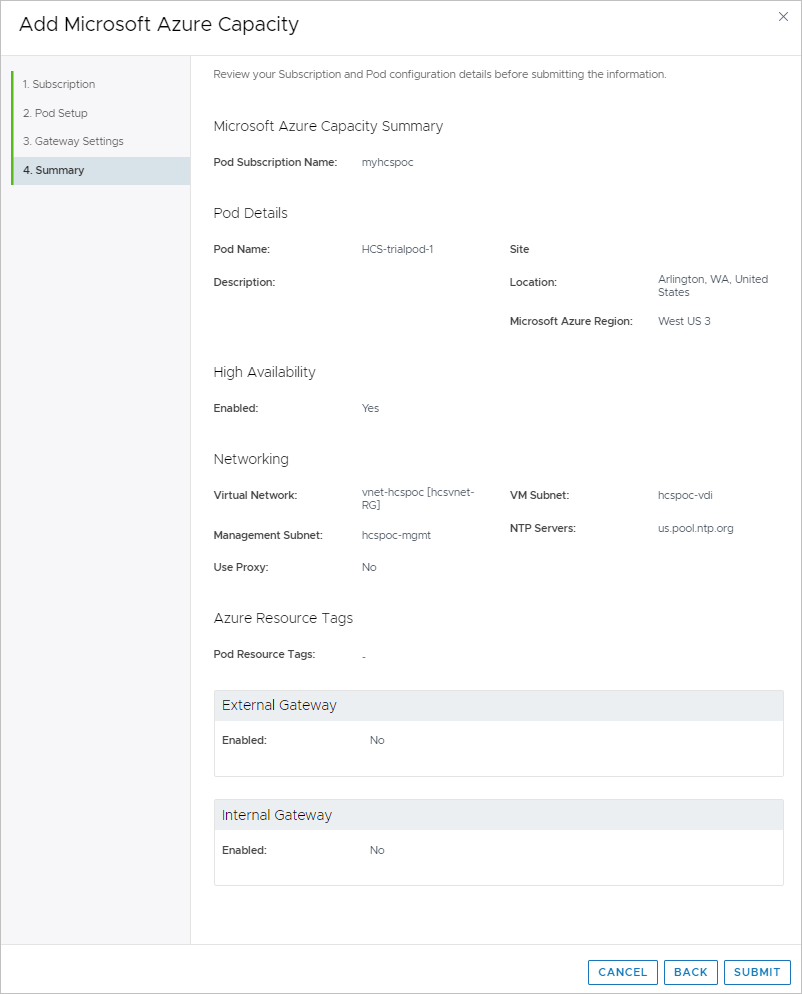
In the wizard's final Summary step, verify that it lists the correct
mgmtandvdisubnets that you set up for your PoC.Here is the full view from our example.
-
Click Submit. The system starts generating the Horizon Cloud on Microsoft Azure deployment in your Azure subscription.
-
The console will reflect the progress state, starting with:
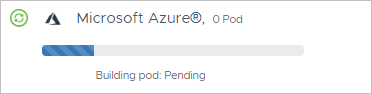
And then moving into:
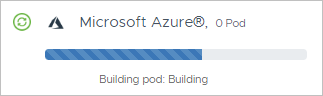
The deployment can take between 30 to 45 minutes, depending on network traffic between Azure Cloud and Horizon Cloud.
The console will reflect when the process is completed.
When you see that Complete indicator, take the steps in the next section to register the PoC Active Directory domain with this Horizon Cloud on Microsoft Azure deployment.
Register the PoC Active Directory with the Horizon Cloud Tenant
 | Because this activity unlocks the rest of the console, you must complete it before you can start exploring your new PoC Horizon Cloud on Microsoft Azure deployment and start on day-2 tasks. |
We set up the PoC Active Directory domain VM to make it easy to complete this activity.
-
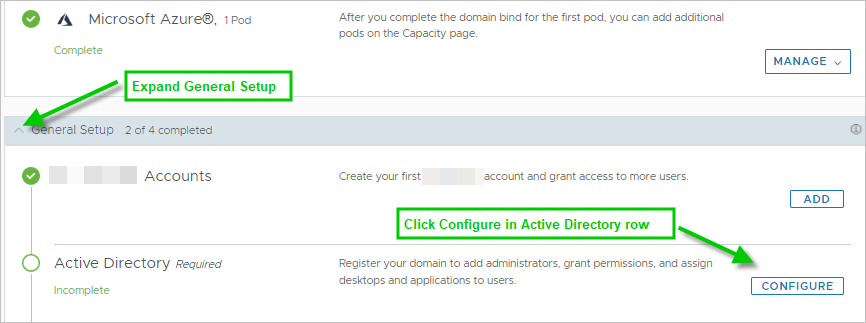
When you see the deployment is successful on the console's Getting Started page, expand General Setup to see the Active Directory row.
Click Configure in that row.
-
In the Register Active Directory window, enter the requested information about the PoC Active Directory domain and users created in Activity
.The required information is the PoC Active Directory domain's NetBIOS name, DNS domain name, and the short names and passwords for the AD users set up for this purpose.
Our PoC values are our NetBIOS name of
HCSPOC, our DNS domain namehcspoc.local, and our two users namedhcsbind1andhcsbind2. This screenshot depicts our entries.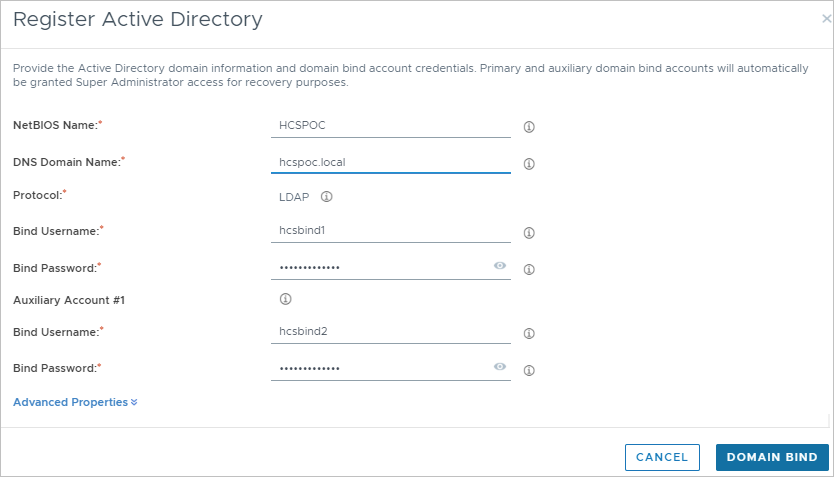
Click Domain Bind.
The system saves the information and then displays the Domain Join window.
-
In the Domain Join window, enter the PoC Active Directory VM's IP address and the credentials for the third AD user created in Activity
.Our PoC values are our VM's
10.0.0.4IP address and the credentials for our user namedhcsjoin. This screenshot depicts our entries.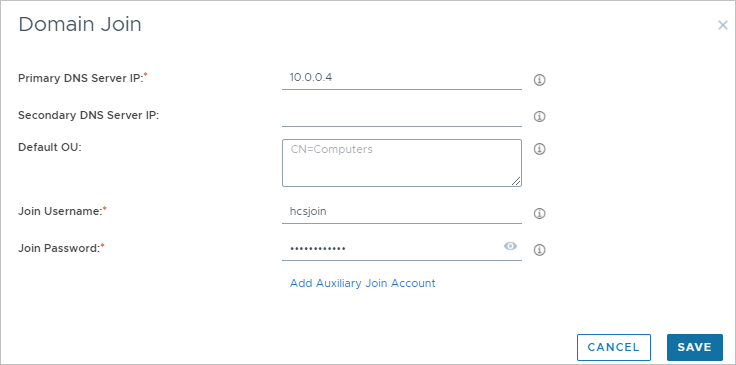
Click Save.
The system saves the information and then displays the Add Administrator window.
-
In the Add Administrator window, start typing the letters for Domain Admins until you see the system's search has located the Domain Admins group in your PoC Active Directory domain.
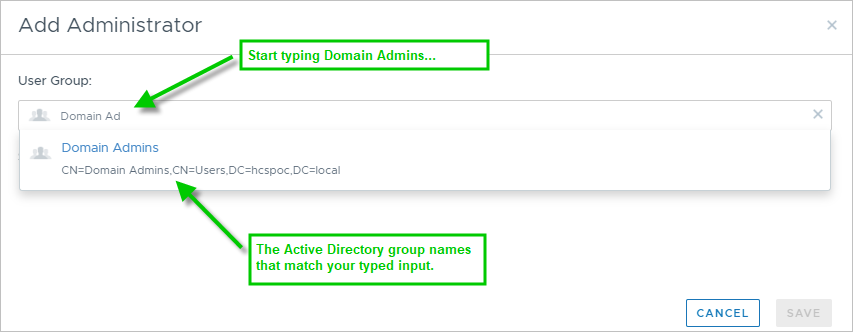
Click Domain Admins to select that AD group. That is the AD group that three user accounts created in Activity
were added to as members.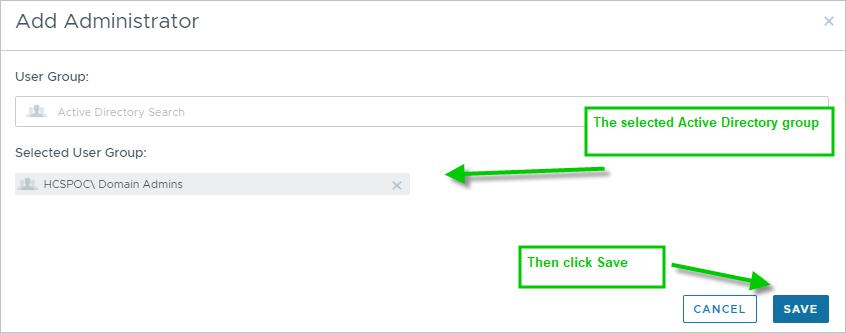
Then click Save.
-
At this point, the system automatically and immediately logs you out of the console.
Please note that this forced logout is by design.
Now that the Active Directory domain is registered with the Horizon Cloud on Microsoft Azure deployment,authentication to your cloud tenant will have two gates: one for authenticating with the tenant account credentials and one for authenticating with an AD user account that is a member of the selected AD Domain Admins group.
-
Return to the main login page and log in again as you did before using your account credentials. From
cloud.horizon.omnissa.com, the system will automatically redirect to the Cloud Services login UI to complete the login flow.
-
After logging in, an Active Directory Credentials window displays. The NetBIOS name from Step 2 above is displayed in the window.
Log in using the credentials of one of the user accounts that are members of the AD Domain Admins group,
For our PoC, we use the credentials of our
hcsjoinaccount, as illustrated below.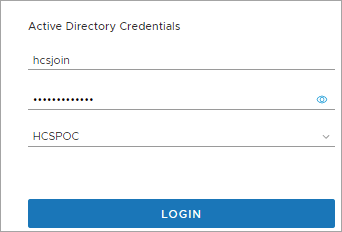
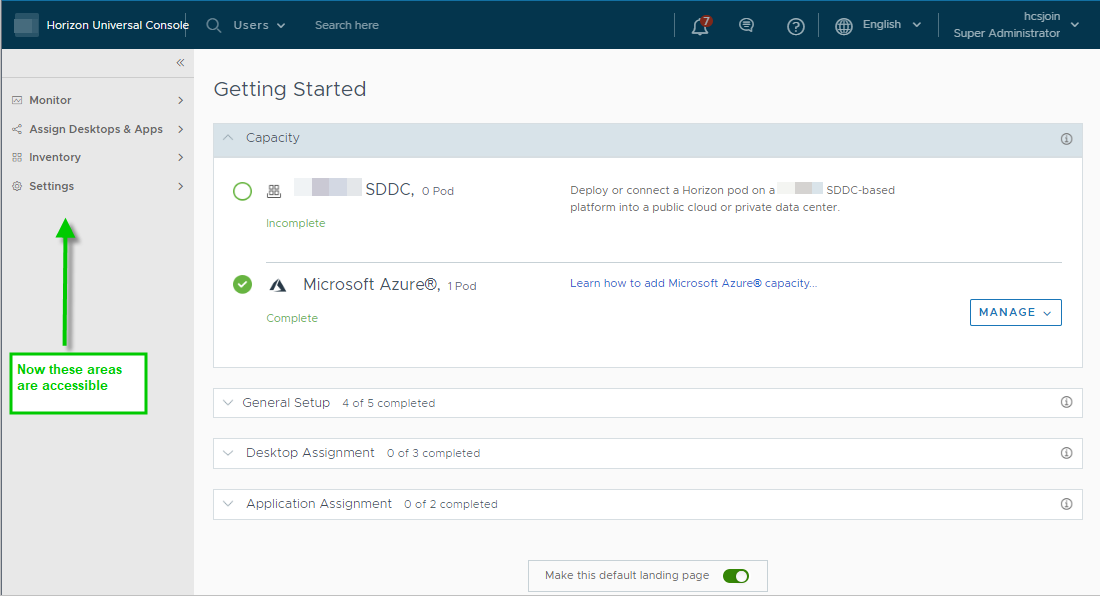
After completing those two authentication gates, you are back in the Horizon Universal Console — and now all of the left-hand navigation areas are accessible!
Usually at this point, a window What's New in Horizon Cloud window pops up. This window can be closed - you can easily display it from the upper help menu. The help menu looks like a circled ?, as depicted here:
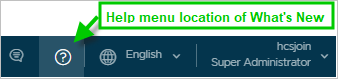
menu.
Start Using Horizon Cloud
 | Congratulations! By reaching this point, you have successfully completed this step-by-step recipe for a pod to use in a simplified, kick-the-tires exploration of Horizon Cloud on Microsoft Azure deployment. |
Now you can begin your exploration and our recipe ends here.
Final Notes
One of the simplifications we chose at the beginning of this recipe was to first deploy without an external Unified Access Gateway configuration and then add that later.
To perform a number of the day-2 PoC activities, you will want to add that external Unified Access Gateway configuration.
A prerequisite to running the Edit Pod wizard to add an external Unified Access Gateway configuration is you must provide a signed SSL certificate that meets specific criteria.
The reason why this signed SSL certificate is needed is the Unified Access Gateway capabilities require SSL for client connections. The certificate must be signed by a trusted Certificate Authority (CA). The signed SSL server certificate must be in PEM format and based on an FQDN. The single PEM file must contain the full entire certificate chain with the private key. For example, the single PEM file must contain the SSL server certificate, any necessary intermediate CA certificates, the root CA certificate, and private key. OpenSSL is a tool you can use to create the PEM file.
For reference, see the following pages.
Was this page helpful?