After the domain information is saved successfully in Horizon Cloud, connect your identity provider to your organization ID for end user authentication and access.
Connecting Microsoft Entra as the Identity Provider
When Microsoft Entra ID Commercial or Microsoft Entra ID Government is your identity provider, a user with Microsoft Entra ID App Global Administrator privileges must do the following:
-
Approve the requested permissions. For the list of required permissions, see To Use a Custom Role for Horizon Cloud App Registration.
-
Provide consent for the entire organization.
-
Provide consent for the Entra ID application to access your organization's data. Microsoft Graph permissions will be requested by the application for the following items:
| Permission | Details | Administrator Consent Required - Yes/No |
|---|---|---|
| Group.Read.All |
| Yes |
| GroupMember.Read.All |
| Yes |
| User.Read.All |
| Yes |
| openid |
| No |
| profile |
| No |
| User.Read |
| No |
| user_impersonation |
| Yes |
Note: For legacy reasons, Horizon Cloud may request consent for the Directory.Read.All permission. That permission can be safely removed later from the application permissions list.
For related information, also see Configure Microsoft Entra ID as Your Identity Provider.
Note: If you use a Microsoft Entra ID and later change the organization ID after connecting, you must reconnect the Microsoft Entra ID.
Connecting Workspace ONE Access as the Identity Provider
When Workspace ONE Access Cloud or Workspace ONE Access On Premises is your identity provider, a user with Administrator privileges must do the following:
- Approve the requested permissions.
- Provide consent for the entire organization.
Connecting Omnissa Identity Service as the Identity Provider
When the Omnissa Identity Service is your identity provider, a user with Administrator privileges must do the following:
- Approve the requested permissions.
- Provide consent for the entire organization.
Procedure to Connect Your Identity Provider
Use the following procedure to connect your identity provider. In addition, you can optionally connect a secondary provider.
-
Click Integrations from the Horizon Universal Console.
-
Click Manage on the Identity and Access tile.
Microsoft Entra ID Commercial or Microsoft Entra ID Government
-
On the Identity and Access page, select Microsoft Entra ID Commercial or Microsoft Entra ID Government as the Identity Provider.
-
Add the Tenant subdomain for the Broker URL for your end users to access their entitlements.
If you are not a Global Administrator, click Generate Link to generate a link and share with your administrator to request approval.
-
Click Connect.
-
Review the page content and then click Accept to give permissions to navigate to the Horizon Universal Console.
Perform the subsequent steps as prompted.
Workspace ONE Access Cloud
-
On the Identity and Access page, select Workspace ONE Access Cloud as the Identity Provider.
-
Add the Tenant subdomain for the Broker URL for your end users to access their entitlements.
-
Add the Workspace ONE Access tenant FQDN in the format yourcompany.workspaceoneaccess.com.
-
Click Connect to navigate to the Horizon Universal Console.
Workspace ONE Access On Premises
-
On the Identity and Access page, select Workspace ONE Access On Premises as the Identity Provider.
-
Add the Tenant subdomain for the Broker URL for your end users to access their entitlements.
-
Add the Workspace ONE Access tenant FQDN in the format yourcompany.workspaceoneaccess.com.
-
Enter the OAuth Client ID configured on Workspace ONE On-Prem.
-
Enter the OAuth Client secret configured on Workspace ONE On-Prem.
-
Click Connect to navigate to the Horizon Universal Console.
Omnissa Identity Service
-
On the Identity and Access page, select Omnissa Identity Service as the Identity Provider.
-
Specify the Tenant subdomain for your end users to access their entitlements.
-
Specify the Tenant URL for your end users to access their entitlements.
-
Click Connect.
-
Review the page content and then click Accept to give permissions to navigate to the Horizon Universal Console.
-
Perform the subsequent steps as prompted.
-
Connecting Imprivata as the Secondary Identity Provider
Imprivata customers can optionally connect to and use Imprivata as a secondary identity and access management provider for your Horizon Cloud account by using the following procedure.
Considerations:
-
At initial release, support requires Horizon Client for Windows 2609 or later and Imprivata EAM 26.3 or later, with the Imprivata agent installed and appropriate access policies configured. See Horizon Cloud release notes and support matrices going forward.
-
To configure a secondary identity provider, the primary identity provider must already be configured.
-
To ensure that the user’s UPN is synchronized across both the primary and secondary providers, and that both providers contain consistent data, the Company domain value specified in the following procedure must be different from the primary provider’s domain.
-
In the left pane Horizon Cloud navigation panel, click Integration and then click Manage on the Identity & access tile to open the Identity & access page.
-
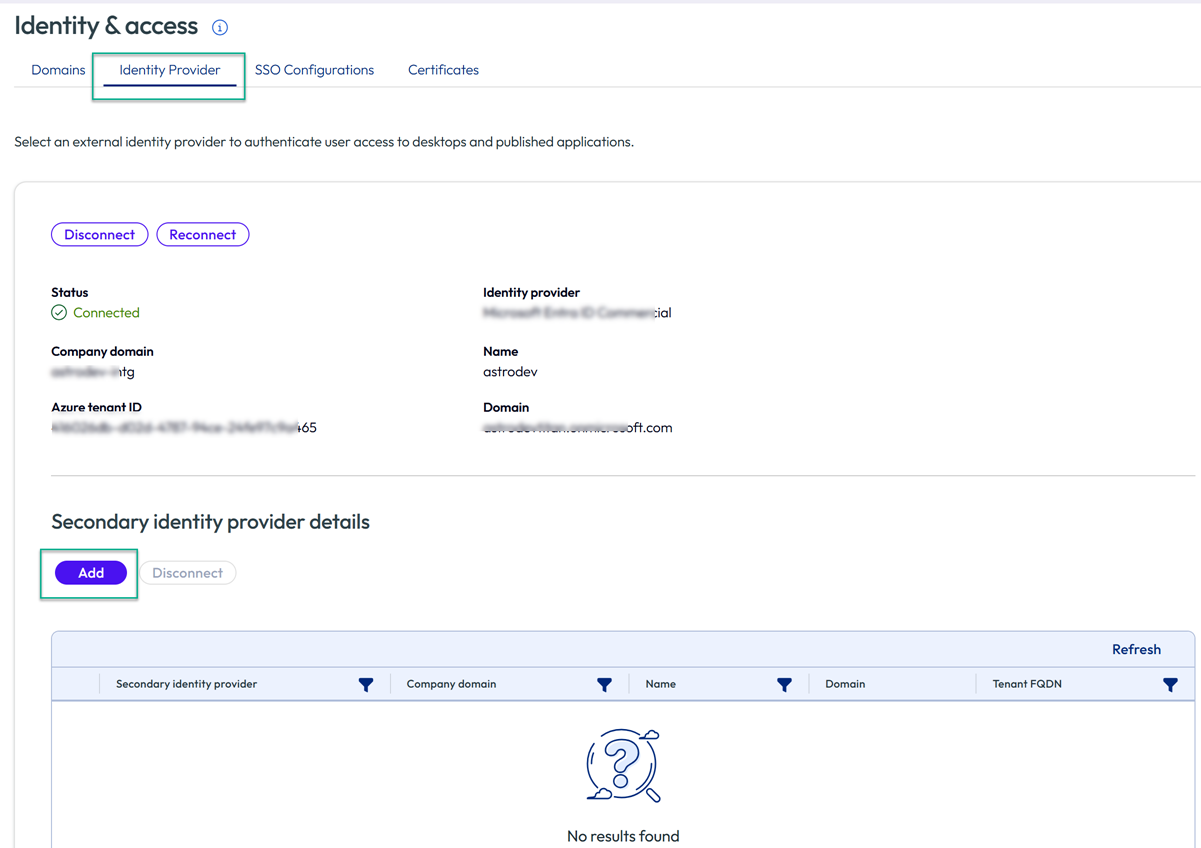
Click the Identity Provider tab on the Identity & access page.
-
Click Add in the Secondary identity provider details section of the page.
-
In the Secondary identity provider drop-down menu, select Imprivata.
-
For Company domain, enter a unique domain name used to identify the secondary identity provider that is associated with the Imprivata account. This domain must be different from the primary provider domain.
Note: Do not enter the company's primary domain. Instead, enter a unique domain name used to identify the secondary identity provider associated with the Imprivata account.
The Broker URL will automatically populate to include a Horizon-specific preface.
-
For the Redirect URL, specify the URL at which to obtain the OIDC open authentication protocol auth code (based on its source OAuth code). This is the same URL that is registered for your account in your Imprivata IDP product console.
-
For the Tenant ID, enter the tenant ID value that you established during your Imprivata server setup in your Imprivata product console.
-
For the Client ID, enter the client ID value of the OAuth application that you established during your Imprivata server setup in your Imprivata product console.
-
For the Client secret, enter the client secret key code obtained when you created the OAuth application during your Imprivata server setup in your Imprivata product console. Note that you can hide the secret key value from the UI display.
-
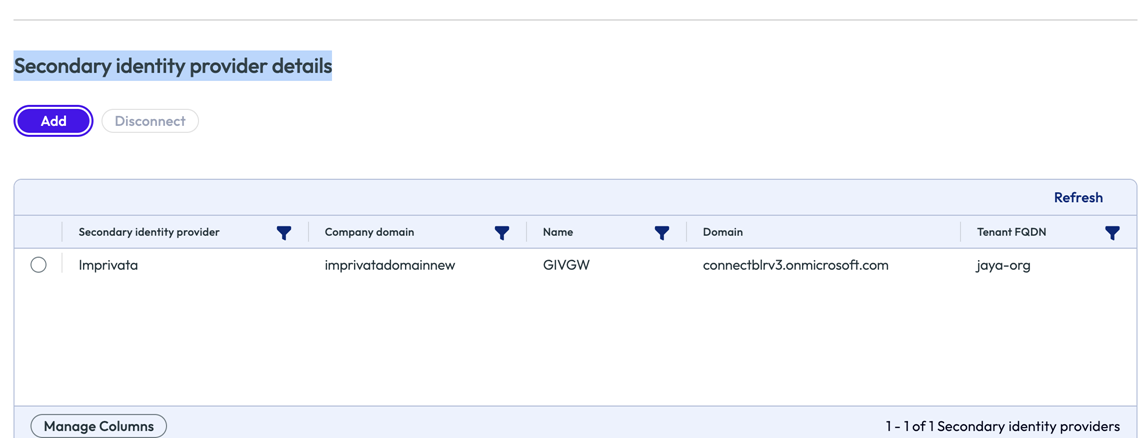
Click Add to complete the process. A sample screen is shown below:
Reconnecting your Identity Provider for Microsoft Entra ID
If you change your organization ID, you must reconnect your Entra ID to the new organization ID to maintain resource capabilities and end user access.
-
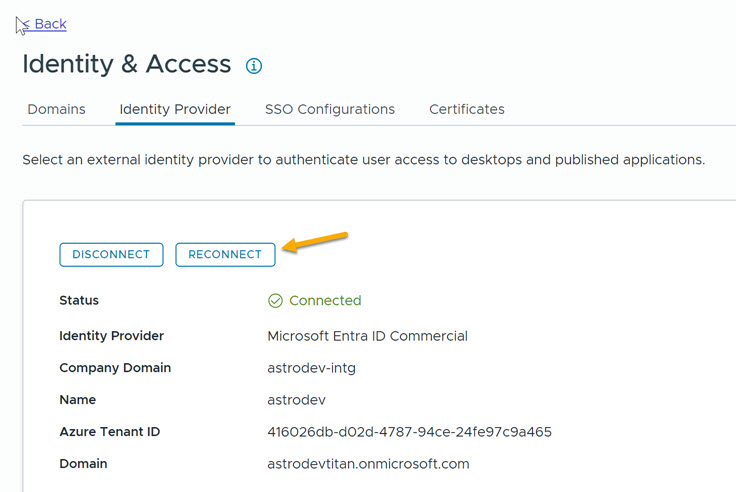
Click Integrations > Identity & Access and click the Reconnect option on the Identity Provider tab.
-
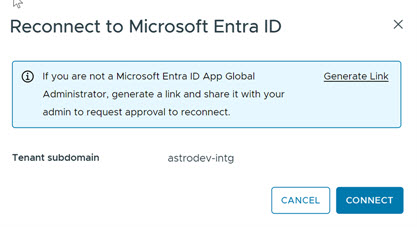
You are prompted to generate a link or click Connect. If you have Microsoft Entra ID App Global Administrator privileges, you can click Connect directly. Otherwise, click Generate Link and respond as prompted.
-
Respond to all Microsoft prompts.
When the reconnection is complete, a connected message appears on the Identity & Access page and the status for the identity provider displays as Connected for the tenant.
Note: After you reconnect your identity provider, you can remove the old application. Removal is not required, but may be desired as it will not be used in the future.
-
Verify that the new Omnissa-based identity provider is present for the Entra ID. A sample is shown below:
Application ID: b3227489-6673-4623-xxxx-b805fb2f8009 Homepage URL: https://cloud.horizon.omnissa.com -
Delete the old application. A sample is shown below:
   Application ID: 7909838c-2842-xxxx-8440-aaedd5a6998c
   Homepage URL: https://cloud.horizon.omnissa.com
What to do next
After connecting your identity provider, you can add a Horizon Edge as described in Using and Managing Horizon Cloud
Was this page helpful?