Workspace ONE UEM supports provisioning your Windows devices with apps before they leave the factory. You do so by creating provisioning packages using Workspace ONE Drop Ship Provisioning (Offline). Before creating provisioning packages, you must meet the Workspace ONE Drop Ship Provisioning (Offline) requirements. Use the listed component versions, and see the provisioning components the Workspace ONE UEM enables or requires for your deployment type. After meeting the requirements, you must install the Factory Provisioning Service in your environment.
Workspace ONE Drop Ship Provisioning (Offline) requires on-premises customers to install the service onto an application server.
This service exports applications from the Workspace ONE UEM console and converts them into .PPKG files. You create this provisioning package in the Workspace ONE UEM console using a wizard. The wizard covers configuring the package, adding apps, and exporting the package.
Contact Your OEM for Availability
To use Workspace ONE Drop Ship Provisioning (Offline), contact your OEM (Original Equipment Manufacturer) Representative.
Provisioning Packages
You can also create encrypted PPKGs to provision devices yourself. This process does not use Workspace ONE Drop Ship Provisioning (Offline). You can provision devices either using the device OOBE or by running the PPKG on a device.
Workspace ONE Drop Ship Provisioning (Offline) Requirements by Deployment Type
The following tables show the requirements for Workspace ONE Drop Ship Provisioning (Offline) for each type of deployment. Consider these requirements before using Workspace ONE Drop Ship Provisioning (Offline).
- Workspace ONE UEM v2008 or later
- Workspace ONE Intelligent Hub for Windows v20.08 or later
- Software Distribution of Win32 apps released with Workspace ONE UEM v2008 and later
| Workspace ONE UEM Deployment | Software Distribution | File Storage | CDN |
|---|---|---|---|
| SaaS Shared | Enabled by Default | N/A | Enabled by Default |
| SaaS Dedicated version 2008 and later | Enabled by Default | N/A | Enabled by Default |
| On-premises version 2008 and later | Enabled by default | Required | Disabled by default, optional |
Note:
- Any application uploaded before you enable Software Distribution must be uploaded again.
- If you use the Factory Provisioning Service v20.11 or later, you must use the Workspace ONE Provisioning Tool v.3.1 or later.
Install the Factory Provisioning Service
Before you can use Workspace ONE Drop Ship Provisioning (Offline), you must install the Factory Provisioning Service in your environment.
Prerequisites: This process installs the Factory Provisioning Service into your environment. Only On-Premises customers must install this service. Consider reviewing the Workspace ONE UEM Recommended Architecture Guide before installing the service.
Ensure that the servers the Factory Provisioning Service are installed on can reach and connect to your REST API server. The URL for REST API is set under Groups & Settings > All Settings > System > Advanced > Site URLs > REST API URL.
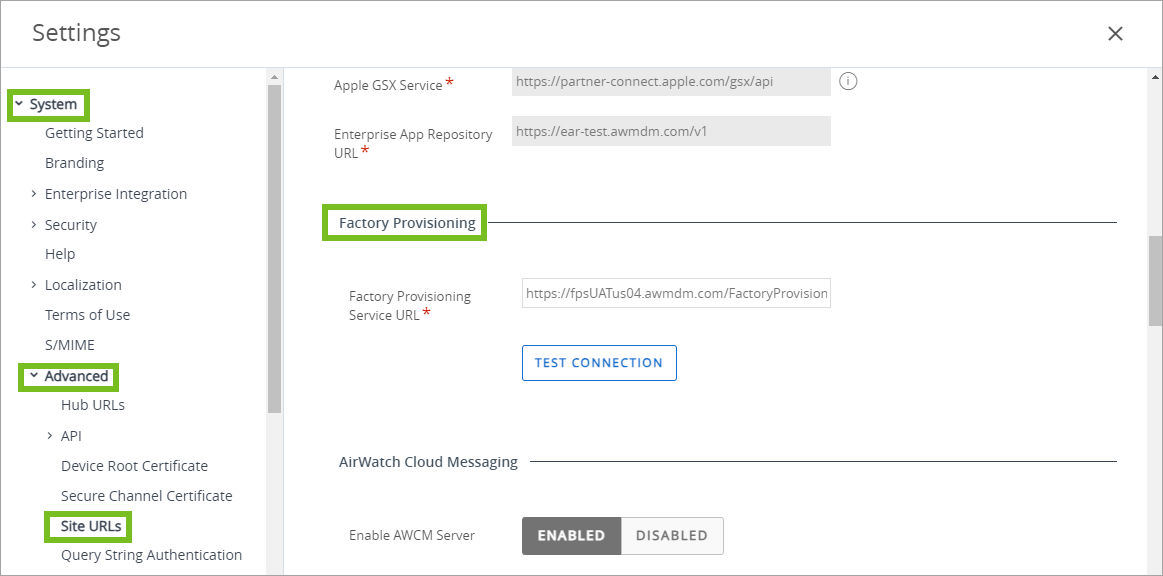
Use TLS to ensure that the traffic between the Factory Provisioning Service server and the Workspace ONE UEM console is secured. To use TLS, you must install a certificate for the Factory Provisioning Service server and enable HTTPS.
Procedure:
- Download the Factory Provisioning Service from myWorkspaceONE.
- Run the Factory Provisioning Service installer.
- In the Workspace ONE UEM console, navigate to Groups & Settings > All Settings > System > Advanced > Site URLs.
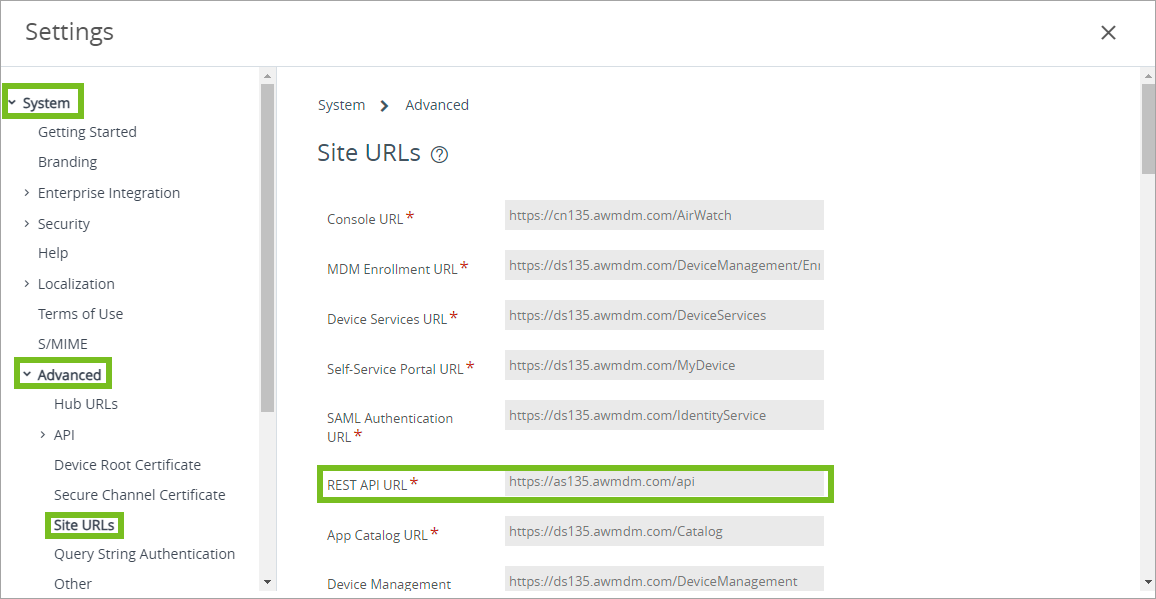
- Ensure that the correct URL is entered:
https://[FPS]/FactoryProvisioning/Package.
The Factory Provisioning Service is now installed. You can validate the installation by checking the communication between the various components used.
Factory Provisioning Service and the following:
- REST API over HTTPS
- Device Services over HTTPS
- CDN (if configured)
- Network file share access
The Workspace ONE UEM console and the REST API server communicate with the Factory Provisioning Service server over HTTPS.
Creating Provisioning Packages for Windows Devices
Create a provisioning package for Windows devices to use with Workspace ONE Drop Ship Provisioning (Offline) or as an encrypted PPKG to install on devices yourself. Add the package to devices using the Windows Out of Box Experience (OOBE). This method installs your configurations and applications during the initial device setup. Run the package on any Windows device you want to configure.
Create a provisioning package for Windows devices. This package contains the configuration file and the applications for your Windows devices.
Prerequisites: Meet the Workspace ONE Drop Ship Provisioning (Offline) Requirements.
Procedure:
-
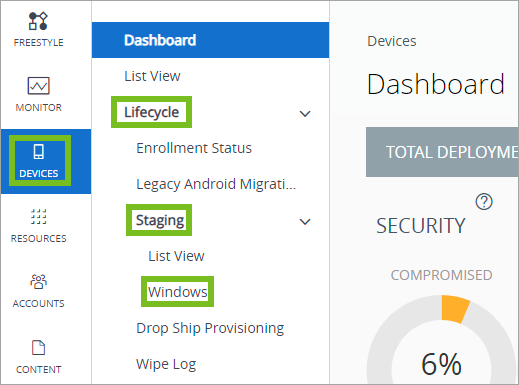
Navigate to Devices > Lifecycle > Staging > Windows and select New.
-
Enter the general settings including the Provisioning Package Name, Description, and the smart group the package is Managed By. Then select Next.
-
Select the Onboarding Method. To create a PPKG for Workspace ONE Drop Ship Provisioning (Offline), select Factory Provisioning. To create an encrypted PPKG for your own use, select Encrypted PPKG. Then select Next.
-
Set the Configurations settings. The settings that display depend on the Active Directory Type selected. Here is a list of possible settings and their.
Settings Description AD Organization Unit (OU) Enter the organization unit for the AD. The OU must follow the correct formatting:
This setting displays when you set the Active Directory Type to On-Prem AD Join.OU=,OU=,DC=Company,DC=comAdditional Synchronous Commands Add commands that automatically run at the end of the Windows setup process but before any user logs in. Computer Name The computer name is randomly generated by default so that every system coming from the factory is unique. To create a naming convention, use theRegistered Owner and Registered Organization settings. The computer name takes the first 7 characters fromRegistered Organization or Registered Owner as the prefix and then randomizes the rest of the characters up to the 15 character maximum. Device Services URL Enter your device services URL. Find the device services URL by navigating in the Workspace ONE UEM console to Groups & Settings > All Settings > System > Advanced > Site URLS. This setting only displays when you set the Active Directory Type to Azure AD - No Premium. Domain Password Enter the password for the Domain Join user. This setting displays when you set the Active Directory type to On-Prem AD Join. Note: This information saved in plain text in the XML file. Ensure that this file is always secured and not sent over insecure connections. Domain Username Enter the username that has Domain Join privileges. This setting displays when you set the Active Directory Type to On-Prem AD Join. Note: This information is saved in plain text in the XML file. Ensure that this file is always secured and not sent over insecure connections. Enrollment Server Enter your Workspace ONE UEM enrollment server URL. Find the enrollment URL by navigating in the Workspace ONE UEM console to Groups & Settings > All Settings > System > Advanced > Site URLS. This setting displays when you set the Active Directory Type to On-Prem AD Join or Workgroup. First Logon Commands Add commands that automatically run the first time a user logs in. This setting requires the user have local admin privileges. Make Administrator? You must make the local user account an administrator to start Workspace ONE enrollment automatically. During OOBE, the device prompts the user to enter their enrollment credentials. This setting displays when you set the Active Directory Type to Workgroup or Azure AD. Operating System Language Use this setting to set the Operating System language. If using encrypted PPKG, you can use a language other than the ones listed by following the listed procedure. - Select Other.
- In the Custom OS Language field that displays, enter the standard, BCP 47 code text string for the desired language locale.
Product Key Enter the Windows product key. You must follow the correct format: 12345-54CDE-XYZ78-ONM98-456TYRegion & Keyboard settings Use this setting to set the language for your users’s region and keyboards. If using an encrypted PPKG, you can use a language other than the ones listed by following the listed procedure. - Select Other.
- In the Custom Region & Keyboard settings field that displays, enter the standard, BCP 47 code text string for the desired language locale.
Remove Windows 10 Consumer Apps Select Yes to prevent consumer apps from appearing in Windows. This setting is only supported for Windows Enterprise or Education. You must enter a Windows Enterprise or Education key. Staging Account Enter the username for the staging account. Find this username by navigating in the Workspace ONE UEM console to Groups & Settings > All Settings > Devices & Users > Windows > Windows Desktop > Staging & Provisioning. This setting displays when you set the Active Directory Type to On-Prem AD Join or Workgroup. Workgroup Enter the name of the workgroup you want the client to join. The workgroup name must be 15 characters or fewer. This setting displays when you set the Active Directory Type to Workgroup. -
Select Next.
-
Select the apps to include in the provisioning package. The apps that display are those apps available to the smart group set during the General settings step.
This screen only displays Win32 apps recognized through Software Distribution. User context apps behave differently than device context apps. A provisioning package installs any device context apps in the factory, but user context apps install when a user signs in for the first time. These apps install using Software Distribution.
-
Optionally, if the app requires transforms and patches (MST and MSP files), select the Arrow icon > to add the necessary transforms and patches. You must add these transforms from the Edit Application modal before creating a provisioning package. Then, select Next.
-
Review the summary and either export or Save the provisioning package as a template.
- To export the provisioning package, select Save and Export.
- To save the package as a template, select Save. Templates do not create a PPKG file but save the settings for later creation and exporting. A template displays in the Windows list view with the Draft status.
- **Note:**You can only have one provisioning package PPKG stored at a time.
-
Once completed, Workspace ONE UEM will export the package or save the template.
- If you created a Workspace ONE Drop Ship Provisioning (Offline) PPKG, send the package to your OEM to provision your Windows devices.
- If you created an Encrypted PPKG, you must save the PPKG to the root of a USB drive and install the package on the Windows device.
If you want to change any settings in a provisioning package after creating one, you must either edit the existing package or export a template. Repeat the creation process and send the package to your OEM again. Exporting a new PPKG template overwrites any PPKGs currently available for download.
Add an Encrypted PPKG During Out of Box Experience
After creating an encrypted PPKG, you can add the package to devices using the Windows Out of Box Experience (OOBE). This method installs your configurations and applications during the initial device setup.
Prerequisites:
- Create an encrypted PPKG in the Workspace ONE UEM console.
- You need a USB drive to transfer the PPKG to the Windows device. The USB drive must be formatted NTFS or FAT32.
Procedure:
- Navigate to Devices > Lifecycle > Staging > Windows.
- Find the encrypted package and select Download Encrypted PPKG.
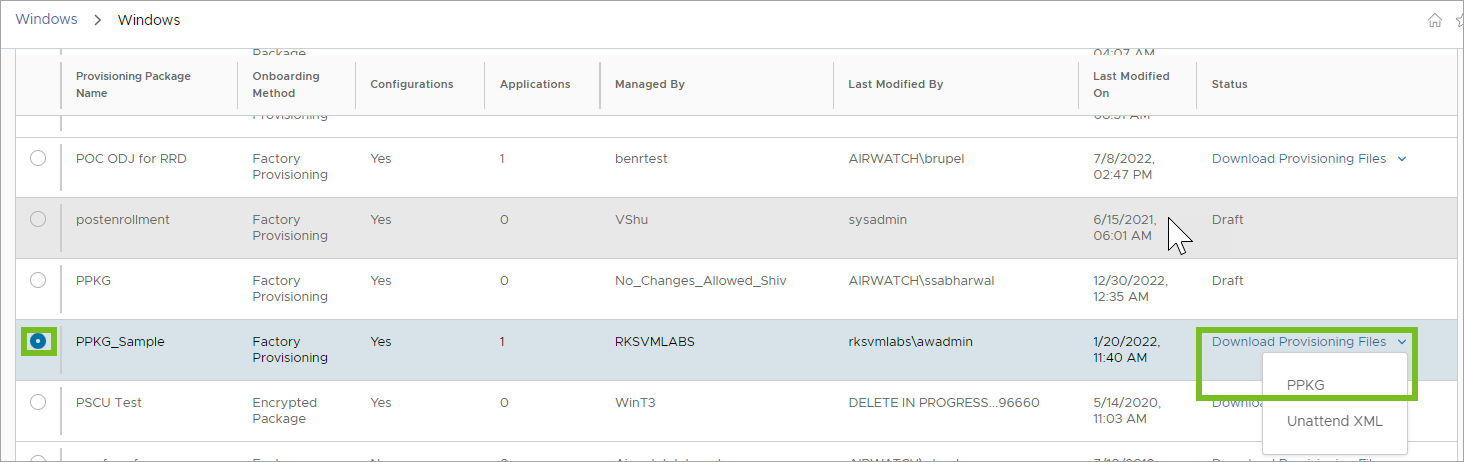
- Save the PPKG to the root of a USB drive.If you save the PPKG to a subfolder, OOBE cannot detect the file.
- On the Windows device you want to provision, insert the USB drive at the Select your Region screen of the Out of Box Experience. If you save multiple PPKGs on the USB device, Windows prompts you to select the PPKG you want to apply. After selecting the PPKG, Windows automatically detects and begins processing the PPKG.
- When prompted, enter the password used to encrypt the PPKG.
- If you want to see the progress of the app installation, pressShift + F10 to run a cmd window, press Alt + Tab and select the Provisioning Tool.
The OOBE process runs the PPKG and installs the configuration and applications included in the package. The workflow changes based on the content of your PPKG:
- If you do not include configurations in your PPKG, the process completes and returns you to the Select your Region to complete the OOBE process.
- If you include configurations in your PPKG, Windows automatically runs Sysprep and reboots the device. After rebooting the device, Windows completes the device setup based on your configuration. After setup completes, Workspace ONE Intelligent Hub runs and completes device enrollment.
Run an Encrypted PPKG on a Windows Device
After creating an encrypted PPKG, you can run the package on any Windows device you want to configure. This method installs your configurations and applications on any Windows device, even those already configured.
Prerequisites:
- Create an encrypted PPKG in the Workspace ONE UEM console.
- You need a USB drive to transfer the PPKG to the Windows device. The USB drive must be formatted NTFS or FAT32.
- Your devices must run Windows 1709 or later. They must also be unmanaged devices. If the device is already enrolled, the process does not apply any configurations or install any apps.
Procedure:
- Navigate to Devices > Lifecycle > Staging > Windows.
- Find the encrypted package and select Download Encrypted PPKG.
- Save the PPKG to a USB drive.
- On the Windows device you want to provision, insert the USB drive, open it, and double-click to run the PPKG.
- Enter the password you used to encrypt the PPKG.
- Confirm that you trust the source by selecting Yes, Add It.
The Provisioning Tool runs and begins installing the configuration and applications included in the package. If you included configurations in your PPKG, Sysprep runs and automatically reboots the device. After rebooting the device, Windows completes the device setup based on your configuration. After setup, Workspace ONE Intelligent Hub runs and completes device enrollment.
Managing (Offline) Provisioning Packages and Testing a Configuration File
After creating provisioning packages, you can manage your templates and packages from the Windows list view. This page allows you to create, edit, and delete your existing packages. After creating a configuration file for Workspace ONE Drop Ship Provisioning (Offline), test the file to ensure your devices are correctly configured. Testing configuration files requires a test device or virtual machine.
Creating a Provisioning Package
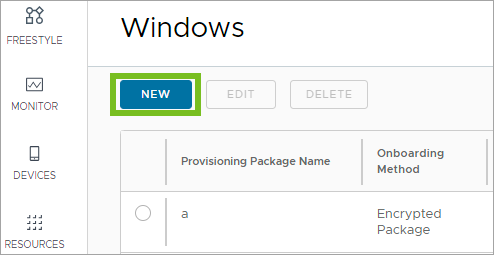
Create a provisioning package to configure your Dell devices. To create a package, navigate to Devices > Lifecycle > Staging > Windows and then select New.
Provisioning Package Templates
After creating a provisioning package, you can choose to either export the package or save it as a template. The templates are the saved settings for provisioning packages. When you save a template, the settings you configured are saved, but templates do not generate PPKG files until you export the package. Use templates to save and edit packages without exporting them.
Workspace ONE UEM purges PPKG files from storage based on the Purge job in the scheduler. Once the Purge job initiates, PPKG files are deleted, but the template is saved and you can export the package again.
In the Windows list view, templates show a Draft status. Active exports show the status of the export (Queued, In Progress, and so on).
Note: If an administrator's account is removed, any of the Provisioning Packages that Administrator created will also be removed from the console.
Editing a Provisioning Package
You can edit existing provisioning packages. Select a package to edit and then select Edit. 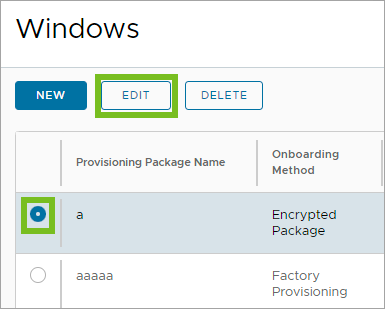
From the editing page, you can edit any of the provisioning package settings. You can also export a saved template by selecting Save and Export.
Deleting a Provisioning Package
You can delete provisioning packages and templates as needed. To delete, select the package or template, and select Delete. When you delete a package, you also delete any stored PPKG files.
Testing a Workspace ONE Drop Ship Provisioning (Offline) Configuration File
Test the configuration file to ensure your devices are correctly configured. Testing configuration files requires a test device or virtual machine.
Prerequisites:
- You must have a test device or virtual machine. To test the file, you must run the System Provisioning Tool in audit mode.
- You must have one of the following items to test:
- A PPKG containing the apps you want to install onto the device.
- A Workspace ONE Drop Ship Provisioning (Offline) configuration file.
- The test device must be offline (disconnected from the internet) before running the Workspace ONE Provisioning Tool to prevent Windows Updates from deploying during provisioning.
Procedure:
-
Download the Workspace ONE Provisioning Tool to the test device.
-
Start the Workspace ONE Provisioning Tool.
-
In the tool, select a PPKG or a Configuration to test.
-
Select the test method you want to use. Select Apply Apps Only to only apply the apps in the PPKG to the device. Select Apply Full Process to apply the apps and the settings in the configuration file.
-
If you select a configuration file to test, you can select what happens after by setting After Applying Sysprep. You can choose to shutdown, restart, or quit after configuration. If you restart the machine, the OOBE runs. If you select quit, the Workspace ONE Provisioning Tool closes after applying sysprep.
Only device-context apps are applied during this test. As there is no user for the device, user-context apps do not apply. If an app requires a reboot to finish installation, the tool prompts you to schedule a reboot. During the reboot, the device is told to resume installation after reboot and the tool relaunches.
The Workspace ONE Provisioning Tool applies the PPKG and the configuration file based on the test method selected. On the right-side of the tool, you can see the status of each step. You can view the logs after running the tool. The logs are found in C:\ProgramData\Airwatch\UnifiedAgent\Logs\PPKGFinalSummary.log.
Was this page helpful?