Workspace ONE Drop Ship Provisioning (Online) is the next evolution to provide our SaaS customers with the ability to provision devices before shipping them to their end users. This service can dynamically assign Workspace ONE UEM payloads like profiles, domain join, and applications to the windows PCs before first time end user login. Workspace ONE Drop Ship Provisioning (Online) is supported for SaaS customers only.
As an admin, you can provision the Windows devices over the air (OTA) with assignments at the manufacturer (OEM) or your own 2nd touch facility and ship these devices directly to end users. By configuring the system with the Workspace ONE UEM console you can make changes anytime and update the payloads dynamically. The devices become part of the resources suite.
Note: A feature was added to dectect and track the status of Freestyle Workfows when using Windows Hub (version 2310+) with the Provisioning tool (3.4+). Each workflow will be tracked in the UI and the system will not complete processing (Green Screen) until all workflow is complete.
Your OEM will request specific information about your Workspace ONE UEM console, along with any Workspace ONE UEM tags that you want to apply to these devices to determine payload assignments. With this information, the manufacturer builds your devices and puts a Provisioning Agent from Workspace ONE UEM on the devices. This agent communicates with Workspace ONE UEM to get your profiles, apps, and device login method. Then when the device is received by the end user, it will already have your business's approved settings, apps, and resources.

Workspace ONE UEM uses the Workspace ONE OEM Provisioning Service to store your device registration information from the manufacturer. It communicates with your devices through the Provisioning Agent ensuring the devices are provisioned with your desired resources. The device provisioning workflow over the air follows the listed steps.
- Enable Workspace ONE Drop Ship Provisioning (Online) in Workspace ONE UEM.
- Create a tag and assign payloads to the assignment groups using the smart groups defined with the tag.
- Order your devices and give the manufacturer your Workspace ONE UEM information.
- The manufacturer registers the devices with Workspace ONE OEM Provisioning Service. Optionally, the devices can be self-registered using the self-registration flow in the UEM console.
- The manufacturer builds your devices and puts the Provisioning Agent on them.
- The Workspace ONE UEM scheduler syncs or you manually sync and get registered information from the OEM Provisioning Service. Devices are now listed on the Enrollment Status page in the console.
- The manufacturer powers on the device and the Provisioning Agent communicates with the OEM Provisioning Service.
- The Provisioning Agent enrolls with Workspace ONE UEM and gets the current profiles, apps, and login configurations for the current device.
- The Provisioning Agent deploys the assigned payloads and shows a Green success screen to the operator.
The device is ready to ship, fully provisioned based on your most current Workspace ONE UEM payload assignments.
Note: Starting with UEM version 23.06, deleting and re-adding a device into Drop Ship Provisioning Online is supported.
Requirements
Before you configure the Workspace ONE Drop Ship Provisioning (Online), confirm that these requirements are met.
Administrator Requirements:
- You are using the Workspace ONE Intelligent Hub for Windows 20.10 or later.
- From the UEM console, navigate to Groups & Settings > All Settings > Devices & Users > Microsoft > Windows > Intelligent Hub Application.
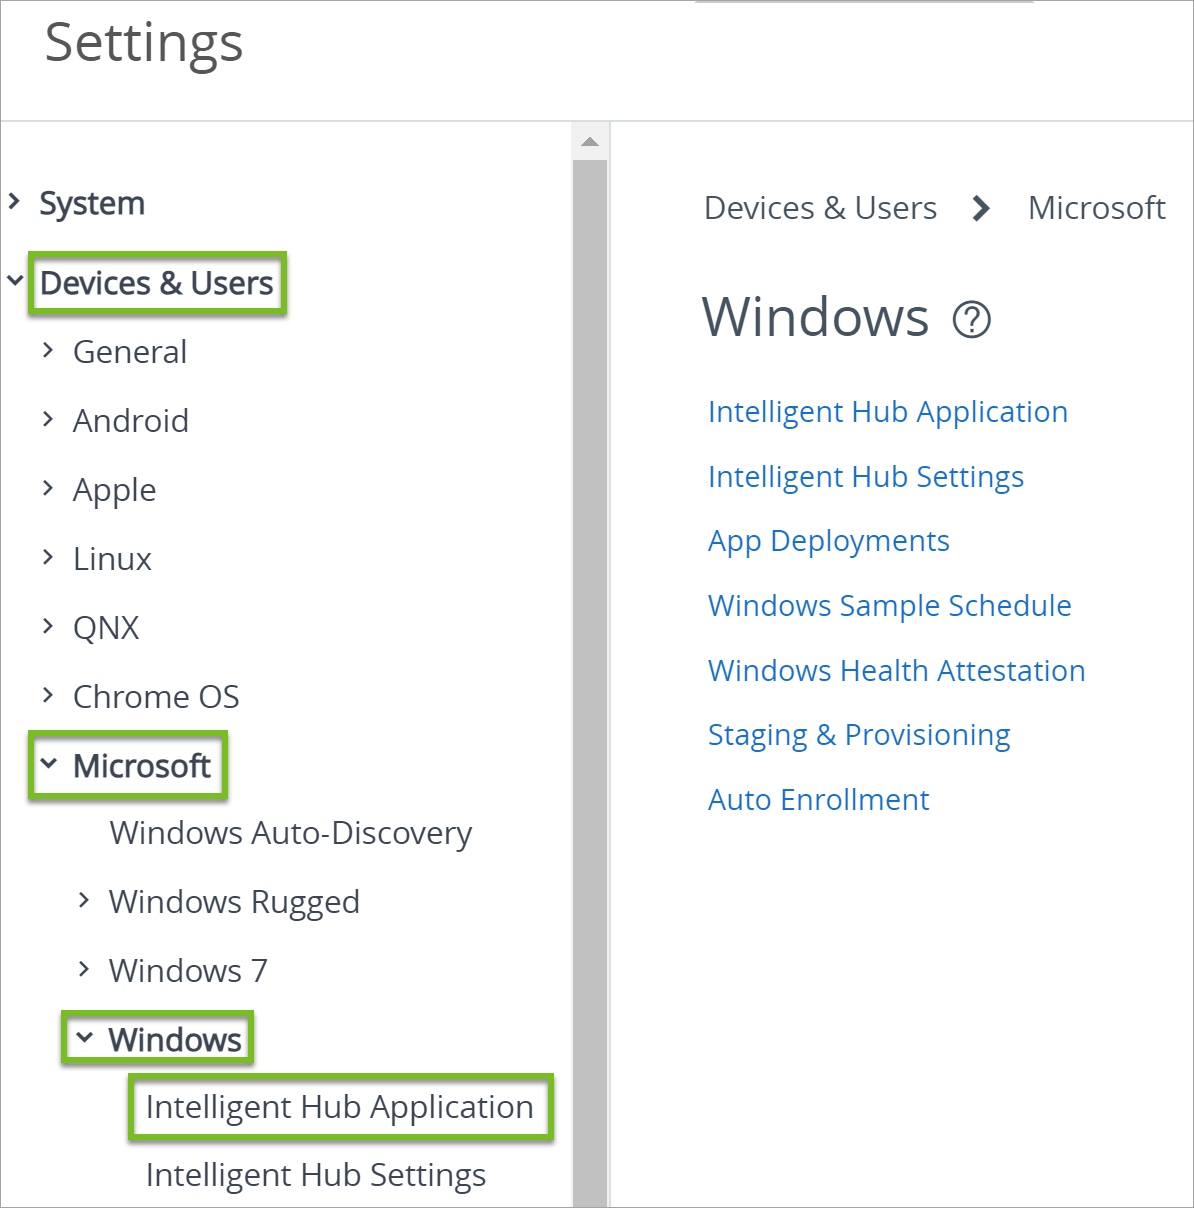
- Publish Intelligent Hub
- Check Publish Workspace ONE Intelligent Hub for “Unknown or has not been set” as well as any other Device Ownership Types in use by the OG.
- Configure Intelligent to Update automatically
- Check Intelligent Hub Automatic Updates.
- Publish Intelligent Hub
- Configure Software Distribution in the organization group where your Workspace ONE Drop Ship Provisioning (Online) settings reside.
- Use Workspace ONE UEM 2105 or later (SaaS only).
- Workspace ONE Drop Ship Provisioning (Online) does not support On-Demand or User context applications. Ensure your app assignments are in the Device context, and are set to Automatic deployment.
Device Task and Package Requirements:
- Register all devices with the Workspace ONE OEM Provisioning Service.
- Stage all devices by booting into Sysprep audit mode, then installing the Provisioning Tool with Generic PPKG.
Note: At this time, Drop Ship Provisioning (Online) is only supported for workgroup or on-premises domain join flows.
Configure the Workspace ONE UEM Console
- Select the organization group you want to configure Workspace ONE Drop Ship Provisioning (Online).
- Go to Devices > Lifecycle > Devices & Users > Drop Ship Provisioning.
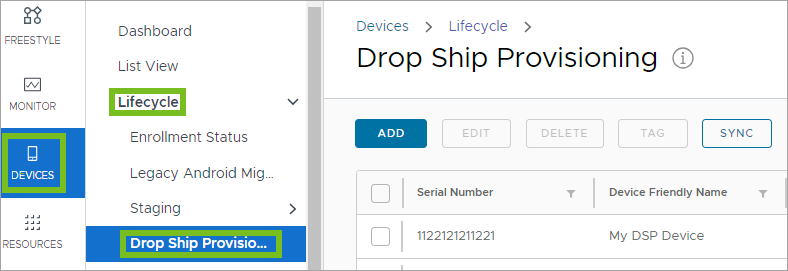
- Click Enable Workspace ONE Drop Ship Provisioning.
- Copy the Organization Group UUID and give it to your manufacturer.
- Save the settings.
Create a Tag in the Console
The Workspace ONE Drop Ship Provisioning (Online) system uses this tag to match your Workspace ONE UEM configurations with your registered devices. Record the tag value and give it to your manufacturer.
- Select the applicable organization group.
- Go to Groups & Settings > All Settings > Devices & Users > Advanced > Tags and select Create Tag.
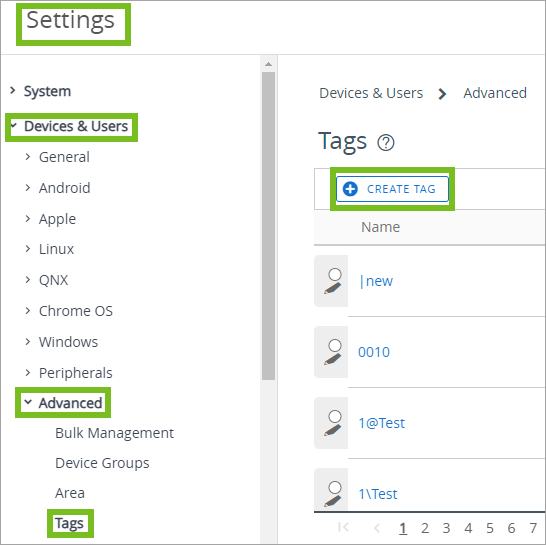
- Enter a name for the tag. You can use any name you want. Consider using a name that identifies the business unit that uses these provisioned devices. For example, enter the name
RnDfor the research and development unit. - Save your tag.
Create a Smart Group and Assign the Tag
Workspace ONE UEM uses the tag to match your configurations to the devices in the smart group.
- Ensure you are in the right organization group.
- Go to Groups & Settings > Groups > Assignment Groups and select Add Smart Group.
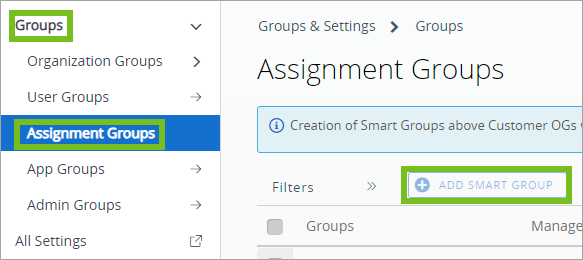
- Enter a name for the smart group and use the Criteria type.
- Select the Tag section and enter the tag you previously created.
- Save your smart group.
Configure the End User Log In Experience
To create local accounts for access, create a local administrator account using a Custom Settings profile and using Microsoft's Accounts CSP.
If you have an on-premises domain, you can join your devices to the domain and enable users to login with their Active Directory credentials.
Assign Profiles and Apps to the Smart Group
Configure or edit profiles and assign them to the provisioning smart group you previously created. Also, publish apps to this smart group. Workspace ONE Drop Ship Provisioning (Online) does not support On-Demand or User context applications. Ensure your app assignments are in the Device context, and are set to Automatic deployment.
Register Devices with the Manufacturer
Work with your device manufacturer to order your devices. The manufacturer registers your devices using the Workspace ONE UEM tag and the Organization Group UUID .
Here is a checklist of the items you give your manufacturer.
- Give them the Origination Group UUID you captured when you enabled Drop Ship Provisioning.
- Give them the tag you created in Workspace ONE UEM in the Tags area.
Sync Devices in the Console Manually or Set Up a Schedule
You can wait for the scheduler job to sync your registered devices from the manufacturer or you can initiate a sync.
- Ensure you are in the correct organization group.
- Go to Devices > Lifecycle > Enrollment Status.
- Select Sync Devices > Windows.
Your registered devices display on the Enrollment Status page. 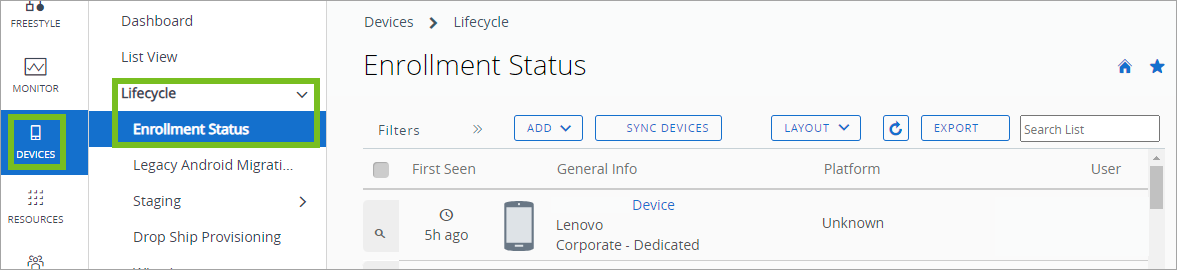
Optional: Use a Custom Cache Server
Sometimes too much device traffic can become a bandwidth issue. If you find that starting to happen, consider setting up a custom cache server. For detailed instructions on how to do that, refer to our Knowledge Base Article 92819.
Self-Registration for Workspace ONE Drop Ship Provisioning (Online)
With Self-Registration for Workspace ONE Drop Ship Provisioning (Online), you can register your Windows devices in Workspace ONE UEM instead of having your Windows device manufacturer (OEM) register them for you. You can use this process to test the Workspace ONE Drop Ship Provisioning (Online) process with a single device to ensure a desired outcome. Workspace ONE Drop Ship Provisioning (Online) is supported for SaaS customers only.
In the current Workspace ONE Drop Ship Provisioning (Online) process, you work with your OEM to provision your Windows devices. We've now updated the process so that you can register and provision your own Windows devices without your OEM.
To self-provision using Workspace ONE Drop Ship Provisioning (Online), you must first stage your windows devices with a provisioning bundle, and then register the device into the Workspace ONE OEM Provisioning Service from the Workspace ONE UEM console. You must complete both these tasks before powering on the device to launch the zero-touch provisioning process.
Prerequisites:
Before you configure the Workspace ONE Drop Ship Provisioning (Online) with self-registration, confirm that both the Administrator and Device Requirements are met.
Administrator Requirements:
-
Complete the console-side tasks to register devices in the Workspace ONE UEM console.
-
Use the Workspace ONE Intelligent Hub for Windows 20.10 or later.
-
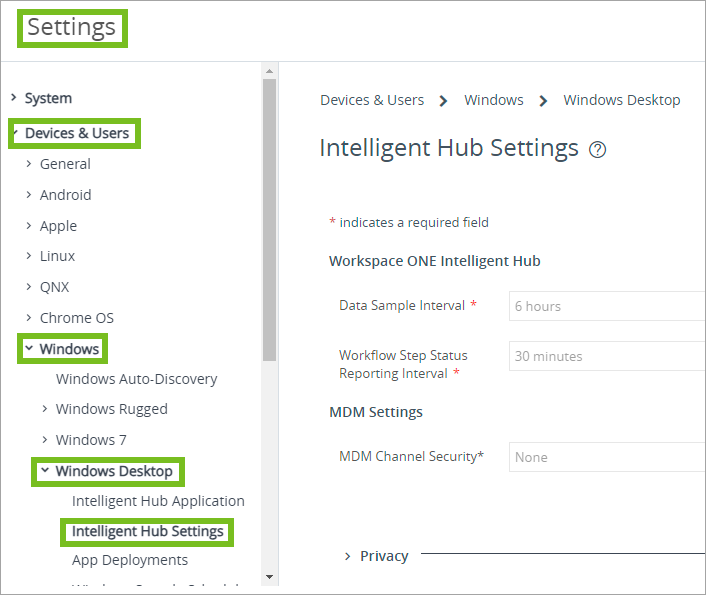
From the UEM console, navigate to Groups & Settings > All Settings > Devices & Users > Windows > Windows Desktop > Intelligent Hub Application.
-
Publish Intelligent Hub
Check Publish Workspace ONE Intelligent Hub for “Unknown or has not been set” as well as any other Device Ownership Types in use by the OG.
-
Configure Intelligent to Update automatically
Check Intelligent Hub Automatic Updates.
-
Configure Software Distribution in the organization group where your Workspace ONE Drop Ship Provisioning (Online) settings reside.
-
Use Workspace ONE UEM 2210 or later.
-
Workspace ONE Drop Ship Provisioning (Online) does not support On-Demand or User context applications. Ensure your app assignments are in the Device context, and are set to Automatic deployment.
Device Tasks and Package Requirements:
Stage all devices by booting into Sysprep audit mode, then installing the Provisioning Tool with Generic PPKG.
Note: At this time, Drop Ship Provisioning (Online) is only supported for workgroup or on-premises domain join flows.
Self-Registration: Creating a Tag in the Console
The Workspace ONE Drop Ship Provisioning (Online) system uses this tag to match your Workspace ONE UEM configurations with your registered devices. You can select the Create Tags card on the Drop Ship Provisioning page to start this process. Find the card located at Devices > Lifecycle > Drop Ship Provisioning.
-
Select the applicable organization group.
-
Go to Groups & Settings > All Settings > Devices & Users > Advanced > Tags and select Create Tag.
-
Enter a name for the tag. You can use any name you want. Consider using a name that identifies the business unit that uses these provisioned devices. For example, enter the name
RnDfor the research and development unit. -
Save your tag.
Self-Registration: Creating Smart Groups and Assigning a Tag
Workspace ONE UEM uses the tag to match your configurations to the devices in the smart group. You can select the Create Smart Groups card on the Drop Ship Provisioning page to start this process. Find the card located at Devices > Lifecycle > Drop Ship Provisioning.
-
Ensure you are in the right organization group.
-
Go to Groups & Settings > Groups > Assignment Groups and select Add Smart Group.
-
Enter a name for the smart group and use the Criteria type.
-
Select the Tag section and enter the tag you previously created.
-
Save your smart group.
Self-Registration: Configuring and Assigning Profiles
For Log In:
To create local accounts for access, create a local administrator account using a Custom Settings profile and using Microsoft's Accounts CSP.
If you have an on-premises domain, you can join your devices to the domain and enable users to login with their Active Directory credentials. Find information on domain join through Workspace ONE UEM Device Management guide under Deploying Domain Join Configurations for Windows.
Assigning Profiles:
Configure or edit profiles and assign them to the provisioning smart group you previously created. Also, publish apps to applicable smart groups. Workspace ONE Drop Ship Provisioning (Online) does not support On-Demand or User context applications. Ensure your app assignments are in the Device context, and are set to Automatic deployment.
Self-Registration: Registering Devices
You can register your devices with the Workspace ONE OEM Provisioning Service using the tag previously created (optional), your organization groups (OGs), and your device serial numbers. The listed process outlines the menu items you see when you register the first time.
- Enable Workspace ONE Drop Ship Provisioning (Online).
- Ensure you are in the correct organization group.
- Go to Devices > Lifecycle > Drop Ship Provisioning.
- Select Enable Drop Ship Provisioning.
- As an option, you can add child OGs in the Drop Ship Provisioning page. Go to the Enable Child Organization Groups menu item and select child groups where you want to register devices.
- Enter Windows device information for registration.
-
Go to Devices > Lifecycle > Drop Ship Provisioning.
-
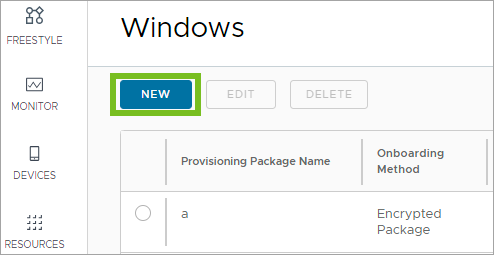
Select Add Device.
-
Complete the menu options in the Add Drop Ship Device page. Most of the menu items are optional except for the Serial Number menu item. You must enter this string. Although optional, you can select the tag you created previously in the Tag menu item.
-
See your device in the Drop Ship Provisioning list view. The page displays the Sync Status for the device.
Self-Registration: Syncing Device Records Manually or by Scheduler
Sync your device records with the Workspace ONE OEM Provisioning Service. You can wait for the scheduler job to sync your registered device records in the console or you can initiate a sync. Additions or changes to the Drop Ship Provisioning page must sync with the Workspace ONE OEM Provisioning Service to display in the console.
- Ensure you are in the correct organization group.
- Go to Devices > Lifecycle > Drop Ship Provisioning.
- Select Sync and refresh your browser to refresh the Sync Status column for the devices in the list view.
Your registered devices display on the Drop Ship Provisioning page.
Self-Registration: Staging Devices for Provisioning
Prepare your Windows devices for self-registration for Workspace ONE Drop Ship Provisioning (Online). You can get the bundle from My Workspace One.
- Download a bundle that contains the listed files.
- Workspace ONE Provisioning Tool
- Generic PPKG
- Generic answer file (unattend.xml)
- RunPPKGandXML.bat file that contains a one line script to orchestrate the staging process
- License file
- Start the device in Audit mode and extract the tool, the PPKG, the unattend file, and the script file to the device.
- Double-click the RunPPKGandXML.bat file.
- The Workspace ONE Provisioning Tool staging process starts zero-touch provisioning.
- After staging completes, the device automatically runs Sysprep and powers down, as it prepares to launch the zero-touch process.
- Initiate the zero-touch provisioning process by starting the device after the device completes staging and its registration steps.
- Results: After the process completes, the device displays a green screen that reads
Workspace One Provisioning complete.
Self-Registration: Adding Device Tags in Bulk
You can add a tag to devices in bulk using the Drop Ship Provisioning list view.
Note: You cannot change or remove tags in bulk. If you want to change a tag, you must perform this task for each device.
- Ensure you are in the correct organization group.
- Go to Devices > Lifecycle > Drop Ship Provisioning.
- Select the check box for all devices for which you want to add the tag.
- Select the Tag button.
- Select the desired tag from the drop-down list.
- Wait for the sync scheduler job to sync your changes with the Workspace ONE OEM Provisioning Service or use the Sync button to initiate the sync. For updates to display, additions or changes to the Drop Ship Provisioning page must sync with the Workspace ONE OEM Provisioning Service.
Was this page helpful?