This topic describes the Avery Dennison Printer Setup
Integrate Workspace ONE UEM with Avery Dennison Print Server
Integrate Avery Dennison Print Server with Omnissa Workspace ONE UEM by adding the print server to an organization group. Adding the print server automatically generates the HMAC token and UID that is required for connecting the print server and the UEM console.
You can enroll a print server to a parent organization group and if required move it to a child organization group using the Change Organization Group option in the List View page.
To integrate Workspace ONE UEM and Avery Dennison print server:
-
Navigate to Devices > Peripherals > Settings > Server. Ensure that the correct organization group is displayed at the top of the page.
-
Select Add Print Server.
-
Enter a Friendly Name for the print server.
-
Note the HMAC Token that was automatically generated. The HMAC Token is required as an input value for Step 7.
-
Select the enrollment user associated with the print server from the User ID drop-down menu.
Note: Note that the users created in parent organization group are not available for selection in the child organization group.
-
Enter the Service UID or use the Generate UID option. The Service UID is a 16 to 36 character alphanumeric value (applicable only when manually entered by the IT admin). Note down the UID value.
Note: Use the Avery AirWatch Connector software to create a new Avery Dennison print server for use with Workspace ONE UEM server. Workspace ONE UEM does not request installing the Avery Dennison print server and Workspace ONE UEM server on the same hardware. However, you can install both servers within the same firewall (http) or behind different firewalls (https), as per your requirement. UID and HMAC are unique for a user and the related print server and they cannot be interchanged with another user or print server.
-
In the Avery AirWatch Connector, enter the following details to get the connector registered to the UEM console:
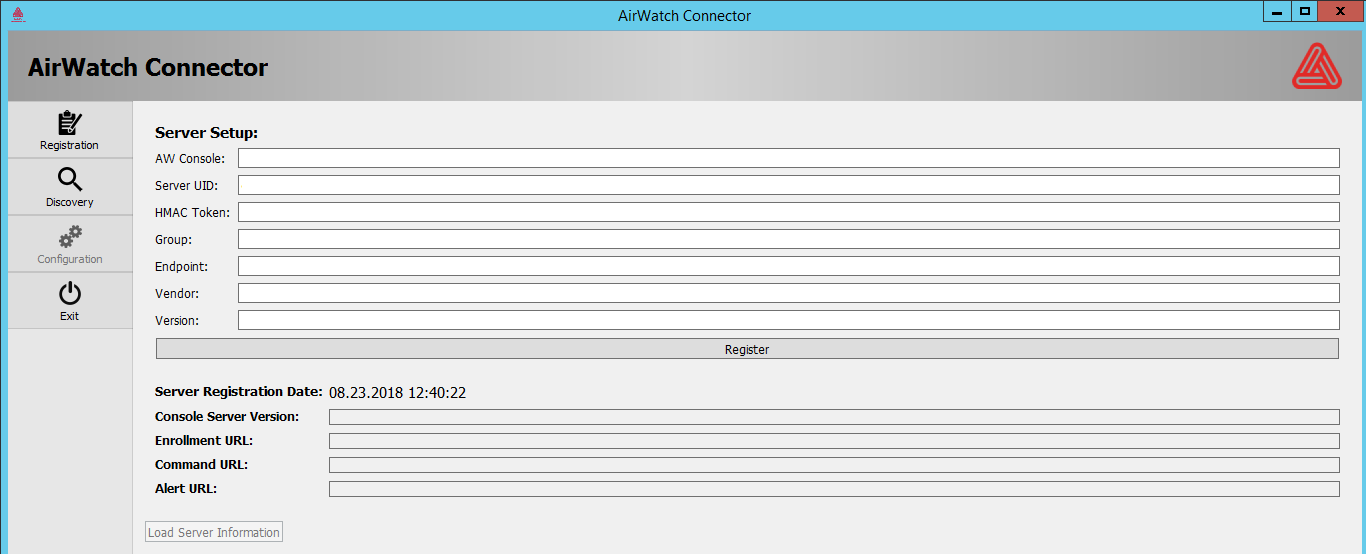
- AW Console – URL for Workspace ONE UEM registration endpoint.
- Server UID – UID to associate the connector to Workspace ONE UEM . The UID is obtained from the UEM console when adding the server (from step 6).
- HMAC Token – Auto-generated key used to associate connector to appropriate group in the UEM console. The token is obtained from the UEM console when adding the server (from step 4).
- Group – ID for the company obtained during the Workspace ONE UEM installation.
- Endpoint – The wake-up or check-in location for the connector.
- Vendor – Avery Dennison (is a hard coded value).
- Version – Arbitrary value used for tracking.
-
Select Register to send the values to the UEM console.
Once the Avery Connector is registered with the UEM console, the connector starts sending UDP broadcasts to the Avery Dennison printers requesting to send the information back to the connector. The connector creates a list of printers and enrolls them into the UEM console.
Once the printers are enrolled to the UEM console, admins can utilize the ability to query printers for general information and send configuration files.
AirWatch Connector's Discovery
The Avery AirWatch Connector's Discovery screen displays the printer information and date of enrollment into the UEM console.
The Avery AirWatch Connector's Discovery screen displays the printer information and date of enrollment into the UEM console. When a configuration file is sent to the printer through the console, an update is displayed in the Messages column.
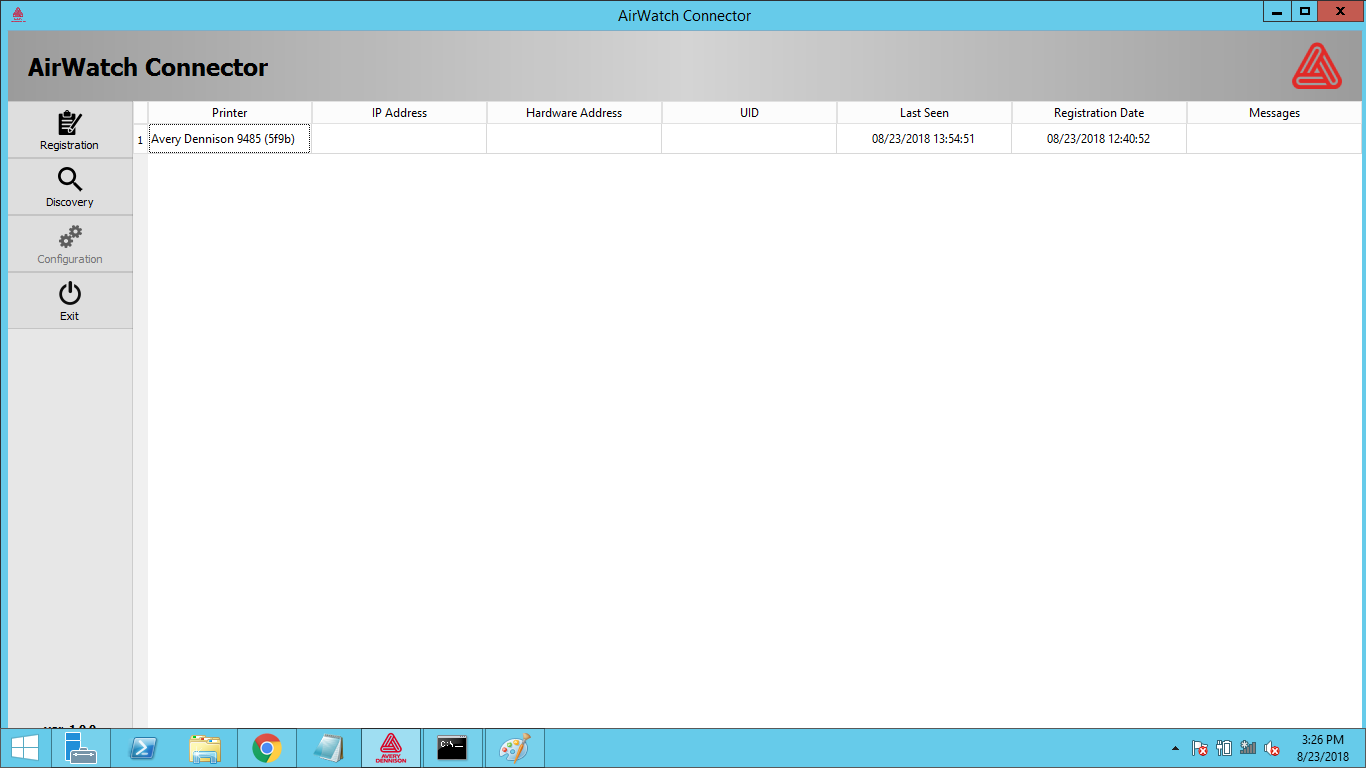
The discovery service runs every 30 seconds by default. The admin can also force run the discovery service by pressing the F5 key on the keyboard. This action clears the current list and restarts the discovery service.
Once the printer is discovered, the connector creates a log and maintains the printers list in the Discovery tab. The connector then enrolls each printer with the UEM console through the endpoint returned during connector registration.
Configure Wireless Connection
Configure a wireless connection to enable Wi-Fi settings using Avery Mobile Label Printer Utility to establish the Avery Dennison printer connection.
Configure a wireless connection to enable Wi-Fi settings using Avery Mobile Label Printer Utility to establish the Avery Dennison printer connection.
To configure a wireless connection:
- Connect the USB cable from the 9485 printer to your computer and turn on the Avery Dennison printer.
- Start the Avery Mobile Label Printer Utility setup wizard.
- Select Start Wi-Fi Settings.
- From the Wi-Fi Settings dialog box, select USB from the Port drop-down menu and then select Open Port.
- (Optional) Enter the SSID, Wi-Fi Mode, Wi-Fi Encryption, Wi-Fi Authentication, and WPA Keys.
- Enter a known IP address, NetMask, and Gateway or enable DHCP to automatically receive an IP address from your network. Note: If network uses a DHCP server, the printers might receive a different IP address whenever they are switched off and on.
- Select Save Wi-Fi Information. The Save Complete screen appears.
- (Optional) Select Get Wi-Fi Information to get the printer Wi-Fi details.
- Select OK and then select Close Port.
- Exit from the Avery Mobile Label Printer Utility setup wizard.
Was this page helpful?