Omnissa Cloud Services provides multiple features to run your resources in a secured and controlled environment with several controls and policies that you can enforce. Select from multi-factor authentication (MFA), entering specific addresses and ranges, or using source domains. You can also configure timeout session preferences to further control authentication.
Multi-Factor Authentication
Cloud services provide multi-factor authentication that each individual user can turn on in their profile to add another level of authentication to log in to the services. As an organization owner, you can enforce MFA for all eligible users to ensure that each user can only log in after providing a second factor authentication code.
If the organization belongs to a federated domain, then only non-federated users are enforced with MFA. All federated users follow the authentication policies set within the Identity Provider, including MFA.
Supported third-party authenticators
Currently, only Google Authenticator is a supported third party authenticator that works with this feature. Download Google Authenticator from the applicable app store.
Navigation
To set MFA at your organization, go to Organization > Authentication Policy, select the Multi-Factor Authentication tab and activate MFA for console authentication.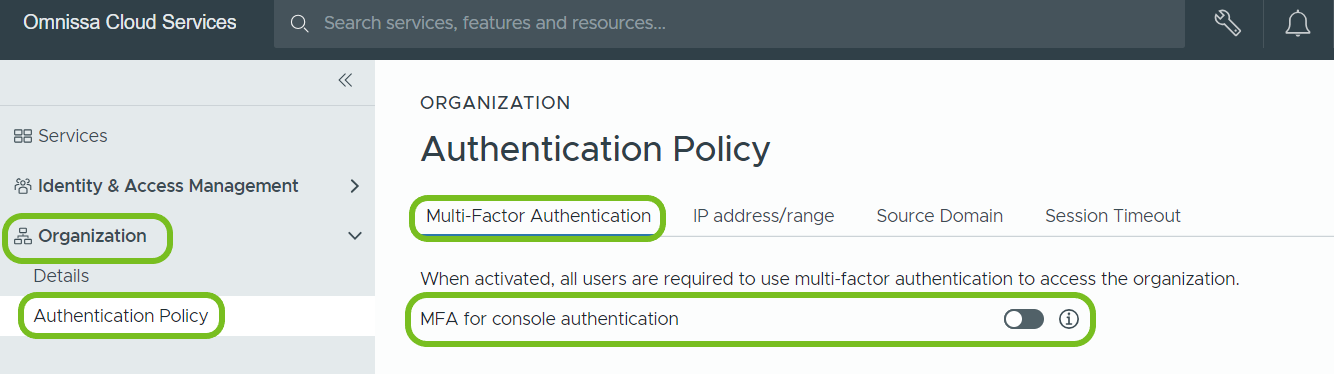
Selecting IP address/range to allow or disallow access
IP address/range allows admins to allow or deny user logins from specific IP address ranges. This provides additional security to organizations to safeguard access to the service through known safe IP address ranges.
How Do I Define IP Authentication Preferences
As an Organization Owner, you can manage access to your Organization by defining IP addresses or IP ranges to either block or allow user access from specific IPs.
You do that by applying an authentication preference to block or allow user access from an IP range or specific IP address. If your authentication preference is defined for an IP range, you can set exceptions for specific IPs within the range. For example, if you apply block authentication to an IP range, you can then set an exception for one or more IPs within that range that will be allowed access to your Omnissa Cloud Services.
Note: The IP address you enter must follow CIDR notation for IPv4 and IPv6 IP addresses.
There are two authentication preference options you can define:
- Block IP: User logins from specific IP addresses/ranges are blocked access to the Organization.
- Allow IP: User logins from specific IP addresses/ranges are allowed access to the Organization.
You can have only one preference activated in your Organization.
You can switch between the two preferences, but you can't have both of them activated at the same time.
To set or modify an IP authentication preference in your Organization, log in to the Cloud Services Console and navigate to Organization > Authentication Policy > IP address/range.
Note: It may take up to 30 minutes for your policy settings to take effect in the Organization.
Set an IP authentication preference for your Organization
- If setting an IP authentication preference for the first time, select an option and click Activate.
The policy settings page displays, indicating the IP address/range has been activated in your Organization. - Click Add and enter an IP address or range.
- Click Add again.
The address or range you entered is added to the list of blocked or allowed addresses and ranges specified for your Organization.
Add an exception to your authentication preference
You define exception rules for IP addresses from an IP range that is already specified in the list of allowed or blocked IPs.
- In the Exception section of the IP address/range page, click Add an Exception.
- In the pop-up window that opens, type the IP addresses you want to add as exceptions to the authentication policy in your Organization.
If you activated the Allow IP preference, users accessing Omnissa Cloud Services from the IPs on the exceptions list will be denied access. Conversely, if you activated the Block IP preference, users accessing Omnissa Cloud Services from the IPs on the exceptions list will be allowed access.
Modify the IP addresses, ranges, or exceptions for your authentication preference
Once you activated an IP authentication policy, you can add additional IPs, IP ranges, and exceptions. You can also modify or remove existing IPs and ranges from the policy.
To make a change, first select the IP address or range from the list, then apply the appropriate action.
Change your IP authentication preference
If you want to switch the authentication preference in your Organization from Block IP to Allow IP or vice versa, you must first remove all IP addresses and ranges specified for the current authentication preference.
- On the IP address/range tab, select all currently defined IP addresses and ranges.
- Click Remove.
- Click the Change link next to the User IP Authentication Preference option.
- In the pop-up window that opens, select the new option, then click Save.
- To define new IP addresses or ranges for the newly selected policy setting, click Add.
I accidentally blocked myself and want to unblock my IP
If you accidentally added your IP in the Block IP list for your Organization, you must file a support ticket to unblock. As you are not able to log in to your Organization and use the Support Center in Cloud Services Console, you can do that by calling Support.
Does blocking a user IP address in my Organization block them from accessing other Organizations to which they are members
If a user belongs to multiple Organizations and IP based policy is enforced in one of these Organizations, they are not allowed access in that particular Organization. Then they have the option to switch to a different Organization upon login.
Selecting source domains to restrict access
Source Domain allows only users from the specified source domains and subdomains to access the organization.
How Do I Manage User Access At Domain Level
As an Organization Owner user, you can determine the domains allowed to access your Omnissa Cloud Services Organization.
When the source domain authentication policy is activated, only users from the domains you specify can access your Organization. Access from all other domains is locked even if the groups and users are added or invited in your Organization.
- Log in to Cloud Services Console and navigate to Organization > Authentication Policy > Source Domain.
- To activate the policy, click the slider and change its position to show source domains are locked.
- Enter the domain name you are allowing access to the Organization.
- Optional: To add more domains and sub-domains to the allowed domains list, click the + Add Domains link.
- Click Save.
Source domain is now activated for the domains and subdomains you specified. Only Organization members logging in from the allowed domains can access your Organization. Access for users logging in from a different domain is locked.
Note: It may take up to 30 minutes for the policy to take effect in the Organization.
If you or another Organization Owner accidentally locks you out from accessing the Organization by not including your domain to the list of source domains that are allowed access to the Organization, open a help support ticket.
Changing the Session Timeout Setting
As an Organization Owner user, you can determine session timeout intervals after which a user accessing your Organization will be logged out and required to re-log in to Omnissa Cloud Services and Cloud Services Console.
Important: Some Omnissa Cloud Services have been enabled so far to use the Idle Session Timeout feature in Cloud Services Console. To learn if a service you are using in the Organization can utilize this setting, contact Support.
By default the session timeout setting is deactivated. When you activate it, you can modify the following values:
| Setting | Minimum Value | Maximum Value | Default Value |
|---|---|---|---|
| Idle session timeout is the maximum time a logged in user is allowed tostay idle session is terminatedand they are required to re-authenticate. | 5 minutes | 24 hours | 30 minutes |
| Max session timeout is he maximum time a user is allowed to stay actively logged in to Omnissa Cloud Services before they are required to re- authenticate. | 30 minutes | 24 hours | 24 hours |
Configuring session timeout
- Log in to Cloud Services Console and select Organization > Authentication Policy > Session Timeout.
- Modify the Idle Session Timeout setting.
- Use the Policy Status slider to activate the setting.
- Define the time values for the setting.
- Click Save.
Was this page helpful?