Enable Microsoft Single Sign-On (SSO) for shared iOS devices to provide shift workers with seamless single sign-on into Intelligent Hub, Microsoft apps, and other enterprise applications that support Microsoft Authentication Library (MSAL) and Shared Device Mode. Additionally, we now have support for Global Sign-Out, which clears cached authorization tokens on the device, enhances security by ensuring the user’s Entra ID credentials are cleared from all these apps with a single click.
Intelligent Hub interacts with Authenticator on the device to perform a one-time registration of the device with Entra ID in Shared Device Mode. Once this is successful, Workspace ONE UEM can relay compliance and management signals to Microsoft. As each user logs in/out of the device, Conditional Access policies can evaluate the device’s posture before authorizing the user.
Prerequisites
To enable this feature, the following prerequisites must be met:
-
Workspace ONE UEM 2602 or higher
- This feature is Generally Available (GA) with UEM 2604. If your environment is on UEM 2604 or later, no action is required from your Omnissa Account Representative. Simply follow the steps in this guide to configure and deploy the feature. If your environment is on UEM 2602, contact your Omnissa Account Representative for feature enablement.
-
Intelligent Hub 25.09 or higher
-
Intelligent Hub and Microsoft Authenticator must be deployed via Workspace ONE UEM. Any additional Microsoft Applications that support Shared Device Mode must also be deployed via Workspace ONE UEM.
-
iOS/iPadOS devices running v16.0 or later. Refer to Omnissa Workspace ONE Intelligent Hub for iOS Release Notes for the latest OS version requirements for the current release of Hub
-
Configure Entra ID (Azure) Conditional Access integration for iOS. For more details, see Conditional Access Using Microsoft Entra ID.
- Entra ID US GovCloud (GCCH) is not supported
-
If a device has been previously registered for Conditional Access, complete the following steps before proceeding:
-
Clear all Entra ID accounts from the device through Authenticator and delete associated records in Entra ID
-
Unenroll and delete them from Workspace ONE UEM, then re-enroll.
-
-
Users who will check out the shared device must be provisioned to Workspace ONE UEM. Just-in-time (JIT) user provisioning is not supported with Microsoft SSO.
-
Each device must be enrolled to a multi-user staging-enabled account and set up as a shared device for Check-in/Check-Out through Intelligent Hub
Configuring MSAL Global Sign-in/Sign-out
Configuration for MSAL GSSO depends on how you have configured user provisioning in Workspace ONE UEM. There are two supported configurations:
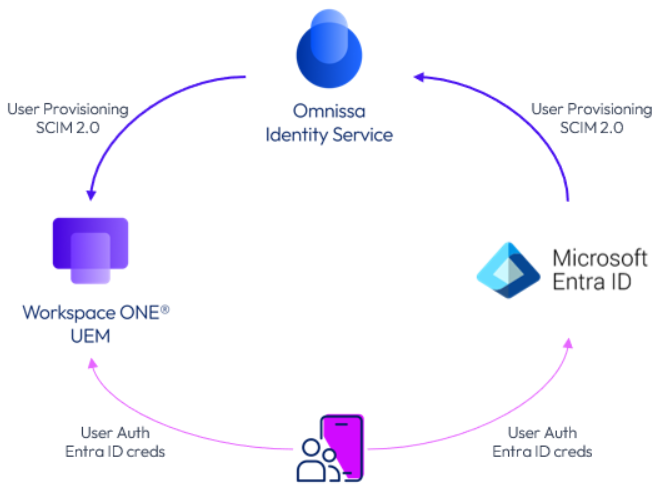
Direct integration with Entra ID using Omnissa Identity Service (OIS)
You have configured OIS as the Directory Type in Workspace ONE UEM to provision users from Entra ID using SCIM 2.0.
LDAP integration
Users can be synchronized with Workspace ONE UEM by integrating LDAP with an on-premises directory server (such as Active Directory) or with another Identity Provider that is also synced to Entra ID. In this case, an Immutable ID or Source Anchor is required to identify a user uniquely across all three systems – Workspace ONE UEM, Entra ID, and your LDAP directory. The attribute used as Immutable ID in Entra ID can vary but is typically mS-DS-ConsistencyGuid or objectGUID.
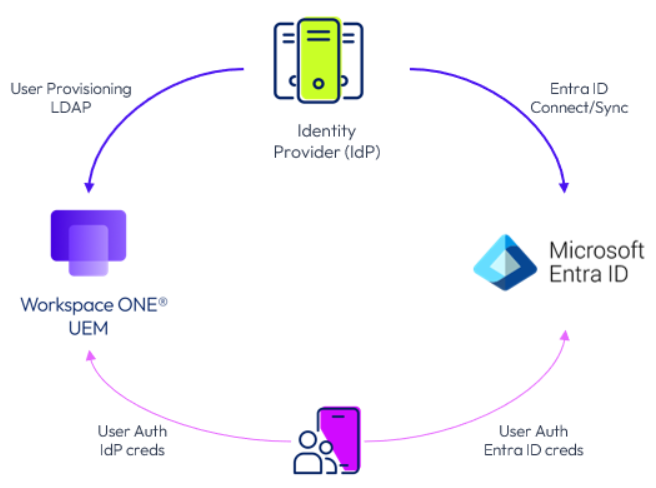
When an end-user authenticates using their Entra ID credentials to check out an iOS Shared Device through Intelligent Hub, the Immutable ID is used by Workspace ONE UEM to determine the user record in UEM that corresponds to the Entra ID account.
Conditional Access integration for iOS
To start, integrate Workspace ONE UEM with Entra ID for Conditional Access by following the steps in Configure Conditional Access Using Entra ID, ensuring that you have enabled:
- Workspace ONE Conditional Access as a compliance partner in Intune for iOS
- Use compliance data in Azure conditional access policies for iOS, Android, and macOS in Workspace ONE UEM
Enable shared device check out
In your Workspace ONE UEM console, navigate to the organization group where you have configured Conditional Access and go to Groups & Settings > All Settings > System > Enterprise Integration > Directory Services.
-
Under Advanced, enable Use Azure AD for Identity Services.
-
If your deployment type is LDAP Integration, specify the relevant Immutable ID Mapping Attribute and Mapping Attribute Data Type.
-
Enable Android Shared Device Check out.
Although the setting is labeled for Android, it also applies to iOS devices. When this option is enabled, you will be redirected to Entra ID in a new browser tab to grant administrator consent through OAuth for the Workspace ONE UEM MSAL SSO enterprise application registered with Entra ID (along with its required API permissions). You must sign in using an Entra ID administrator account and accept the permissions. Workspace ONE uses this application and its permissions to obtain users’ Entra ID attributes for Global Sign-in and Sign-out processes.
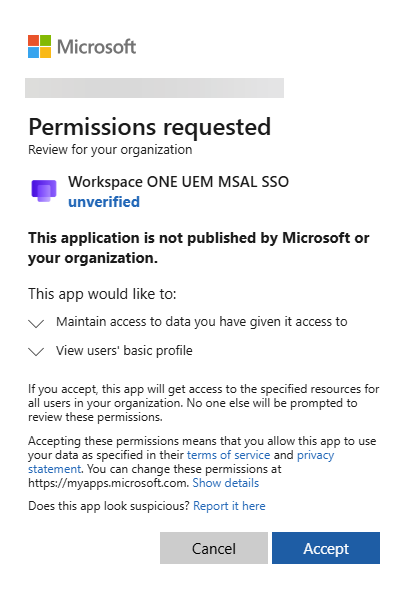
Once you accept the permissions, you can return to Workspace ONE UEM and save the Directory Services page.
- If your deployment type is LDAP Integration, you must perform Sync Attributes from the Directory Services > Users (Advanced) tab, after saving the Immutable ID Mapping Attribute so Workspace ONE UEM can retrieve the Immutable ID from your IdP.
Additional configuration for LDAP deployment
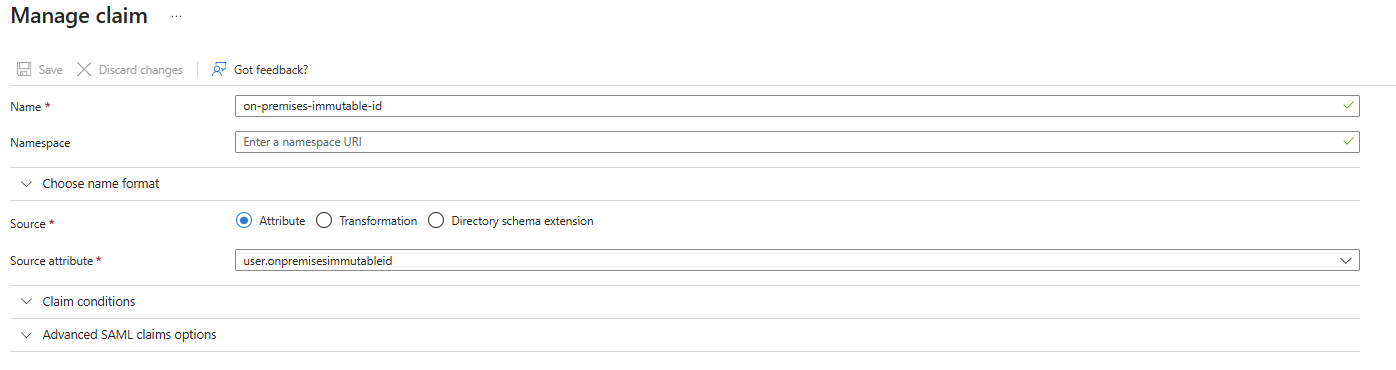
For LDAP Integration deployment type, administrators must configure Entra ID to issue the custom Immutable ID claim to Workspace ONE UEM when users authenticate during shared device checkout.
Add Immutable ID as a custom claim
You must add Immutable ID as a custom claim for the Workspace ONE UEM MSAL SSO application in Entra ID.
-
Log in to your Microsoft Entra ID Admin Console.
-
Navigate to Enterprise Applications and select Workspace ONE UEM MSAL SSO.
-
Open the Single Sign-On menu.
-
Select Edit next to Attributes & Claims.
-
Select Add New Claim.
-
In the Manage Claim blade, set:
- Name: on-premises-immutable-id
- Source: Attribute
- Source attribute:
user.onpremisesimmutableid
Add custom signing key to service principal
To issue custom claims like Immutable ID in a secure manner, administrators must add a custom signing key to their Workspace ONE UEM MSAL SSO service principal. Entra ID will use this key to sign claims issued to Workspace ONE UEM for this organization. The custom signing key consists of a public key file, a private key file, and the password used to decrypt the private key file.
Omnissa provides a PowerShell script that administrators can use to set the custom signing key. You may either:
-
Provide private and public key files (e.g. issued by your Certificate Authority)
-
Use a self-signed custom signing key generated by the script
When you run the script, an authentication prompt will appear requiring you to sign in with Entra ID credentials and authorize the PowerShell script. Ensure you use an Entra ID administrator account that has the permissions required to modify Entra ID applications for your tenant (e.g. Application Administrator role). For more information on custom signing keys, see Microsoft’s article on this topic.
Prepare to run the script
- Download the PowerShell script provided in Omnissa Customer Connect under the Workspace ONE UEM Seed Scripts section. Look for Set Custom Signing Key – Microsoft SSO under Product Downloads.
- Provide your own private-public key pair and download them as well.
- Launch PowerShell as an administrator.
- In the PowerShell Console, change to the directory where the script file is saved.
If you are using a self-signed custom signing key generated by the script:
-
Copy the following command
./setCustomSigningKey.ps1 -CertFriendlyName "XXX" -Password "XXX" -TenantId "XXX" -ApplicationObjectId "XXX" -SelfSigned “Y” -
In a text editor, replace XXX for all arguments in the command as follows:
-
CertFriendlyName: Set a friendly name for the custom signing key. The IssuedTo and IssuedBy fields for the self-signed will be set to
CN=$CertFriendlyName. -
Password: The password that the script will use to generate the self-signed private key.
-
TenantId: The Entra tenant ID for your organization.
-
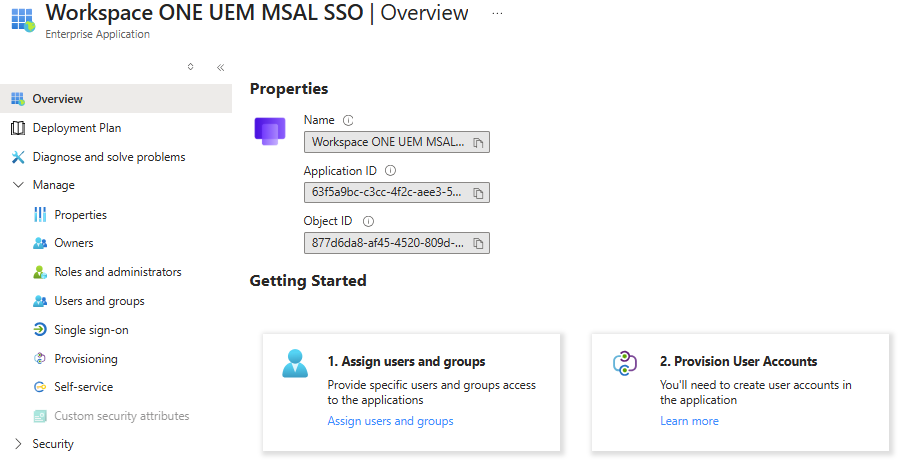
ApplicationObjectId: The ID of the Workspace ONE UEM MSAL SSO service principal added to your Microsoft Entra tenant. To find this value:
- Log into the Entra ID Admin Portal.
- Navigate to Enterprise applications.
- Select Workspace ONE UEM MSAL SSO.
- In the Overview tab, copy the Object ID.
If you are providing a public-private key pair that should be set as the custom signing key:
-
Copy the following command:
./setCustomSigningKey.ps1 -CertFriendlyName "XXX" -Password "XXX" -TenantId "XXX" -ApplicationObjectId "XXX" -cerFile "XXX" -pfxFile "XXX” -SelfSigned “N” -
In a text editor, replace XXX for all arguments in the command as follows:
-
CertFriendlyName: Set a friendly name for the custom signing key.
-
Password: The password of the private key file provided in pfxFile.
-
TenantId: The Microsoft Entra tenant ID for your organization
-
ApplicationObjectId: The ID of the Workspace ONE UEM MSAL SSO service principal added to your Microsoft Entra tenant. To find this value:
- Log into the Entra ID Admin Portal.
- Navigate to Enterprise Applications.
- Select Workspace ONE UEM MSAL SSO.
- In the Overview tab, copy the Object ID.
-
cerFile: The path to the public key file (.cer)
-
pfxFile: The path to the private key file (.pfx)
Run the script
- Copy the completed command and paste it in the PowerShell terminal.
- Run the command.
- When prompted, log in using an administrator account. The account must have the permissions required to manage applications for this Entra ID tenant.
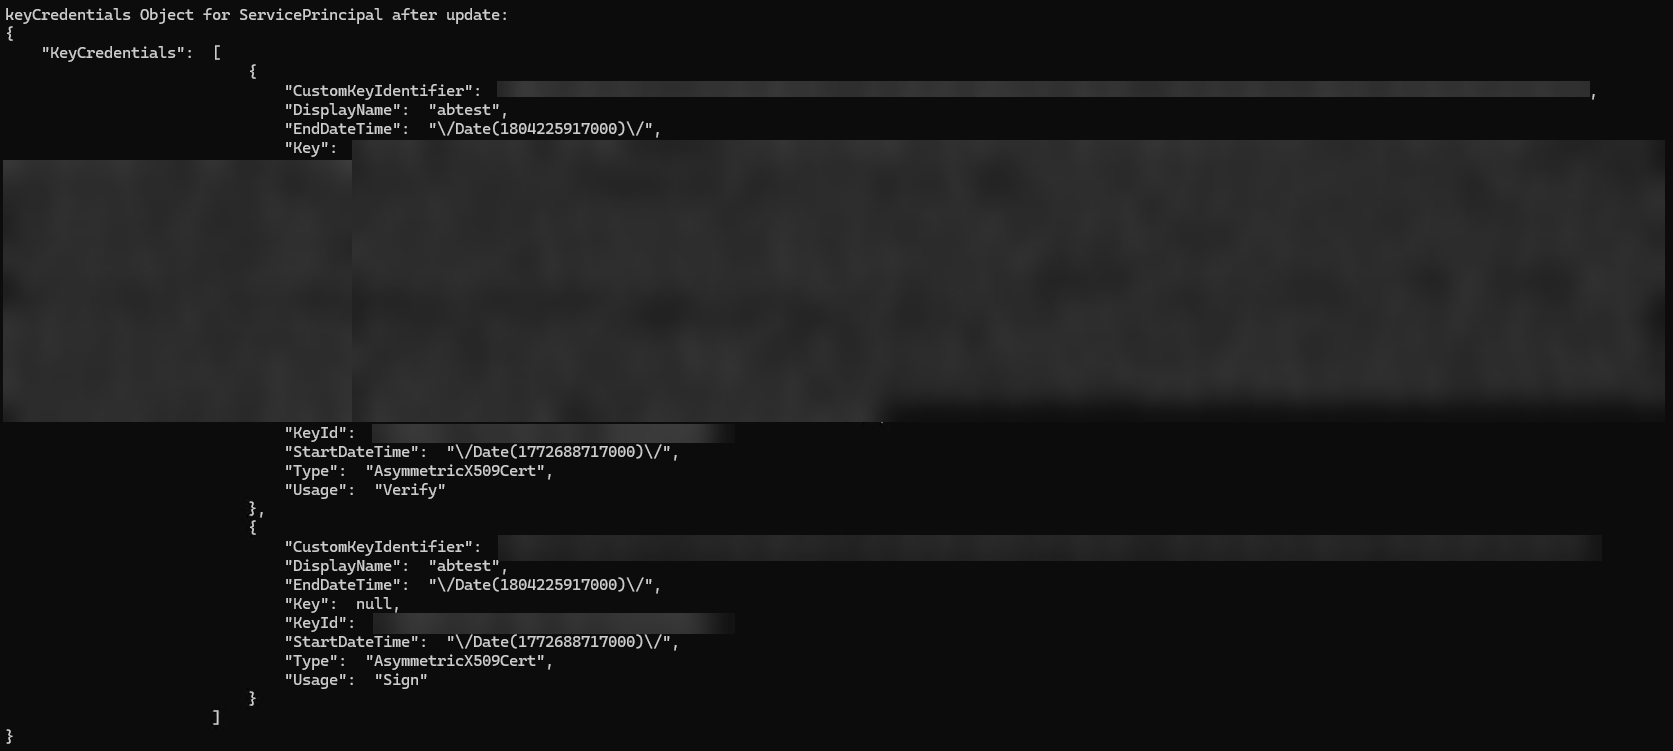
- A log will be printed showing the
keyCredentialsobject that was added to the service principal, including the public key, private key, and password (masked).
Enable Check‑In/Check‑Out using MSAL in Intelligent Hub
Perform the following steps to enable Check-in/Check-out using MSAL for Intelligent Hub.
- Navigate to Groups & Settings > All Settings > Devices & Users > Apple > Apple iOS > Intelligent Hub Settings.
- Enable Register as Shared Device with Azure for Conditional Access.
- Enable Check-in / Check-Out using MSAL.
- Click Save.
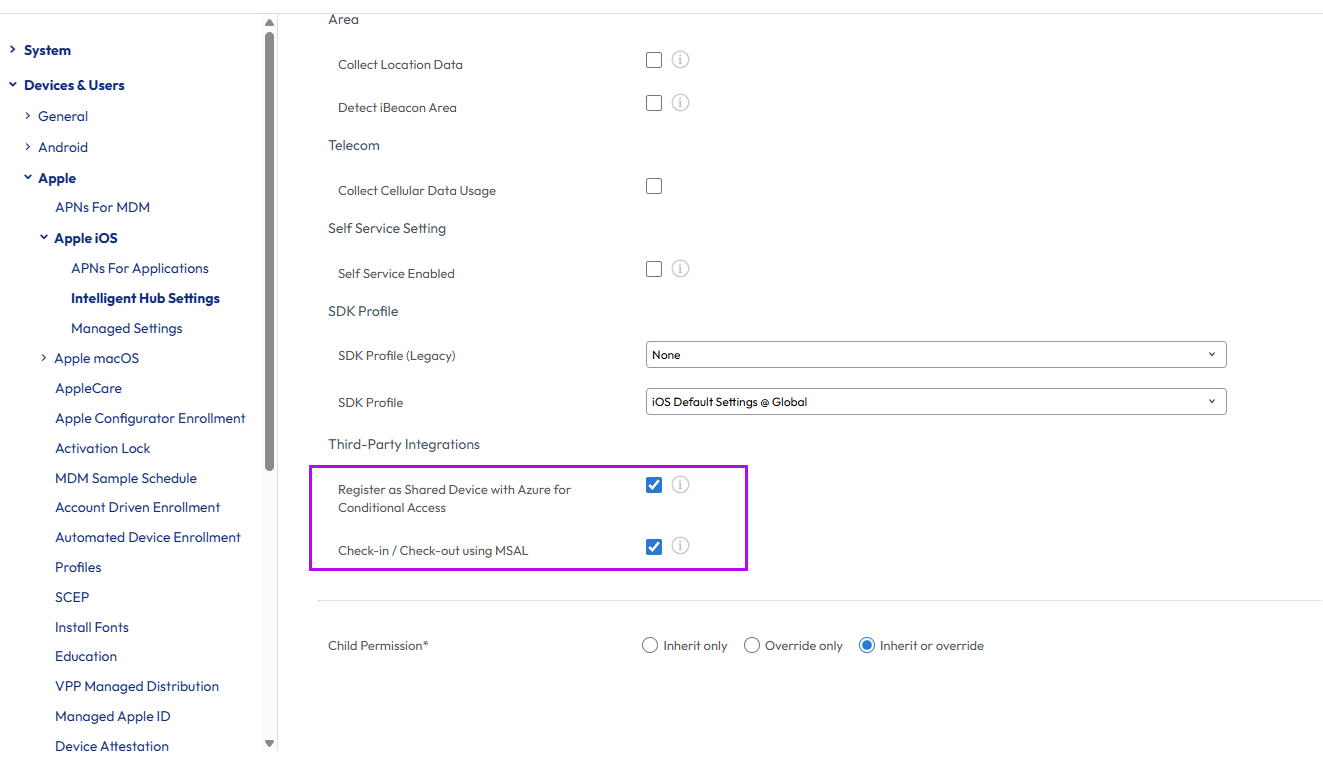
Ensure that your device is enrolled to the Organization Group where these settings are configured to ensure Intelligent Hub receives the configuration for Microsoft SSO.
iOS SSO Extension Profile for Authenticator Shared Device Mode
An iOS SSO Extension Profile must be deployed to relevant devices to configure Shared Device Mode registration for Microsoft Authenticator. This profile ensures delivery of the SDM registration token to Authenticator.
-
Under Resources > Profiles & Baselines > Profiles, Add a new iOS profile with Management Type set to Imperative and Context set to Device.
-
Provide an appropriate Name and Description.
-
Add the SSO Extension payload and configure the following values:
-
Extension Type: Generic
-
Extension Identifier:
com.microsoft.azureauthenticator.ssoextension -
Type: Redirect
-
URLs (one per row):
https://login.microsoftonline.comhttps://login.microsoft.comhttps://sts.windows.net
-
Additional Settings (Custom XML):
<dict>
  <key>device_registration</key>
  <string>{SharedDeviceRegistrationToken}</string>
</dict>
-
-
Assign the profile to the relevant Smart Groups, set Assignment Type to Auto (recommended) and Deployment to Managed.
-
Click Save and Publish.
Deploy and configure required applications
Intelligent Hub and Microsoft Authenticator must be installed on every shared device to leverage this feature. It is recommended that both applications are deployed to such devices through Workspace ONE UEM as a managed application, and remain installed when the device is Checked-in.
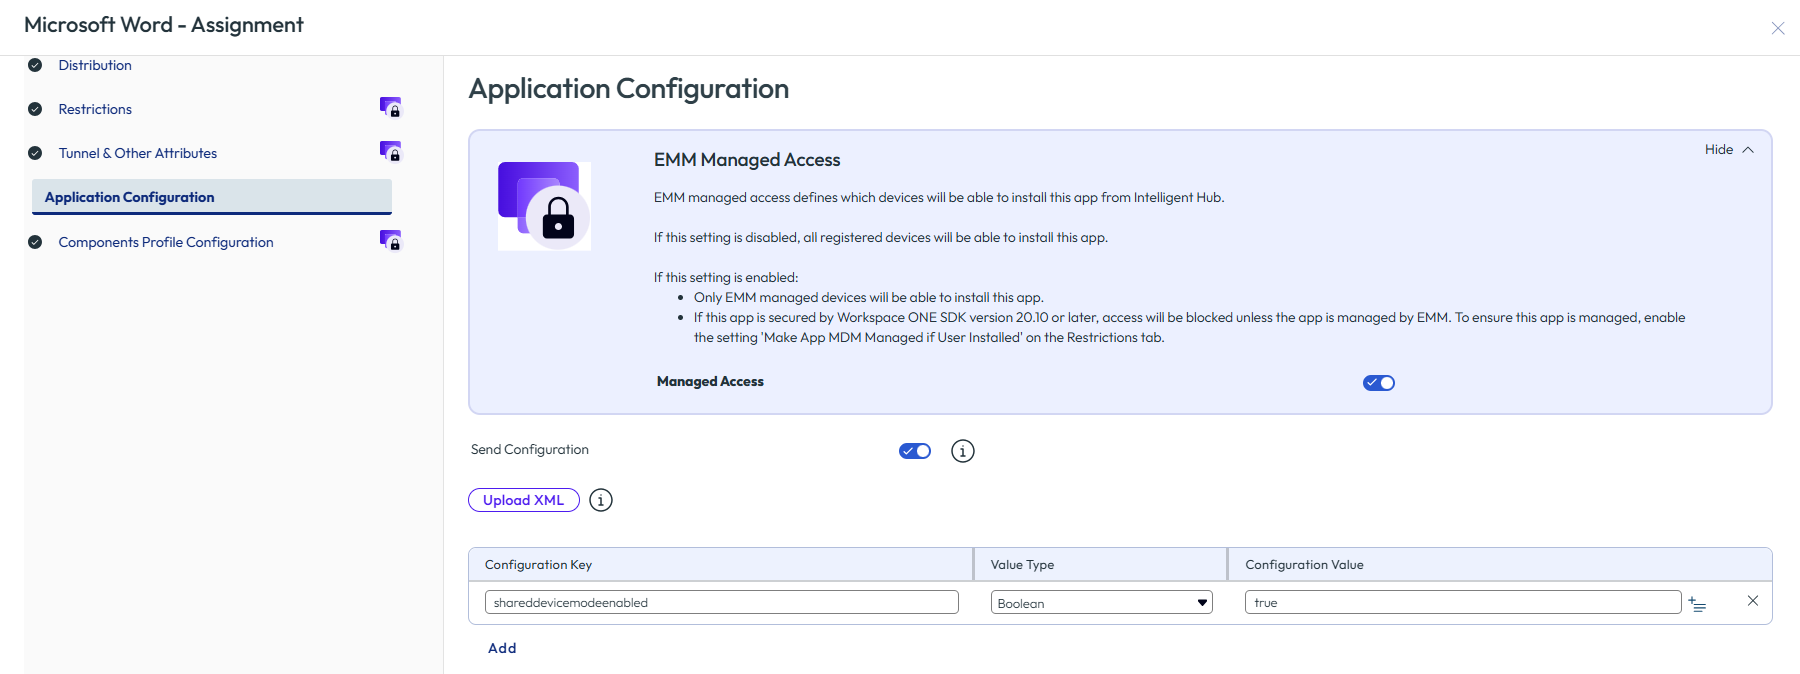
Any additional Microsoft applications needed by your end users should also be deployed using Workspace ONE UEM. Microsoft 365 applications (such as Unified Microsoft 365, Word, Excel, or PowerPoint) require additional application configuration:
-
Edit the assignment for the relevant Microsoft 365 application.
-
Click on the Assignment name.
-
Navigate to the Application Configuration page.
-
Enable Send Configuration. Add the following Configuration Key-Value pair:
- Configuration Key: shareddevicemodeenabled
- Value Type: Boolean
- Configuration Value: true
End-user experience
Global Sign-in
When you launch Hub to check-out a device and the organization group for check-out is determined, you will be redirected to Entra ID for authentication.
After successfully authenticating with Entra ID, you are logged into Intelligent Hub, and the device is checked out in Workspace ONE UEM. Additionally, you are logged-in to any other MSAL-enabled applications installed on the device if those applications support and are configured for Shared Device Mode (SDM). For example, in Microsoft Teams:
Global Sign-out
At the end of your shift, you have two options for initiating Global Sign-Out. Either of these methods will result in user's Entra ID account being cleared from all MSAL-enabled apps configured for Shared Device Mode, and the user being logged out of Intelligent Hub. This also checks the device back in to staging user in Workspace ONE UEM.
Hub-initiated Sign-Out
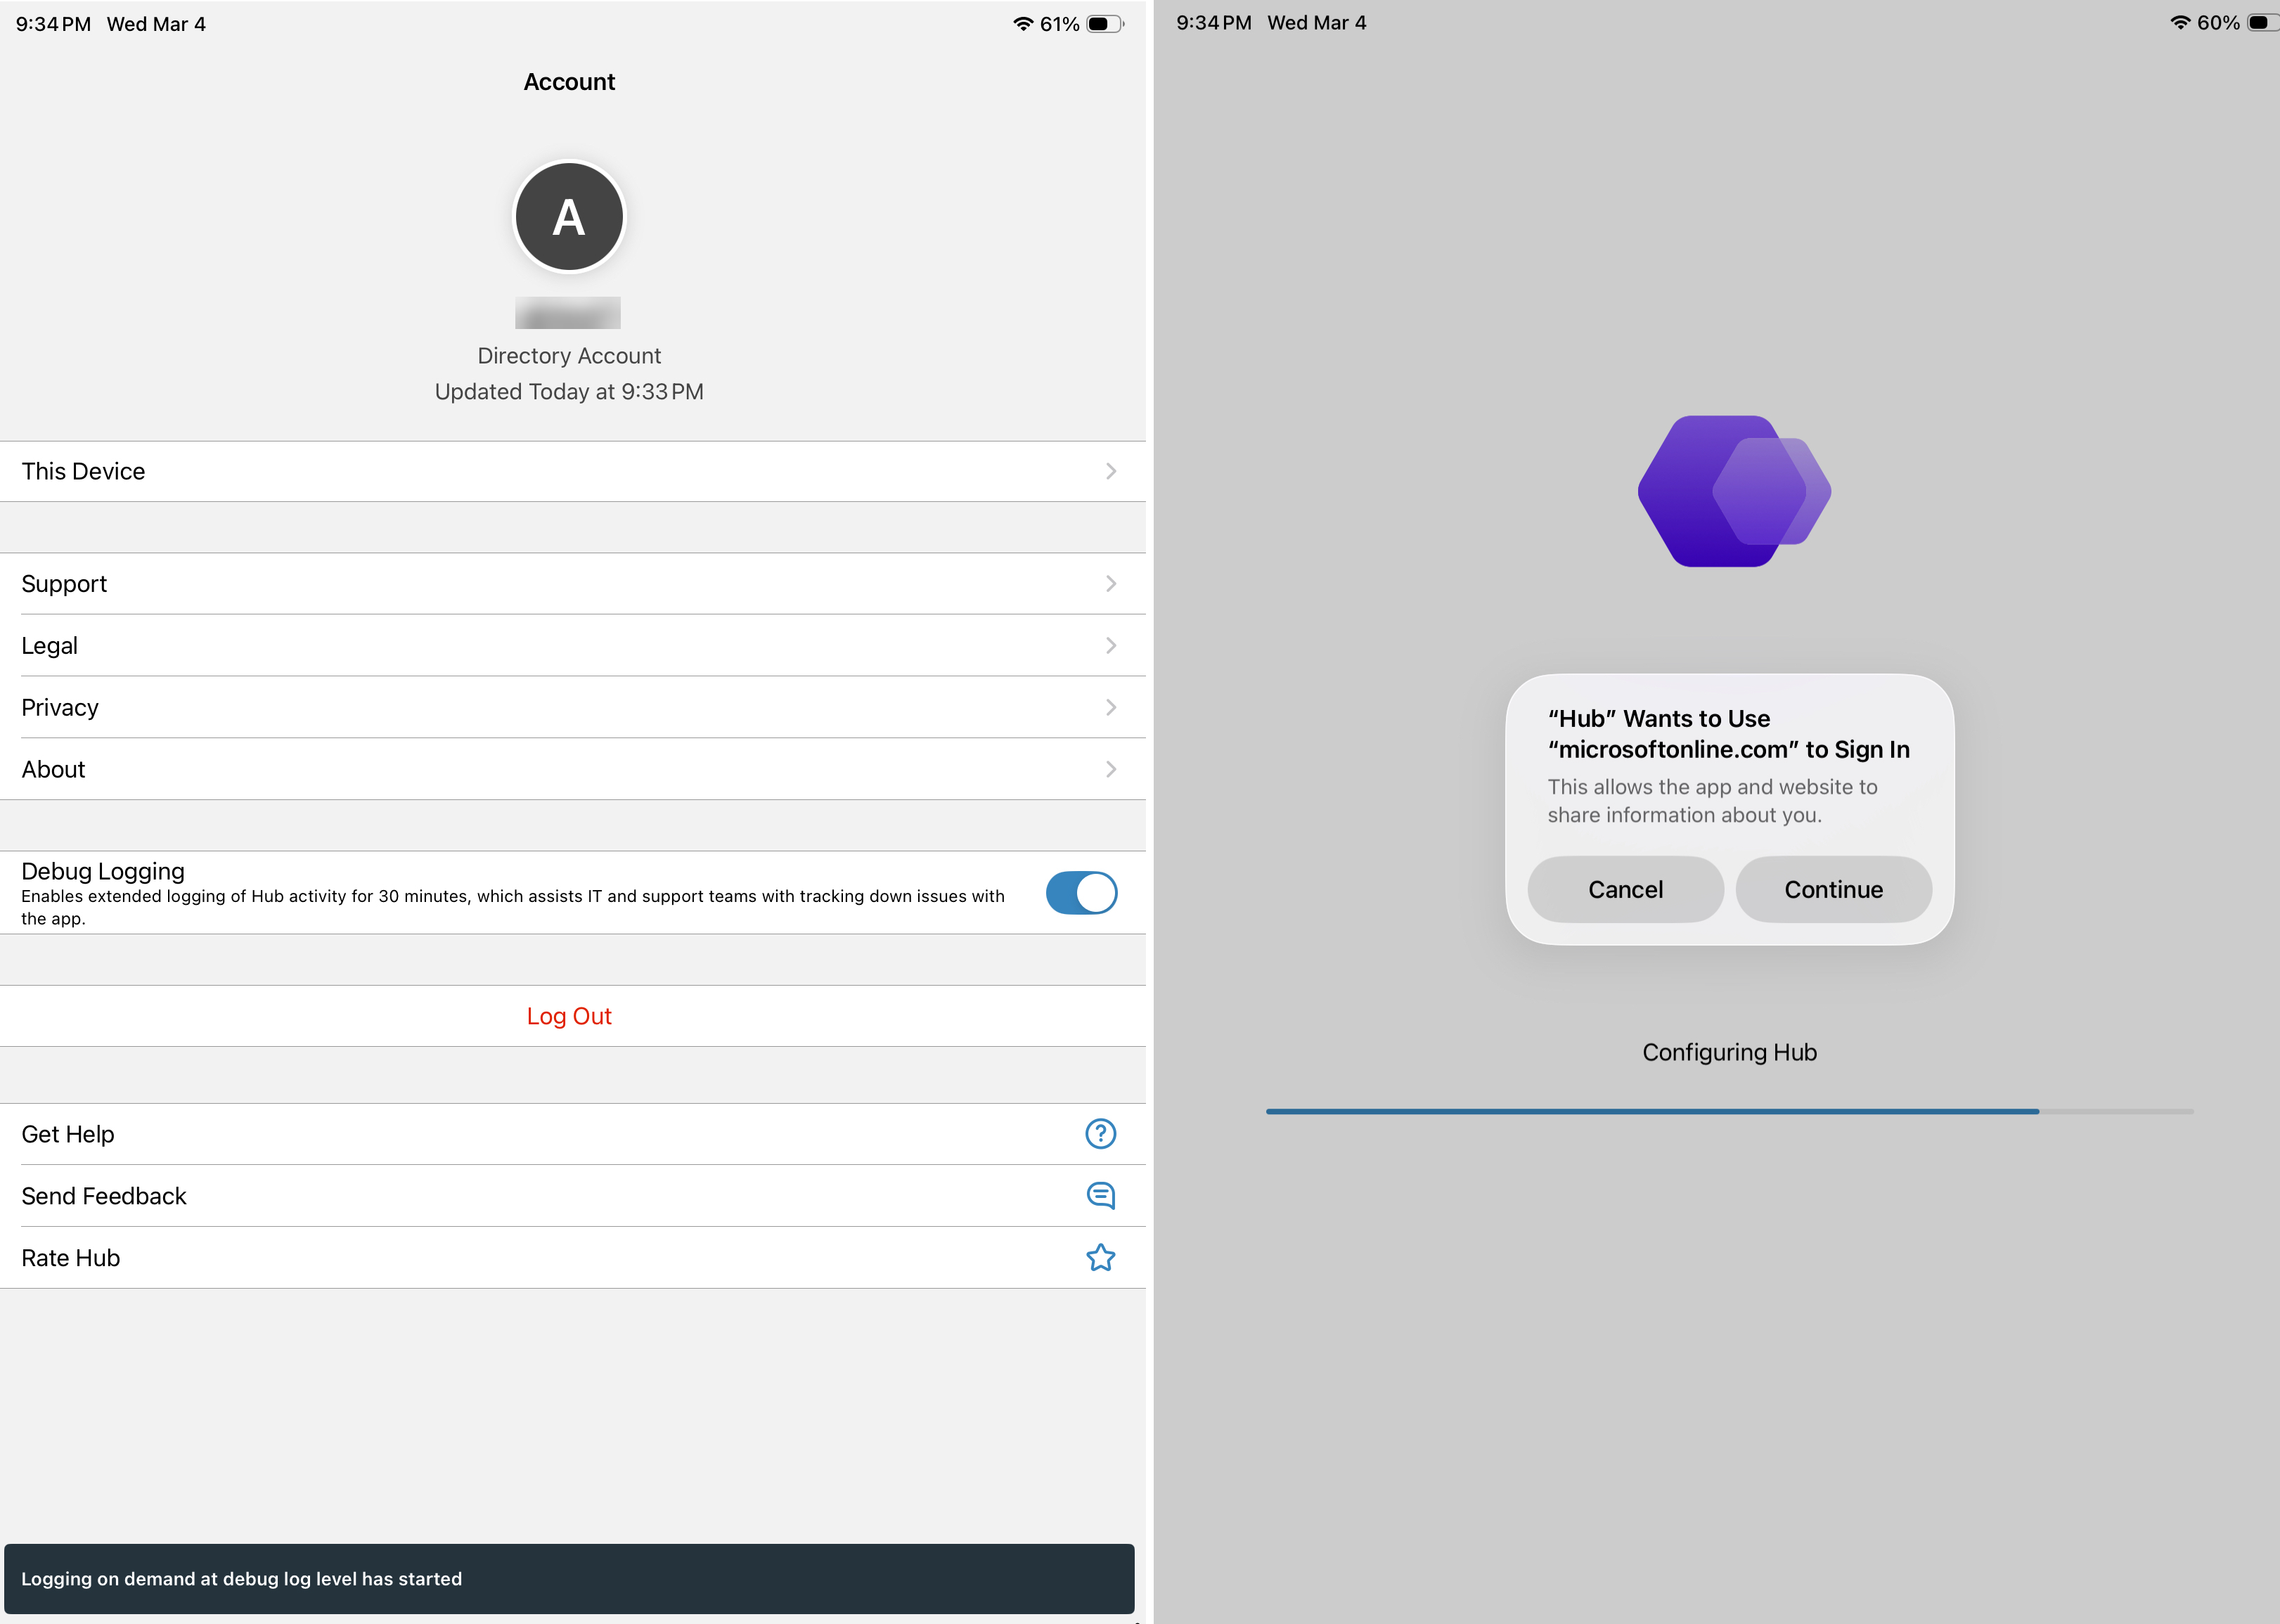
In this method, you open Hub and click Log Out. You are prompted to grant Hub permission to carry out a Global Sign-Out. After you click Continue, you are notified that your Entra ID account has been removed from the device.
MSAL-app initiated Sign-Out
Alternatively, the you may choose to sign out of your Entra ID account in an MSAL-enabled app (configured for Shared Device Mode). For example, you may sign-out of your account in Microsoft Teams. This clears your Entra ID account from other MSAL-enabled apps. When Hub is launched next, it logs the user out and checks the device back in to the staging user in Workspace ONE UEM.
Additional Information
Confirm SDM Registration
There are a few places to look to confirm that SDM registration is successful on a device:
SSO Extension Payload
Once you’ve configured the SSO Extension profile in Workspace ONE UEM and assigned it to your device, you can confirm it is installed from Workspace ONE UEM > Device Details > Profiles tab. When the profile is noted as Installed here, you can navigate to Settings > General > VPN & Device Management > Device Manager > More Details, on the device and look for the SINGLE SIGN ON EXTENSION payload’s presence for Authenticator.
At this stage, you will also see a new device record in Entra ID with the following properties:
- Name – 36-character GUID (Entra ID Device Identifier)
- Owner, User Principal Name - None
Authenticator and Workspace ONE UEM
After the SSO Extension payload is installed on the device, you are ready to perform the first Global Sign-in. During this first sign-in attempt, Authenticator consumes the Shared Device Registration token bundled within the SSO Extension payload and sets itself in Shared Device Mode. Global Sign-in can then proceed and once it is completed in Hub, Hub can relay the Entra ID Device Identifier and registration status to Workspace ONE UEM. You can expect the following:
- Authenticator shows “Shared Device Mode – This mode is designed for kiosk devices used by multiple shift workers.” In addition to the Entra ID Device identifier (matches the 36-character GUID seen as Name in Entra ID Confirm SDM Registration, above)
- Under Workspace ONE UEM > Device Details > Summary, the Security card shows successful Azure Active Directory Registration, and the Device Info card lists the Azure Device ID (i.e., the Entra ID Device Identifier)
The device is now successfully registered for Conditional Access, and you can look in the Device Details > Conditional Access Log for events that note the Compliance and Enrollment Status updates sent by Workspace ONE to Entra ID (via Intune)
Group Assignment Mode
On shared devices, whether the user is prompted to enter a Group ID in Hub for sign-in, is dependent on the Group Assignment Mode configured in Workspace ONE UEM. You can test by setting it, based on your needs, from Groups & Settings > All Settings > Devices & Users > General > Shared Device, to one of the following:
- Prompt User For Organization Group
- Fixed Organization Group
- User Group Organization Group
For additional details, refer to Device and User Shared Device Settings.
Troubleshooting
-
If a device that was previously SDM-registered needs to be re-enrolled, please delete the device record from Workspace ONE UEM and Entra ID, after unenrolling it and before re-enrollment. If the record from Entra ID is not deleted, Authenticator may continue to use a stale/cached Entra ID Device Identifier even after re-enrollment when the new SSO Extension payload is installed.
-
Enable the following in the assignment Restrictions for Microsoft applications, including Authenticator, and Intelligent Hub:
- Remove on Unenroll
- Make App MDM Managed if User Installed
- For Authenticator, enable “Prevent Application Backup”
-
During Global Sign-in, if there an issue is encountered with SDM Registration (which involves Hub, Authenticator, Entra ID, and Workspace ONE), the sign-in process may fail. In such cases, Hub may prompt the user to Sign-Out (as shown in Hub-initiated Sign-Out), and will then provide an option to Retry.
Was this page helpful?