Work in the Omnissa Connect consoles, Cloud Admin Hub (also known as Workspace ONE Cloud) and Cloud Services, to get your Workspace ONE products and services up and running. Work in the Cloud Services console to join your Cloud Admin Hub instance to Cloud Services. You then can create and manage user accounts in Cloud Services. In the Cloud Admin Hub console, you can federate your corporate domain to use your organization's SSO and identity source to sign-in to your Workspace ONE products and services. You can discover other Workspace ONE services, upgrade current services, try premium versions, and access Omnissa Tech Zone articles and other guide information to learn more about services you want to purchase.
Cloud Services product documentation
Find content about Cloud Services by accessing Omnissa Cloud Services Documentation. To learn about organization roles and permissions for Cloud Services, access Identity and Access Management.
Cloud Services console and the Cloud Admin Hub console are Omnissa Connect
At first, it can be confusing that there are two consoles to work in to get started. However, these consoles together are Omnissa Connect which is the gateway for your users to access your Omnissa products and services.
- Use the Cloud Services console to set up your Cloud Services organizations, your users' identities, and their roles and services.
- You perform many initial setup steps in this console.
- Use Workspace ONE Cloud console (also called Cloud Admin Hub) to access and launch your Omnissa services.
- You can discover new services from this console.
Log in to the Cloud Services console
- Read your service welcome email.
- After you make your subscription purchase (either through Sales or through your partner) or after you request a trial, the system sends you a service welcome email to the email ID associated with the order or trial request.
- Your Welcome to Workspace ONE email includes your unique service activation link.
- If you haven't seen the email, check your spam messages or corporate spam filter. The unique service activation directs you to the Cloud Services console. It is important to use this service activation link when you log in to the Cloud Services console for the first time.
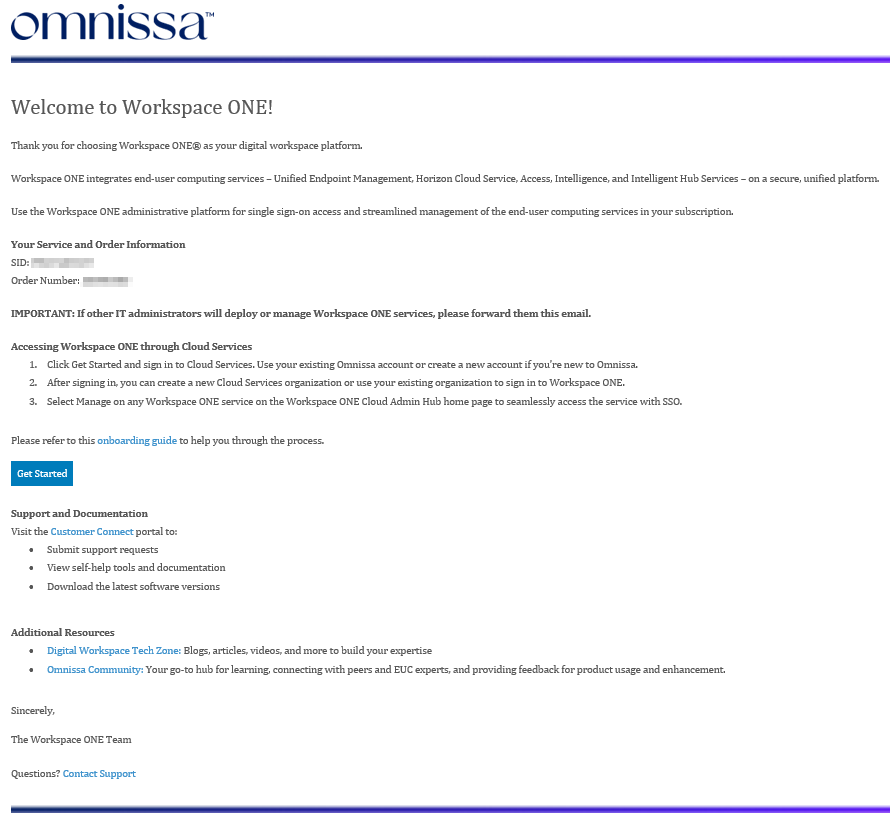
- If you still cannot find the email, ask your Sales Specialist to resend the email or to provide you with the service activation link.
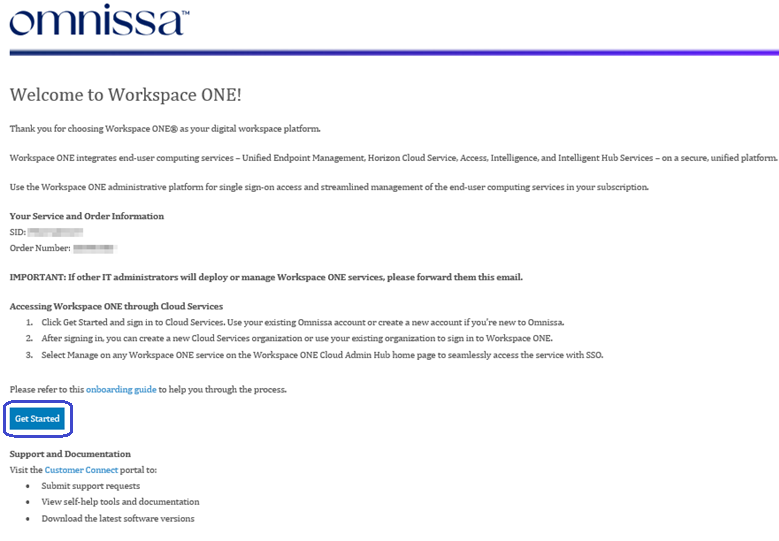
- Select the service activation link provided in the Get Started button in the welcome email.
- Use the email and password from your Omnissa account to log in.
- If you do not have an Omnissa account, create one and fill in all mandatory fields.
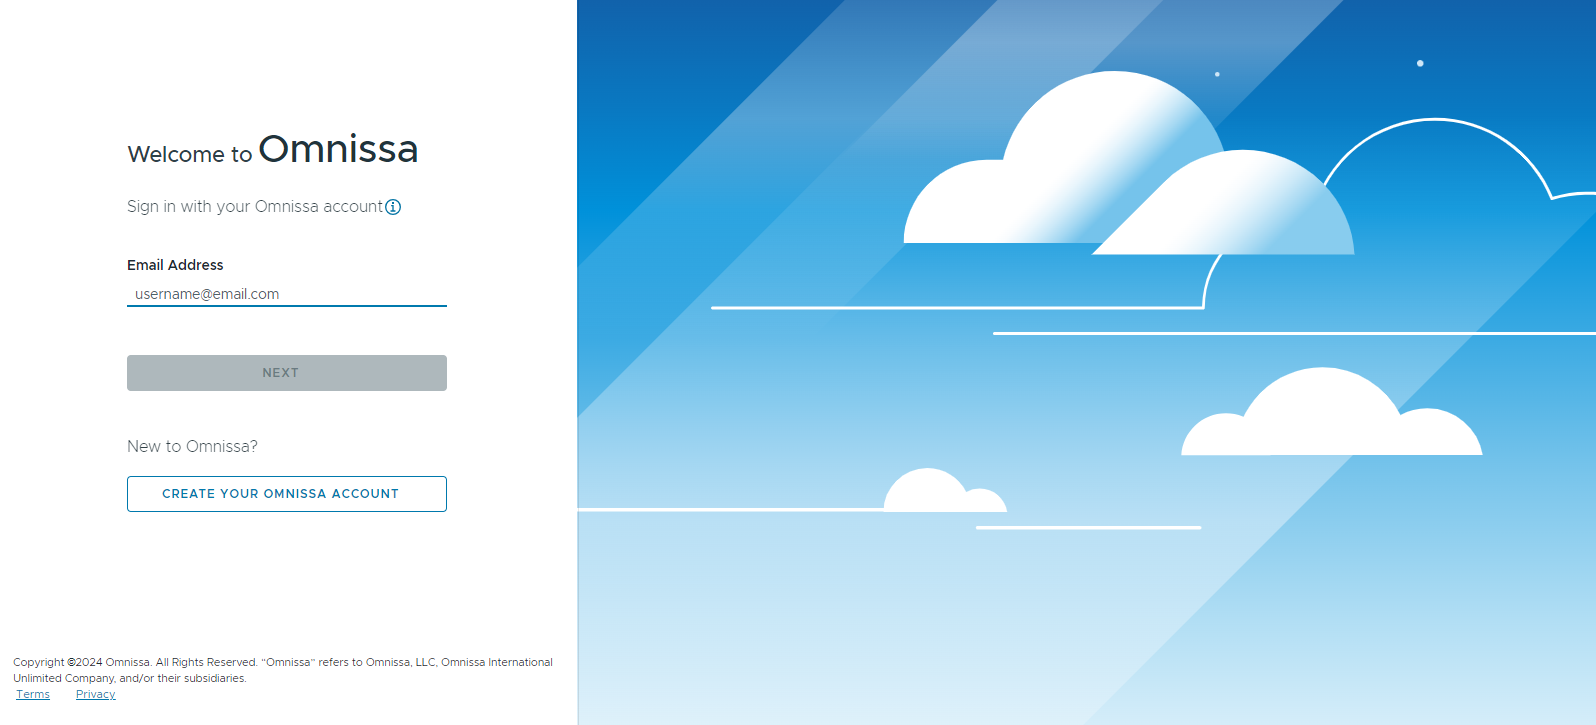
- If you do not have an Omnissa account, create one and fill in all mandatory fields.
Join your Cloud Admin Hub to a Cloud Services Organization
A Cloud Services Organization is a container for all your services, and Cloud Services uses organizations to control access to your Omnissa services. To access a service, you must belong to an organization. For details about organizations in Cloud Services, access the topic Managing Cloud Services Organizations.
To join an organization, attach or join your Cloud Admin Hub to a Cloud Services Organization so that you can access the Cloud Admin Hub console.
After logging in to the Cloud Services console, you might see a list of organizations that you already have access to. This list can include organizations associated with services outside of Workspace ONE. Having access to organizations associated with and outside of Workspace ONE gives you the option to join your subscription with an existing organization or to create a new organization.
(Option 1): Join to an existing organization
There are several benefits for you as an organization owner to having multiple subscriptions in a single organization.
- Combines multiple Workspace ONE subscriptions into a single view.
- Reduces the number of organizations you manage in Cloud Services.
By selecting an existing organization that includes other Workspace ONE service subscriptions, the services you are currently adding combine with services in the existing subscription. You now have a single view of your Workspace ONE services.
For example, if there is an existing subscription for Horizon and Access services and you have a new subscription for Workspace ONE UEM, then selecting the organization that includes Horizon and Access to use for the new UEM subscription combines all subscriptions. The organization now includes Horizon, Access, and UEM in a single view.
Considerations
Before you add your current subscription to an existing one, view the considerations to see if this process meets your needs.
- For those instances that must have their Workspace ONE subscriptions managed separately, create a Cloud Services organization and do not use an existing one.
- If your new subscription has Workspace ONE UEM, the process of selecting an existing organization that also includes Workspace ONE UEM is not currently supported.
- You cannot select an existing organization that is associated with an expired Workspace ONE subscription. Contact Customer Connect to help with an expiration issue.
- You cannot select an existing organization that is associated with a different region from your region. Contact Customer Connect to help with product region issues.
Procedure
- Log into the Cloud Services console.
- You see a list of organizations, ones that you created for other Workspace ONE subscriptions.
- Take one of the listed actions.
- If you see the desired organization in the current list, select the organization and then select Proceed To Service.
- Selecting this menu item associates your new subscription with your current Workspace ONE subscriptions in the selected organization.
- The action directs you to the Cloud Admin Hub console.
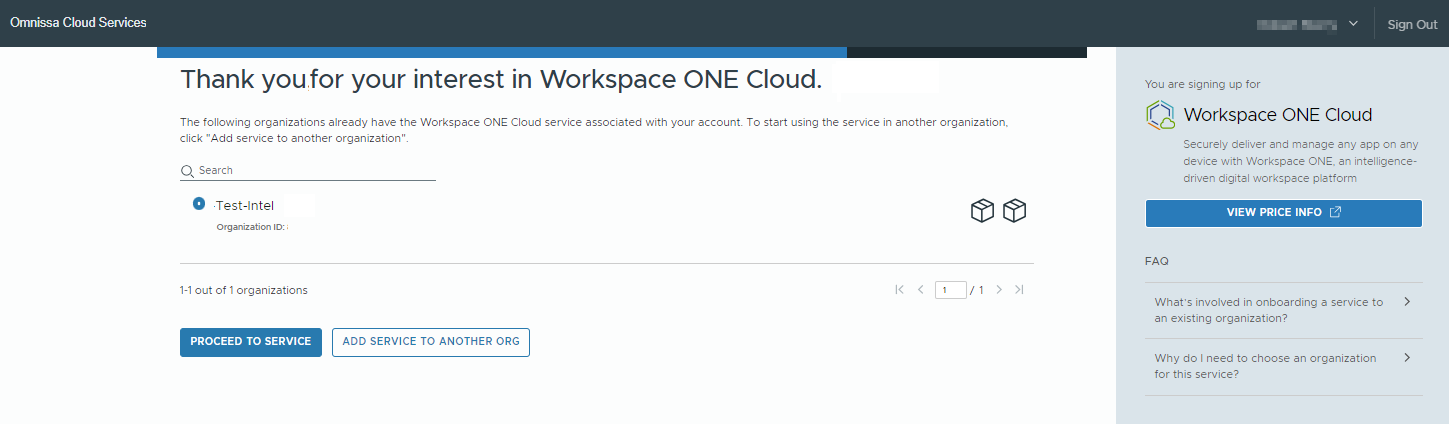
- If you do not see the desired organization in the current list, and you want to see a list of all organizations that you are a member of, select Add Service To Another Org.
- Selecting this menu item takes you to a list of all organizations of which you are a member. These organizations might or might not be associated with Workspace ONE services.
- You can select an organization from the list if you are the owner of that organization.
- Select Continue to associate your new Workspace ONE subscription to the selected organization. The action directs you to the Cloud Admin Hub console.
- If you see the desired organization in the current list, select the organization and then select Proceed To Service.
(Option 2): Create a new Cloud Services Organization
There are several reason why you create an organization rather than joining to an existing one. Create a new organization in these listed scenarios.
- This subscription is your first Workspace ONE subscription.
- The new subscription requires its own admin management experience.
- Some Workspace ONE subscriptions are managed by independent admin groups.
- Admin groups require separate and independent Cloud Admin Hub consoles for the subscriptions they manage.
- You want to keep the new subscription segregated for future billing and support reasons.
Procedure
- Log into the Cloud Services console.
- Select Create Organization.
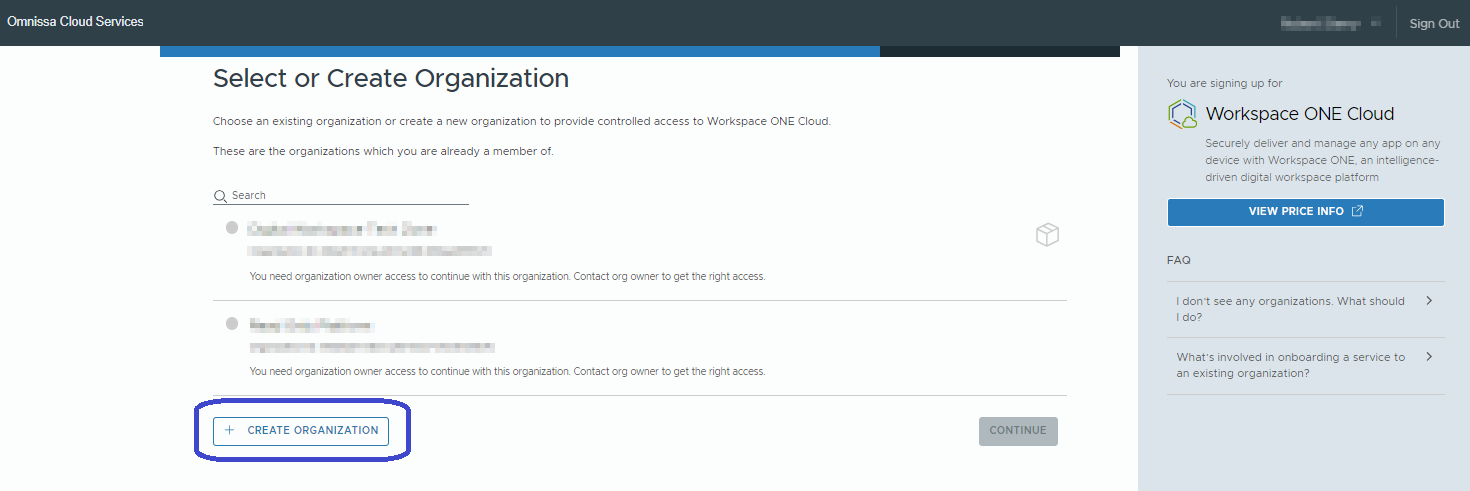
- Enter a name for the organization.
- Agree to the terms of service and complete the organization setup.
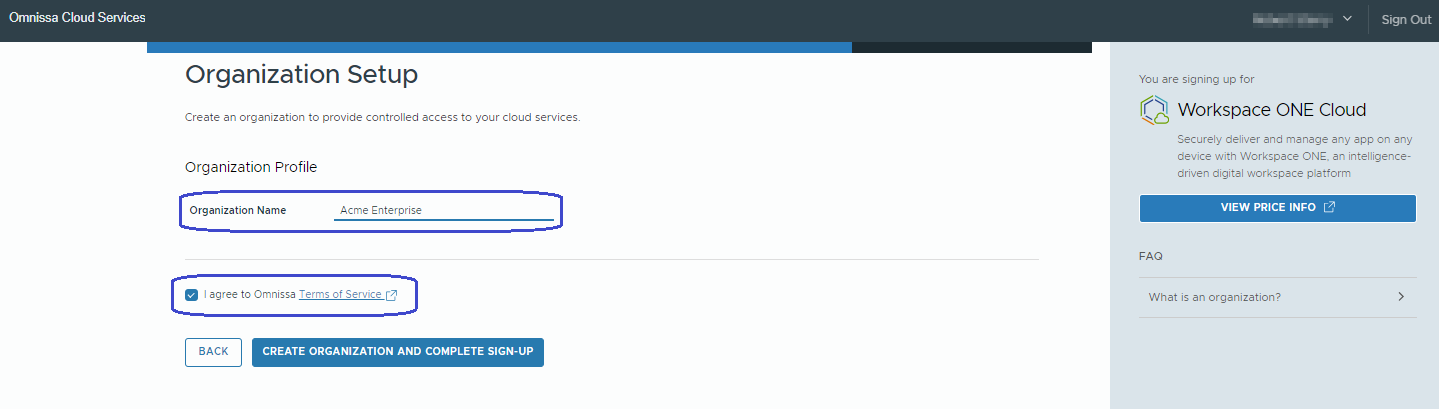
- Select Create Organization and Complete Sign-Up. The action directs you to the Cloud Admin Hub console.
Access your Workspace ONE services
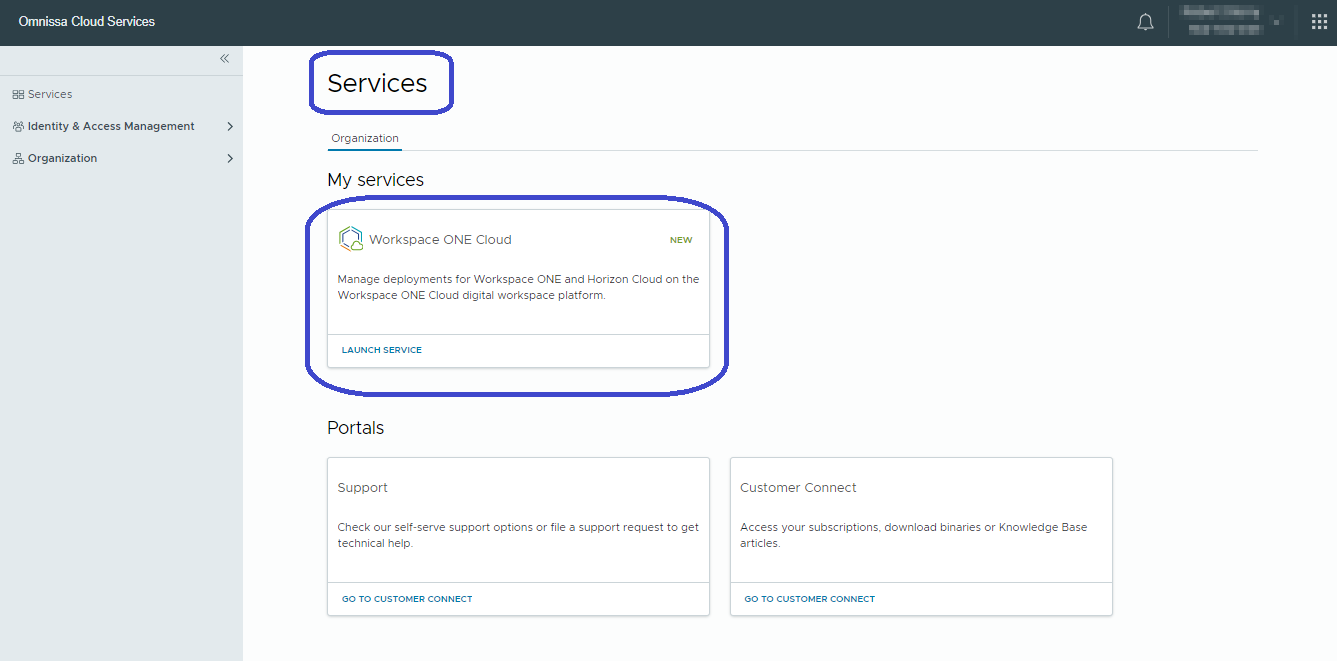
You can access Workspace ONE services in the Services area of the Cloud Services console.
- In the Cloud Services console, launch the Workspace ONE Cloud service. This console is also called the Cloud Admin Hub.
- Service tiles have an SSO capable link and they log you into the respective console.
- The system creates a user account in the service console using your Cloud Services organization and service role.
- In the Cloud Admin Hub console, go to Workspace > My Workspace.
- Select the My Services filter to see the services you are entitled to use based on your subscription purchases.
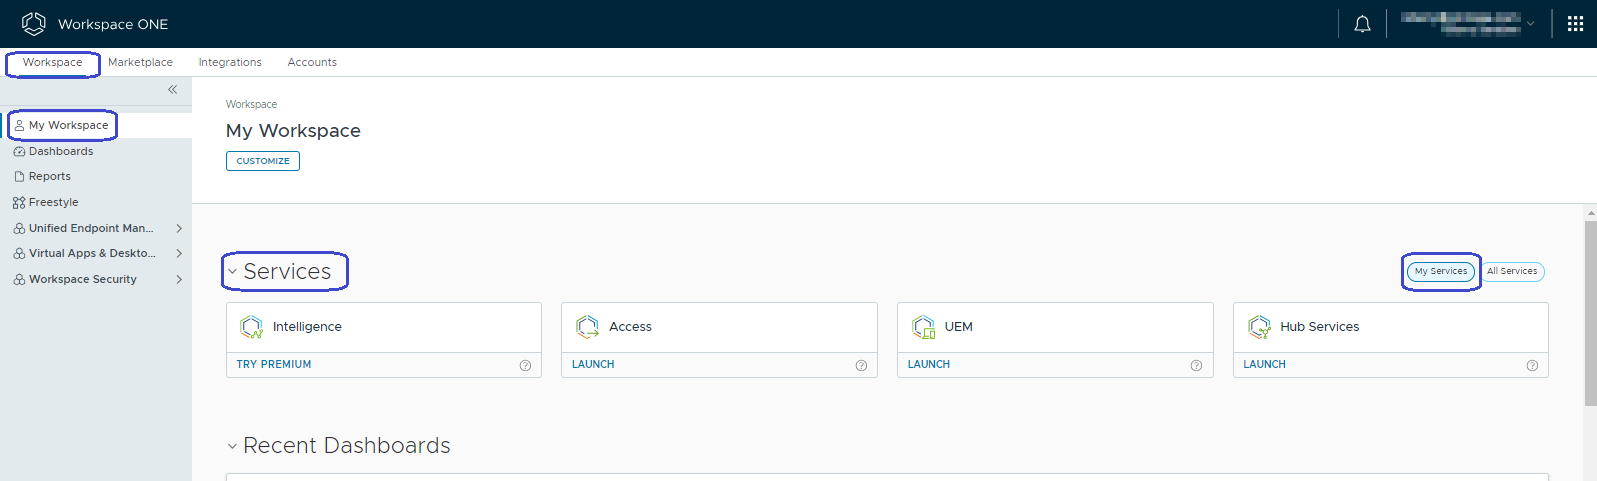
- These service tiles are SSO enabled links.
- The tiles sign you into your service console using the identity established in Cloud Services.
- To log in, select the tile and the system logs you into your service console.
- You can also discover other services using the All Services filter.
Invite new users and assign them organization and service roles
When you select the initial activation link and create a Cloud Services Organization, the system creates an account for you with an Organization Owner role.
As an organization owner, you can invite additional users to your organization and assign them organization and service roles. Organization roles activates the user as a member of the organization. You can also assign them additional organization roles if applicable. Assigning a service role controls the access permissions (admin or basic) the user has to the organization and to the services within the organization.
Note: Unlike owners, users with organization roles cannot invite others to an organization.
Procedure
- In the Cloud Services console, go to Identity and Access Management > Active Users. You see a list of all the users currently in your organization.
- Select Add Users and complete the Add New Users settings.
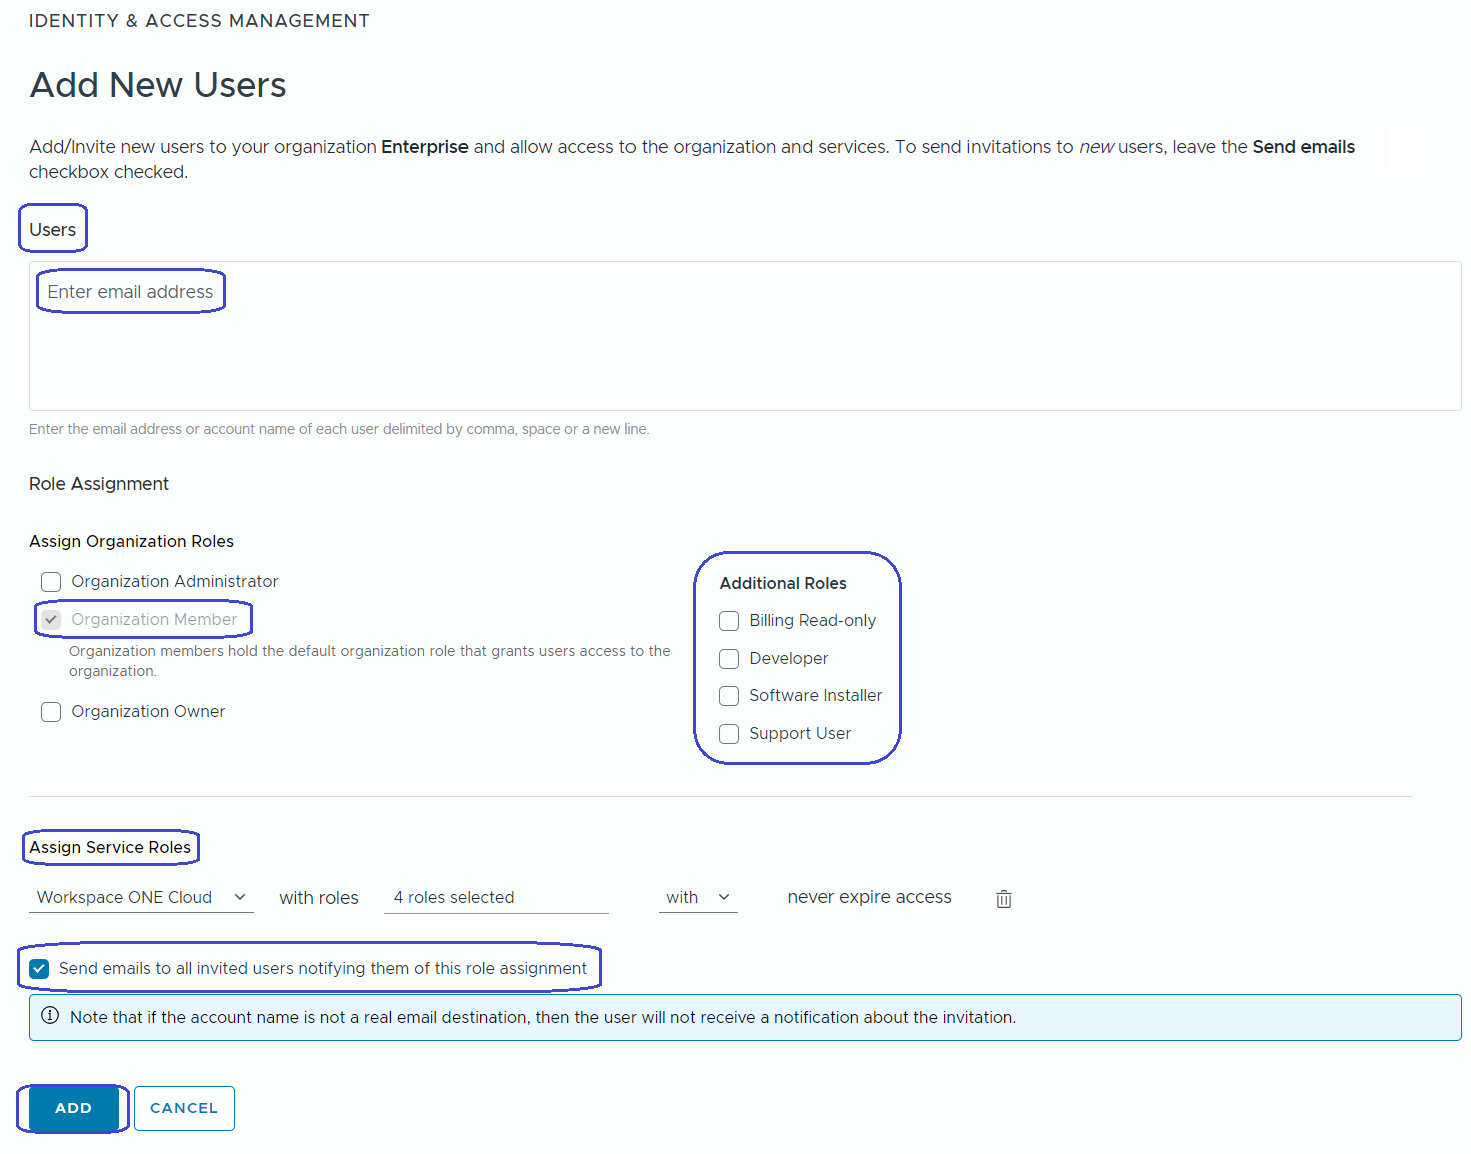
- Enter an email address for each user you want to add, separated by a comma, space, or a new line.
- Select Organization Member as an organization role (if it is not selected by default) and choose additional roles if desired.
- In the Assign Service Roles area, select + Add a Service.
- Select Workspace ONE Cloud from the drop-down, and select a service role.
- Admin: Provides full access to Cloud Admin Hub and provides access to all entitled Workspace ONE services.
- Basic: Provides read-only access to Cloud Admin Hub and provides read-only access to all entitled Workspace ONE services.
- With: Allows the user to keep the service role indefinitely.
- Until: Restricts how long the user can access the permissions in the service role to an end date you configure.
- Select Send emails to all invited users notifying them of this role assignment. Email recipients can use these emails to activate their accounts.
- Select Add to complete the process.
Federate user access to Cloud Services
Working in the Cloud Admin Hub console, you can activate single sign-on for your users to access Cloud Services by federating multiple corporate domains. Use a self-service workflow to configure federation with Cloud Services. The workflow supports integration with SAML 2.0 based identity providers.
To learn more about the federation process, access Setting Up Enterprise Federation with Cloud Services.
Requirements
Setting up Enterprise Federation is a highly secure task so we have created a special role for this task. It is called the Enterprise Administrator role. As an organization owner, you must invite and assign someone to fill the Enterprise Administrator role. This person must have permissions to manage your corporate Active Directory or identity provider system. You can invite yourself if that person is you.
Procedure
Work in the Cloud Admin Hub console (Workspace ONE Cloud) to access the federation workflow.
- In the Cloud Admin Hub console, go to Workspace > My Workspace and scroll down to the Getting Started area.
- Select the Federate access to Cloud Services tile.
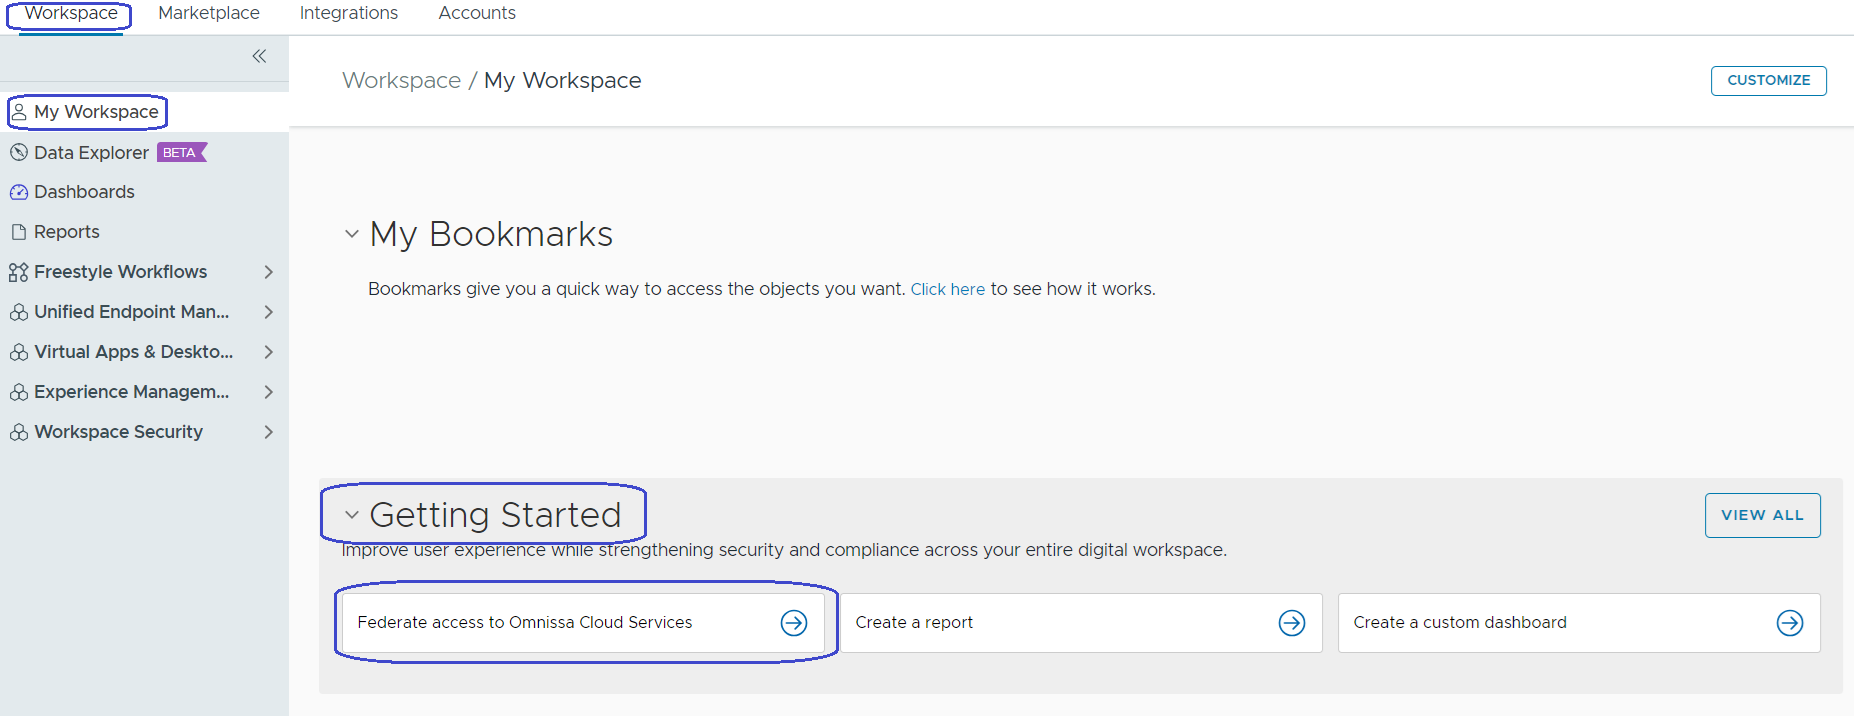
- Enter the email address of the person who manages your corporate Active Directory or identity provider system.
- The person who manages your corporate Active Directory or identity provider system accepts the invitation and is now the Enterprise Administrator. The system navigates the person to a sign-up page for Cloud Services.
- The Enterprise Administrator signs into Cloud Services.
- The Enterprise Administrator can start the federation flow following these steps.
- Verify your domains and sub-domains.
- Install a connector that connects to your on-premises Active Directory system.
- Sync users and groups.
- Configure your identity provider.
- Validate and finish set up.
Results
Your admin users can use your corporate identity to access Cloud Services.
Discover additional Workspace ONE services
In the Cloud Admin Hub console, you can discover additional Workspace ONE services.
- In Cloud Admin Hub, go to Workspace > My Workspace > Services.
- Select the All Services filter.
- You can upgrade services, launch services, and try premium versions from these tiles.
- Some of these services may provide free trials that offer a hands-on experience. Use the free trials to validate your use cases. Contact Sales or your partner if you are interested in any of these other services.
Find guides on the Getting Started page
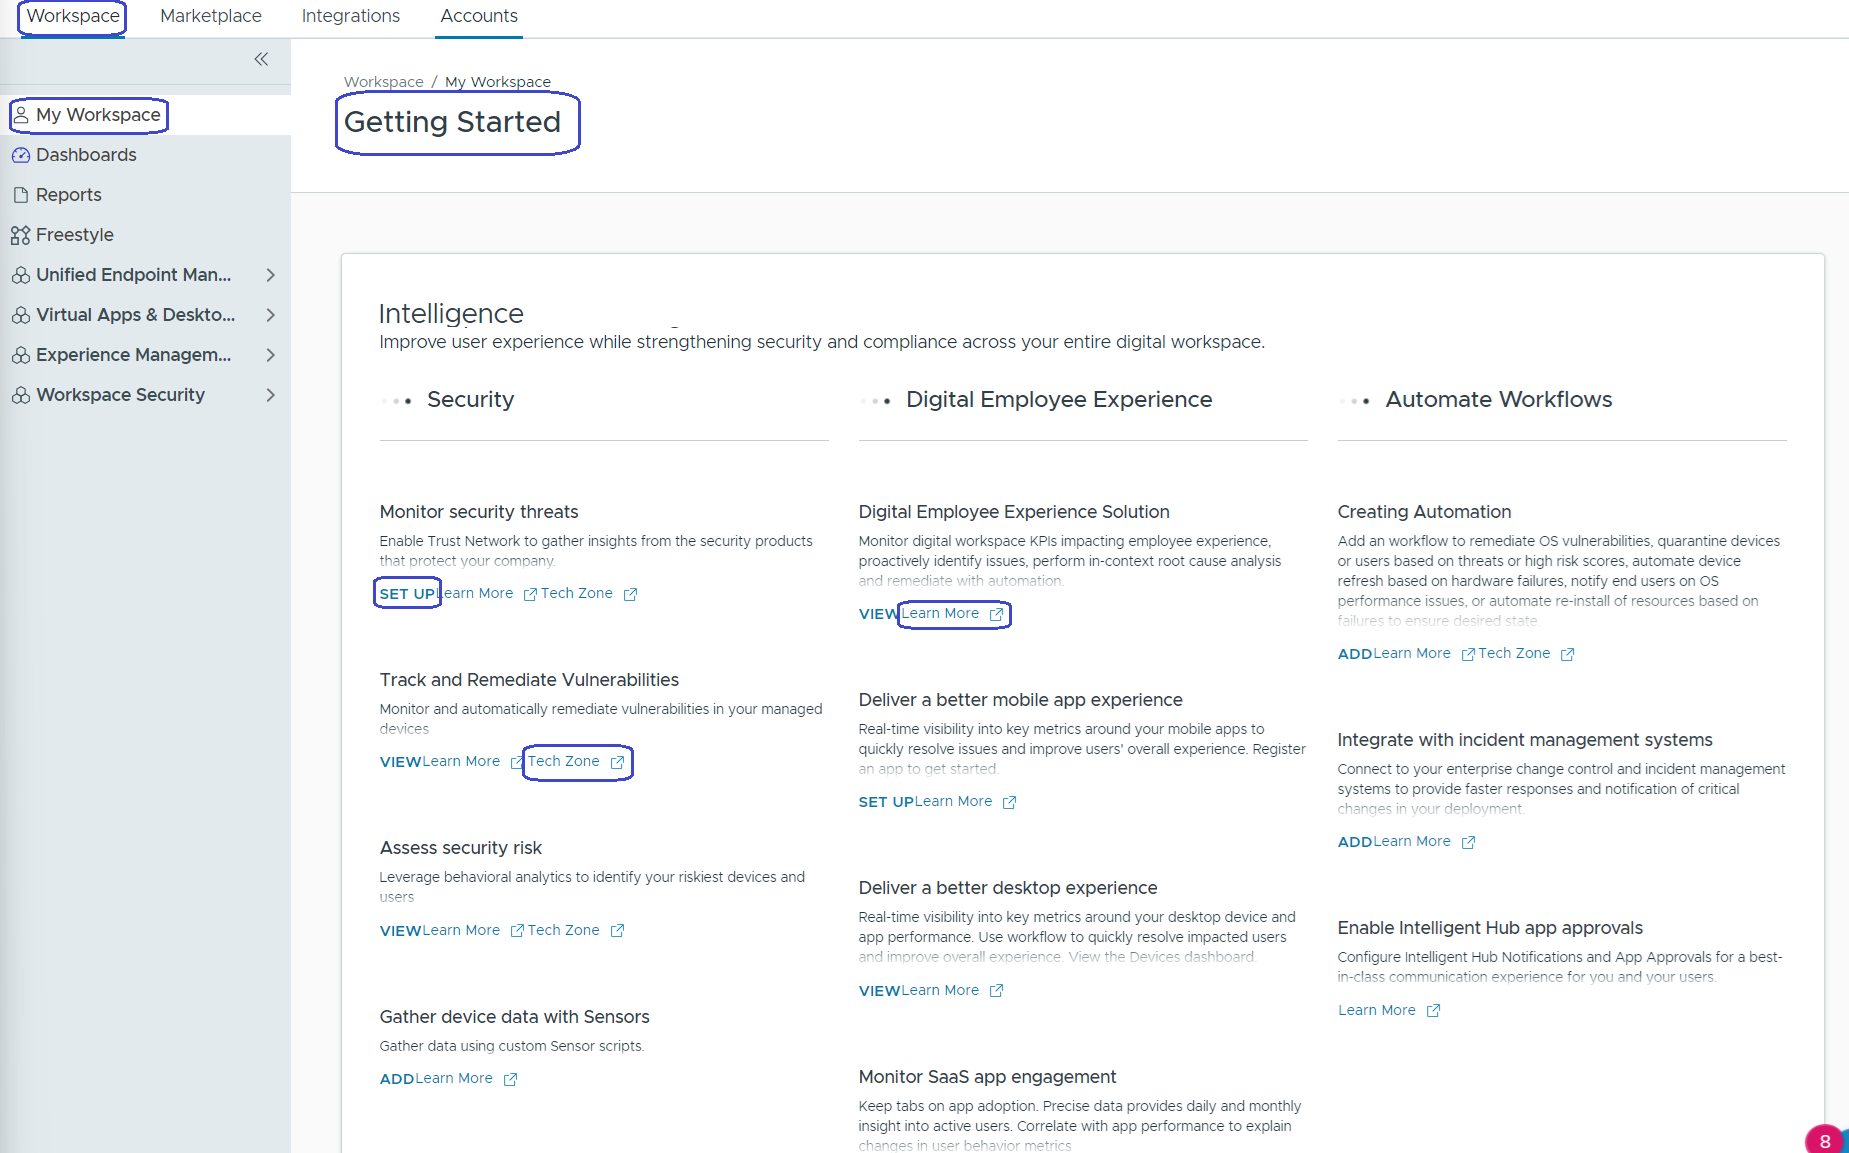
In the Cloud Admin Hub console, you can find many helpful guides to get started with various Workspace ONE services on the Getting Started page. The page displays processes available to you depending on your Workspace ONE subscriptions.
- In the Cloud Admin Hub console, go to Workspace > My Workspace and scroll down to the Getting Started area.
- Select View All.
- Select Learn More or Tech Zone to find information on the service. You can also use Set Up to configure a service.
Was this page helpful?