Admin groups enable you to assemble subsets of administrator accounts for assigning roles and permissions beyond the permissions that come from having an admin account in Workspace ONE UEM.
Admin groups can be used to assign roles and permissions granting access to the console that is specific to a special project. You can add your existing directory service administrators into admin groups or create admin groups from scratch using custom queries.
For example, if you have a new business directive, you might need to assign special admin access to a group of training facilitators. You might create an admin group, run a custom query for training facilitators, and assign a role that is specific to the new business effort. For more information, see Admin Accounts.
Admin Groups List View
The Admin Groups List View page in features useful tools for common user group maintenance and upkeep. Such upkeep includes adding, viewing, merging, and deleting user groups and missing users.
View this page by navigating to Accounts > Administrators > Admin Groups.
Display the Edit Admin Group page by selecting the hypertext name in the Group Name column of the list view. Use this page to change the name of the admin group. You can also add and remove roles that are applicable to group members. For more information, see the Admin Roles section in Role Based Access.
Display the Admin Group Members listing by selecting the hypertext link number in the Admin column. This listing shows you the names of all the administrators in the admin group.
You can also download a CSV (comma-separated values) file of the Admin Groups List View. You can then view and analyze this file with MS Excel. Select the Export button then navigate to Monitor > Reports & Analytics > Exports to view and download the resulting report.
Access the following actions and maintenance functions by selecting the radio button next to the group name.
| Action | Description |
|---|---|
| Sync | Copy recently added admin group users to the temporary table, manually, ahead of the scheduled, automated Active Directory sync by Workspace ONE UEM. |
| More Actions | |
| View and Merge | View, Add, and Remove users recently added to the temporary admin group table. Admin group administrators that appear in this table await the automated Workspace ONE UEM admin group sync. |
| Delete | Delete an admin group. |
| Top, Up, Down, Bottom | You can edit the ranking of each admin group as it appears in the listing. Moving the groups in this way is useful for when you have more admin groups than a single page can display. |
| Add Missing Users. | Combine the temporary admin group table with the Active Directory table, making the addition of these new admins in the group official. |
Add Admin Groups
You can add admin groups in Workspace ONE UEM to assign additional roles and permissions to your admins for special projects by taking the following steps.
-
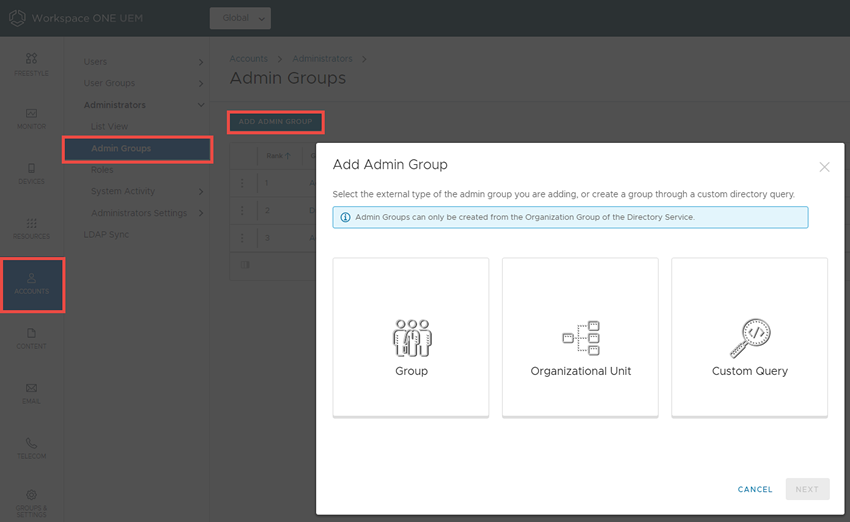
Navigate to Accounts > Administrators > Admin Groups and select Add Admin Group. Complete the applicable settings.
Setting Description External Type Select the external type of admin group you are adding.
* Group – Refers to the group object class on which your admin group is based. Customize this class by navigating to Groups & Settings > All Settings > System > Enterprise Integration > Directory Services > Group.
* Organizational Unit – Refers to the organizational unit object class on which your admin group is based. Customize this object class by navigating to Groups & Settings > All Settings > System > Enterprise Integration > Directory Services > Group.
* Custom Query – You can also create an admin group containing administrators you locate by running a custom query. Selecting this external type replaces the Search Text function but displays the Custom Query section.Directory Name Read-only setting displaying the address of your directory services server. Domain and Group Base DN This information automatically populates based on the directory services server information you enter on the Directory Services page (Accounts > User Groups > Settings > Directory Services).
Select the Fetch DN plus sign (+) next to the Group Base DN setting, which displays a list of Base Domain Names from which you can select.Search Text Enter the search criteria to identify the name of an admin group in your directory and select Search to search for it. If a directory group contains your search text, a list of group names displays.
Also, you can apply default roles to the admin group you are creating. After a successful search is run, select the Roles tab and then select the Add button to add a new role. Or edit an existing role by changing the Organization Group and Role selection.
This setting is available only when Group or Organizational Unit is selected as the External Type.Custom Object Class Identifies the object class under which your query runs. The default object class is 'person' but you can supply a custom object class to identify your admins with greater accuracy.
This setting is available only when Custom Query is selected as External Type.Custom Base DN Identifies the base distinguished name which serves as the starting point of your query. The default is 'airwatch' and 'sso' but you can supply a custom base distinguished name if you want to run the query from a different starting point.
This setting is available only when Custom Query is selected as External Type.Group Name Select a Group Name from your Search Text results list. Selecting a group name automatically alters the value in the Distinguished Name setting.
This setting is available only after you have completed a successful search with the Search Text setting.Distinguished Name Read-only setting that displays the full distinguished name of the admin group you are creating.
This setting is available only after you have completed a successful search with the Search Text setting.Rank Read-only setting that displays the rank of the admin group once it is created. You can change an admin group's rank by navigating to Groups & Settings > Groups > Admin Groups and moving its relative position using the More action button  to the right of the admin group listing.
Auto Sync This option enables the directory sync, which detects user membership from the directory server and stores it in a temporary table. An administrator approves all changes to the console unless the Auto Merge option is enabled. Auto Merge Enable this option to apply sync changes automatically from the database without administrative approval. Maximum Allowable Changes Use this setting to set a threshold for the number of automatic admin group sync changes that can occur before approval must be given.
This option is available only when Auto Merge is enabled.Add Group Members Automatically Enable this option to add administrators automatically to the admin group. Time Zone Enter the time zone associated with the admin group. This required setting impacts when the scheduled, automated Active Directory sync runs. Locale Select the localization setting (language\ associated with the admin group. This setting is required. Initial Landing Page Enter the initial landing page for administrators in the admin group. The default setting for this required setting is the Device Dashboard but you can set it to any page of your choice. Custom Query Query This setting displays the currently loaded query that runs when you select the Test Query button and when you select the Continue button. Changes you make to the Custom Logic option or the Custom Object Class setting are reflected here. Custom Logic Add your custom query logic here, such as an admin name. For example, "cn=jsmith". You can include as much or as little of the distinguished name as you like. The Test Query button allows you to see if the syntax of your query results in a successful search before selecting the Continue button. For more information on Distinguished Name, search for Microsoft's TechNet article entitled "Object Naming" at https://technet.microsoft.com/.
-
Select Save.
Note: If you receive an error message "This door is locked," while trying to add an admin group, then you must add a new resource permission to your administrator role.
- Navigate to Accounts > Administrators > Roles and select the pencil icon next to the role you want to edit.
- In the Search Resources text box, enter the following resource permission name: Settings Directory Services. The Enterprise Integration resource displays.
- Select the Details link next to the Enterprise Integration listing. The Settings Directory Services displays.
- Enable this setting by adding a check mark to the Edit check box.
- Select Save
For more information, see the knowledgebase article https://kb.omnissa.com/s/article/90165.
Was this page helpful?