There are two parts to enable session Multi-Factor Authentication (MFA) with SAML. First you will set up the SAML configuration in the Omnissa Workspace ONE UEM console and then you will configure your Identity Provider (IDP) settings for use with Omnissa Workspace ONE Tunnel.
SAML is the standard for transferring identity data between two parties like an identity provider (IdP) and a server provider (SP) by providing a single point authentication that allows your users to only sign in one time to be able access multiple service providers.
From your Workspace ONE UEM console, navigate to Security → Tunnel → Gateways. The Tunnel Configuration settings page lists all the Tunnel configurations setup at the Organization Group.
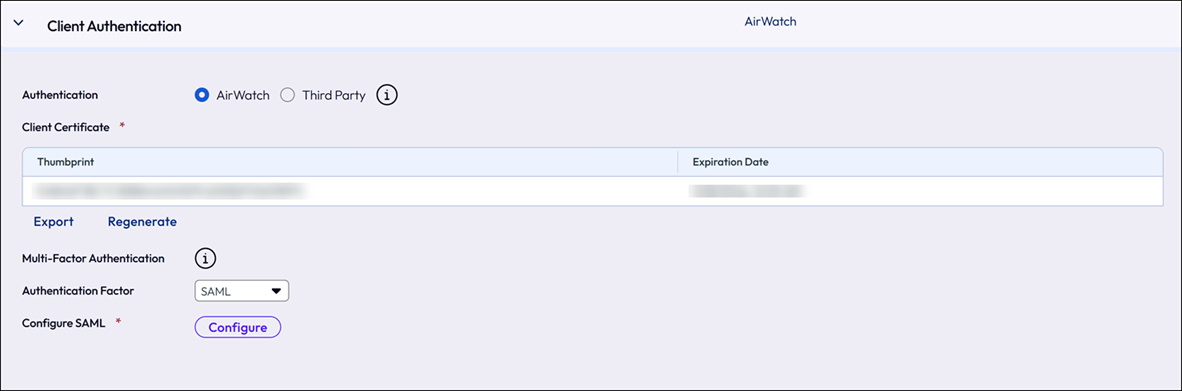
Edit the Tunnel configuration for which you are configuring MFA and provide MFA information under the Client Authentication section.
-
In the Client Authentication section, select SAML from the Authentication factor's drop down menu.
-
Click Configure to upload the IDP metadata. The metadata file type should be XLM.
-
Enter the Application ID as setup on IDP.
Workspace ONE Tunnel Profile
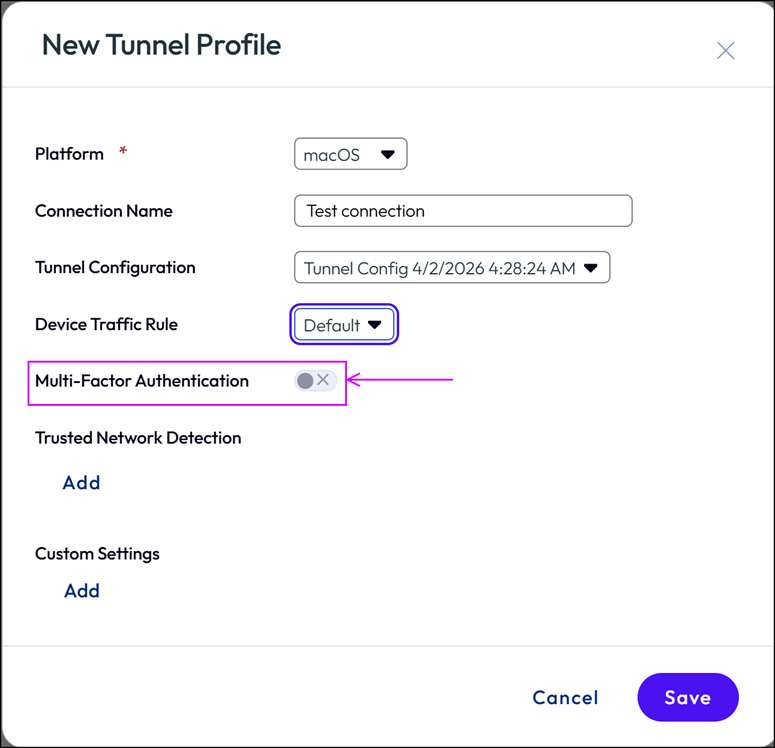
The Tunnel profiles for both MDM and Standalone enrollment will show a toggle to enable Multi-Factor Authentication (MFA) but the support will vary based on the platform type. Once the toggle is enabled and the profile is saved, all clients that receive this profile will be enabled for MFA.
Platform Enrollment Support for MFA: Multi-factor authentication is supported for all platforms - iOS, Android, Windows, and macOS and for both MDM and Standalone mode of enrollment.
Device Traffic Rules (DTR) Configuration
Set the following configurations based on your platform type.
For Windows: Per-App Tunnel Mode- No action is required. Full Device Tunnel Mode- If the Default Rule is TUNNEL, add a Rule with Rank 1 to Bypass the IDP-related domains. If the default rule is BYPASS, no additional action is required. Configure other rules per requirement.
For macOS: The macOS client in Standalone mode currently does not support Per-App Tunnel mode. Full Device Tunnel Mode- No action is required.
For iOS: No action is required.
For Android: No action required.
Optional Custom Settings
There are two KVPs that control the MFA session timeout.
-
The validity of the session token will equal the
mfa_session_timeoutvalue from the time of initial authentication. At the end of this period, any existing session will disconnect and the user will have to re-authenticate. -
If there is a need to extend any existing session beyond the token expiration, you can add the
mfa_graceperiodKVP.
| Key | Default Value | Customizable | Notes |
|---|---|---|---|
mfa_session_timeout | 12 hours | Yes | - Default applies if the key-value pair is missing. - Sessions valid for 60 mins if set to 0. |
mfa_graceperiod | Not Defined | Yes | - (Optional) Must be a positive, non-zero value. - Unit is in minutes. |
Identity Provider Configurations
We currently support Workspace ONE Access, OKTA, and Microsoft Azure IDPs. Support for other IDPs is on our roadmap. Here is how to set up your Workspace ONE Access tenant for use with Workspace ONE Tunnel for this feature.
Workspace ONE Access
-
Log in to Workspace ONE Access Admin page.
-
Select Resources.
-
Select New.
-
Update the Name & Description.
-
Upload the tunnel icon if required.
-
Click Next.
-
-
Configuration
-
Set the authentication type to SAML 2.0 and configuration type to Manual.
-
Update the Single Sign-On URL to:
HTTPS://{TunnelserverHostname}:{TunnelServerPortinUEM}/tunnel -
Update the Recipient URL to:
HTTPS://{TunnelServerHostname}:{TunnelServerPortinUEM}/tunnel-
TunnelServerHostname is the public FQDN for the tunnel server.
-
This is the same hostname configured with the UEM console for the Tunnel configuration.
-
-
Set the Application ID to WS1Tunnel.
- You may provide a different Application ID. Please enter the same Application ID while uploading the SAML Metadata within WS1 UEM.
-
-
Access Policies.
- Select the access policy as desired.
-
Save and assign the application to the user or user group.
-
Steps to retrieve the SAML Metadata
-
Log in to Workspace ONE Access Admin page.
-
Go to Resources → Settings section.
-
Select SAML Metadata under SaaS Apps.
-
Click on copy URL for IDP metadata.
-
-
Save the SAML metadata.
OKTA
The following information is a guideline to set up OKTA IDP for use with Workspace ONE Tunnel for this feature.
Note:
Please follow the appropriate documentation per your Identity Provider for required setup.
-
Log in to the OKTA Admin page.
-
Select Applications.
-
Go to: Application → Create App Integration → SAML 2.0.
-
Click Next.
-
Enter the App name.
-
Upload the App logo if required.
-
Select these two options: Do not display application icon to users and Do not display application icon in the OKTA Mobile app.
- This is not mandatory but a recommended best practice to disable for Tunnel MFA workflow.
-
Click Next.
-
Update the Single Sign-On URL to:
HTTPS://{TunnelServerHostname}:65535/tunnel- TunnelServerHostname is the public FQDN for the Tunnel server.
-
Update the Audience URI (SP Entity ID) to WS1Tunnel.
- You may provide a different Application ID. Please enter the same Application ID while uploading the SAML Metadata within WS1 UEM.
-
Update the Default RelayState to:
HTTPS://{TunnelServerHostname}:65535/tunnel- TunnelServerHostname is the public FQDN for the Tunnel server.
-
Keep the Name ID format as unspecified.
-
Choose the Application username based on your requirement (or keep it to the OKTA username).
-
Click Finish.
-
Click on assignment and assign the application to the user or groups.
-
Steps to retrieve the SAML Metadata
-
Log in to the OKTA Admin page.
-
Select Applications.
-
Select the application created for the Tunnel SAML MFA.
-
Select Sign on, scroll down to SAML Signing Certificates, and set:
-
Click the action drop-down for the active certificate Type ( SHA-1 or SHA-2).
-
Select View IDP metadata.
-
Save the SAML metadata based on the console version.
-
Microsoft Azure
The following information is a guideline to set up Microsoft Azure IDP for use with Workspace ONE Tunnel for this feature.
Note:
Please follow the appropriate documentation per your Identity Provider for required setup.
-
Log in to the Azure Admin page.
-
Select Azure Active Directory.
-
Select Enterprise applications.
-
Click New Application.
-
Click Create Your Own Application.
-
Enter a name for your application.
-
Select Integrate any other application you don't find in the gallery (Non-gallery).
-
Click Create.
-
-
Select Single Sign-on under Manage.
-
Select SAML.
-
Click Edit for Basic SAML Configuration.
-
Add the Identifier (Entity ID) as WS1Tunnel.
- You may provide a different Application ID. Please enter the same Application ID while uploading the SAML Metadata within Workspace ONE UEM.
-
Update the Reply URL (Assertion Consumer Service URL) to
HTTPS://{TunnelServerHostname}:65535/tunnel- TunnelServerHostname is the public FQDN for the Tunnel server.
-
Add the Sign-on URL and Relay State. to
HTTPS://{TunnelServerHostname}:65535/tunnelor leave it blank as it is not mandatory.- TunnelServerHostname is the public FQDN for the Tunnel server.
-
Click Save.
-
-
Select Users and Groups.
- Assign the application to the user or groups.
Steps to retrieve the SAML Metadata
-
Log in to the Azure Admin page.
-
Select Azure Active Directory.
-
Select Enterprise applications.
-
Select Single Sign-on under Manage.
- Under SAML Certificates, download the Federation Metadata XML.
Was this page helpful?