Android profiles ensure proper use of devices and protection of sensitive data. Profiles serve many different purposes, from letting you enforce corporate rules and procedures to tailoring and preparing Android devices for how they are used.
Android Versus Android Legacy Profiles
When deploying profiles, there are two Android profile types: Android and Android (Legacy). Select the Android profile option if you have completed the Android EMM Registration. If you have opted out of the EMM registration, then the Android (Legacy) profiles are available. When you select Android but have not walked through the Android EMM Registration, an error message displays prompting you to go to the settings page to complete EMM registration or proceed to Android (Legacy) profile deployment.
Work Profile vs. Work Managed Device Mode
A Work Profile is a special type of administrator tailored primarily for a BYOD use case. When the user already has a personal device configured with their own Google account, Workspace ONE UEM enrollment creates a Work Profile, where it installs the Workspace ONE Intelligent Hub. Workspace ONE UEM only controls the Work Profile. Managed apps install inside the Work Profile and display an orange briefcase badge to differentiate them from personal apps.
Work Managed device applies to devices enrolled from an unprovisioned or factory reset state. This mode is recommended for corporate owned devices. Workspace ONE Intelligent Hub is installed during the setup process and set as the device owner, meaning Workspace ONE UEM will have full control of the entire device.
Android profiles will display the following tags: Work Profile and Work Managed Device.
Profile options with the Work Profile tag only apply to the Work Profile settings and apps, and do not affect the user's personal apps or settings. For example, certain restrictions turn off access to the Camera or taking screen capture. These restrictions only affect the Android badged apps inside the Work Profile and will not impact personal apps. Profile options configured for Work Managed Device apply to the entire device. Each profile discussed in this section indicates which device type the profile affects.
Profiles Behavior
There are times when more than one profile needs to be implemented for various reasons. When duplicate profiles are deployed, the most restrictive policy takes priority. Therefore, if two profiles are installed, and one says to block camera and another says to allow camera, Intelligent Hub for Android combines the profiles and blocks the camera to choose the more secure option.
Configure Profile
In the Workspace ONE UEM console, you follow the same navigation path for each profile. The Preview section shows you Total Assigned Devices with a list view. You can see the added profiles on the Summary tab.
To configure profiles:
- Navigate to Resources > Profiles & Baselines > Profiles > Add > Add Profile > Android.
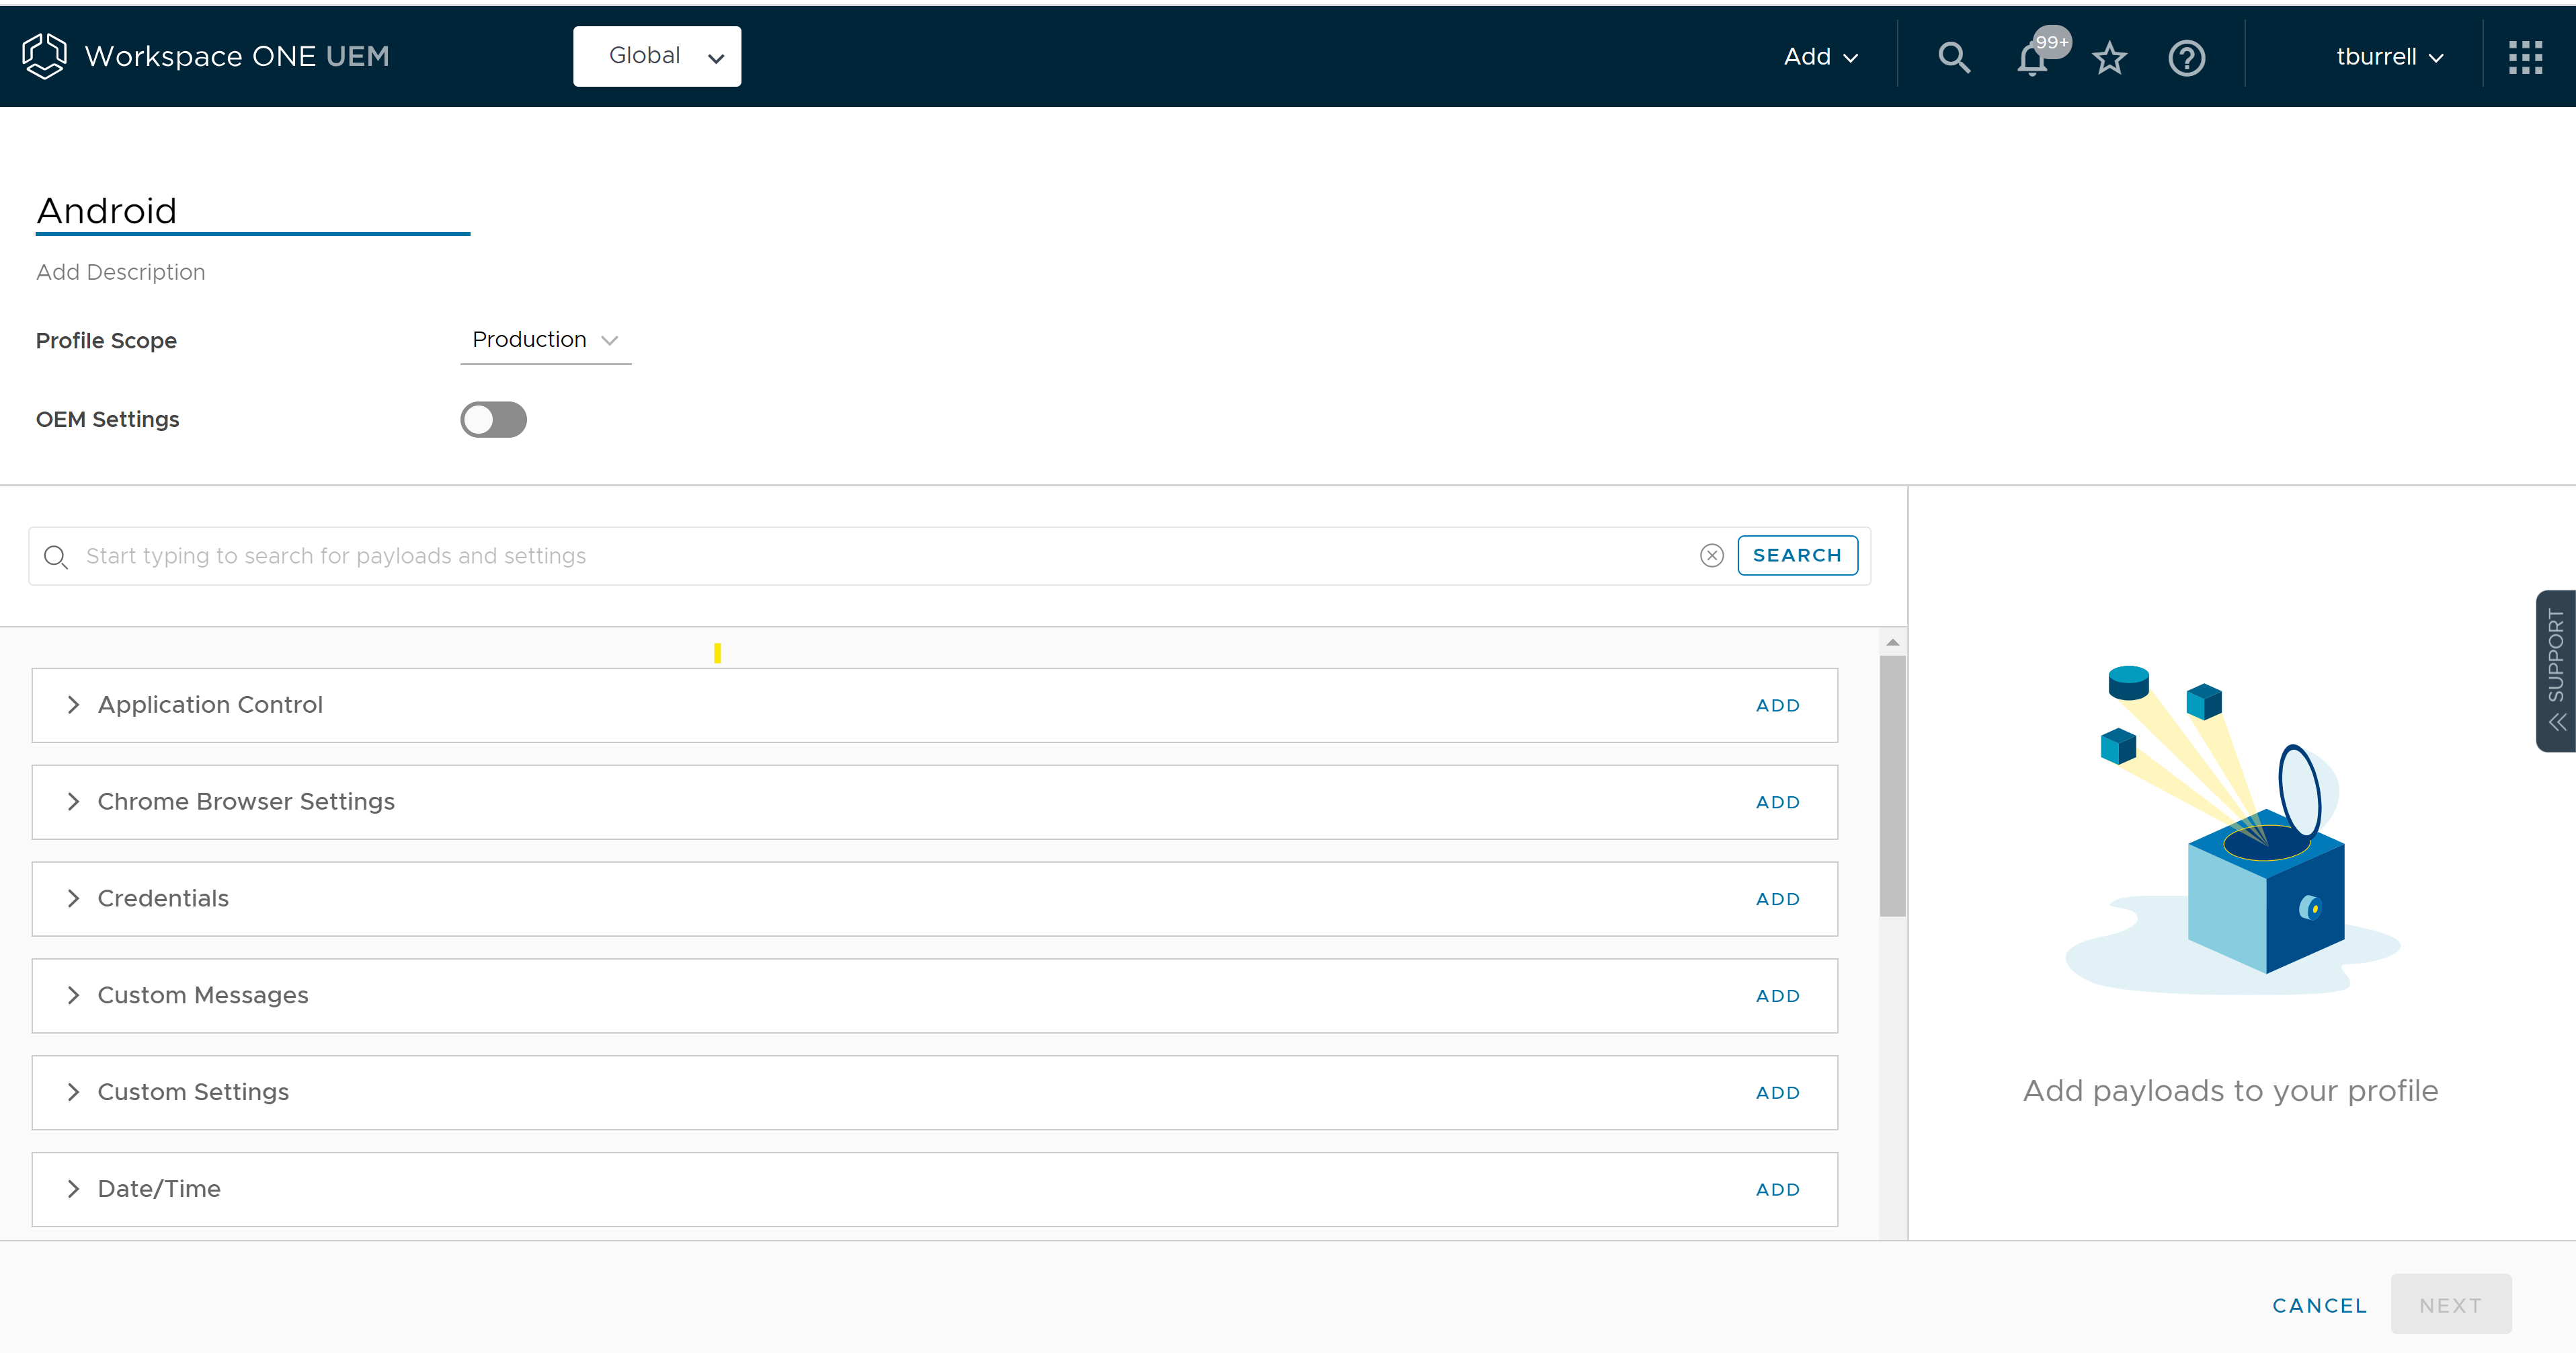
-
Configure the settings:
Settings Description Name Set the name for your profile and add a description that would be easily recognizable to you. Profile Scope Set how the profile is used in your environment either on Production, Staging, or Both. OEM Settings Turn on OEM settings to configure specific settings for Samsung or Zebra devices. Once you select the OEM, you will see additional profiles and settings display that are unique to either OEM. -
Select the Add button for the desired profile and configure the settings as desired. You can use the drop-down and preview profile settings before selecting add.
-
Select Next to configure the general Assignment and Deployment profile settings as appropriate. Configure the following settings:
Settings Description Smart Group Allow Exclusion When turned on, a new text box Exclude Group displays. You can then select those groups you want to exclude from the assignment of the device profile. Assignment Type Determines how the profile is deployed to devices: Auto – The profile is deployed to all devices. Optional – An end user can optionally install the profile from the Self-Service Portal (SSP), or it can be deployed to individual devices at the administrator's discretion. End users can also install profiles representing Web applications, using a Web Clip or a Bookmark payload. And if you configure the payload to show in the App Catalog, then you can install it from the App Catalog. Compliance – The profile is applied to the device by the Compliance Engine when the user fails to take corrective action toward making their device compliant. Managed By The organization group with administrative access to the profile. Install Area Only Turn on to display geofencing option: Install only on devices inside selected areas: Enter an address anywhere in the world and a radius in kilometers or miles to make a 'perimeter of profile installation'. Schedule Install Time Turn on to configure time schedule settings: Turn on Scheduling and install only during selected time periods:Specify a configured time schedule in which devices receive the profile only within that timeframe. -
Select Save & Publish.
Passcode
Setting a passcode policy requires your end users to enter a passcode, providing a first layer of defense for sensitive data on devices.
The Work Profile passcode policies apply only to work apps, so users do not have to enter complex passwords each time they unlock their device when enrolled with a Work Profile. The Work keeps corporate app data protected and allows end users to access personal apps and data in any way they like. For Work Managed devices, this passcode policy applies to the device. The Work Passcode is available on Android 7.0 (Nougat) and above for Work Profile enrolled devices.
The Device Passcode policies apply to the whole device (enrolled with a Work Profile or as Work Managed). This passcode needs to be entered each time the device is unlocked and can be applied in addition to the work passcode.
By default, when creating new profiles, only the Work Passcode is Turn on (Device Passcode is disabled). The admin has to Turn on the device passcode manually.
Note: When Passcode profile is present on the device and the user does not set the passcode, no apps or profiles are pushed to the device until the device is compliant.
Once the passcode profile settings are established, the UEM console notifies the user through persistent notification to update the passcode settings when a passcode reaches minimum passcode age or passcode required change. Users are unable to use Intelligent Hub until they set up the passcode as required in the profile. On Samsung devices, the user is locked into lock screen setup wizard until they set a passcode meeting the passcode policy requirements. For Work Managed devices, users are unable to use the device. For Work Profile and COPE devices, users are unable to access work apps.
Passcode Complexity
When setting either the work or device passcode, you will determine the Passcode complexity before configuring additional settings. First, you will decide how granular your minimum passcode complexity requirements will be by setting passcode complexity controls to Basic or Advanced.
When you select Basic you can simply set the complexity as Low, Medium, or High. For Low, users can set a screen lock of any type. For Medium complexity, users will need to set a complex pin or passcode on their device with no minimum length requirement. When High is selected, users will need to set either:
- A complex pin with a minimum length of 8
- A password with a minimum length of 6
If you select Advanced you have to set the Passcode Content and Minimum Passcode Length settings listed in the profile settings.
The available settings for the Passcode profile are outlined below.
| Setting | Description |
|---|---|
| Turn on Work Passcode Policy | Turn on to apply passcode policies only to Android badged apps. |
| Minimum Passcode Length | Ensure passcodes are appropriately complex by setting a minimum number of characters. |
| Passcode Content | Ensure the passcode content meets your security requirements by selecting one of the following:Any, Numeric, Alphanumeric, Alphabetic, Complex, Complex numeric or Weak Biometric from the drop-down menu. |
| Use simple values for quick access or alphanumeric passcodes for enhanced security. You can also require a minimum number of complex characters (@, #, &,! , ,? ) in the passcode. | |
| Weak Biometric passcode content allows low-security biometric unlock methods, such as face recognition. Important: If the minimum number of complex characters in the password is greater than 4, at least one lowercase character and one uppercase character is required(SAFE v5.2 devices only). | |
| Maximum Number of Failed Attempts | Specify the number of attempts allowed before the device is wiped. |
| Maximum Passcode Age (days) | Specify the maximum number of days the passcode can be active. |
| Passcode Change Alert | Set the amount of time prior to the expiration of the passcode that the user is notified to change their passcode. This option is also available in Device Passcode Policy. The user is prompted to change the passcode through prompt on their device, but they are not blocked from performing any other functions on their device. You can configure a compliance policy or use the settings in the Workspace ONE Intelligent Hub for Android to create and enforce a passcode being re-added to the device. |
| Passcode History | Set the number of times a passcode must be changed before a previous passcode can be used again. |
| Work Profile Lock Timeout Range (in Minutes) | Set the period of inactivity before the device screen locks automatically |
| Password Required Range (in minutes) | Set the amount of time after unlocking a device with a non-strong authentication method (such as fingerprint or face recognition) before a passcode is required. This option is also available in Device Passcode Policy. |
| Allow One Lock | Disable to force separate and more restrictive passcode for the Work profile passcode and the device passcode. |
| One Lock is Turn on in the background until a Work Profile passcode is created. When users needs to create a device and Work Profile passcode, the user can choose which one to create first, but the more complex requirement is enforced first. | |
| Note: Applies to Android 9.0+ Work Profile devices and COPE devices only. | |
| Allow Biometric options | Turn on to allow biometric unlock methods, such as face recognition. |
| Allow Fingerprint Sensor | Turn on to allow users to use their fingerprint to unlock their devices. Disable to prevent using fingerprint as the primary method of authentication and instead requires that the end user enter the specified type of password in the profile instead. |
| Allow Face Scanning | Disable to prevent the Face Unlock method from being configurable or selectable.Note: Applies to Android 9.0+ Work Managed devices only. |
| Allow Iris Scanning | Disable to prevent the Iris Scanner method from being configurable or selectable.Note: Applies to Android 9.0+ Work Managed devices only. |
| Turn on Device Passcode Policy | Apply passcode policies for the device enrolled with a Work Profile. This passcode will need to be entered to unlock the device and can be applied in addition to the work passcode. For Work Managed devices, this passcode policy is applied to the device. |
| Minimum Passcode Length | Ensure passcodes are appropriately complex by setting a minimum number of characters. |
| Set initial passcode | Turn on to set an initial passcode at the device level on all deployed devices. After deployment, it is possible to reset the passcode at the device level. Note: Applies to Android 7.0+ Work Managed devices only. |
| Passcode Content | Ensure the passcode content meets your security requirements by selecting Any, Numeric, Alphanumeric, Alphabetic,Complex, or Complex Numeric from the drop-down menu. |
| Maximum Number of Failed Attempts | Specify the number of attempts allowed before the device is wiped. |
| Maximum Passcode Age (days) | Specify the maximum number of days the passcode can be active. |
| Passcode Change Alert | Set the amount of time prior to the expiration of the passcode that the user is notified to change their passcode. |
| Passcode History | Set the number of times a passcode must be changed before a previous passcode can be used again. |
| Work Profile Lock Timeout Range (in Minutes) | Set the period of inactivity before the device screen locks automatically. |
| Allow Biometric options | Turn on to allow biometric unlock methods, such as face recognition. |
| Allow Fingerprint Unlock | Turn on to allow users to use their fingerprint to unlock their devices and prevents using fingerprint as the primary method of authentication and instead requires that the end user enter the specified type of password in the profile instead. |
| Allow Face Scanning | Disable to prevent the Face Unlock method from being configurable or selectable on the Samsung device.Note: Applies to Android 9.0+ Work Managed devices only. |
| Allow Iris Scanning | Disable to prevent the Iris Scanner method from being configurable or selectable on the Samsung device.Note: Applies to Android 9.0+ Work Managed devices only. |
| Passcode Visible | Turn on to show the passcode on the screen as it is entered. For Samsung devices. Requires you to Turn on OEM Settings in the General profile and Samsung from Select OEM dropdown. |
| Require SD Card Encryption | Indicate if the SD card requires encryption. For Samsung devices. Requires you to Turn on OEM Settings in the General profile and Samsung from Select OEM dropdown. |
| Maximum Number of Repeating Characters | Prevent your end users from entering easily cracked repetitive passcodes like '1111' by setting a maximum number of repeating characters. For Samsung devices. |
The following settings apply if you select Complex from the Passcode Content text box.
| Setting | Description |
|---|---|
| Minimum Number of Letters | Specify the number of letters that can be included in the passcode. |
| Minimum Number of Lower Case Letters | Specify the number of lowercase letters required in the passcode. |
| Minimum Number of Upper Case Letters | Specify the number of uppercase letters required in the passcode. |
| Minimum Number of Non-Letters | Specify the number of special characters required in the passcode. |
| Minimum Number of Numerical Digits | Specify the number of numerical digits required in the passcode. |
| Minimum Number of Symbols | Specify the number of symbols required in the passcode. |
The following settings apply for setting a passcode on Samsung device.
These settings only display when OEM Settings in the General profile and Samsung from Select OEM dropdown are selected.
| Setting | Description |
|---|---|
| Passcode Visible | Turn on to show the passcode on the screen as it is entered. |
| Allow Fingerprint Unlock | Turn on to allow users to use their fingerprint to unlock their devices and prevents using fingerprint as the primary method of authentication and instead requires that the end user enter the specified type of password in the profile instead. |
| Require SD Card Encryption | Indicate if the SD card requires encryption. |
| Require Passcode | Requires user to enter the passcode used to encrypt the SD card. If left unchecked, some devices allow the SD card to be encrypted without user interaction. |
| Maximum Number of Repeating Characters | Prevent your end users from entering easily cracked repetitive passcodes like '1111' by setting a maximum number of repeating characters. |
| Maximum length of numeric sequences | Prevent your end user from entering an easily cracked numeric sequence like 1234 as their passcode. For Samsung devices. |
| Allow Iris Scanner | Disable to prevent the Iris Scanner method from being configurable or selectable on the Samsung device. |
| Allow Face Unlock | Disable to prevent the Face Unlock method from being configurable or selectable on the Samsung device. |
| lock screen Overlay | Turn on to push information to the end user devices and display this information over the lock screen. |
| - Image Overlay – Upload images to display over the lock screen. You can upload a primary and secondary image and determine the position and transparency of the images. | |
| - Company Information – Enter company information to display over the lock screen. This can be used for emergency information in the event the device has been lost or reported stolen. | |
| The lock screen Overlay setting is for Safe 5.0 devices and above only. The lock screen Overlay settings remains configured on the device while in use and cannot be changed by the end user. |
Configure lock screen Overlay (Android)
The lock screen Overlay option in the passcode profiles gives you the ability to overlay information over the screen lock image to provide information to the end user or anyone who may find a locked device. lock screen Overlay is a part of the Passcode profile.
lock screen Overlay is a native functionality for Android and available across several OEMs.
The lock screen Overlay settings for Android profiles on only displays when the OEM Settings field is toggled to Turn on and Samsung is selected from the Select OEM field. The OEM settings field in the General profile only applies to Android profiles and not Android (Legacy) configurations.
Configure the settings for Image Overlay as desired:
| Setting | Description |
|---|---|
| Image Overlay Type | Select Single Image or Multi Image to determine the number of overlay images required. |
| Primary Image | Upload an image file. |
| Primary Image Top Position in Percent | Determine the position of the top image from 0-90 percent. |
| Primary Image Bottom Position in Percent | Determine the position of the bottom image from 0-90 percent. |
| Secondary Image | Upload a second image if desired. This field only displays if Multi Image is selected from the Image Overlay Type field. |
| Secondary Image Position in Percent | Determine the position of the top image from 0-90 percent. Only application if Multi Image is selected from the Image Overlay Type field. |
| Secondary Image Bottom Position in Percent | Determine the position of the bottom image from 0-90 percent. Only applicable if Multi Image is selected from the Image Overlay Type field. |
| Overlay Image | Determine the transparency of your image as Transparent or Opaque. |
Configure the settings for Company Information as desired.
| Setting | Description |
|---|---|
| Company Name | Enter your company name for display. |
| Company Logo | Upload the company logo with an image file. |
| Company Address | Enter the company office address. |
| Company Phone Number | Enter the company phone number. |
| Overlay Image | Determine the transparency of your image as Transparent or Opaque. |
Chrome Browser Settings
The Chrome Browser Settings profile helps you to manage settings for the Work Chrome app.
Chrome is Google's web browser. Chrome offers a number of features such as search, the omnibox (one box to search and navigate), auto-fill, saved passwords, and Google account sign-in to instantly access recent tabs and searches across all your devices. The work Chrome app functions the same as the personal version of Chrome. Configuring this profile will not affect the user's personal Chrome app. You can push this profile in conjunction with a separate VPN or Credentials Wi-Fi payload to ensure end-users can authenticate and log in to your internal sites and systems. This will ensure that users must use the Work Chrome app for business purposes.
Chrome Browser Settings Matrix (Android)
The Chrome Browser Settings profile helps you to manage settings for the Work Chrome app. Configuring this profile will not affect the user's personal Chrome app. You can push this profile in conjunction with a separate VPN or Credentials or Wi-Fi payload to ensure end-users can authenticate and log in to your internal sites and systems.
This matrix details the available settings in the Chrome Browser profile:
| Setting | Description |
|---|---|
| **Allow Cookies | Select to determine browser cookies settings.** |
| Allow Cookies On These Sites | Specify URLs which are allowed to set cookies. |
| Block Cookies On These Sites | Specify URLs which are not allowed to set cookies. |
| Allow Session Only Cookies On These Sites | Specify sites which are allowed to set session only cookies. |
| **Allow Images | Select to determine which sites allow images. |
| Allow Images On These Sites | Specify a list of URLs which are allowed to display images. |
| Block Images On These sites | Specify a list of URLs which are not allowed to display images. |
| Allow JavaScript | Select JavaScript browser settings. |
| Allow JavaScript On These Sites | Specify sites which are allowed to run JavaScript. |
| Block JavaScript On These Sites | Specify sites which are not allowed to run JavaScript. |
| Allow Pop-Ups | Select pop-up browser settings. |
| Allow Popups On These Sites | Select option to determine which sites are allowed to open popups. |
| Block Popups On These sites | Specify sites which are not allowed to open popups. |
| Allow Track Location | Set whether websites are allowed to track the users' physical location. |
| Proxy Mode | Specify the proxy server used by Google Chrome and prevents users from changing proxy settings. |
| Proxy Server URL | Specify the URL of the proxy server. |
| Proxy PAC File URL | Specify a URL to a proxy .pac file. |
| Proxy Bypass Rules | Specify which proxy settings to bypass. This policy only takes effect if you have selected manual proxy settings. |
| Force Google SafeSearch | Turn on to force search queries in Google web search to be done with SafeSearch. |
| **Force YouTube Safety Mode | Turn on to give users the opportunity to bar mature content. |
| **Turn on Touch to Search | Turns on the use of Touch to Search in Google Chrome's content view. |
| Turn on Default Search Provider | Specify the default search provider. |
| Default Search Provider Name | Specify the name of the default search provider. |
| Default Search Provider Keyword | Specify the keyword search for the default search provider. |
| Default search provider search URL | Specify the URL of the search engine used when doing a default search. |
| Default search provider suggest URL | Specify the URL of the search engine used to provide search suggestions. |
| Default Search Provider Instant URL | Specify the default search providers when user's input search inquiries. |
| Default Search Provider Icon | Specify the favorite icon URL of the default search provider. |
| Default Search Provider Encodings | Specify the character encodings supported by the search provider. Encodings are code page names like UTF-8, GB2312, and ISO-8859-1. If not set, the default will be used which is UTF-8. |
| List Of Alternate URLs For The Default Search Provider | Specify a list of alternate URLs that can be used to extract search terms from the search engine. |
| Search Terms Replacement Key | Enter all search term replacement keys. |
| Search Provider Image URL | Specify the URL of the search engine used to provide image search. |
| **New Tab URL | Specify the URL that a search engine uses to provide a new tab page. |
| POST URL Search Parameters | Specify the parameters used when searching a URL with POST. |
| POST Suggestion Search Parameters | Specify the parameters used when doing image search with POST. |
| POST Image Search Parameters | Specify the parameters used when doing image search with POST. |
| Turn on The Password Manager | Turn on saving passwords to the password manager. |
| Turn on Alternate Error Pages | Turn on to use alternate error pages that are built into Google Chrome (such as 'page not found'). |
| Turn on Autofill | Turn on to allow users to auto complete web forms using previously stored information such as address or credit card information. |
| Turn on Printing | Turn on to allow printing in Google Chrome. |
| Turn on Data Compression Proxy Feature | Specify one of the following options for data compression proxy: Always Turn on, Always disable. Data compression proxy can reduce cellular data usage and speed up mobile web browsing by using proxy servers hosted at Google to optimize website content. |
| Turn on Safe Browsing | Turn on to activate Google Chrome's Safe Browsing. |
| Disable Saving Browser History | Turn on to disable saving browser history in Google Chrome. |
| Prevent Proceeding After Safe Browsing Warning | Turn on to prevents users from proceeding from the warning page to malicious sites. |
| Disable SPDY protocol | Disables use of the SPDY protocol in Google Chrome |
| Turn on Network Prediction | Select network prediction in Google Chrome. |
| Turn on Deprecated Web Platform Features For A Limited Time | Specify a list of deprecated web platform features to re-Turn on temporarily. |
| Force Safe Search | Turn on to activate safe search while using the web browser. |
| Incognito Mode Availability | Specify whether a user can open pages in Incognito mode in Google Chrome. |
| Allows sign in to Chromium | Turn on to force Chrome users to log into the browser if they signed into Gmail on the web. |
| Turn on Search Suggestions | Turn on search suggestions in Google Chrome's omnibox. |
| Turn on Translate | Turn on the integrated Google Translate service on Google Chrome. |
| Turns on or Disables Bookmark Editing | Turn on to allow bookmarks to be added, removed, or modified. |
| Managed Bookmarks | Specify a list of managed bookmarks. |
| Block Access To A List Of URLs | Enter URLs to prevents the user from loading web pages from blacklisted URLs. |
| Exceptions to blocked list of URLs | Enter blocklist exception URLs. You can separate the list with commas. |
| Minimum SSL Version Turn on | Selected the minimum SSL version from the dropdown. |
| Minimum SSL Version To Fallback TO | Select the minimum, SSL version to fallback to from the dropdown. |
Restrictions
The Restrictions profiles in the UEM console locks down native functionality of Android devices. The available restrictions and behavior vary based on device enrollment.
The Restrictions profile displays tags that indicate if the selected restriction applies towards the Work Profile, Work Managed Device, or both, however, that for Work Profile devices these only affect the Android badged apps. For example, when configuring restrictions for the Work Profile you can disable access to the work Camera. This only affects the Android badged camera and not the users personal camera.
Note, there are a handful of system apps included with the Work Profile by default such as Work Chrome, Google Play, Google settings, Contacts, and Camera – these can be hidden using the restrictions profile and does not affect the user's personal camera.
Restrictions on Using Non-Managed Google Accounts
You might want to allow people to add non-managed or personal Google accounts, to read personal emails example, but you still want to restrict the personal account from installing apps on the device. Your can set a list of accounts people can use in Google Play in the Workspace ONE UEM console.
Deploy a restrictions payload for added security on Android devices. Restrictions payloads devices can disable end-user access to device features to make sure devices are not tampered with.
Select the Restrictions profile and configure the settings:
| Settings | Description |
|---|---|
| Device Functionality | Device-level restrictions can disable core device functionality such as the camera, screen-capture and factory reset to help improve productivity and security. For example, disabling the camera protects sensitive materials from being photographed and transmitted outside of your organization. Prohibiting device screen captures helps protect the confidentiality of corporate content on the device. |
| Application | Application-level restrictions can disable certain applications such as YouTube and native browser, which lets you to enforce adherence to corporate policies for device usage. |
| Sync and Storage | Control how information is stored on devices, allowing you to maintain the highest balance of productivity and security. For example, disabling Google or USB Backup keeps corporate mobile data on each managed device and out of the wrong hands. |
| Network | Prevent devices from accessing Wi-Fi and data connections to ensure that end users are not viewing sensitive information through an insecure connection. |
| Work and Personal | Determine how information is accessed or shared between personal container and work container. These settings apply to the Work Profile Mode only. |
| Location Services | Configure Location Service settings for Work Managed devices. This restriction behaves differently between Android versions. In Android 8.0 and below, the behavior works according to the selected setting in the UEM console. In Android 9.0 and later, each settings either turns on or off location services as follows:None does nothing. Allow no location access- Turns off location services, Set GPS location only - Turns on location services. Set Battery Saving Location Only - Turns off location services. Set High Accuracy Location Only - Turns off location services. |
| Samsung Knox | Configure restrictions specifically for Android devices running Samsung Knox. This section is only available when OEM Settings in the General Profile is Turn on and Samsung is selected from the Select OEM field. |
Specific Restrictions for Android
This matrix provides a representational overview of the restrictions profile configurations available by device ownership type.
| Feature | Work Managed Device mode | Work Profile mode |
|---|---|---|
| Device Functionality | ||
| Allow Factory Reset | ✓ | ✓ |
| Allow Screen Capture | ✓ | ✓ |
| Allow Adding Google Accounts | ✓ | ✓ |
| Allow Removing the Android Work Account | ✓ | |
| Allow Outgoing Phone Calls | ✓ | |
| Allow Send/Receive SMS | ✓ | |
| Allow Credentials Changes | ✓ | |
| Allow All Keyguard Features | ✓ | |
| Allow Keyguard Camera | ✓ | |
| Allow Keyguard Notifications | ✓ | |
| Allow Keyguard Fingerprint Sensor | ✓ | ✓ |
| Allow Keyguard Trust Hub State | ✓ | ✓ |
| Allow Keyguard Unredacted Notifications | ✓ | ✓ |
| Force Screen On when Plugged In on AC Charger (Android 6.0+) | ✓ | |
| Force Screen On when Plugged In on USB Charger (Android 6.0+) | ✓ | |
| Force Screen On when Plugged In on Wireless Charger (Android 6.0+) | ✓ | |
| Allow Wallpaper Change (Android 7.0+) | ✓ | |
| Allow Status Bar | ✓ | |
| Allow Keyguard (Android 6.0+) This setting is ignored when a passcode is present on the device. | ✓ | |
| Allow Adding Users | ||
| Allow Removing Users | ||
| Allow Safe Boot (Android 6.0+) | ✓ | |
| Allow Wallpaper Change (Android 7.0+) | ||
| Allow User Icon Change (Android 7.0+) | ✓ | ✓ |
| Allow Adding/Deleting Accounts | ✓ | ✓ |
| Prevent System UI (Toasts, Activities, Alerts, Errors, Overlays) | ✓ | |
| Set Maximum Days for Disabling Work Profile | ✓ | |
| Application | ||
| Allow Camera | ✓ | ✓ |
| Allow Google Play | ✓ | ✓ |
| Allow Chrome Browser | ✓ | |
| Allow Non-Market App Installation | ✓ | ✓ |
| Allow Modifying Application In Settings | ✓ | |
| Allow Installing Applications | ✓ | ✓ |
| Allow Uninstalling Applications | ✓ | ✓ |
| Allow Disabling Application Verification | ✓ | ✓ |
| Skip user tutorial and introductory hints | ✓ | ✓ |
| Allow Whitelist Accessibility Services | ✓ | |
| Restrict Input Methods | ✓ | ✓ |
| Sync and Storage | ||
| Allow USB Debugging | ✓ | |
| Allow USB Mass Storage✓ | ||
| Allow Mounting Physical Storage Media | ✓ | |
| Allow USB File Transfer | ✓ | |
| Allow Backup Service (Android 8.0+) | ||
| Network | ||
| Allow Wi-Fi changes | ✓ | |
| Allow Bluetooth Pairing | ✓ | |
| Allow Bluetooth (Android 8.0+) | ✓ | |
| Allow Bluetooth Contact Sharing (Android 8.0+)* | ✓ | |
| Allow Outgoing Bluetooth Connections* | ✓ | ✓ |
| Allow All Tethering | ✓ | |
| Allow VPN Changes | ✓ | |
| Allow Mobile Network Changes | ✓ | |
| Allow NFC | ✓ | |
| Allow Managed Wi-Fi Profile Changes (Android 6.0+) | ✓ | |
| Work and Personal | ||
| Allow Pasting Clipboard Between Work and Personal Apps | ✓ | |
| Allow Works Apps To Access Documents From Personal Apps | ✓ | |
| Allow Personal Apps to Access Documents From Work Apps | ✓ | |
| Allow Personal Apps to Share Documents With Work Apps | ✓ | |
| Allow Work Apps to Share Documents With Personal Apps | ||
| Allow Work Contact's Caller ID Info to Show in Phone Dialer | ✓ | |
| Allow Work Widgets To Be Added To Personal Home Screen | ✓ | |
| Allow Work Contacts in Personal Contacts App (Android 7.0+) | ||
| Cross Profile Calendar Access (Turns on Android calendar app developers to have access to Work Profile calendar information using Android 10 APIs. We cannot guarantee whether or not each calendar application supports these Android 10 specific methods.) | ✓ | |
| Allow app cross-profile communication | ✓ | |
| Location Services | ||
| Allow Location Service Configuration | ✓ | |
| Allow User to Modify Location Settings | ✓ | ✓ |
| Samsung Knox | ||
| Device Functionality | ||
| Allow Airplane Mode | ✓ | |
| Allow Microphone | ✓ | |
| Allow Mock Locations | ✓ | |
| Allow Clipboard | ✓ | |
| Allow Power Off | ✓ | |
| Allow Home Key | ✓ | |
| Allow Audio Recording if Microphone is Allowed | ✓ | |
| Allow Video Recording if Camera is Allowed | ✓ | |
| Allow Email Account Removal | ✓ | |
| Allow Ending Activity When Left Idle | ✓ | |
| Allow User to Set Background Process Limit | ✓ | |
| Allow Headphones | ✓ | |
| Sync and Storage | ||
| Allow SD Card Move | ✓ | |
| Allow OTA Upgrade | ✓ | |
| Allow Google Accounts Auto Sync | ✓ | |
| Allow SD Card Write | ✓ | |
| Allow USB Host Storage | ✓ | |
| Allow Auto Fill (Android 8.0 or later) | ✓ | ✓ |
| Application | ||
| Allow Settings Changes | ✓ | |
| Allow Developer Options | ✓ | |
| Allow Background Data | ✓ | |
| Allow Voice Dialer | ✓ | |
| Allow Google Crash Report | ✓ | |
| Allow S Beam | ✓ | |
| Allow Prompt for Credentials | ✓ | |
| Allow S Voice | ✓ | |
| Allow User To Stop System Signed Applications | ✓ | |
| Bluetooth | ||
| Allow Desktop Connectivity Via Bluetooth | ✓ | |
| Allow Bluetooth Data Transfer | ✓ | |
| Allow Outgoing calls via Bluetooth | ✓ | |
| Allow Bluetooth Discoverable Mode | ✓ | |
| Turn on Bluetooth Secure Mode | ✓ | |
| Network | ||
| Allow Wi-Fi | ✓ | |
| Allow Wi-Fi Profiles | ✓ | |
| Allow Unsecure Wi-Fi | ✓ | |
| Allow Only Secure VPN Connections | ✓ | |
| Allow VPN | ✓ | |
| Allow Auto Connection Wi-Fi | ✓ | |
| Allow Cellular Data | ✓ | |
| Allow Wi-Fi Direct | ✓ | |
| Roaming | ||
| Allow Automatic Sync on Roaming | ✓ | |
| Allow Auto Sync When Roaming Is Disabled | ✓ | |
| Allow Roaming Voice Calls | ✓ | |
| Data Usage on Roaming | ✓ | |
| Allow Push Messages on Roaming | ✓ | |
| Phone & Data | ||
| Allow Non-Emergency Calls | ✓ | |
| Allow User to Set Mobile Data Limit | ✓ | |
| Allow WAP Push | ✓ | |
| Hardware Restrictions | ||
| Allow Menu Key | ✓ | |
| Allow Back Key | ✓ | |
| Allow Search Key | ✓ | |
| Allow Task Manager | ✓ | |
| Allow System Bar | ✓ | |
| Allow Volume Key | ✓ | |
| Security | ||
| Allow Lock Screen Settings | ✓ | |
| Allow Firmware Recovery | ✓ | |
| Tethering | ||
| Allow USB Tethering | ✓ | |
| MMS Restrictions | ||
| Allow Incoming MMS | ✓ | |
| Allow Outgoing MMS | ✓ | |
| Miscellaneous | ||
| Set Device Font | ✓ | |
| Set Device Font Size | ✓ | |
| Allow User to Stop System Signed Applications | ✓ | |
| Allow Only Secure VPN Connections | ✓ |
Exchange Active Sync
Workspace ONE UEM uses the Exchange ActiveSync (EAS) profile on Android devices to guarantee a secure connection to internal email, calendars, and contacts using mail clients. For example, the configured EAS email settings for the Work Profile affects any email apps downloaded from the Workspace ONE UEM Catalog with the badged icon and not the user's personal email.
Once each user has an email address and user name you can create an Exchange Active Sync profile.
Note: The Exchange Active Sync profile applies towards the Work Profile and Work Managed Device mode types.
Select the Exchange Active Sync profile and configure the following settings.
| Settings | Description |
|---|---|
| Mail Client Type | Use the drop-down menu to select a mail client that is being pushed to user devices. |
| Host | Specify the external URL of the company Active Sync server. |
| Server Type | Select between Exchange and Lotus. |
| Use SSL | Turn on to encrypt EAS data. |
| Disable Validation Checks on SSL Certs | Turn on to allow Secure Socket Layer certifications. |
| S-MIME | Turn on to select an S/MIME certificate you associate as a User Certificate on the Credentials payload. |
| S/MIME Signing Certificate | Select the certificate to allow provision of S/MIME certificates to the client for message signing. |
| S/MIME Encryption Certificate | Select the certificate to allow provision of S/MIME certificates to the client for message encryption. |
| Domain | Use lookup values to use the device-specific value. |
| Username | Use lookup values to use the device-specific value. |
| Email Address | Use lookup values to use the device-specific value. |
| Password | Leave blank to allow end users to set their own password. |
| Login Certificate | Select the available certificate from the drop-down menu. |
| Default Signature | Specify a default email signature to display on new messages. |
| Maximum Attachment Size (MB) | Enter the maximum attachment size that user is allowed to send. |
| Allow Contacts And Calendar Sync | Turn on to allow contacts and calendar to sync with devices. |
Public App Auto Update
The Public App Auto update profile allows you to configure auto updates and scheduling maintenance windows for public Android applications.
The Public app auto update profile uses Google API's to send profile data directly to devices. This profile will not be displayed in the Workspace ONE Intelligent Hub.
To configure the Public App Auto Update profile:
Note: If a profile contains a Public App Update payload, it cannot contain any other payloads.
Select Public App Auto Update from the payload list and configure the update settings:
- Public Apps Auto Update Policy: Specify when Google Play allows auto-date. Select Allow user to configure, Always auto update, Update on Wi-Fi only, or Never auto update.
The default selection is Allow user to configure.
- Start Time: Configure what the local time applications in the foreground should be allowed to auto update each day. Select a time between 00:30 to 23:30.
Note: Only applies if Update on Wi-Fi Only or Always auto update are selected.
- End Time: Configure what the local time applications in the foreground should be allowed to auto update each day. Select a time between 30 minutes to 24 hours.
Note: Only applies if Update on Wi-Fi Only and Always auto update are selected.
Based on time set, the applications only auto updates during the specified start and end times. For example, you would set kiosk devices to only update outside of business hours to not interrupt kiosk usage.
Credentials
For greater security, you can implement digital certificates to protect corporate assets. To do this, you must first define a certificate authority, then configure a Credentials payload alongside your Exchange ActiveSync (EAS), Wi-Fi or VPN payload.
Each payload has settings for associating the certificate authority defined in the Credentials payload. Credentials profiles deploy corporate certificates for user authentication to managed devices. The settings in this profile vary depending on the device ownership type. The Credentials profile applies towards the Work Profile and Work Managed Device mode types.
Devices must have a device pin code configured before Workspace ONE UEM can install identity certificates with a private key.
Credentials profiles deploy corporate certificates for user authentication to managed devices. The settings in this profile will vary depending on the device ownership type. The Credentials profile will apply towards the Work Profile and Work Managed Device mode types.
Select the Credentials profile and select Configure.
Use the drop-down menu to select either Upload or Defined Certificate Authority for the Credential Source. The remaining profile options are source-dependent. If you select Upload, you must enter a Credential Name and upload a new certificate. If you select Defined Certificate Authority, you must choose a predefined Certificate Authority and Template.
Allow Apps to Silently Access Certificates
When you choose Defined Certificate Authority as the Credential Source, you may also specify apps that can silently access the client certificate issued by this Certificate Authority. This option is called Allow silent access to apps. When activated, you may choose any Android Public and Internal Apps that you have previously added in the Workspace ONE UEM console.
Normally, Android applications require authorization from the end user before they can access client certificates in the Android Keystore. They request this authorization by presenting a dialog to the end user that asks them to choose from a list of client certificates. By choosing a certificate, the end user authorizes the application to access it.
Using Allow silent access to apps, you can administratively authorize applications to access the certificate in the Credentials Profile. If the application knows the alias of the certificate in advance, it can use the client certificate without prompting the end user. In the case of client certificates issued by a Defined Certificate Authority, the certificate alias is equivalent to the Subject of the Certificate Template selected in the Credentials Profile. The expected certificate alias can be set in many applications using Application Configuration. For example, while assigning a VPN application through the Workspace ONE UEM Console, the Application Configuration may support a field labeled "Certificate Alias" or similar. In this case, you would set this value to match the Subject in the Certificate Template selected in the Credentials Profile.
Manage Certificates With Custom XML
Certificates can be managed through the Workspace ONE Intelligent Hub for Android and by using custom XML in the UEM console. You can specify package names that allow you to manage your certificates on Android devices. You can add the package names through custom settings.
To push these packages:
-
Navigate to Groups & Settings > All Settings > Apps > Settings & Policies > Settings > Custom Settings.
-
Configure the custom XML accordingly:
Setting Description Custom Settings Paste the following custom XML: { "AuthorizedCertInstaller" : "packagename" } and replace the placeholder package name with the actual package name of the app (usually in format: com.company.appname). -
Save the Custom XML.
Custom Messages
The Custom Messages profile allows you configure messages that display on the device home screen when important information needs to be relayed to the user.
The Custom messages profile allows you to set a lock screen message, a message to display when users attempt to perform a blocked setting, or device user settings.
Select the Custom Messages profile and configure the messages settings:
|Set a lock screen Message|Enter a message to display on the device home screen when the device is locked. This is useful for a device that has been lost or stolen to display contact information of the user.| |Set a short message for blocked settings|Enter a message to be displayed when a user tries to perform actions on a device that is blocked. Use the custom message to explain why the feature is blocked.| |Set a long message for users to view in settings|Users can view this message on their device under Settings > Security > Device admins > Intelligent Hub.|
Application Control
The Application Control profile allows you to control approved applications and prevent uninstalling important apps. While the compliance engine can send alerts and takes administrative actions when a user installs or uninstalls certain applications, Application Control prevents users from even making those changes.
Warning: Enabling/ disabling critical system apps results in devices becoming unusable.
Even without an Application Control Profile, organizations already have some control over applications that can be installed on a managed device. By default, only Public Applications the administrator has assigned to the device via the Workspace ONE UEM Console will be available in the managed Play Store app catalog. In Work Profile and Corporate Owned Personally Enabled (COPE) devices, this applies the Play Store catalog in the Work Profile only.
Administrators can apply further application restrictions on managed devices.
Restricting Work Applications
For managed applications on Android devices, administrators can apply the restrictions in the table below.
| Setting | Description |
|---|---|
| Disable access to Denied Apps | Turn on to prevent access to applications included in Denylist Application Groups. If turned on, the applications are hidden from the Android Launcher and cannot be launched by the end user. This option does not uninstall the application from the device. |
| Prevent Un-Installation of Required Apps | Turn on to prevent the uninstallation by the user or the admin of applications included in Required Application Groups. |
| Turn on System Apps | Turn on to unhide pre-installed applications included in Allowlist Application Groups. For COPE devices on Android 10 and lower. |
The restrictions in the above table are applied as follows:
- Work Profile or COPE (Android 11+) Devices: Restrictions apply only to applications in the Work Profile.
- Work Managed Devices: Restrictions apply to the entire device as there is not separation of Work and personal applications.
- COPE (Android 10 and lower) Devices: If the Work Managed checkbox is enabled, restrictions apply to apps in the personal side of the device. If the Work Profile checkbox is enabled, restrictions apply to the Work Profile.
Restricting Personal Applications on Android 11+ COPE Devices
For devices enrolled in COPE mode and running Android 11 or higher, administrators have a separate setting - Personal Play Store Restrictions - to restrict what applications can be used in the personal side of the device.
| Setting | Description |
|---|---|
| Allowlist | Only pre-installed applications and those applications included in COPE Allowlist Application Groups can be used on the personal side of the device. Other applications are disabled in the Android Launcher and cannot be installed from the Play Store. |
| Denylist | Applications in COPE Denylist Application Groups are disabled on the personal side of the device and cannot be installed from the Play Store. |
Application Groups and Application Control Profile
Workspace ONE UEM applies Application Control settings to applications defined in Application Groups, which you create in the Workspace ONE UEM Console. An Application Group only applies to a device if the Application Group is assigned it. In other words, both Application Groups and Application Control Profiles must be assigned to the device for a setting in the Application Control Profile to take effect.
For example, to prevent uninstallation of a Work application, both should be assigned to the device:
- An App Group of type Required containing the application
- An Application Control Profile with Prevent Un-Installation of Required Apps
The order in which these are assigned to the device also matters. Changes to applications in an Application Group are not applied to the device until a matching Application Control Profile is next installed on the device. In the above example, to prevent uninstallation of another application, the application should first be added to the Application Group. The Application Control Profile should then be re-installed on the device.
Finally, multiple Application Groups of the same type can be assigned to a device. In this example, if two Application Groups of type Required containing different apps are assigned to the same device, the Prevent Un-Installation of Required Apps setting will apply to the applications defined in both App Groups on that device.
For more information on Application Groups, see the Mobile Application Management Documentation.
Proxy Settings
Proxy settings are configured to ensure that all the HTTP and HTTPS network traffic is passed only through it. This ensures data security since all the personal and corporate data will be filtered through the Proxy Settings profile.
Configure the Proxy settings as such:
| Setting | Description |
|---|---|
| Proxy Mode | Select the desired proxy type. |
| Proxy PAC URL | Specify a URL to a proxy .pac file. |
| Proxy Server | Enter the host name of IP address for the proxy server. |
| Exclusion List | Add hostnames to prevent them from routing through the proxy. |
System Updates
Use this profile to manage how Android device updates are handled when the device is enrolled into Workspace ONE UEM.
Select the System Updates profile.
Use the drop-down menu from the Automatic Updates field to select the update policy.
| Setting | Description |
|---|---|
| Automatic Updates (Android 6.0 and higher Work Managed and COPE devices) | Install Updates Automatically: Automatically install updates when they become available. |
| Defer Update Notifications: Defer all updates. Send a policy that blocks OS updates for a maximum period of 30 days. | |
| Set Update Window: Set a daily time window in which to update the device. | |
| Annual System Update Freeze Periods (Android 9.0 and higher Work Managed and COPE devices) | Device owners can postpone OTA system updates to devices for up to 90 days to freeze the OS version running on these devices over critical periods (such as holidays). The system enforces a mandatory 60-day buffer after any defined freeze period to prevent freezing the device indefinitely. |
| During a freeze period: | |
| Devices do not receive any notifications about pending OTA updates. | |
| Devices do not install any OTA updates to the OS. | |
| Device users are not able to manually check for OTA updates. | |
| Freeze Period | Use this field to set freeze periods, in month and day, when updates cannot be installed. When the time of the device is within any of the freeze periods, all incoming system updates, including security patches, are blocked and cannot be installed. Each individual freeze period is allowed to be at most 90 days long and adjacent freeze periods need to be at least 60 days a part. |
Wi-Fi
Configuring a Wi-Fi profile lets devices connect to corporate networks, even if they are hidden, encrypted, or protected.
The Wi-Fi profile can be useful for end users who travel to various office locations that have their own unique wireless networks or for automatically configuring devices to connect to the appropriate wireless network while in an office.
When pushing a Wi-Fi profile to devices running Android 6.0+, if a user already has their device connected to a Wi-Fi network through a manual setup; the Wi-Fi configuration cannot be changed by Workspace ONE UEM. For example, if the Wi-Fi password has been changed and you push the updated profile to enrolled devices, some users have to update their device with the new password manually.
To configure the profile:
Configure Wi-Fi settings, including:
| Setting | Description |
|---|---|
| Service Set Identifier | Provide the name of the network the device connects to. |
| Hidden Network | Indicate if the Wi-Fi network is hidden. |
| Set as Active Network | Indicate if the device will connect to the network with no end-user interaction. |
| Security Type | Specify the access protocol used and whether certificates are required. Depending on the selected security type, this will change the required fields. If None, WEP, WPA/WPA 2, or Any (Personal) area selected; the Password field displays. If WPA/WPA 2 Enterprise is selected, the Protocols and Authentication fields displays. |
| Protocols | |
| - Use Two Factor Authentication- When turned on, the TFA field shows. | |
| - SFA Type - Choose an authentication protocol. Available options are EAP-TLS, PEAP, or EAP-TTLS. | |
| - TFA Type - Choose an inner authentication method. Available options are GTC, MSCHAP, MSCHAPv2, and PAP. | |
| Authentication | |
| - Identity - Set identity and credentials the device will use to connect to the network. | |
| - Identity Certificate - Select the identity certificate to specify a private key and client certificate chain for client authorization. This certificate must be added to the Profile as part of the Credentials payload. | |
| - Root Certificate - Select a root certificate the device will use to validate the server certificate of the network server. The root certificate should be your server CA's root certificate. This is used for the server certificate validation. If no certificate is specified, the server certificate validation is skipped. This certificate must be added to the Profile as part of the Credentials payload. | |
| - Domain - Set a constraint for server domain name that will be used to validate the server certificate of the network server. This is required to add WPA2Enterprise networks to devices on Android 11 and higher. If set, this FQDN is used as a suffix match requirement for the network server certificate in SubjectAltName dNSName element(s). If a matching dNSName is found in the certificate, this constraint is met. | |
| Suffix match here means that the host/domain name is compared one label at a time starting from the top-level domain. For example, if Domain is set to example.com, it would match test.example.com but would not match test-example.com. | |
| Password | Provide the required credentials for the device to connect to the network. The password field displays when WEP, WPA/WPA 2, Any (Personal), WPA/WPA2 Enterprise are selected from the Security Type field. |
| Include Fusion Settings | Turn on to expand Fusion options for use with Fusion Adapters for Motorola devices. Fusion Settings apply only to Motorola Rugged devices. For more information about Omnissa Support for Android Rugged devices, see the Rugged Android Platform Guide. |
| Set Fusion 802.11d | Turn on to use the Fusion 802.11d to set the Fusion 802.11d settings. |
| Turn on 802.11d | Turn on to use 802.11d wireless specification for operation in additional regulatory domains. |
| Set Country Code | Turn on to set the Country Code for use in the 802.11d specifications. |
| Set RF Band | Turn on to choose 2.4 GHz, 5 Ghz, or both bands and any channel masks applicable. |
| Proxy Type | Turn on to configure the Wi-Fi proxy settings.Note: Wi-Fi Proxy Auto Configuration is not supported using Per-App VPN. |
| Proxy Server | Enter the hostname or IP address for the proxy server. |
| Proxy Server Port | Enter the port for the proxy server. |
| Exclusion List | Enter the hostnames to exclude from the proxy.Hostnames entered here will not be routed through the proxy. Use the * as a wild card for the domain. For example: *.air-watch.com or *air-watch.com. |
VPN
A Virtual Private Network (VPN) provides devices with a secure and encrypted tunnel to access internal resources such as email, files, and content. VPN profiles Turn on each device to function as if it were connected through the on-site network.
Depending on the connection type and authentication method, use look-up values to auto-fill user name info to streamline the login process.
Note: The VPN profile applies for both the Work Profile and Work Managed Device mode types.
Configure VPN settings. The table below defines all settings that can be configured based on the VPN client.
| Setting | Description |
|---|---|
| Connection Type | Choose the protocol used to facilitate VPN sessions. Each Connection Type requires the respective VPN Client to be installed on the device to deploy the VPN profile. These applications should be assigned to users and published as public apps. |
| Connection Name | Enter the assigned to the connection created by the profile. |
| Server | Enter the name or address of the used for VPN connections. |
| Account | Enter the user account for authenticating the connection. |
| Always On VPN | Turn on to force all traffic from work apps to be tunneled through VPN. |
| Lockdown | Forces apps to only connect through the VPN. If the VPN is disconnected or not available, apps will not have any internet access. |
| Allow Apps to Bypass Lockdown | Turn on to specify apps to continue to access the internet even when the VPN is disconnected or not available. |
| Lockdown Allow List | If Lockdown Allow List is Turn on with packages added, then the listed apps will be able to connect straight to the internet if VPN has been disconnected |
| Set Active | Turn on to turn VPN on after the profile applies to the device. |
| Per-App VPN Rules | Turn on Per App VPN which allows you to configure VPN traffic rules based on specific applications. This text box only displays for supported VPN vendors. Note: Wi-Fi Proxy Auto Configuration is not supported using Per-App VPN. |
| Protocol | Select the authentication protocol for the VPN. Available when Cisco AnyConnect is selected from the Connection Type. |
| Username | Enter the username. Available when Cisco AnyConnect is selected from the Connection Type. |
| User Authentication | Choose the method required to authenticate the VPN session. |
| Password | Provide the credentials required for end-user VPN access. |
| Client Certificate | Use the drop-down to select the client certificate. These are configured in the Credentials profiles. |
| Certificate Revocation | Turn on to turn on certificate revocation. |
| AnyConnect Profile | Enter the AnyConnect profile name. |
| FIPS Mode | Turn on to turn on FIPS Mode. |
| Strict Mode | Turn on to turn on Strict Mode. |
| Vendor Keys | Create custom keys to go into the vendor config dictionary. |
| Key | Enter the specific key provided by the vendor. |
| Value | Enter the VPN value for each key. |
| Identity Certificate | Select the identity certificate to be used for the VPN connection. Available when Workspace ONE Tunnel is selected from the Connection Type. |
Configure Per-App VPN Rules
You can force selected applications to connect through your corporate VPN. Your VPN provider must support this feature, and you must publish the apps as managed applications.
Note: Wi-Fi Proxy Auto Configuration is not supported using Per-App VPN.
-
Select the VPN payload from the list.
-
Select your VPN vendor from the Connection Type field.
-
Configure your VPN profile.
-
Select Per-App VPN Rules to Turn on the ability to associate the VPN profile to the desired applications. For Workspace ONE Tunnel client, this selection is Turn on by default. After the checkbox is Turn on, this profile is available for selection under the App Tunneling profiles dropdown in the application assignment page.
-
Select Save & Publish.
If Per-App VPN rules are Turn on as an update to an existing VPN profile, the devices/applications that were previously using the VPN connection are affected. The VPN connection that was previously routing all apps traffic are disconnected and VPN only applies to applications associated with the updated profile.
To configure public apps to use the Per-App VPN profile, see Adding Public Applications for Android in the Application Management for Android publication.
Permissions
The Workspace ONE UEM console provides the admin the ability to view a list of all the permissions that an application is using and set the default action at run time of the app. The Permissions profile is available on Android 6.0+ devices using Work Managed device and Work Profile mode.
You can set run-time permission policies for each Android app. The latest permissions are retrieved when configuring an app at an individual app-level.
Note: All permissions used by an app are listed when you select the app from the Exceptions list, however permission policies from the Workspace ONE UEM console only apply to dangerous permissions as deemed by Google. Dangerous permissions cover areas where the app requests data that includes the user's personal information, or could potentially affect the user's stored data. For more information, please reference the Android Developer website.
Configure the Permissions settings, including:
| Settings | Description |
|---|---|
| Permission Policy | Select whether to Prompt user for permission, Grant all permissions, or Deny all permissions for all work apps. |
| Exceptions | Search for apps that have already been added into AirWatch (should only include Android approved apps), and make an exception to the permission policy for the app. |
Lock Task Mode
Lock Task Mode allows an app to pin itself to the foreground which allows for a single purpose such as kiosk mode. The app must support Lock Task Mode and is added through the Apps & Books setting to show in Whitelisted Apps. The app developer configures the lock task setting during app development and the Lock Task profile settings lets you configure the permissions and settings.
Note: For more information on supported applications, see the link in the Lock Task Mode profile in the Workspace ONE UEM console which directs you to the Google Developer site for specifics.
Configure the Lock Task Mode settings:
| Settings | Description |
|---|---|
| Whitelisted Apps | Select the desired apps to lock device into Lock Task Mode. |
| Home Button | Turn on to show the home button on the screen for the user to access. |
| Recent Apps Button | Turn on to show an overview of recent apps used. |
| Global Actions | Turns on to let users long press the power button to see global actions such as power button or other common actions used on the device. |
| App Notifications | Turn on to show notification icons on the status bar. |
| System Info in Status Bar | Turn on to display device information bar with information such as battery life, connectivity, and volume. |
| Lock Screen | Turns on the lock screen. |
Best Practices for Lock Task Mode
Consider applying these policies and restrictions to ensure the best experience and maintenance for your single-purpose using lock task mode policies. These recommendations are useful if you are deploying a Lock Task Mode profile for devices in kiosk and digital signage use cases where an end user is not associated with the device.
Create a "Restrictions" profile and configure the following within the profile:
-
Disable the following options under Device Functionality:
- Allow Status Bar - This ensures an immersive experience when the device is locked into lock task mode.
- Allow Keyguard - This ensures that the device does not get locked. This setting is ignored when a passcode is present on the device.
-
Turn on the following options under Device Functionality:
- Force Screen On when Plugged In on AC Charger
- Force Screen On when Plugged In on USB Charge
- Force Screen On when Plugged In on Wireless Charger These options ensure that the device screen is always turned on for interaction.
Deploy the System Update Policy profile to ensure the device receives the latest fixes with minimal manual intervention.
Date/Time for Android Devices
Configure the Date/Time sync settings to ensure devices always have the correct time across different regions. Supported on Android 9.0 or later devices.
Configure the Date/Time settings, including:
| Setting | Description |
|---|---|
| Date/Time | Set which data source your devices pulls from for the date and time settings. Select Automatic, HTTP URL, or SNTP Server. |
| Automatic: Sets the date and time based on native device settings. | |
| HTTP URL: Sets the time based on a URL. This URL can be any URL. For example, you can use www.google.com for your URL. | |
| SNTP Server: Enter the server address. For example, you could enter time.nist.gov for your use. | |
| For HTTP URL and SNTP Server, configure the additional settings: Turn on Periodic Sync – Turn on to set the device to sync date/time periodically in days. Set Time Zone – Specify the time zone from the available options. | |
| Allow User to change date/time | Turn on to allow users to manually change the date/time from the device. |
Date/Time for Samsung Devices
Configure the Date/Time sync settings to ensure devices always have the correct time across different regions.
This profile is available when OEM Settings is Turn on and the Select OEM field is set to Samsung in the General profile settings.
Note: The Date/Time profile only displays when the OEM Settings field is toggled to Turn on
Configure the Date/Time settings for Samsung, including:
| Setting | Description |
|---|---|
| Date Format | Change the order of the Month, Day, and Year display. |
| Time Format | Choose 12 or 24 Hours format. |
| Date/Time | Set which data source your devices pulls from for the date and time settings: |
| Automatic: Sets the date and time based on native device settings. | |
| Server Time: Sets the time based on the server time of the Workspace ONE UEM console at the time that the profile is created. Note this may cause device time to be late due to latency with pushing profiles. | |
| HTTP URL: Sets the time based on a URL. This URL can be any URL. For example, you can use www.google.com for your URL. | |
| SNTP Server: Enter the server. | |
| For HTTP URL and SNTP Server, configure the additional settings: Turn on Periodic Sync – Turn on to set the device to sync date/time periodically in days. Set Time Zone – Specify the time zone from the available options. |
Workspace ONE Launcher
Workspace ONE Launcher is an application launcher that lets you to lock down Android devices for individual use cases and customize the look and behavior of managed Android devices. The Workspace ONE Launcher application replaces your device interface with one that is custom- tailored to your business needs.
You can configure Android 6.0 Marshmallow and later devices as corporate-owned, single-use (COSU) mode. COSU mode allows you to configure devices for a single purpose such as kiosk mode by whitelisting supported internal and public applications. COSU mode is supported for Single App mode, Multi App Mode, and Template Mode. For more information on deploying Workspace ONE Launcher profile in COSU mode, see the Workspace ONE Launcher publication.
For a more comprehensive guide to configure Workspace ONE Launcher, see Workspace ONE Launcher Publication.
Firewall
The Firewall payload allows admins to configure firewall rules for Android devices. Each firewall rule type allows you to add multiple rules.
This profile is available when OEM Settings is Turn on and the Select OEM field is set to Samsung in the General profile settings.
Note: The Firewall payload only applies to SAFE 2.0+ devices.
-
Navigate to Resources > Profiles & Baselines > Profiles > Add > Add Profile > Android.
The Firewall profile only displays for Android profiles when the OEM Settings field is Turn on and Samsung is selected from the Select OEM field. The OEM Settings field in the General profile only applies to Android profiles and not Android (Legacy) configurations.
-
Select Device to deploy your profile.
-
Configure the General profile settings.
The General settings determine how the profile deploys and who receives it.
-
Select the Firewall profile.
-
Select the Add button under the desired rule to configure the settings:
Setting Description Allow Rules Allows the device to send and receive from a specific network location. Deny Rules Blocks the device from sending and receiving traffic from a specific network location. Reroute Rules Redirects traffic from a specific network location to an alternate network. If an allowed website redirects to another URL, please add all redirected URLs to the Allow Rules section so it can be accessed. Redirect Exception Rules Avoids traffic from being redirected. -
Select Save & Publish.
APN
Configure Android devices Access Point Name (APN) settings to unify device fleet carrier settings and correct misconfigurations.
-
Navigate to Resources > Profiles & Baselines > Profiles > Add > Add Profile > Android.
-
Select Device to deploy your profile to a device.
-
Configure the profile's General settings. The APN profile only displays when the OEM Settings field is toggled to Turn on and Samsung is selected from the Select OEM field.
The General profile settings determine how the profile deploys and who receives it.
-
Select the APN payload.
-
Configure the APN settings, including:
Setting Description Display Name Provide a user friendly name of the access name. Access Point Name (APN) Enter the APN provided by your carrier (For example: come.moto.cellular). Access Point Type Specifies which types of data communication should use this APN configuration. Mobile Country Code (MCC) Enter the 3-digit country code. This values checks whether devices are roaming on a different carrier than entered here. This is used in combination with a mobile network code (MNC) to uniquely identify a mobile network operator (carrier) using the GSM (including GSM-R), UMTS, and LTE mobile networks. Mobile Network Code (MNC) Enter the 3-digit network code. This values checks whether devices are roaming on a different carrier than entered here. This is used in combination with a mobile country code (MCC) to uniquely identify a mobile network operator (carrier) using the GSM (including GSM-R), UMTS, and LTE mobile networks. MMS Server (MMSC) Specify the server address. MMS Proxy Server Enter the MMS port number. MMS Proxy Server Port Enter the target port for the proxy server. Server Enter the name or address used for the connection. Proxy Server Enter the proxy server details. Proxy Server Port Enter the proxy server port for all traffic. Access Point User Name Specify the username that connects to the access point. Access Point Password Specify the password that authenticates the access point. Authentication Type Select the authentication protocol. Set as Preferred APN Turn on to ensure all end user devices have the same APN settings and to prevent any changes being made from the device or carrier. -
Select Save & Publish.
Enterprise Factory Reset Protection
Factory Reset Protection (FRP) is an Android security method that prevents use of a device after an unauthorized factory data reset.
When Turn on, the protected device cannot be used after a factory reset until you log in using the same Google account previously set up.
If a user has Turn on FRP, when the device is returned to the organization (user leaves the company, for example), you might be unable to set up the device again due to this device feature.
The Enterprise Factory Reset Protection profile uses a Google user ID which allows you to override the Google account after a factory reset to assign the device to another user. To get this Google user ID, visit People:get.
Generate Google user ID for the Factory Reset Protection Profile for Android Devices
This Google User ID allows you to reset the device without the original Google account. Obtain your Google user ID using the People:get API to configure the profile. Before you begin, you must get your Google user ID from the People:get website.
-
Navigate to People:get.
-
In the Try this API window, configure the following settings.
Setting Description resourceName Enter people/me. personFields Enter metadata,emailAddresses requestMask.includefield Leave this field empty. Credentials Turn on both the Google OAuth 2.0 and API Key fields. -
Select Execute.
-
Sign into your Google account, if prompted. This is the account used to unlock devices when FRP is Turn on.
-
Select Allow to grant permissions.
-
Find the 21-digit in the application/json tab in the id field.
-
Return to the Workspace ONE UEM console and configure the Enterprise Factory Reset Protection profile.
Configure Enterprise Factory Reset Protection Profile for Android
Enter the Google user ID in the Enterprise Factory Reset Protection profile.
-
Navigate to Resources > Profiles & Baselines > Profiles > Add > Add Profile > Android.
-
Configure the General profile settings as appropriate.
-
Select the Enterprise Factory Reset Protection payload.
-
Configure the following settings to set the level of control for your application deployments:
Setting Description Google user IDs Enter the Google user ID obtained from Google People:get. -
Select Save & Publish.
Zebra MX
The Zebra MX profile allows you take advantage of the additional capabilities offered with the Zebra MX service app on Android devices. The Zebra MX Service app can be pushed from Google Play and from My Workspace ONE distributed it as an internal app in the Workspace ONE UEM console in conjunction with this profile.
-
Navigate to Resources > Profiles & Baselines > Profiles > Add > Add Profile > Android.
-
Configure the General profile settings as appropriate. Turn on the OEM Settings field and select Zebra from the Select OEM field to Turn on the Zebra MX profile.
-
Configure the Zebra MX profile settings:
Setting Description Include Fusion Settings Turn on to expand Fusion options for use with Fusion Adapters for Motorola devices. Set Fusion 802.11d Turn on to use the Fusion 802.11d to set the Fusion 802.11d settings. Turn on 802.11d Turn on to use 802.11d wireless specification for operation in additional regulatory domains. Set Country Code Turn on to set the Country Code for use in the 802.11d specifications. Set RF Band Turn on to choose 2.4 GHz, 5 Ghz, or both bands and any channel masks applicable. Allow Airplane Mode Turn on to allow access to the Airplane Mode settings screen. Allow Mock Locations Turn on or disable Mock Locations (in Settings > Developer Options). Allow Background Data Turn on or disable background data. Keep Wi-Fi on During Sleep Always On - Wi-Fi stays on when device goes to sleep. Only When plugged in - Wi-Fi stays on when device goes to sleep only if the device is charging. Never On - Wi-Fi turns off when the device goes to sleep. Data Usage On Roaming Turn on to allow data connection while roaming. Force Wi-Fi On Turn on to force Wi-Fi on so user cannot turn it off. Allow Bluetooth Turn on to allow the use of Bluetooth. Allow Clipboard Turn on to allow copy/paste. Allow Network Monitoring notification Turn on to allow Network Monitor Warning notification, which is normally displayed after installing certificates. Turn on Date/Time Settings Turn on to set Date/Time settings Date Format: Determine the order that the Month, Day, and Year displays. Time Format: Choose 12 or 24 Hours. Date/Time: Set which data source your devices will pull from for the date and time settings: Automatic Sets the date and time based on native device settings. Server Time – Sets the time based on the server time of the Workspace ONE UEM console . Set Time Zone – Specify the time zone. HTTP URL – Workspace ONE UEM Intelligent Hub reaches out to the URL and fetches the timestamp from the HTTP header. It then applies that time to the device. It does not handle sites that redirect URL – Enter the web address the Date/Time schedule. Must include http://. Example: http://www.google.com / HTTPS not supported. Turn on Periodic Sync – Turn on to set the device to check date/time periodically in days. Set Time Zone – Specify the time zone. SNTP Server: - The NTP settings are directly applied to the device. URL – Enter the web address the NTP/SNTP server. For example, you could enter time.nist.gov for your use. Turn on Periodic Sync – Turn on to set the device to check date/time periodically in days. Turn on Sound Settings Turn on the sound settings configure audio settings on the device. - Music, Video, Games, & Other Media: Set the slider to the volume level you want to lock-in on the device. Ringtones & Notifications: Set the slider the volume you want to lock-in on the device. Voice Calls: Set the slider to the volume you want to lock-in on the device. Turn on Default Notifications: Allows default notifications on the device to sound. Turn on Dial Pad Touch Tones: Allows dial pad touch tones on the device to sound. Turn on Touch Tones: Allows touch tones on the device to sound. Turn on Screen Lock Sounds: Allows the device to play a sound when locked. Turn on Vibrate on Touch**: Allows the vibrate settings to be activated.- Turn on Display Settings Turn on to set display settings: - Display Brightness: Set the slider to the brightness level you want to lock-in on the device. Turn on Auto-Rotate Screen: Use this option to lock the device orientation. Set Sleep: Choose the amount of time before the screen will set to sleep mode. -
Select Save & Publish.
Custom Settings
The Custom Settings payload can be used when new Android functionality releases or features that Workspace ONE UEM console does not currently support through its native payloads. Use the Custom Settings payload and XML code to manually Turn on or disable certain settings.
-
Navigate to Resources > Profiles & Baselines > Profiles > Add > Add Profile > Android.
-
Configure the profile's General settings.
-
Configure the applicable payload (for example, Restrictions or Passcode).
You can work on a copy of your profile, saved under a "test" organization group, to avoid affecting other users before you are ready to Save and Publish.
-
Save, but do not publish, your profile.
-
Select the radio button from the Profiles List View for the row of the profile you want to customize.
-
Select the XML button at the top to view the profile XML.
-
For the Profile Payload that you configured previously, copy the section of XML code enclosed in the
and tags (including these tags). If the Profile has multiple Payloads, identify thetags for the payload you wish to copy XML code for. For example, a Passcode Profile will have the a tag with a "type" value of com.airwatch.android.androidwork.apppasswordpolicy. -
Copy this section of text and close the XML View. Open your profile.
-
Select the Custom Settings payload and select Configure. Paste the XML you copied in the text box. The XML code you paste should contain the complete block of code, from
to . - This XML should contain the complete block of code as listed for each custom XML.
- Administrators should configure each setting from
to as desired. - If certificates are required, then configure a Certificate payload within the profile and reference the Payload UUID in the Custom Settings payload.
-
Remove the original payload you configured by selecting the base payload section and selecting the minus [-] button. You can now enhance the profile by adding custom XML code for the new functionality.
-
When applying custom settings for Launcher profile, make sure you are using the right characteristic type for your profile type:
- For Android profiles, use characteristic type = "com.airwatch.android.androidwork.launcher".
- For Android (Legacy) profiles, use characteristic type = "com.airwatch.android.kiosk.settings".
Any device not upgraded to the latest version ignores the enhancements you create. Since the code is now custom, you should test the profile devices with older versions to verify expected behavior.
-
-
Select Save & Publish.
Push Application Configuration for Applications
You can push Application Configuration key-value pairs through the Android Custom Settings profile. To do so, follow the template below and provide:
- The application package ID
- For each Application Configuration key-value pair, the key name, value, and value data type
    <characteristic uuid="a0a4acc3-9de1-493b-b611-eb824ffed00f" type="com.airwatch.android.androidwork.app:packageID" target="1">
    <parm name="key1" value="string" type="string" />
    <parm name="key2" value="1" type="integer" />
    <parm name="key3" value="False" type="boolean" />
        </characteristic>
Example
<characteristic uuid="a0a4acc3-9de1-493b-b611-eb824ffed00f" type="com.airwatch.android.androidwork.app:com.airwatch.testapp" target="1">
    <parm name="server_hostname" value="test.com" type="string" />
    <parm name="connection_timeout" value="60" type="integer" />
    <parm name="feature_flag" value="True" type="boolean" />
</characteristic>
Note: Application Configuration can be added while assigning Android applications. See Add Assignments and Exclusions to your Applications for more information.
Allowlist VPN Application for Always-On VPN
To allowlist a VPN client for Always-On VPN, push a Custom Settings profile payload using this template and providing the application PackageID
<characteristic uuid="a0a4acc3-9de1-493b-b611-eb824ffed00f" type="com.airwatch.android.androidwork.app:packageID" target="1">
    <parm name="EnableAlwaysOnVPN" value="True" type="boolean" />
</characteristic>
Note: To push both Application Configuration and turn on Always-on VPN for an application, combine this key-value pair with the Application Configuration key-value pairs and deploy as a single Custom Settings payload.
Custom XML for Android Devices
In Android 11, customers using third party custom attributes need to use the Custom Settings profile to specify an alternate location for storing the custom attribute files. Customers apps will also need to target this same folder location, which may require changes to their app.
Example Custom XML (Value can differ based on customer preference):
<characteristic type="com.android.agent.miscellaneousSettingsGroup" uuid="2c787565-1c4a-4eaa-8cd4-3bca39b8e98b">
<parm name="attributes_file_path" value="/storage/emulated/0/Documents/Attributes"/></characteristic>
Specific Profiles Features for Android
These features matrices are a representative overview of the key OS specific functionality available, highlighting the most important features available for device administration for Android.
| Feature | Work Profile | Work Managed Device |
|---|---|---|
| Application Control | ||
| Disable Access to Blacklisted Apps | ✓ | ✓ |
| Prevent uninstallation of Required Applications | ✓ | ✓ |
| Turn on System Update Policy | ✓ | |
| Runtime Permissions Management | ✓ | ✓ |
| Browser | ||
| Allow Cookies | ✓ | ✓ |
| Allow Images | ✓ | ✓ |
| Turn on Javascript | ✓ | ✓ |
| Allow Pop-Ups | ✓ | ✓ |
| Allow Track Location | ✓ | ✓ |
| Configure Proxy Settings | ✓ | ✓ |
| Force Google SafeSearch | ✓ | ✓ |
| Force YouTube Safety Mode | ✓ | ✓ |
| Turn on Touch to Search | ✓ | ✓ |
| Turn on Default Search Provider | ✓ | ✓ |
| Turn on Password Manager | ✓ | ✓ |
| Turn on alternate error pages | ✓ | ✓ |
| Turn on Autofill | ✓ | ✓ |
| Turn on Printing | ✓ | ✓ |
| Turn on Data Compression Proxy Feature | ✓ | ✓ |
| Turn on Safe Browsing | ✓ | ✓ |
| Disable saving browser history | ✓ | ✓ |
| Prevent Proceeding After Safe Browsing Warning | ✓ | ✓ |
| Disable SPDY protocol | ✓ | ✓ |
| Turn on network prediction | ✓ | ✓ |
| Turn on Deprecated Web Platform Features For a Limited Time | ✓ | ✓ |
| Force Safe Search | ✓ | ✓ |
| Incognito Mode Availability | ✓ | ✓ |
| Allows sign in to Chromium | ✓ | ✓ |
| Turn on Search Suggestion | ✓ | ✓ |
| Turn on Translate | ✓ | ✓ |
| Allow Bookmarks | ✓ | ✓ |
| Allow Access to Certain URLs | ✓ | ✓ |
| Block Access to Certain URLs | ✓ | ✓ |
| Set Minimum SSL Version | ✓ | ✓ |
| Passcode Policy | ||
| Have User Set New Passcode | ✓ | ✓ |
| Maximum failed password attempts | ✓ | ✓ |
| Allow Simple Passcode | ✓ | ✓ |
| Alphanumeric password Allowed | ✓ | ✓ |
| Set Device Lock timeout (in minutes) | ✓ | ✓ |
| Set Maximum Passcode Age | ✓ | ✓ |
| Password History Length | ✓ | ✓ |
| Password History Length | ✓ | ✓ |
| Set Minimum Passcode Length | ✓ | ✓ |
| Set Minimum Number of Numerical Digits | ✓ | ✓ |
| Set Minimum Number of Lower Case Letters | ✓ | ✓ |
| Set Minimum Number of Upper Case Letters | ✓ | ✓ |
| Set Minimum Number of Upper Case Letters | ✓ | ✓ |
| Set Minimum Number of Special Characters | ✓ | ✓ |
| Set Minimum Number of Symbols | ✓ | ✓ |
| Commands | ||
| Allow Enterprise Wipe | ✓ | ✓ |
| Allow Device Wipe | ✓ | |
| Allow Container or Profile Wipe | ✓ | |
| Allow SD Card Wipe | ✓ | |
| Lock Device | ✓ | ✓ |
| Allow Lock Container or Profile | ||
| Native Email Configuration | ✓ | ✓ |
| Allow Contacts and Calendar Sync | ✓ | ✓ |
| Network | ||
| Configure VPN Types | ✓ | ✓ |
| Turn on Per-app VPN (Only available for specific VPN clients) | ✓ | ✓ |
| Use Web Logon for Authentication (Only available for specific VPN clients) | ✓ | ✓ |
| Set HTTP Global Proxy | ✓ | |
| Allow Data Connection to Wi-Fi | ✓ | ✓ |
| Always on VPN | ✓ | ✓ |
| Encryption | ||
| Require Full Device Encryption | ✓ | ✓ |
| Report Encryption Status |
Was this page helpful?