This documentation page applies to the first-gen Horizon Image Management Service. After you have imported and published images from your first-gen tenant's Horizon 8 pods, you can create desktop assignments based on these managed images.
Horizon Image Management Service supports the use of managed images for the following types of desktop assignments.
Note: These desktop pools are the types used for cloud-connected Horizon pods. Such pods are based on Horizon Connection Server software.
- Automated full-clone desktop pools
- Automated instant-clone desktop pools
- Automated instant-clone farms
Cloud-Connected Horizon Pods - Create an Automated Desktop Pool from a Managed Image
This documentation topic is specific to desktop pools for Horizon pods — the pod type that is based on Horizon Connection Server software. You can create an automated instant-clone desktop pool or an automated desktop pool that contains full virtual machines based on a managed image in the image catalog template. Markers allow you to associate the desktop pool with a specific version of the image.
Note: When you want to create a desktop assignment using managed images from your pod-manager-based pods in Microsoft Azure, the steps are different from these steps. In that scenario, you create a multi-cloud desktop assignment. See Pods in Microsoft Azure - Creating VDI Multi-Cloud Assignments with Managed Images.
Prerequisites
- Prepare the managed image that the Horizon pod will use to create the machines. The image must be available in the image catalog in the Horizon Universal Console. Perform the following procedures:
- Import the image. See First-Gen Tenants - IMS and Horizon 8 Pods - Import an Image from vCenter into the Image Catalog.
- Publish at least one version of the image. See First-Gen Horizon Cloud - IMS - Publishing the Image Version.
- Gather the configuration information you must provide to create the automated instant-clone desktop pool or automated desktop pool that contains full virtual machines. For the specific instructions, refer to the information within the Desktops and Applications guide that corresponds to your Horizon 8 deployment version. That guide is located within the Horizon 8 documentation page.
- If you intend to provide access to your desktops and applications through Omnissa Access, create the desktop and application pools as a user who has the Horizon predefined Administrators role on the root access group, as displayed in the pod's Horizon Console. If you give the user the Administrators role on an access group other than the root access group, Omnissa Access will not recognize the SAML authenticator you configure in Horizon, and you cannot configure the pool in Omnissa Access.
Procedure
-
In Horizon Console, select Inventory > Desktops.
-
Click Add.
-
Select Automated Desktop Pool and click Next.
-
Choose to create an automated instant-clone desktop pool or an automated desktop pool that contains full virtual machines.
- To create an instant-clone desktop pool, select Instant Clone, and click Next.
- To create an automated desktop pool that contains full virtual machines, select Full Virtual Machines, and click Next.
-
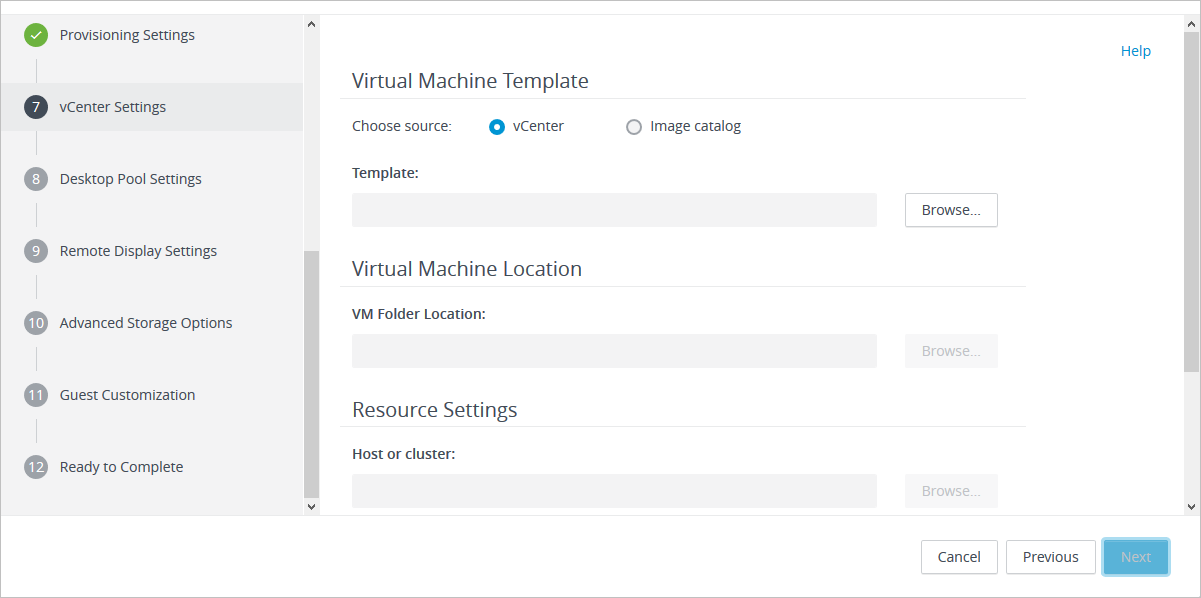
Follow the prompts through the wizard until you reach the vCenter Settings page.
-
Under Virtual Machine Template, select Image Catalog as the image source.
-
Under Stream, click Browse.
The Select Stream dialog box appears.
Note: Horizon Console uses the term "stream" to refer to images.
-
Select the image that you want to use for the desktop pool.
-
To display all the images from the image catalog, regardless of the images' status, select Show all streams.
Note: Selecting this option displays all images from the image catalog, including images that are not yet ready or available for use with a desktop pool.
-
To search for a specific image in the catalog, start typing the name of the image in the filter text box.
-
To update the display list with the latest images from the image catalog, click the refresh (
 ) icon.
 -
In the display list, select the image to serve as the basis for the desktop pool.
-
Click Submit.
-
-
On the vCenter Settings page, select an option from the Marker drop-down menu.
The marker that you select determines the specific version of the image that is used to create the desktop pool. For more information, see First-Gen - Working with IMS Markers in a First-Gen Horizon Cloud Environment.
-
To complete the creation of the desktop pool, continue to follow the prompts through the remaining options and pages of the wizard.
You can go directly back to any wizard page by clicking the page name in the navigation pane.
-
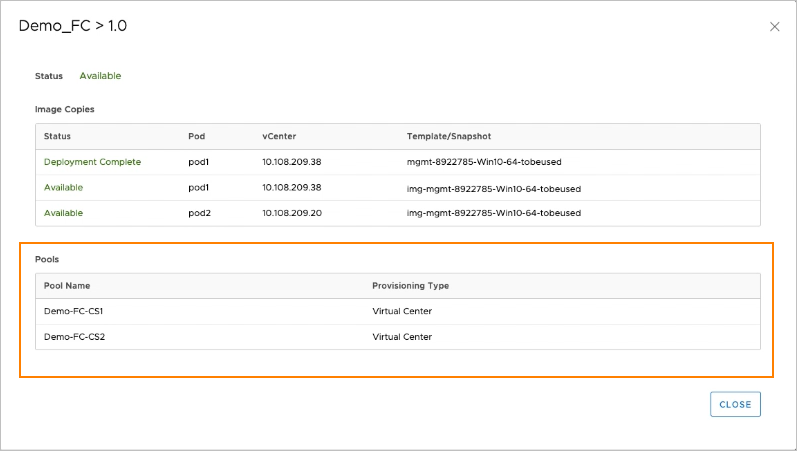
To verify the association between the desktop pool and the image version, go to the Horizon Universal Console and click Inventory > Images - Multi-Pod. From there, click the name of the associated image to open the image details page. Then click the version number of the version tagged with the same marker that you associated with the desktop pool.
On the version details page, verify that the newly created desktop pool appears under the Pools list.
What to do next
Entitle users to access the pool. For the specific instructions, refer to the information within the Desktops and Applications guide that corresponds to your Horizon 8 deployment version. That guide is located within the Horizon 8 documentation page.
Cloud-Connected Horizon Pods - Create an Automated Farm from a Managed Image
This documentation topic is specific to desktop pools for Horizon pods — the pod type that is based on Horizon Connection Server software. You can create an automated instant-clone farm that contains RDS hosts based on a managed image in the image catalog template. Markers allow you to associate the farm with a specific version of the image.
You create an automated instant-clone farm as part of the process to give users access to published applications or published desktops.
Prerequisites
- Prepare the managed image that Horizon will use to create the machines. The image must be available in the image catalog in the Horizon Universal Console. Perform the following procedures:
- Import the image. See First-Gen Tenants - IMS and Horizon 8 Pods - Import an Image from vCenter into the Image Catalog.
- Publish at least one version of the image. See First-Gen Horizon Cloud - IMS - Publishing the Image Version.
- Gather the configuration information you must provide to create the farm. For the specific instructions, refer to the information within the Desktops and Applications guide that corresponds to your Horizon 8 deployment version. That guide is located within the Horizon 8 documentation page.
Procedure
-
In Horizon Console, select Inventory > Farms.
-
Click Add.
-
Select Automated Farm and click Next.
-
Select Instant clone and click Next.
-
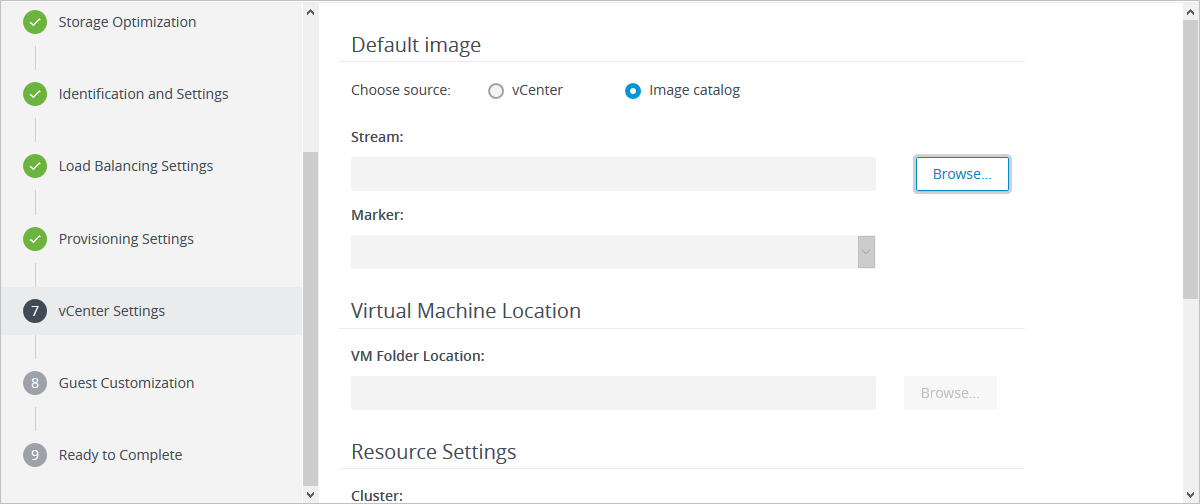
Follow the prompts to proceed through the wizard until you reach the vCenter Settings page.
-
Select Image Catalog as the image source.
-
Under Stream, click Browse.
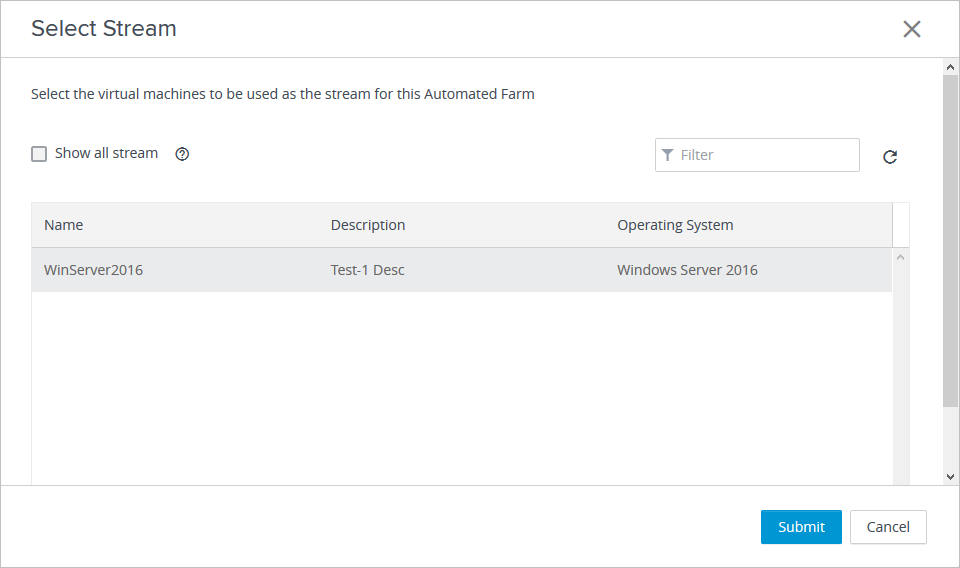
The Select Stream dialog box appears.
Note: Horizon Console uses the term "stream" to refer to images.
-
Select the image that you want to use for the farm.
-
To display all the images from the image catalog, regardless of the images' status, select Show all streams.
Note: Selecting this option displays all images from the image catalog, including images that are not yet ready or available for use with a farm.
-
To search for a specific image in the catalog, start typing the name of the image in the filter text box.
-
To update the display list with the latest images from the image catalog, click the refresh (
) icon. -
In the display list, select the image to serve as the basis for the farm.
-
Click Submit.
-
-
On the vCenter Settings page, select an option from the Marker drop-down menu.
The marker that you select determines the specific version of the image that is used to create the farm. For more information, see First-Gen - Working with IMS Markers in a First-Gen Horizon Cloud Environment.
-
To complete the farm creation, continue to follow the prompts through the remaining options and pages of the wizard.
You can go directly back to any wizard page by clicking the page name in the navigation pane.
-
To verify the association between the farm and the image version, go to the Horizon Universal Console and click Inventory > Images - Multi-Pod. From there, click the name of the associated image to open the image details page. Then click the version number of the version tagged with the same marker that you associated with the farm.
On the version details page, verify that the newly created farm appears under the Pools list.
What to do next
Create a published application pool or a published desktop pool. For the specific instructions, refer to the information within the Desktops and Applications guide that corresponds to your Horizon 8 deployment version. That guide is located within the Horizon 8 documentation page.
Horizon 8 Pods - Changing the Image and Snapshot Source in a Pool or Farm from vCenter Server to Image Catalog or the Reverse
Starting with the Horizon 8 2209 release, depending on how you want your golden image to be managed, you can change the golden image and snapshot source used in a pool or farm from using vCenter Server to use the Horizon Image Management Service (IMS) Image Catalog. Alternatively, if a pool or farm is already using the IMS Image Catalog for its source entity, you can switch to use vCenter Server for that source entity.
With this feature, you can switch the source back and forth as you desire. Prior to Horizon 8 2209 release, a way to switch the source to use IMS's Image Catalog or switch from using the IMS's Image Catalog was not provided.
Using this Feature with Your Automated Full-Clone Desktop Pools
As described in the Horizon guide Desktops and Applications, after you use the Horizon Console to edit the settings for the full-clone desktop pool and change the radio button for the source, you must rebuild the virtual machine associated with the edited source for the change to take effect. Refer to the pages found in a search of the Horizon 8 documentation in our documentation portal search for words Automated Full-Clone Desktop Pools.
Using this Feature with Your Automated Instant Clone Desktop Pools
As described in the Horizon 8 documentation, you change the source setting within the Horizon Console's schedule push image operation (Maintain > Schedule). For Horizon 8 2312, refer to the page Horizon 8 2312 Patching an Instant-Clone Desktop Pool. To see the same page reference for another Horizon 8 version, open that version 2312 page and use the Version drop-down at the top of the page to select a version.
Using this Feature with Your Automated Instant Clone Farms
As described in the Horizon 8 documentation, you change the source setting within the Horizon Console's schedule maintenance operation (Maintain > Schedule). For Horizon 8 2312, refer to the page Horizon 8 2312 Schedule Maintenance for an Automated Instant-Clone Farm. To see the same page reference for another Horizon 8 version, open that version 2312 page and use the Version drop-down at the top of the page to select a version.
Was this page helpful?