This documentation page applies to the first-gen Horizon Image Management Service. Using IMS, you can easily update desktop assignments across your pods with images that you have modified. Once you have set up the proper associations between your desktop assignments and images, you can update these associations by using markers.
To accomplish the automated updating of desktop assignments, perform the following tasks in the listed order:
- Create a new version of the existing image used by the desktop assignments.
- Make the required customizations to the new image version. See Customize an Image.
- Make the newly customized version available for use in desktop assignments by publishing the version. See First-Gen Horizon Cloud - IMS - Publishing the Image Version.
- Update desktop assignments by moving the associated marker from the current image version to the newly customized version. See Update Desktop Assignments with a Customized Image.
Create a New Image Version
To initiate the workflow for updating your desktop assignments with a customized image, you first create a new version of the image in the image catalog. You perform these steps in the Horizon Universal Console.
The new version receives any edits you make to the underlying image. As an example, for on-premises Horizon pods, the new version receives any edits you make to the underlying image instance in vCenter Server.
Note:
Creating an image by selecting a New Image or New Version on the Version page is not possible if one or more of the following situations apply.
- Deletion of the Microsoft Azure source pod upon which the original image was imported and published
- Deletion of the subscription or resource group corresponding to the Microsoft Azure source pod
Procedure
-
Click Inventory > Images - Multi-Pod.
The console displays all the multi-pod images registered in the image catalog.
-
Click the name of the image for which you want to add a new version.
The details page for the image appears, listing all its current versions.
-
Click the selection button to the far left of the source version on which you want to base the new version, and then click New Version.
The New Version dialog box appears.
-
Specify the options for the new version.
Option Description Source Image Version This read-only field shows the image version to be incremented. Version type Specify how to increment the new version number: - Major increments the number by a full integer value (for example, 1.0 to 2.0).
- Minor increments the number by a dot value (for example, 1.1 to 1.2).
Description (Optional) Enter a description for the new version. Marker(s) (Optional) Define one or more reference markers to associate with the new version. -
Click Submit.
The in-progress (
 ) icon appears in the Status column for the new version while Horizon Image Management Service creates the version in the catalog and prepares its underlying image in the source pod. When the image preparation is complete, the status of the new version changes to Deployment Complete.
The underlying image of the new version is a copy of the source version's underlying image. You can now edit the new version's underlying image without affecting the source image version.
What to do next
For Horizon pods in a vSphere-based SDDC, you use vSphere Client to make edits and customizations to the new version's underlying image. Customize the image according to the following section.
Customize an Image
To customize the OS and application settings for an image version registered in the image catalog, use vSphere Client to make the necessary changes to the image on the vCenter Server.
After creating an image version but before publishing it to your pods, you can customize the underlying image to include all the settings and capabilities you want to provide in your end users' desktops.
Your customization tasks might include:
- Installing the third-party applications that you want make available in your end users' desktops.
- Customizing the Windows guest OS, such as installing special drivers required by your organization, applying wallpaper, setting default colors and fonts, configuring taskbar settings, and other such OS-level tasks.
Prerequisites
Perform the steps in Create a New Image Version.
Procedure
-
Identify the source image that you want to customize.
-
In the Horizon Universal Console, select Inventory > Images - Multi-Pod.
-
Click the name of the image containing the version that you want to customize.
-
On the image details page, click the version number of the image version that you want to customize.
-
On the version details page, in the Image Copies section, note the following:
- The IP address or fully qualified domain name of the source vCenter Server, listed under vCenter.
- The name of the image listed under Template/Snapshot. This is the name of the source image in the vCenter content library.
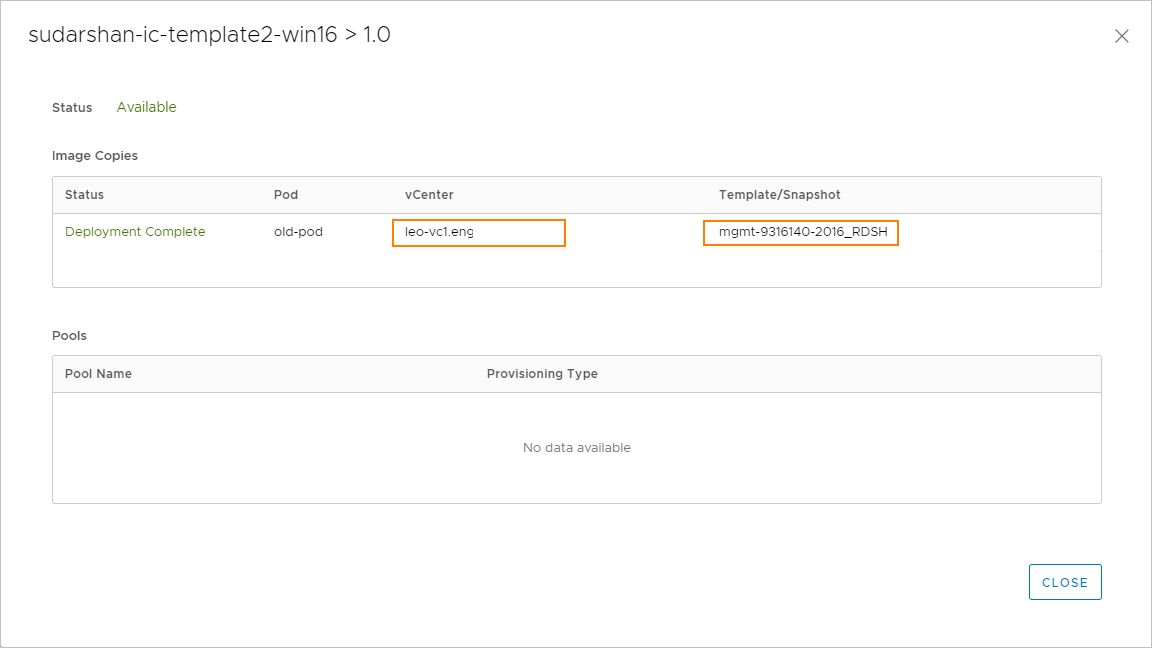
-
-
Locate the source image on the vCenter Server.
-
Using a web browser and the IP address you obtained in the previous step, navigate to the URL of the source vCenter Server.
-
Click Launch vSphere Client (HTML) and log in to vSphere Client.
-
In vSphere Client, search for the source image name that you obtained in the previous step.
-
-
After locating the source image on the vCenter Server, make the required customizations to the image. For detailed instructions about customizing an image in vCenter Server, see the vSphere documentation within techdocs.broadcom.com
What to do next
Publish the customized image version to the pods in your environment. See First-Gen Horizon Cloud - IMS - Publishing the Image Version.
Update Desktop Assignments with a Customized Image
By reassociating or moving markers, you can update a desktop assignment to use a different image version from the one that it currently uses. To update a desktop assignment, move its associated marker from the current image version to the new version.
For detailed information about the marker reassociation workflow, see First-Gen - Working with IMS Markers in a First-Gen Horizon Cloud Environment.
Prerequisites
- Create a New Image Version
- Customize an Image
- First-Gen Horizon Cloud - IMS - Publishing the Image Version
Procedure
-
In the Horizon Universal Console, select Inventory > Images - Multi-Pod.
The console displays all the images registered in the image catalog.
-
Click the name of the image containing the updated version that you want the desktop assignment to use.
The details page for the image appears, listing all its current versions.
-
To move the appropriate marker to the image version that you want the desktop assignment to use, click the selection button next to that version, and then click Edit.
-
For the Markers option, specify the marker that is associated with the desktop assignment.
Note: If the specified marker is currently associated with another image version, an alert message appears. The message notifies you that a change in the association between the marker and image version updates all associated desktop assignments with the newly marked image version.
-
To proceed with the marker reassociation and all applicable desktop assignment updates, click Submit.
-
For Horizon pods, moving the marker prompts Horizon Image Management Service to update all associated desktop assignments with the new image version.
-
For pods in Microsoft Azure, moving the marker prompts Horizon Image Management Service to first validate whether all the associated desktop assignments are online and ready to receive an image update. If the validation is successful, Horizon Image Management Service proceeds to update the associated desktop assignments with the new image version.
Note: The validation can fail when one or more desktop assignments are undergoing configuration changes such as desktop provisioning and not in an online state. In this case, the marker reassociation fails with an error status and the image update does not occur. To retry the image update, wait for all the desktop assignments to come back online and then repeat the steps for moving the marker to the new image version.
-
Was this page helpful?