Profiles are the primary means to manage devices. Configure profiles so your iOS devices remain secure and configured to your preferred settings. You can think of profiles as the settings and rules that, when combined with compliance policies, help you enforce corporate rules and procedures. They contain the settings, configurations, and restrictions that you want to enforce on devices.
A profile consists of the general profile settings and a specific payload. Profiles work best when they contain only a single payload.
iOS profiles apply to a device at either the user level or the device level. When creating iOS profiles, you select the level the profile applies to. Some profiles can only be applied to the user level or device level.
Supervised Mode Requirement for Profiles
You can deploy some or all your iOS devices in Supervised mode. Supervised mode is a device-level setting that provides administrators with advanced management capabilities and restrictions.
Certain profile settings are available only to supervised devices. A supervised setting is tagged using an icon displayed to the right, which indicates the minimum iOS requirement needed for enforcement.

For example, prevent end users from using AirDrop to share files with other macOS computers and iOS devices, by deselecting the check box next to Allow AirDrop. The iOS 7 + Supervised icon means only devices that are running iOS 7 and set up in Supervised mode using Apple Configurator are affected by this restriction.For more information, see Integration with Apple Configurator or the Apple Business Manager. To see a complete list of the iOS system requirements and supervision options, see iOS Functionality Matrix: Supervised vs. Unsupervised.
Configure an iOS Profile
Using the following basic steps you can configure any iOS profile in the Omnissa Workspace ONE UEM. Explore the available settings for each profile in the following sections.
-
Navigate to Resources > Profiles & Baselines > Profiles and select Add > Apple iOS > Device Profile.
-
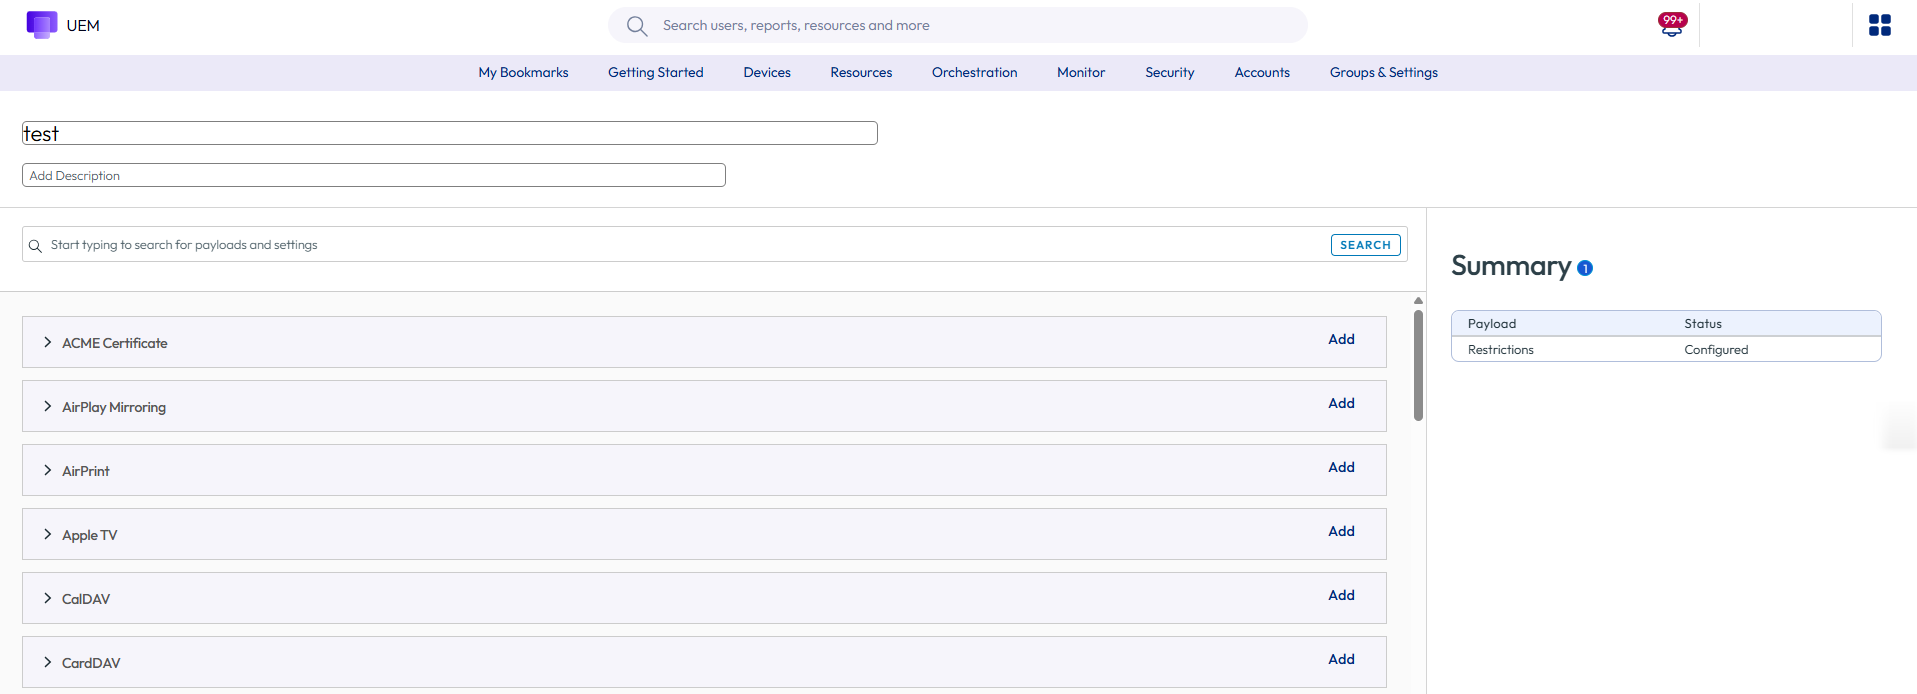
Configure the profile's General settings.
-
Select the payload from the list.
-
Configure the profile settings.
-
Select Save and Publish
ACME Certificate Profile for iOS
Configuring the ACME profile lets your device request an ACME certificate from a specified ACME server.
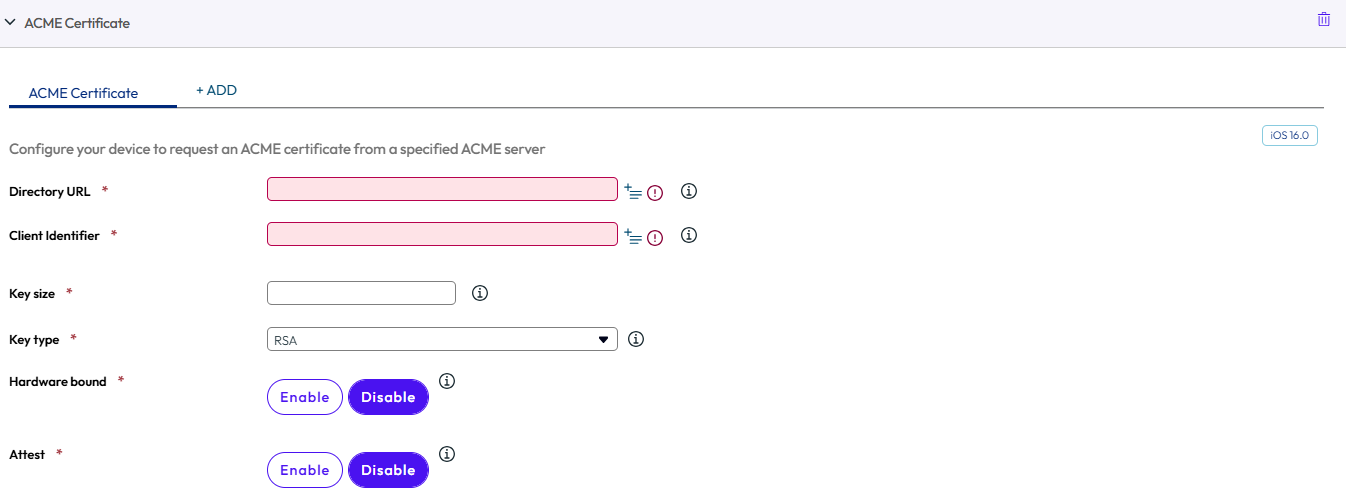
Configure the ACME Certificate settings including:
| Setting | Description |
|---|---|
| Directory URL | Enter the directory URL of the ACME server. |
| Client Identifier | Enter the unique string identifying a specific device. |
| Key size | Enter the Key Size. This depends on the values of KeyType and Hardwarebound. |
| Key Type | Select from the dropdown to choose between RSA and ECSECPrimeRandom key pairs. |
| Hardwarebound | Enable this key to confirm if the private key is bound to the device. If false, the private key is not bound to the device. |
| Attest | Enable this option to provide attestation to describe the device and generated keys to the ACME server. |
| Subject | Enter the name of the individual, computer, device or certificate authority to whom the certificate is issued. |
| Subject Alternative Name | |
| DNS Name | Enter the DNS name. |
| NT Principal Name | Enter the NT Principal name. |
| RFC822 Name | Enter the RFC822 name. |
| URI | Enter the URI. |
| Usage | |
| Key usage | Enter the key usage in the bit format. |
| Extended Key usage | Enter the key usage in an array of strings format. |
| Key is extractable | If it is enabled, the private of the identity obtained via SCEP should be tagged as "non-extractable" in the key chain. |
| Allow all apps access | If it is enabled, all apps have access to the private key. |
AirPlay Profile for iOS
Configuring the AirPlay payload lets you allow a specific set of devices to receive broadcast privileges according to device ID. Also, if the display access to your Apple TV is password-protected, you can pre-enter the password to create a successful connection without revealing the PIN to unauthorized parties.
This payload works even if you do not enroll your Apple TVs with Omnissa Workspace ONE UEM. For more information about tvOS capabilities, see tvOS Management guide.
Note: AirPlay allowlist currently only pertains to supervised iOS 7 and iOS 8 devices.
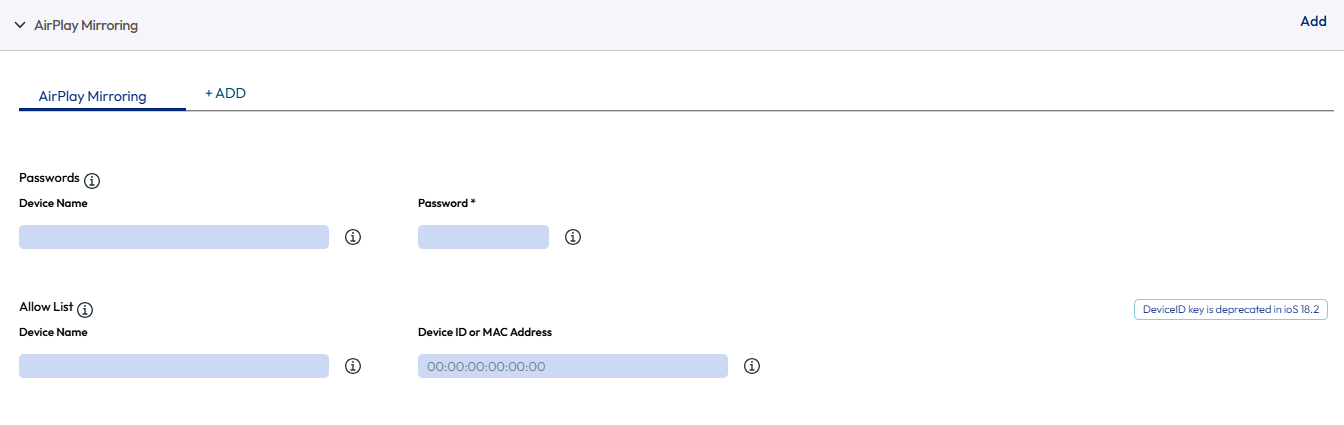
- Configure Passwords settings for iOS 7 devices and Allow Lists for iOS 7 + Supervised devices.
-
Configure the settings including:
Setting Description Device Name Enter the device name for the AirPlay destination. Password Enter the password for AirPlay destination. Select Add to include additional allowed devices. Display Name Enter the name of the destination display. The name must match the tvOS device name and is case-sensitive. The device name can be found on the tvOS device settings. (iOS 7 + Supervised) Device ID Enter the device ID (include the MAC address or Ethernet address formatted as XX:XX:XX:XX:XX:XX) for the destination display. Select Add to include additional allowed devices. (iOS 7 + Supervised) -
Now that the AirPlay destination allowlist is established for iOS 7 + Supervised devices, use the Device Control Panel to activate or deactivate AirPlay manually:
a. Navigate to Devices > List View and locate the device intending to AirPlay, and select the device's Friendly Name.
b. Select Support and select Start AirPlay from the list of support options.
c. Choose the Destination created in the AirPlay profile, enter the Password if necessary and select the Scan Time. Optionally, select Custom from the Destination list to create a custom destination for this particular device.
d. Select Save and accept the prompt to enable AirPlay.
-
To deactivate AirPlay manually on the device, return to the device's Control Panel, select Support and select Stop AirPlay.
AirPrint Profile for iOS
Configure an AirPrint payload for an Apple device to enable computers automatically to detect an AirPrint printer even if the device is on a different subnet than the AirPrint printer.
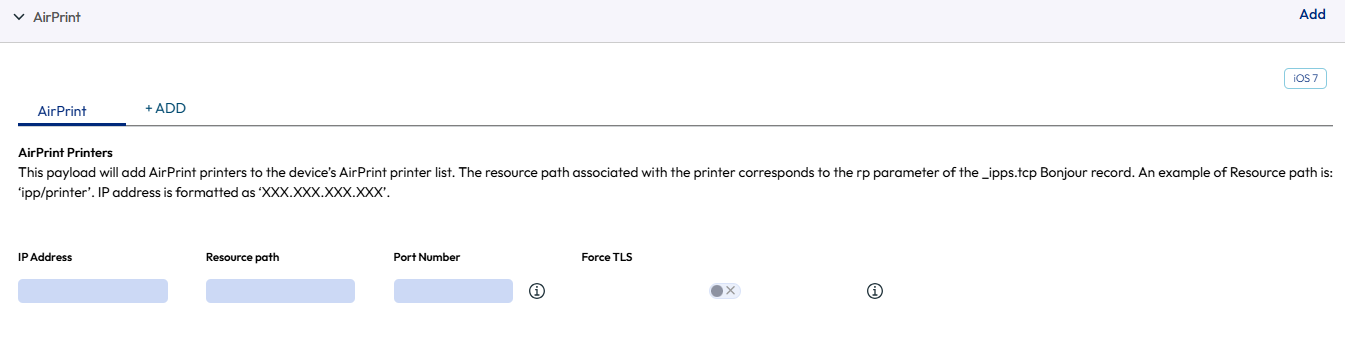
Configure the AirPrint profile settings including:
| Setting | Description |
|---|---|
| IP address | Enter the IP address (XXX.XXX.XXX.XXX). |
| Resource Path | Enter the Resource Path associated with the AirPrint printer (ipp/printer or printers/Canon_MG5300_series). To find the Resource Path and IP address information of a printer, see the Retrieve AirPrint Printer Information section. |
Retrieve AirPrint Printer Information
To know the AirPrint printer's information such as IP address and Resource path, perform the steps mentioned in this section.
-
Connect an iOS device to the local network (subnet) where the AirPrint printers are located.
-
Open the Terminal window (located in /Applications/Utilities/), enter the following command and then press Return.
ippfindNote: Make a note of the printer information that is fetched through the command. The first part is the name of your printer and the last part is the resource path.
ipp://myprinter.local.:XXX/ipp/portX -
To get the IP address, enter the following command and the name of your printer.
ping myprinter.local.Note: Make a note of the IP address information that is fetched through the command.
PING myprinter.local (XX.XX.XX.XX) -
Enter the IP address (XX.XX.XX.XX) and resource path (/ipp/portX) obtained from the steps 2 and 3 into the AirPrint payload settings.
CalDAV or CardDAV Profile for iOS
Deploy a CalDAV or CardDAV profile to allow end users to sync corporate calendar items and contacts, respectively.
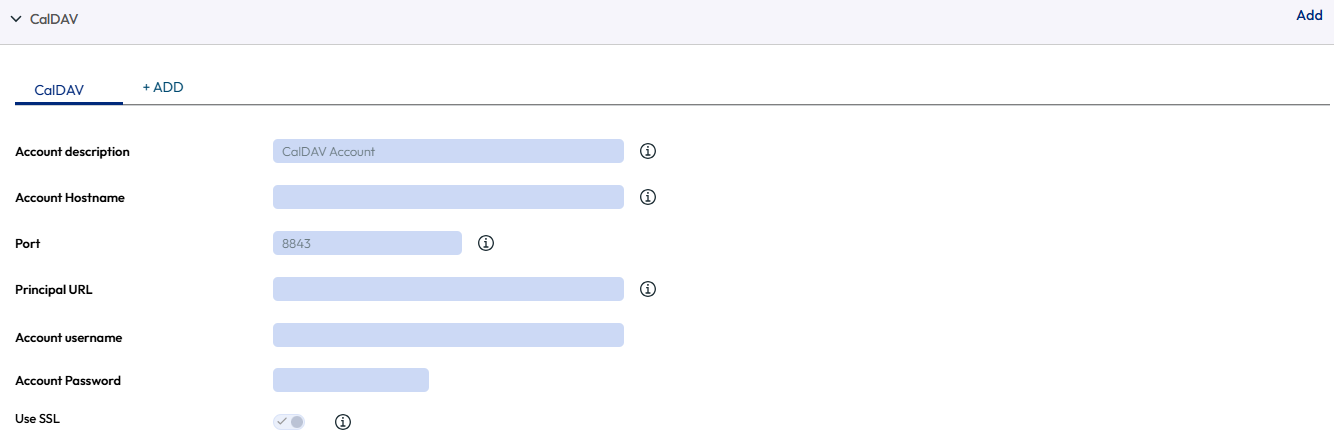
Configure the CalDav profile settings including:
| Setting | Description |
|---|---|
| Account Description | Enter a brief description of the account. |
| Account Hostname | Enter/view the name of the server for CalDAV use. |
| Port | Enter the number of the port assigned for communication with the CalDAV server. |
| Principal URL | Enter the Web location of the CalDAV server. |
| Account Username | Enter the user name for the Active Directory account. |
| Account Password | Enter the password for the Active Directory account. |
| Use SSL | Select to enable Secure Socket Layer use. |
Cellular Profile for iOS
Configure a cellular payload to configure cellular network settings on devices and determine how your device accesses the carrier's cellular data network.
Push this payload to use a different APN from the default point. If your APN settings are incorrect you may lose functionality, so find out the correct APN settings from your carrier. For more information on cellular settings, see Apple's knowledge base article.
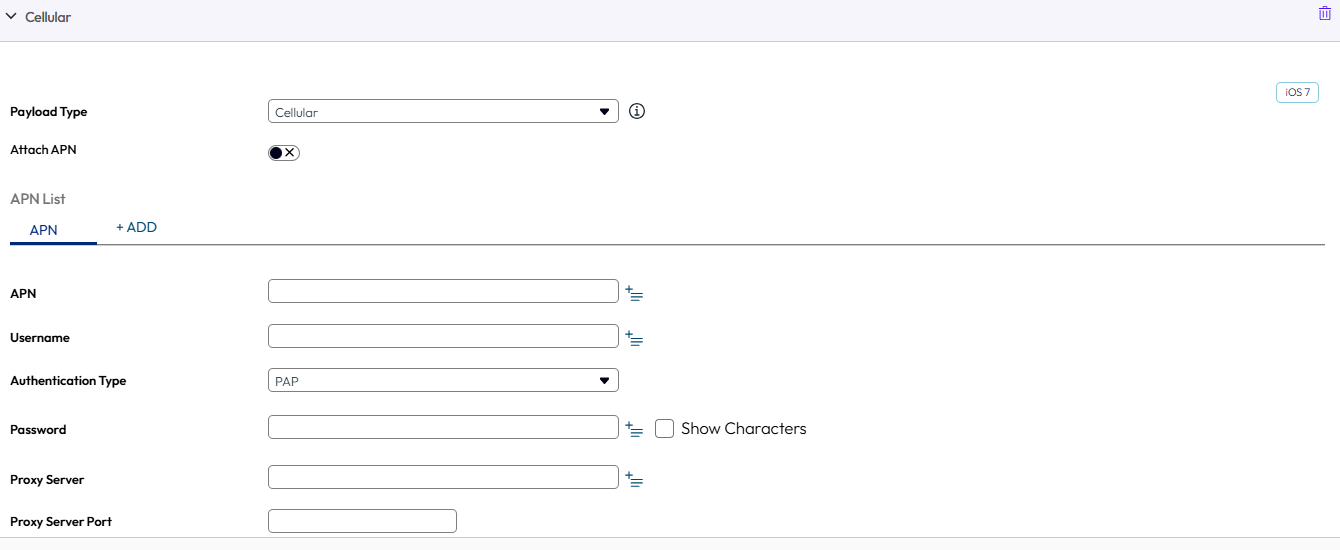
Configure the CalDav profile settings including:
| Setting | Description |
|---|---|
| Access Point Name (APN) | Enter the APN provided by your carrier (For example: come.moto.cellular). |
| Authentication Type | Select the authentication protocol. |
| Access Point Username | Enter the user name used for authentication. |
| Access Point Password | Enter the APN password used for authentication. |
| Access Point Name | Enter the APN provided by your carrier (For example: come.moto.cellular). |
| Access Point Username | Enter the user name used for authentication. |
| Authentication Type | Select the authentication protocol. |
| Password | Enter the APN password used for authentication. |
| Proxy Server | Enter the proxy server details. |
| Proxy Server Port | Enter the proxy server port for all traffic. Select Add to continue this process. |
Custom Settings Profile for iOS
The Custom Settings payload can be used when Apple releases new iOS functionality or features that Omnissa Workspace ONE UEM does not currently support through its native payloads. If you do not want to wait for the newest release of Workspace ONE UEM to control these settings, you can use the Custom Settings payload and XML code to enable or deactivate certain settings manually.
You might want to copy your profile and save it under a "test" organization group to avoid affecting users before you are ready to Save and Publish.
Do not assign a profile to any smart group as it might give an encrypted value when viewing XML.
-
Navigate to Resources > Profiles & Baselines > Profiles > Add > Add Profile > iOS.
-
Configure the profile's General settings.
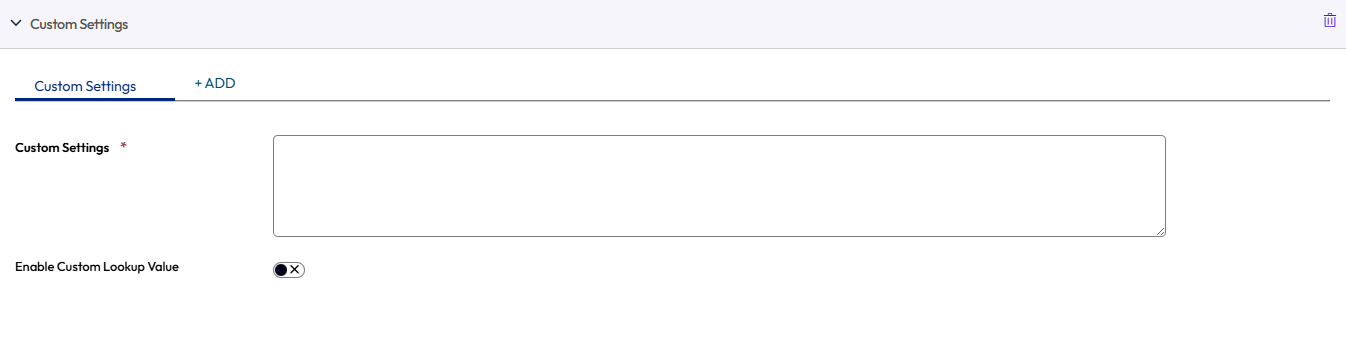
You can enable Custom Lookup Value to dynamically generate a value based on the device the profile is assigned to. For example, if there is a key
EmailAddress,<key>EmailAddress</key> <string>xyz@omnissa.com</string>You can input
<key>EmailAddress</key>
<string>{EmailAddress}</string>
This value will dynamically resolve for each device this profile is assigned to. For more information on Lookup Vaues, see Lookup Values.
-
Configure the appropriate payload (for example, Restrictions or Passcode).
-
Select Save and Publish.
Note: Ensure that the profile created in Steps 1–4 is not assigned to any smart group. Otherwise, the data might be encrypted when viewing xml.
-
Navigate back to the Profiles page and select a profile using the radio button next to the profile name. Menu options appear above the list.
-
Select </> XML from the menu choices. A View Profile XML window appears.
-
Look for the PayloadContent key and copy the single dictionary nested inside. Copy the entire dictionary content from <dict>...</dict>. See below for sample XML for the Restrictions payload.
<plist version="1.0">
    <dict>
    <key>PayloadContent</key>
    <array>
      <dict>
        <key>safariAcceptCookies</key>
        <real>2</real>
        <key>safariAllowAutoFill</key>
        <true />
        <key>PayloadDisplayName</key>
        <string>Restrictions</string>
        <key>PayloadDescription</key>
        <string>RestrictionSettings</string>
        <key>PayloadIdentifier</key>
        <string>745714ad-e006-463d-8bc1-495fc99809d5.Restrictions</string>
        <key>PayloadOrganization</key>
        <string></string>
        <key>PayloadType</key>
        <string>com.apple.applicationaccess</string>
        <key>PayloadUUID</key>
        <string>9dd56416-dc94-4904-b60a-5518ae05ccde</string>
        <key>PayloadVersion</key>
        <integer>1</integer>
      </dict>
    </array>
    <key>PayloadDescription</key>
    <string></string>
    <key>PayloadDisplayName</key>
    <string>Block Camera/V_1</string>
    <key>PayloadIdentifier</key>
    <string>745714ad-e006-463d-8bc1-495fc99809d5</string>
    <key>PayloadOrganization</key>
    <string></string>
    <key>PayloadRemovalDisallowed</key>
    <false />
    <key>PayloadType</key>
    <string>Configuration</string>
    <key>PayloadUUID</key>
    <string>86a02489-58ff-44ff-8cd0-faad7942f64a</string>
    <key>PayloadVersion</key>
    <integer>1</integer>
  </dict>
</plist>
For more examples and information on the XML code, refer to the KB article here.
-
If you see encrypted text between dict tags in the XML window, you can generate the decrypted text by modifying the settings in the profiles page. To do this:
a. Navigate to Groups & Settings > All Settings > Devices > Users > Apple > Profiles.
b. Override the custom settings option.
c. Deactivate Encrypt Profiles option and then Save.
-
Navigate back to Custom Settings profile and paste the XML you copied in the text box. The XML code you paste should contain the complete block of code, from <dict> to </dict>.
-
Remove the original payload you configured by selecting the base payload section, for example, Restrictions, Passcode and selecting the minus [-] button. You can now enhance the profile by adding custom XML code for the new functionality.
-
Select Save and Publish.
Device Passcode Profile for iOS
Device passcode profiles secure iOS devices and their content. Configure the level of security based on your users' needs.
Choose strict options for high-profile employees or more flexible options for other devices or for employees who are part of a BYOD program. In addition, when a passcode is set on an iOS device, it provides hardware encryption for the device and also creates a device indicator Data Protection is Enabled in the Security tab of the Device Details page.
Create a passcode and configure:
- Complexity – Use simple values for quick access or alphanumeric passcodes for enhanced security. You can also require a minimum number of complex characters (@, #, &,! , ,? ) in the passcode. For example, require users with access to sensitive content to use more stringent passcodes.
- Maximum Number of Failed Attempts – Prevent unauthorized access by wiping or locking the device after determined number of attempts. This option works well for corporate-owned devices, but not for employee-owned devices in a BYOD program. For example, if a device is restricted to five passcode attempts, and a user entered a passcode incorrectly five times in a row, then the device automatically performs a full device wipe. If simply locking the device is preferable, set this option to None, that implies you can attempt passcode retries indefinitely.
- Maximum Passcode Age – Enforce renewal of passcodes at selected intervals. Passcodes that are changed more frequently may be less vulnerable to exposure to unauthorized parties.
- Auto-Lock (min) – The maximum number of minutes for which the device can be idle without the user unlocking it, before the system locks it. When this limit is reached, the system locks the device and the passcode is required to unlock it. The user can edit this setting, but the value can not exceed the configured setting.
Configure a Device Passcode Profile for iOS
Device passcode profiles secure iOS devices and their content. Configure several settings as part of a passcode payload to enforce device passcodes based on your users' needs.
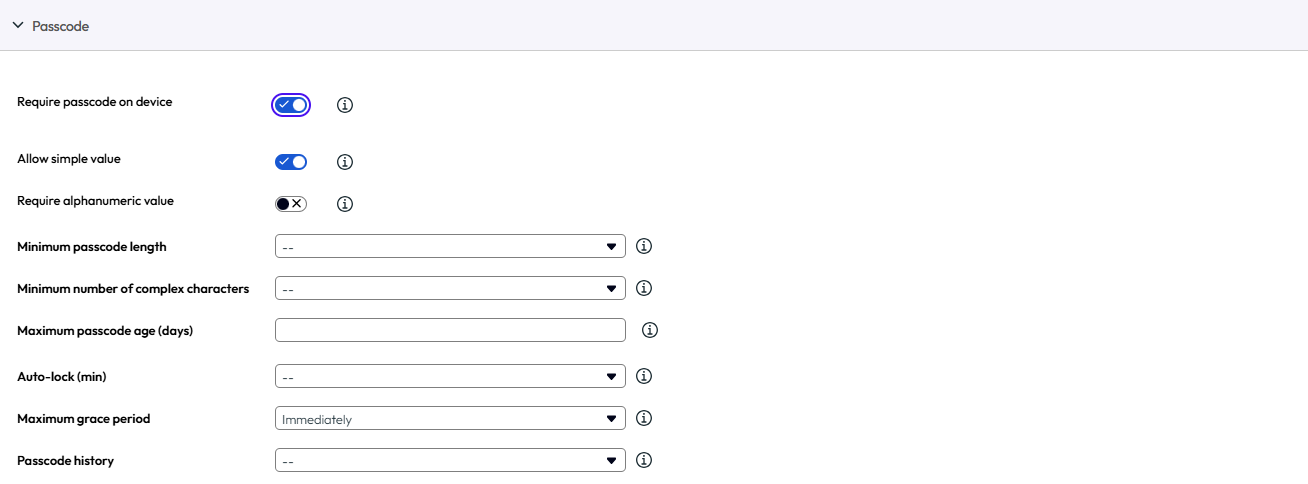
Configure the Device Passcode profile settings including:
| Setting | Description |
|---|---|
| Require passcode on device | Enable mandatory passcode protection. |
| Allow simple value | Allow the end user to apply a simple numeric passcode. |
| Require Alphanumeric Value | Restrict the end user from using spaces or non-alphanumeric characters in their passcode. |
| Minimum Passcode Length | Select the minimum number of characters required in the passcode. |
| Minimum number of complex characters | Select the minimum number of complex characters (#, $,! , @) a passcode required. |
| Maximum Passcode Age (days) | Select the maximum number of days the passcode can be active. |
| Auto-lock (min) | The maximum number of minutes for which the device can be idle without the user unlocking it, before the system locks it. When this limit is reached, the system locks the device and the passcode is required to unlock it. The user can edit this setting, but the value can not exceed the configured setting. |
| Passcode History | Select the number of passcodes to store in history that an end user cannot repeat. |
| Grace period for the device lock (min) | Select an amount of time in minutes that a device can be idle before it is locked by the system, and the end user must reenter their passcode. |
| Maximum Number of Failed Attempts | Select the number of attempts allowed. If the end user enters an incorrect passcode that many times, the device performs a factory reset. |
Email Account Profile for iOS
Configure an email profile for iOS devices to configure email settings on the device.
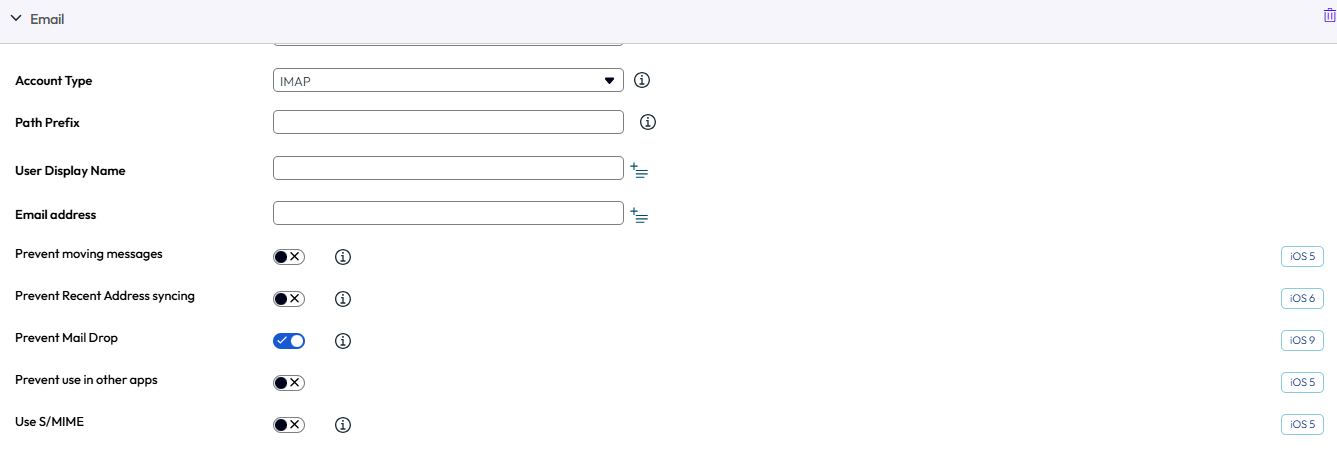
Configure the settings including:
| Settings | Descriptions |
|---|---|
| Account Description | Enter a brief description of the email account. |
| Account Type | Use the drop-down menu to select either IMAP or POP. |
| Path Prefix | Enter the name of the root folder for the email account(IMAP only). |
| User Display Name | Enter the name of the end user. |
| Email Address | Enter the address for the email account. |
| Prevent Moving Messages | Select to block the user from forwarding email or opening in third-party apps. |
| Prevent Recent Address Syncing | Select to restrict the user from syncing email contacts to their personal device. |
| Prevent Use in Third Party Apps | Select to prevent users from moving corporate email into other email clients. |
| Prevent Mail Drop | Select to prevent users from using Apple's Mail Drop feature. |
| Use S/MIME | Select to use more encryption certificates. |
| Host Name | Enter the name of the email server. |
| Port | Enter the number of the port assigned to incoming mail traffic. |
| Username | Enter the user name for the email account. |
| Authentication Type | Use the drop-down menu to select how the email account holder is authenticated. |
| Password | Enter the password required to authenticate the end user. |
| Use SSL | Select to enable Secure Socket Layer use for incoming email traffic. |
| Host Name | Enter the name of the email server. |
| Port | Enter the number of the port assigned to outgoing mail traffic. |
| Username | Enter the user name for the email account. |
| Authentication Type | Use the drop-down menu to select how the email account holder is authenticated. |
| Outgoing Password Same As Incoming | Select to auto-populate the password text box. |
| Password | Enter the password required to authenticate the end user. |
| Use SSL | Select to enable Secure Socket Layer use for outgoing email traffic. |
Exchange ActiveSync (EAS) Mail for iOS Devices
The industry standard protocol designed for email synchronization on mobile devices is called Exchange Active Sync (EAS). Through EAS profiles, you can remotely configure devices to check into your mail server to sync email, calendars and contacts.
The EAS profile uses information from each user, such as user name, email address, and password. If you integrate Omnissa Workspace ONE UEM with Active Directory services, then this user information is automatically populated for the user and can be specified in the EAS profile by using look-up values.
Create a Generic EAS Profile for Multiple Users
Before you create an EAS profile that automatically enables devices to pull data from your mail server, you must first ensure that users have the appropriate information in their user account records. For Directory Users, or those users that enrolled with their directory credentials, such as Active Directory, this information is automatically populated during enrollment. However, for Basic Users this information is not automatically known and must be populated in one of two ways:
-
You can edit each user record and populate the Email Address and Email Username text boxes.
-
You can prompt users to enter this information during enrollment by navigating to Devices > Device Settings > General > Enrollment and under the Optional Prompt tab, checking the Enable Enrollment Email Prompt box.
Configure an EAS Mail Profile for the Native Mail Client
Create an email configuration profile for the native mail client on iOS devices.
-
Navigate to Resources> Profiles & Baselines > Profiles > Add. Select Apple iOS.
-
Configure the profile's General settings.
-
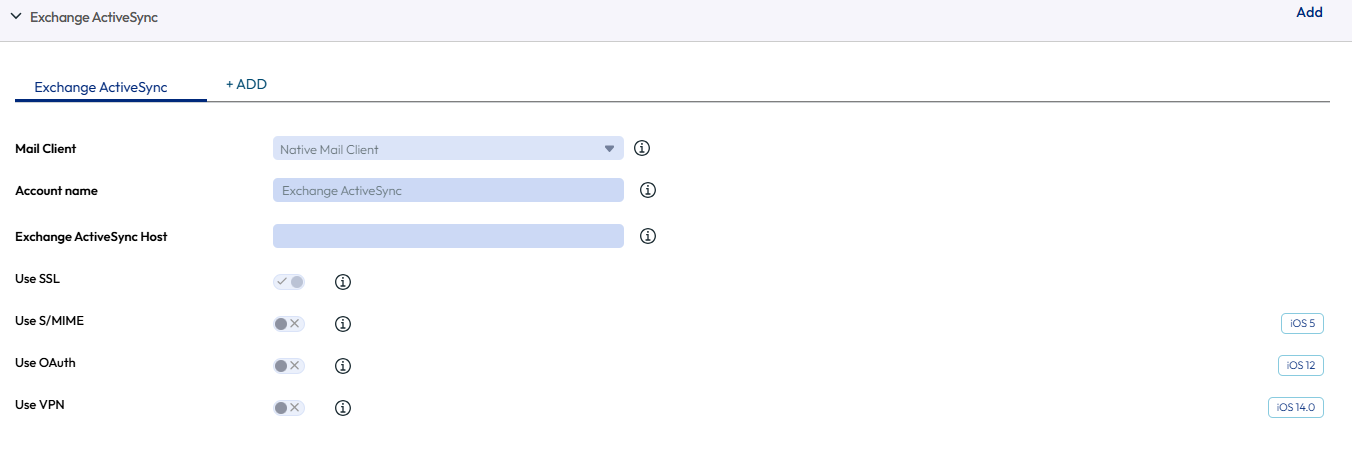
Select the Exchange ActiveSync payload.
-
Select Native Mail Client for the Mail Client. Fill in the Account Name text box with a description of this mail account. Fill in the Exchange ActiveSync Host with the external URL of your company's ActiveSync server.
The ActiveSync server can be any mail server that implements the ActiveSync protocol, such as Lotus Notes Traveler, Novell Data Synchronizer, and Microsoft Exchange. In the case of Secure Email Gateway (SEG) deployments, use the SEG URL and not the email server URL.
-
Select the Use SSL check box to enable Secure Socket Layer use for incoming email traffic.
-
Select the S/MIMEcheck box to use more encryption certificates. Prior to enabling this option, ensure you have uploaded necessary certificates under Credentials profile settings.
a. Select the S/MIME Certificate to sign email messages.
b. Select the S/MIME Encryption Certificate to both sign and encrypt email messages.
c. Select the Per Message Switch check box to allow end users to choose which individual email messages to sign and encrypt using the native iOS mail client (iOS 8+ supervised only).
-
Select the Use OAuth check box to enable OAuth for authentication. OAuth is required for modern authentication-enabled accounts.
a. OAuth Sign In URL - Enter the OAuth Sign In URL.
b. OAuth Token URL - Enter the OAuth Token URL.
-
Fill in the Login Information including Domain Name, Username and Email Address using look-up values. Look-up values pull directly from the user account record. To use the {EmailDomain}, {EmailUserName} {EmailAddress} look-up values, ensure your Omnissa Workspace ONE UEM user accounts have an email address and email user name defined.
-
Leave the Password field empty to prompt the user to enter a password.
-
Select the Payload Certificate to define a certificate for cert-based authentication after the certificate is added to the Credentials payload.
-
Configure the following Settings and Security optional settings, as necessary:
a. Past Days of Mail to Sync – Downloads the defined amount of mail. Note that longer time periods will result in larger data consumption while the device downloads mail.
b. Prevent Moving Messages – Disallows moving mail from an Exchange mailbox to another mailbox on the device.
c. Prevent Use in 3rd Party Apps – Disallows other apps from using the Exchange mailbox to send message.
d. Prevent Recent Address Syncing – Deactivates suggestions for contacts when sending mail in Exchange.
e. Prevent Mail Drop – Deactivates use of Apple's Mail Drop feature.
f. (iOS 13) Enable Mail – Enables the configuration of a separate Mail app for the Exchange account.
g. (iOS 13) Allow Mail toggle – If deactivated, prevents the user to toggle Mail on or off.
h. (iOS 13) Enable Contacts – Enables the configuration of a separate Contacts app for the Exchange account.
i. (iOS 13) Allow Contacts toggle – If deactivated, prevents the user to toggle Contacts on or off.
j. (iOS 13) Enable Calendars – Enables the configuration of a separate Calendar app for the Exchange account.
k. (iOS 13) Allow Calendars toggle – If deactivated, prevents the user to toggle Calendars on or off.
l. Enable Notes – Enables the configuration of a separate Notes app for the Exchange account.
m. (iOS 13) Allow Notes toggle – If deactivated, prevents the user to toggle Notes on or off.
n. (iOS 13) Enable Reminders – Enables the configuration of a separate Reminders app for the Exchange account
o. (iOS 13) Allow Reminders toggle – If deactivated, prevents the user to toggle Reminders on or off.
-
Assign a Default Audio Call App that your Native EAS account will use to make calls when you select a phone number in an email message.
-
Select Save and Publish to push the profile to available devices.
Font Profile for iOS
Configure Font profile for iOS devices to configure font settings on the device.
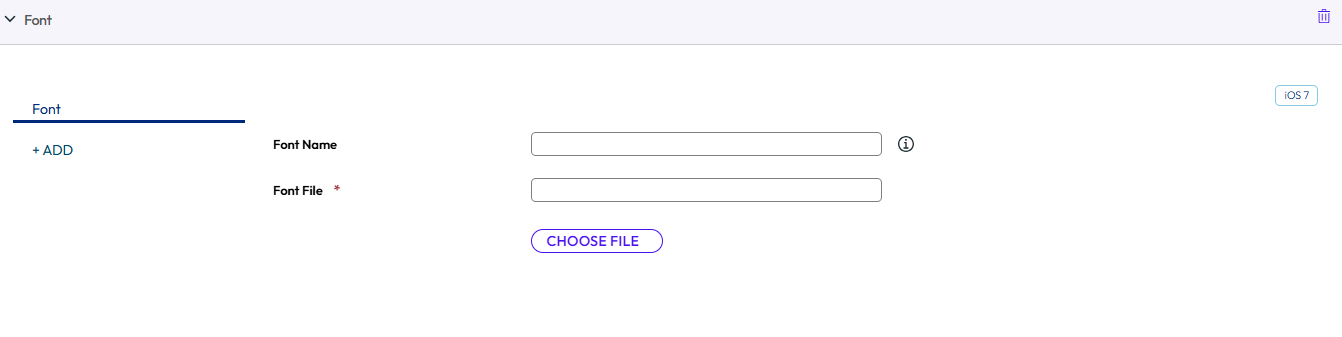
Configure Font settings including:
| Settings | Description |
|---|---|
| Font Name | Enter the user visible name for the font. This name will be replaced after the actual name of the font after installation. |
| Font File | Select the font file from your local repository. |
Forcepoint Content Filter for iOS
With the Omnissa Workspace ONE UEM integration with Forcepoint, you can use your existing content filtering categories in Forcepoint and apply them to devices you manage within the UEM console.
Allow or block access to websites according to the websites you configure in Forcepoint and then deploy a VPN payload to force devices to comply with those rules. Directory users enrolled in Workspace ONE UEM are validated against Forcepoint to determine which content filtering rules to apply based on the specific end user.
You can enforce content filtering with Forcepoint in one of following two ways.
a. Use the VPN profile as described in this topic. Enforcing content filtering using VPN profile can be applied to all Web traffic using browsers other than the Omnissa Browser.
b. Configure the Settings and Policies page, which applies to all Web traffic using browsers other than the Omnissa Browser. Procedure
-
After you select the payload, then select Websense (Forcepoint) as the Connection Type.
-
Configure Connection Info including:
Settings Description Connection Name Enter the name of the connection name to be displayed. Username Enter the user name to connect to the proxy server. Password Enter the password for connection. -
You can also Test Connection.
-
Configure Vendor Configurations settings.
Setting Description Vendor Keys Create custom keys and add to the vendor config dictionary. Key Enter the specific key provided by the vendor. Value Enter the VPN value for each key. -
Select Save & Publish. Directory-based end users can now access permitted sites based on your Forcepoint categories.
Google Account Profile for iOS
Enable an end user to use their Google account on their iOS device Native Mail application. Add a Google Account directly from the UEM console.
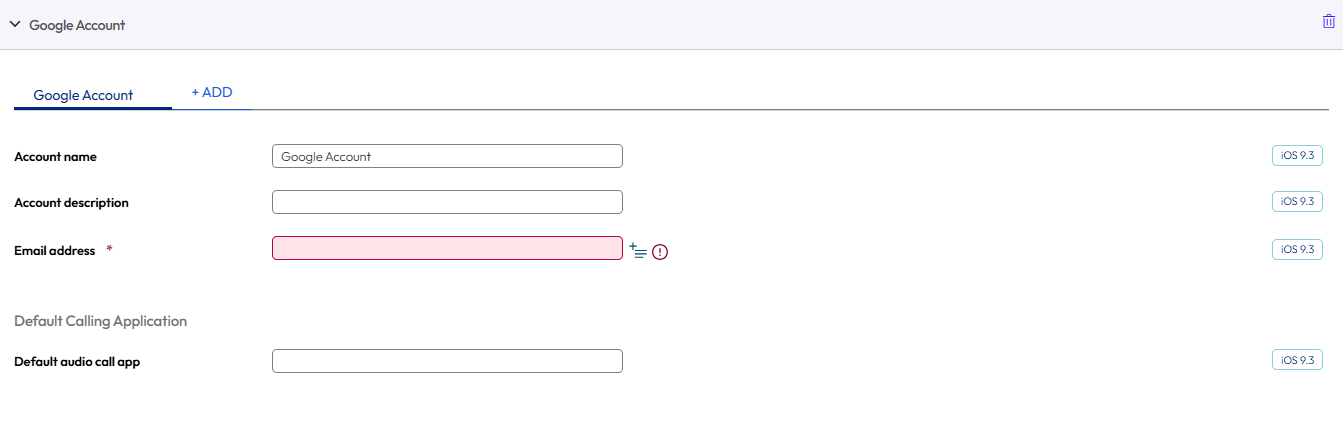
Configure the Google account profile settings including:
| Setting | Description |
|---|---|
| Account Name | The full user name for the Google account. This is the user name that appears when you send a mail message. |
| Account Description | A description of the Google account, which appears in Mail and Settings. |
| Email Address | The full Google email address for the account. |
| Default Audio Call App | Search and select an application that will be the default app for making any calls made from configured Google account. |
Global HTTP Proxy Profile for iOS
Configure a global HTTP proxy to direct all HTTP traffic from Supervised iOS 7 and higher devices through a designated proxy server. For example, a school can set a global proxy to ensure that all web browsing is routed through its Web content filter.
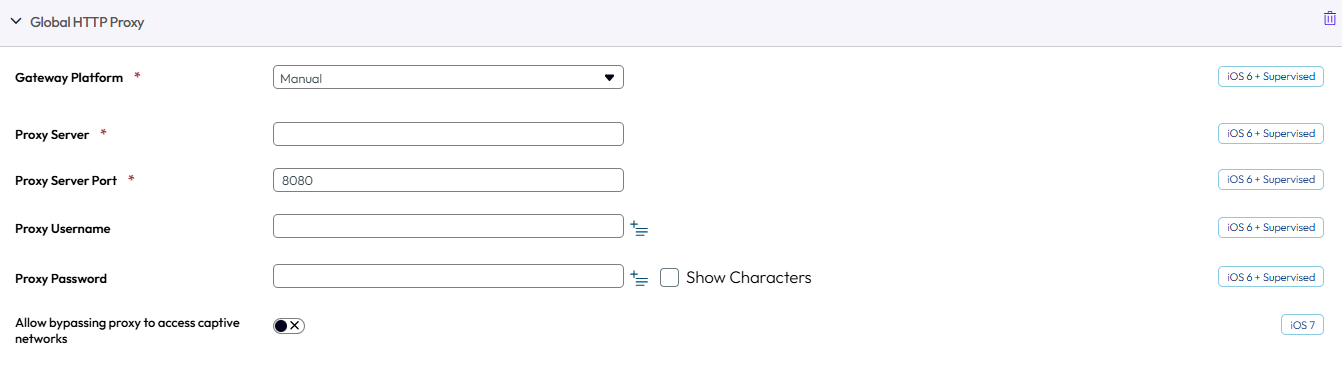
Configure Global HTTP Proxy settings including:
| Setting | Description |
|---|---|
| Proxy Type | Choose Auto or to Manual for proxy configuration. |
| Proxy Server | Enter the URL of the proxy server. This text box displays when the Proxy Type is set to Manual. |
| Proxy Server Port | Enter the port used to communicate with the proxy. This text box displays when the Proxy Type is set to Manual. |
| Proxy Username/Password | If the proxy requires credentials, you can use look-up values to define the authentication method. This text box displays when the Proxy Type is set to Manual. |
| Allow bypassing proxy to access captive networks | Select this check box to allow the device to bypass proxy settings to access a known network. This text box displays when the Proxy Type is set to Manual. |
| Proxy PAC File URL | Enter the URL of the Proxy PAC File to apply its settings automatically. This text box displays when the Proxy Type is set to Auto. |
| Allow direct connection if PAC is unreachable | Select this option to have iOS devices bypass the proxy server if the PAC file is unreachable. This text box displays when the Proxy Type is set to Auto. |
| Allow bypassing proxy to access captive networks | Select this check box to allow the device to bypass proxy settings to access a known network. This text box displays when the Proxy Type is set to Auto. |
Home Screen Layout Profile (iOS Supervised)
Use this payload to define the layout of apps, folders, and web clips for the home screen. Deploying this payload allows you to group applications and web clips in ways that meet your organization's needs.
When the payload is deployed to the device, the home screen layout is locked and cannot be modified by the users. This payload is allowed on iOS 9.3+ Supervised devices.
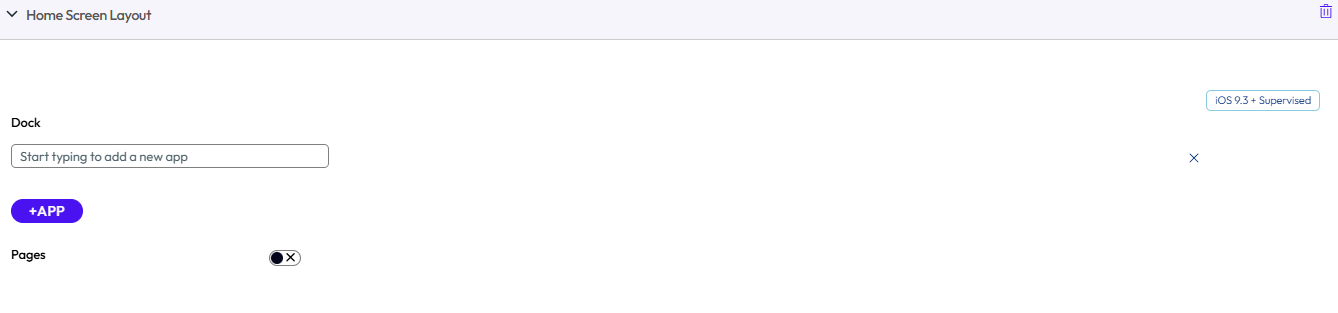
Configure the Home Screen Layout profile settings including:
| Setting | Description |
|---|---|
| Dock | Choose what applications and web clips you want to appear in the dock. |
| Page | Choose applications and web clips you want to add to the device. You can also add more pages for more groups of applications and web clips. |
| Add Folder | Configure a new folder to add to the device screen on the selected page.- Use the pencil icon in the gray bar to create or edit the name of the folder. |
Select Add Page to add more pages to the device if needed and select Save & Publish to push this profile to devices.
LDAP Profile for iOS
Configure an LDAP profile to allow end users to access and integrate with your corporate LDAPv3 directory information.
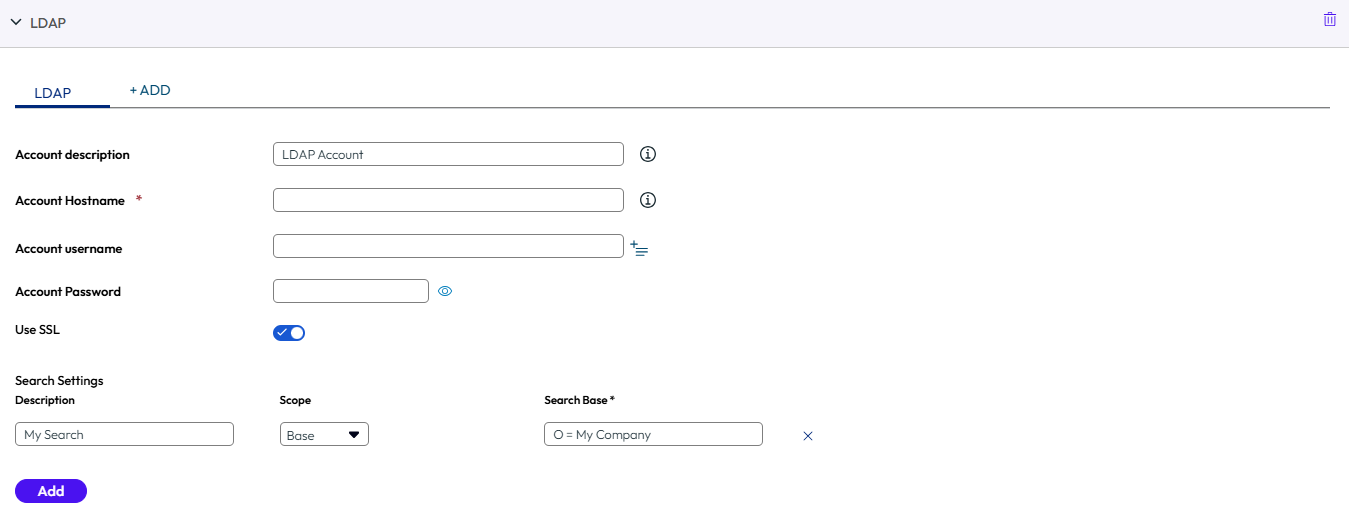
Configure the LDAP profile settings including:
| Setting | Description |
|---|---|
| Account Description | Enter a brief description of the LDAP account. |
| Account Hostname | Enter/view the name of the server for Active Directory use. |
| Account Username | Enter the user name for the Active Directory account. |
| Account Password | Enter the password for the Active Directory account. |
| Use SSL | Select this check box to enable Secure Socket Layer use. |
| Search Settings | Enter settings for Active Directory searches ran from the device. |
Lock Screen Message Profile for iOS
Customize the Lock Screen of your end users' devices with information that may help you retrieve devices that are lost.

Configure the Lock Screen Message profile settings including:
| Setting | Description |
|---|---|
| "If lost return to" Message | Display a name or organization to whom a found device should be returned. This field supports lookup values. |
| Asset Tag Information | Display the device asset tag information on the device lock screen. This asset tag may duplicate or replace a physical asset tag attached to the device. This field supports lookup values. |
macOS Server Account Profile for iOS
Add an macOS server account directly from the UEM console to help manage your MDM framework. Use to provide the credentials to allow end users to access File Sharing on macOS.
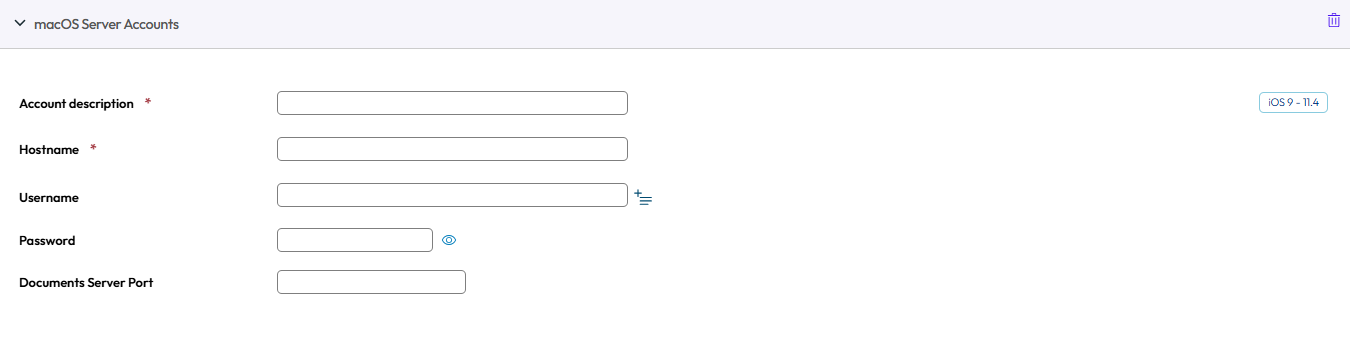
Configure the macOS server profile settings including:
| Setting | Description |
|---|---|
| Account Description | Enter the display name for the account. |
| Hostname | Enter the server address. |
| User Name | Enter the user's login name. |
| Password | Enter the user's password. |
| Port | Designates the port number to use when contacting the server. |
Managed Domains Profile for iOS
Managed domains are another way Omnissa Workspace ONE UEM enhances Apple's "open in" security feature on iOS 8 devices. Using the "open in" feature with managed domains, you can protect corporate data by controlling what apps can open documents downloaded from enterprise domains using Safari.
Specify URLs or subdomains to manage how documents, attachments, and downloads from the browser are opened. Also, in managed email domains, a color-coded warning indicator can be displayed in email messages that are sent to unmanaged domains. These tools help end users quickly determine what documents can be opened with corporate apps and what documents are personal and may be opened in personal applications.
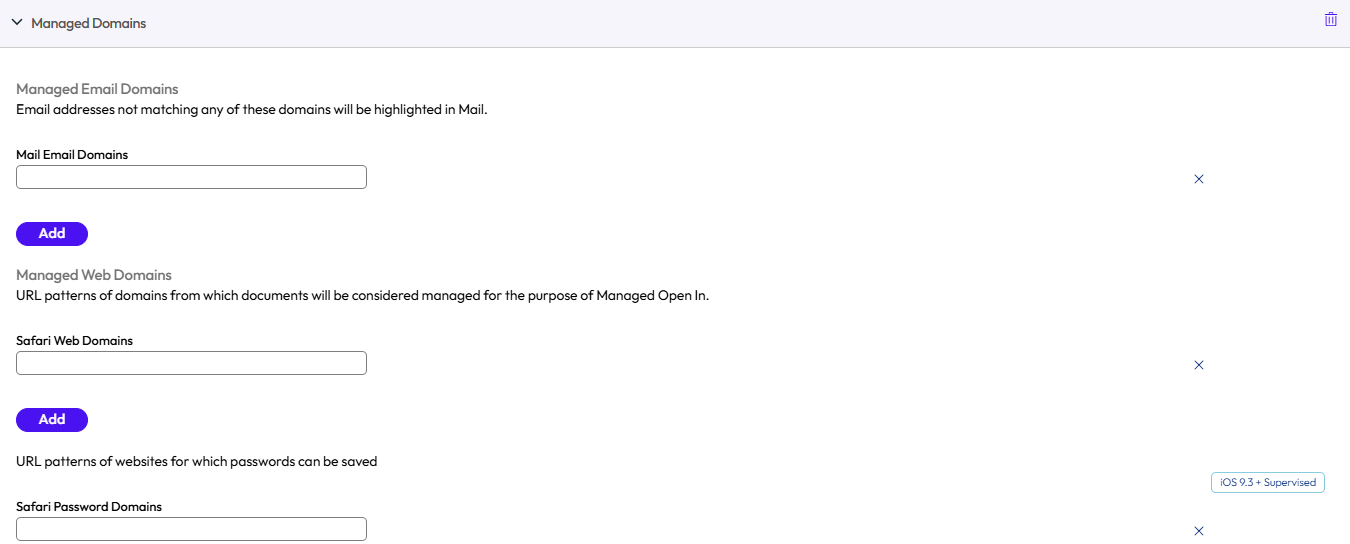
Configure the Managed Domains profile settings including:
| Setting | Description |
|---|---|
| Managed Email Domains | Enter domains to specify which email addresses are corporate domains. For example: exchange.acme.com. Emails sent to addresses not specified here are highlighted in the email app to indicate that the address is not part of the corporate domain. |
| Managed Web Domains | Enter domains to choose specific URLs or subdomains that can be considered managed. For example: sharepoint.acme.com. Any documents or attachments coming from those domains are considered managed. |
| Safari Password Domains | Enter password for the domains you specify for Safari to save. This option is applicable only for supervised devices. |
Network Usage Rules for iOS
Configure network usage rules to control which applications and SIM cards can access data based on the network connection type or when the device is roaming. This feature allows administrators to help manage data charges when employees are using devices for work. Use granular controls to apply different rules to different apps and SIMs as needed.
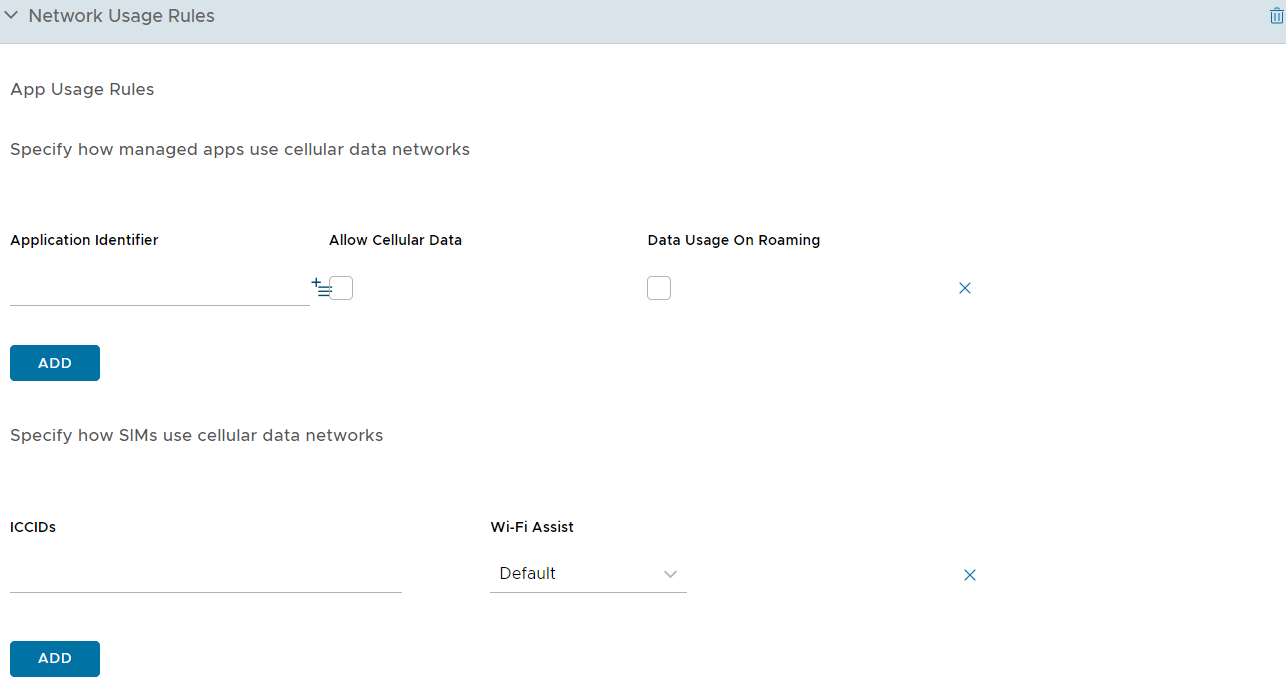
- Under the App Usage Rules, enter the Application Identifier of any public, internal, or purchased applications.
-
Enable Allow Cellular Data and Data Usage on Roaming. Both options are selected by default.
-
Under the SIM Usage Rules, provide the ICCIDs of SIM cards (physical and eSIM cards) and specify the type of Wi-Fi Assist capability, either Default or Unlimited Cellular Data.
-
Select Save & Publish.
Notifications Profile for iOS
Use this profile to allow notifications for specific apps to appear on the home screen when it is locked.
Control when and how the notifications appear. This profile applies to iOS 9.3 + Supervised devices.
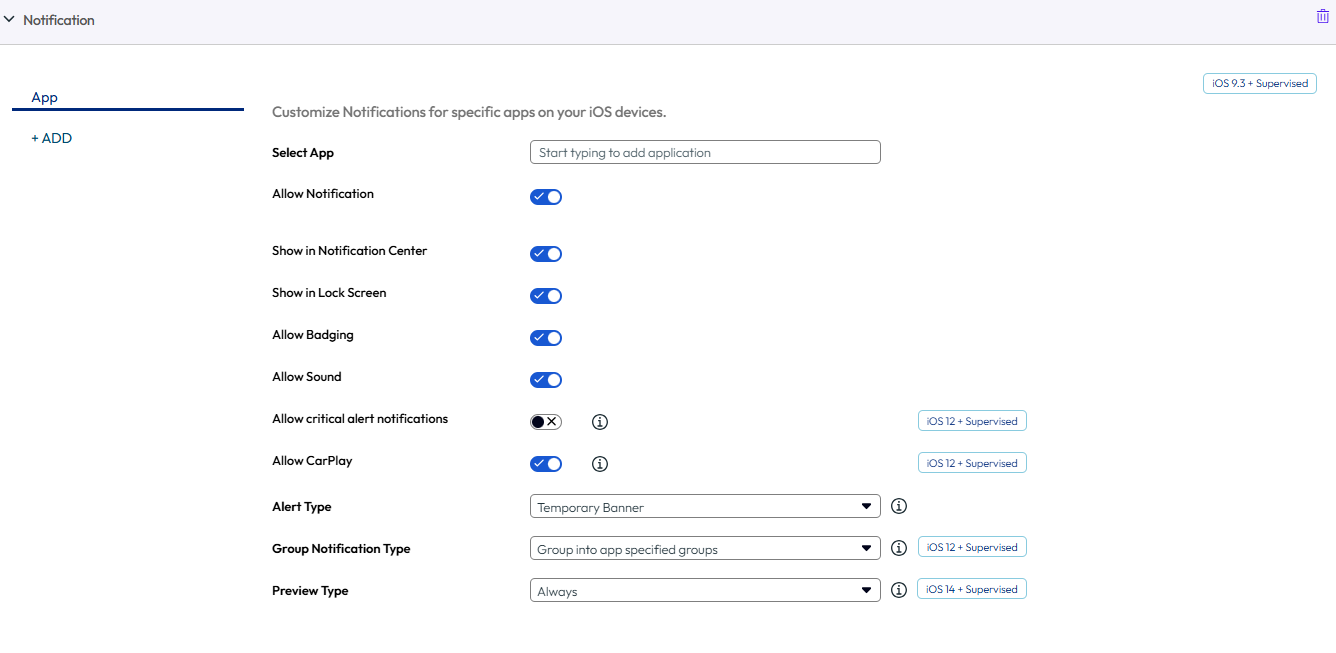
- Choose Select App. A new window appears.
-
Configure the settings.
Setting Description Select App Choose the app that you want to configure. Allow Notifications Select whether to allow any notifications. Show in Notification Center Select whether to allow notifications to appear in the Notification Center. Show in Lock Screen Select whether to allow notifications to appear in the lock screen. Allow Sound Select whether to allow a sound to occur with the notification. Allow Badging Select whether to allow badges to appear on the application icon. Alert Style when Unlocked Choose the style for the notification when unlocked:
Banner - A banner appears across the home screen alerting the user.
Modal Alert - A window appears across the home screen. The user must interact with the window before proceeding. -
Select Save to push the payload to the device.
Per-App VPN Profile for iOS
For iOS 7 and higher devices, you can force selected applications to connect through your corporate VPN. Your VPN provider must support this feature, and you must publish the apps as managed applications.
-
Configure your base VPN profile accordingly.
-
Select Per-App VPN to generate a VPN UUID for the current VPN profile settings. The VPN UUID is a unique identifier for this specific VPN configuration.
-
Select Connect Automatically to display text boxes for the Safari Domains, which are internal sites that trigger an automatic VPN connection.
-
Choose a Provider Type to determine how to tunnel traffic, either through an application layer or IP layer.
-
Select Save & Publish.
If saving was done as an update to an existing VPN profile, then any existing devices/applications that currently use the profile are updated. Any devices/applications that were not using any VPN UUID are also updated to use the VPN profile.
Configure Public Apps to Use Per App Profile
After you create a per app tunnel profile, you can assign it to specific apps in the application configuration screen. This tells the application to use the defined VPN profile when establishing connections.
-
Navigate to Resources > Apps > Native Apps.
-
Select the Public tab.
-
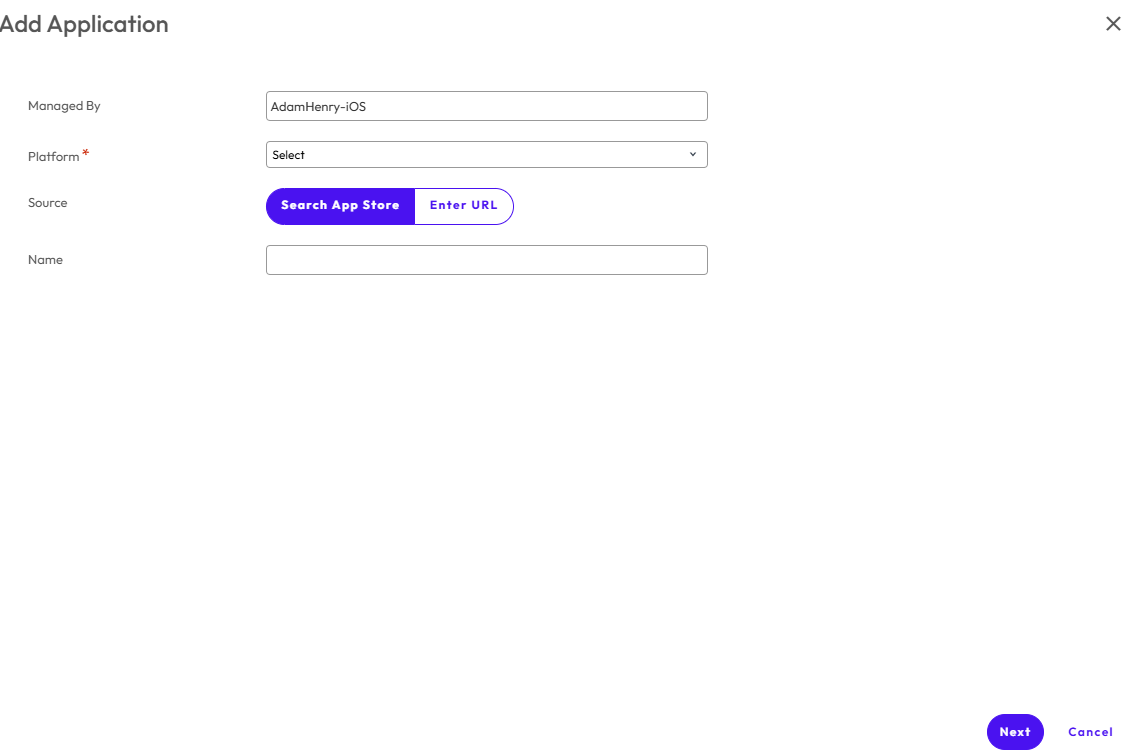
Select Add Application to add an app or Edit an existing app.
-
On the Deployment tab, select Use VPN and then select the profile you created.
-
Select Save and publish your changes.
For more information on adding or editing apps, see the Mobile Application Management guide.
Configure Internal Apps to Use Per App Profile
After you create a per app tunnel profile you can assign it to specific apps in the application configuration screen. This tells the application to use the defined VPN profile when establishing connections.
-
Navigate to Resources > Apps > Native Apps.
-
Select the Internal tab.
-
Select Add Application and add an app.
-
Select Save & Assign to move to the Assignment page.
-
Select Add Assignment and select Per-App VPN Profile in the Advanced section.
-
Save & Publish the app.
For more information on adding or editing apps, see Mobile Application Management guide in Omnissa documentation
Relay Profile for iOS
Relay profile allows you to configure relay servers on your iOS devices.
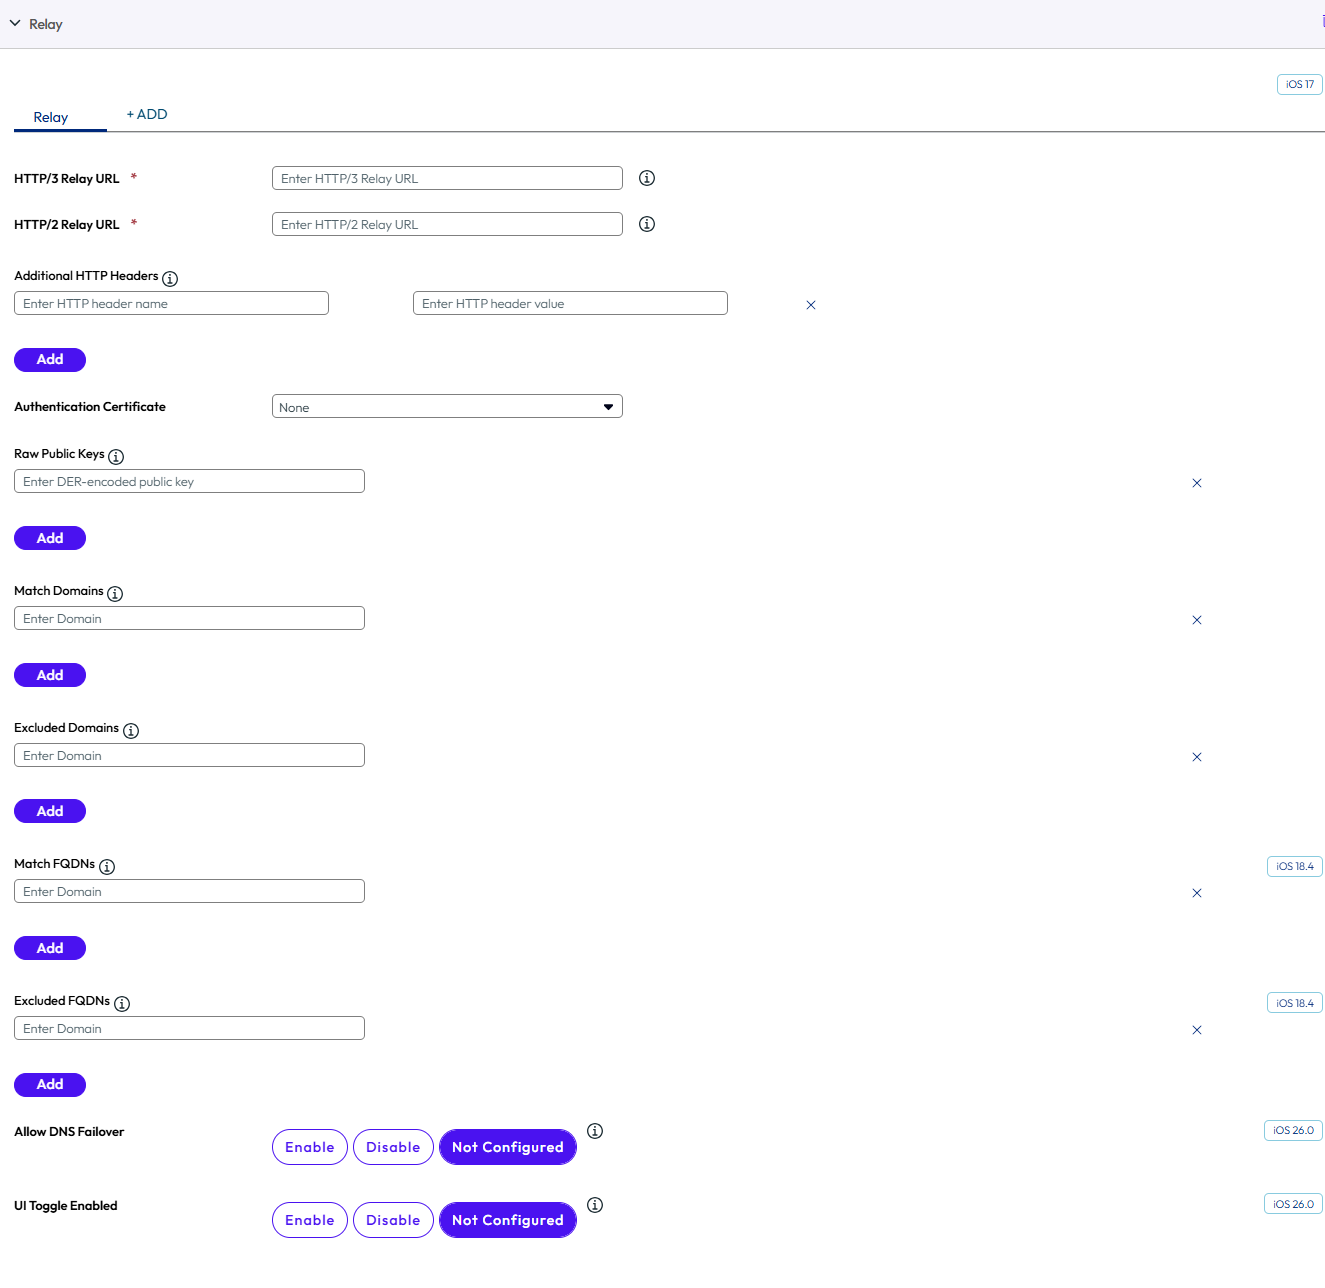
Configure the relay settings including:
| Settings | Descriptions |
|---|---|
| HTTP/3 Relay URL | Enter a HTTP/3 relay server's URL or URI template. |
| HTTP/2 Relay URL | Enter a HTTP/2 relay server's URL or URI template. |
| Additional HTTP Headers | Enter the additional headers from the dictionary that contains custom http header keys and values to add to each request. |
| Authentication Certificate | Select the authentification certificate. |
| Raw Public Keys | Enter DER-encoded public key. |
| Match Domains | Enter the domain string. |
| Excluded Domains | Enter the domain strings that should not be routed through the servers in relays. |
Restrictions Profile for iOS
Restrictions profile limit how employees can use their iOS devices and give administrators the ability to lock down the native functionality of iOS devices and enforce data-loss prevention.
Certain restriction options on the Restrictions profile page have an icon displayed to the right, which indicates the minimum iOS version required to enforce that restriction. For example, the iOS 7 + Supervised icon next to the Allow AirDrop check box means only devices running iOS 7 that are also set to run in Supervised mode using Apple Configurator or Apple's Device Enrollment Program are affected by this restriction.

The step-by-step instructions listed here list a few functional examples of settings you can restrict. To see a complete list of iOS version and supervised requirements, see iOS Functionality Matrix: Supervised vs. Unsupervised.
Configure a Restrictions Profile
You can configure device restrictions,application level restrictions, iCloud restrictions etc on your iOS devices.
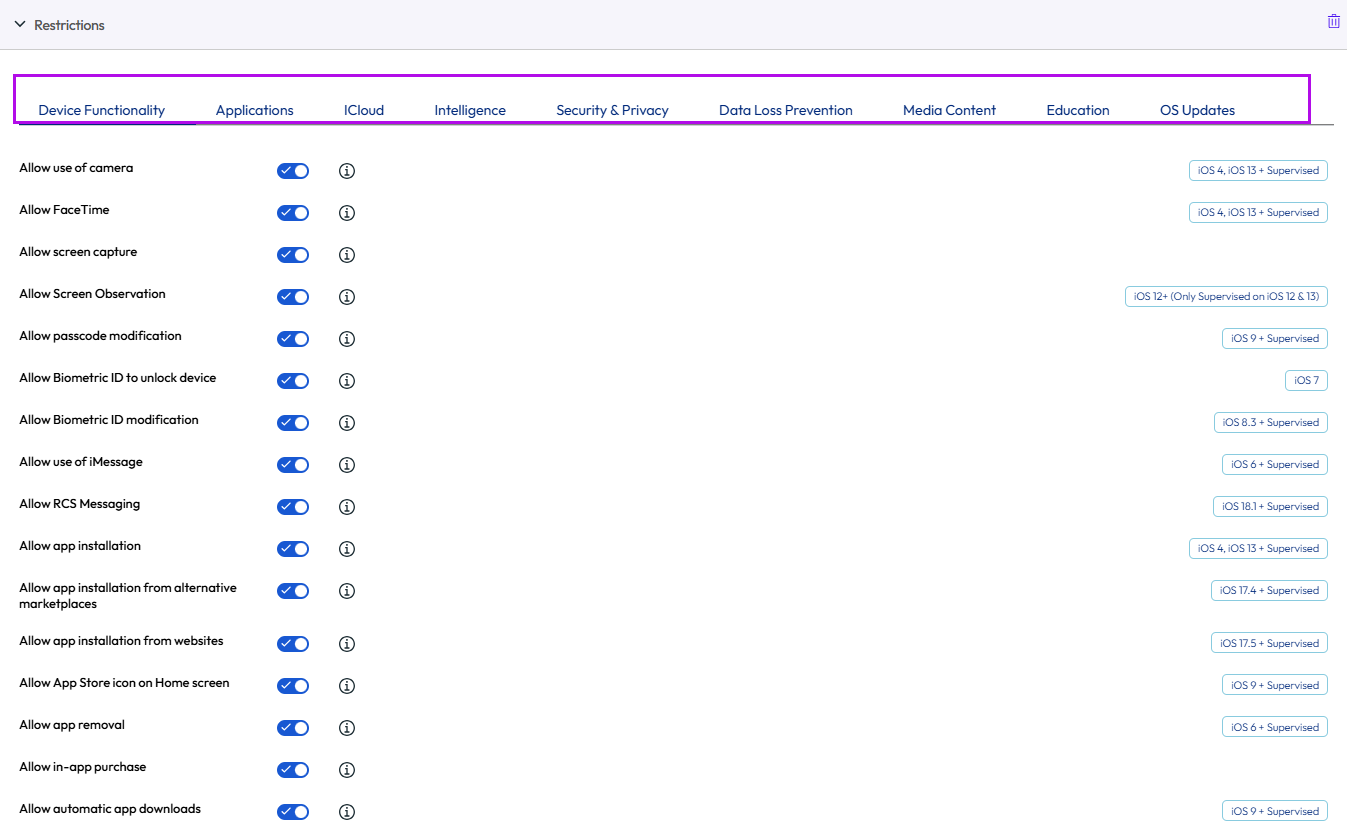
Configure the restrictions profile settings including:
| Settings | Descriptions |
|---|---|
| Device Functionality | Device-level restrictions can deactivate the core device functionality such as the camera, FaceTime, Siri, and in-app purchases to help improve productivity and security. |
| Applications | Application-level restrictions deactivates certain applications such as YouTube, iTunes, and Safari, or some of their features, to enforce corporate use policies. |
| iCloud | Omnissa Workspace ONE UEM provides restrictions for iOS 7 and later devices that can deactivated iCloud or iCloud functionality if needed. |
| Security & Privacy | Security and privacy-based restrictions prohibit end users from performing certain actions that might violate corporate policy or otherwise compromise their device. |
| Data Loss Prevention | Data loss prevention restrictions prevent end users from using AirDrop to share files with other macOS computers and iOS devices, Allow managed apps to write contacts to unmanaged contacts accounts etc |
| Media Content | Ratings-based restrictions prevent access to certain content based on its rating, which is managed by region. |
| Education | Restrictions for students to force unprompted screen observation for managed classes |
| OS Updates | OS level software delay restrictions which allow you to hide iOS updates from end users for a specified number of days. |
Specific Restrictions for iOS
| Functionality | Supported Devices | Supervised |
|---|---|---|
| Device Functionality Restrictions | ||
| Allow use of camera | iOS 4, iOS 13 + | ✓ |
| Allow FaceTime | iOS 4, iOS 13 + | ✓ |
| Allow screen capture | ||
| Allow Screen Observation | iOS 9.3 + | ✓ |
| Allow passcode modification | iOS 9 + | ✓ |
| Allow Biometric ID to unlock device | iOS 7 | |
| Allow Biometric ID modification | iOS 8.3 + | ✓ |
| Allow use of iMessage | iOS 6 + | ✓ |
| Allow app installation | iOS 4, iOS 13 + | ✓ |
| Allow app installation from alternative marketplaces | iOS 17.4 | ✓ |
| Allow app installation from websites | iOS 17.5 | ✓ |
| Allow App Store icon on Home screen | iOS 9 + | ✓ |
| Allow app removal | iOS 6 + | ✓ |
| Allow in-app purchase | ||
| Allow automatic app downloads | iOS 9 + | ✓ |
| Allow changes to cellular data usage for apps | iOS 7 + | ✓ |
| Force limited ad tracking | iOS 7 | |
| Allow Handoff | iOS 8 | |
| Allow automatic sync while roaming | ||
| Allow voice dialing | ||
| Allow internet results in Spotlight | iOS 8 + | ✓ |
| Allow Siri | iOS 5 | |
| Allow Siri while device locked | iOS 5.1 | |
| Enable Siri Profanity Filter | iOS 11 + | ✓ |
| Show user-generated content in Siri | iOS 7 + | ✓ |
| Allow manual profile installation | iOS 6 + | ✓ |
| Allow configuring Restrictions | iOS 8 + | ✓ |
| Allow Erase All Contents and Settings | iOS 8 + | ✓ |
| Allow device name modification | iOS 9 + | ✓ |
| Allow wallpaper modification | iOS 9 + | ✓ |
| Allow account modification | iOS 7 + | ✓ |
| Require passcode on first AirPlay pairing | iOS 7.1 | |
| Allow Wallet notifications in Lock screen | iOS 6 | |
| Show Control Center in Lock screen | iOS 7 | |
| Show Notifications Center in Lock screen | iOS 7 | |
| Show Today view in Lock screen | iOS 7 | |
| Enforce AirDrop as an unmanaged drop destination | iOS 9 | |
| Allow Apple Watch pairing | iOS 9 + | ✓ |
| Enforce Wrist Detection on Apple Watch | iOS 8.3 | |
| Allow keyboard shortcuts | iOS 9 + | ✓ |
| Allow predictive keyboard | iOS 8.1.3 + | ✓ |
| Allow auto correction for keyboard | iOS 8.1.3 + | ✓ |
| Allow spell check for keyboard | iOS 8.1.3 + | ✓ |
| Allow definition lookup for keyboard | iOS 8.1.3 + | ✓ |
| Allow Bluetooth Settings Modification | iOS 10 + | ✓ |
| Allow Dictation | iOS 10.3 + | ✓ |
| Allow system app removal | iOS 11 + | ✓ |
| Allow manual VPN creation | iOS 11 + | ✓ |
| Allow new device proximity setup | iOS 11 + | ✓ |
| Allow password proximity requests | iOS 12 + | ✓ |
| Force Date & Time to be Set Automatically | iOS 12 + | ✓ |
| Allow auto filling of passwords | OS 12 + | ✓ |
| Allow sharing of Wi-Fi passwords | iOS 12 + | |
| Force authentication before autofilling passwords | iOS 11 + | ✓ |
| Allow cellular plan modification | iOS 11 + | ✓ |
| Allow eSIM modification | iOS 12.1 + | ✓ |
| Force eSIM preservation on erase | iOS 17.2 | ✓ |
| Allow personal hotspot modification | iOS 12.2 + | ✓ |
| Allow Siri server logging | iOS 12.2 | |
| Allow toggling Wi-Fi on/off | iOS 13 + | ✓ |
| Allow QuickPath keyboard | iOS 13 + | ✓ |
| Allow USB drive access | iOS 13 + | ✓ |
| Force on Wi-Fi | iOS 13.1 + | ✓ |
| Allow network drive access | iOS 13.1 + | ✓ |
| Allow deprecated TLS versions | iOS 13.4 | |
| Allow Shared device temporary session | iOS 13.4 | |
| Allow App Clips | iOS 14 + | ✓ |
| Allow automatic unlock | iOS 14.5 | |
| Allow iCloud Private Relay | iOS 15 + | ✓ |
| Allow or block Apple Intelligence features (Genmoji,Image Playground,Image Wand,Personalized Handwriting Results,Writing Tools,Mail Summary) | iOS 18 + | ✓ |
| Allow or block Auto Dim | iOS 17.4 + | ✓ |
| Allow or block iPhone Mirroring | iOS 18 + | ✓ |
| Allow or block Video Conferencing Remote Control | iOS 18 + | ✓ |
| Allow or block Hiding Apps | iOS 18 + | ✓ |
| Allow or block Locking Apps | iOS 18 + | ✓ |
| Allow or block Call recording | iOS 18.1 + | ✓ |
| Allow or block RCS Messaging | iOS 18.1 + | ✓ |
| Applications Restrictions | ||
| Allow use of YouTube | iOS 5 and below | |
| Allow use of iTunes Music Store | iOS 4, iOS 13 + | ✓ |
| Allow use of iBookstore | iOS 6 + | ✓ |
| Allow Game Center | iOS 6 + | ✓ |
| Allow multiplayer gaming | iOS 4.1, iOS 13 + | ✓ |
| Allow adding Game Center friends | iOS 4.2.1, iOS 13 + | ✓ |
| Allow changes to Find My Friends | iOS 7 + | ✓ |
| Allow use of Safari | iOS 4, iOS 13 + | ✓ |
| Allow News | iOS 9 + | ✓ |
| Allow Radio Service | iOS 9.3 + | ✓ |
| Allow Music Service | iOS 9 + | ✓ |
| Allow Podcasts | iOS 8 + S | ✓ |
| Enable autofill | iOS 4, iOS 13 + | ✓ |
| Force fraud warning | ||
| Enable JavaScript | ||
| Block pop-ups | ||
| Accept Cookies | ||
| Show Apps | iOS 9.3 + | ✓ |
| Hide Apps | iOS 9.3 + | ✓ |
| Allow Find My Device | iOS 13 + | ✓ |
| Allow Find My Friends | iOS 13 + | ✓ |
| Allow Genmoji | iOS 18 + | ✓ |
| Allow Image Playground | iOS 18 + | ✓ |
| Allow Image Wand | iOS 18 + | ✓ |
| Allow Personalized Handwriting Results | iOS 18 + | ✓ |
| Allow Writing Tools | iOS 18 + | ✓ |
| Allow Mail Summary | iOS 18.1 + | ✓ |
| Allow External Intelligence Integrations | iOS 18.2 | ✓ |
| Allow External Intelligence Integrations Sign-in | iOS 18.2 + | ✓ |
| Allow Auto Dim | iOS 17.4 + | ✓ |
| Allow iPhone Mirroring | iOS 18 + | ✓ |
| Allow Video Conferencing Remote Control | iOS 18 + | ✓ |
| Allow Hiding Apps | iOS 18 + | ✓ |
| Allow Locking Apps | iOS 18 + | ✓ |
| Allow Call recording | iOS 18.1 + | ✓ |
| Allow RCS Messaging | iOS 18.1 + | ✓ |
| Allow Default Browser Modification | iOS 18.2 + | ✓ |
| iCloud Restrictions | ||
| Allow backup | iOS 5, iOS 13 + | ✓ |
| Allow document sync | iOS 5, iOS 13 + | ✓ |
| Allow keychain sync | iOS 7, iOS 13 + | ✓ |
| Allow managed apps to store data | iOS 8 | |
| Allow backing up Enterprise Books | iOS 8 | |
| Allow synchronizing Enterprise Books notes and highlights | iOS 8 | |
| Allow Photo Stream | iOS 5 | |
| Allow Shared Photo Stream | iOS 6 | |
| Allow iCloud photo library | iOS 9 | |
| Security & Privacy restrictions | ||
| Allow USB Restricted Mode | iOS 11.4.1 + | ✓ |
| Allow recovery mode with unpaired device | iOS 14.5 + | ✓ |
| Allow user to trust unmanaged enterprise apps | iOS 9 | |
| Force iTunes Store password entry | iOS 5 | |
| Allow diagnostic data to be sent to Apple | iOS 5 | |
| Force on-device dictation | iOS 14.5 | |
| Force on-device translation | iOS 15 | |
| Allow user to accept untrusted TLS certificates | iOS 5 | |
| Allow over the air PKI updates | iOS 7 | |
| Force encrypted backups | ||
| Allow pairing with non-Configurator hosts | iOS 7 + | ✓ |
| Require Managed Wi-Fi | iOS 10.3 + | ✓ |
| Allow AirPrint credentials storage in keychain | iOS 11 + | ✓ |
| Force AirPrint to use a trusted TLS certificate | iOS 11 + | ✓ |
| Allow AirPrint iBeacon discovery | iOS 11 + | ✓ |
| Allow personalized advertising | iOS 14 + | ✓ |
| Allow Mail Privacy Protection | iOS 15.2 + | ✓ |
| Allow Live Voicemail | iOS 17.2 | ✓ |
| Data Loss Prevention Restrictions | ||
| Allow documents from managed sources in unmanaged destinations | iOS 7 | |
| Allow documents from unmanaged sources in managed destinations | iOS 7 | |
| Allow AirDrop | iOS 7 + | ✓ |
| Allow AirPrint | iOS 11 + | ✓ |
| Allow NFC | iOS 14.2 + | ✓ |
| Allow managed apps to write contacts to unmanaged contacts accounts | iOS 12 | |
| Allow unmanaged apps to read contacts from managed contacts accounts | iOS 12 | |
| Require managed pasteboard | iOS 15.0 | |
| Media Content Restrictions | ||
| Ratings region | ||
| Movies | ||
| TV Shows | ||
| Apps | ||
| iBooks | iOS 6 | |
| Allow explicit music and podcasts | iOS 4, iOS 13 + | ✓ |
| Exempted Apps (If present, the system exempts apps with bundle IDs in the array from age-based rating restrictions) | iOS 26.1 | ✓ |
| Education Restrictions | ||
| Force unprompted screen observation for managed classes | iOS 10.3 + | ✓ |
| Allow unprompted app and device lock in unmanaged classes | iOS 11 + | ✓ |
| Allow automatic joining of unmanaged classes | iOS 11 + | ✓ |
| Force students to request permission to leave unmanaged classes | iOS 11.3 + | ✓ |
| OS updates Restrictions | ||
| Delay OS Updates (Days) | iOS 11.3 + | ✓ |
| Allow Rapid Security Response Installation | iOS 16.0 + | ✓ |
| Allow Rapid Security Response Removal | iOS 16.0 + | ✓ |
SCEP/Credentials Profile for iOS
Even if you protect your corporate email, Wi-Fi and VPN with strong passcodes and other restrictions, your infrastructure may remain vulnerable to brute force and dictionary attacks, in addition to employee error. For greater security, you can implement digital certificates to protect corporate assets.
To assign certificates, you must first define a certificate authority. Then, configure a Credentials payload alongside your Exchange ActiveSync (EAS), Wi-Fi, or VPN payload. Each of these payloads has settings for associating the certificate authority defined in the Credentials payload.
To push down certificates to devices, you must configure a Credentials or SCEP payload as part of the profiles you created for EAS, Wi-Fi, and VPN settings. Use the following instructions to create a certificate-enabled profile:
-
Navigate to Resources > Profiles & Baselines > Profiles > Add and select iOS from the platform list.
-
Configure the profile's General settings.
-
Select either the EAS, Wi-Fi, or VPN payload to configure. Fill out the necessary information, depending on the payload you selected.
-
Select the Credentials (or SCEP) payload.
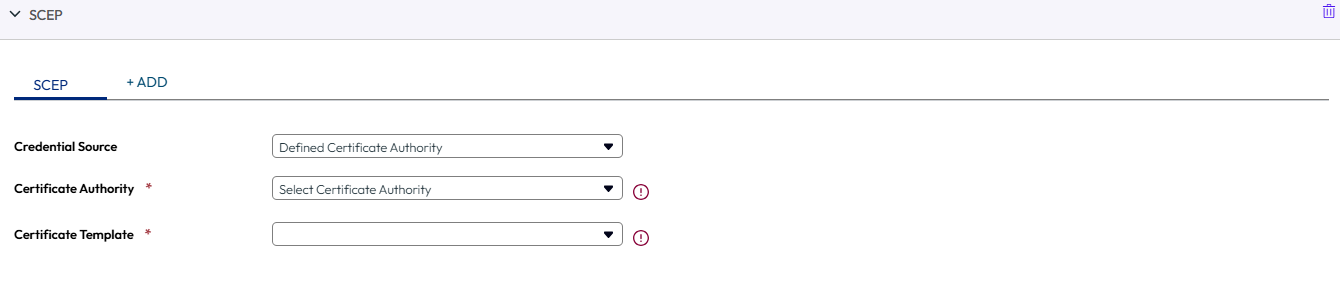
-
Choose one option from the Credentials Source menu:
a. Choose to Upload a certificate and enter the Certificate Name.
b. Choose Defined Certificate Authority and select the appropriate Certificate Authority and Certificate Template.
c. Choose User Certificate and the use for the S/MIME certificate.
d. Choose Derived Credentials and select the appropriate Key Usage based on how the certificate is used. Key Usage options are Authentication, Signing, and Encryption.
-
Navigate back to the previous payload for EAS, Wi-Fi, or VPN.
-
Specify the Identity Certificate in the payload:
a. EAS – Select the Payload Certificate under Login Information.
b. Wi-Fi – Select a compatible Security Type (WEP Enterprise, WPA/WPA2 Enterprise or Any (Enterprise) and select the Identity Certificate under Authentication.
c. VPN – Select a compatible Connection Type (for example, CISCO AnyConnect, F5 SSL) and select Certificate from the User Authentication drop-down. Select the Identity Certificate.
-
Navigate back to Credentials (or SCEP ) payload.
-
Select Save & Publish after configuring any remaining settings.
Single App Mode Profile for iOS
Use Single App Mode to provision devices so they can only access a single app of choice. Single App Mode deactivates the home button and forces the device to boot directly into the designated app if the user attempts a manual restart.
This feature ensures that the device is not used for anything outside of the desired application and has no way of accessing unintended other apps, device settings, or an Internet browser. This feature is useful for restaurants and retail stores. For education, students can use devices that are locked access to a single game, eBook, or exercise.
An iOS 7 or higher device configured in Supervised mode. (iOS 7 and higher is required for extra options and autonomous single app mode.)
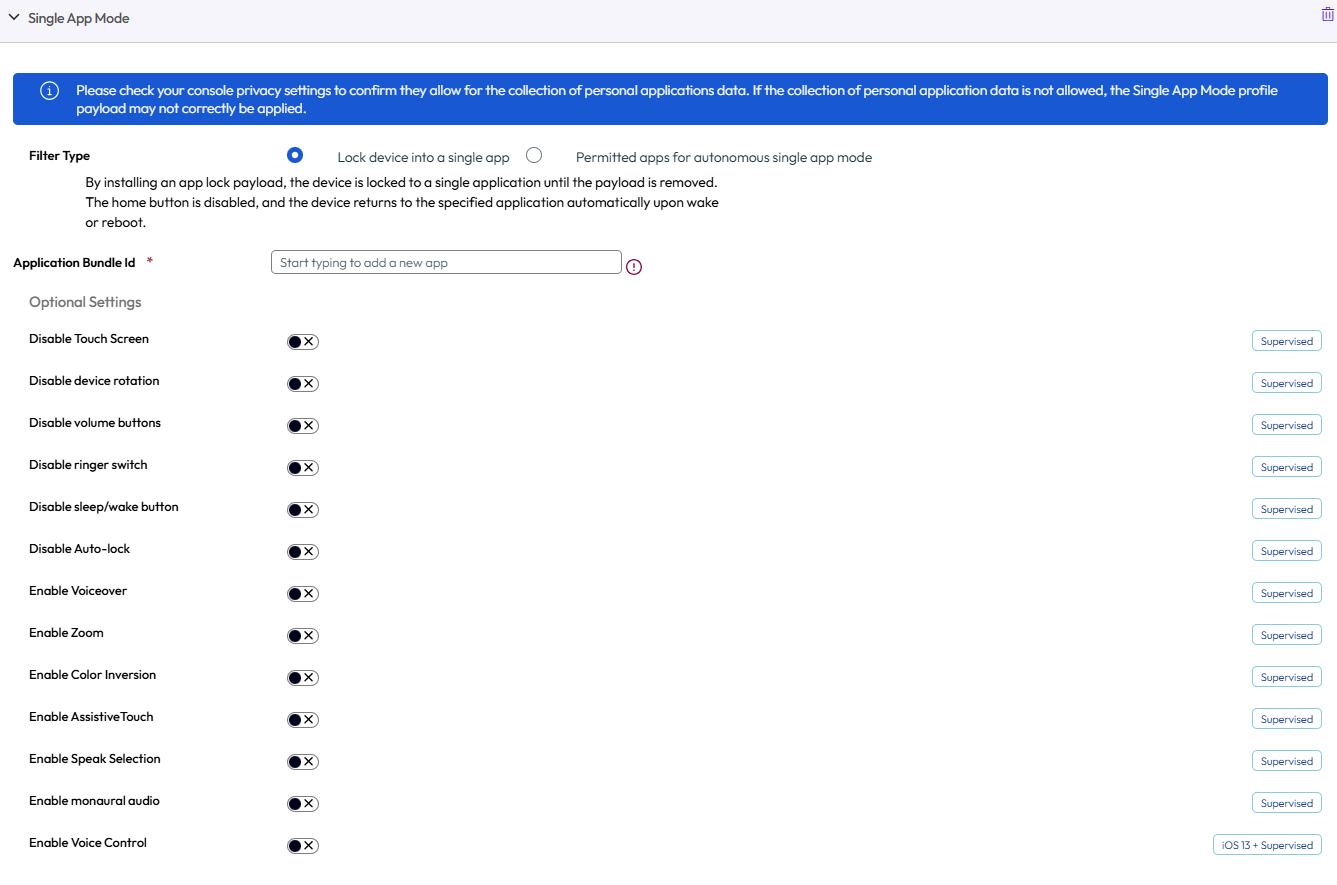
Configure Single App mode settings including:
| Setting | Description |
|---|---|
| Filter Type | Choose a filter, either Lock device into a single app or Permitted apps for autonomous single app mode: Lock device into a single app – Lock devices into a single public, internal, purchased, or native application until the profile with this payload is removed. The home button is deactivated, and the device always returns to the specified application from a sleep state or reboot. Permitted apps for autonomous single app mode – Enable allowed applications to trigger Single App Mode based on an event that controls when to turn on and off Single App Mode on the device. This action happens within the app itself as determined by the app developer. |
| Application Bundle ID | Enter the bundle ID or select one from the drop-down menu. The bundle ID appears in the drop-down menu after the application has been uploaded to the UEM console. For example: com.air-watch.secure.browser. |
| Optional Settings | Choose optional settings for Supervised iOS 7 and higher devices. |
Once you save the profile,each device provisioned with this profile enters Single App Mode.
Restart a Device Operating in Single App Mode
The hard reset procedure is used to restart a device operating in Single App Mode.
-
Press and hold the Home button and the Sleep/Wake button simultaneously.
-
Continue holding both buttons until the device shuts off and begins to restart.
-
Let go when you see the silver Apple logo. It may take a while for the device to load from the Apple logo to the main screen.
Exit Single App Mode on iOS Devices
End users cannot exit the app when Single App Mode is enabled. Omnissa Workspace ONE UEM provides two options for exiting single app mode, depending on which Single App Mode you enable.
You can deactivate Single App Mode temporarily if you need to update the specified app to a new version or release. Deactivate Single App Mode using the instructions below, install the new app version, and enable Single App Mode again.
Procedure
- Navigate to Resources > Profiles & Baselines > Profiles. In the row for the Single App Mode profile, select the View Devices icon.
- Select Remove Profile for the device from which you want to remove the setting.
- Update the application to the desired version.
- Re-install the profile using the steps under Configure Single App Mode
Allow Device Admin to Exit Single App Mode from the Device
You can allow an admin to exit Single App Mode with a passcode on the device itself. This option is only available if you enable autonomous single app mode as the Filter Type for the Single App Mode profile.
Procedure
- Navigate to Resources > Profiles & Baselines > Profiles > Add. Select Apple iOS.
- Configure the profile's General settings.
- Select the Single App Mode payload.
- With Permitted apps for autonomous single app mode selected, enter the bundle ID of an application that supports autonomous single app mode under Permitted Applications.
- Select Save & Publish to push this profile to the assigned devices.
- Navigate to Resources > Apps > Native Apps > Public for public apps, or Resources > Apps > Native Apps > Purchased for apps managed through VPP.
- Locate the autonomous single app mode supported application and select the Edit Assignment icon. The Edit Application window displays.
- Select the Assignment tab and expand the Policies section.
- Select Enabled for Send Application Configuration, enter AdminPasscode as the Configuration Key, and set the Value Type to String.
- Enter the passcode admins use to exit Single App Mode as the Configuration Value. The value can be numeric or alphanumeric. Select Add.
- Select Save and Publish to push the application configuration.
Single Sign-On Profile for iOS
Enable single sign-on for corporate apps to allow seamless access without requiring authentication into each app. Push this profile to authenticate end users through Kerberos authentication instead of storing passwords on devices. For more information on single sign-on settings, refer to the Workspace ONE UEM Mobile Application Management Guide.
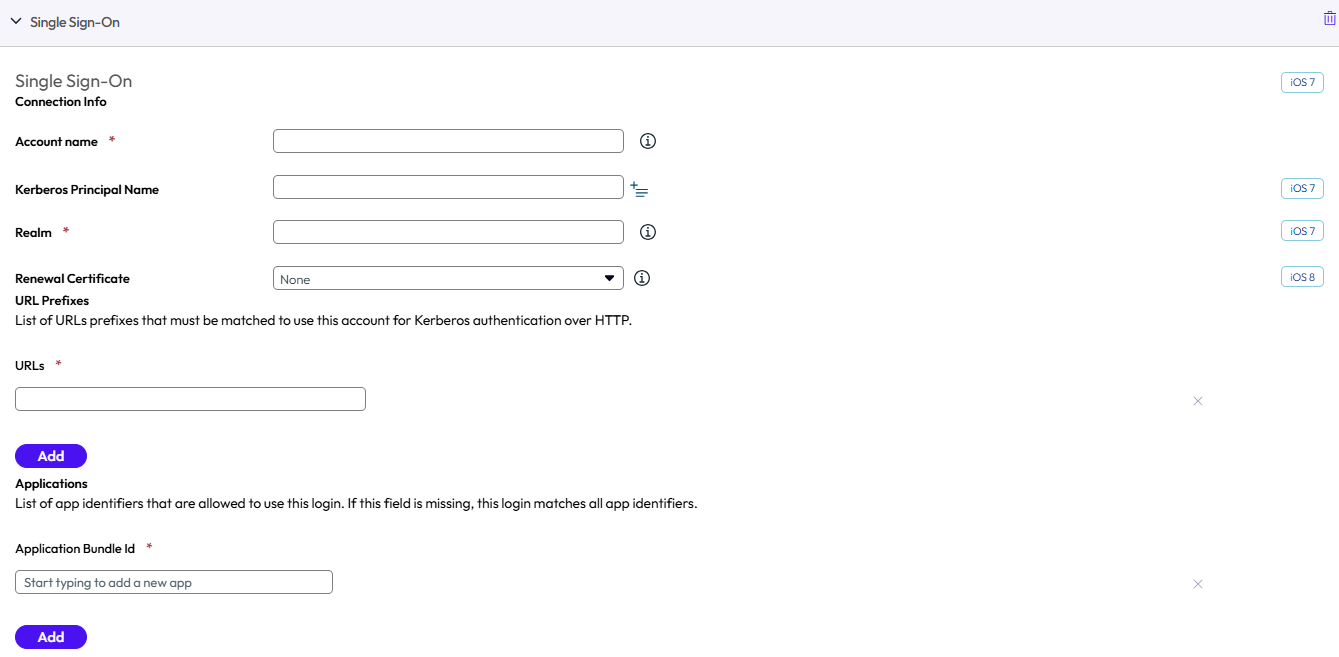
-
Enter Connection Info:
Setting Description Account Name Enter the name that appears on the device. Kerberos Principal Name Enter the Kerberos principal name. Realm Enter the Kerberos domain realm. This parameter must be fully capitalized. Renewal Certificate On iOS 8+ devices, select the certificate used to reauthenticate the user automatically without any need for user interaction when the user's single sign-on session expires. Configure a renewal certificate (for example: .pfx) using a credentials or SCEP payload. -
Enter the URL Prefixes that must be matched to use this account for Kerberos authentication over HTTP. For example:
http://sharepoint.acme.com. If left empty, the account is eligible to match all HTTP and HTTPS URLs. -
Enter the Application Bundle ID or select one from the drop-down menu. The bundle ID appears in this drop-down menu after the application has been uploaded to the UEM console. For example: com.air-watch.secure.browser. The applications specified must support Kerberos authentication.
-
Select Save & Publish.
In the example of a Web browser, when end users navigate to a Web site specified in the payload, they are prompted to enter the password of their domain account. Afterward, they do not have to enter credentials again to access any of the Web sites specified in the payload.
Note:
-
Using Kerberos authentication, devices must be connected to the corporate network (either using corporate Wi-Fi or VPN).
-
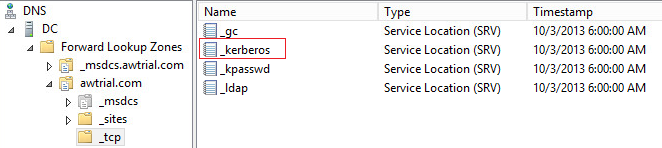
The DNS server must have a record of the Kerberos services (KDC server).
-
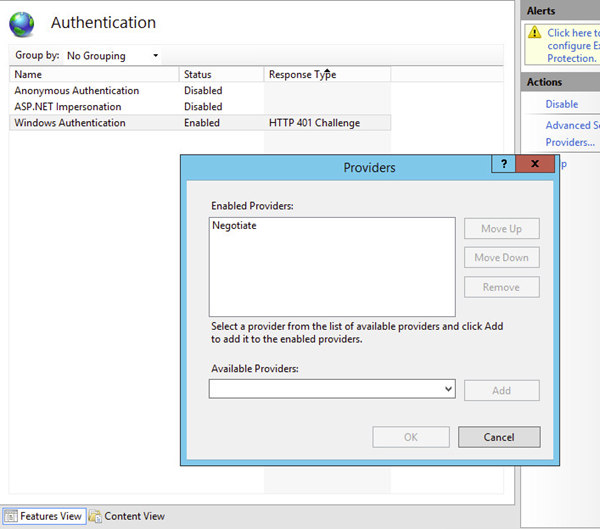
Both the application on the mobile device and the Web site must support Kerberos/Negotiate authentication.
Skip Setup Assistant Profile for iOS
Use Setup Assistant profile to skip Setup Assistant screens on the device after an OS update. This profile is applicable only to iOS 14, IPadOS 14 and later.
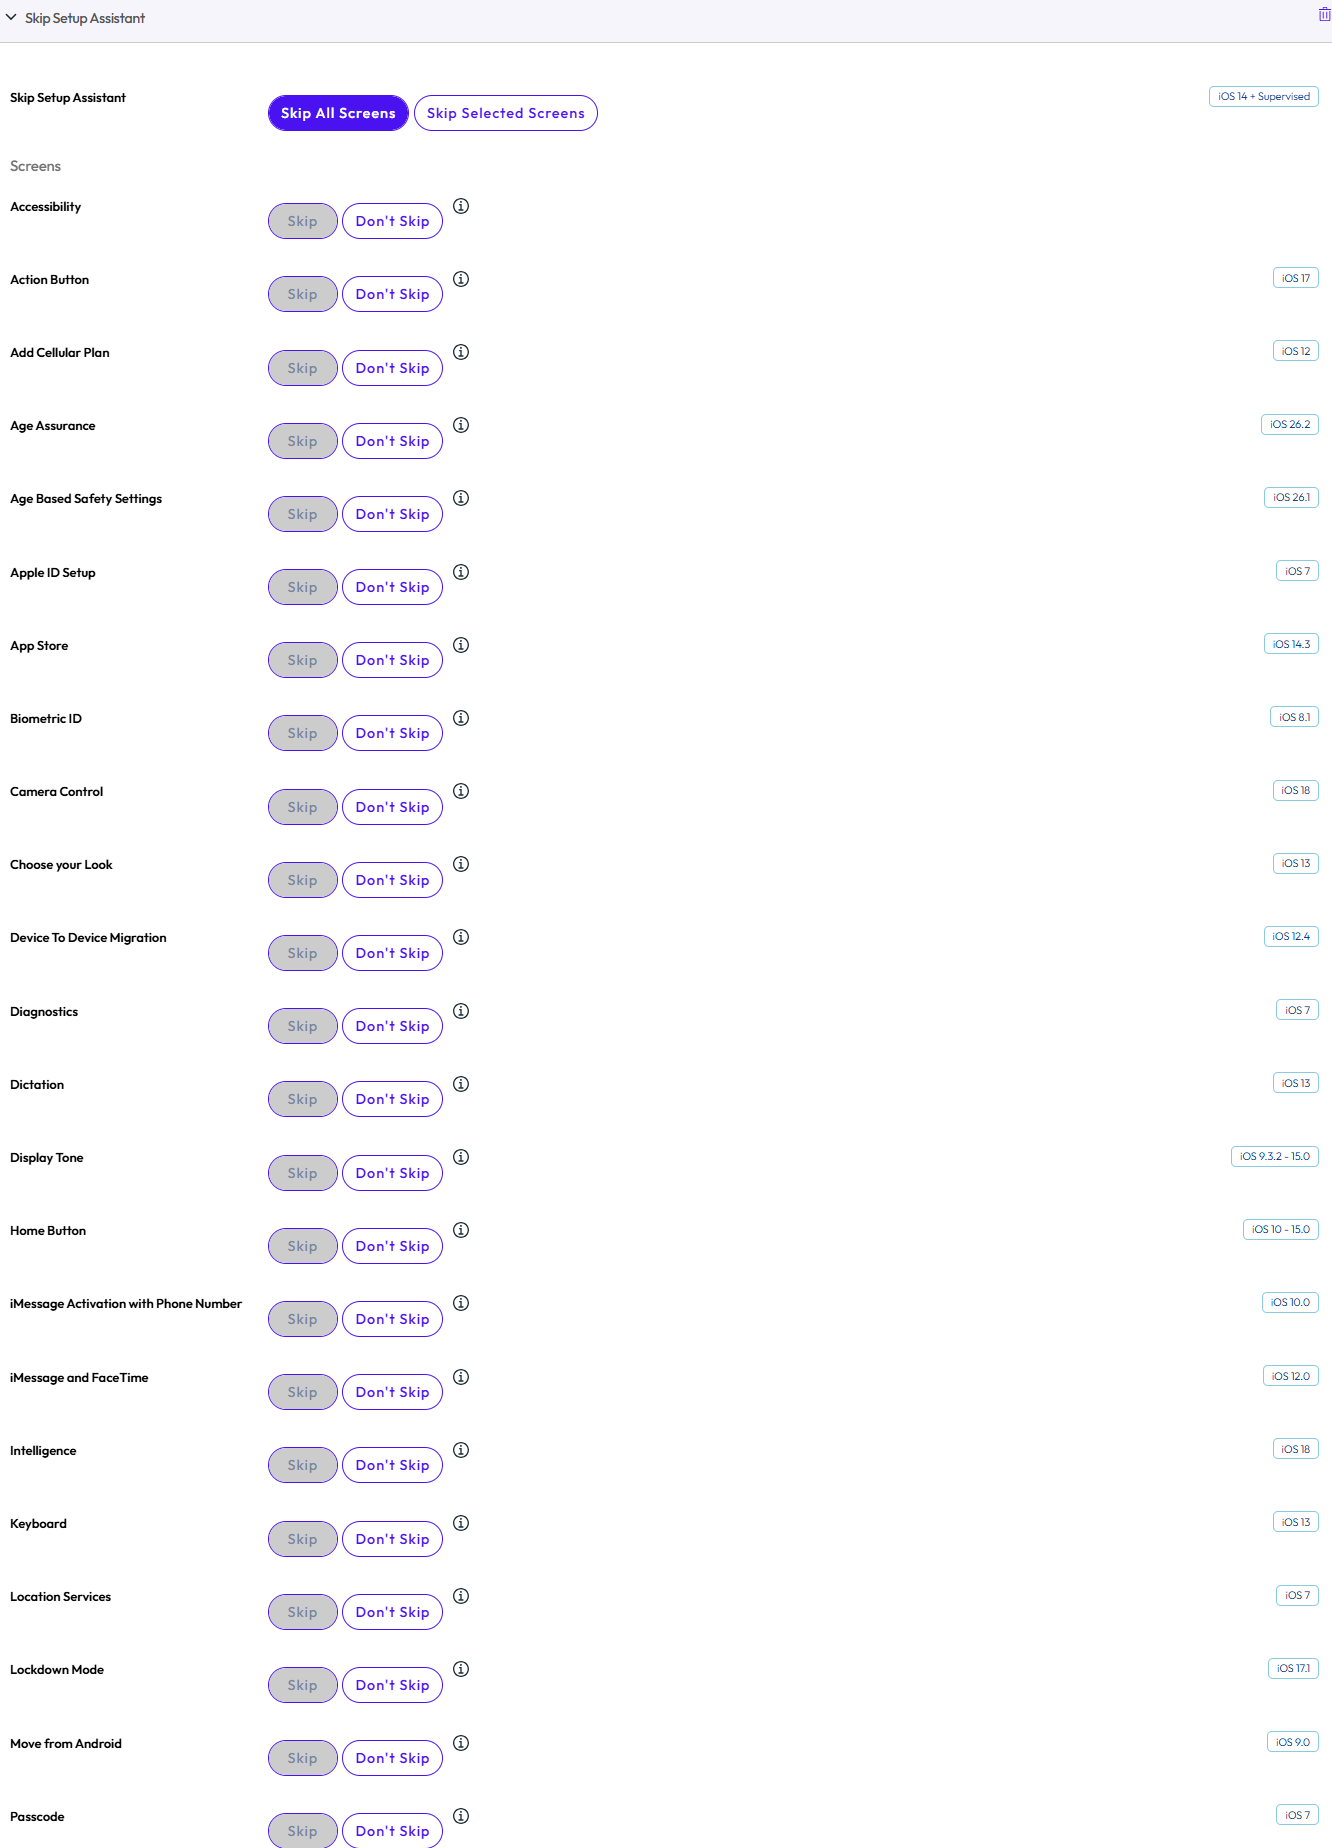
Configure the Skip Setup Assistant profile settings, including:
| Settings | Description |
|---|---|
| Setup Assistant | Select either skip all Setup Assistant screens after an OS update or skip selected screens from the list below. Note: By default, Skip all screens option is selected. When users select option to Skip some screens, the rest of the text boxes are editable. |
| Move from Android | If the Restore pane is not skipped, skips the Move from Android option in the Restore pane on iOS. |
| Choose Your Look | Skips the Choose Your Look screen. |
| Apple ID Setup | Skips Apple ID setup. |
| Apple Intelligence | Skips Apple Intelligence setup. |
| App Store | Skips the App Store page during the Setup. |
| Emergency SOS | Skips the Emergency SOS page during the Setup. |
| Biometric ID | Skips biometric setup. Device To Device Migration |
| Device To Device Migration | Skips Device to Device Migration pane. |
| Diagnostics | Skips the App Analytics pane. |
| Display Tone | Skips DisplayTone setup. |
| Home Button | Skips the Meet the New Home Button screen on iPhone 7, iPhone 7 Plus, iPhone 8, iPhone 8 Plus, and iPhone SE. |
| iMessage and FaceTime | Skips the iMessage and FaceTime screen in iOS. |
| Location Services | Skips Location Services. |
| Passcode | Skips the passcode pane. |
| Payment | Skips Apple Pay setup. |
| Privacy | Skips the privacy pane. |
| Restore | Deactivates restoring from backup restore. |
| Restore Completed | Skips the Restore Completed pane. |
| Screen Time | Skips the Screen Time pane. |
| Add Cellular Plan | Skips the add cellular plan pane. |
| Siri | Skips Siri. |
| Software Update | Skips the mandatory software update screen in iOS. |
| Terms and Conditions | Skips Terms and Conditions. |
| Terms of Address | Skips Terms of Address during the Setup Wizard |
| Update Completed | Skips the Software Update Complete pane. |
| Watch Migration | Skips the screen for watch migration. |
| Welcome | Skips the Get Started pane. |
| Zoom | Skips zoom setup. |
| CameraButton | Skips the Camera Control pane. |
| Keyboard | Skips the Keyboard setup pane. |
| SpokenLanguage | Skips the Dictation pane |
| AgeAssurance | Skips Age Assurance pane. |
| AgeBasedSafetySettings | Skips Age Based Safety Settings pane. |
SSO Extension Profile for iOS
To configure an application on device to perform single sign-on (SSO) with the Kerberos extension, configure the SSO Extension profile. With the SSO Extension profile, users do not have to provide their user name and password to access specific URLs. This profile is applicable only to iOS 13 and later devices.
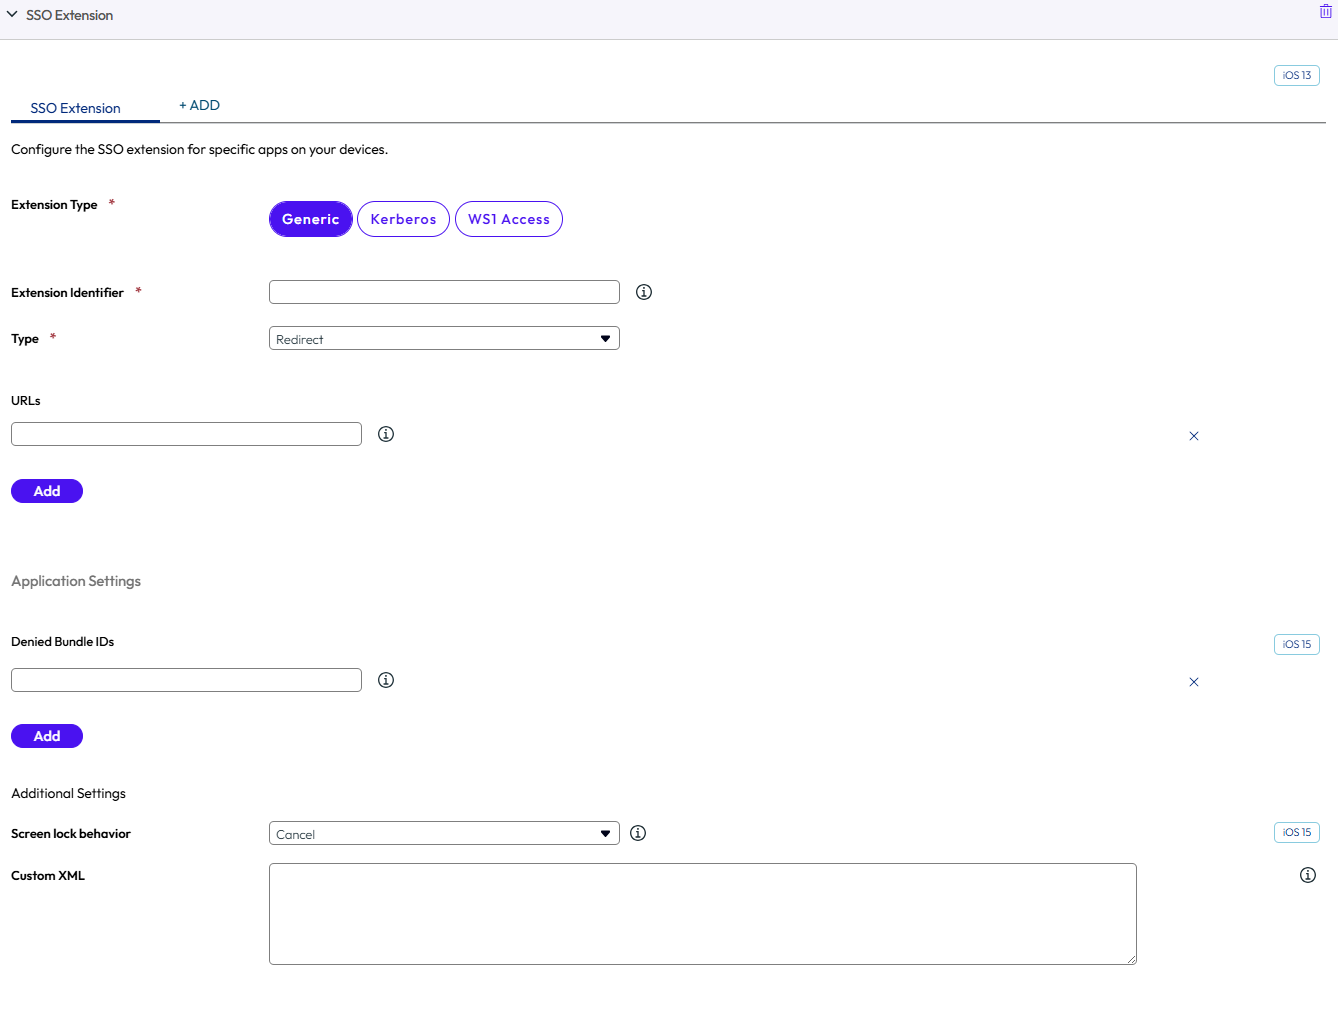
Configure the SSO Extension settings, including:
| Setting | Description |
|---|---|
| Extension Type | Select the type of the SSO extension for the application. If Generic is selected, provide the Bundle ID of the application extension that performs SSO for the specified URLs in the Extension Identifier field. If Kerberos is selected, provide the Active Directory Realm and Domains. |
| Type | Select either Credential or Redirect as extension type. Credentials extension is used for the challenge/response authentication. Redirect extension can use OpenID Connect, OAuth, and SAML authentication. |
| Team Identifier | Enter the Team Identifier of the application extension that performs SSO for the specified URLs. |
| URLs | Enter one or more URL prefixes of identity providers where the application extension performs SSO. |
| Additional Settings | Enter additional settings for the profile in XML code which is added to the ExtensionData node. |
| Active Directory Realm | This option appears only if Kerberos is selected as the Extension Type. Enter the name for the Kerberos Realm. |
| Domains | Enter the host names or the domain names which can be authenticated through the application extension. |
| Use Site Auto-Discovery | Enable the option to make the Kerberos extension to automatically use LDAP and DNS to determine the Active Directory site name. |
| Allow Automatic Login | Enable the option to allow passwords to be saved to the keychain. |
| Require User Touch ID or Password | Enable the option to allow the user to provide Touch ID, FaceID, or passcode to access the keychain entry. |
| Certificate | Select the certificate to push down to the device which is in the same MDM profile. |
| Allowed Bundle IDs | Enter a list of application bundle IDs to allow access to the Kerberos Ticket Granting Ticket (TGT). |
Subscribed Calendar Profile for iOS
Push calendar subscriptions using the native Calendar app in macOS to your iOS devices by configuring this payload.
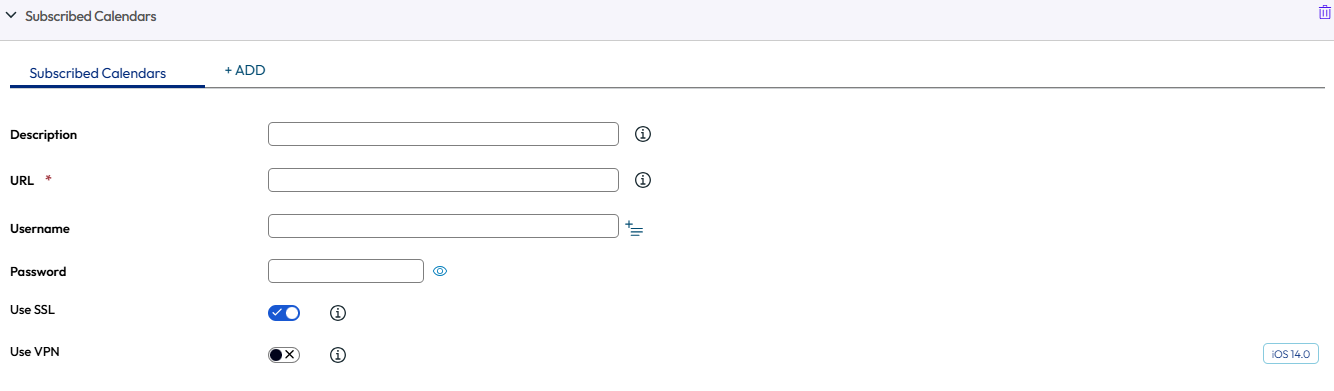
Configure the calendar settings, including:
| Setting | Description |
|---|---|
| Description | Enter a brief description of the subscribed calendars. |
| URL | Enter the URL of the calendar to which you are subscribing. |
| Username | Enter the user name of the end user for authentication purposes. |
| Password | Enter the password of the end user for authentication purposes. |
| Use SSL | Check to send all traffic using SSL. |
Virtual Private Network (VPN) Profile for iOS
Virtual private networks (VPNs) provide devices with a secure and encrypted tunnel to access internal resources. VPN profiles enable each device to function as if it were connected through an on-site network. Configuring a VPN profile ensures that end users have the seamless access to email, files, and content.
The settings that you see may vary depending on the Connection Type you choose. For more information on using the Forcepoint content filtering, see Creating a Forcepoint Content Filter Profile.
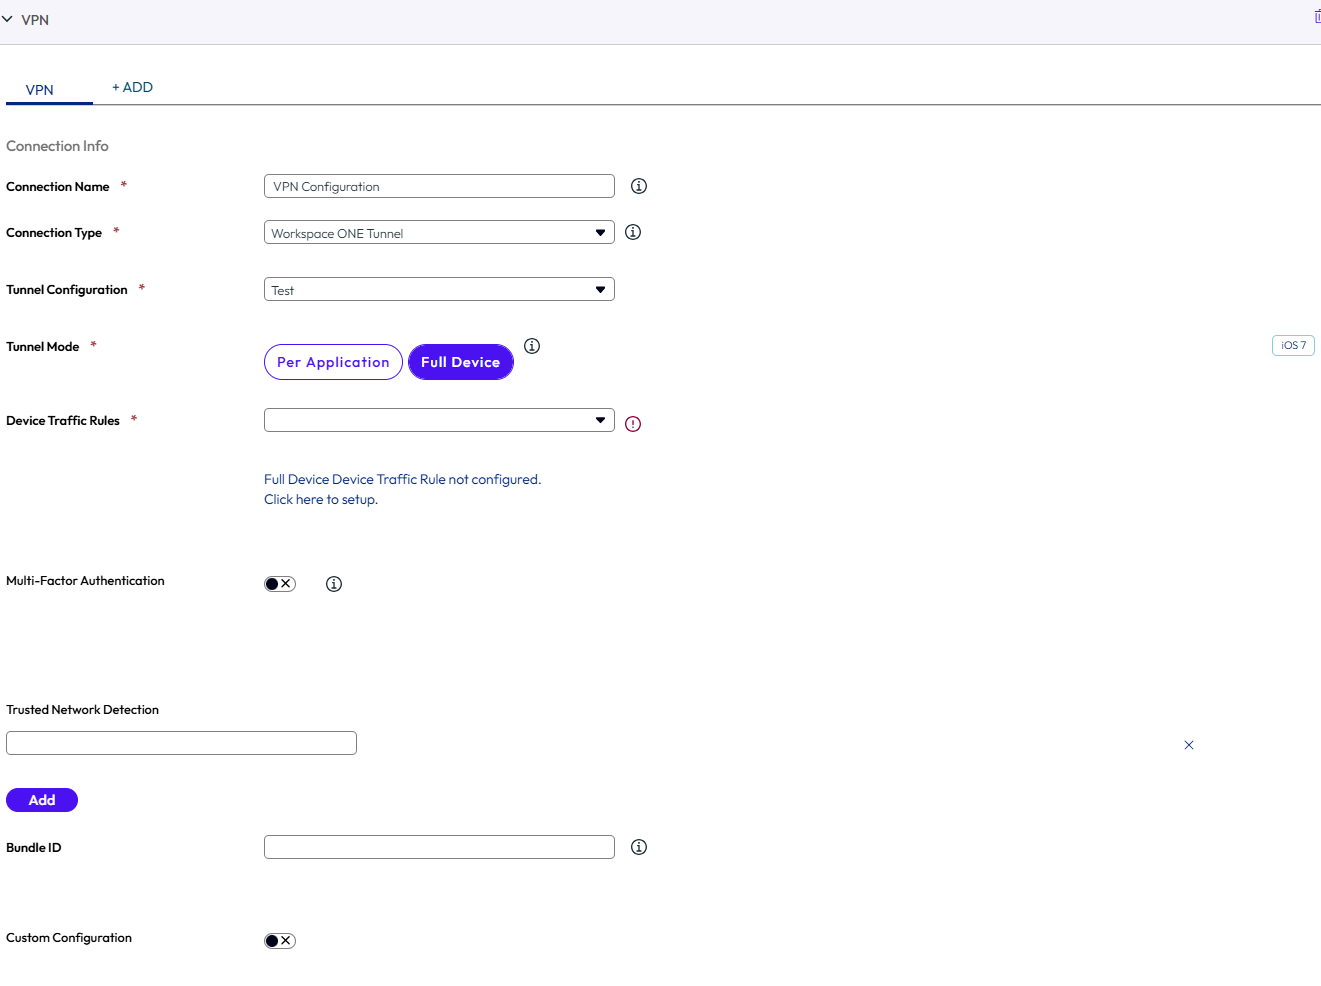
Configure the Notifications profile settings, including:
| Settings | Description |
|---|---|
| Connection Name | Enter the name of the connection to be displayed on the device. |
| Connection Type | Use the drop-down menu to select the network connection method. |
| Server | Enter the hostname or IP address of the server for connection. |
| Account | Enter the name of the VPN account. |
| Send All Traffic | Force all traffic through the specified network. |
| Disconnect on Idle | Allow the VPN to auto-disconnect after a specific amount of time. Support for this value depends on the VPN provider. |
| Connect Automatically | Select to allow the VPN to connect automatically to the following domains. This option appears when Per App VPN Rules is selected. Safari Domains Mail Domains Contacts Domains Calendar Domains |
| Provider Type | Select the type of the VPN service. If the VPN service type is an App proxy, the VPN service tunnels the traffic at the application level. If it is a Packet tunnel, the VPN service tunnels the traffic at the IP layer. |
| Per App VPN Rules | Enables the Per App VPN for devices. For more information, see Configuring Per-App VPN for iOS Devices in this guide |
| Authentication | Select the method to authenticate to end users. Follow the related prompts to upload an Identity Certificate, or enter a Password information, or the Shared Secret key to be provided to authorize end users for VPN access. |
| Enable VPN On Demand | Enable VPN On Demand to use certificates to establish VPN connections automatically using the Configuring VPN On Demand for iOS Devices section in this guide. |
| Proxy | Select either Manual or Auto as the proxy type to configure with this VPN connection. |
| Server | Enter the URL of the proxy server. |
| Port | Enter the port used to communicate with the proxy. |
| Username | Enter the user name to connect to the proxy server. |
| Password | Enter the password for authentication. |
| Vendor Keys | Select to create custom keys to go into the vendor config dictionary. |
| Key | Enter the specific key provided by the vendor. |
| Value | Enter the VPN value for each key. |
| Exclude Local Networks | Enable the option to include all networks to route the network traffic outside the VPN. |
| Include All Networks | Enable the option to include all networks to route the network traffic through the VPN. |
| Enforce routes | Enable this option for all VPN non-default routes to take precedence over locally defined rules.If you have enabled Include all networks, this setting is ignored. |
| Maxium Transmission Unit | This specifies the maximum size in bytes of each packet that will be sent over the IKEv2 VPN interface. |
| SMB Domains | An array of SMB domains that is accessible through this VPN connection. |
| Prevent on demand override | Enable this option to prevent users from toggling VPN On Demand in Settings. |
| Cellular Slice(iOS 18) | The data network name (DNN) or app category identifying a Cellular Slice for the VPN. The presence of this key will scope the VPN tunnel onto the specified Cellular Slice. |
| Post-Quantum Pre-Shared Key(iOS 18) | The Post-quantum Pre-shared key (PPK) used for this VPN. This key is meant to be used with VPN servers that support RFC 8784. |
Note: If you have chosen IKEv2 as the type, you are eligible to enter the minimum and the maximum TLS version for the VPN connection. Provided that you enable the Enable EAP check box before you enter the TLS version.
After saving the profile, end users have access to permitted sites.
VPN On Demand Profile for iOS
VPN On Demand is the process of automatically establishing a VPN connection for specific domains. For increased security and ease of use, VPN On Demand uses certificates for authentication instead of simple passcodes.
Ensure your certificate authority and certificate templates in Omnissa Workspace ONE UEM are properly configured for certificate distribution. Make your third-party VPN application of choice available to end users by pushing it to devices or recommending it in your enterprise App Catalog.
-
Configure your base VPN profile accordingly.
-
Select Certificate from the User Authentication drop-down menu. Navigate to the Credentials payload.
a. From the Credential Source drop-down menu, select Defined Certificate Authority.
b. Select the Certificate Authority and Certificate Template from the respective drop-down menus.
c. Navigate back to the VPN payload.
-
Select the Identity Certificate as specified through the Credentials payload if you are applying certificate authentication to the VPN profile.
-
Select the Enable VPN On Demand box.
-
Configure the Use the New on Demand Keys (iOS 7) to enable a VPN connection when end users access any of the domains specified:
Setting Description Use new On Demand Keys (iOS 7 and higher) Select to use the new syntax that allows for specifying more granular VPN rules. On Demand Rule/Action Choose an Action to define VPN behavior to apply to the VPN connection based on the defined criteria. If the criterion is true, then the action specified takes place.
Evaluate Connection: Automatically establish the VPN tunnel connection based on the network settings and on the characteristics of each connection. The evaluation happens every time the VPN connects to a Web site.
Connect: Automatically establish the VPN tunnel connection on the next network attempt if the network criteria met.
Disconnect: Automatically deactivate the VPN tunnel connection and do not reconnect on demand if the network criteria are met.
Ignore: Leave the existing VPN connection, but do not reconnect on demand if the network criteria are met.Action Parameter Configure Action Parameters for specified domains to trigger a VPN connection attempt if domain name resolution fails, such as when the DNS server indicates that it cannot resolve the domain, responds with a redirection to a different server, or fails to respond (timeout).
If choosing Evaluate Connection, these options appear:
Choose Connect If Needed/Never Connect and enter additional information:
Domains – Enter the domains for which this evaluation applies.
URL Probe – Enter an HTTP or HTTPS (preferred) URL to probe, using a GET request. If the URL’s hostname cannot be resolved, if the server is unreachable, or if the server does not respond with a 200 HTTP status code, a VPN connection is established in response.
DNS Servers – Enter an array of DNS server IP addresses to be used for resolving the specified domains. These servers need not be part of the device’s current network configuration. If these DNS servers are not reachable, a VPN connection is established in response. These DNS servers must be either internal DNS servers or trusted external DNS servers. (optional)Criteria/Value for Parameter Interface Match – Select the type of connection that matches device's network current adapter. Values available are any, Wifi, Ethernet, and Cellular.
URL Probe – Enter the specified URL for criteria to be met. When criteria is met, a 200 HTTP status code is returned. This format includes protocol (https).
SSID Match – Enter the device's current network ID. For the criteria to be met, it must match at least one of the values in the array. - Use the + icon to enter multiple SSIDs as needed.
DNS Domain Match – Enter the device's current network search domain. A wildcard is supported (*.example.com).
DNS Address Match – Enter the DNS address that matches the device's current DNS server's IP address. For criteria to be met, all the device's listed IP addresses must be entered. Matching with a single wildcard is supported (17.*). -
Alternatively, choose legacy VPN On Demand:
Setting Description Match Domain or Host On Demand Action
Establish if Needed or Always Establish – Initiates a VPN connection only if the specified page cannot be reached directly.
Never Establish – Does not establish a VPN connection for addresses that match the specified the domain. However, if the VPN is already active, it can be used. -
Use the + icon to add more Rules and Action Parameters as desired.
-
Choose a Proxy type:
Setting Description Proxy Select either Manual or Auto proxy type to configure with this VPN connection. Server Enter the URL of the proxy server. Port Enter the port used to communicate with the proxy. Username Enter the user name to connect to the proxy server. Password Enter the password for authentication. -
Complete Vendor Configurations. These values are unique to every VPN provider.
Setting Description Vendor Keys Select to create custom keys to add to the vendor config dictionary. Key Enter the specific key provided by the vendor. Value Enter the VPN value for each key. -
Click Save and Publish. Once the profile installs on a user's device, a VPN connection prompt automatically displays whenever the user navigates to a site that requires it, such as SharePoint.
Web Clips Profile for iOS
Web Clips are Web bookmarks that you can push to devices that display as icons on the device springboard or in your app catalog.
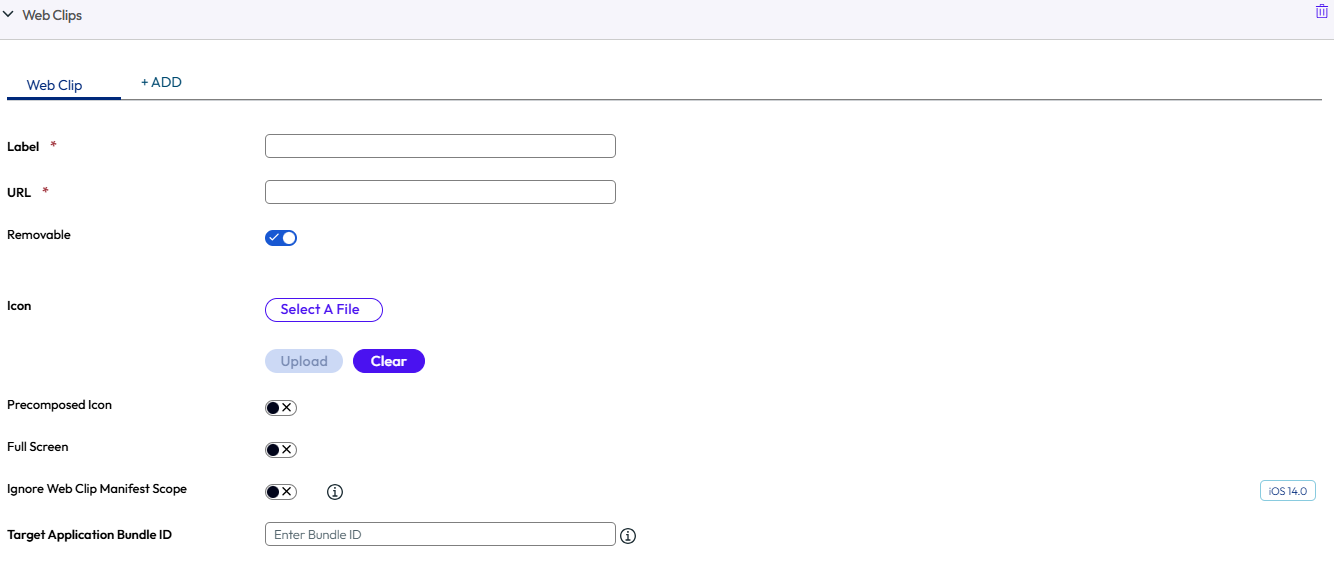
Configure Web Clip settings, including:
| Setting | Description |
|---|---|
| Label | Enter the text displayed beneath the Web Clip icon on an end user's device. For example: "AirWatch Self-Service Portal." |
| URL | Enter the URL of the Web Clip that displays. Here are some examples for Omnissa Workspace ONE UEM pages: For the SSP, use: https://{Airwatch Environment}/mydevice/ For the app catalog, use: https://{Environment}/Catalog/ViewCatalog/{SecureDeviceUdid}/{DevicePlatform} For the book catalog, use: https://{Environment}/Catalog/BookCatalog?uid={DeviceUUID} |
| Removable | Enable device users to use the long press feature to remove the Web Clip off their devices. |
| Icon | Select this option to upload as the Web Clip icon. Upload a custom icon using a .gif, .jpg, or .png format, for the application. For best results, provide a square image no larger than 400 pixels on each side and less than 1 MB when uncompressed. The graphic is automatically scaled and cropped to fit and converted to .png format, if necessary. Web Clip icons are 104 x 104 pixels for devices with a Retina display or 57 x 57 pixels for all other devices. |
| Precomposed Icon | Select this option to display the icon without any visual effects. |
| Full Screen | Select this option to run the Web page in full screen mode. |
| Target Application Bundle ID (iOS 14) | The application bundle identifier of the application that opens the URL. |
| Ignore Manifest Scope (iOS 14) | If enabled, a full screen web clip can navigate to an external website without showing Safari UI. Otherwise, Safari UI appears when navigating away from the web clip's URL. This key has no effect when 'FullScreen' is 'false'. |
Note: For native Shared iPad devices, the web clip profile is only supported via the user channel and cannot be applied at the device level. To apply a web clip profile to a shared device, configure it at the user level.
Web Content Filter Profile for iOS
You can allow or prevent end users from accessing specific URLs using a Web browser by configuring a Web content filter payload that is applied to devices. All URLs must begin with http:// or https://. If necessary, you must create separate entries for both the HTTP and HTTPS versions of the same URL. The Web content filter payload requires iOS 7+ supervised devices.
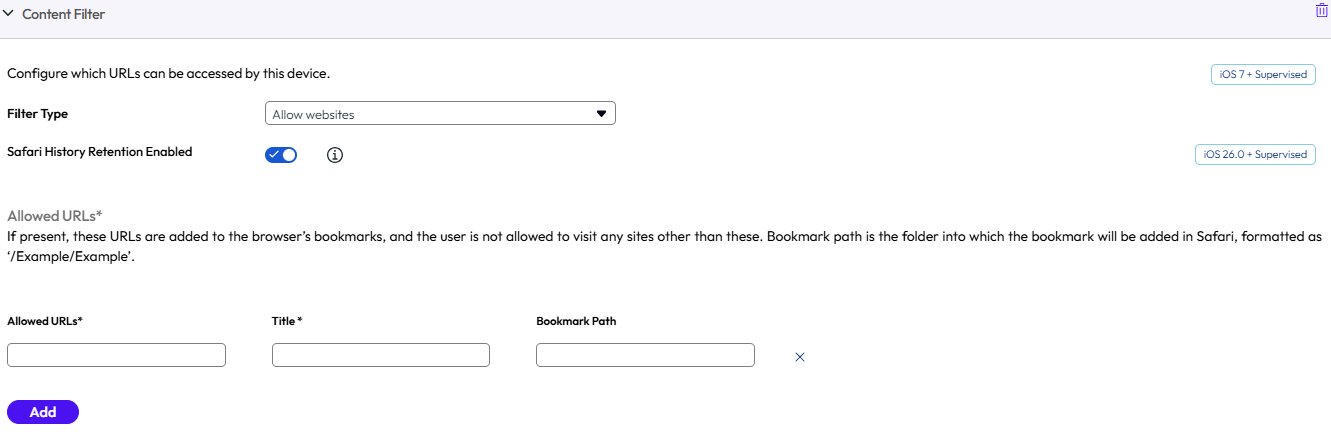
Configure the web content filter settings, including:
Select Filter Type drop-down menu:
-
Built-in: Allow Web sites
-
Built-in: Deny Web sites
-
Plug-in
Built-in: Allow Web Sites
Configure an allowlist of URLs to allow end users to access only these specific Web sites on the list and prevent them from accessing any other Web sites.
-
Select Built-in: Allow Websites in the Filter Type drop-down menu to choose what plug-ins can be accessed.
-
Select Add and configure a list of allowed Web sites:
Setting Description Allowed URLs The URL of a allowed site. Title The bookmark title. Bookmark Path The folder into which the bookmark is added in Safari.
Built-in: Deny Web Sites
Configure a denylist of URLs to prevent users from accessing the specified Web sites. However, all other Web sites remain available to end users. Also, Web sites with profanity are automatically filtered unless an exception is permitted.
Select Built-in: Deny Website in the Filter Type drop-down menu and configure denied Web sites:
| Setting | Description |
|---|---|
| Denied URLs | Enter Denied URLs and separate with new lines, spaces, or commas. |
| Automatically filter inappropriate Web sites | Select to filter adult Web sites. |
| Bookmark Path | Enter the folder path into which the bookmark is added in Safari. |
| Permitted URLs | Enter any Web sites that may be allowed as exceptions to the automatic filter. |
Plug-ins
This payload allows you to integrate with a third-party Web content filtering plug-in with Safari.
If you want to integrate specifically with Forcepoint or Blue Coat content filters, see the appropriate sections in this guide.
-
Select Plug-in in the Filter Type drop-down menu to choose what plug-ins can be accessed. You must enable either Webkit or Socket traffic needs in order for the payload to work.
Setting Description Filter Name Enter the name of filter that displays on the device. Identifier Enter the bundle ID of the identifier of the plug-in that provides filtering service. Service Address Enter the hostname, IP address, or URL for service. Organization Choose the organization string that is passed to the third party plug-in. Filter WebKit Traffic Select to choose whether to filter Webkit traffic. Filter Socket Traffic Select to choose whether to filter SocKet traffic. -
Configure the Authentication information including:
Setting Description Username Use look-up values to pull directly from the user account record. Ensure your Omnissa Workspace ONE UEM user accounts have an email address and email user name defined. Password Enter the password for this account. Payload Certificate Choose the authentication certificate. -
Add Custom Data which includes keys required by the third-party filtering service. This information goes into the vendor config dictionary.
-
Select Save & Publish.
Wi-Fi Profile for iOS
Configuring a Wi-Fi profile allows devices to connect to corporate networks, even if they are hidden, encrypted, or password protected. This payload is useful to end users who travel and use their own unique wireless network or to end users in an office setting where they are able to automatically connect their devices to a wireless network on-site.
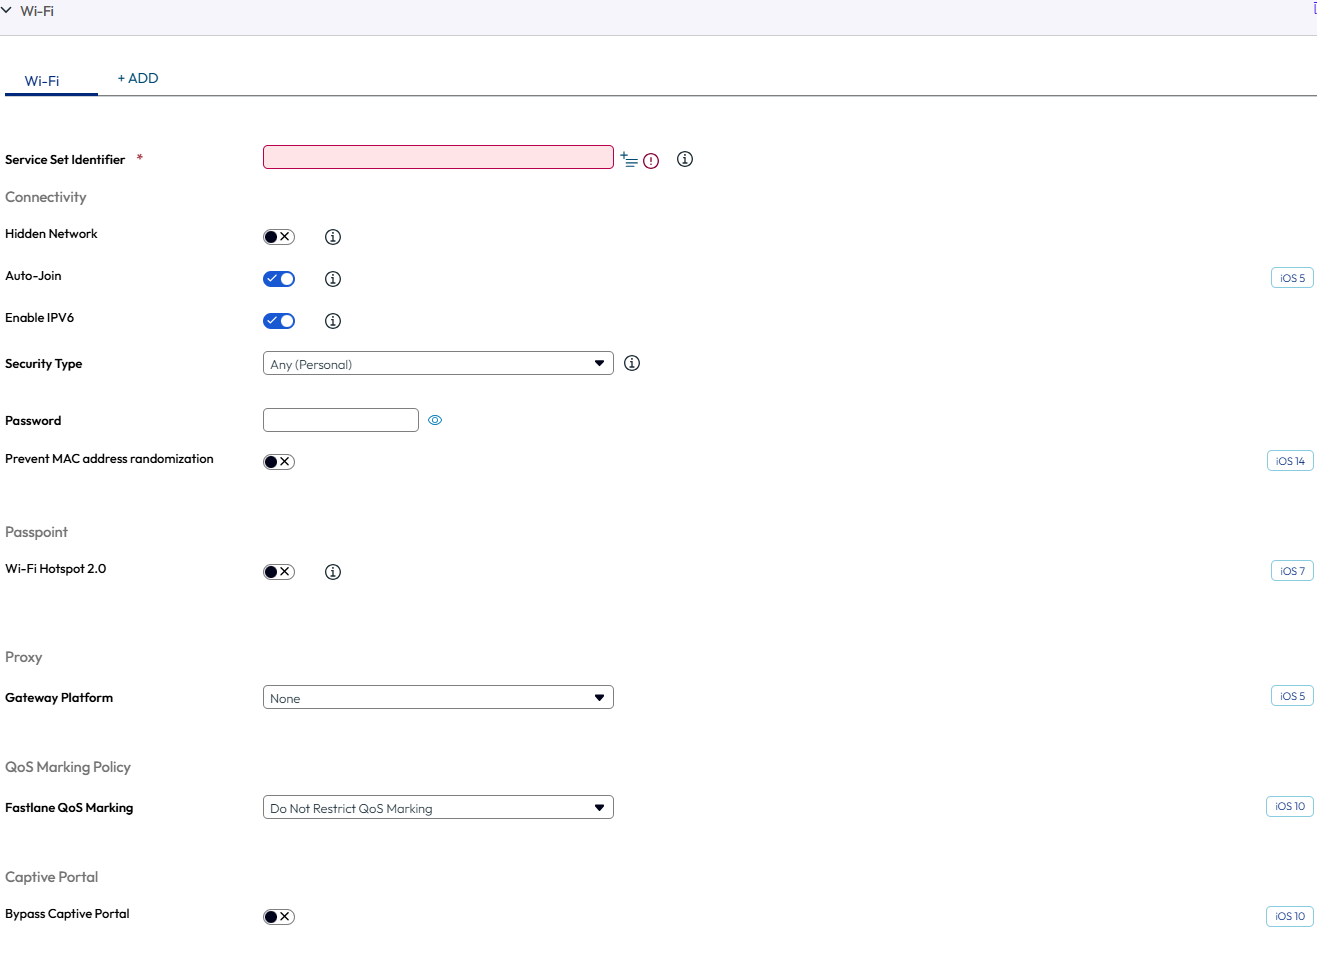
-
Configure the wi-fi settings including:
Setting Description Service Set Identifier Enter the name of the network where the device connects. Hidden network Enter a connection to a network that is not open or broadcasting. Auto-Join Determine whether the device automatically connects to the network when starting the device. The device keeps an active connection until the device is restarted or a different connection is chosen manually. Enable IPv6 Deselect this option to disable IPv6 Security Type Select the type of access protocol to be used. Enter the Password or select the Protocols that apply to your Wi-Fi network. Protocols Choose protocols for network access. This option appears when WiFi and Security Type is any of the Enterprise choices. This option also appears when Ethernet is selected.
Wi-Fi Hotspot 2.0 Enable Wi-Fi Hotspot 2.0 functionality and is only available for iOS 7 and higher devices. Hotspot 2.0 is a type of public-access Wi-Fi that allows devices to identify and connect seamlessly to the best match access point. Carrier plans must support Hotspot 2.0 for it to function correctly. HESSID The HESSID used for Wi-Fi Hotspot 2.0 negotiation Domain Name Enter the domain name of the Passpoint service provider. Allow connecting to roaming partner Passpoint networks Enable roaming to partner Passpoint networks. Displayed Operator Name Enter the name of the Wi-Fi hotspot service provider. Roaming Consortium Organization ID Enter the roaming consortium organization identifiers. Network Access ID Enter the Network Access ID realm names. MCC/MNC Enter the Mobile Country Code/Mobile Network Configuration formatted as a 6-digit number. Authentication Configure Authentication settings that vary by protocol. User name Enter the username for the account. User Per-Connection Password Request the password during the connection and send with authentication. Password Enter the password for the connection. Identity Certificate Select the certificate for authentication. Outer Identity Select the external authentication method. TLS Certificate Required Enable to allow for two-factor authentication for EAP-TTLS, PEAP, or EAP-FAST. Select disabled to allow for zero-factor authentication for EAP-TLS. TLS Minimum Version Select the minimum TLS version 1.0, 1.1, and 1.2. If no value is selected, the minimum TLS version defaults to 1.0.
Note: Maximum TLS versions can be configured only for TLS, TTLS, EAP-Fast, and PEAP protocol types.TLS Maximum Version Select the maximum TLS version 1.0, 1.1, and 1.2. If no value is selected, the maximum TLS version defaults to 1.2. Trusted Certificates These are the trusted server certificates for your Wi-Fi network. Trusted Server Certificate Names Enter the trusted server certificate names. Allow Trust Exceptions Allow end users to make trust decisions. -
Configure Proxy settings for either Manual or Auto proxy types.
-
If you use a Cisco infrastructure, configure the QoS Marking Policy (iOS v11 and higher).
Setting Description Fastlane QoS Marking Select the marking setup that you require. Enable QoS Marking Select this option to choose apps for prioritized data allocations. Allow Apple Calling Select Allow Apple Calling to add Apple Wifi Calling to your QoS allowlist. Allow Apps for QoS Marking Search for and add Apps to allocate prioritized data. -
Configure Captivate Portal to bypass the portal.
-
Select Save & Publish when you are finished to push the profile to devices.
Was this page helpful?