After your devices are enrolled and configured, manage the devices using the Omnissa Workspace ONE ™ UEM console. The management tools and functions enable you to keep an eye on your devices and remotely perform administrative functions.
You can manage all your devices from the UEM console. The Dashboard is a searchable, customizable view that you can use to filter and find specific devices. This feature makes it easier to perform administrative functions on a particular set of devices. The Device List View displays all the devices currently enrolled in your Workspace ONE UEM environment and their status. The Device Details page provides device-specific information such as profiles, apps currently installed on the device. You can also perform remote actions on the device from the Device Details page that are platform-specific.
Device Dashboard
As devices are enrolled, you can manage them from the Device Dashboard in Omnissa Workspace ONE UEM. The Device Dashboard provides a high-level view of your entire fleet and allows you to act on individual devices quickly. You can view graphical representations of relevant device information for your fleet, such as device ownership type, compliance statistics, and platform and OS breakdowns. You can access each set of devices in the presented categories by selecting any of the available data views from the Device Dashboard. For general information about Device Dashboard and Device List View, see Managing Devices with Workspace ONE UEM and Device List View.
Using the Device Details Page for iOS Devices
Use the Device Details page to track detailed device information and quickly access user and device management actions.
You can access the Device Details page by either selecting a device's Friendly Name from the List View page, from one of the available Dashboards or by using any of the available search tools within the UEM console.
View Device Information Use the Device Details menu tabs to access specific device information, including:
- Summary – View general statistics such as:
- Device Info
- Organization group and Smart Groups
- Phone number (for the devices such as iPhone XS, XR, or XS Max that supports multiple SIM cards including eSIM, displays the phone numbers of all the SIMs associated with the device)
- Serial number, UDID, Build Version and asset number
- Power status
- Storage Capacity
- Physical Memory
- Battery Level
- Last evaluation
- Customer UUID
- Tenant UUID
- Security
- User Info
- Available OS Updates (iOS 11 and later devices)
- Profiles
- Apps
- Certificates
- Content
- Device Attestation
- Device Info
- Compliance – Display the status, policy name, date of the previous and forthcoming compliance check and the actions already taken on the device.
- Profiles – View all MDM profiles currently installed on a device.
- Apps – View the app status, app name, type of the app (whether public or internal), installation status,assignment status,and distribution identifier of the app. For iOS 11.+ devices, the UEM console displays available app updates (whether the installed version is the latest version or if an update is available) and app source (whether the app is installed through the App Store, distributed as a Beta app, signed adhoc by an enterprise account, or managed using a device based VPP license).
Note: Due to the way application status is reported on iOS devices, an application achieves Installed status only after the installation process is fully completed. Which means when the Omnissa Workspace ONE UEM console queries the device for its application list sample, and if the application is still downloading, then the application returns a status of Installing. On a successful application installation, the device returns the application status as Installed which is marked the same in the Workspace ONE UEM console. - Updates – View the iOS updates available for the device including the OS version, product key, build version, last update, download percentage, and progress status.
- Content – View the status, type, name, priority, deployment, last update, and date and time of views, and provides a toolbar for administrative action (install or delete content).
- Location – View current location or location history of a device.
- User – Access details about the user of a device as well as the status of the other devices enrolled to this user.
The menu tabs below are accessed by selecting More from the main Device Details page:
- Books - View all internal books on the device.
- Network – View the current network (Cellular, Wi-Fi, Bluetooth) status of a device. For iOS 12.1 and later devices such as iPhone XS, XR, or XS Max that supports multiple SIMs and eSIM, you can view and track the network status of the SIMs on the UEM console.
- Security – View the current security status of a device based on security settings.
- Restrictions – View all restrictions currently applied to a device. This tab also shows specific restrictions by Device, Apps, Ratings, and Passcode.
- Telecom – View all amounts of calls, data and messages sent and received involving the device.Item
- Notes – View and add notes regarding the device. For example, note the shipping status or if the device is in repair and out of commission.
- Certificates – Identify device certificates by name and issuant. This tab also provides information about certificate expiration.
- Terms of Use – View a list of End User License Agreements (EULAs) which have been accepted during device enrollment.
- Shared Device Log – View the history of the shared device including past check-ins and check-outs and status.
- Conditional Access Log - View the Audit Event Time Stamp and Compliance status.
- Troubleshooting – View Event Log and Commands logging information. This page features export and search functions, enabling you to perform target searches and analysis.
- Event Log – View detailed debug information and server check-ins, including a Filter by Event Group Type, Date Range, Severity, Module, and Category.
- Status History – View history of device in relation to enrollment status.
- Targeted Logging – View the logs for the Console, Catalog, Device Services, Device Management, and Self Service Portal. You must enable Targeted Logging in settings and a link is provided for this purpose. You must then select the Create New Log button and select a length of time the log is collected.
- Attachments – Use this storage space on the server for screenshots, documents, display Hub logs sent from the Intelligent Hub, and links for troubleshooting and other purposes without taking up space on the device its
Perform Remote Actions
The More Actions drop-down on the Device Details page enables you to perform remote actions over-the-air to the selected device. See below for detailed information about each remote action. The actions listed below will vary depending on factors such as device platform, UEM console settings, and enrollment status.
-
Query – Send a query command to the device to return a list of installed applications (including Omnissa Workspace ONE Intelligent Hub, where applicable), books, certificates, device information, profiles, and security measures.
- Device Information (Query) – Send an MDM query command to the device to return information on the device such as friendly name, platform, model, organization group, operating system version, and ownership status.
- Security (Query) – Send an MDM query command to the device to return the list of active security measures (device manager, encryption, passcode, certificates, and so on).
- Profiles (Query) – Send an MDM query command to the device to return a list of installed device profiles.
- Apps (Query) – Send an MDM query command to the device to return a list of installed applications.
- Certificates (Query) – Send an MDM query command to the device to return a list of installed certificates.
-
Clear Passcode (Restrictions Setting) – Clear the passcode command clears the login passcode on the device. The device needs to be supervised.
- Device
- Generate App Token - Generate a one-time-token for your user to reset the passcode in their AirWatch app using the forgot passcode option.
-
Management
-
Manage Tunnel Access
-
Enterprise Wipe - Enterprise Wipe a device to unenroll and remove all managed enterprise resources including applications and profiles. This action cannot be undone and re-enrollment is required before Workspace ONE UEM can manage this device again. This device action includes options to prevent future re-enrollment and a Note Description text box for you to add information about the action. Enterprise Wipe is not supported for cloud domain-joined devices.
-
Managed Settings - Activate or deactivate voice roaming, data roaming, and personal hotspots.
-
Device Wipe - Send an MDM command to wipe a device clear of all data and operating system. This puts the device in a state where recovery partition will be needed to reinstall the OS. This action cannot be undone. The recovery partition is only needed on Mac devices and not in iOS devices.
-
iOS Device Wipe Considerations
- For iOS 11 and below devices, the device wipe command would also wipe the Apple SIM data associated with the devices.
- For iOS 11+ devices, you have the option to preserve the Apple SIM data plan (if existed on the devices). To do this, select the Preserve Data Plan checkbox on the Device Wipe page before sending the device wipe command.
- For iOS 11.3+ devices, you have an additional option to activate or deactivate to skip the Proximity Setup screen while sending down the device wipe command. When the option is enabled, the Proximity Setup screen will be skipped in the Setup Assistant and thus preventing the device user from seeing the Proximity Setup option.
For more information about troubleshooting device wipes, related permissions, and when device wipe actions appear in the UEM console, refer to the following Workspace ONE UEM Knowledge Base article.
-
Refresh eSIM - Send a query to a carrier eSIM server URL to refresh the active eSIM cellular plan profiles on the device.
-
-
Support
- Find Device – Send a text message to the applicable Omnissa Workspace ONE UEM application together with an audible sound designed to help the user locate a misplaced device. The audible sound options include playing the sound a configurable number of times and the length of the gap, in seconds, between sounds.
- Request Device Check-In – Request the selected device to check-in itself in to the UEM console and updates the Last column status. This action also resets the device enrollment to the staging user.
- Sync Device – Synchronize the selected device with the UEM console, aligning its Last Seen status.
- Start AirPlay - Provide the destination information for the device to stream content to.
-
Admin
- Change Organization Group – Change the device's home organization group to another existing OG. Includes an option to select a static or dynamic OG.
- If you want to change the organization group for multiple devices at a time, you must select devices for the bulk action using the Block selection method (using the shift-key) instead of the Global check box (next to the Last Seen column heading in the device list view).
- Manage Tags - Assign a customizable tag to a device, which can be used to identify a special device in your fleet.
- Edit Device – Edit device information such as Friendly Name, Asset Number, Device Ownership, Device Group Device Category.
- Delete Device – Delete and unenroll a device from the console. Sends the enterprise wipe command to the device that gets wiped on the next check-in and marks the device as Delete In Progress on the console. If the wipe protection is turned off on the device, the issued command immediately performs an enterprise wipe and removes the device representation in the console.
- Change Organization Group – Change the device's home organization group to another existing OG. Includes an option to select a static or dynamic OG.
-
Enable/Disable Lost Mode – Use this device action to lock a device and send a message, phone number, or text to the lock screen. The device end user cannot deactivate Lost Mode. When an admin deactivates Lost Mode, the device returns to normal functionality. Users receive a message that tells them that the location of the device was shared. (iOS 9.3 + Supervised)
- Request Device Location – Query a device when in Lost Mode and then use the Location tab to find the device. (iOS 9.3 + Supervised)
- Log out user - Log out the current user of the device if needed.
Configure and Deploy a Custom Command to a Managed Device
Omnissa Workspace ONE UEM enables administrators to deploy a custom XML command to managed Apple devices. Custom commands allow more granular control over your devices.
Use custom commands to support device actions that the UEM console does not currently support. Do not use custom commands to send commands that exist in the UEM console as Device Actions. Samples of XML code you can deploy as custom commands at https://github.com/euc-oss/euc-samples/tree/main/UEM-Samples.
Important: Improperly formed or unsupported commands can impact the usability and performance of managed devices. Test the command on a single device before issuing custom commands in bulk
Procedure
-
In the UEM console, navigate to Devices > Devices.
-
Select one or more macOS or iOS devices using the check boxes in the left column.
-
Select the More Actions drop-down and select Custom Commands. The Custom Commands dialogue box opens.
-
Enter the XML code for the action you want to deploy and select Send to deploy the command to devices.
-
Browse XML code for Custom Commands on the Omnissa Workspace ONE UEM Knowledge Base at https://github.com/euc-oss/euc-samples/tree/main/UEM-Samples.
If the Custom Command does not run successfully, delete the command by navigating to Devices > Devices. Select the device to which you assigned the custom command. In the Device Details View, select More > Troubleshooting > Commands. Select the Command you want to remove, and then select Delete. The Delete option is only available for Custom Commands with a Pending status.
Set the Device Name for a Supervised iOS Device
Automatically or manually set an iOS 8+ supervised device name to match the Friendly Name in the UEM console. This feature is helpful when performing asset tracking from the device itself. The device name appears when the device is connected to iTunes and it can be edited in iTunes too.
-
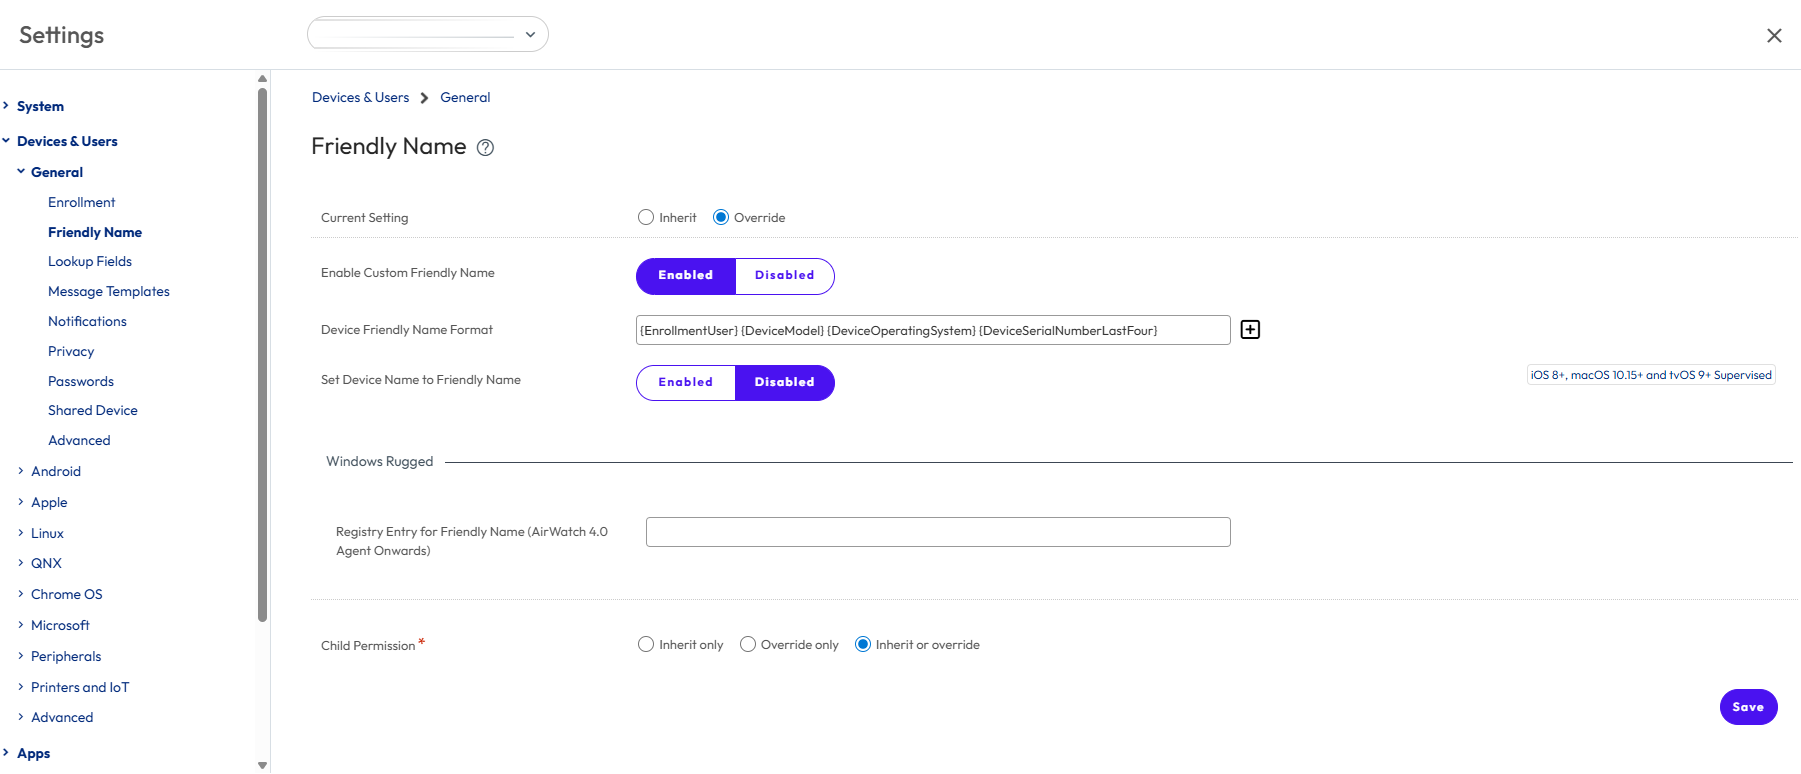
Navigate to Groups & Settings > All Settings > Devices & Users > General > Friendly Name.
-
Select the Enable Custom Smartphone Friendly Name to set the device name as the friendly name.
-
Enter the Smartphone Friendly Name Format by entering the enrollment user, the device model, and device operating system information.
-
Select the Set Device Name to Friendly Name setting to set this name as the Device Name to match the Friendly Name.
-
Select Save to update the name.
Managed Device Attestation
Managed Device attestation protects your device from threats. Omnissa Workspace ONE UEM accomplishes this by querying devices for their attestation certificates. The MDM server evaluates the attestation, marking the device as "Compromised" if any discrepancies arise between the attestation certificate attributes and the device attributes.
Workspace ONE UEM supports Managed Device attestation through:
- Attestation Certificates - These verify the authenticity of device attributes, including serial number, UDID, and OS version.
For more information about Managed Device Attestation, see Managed Device Attestation for Apple devices.
Supported Devices
Managed Device Attestation is available for iOS 16, iPadOS 16.1, macOS 14 or tvOS 16, or later.
Procedure
1.To enable Device Attestation, navigate to Settings > Device and Users > Apple > Device Attestation and select Enable.
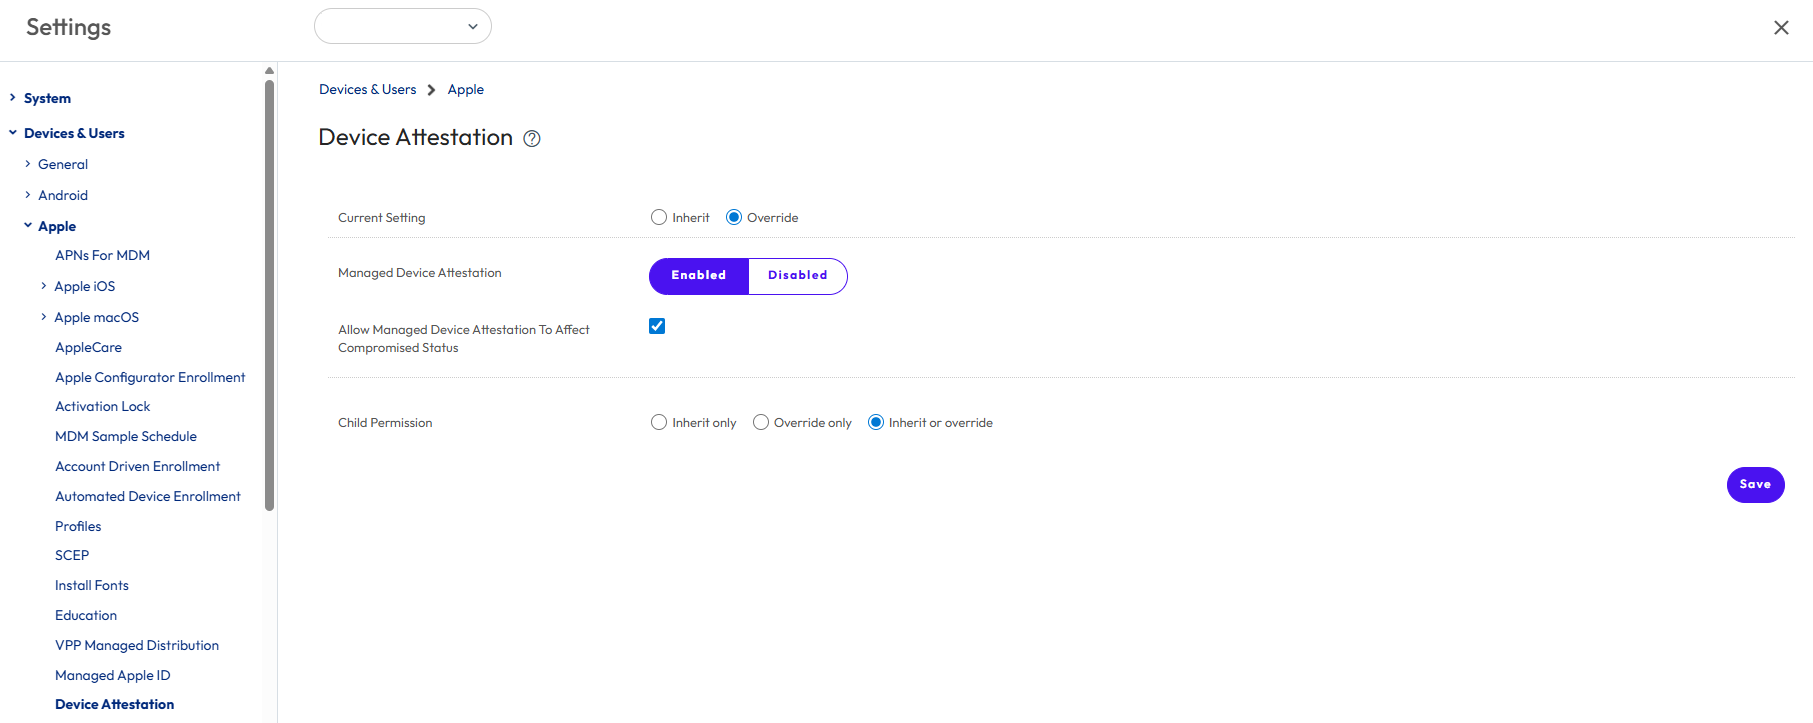
When you enable Allow Managed Device Attestation to affect Compromised Status, it allows attestation results to impact the Compromised status of the device in Workspace ONE UEM. Disabling it means attestation failures won’t impact the device’s compromise status.
-
To view the attestation results, navigate to Devices > Details > List View.
-
Select a device, then click More Actions > Query > Device Information.
The displayed data updates every 4 hours as part of the query. However, the managed device attestation query runs every 15 days.
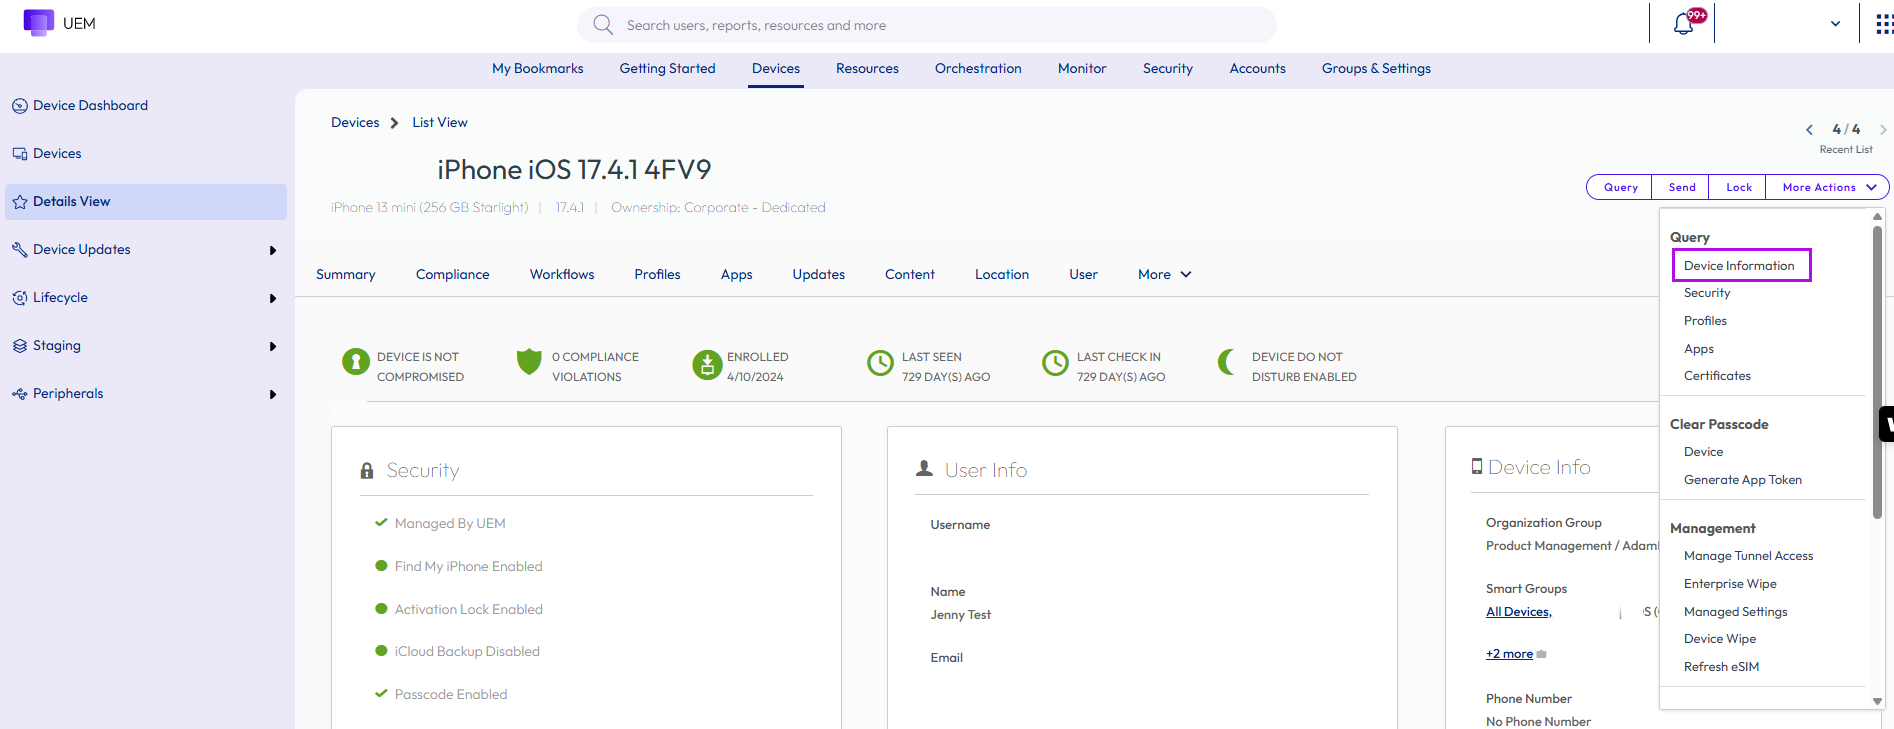
The Device Summary page shows that the device status is Compromised Unknown.
- Query the device again. Check the Events to view the logs indicating that the Apple Managed Device attestation was sent to the device.
- To verify successful device attestation, go to Devices > Details > Summary.
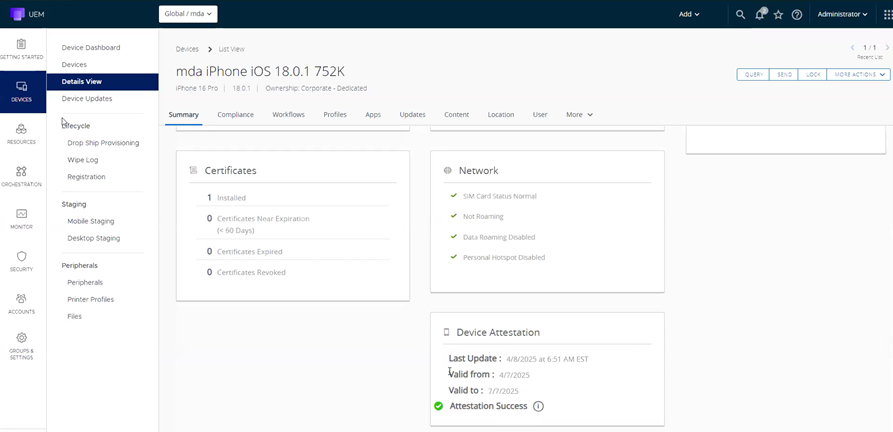
On the Device Summary page, you can confirm that Device is not compromised and the Device attestation is successful. You will also see the last update time, the certificate received from the device, and its validity.
Note Managed Device Attestation is not supported for devices enrolled through User based enrollment.
Smart Groups for iOS Devices
Smart Groups are essential for applying security policies. You can filter both supervised corporate-owned Apple devices and BYOD devices.
Within Workspace ONE UEM, the following filter categories are available for iOS devices:
OEM and Model
Filter devices by manufacturer and specific model variants for the following device types.
- iPhone
- iPad
- iPod Touch
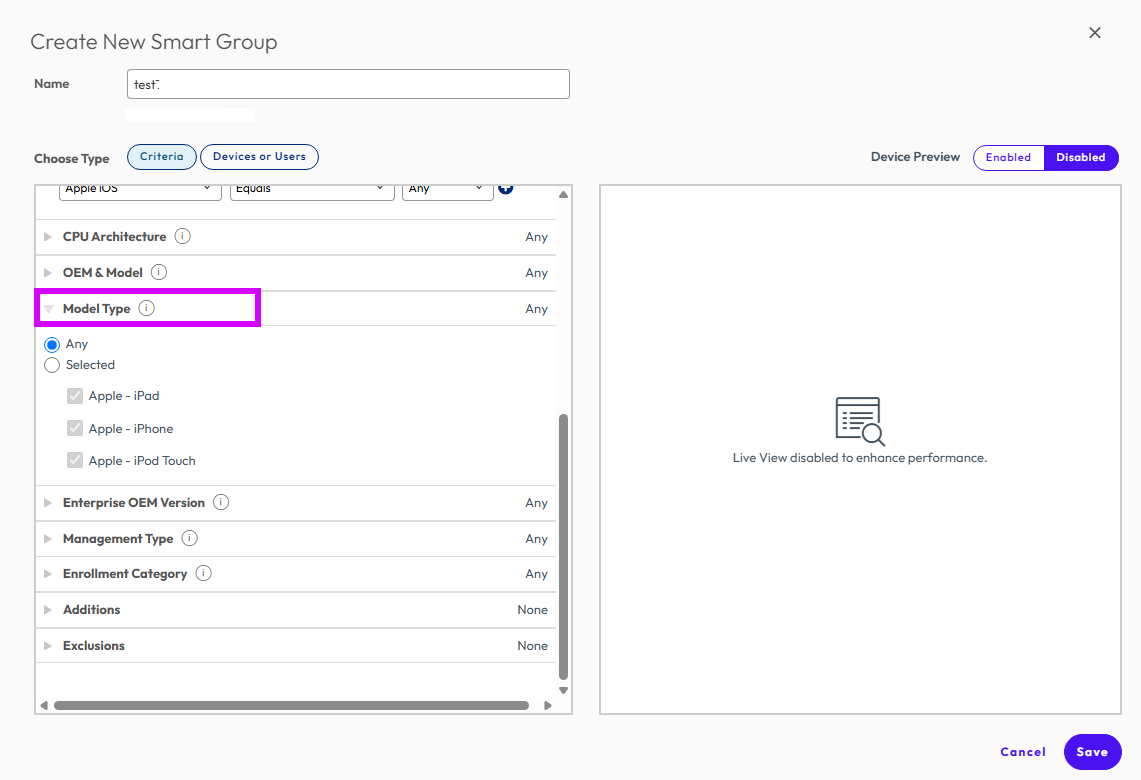
Model Type
Filter devices by Apple device category. The following enrollment types are available:
- Apple - iPad
- Apple - iPhone
- Apple - iPod Touch
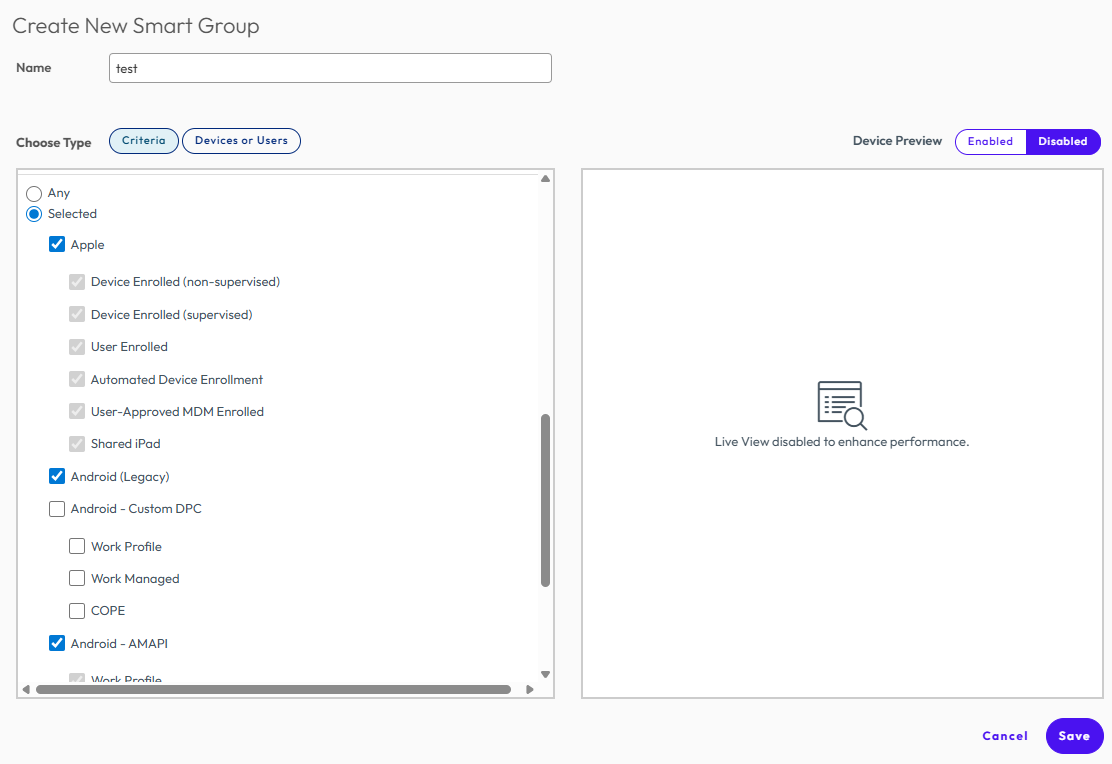
Enrollment Category
Filter devices by enrollment type. The following enrollment types are available:
- Device Enrolled (non-supervised)
- Device Enrolled (supervised)
- User Enrolled
- Automated Device Enrollment
- User-Approved MDM Enrolled
- Shared iPad
To add a Smart Group filter:
- Navigate to Groups and Settings > Assignment Groups > Add Smart Group.
- In Create Smart Group window, enter the name of the smart group.
- In Platform and Operating System, select the Apple iOS platform.
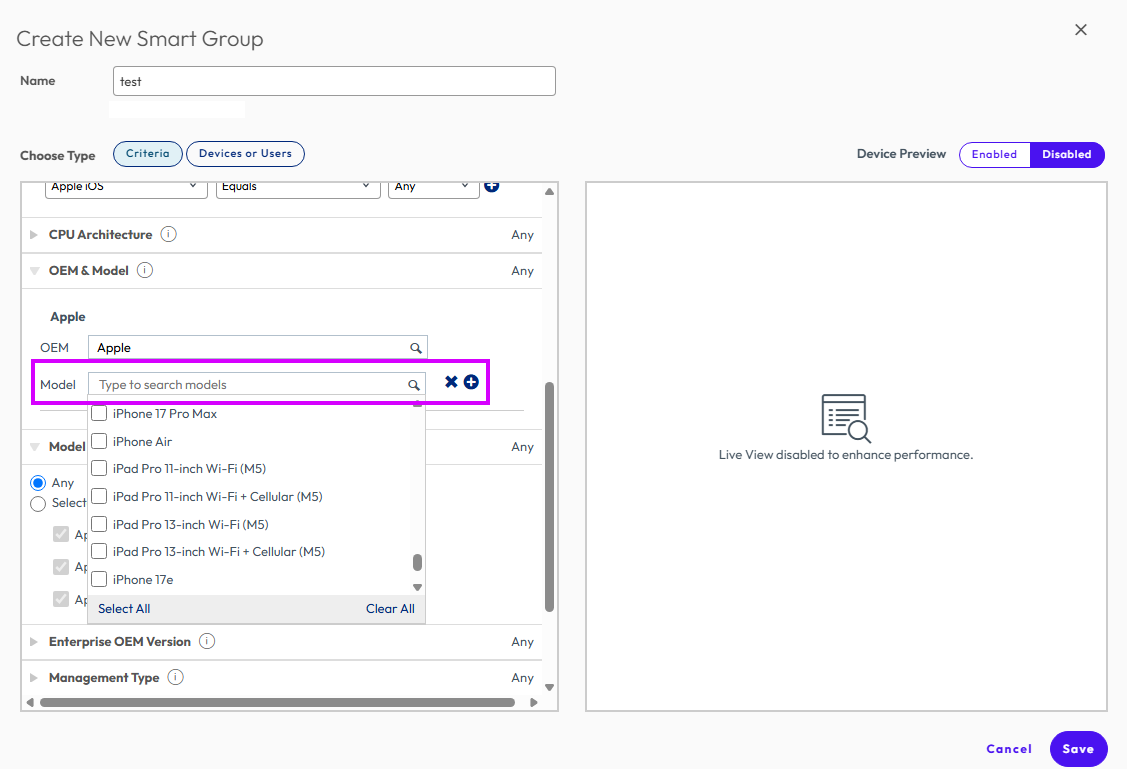
- From the OEM and Model category, select the iOS device Model type.
- From the Model Type category, select the type of the iOS device.
- From the Enrollment Category drop-down menu, select any iOS enrollment option.
- Click Save.
For more information on Smart Groups, see Create and Assign Smart groups.
Was this page helpful?