After you upgrade to Omnissa Access 24.07, review the post-upgrade configuration procedures and determine which ones you must do to complete the upgrade to 24.07.
Configuring Omnissa Access Connector Instances
You can upgrade your existing Omnissa Access connector installation to version 24.07 to get the latest features, security updates, and fixed resolved issues. Omnissa Access connector is a component of Omnissa Access. See the Installing Omnissa Access Connector guide.
Save the Workspace ONE UEM Configuration
After you upgrade the appliance, you must go to the Omnissa Access console and save the Workspace ONE UEM configuration settings. Saving the Workspace ONE UEM configuration populates the Device Services URL for the catalog. Perform this task to allow new end users to enroll and manage their devices.
- Log in to the Omnissa Access console.
- Open the Integrations > UEM Integration page.
- In the Workspace ONE UEM Configuration section, click Save.
Cluster ID in Secondary Data Center
Cluster IDs are used to identify the nodes in a cluster.
Omnissa Access detects and assigns a cluster ID automatically when a new service appliance is powered up. For a multiple data center deployment, each cluster must be identified with a unique ID.
All appliances that belong to a cluster have the same cluster ID and a cluster typically consists of three appliances.
When you set up the secondary data center, verify that the cluster ID is unique to the data center. If a cluster ID is not unique to the data center, edit the cluster ID manually as described in the instructions that follow. You only need to perform these actions once and only on the secondary data center.
-
Log in to the Omnissa Access console.
-
Select the Monitor > Resiliency tab.
-
In the top panel, locate the cluster information for the secondary data center cluster.
-
Update the cluster ID of all the nodes in the secondary data center to a different number than the one used in the first data center.
For example, set all the nodes in the secondary data center to 2, if the first data center is not using 2.

-
Verify that the clusters in both the primary and secondary data centers are formed correctly.
Follow these steps for each node in the primary and secondary data centers.
-
Log in to the virtual appliance.
-
Run the following command:
curl 'http://localhost:9200/_cluster/health?pretty'If the cluster is configured correctly, the command returns a result similar to the following example:
{
  "cluster_name" : "horizon",
  "status" : "green",
  "timed_out" : false,
  "number_of_nodes" : 3,
  "number_of_data_nodes" : 3,
  "active_primary_shards" : 20,
  "active_shards" : 40,
  "relocating_shards" : 0,
  "initializing_shards" : 0,
  "unassigned_shards" : 0,
  "delayed_unassigned_shards" : 0,
  "number_of_pending_tasks" : 0,
  "number_of_in_flight_fetch" : 0
}
-
Cache Service Setting in Secondary Data Center Appliances
If you set up a secondary data center, Omnissa Access instances in the secondary data center are configured for read-only access with the "read.only.service=true" entry in the /usr/local/horizon/conf/runtime-config.properties file. After you upgrade such an appliance, the service fails to start.
To resolve this issue, perform the steps that follow. The steps include an example scenario of a secondary data center containing the following three nodes.
| sva1.example.com |
| sva2.example.com |
| sva3.example.com |
-
Log in to a virtual appliance in the secondary data center as the root user.
For this example, log in to
sva1.example.com. -
Edit the
/usr/local/horizon/conf/runtime-config.propertiesfile as indicated in the substeps that follow.You might be able to edit an existing entry, or you can add a new entry. If applicable, uncomment entries that are commented out.
- Set the value of the
cache.service.typeentry toehcache.
cache.service.type=ehcache- Set the value of the
ehcache.replication.rmi.serversentry to the fully qualified domain names (FQDN) of the other nodes in the secondary data center. Use a colon:as the separator. For this example, configure the entry as follows.
ehcache.replication.rmi.servers=sva2.example.com:sva3.example.com - Set the value of the
-
Restart the service.
service horizon-workspace restart -
Repeat the preceding steps on the remaining nodes in the secondary data center.
For this example, the remaining nodes to configure are
sva2.example.comandsva3.example.com.
Manage External Database Properties from Omnissa Access Console
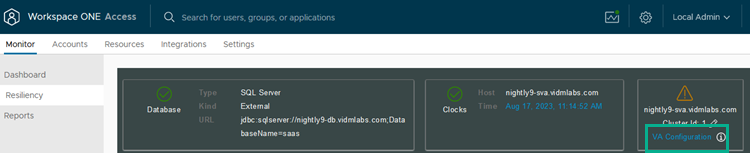
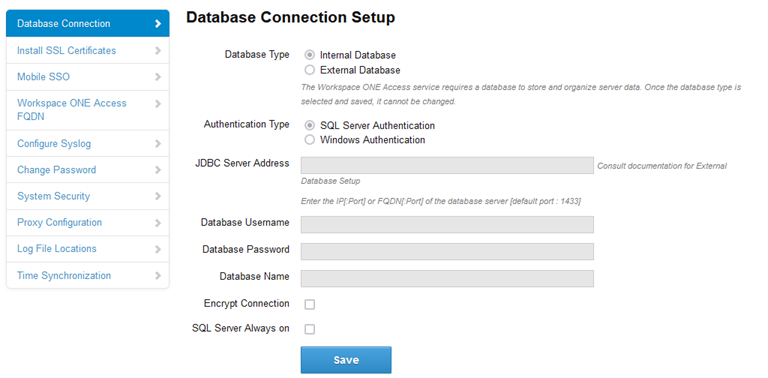
After an upgrade, you manage the external database properties from the Omnissa Access appliance VA Configuration > Database Connection Setup page. You can access this page from the Omnissa Access console Monitor > Resiliency page. Click VA Configuration for the service node you want to review.
The Database Connection Setup page is displayed.
Was this page helpful?