Before you can manage any ADE-enabled devices, you must sync them from the UEM console after you register them with Apple.
Sync Apple ADE Devices Manually
If you selected Sync Now and Assign to All Devices, then the registered devices are automatically synced when you save your ADE Profile. If you decide to add more devices later, perform a manual sync using the instructions below or wait for the ADE sync scheduler to run.
- Navigate to Devices > Lifecycle> Registration.
- Select the devices to sync.
- Navigate to Add > Sync Devices and follow the prompt to complete the process.
- Sync Devices – This option is available only after the ADE is set up in the console. Selecting this option populates the UEM console with any newly registered devices from Apple Business Manager. It also automatically assigns the current Default Profile Assigned for Newly Synced Devices to devices, if the feature was configured earlier.
Note: The Omnissa Workspace ONE UEM console supports the ability to Fetch All Devices. See the Best Practices for Using Tokens topic to know when to use each option.
To avoid issues with your ADE sync tokens such as expiration or new Terms of Use acceptance, administrators can set the notifications in Workspace ONE UEM for ADE sync failures. For more information, see Configure Notification Settings in Console Basics guide.
Renew Your Apple Server Token for ADE Deployments
Your Apple server token file is valid for one year, after which time you must renew it. To renew your Apple server token after configuring the ADE, perform the following steps:
-
Go to Settings > Devices & Users > Apple> Automated Device Enrollment
-
Click the Renew button and the following screen appears.
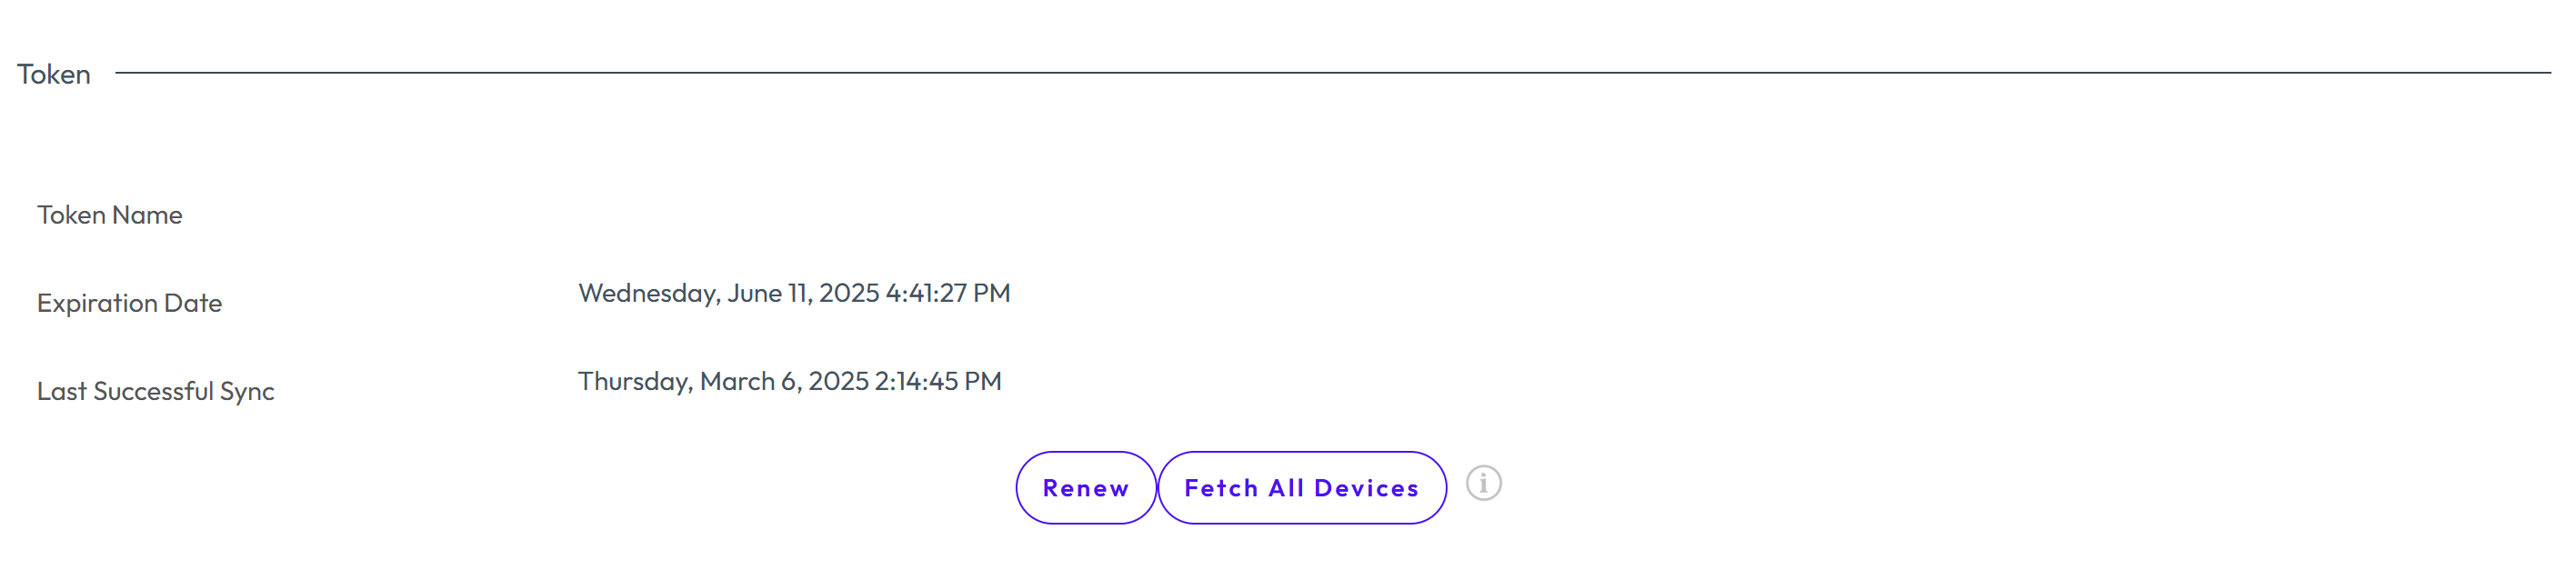
Note: Last Successful Sync indicates the last time a successful ADE device sync was completed for a ADE account. The Fetch All Devices synchronizes all the Apple Business Manager enrolled devices with the UEM console, including the devices that were already synchronized. The Fetch All Devices option must be used when the devices are not synchronizing even after using the Sync Devices from the Enrollment Status page. Use the Fetch All Devices as a final alternative to synchronize devices.
-
In the Renew screen, click Download the existing token link.
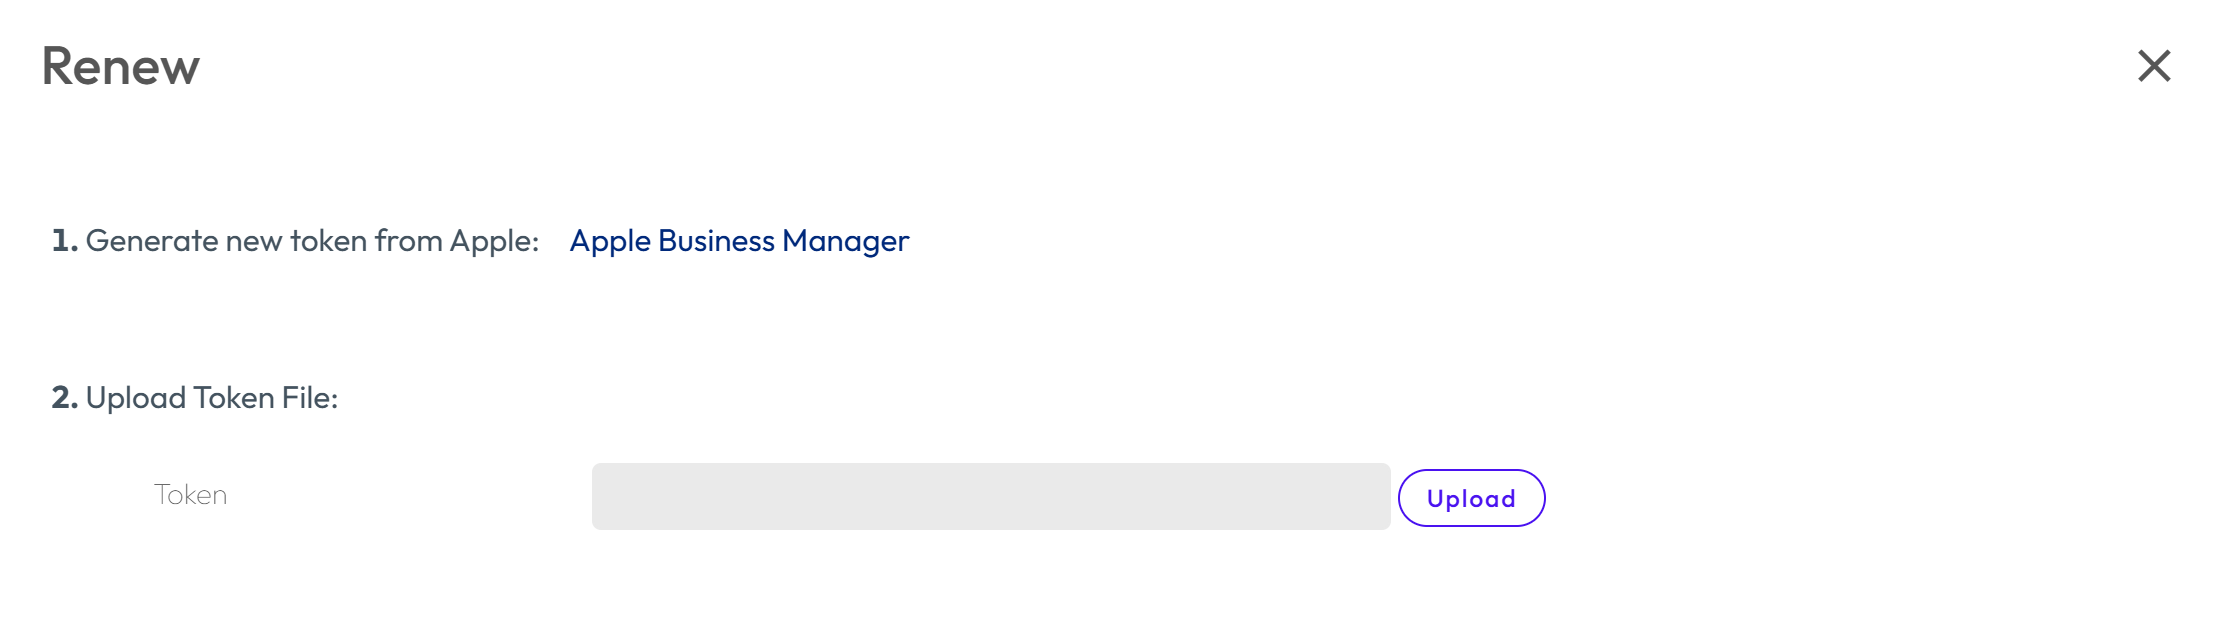
Note: If you have erroneously updated the public key in Apple Business Manager, you can not renew the token as the public key which is used to generate the new token in the Apple Business Manager and private key in the console are not matching. So, ensure that you always update the public key in Apple Business Manager before downloading the server token.
- Navigate to the Apple Business Manager, click Settings, select your MDM server, and download the Apple server token.
- Navigate to the Omnissa Workspace ONE UEM console and click UPLOAD to upload the token file.
- Click Save to renew your Apple server token.
Best Practices for Using Server Tokens
Follow the best practices for uploading tokens to any organization group in the UEM console.
- The token determines which device you can assign that profile to. Administrators can add profiles for the tokens at the current, parent, or child organization groups where the ADE is configured.
- Administrators can override ADE settings and add a new token at the child organization groups.
- Review the Last Successful Sync time to view when the most recent successful ADE device synchronization was completed for a ADE account.
- Use the Sync Devices option on the Enrollment Status page to manually synchronize the new devices and updates into Omnissa Workspace ONE UEM.
- The Fetch All Devices option synchronizes all the devices assigned to this token in Apple Business Manager with the UEM console, including the devices that are already synchronized. This option must only be used as a final alternative to fully refresh and resynchronize all your devices from Apple Business Manager.
Perform Remote Actions on All Devices
You can perform various remote actions on devices that are enrolled to Apple Business Manager using ADE.
-
Navigate to Devices > Devices > Select Device.The Details View appears.
-
Select More Actions and choose from the following education-specific actions.
Option Description Device Configured (Admin) Send this command if a device is stuck in an Awaiting Configuration state. iOS updates (Admin) Select individual devices or devices in bulk to update devices. Enable/Disable Lost Mode Lock a device and send a message, phone number, or text to the lock screen. Lost Mode is deactivated by administrators only. When Lost Mode is deactivated, the device returns to normal functionality. Users are sent a message that tells them that the location of the device was shared. Request Device Location Query a device in Lost Mode, and then access the Location tab to find the device. (iOS 9.3 + Supervised)
Delete ADE Device Records
You can remove ADE-enabled device records from the Device List View in the UEM console for enrolled devices while the device remains registered with the Automated Device Enrollment Program in the Apple Business Manager portal.
It is recommended that you do not delete an enrolled ADE device. Instead, you must device wipe it and then you can delete it from the console. Once this device record is deleted, the device status changes from enrolled to unenrolled. Simply factory wipe the device and re-enroll it.
- Navigate to Devices > Devices.
- Select the devices to delete.
- Navigate to the More drop-down menu.
- Select Admin > Delete .
Note: The UEM console only allows you to delete a device record from the Devices page. You are prevented from manually deleting a ADE-enabled device from the Enrollment Status page. To manually delete a device, see Associate and Disassociate Devices in Apple Business Manager Portal. If you delete a device that is enrolled, it sends an enterprise wipe.
Wiping ADE-enrolled Devices
You should not perform an enterprise wipe through Omnissa Workspace ONE UEM on an enrolled device. Instead, perform a device wipe, so the user is forced to re-enroll when it is reactivated.
To discourage an enterprise wipe on ADE enrolled devices, Workspace ONE UEM displays an additional warning in the UEM console when performing the command.
Release a Device
You can release a device from Apple Business Manager or Apple School Manager directly through the Workspace ONE UEM console when a user wants to retain their corporate Apple devices after leaving the organization. Workspace ONE UEM enables device release through the Enterprise Wipe, Device Wipe, and Delete Device actions. Once you release a device, you cannot re-enroll it.
Release Device through Enterprise Wipe
Use the Enterprise Wipe functionality to release a device from the organization.
-
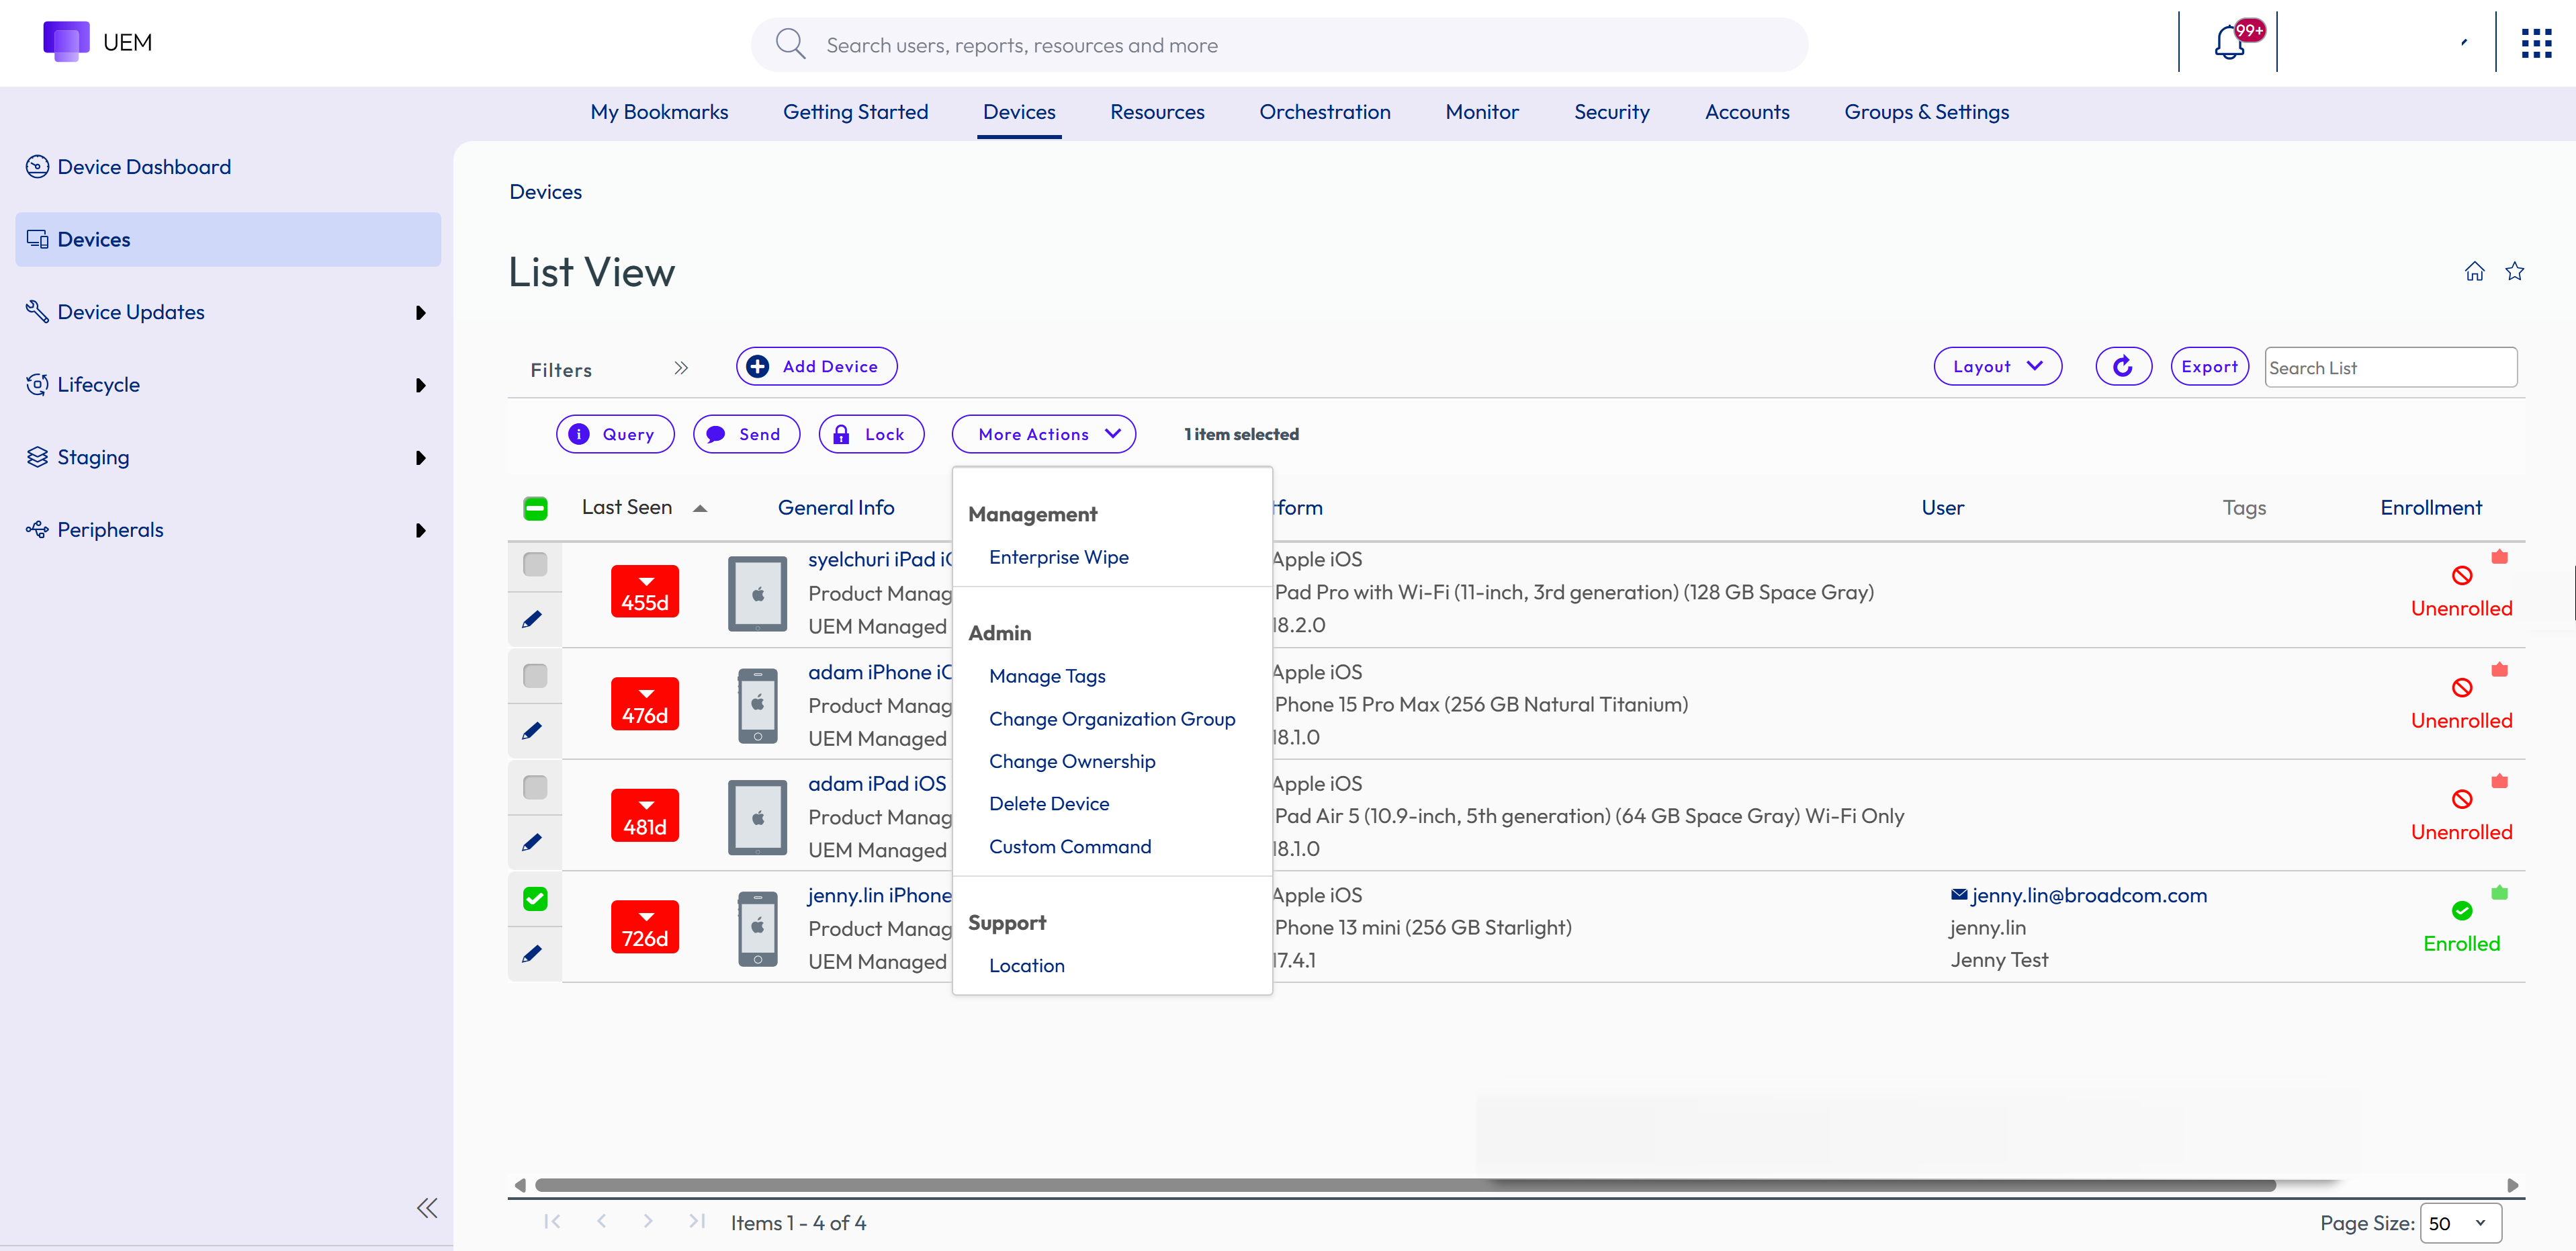
On the Workspace ONE UEM console, go to to Devices > Devices > More Actions > Enterprise Wipe
-
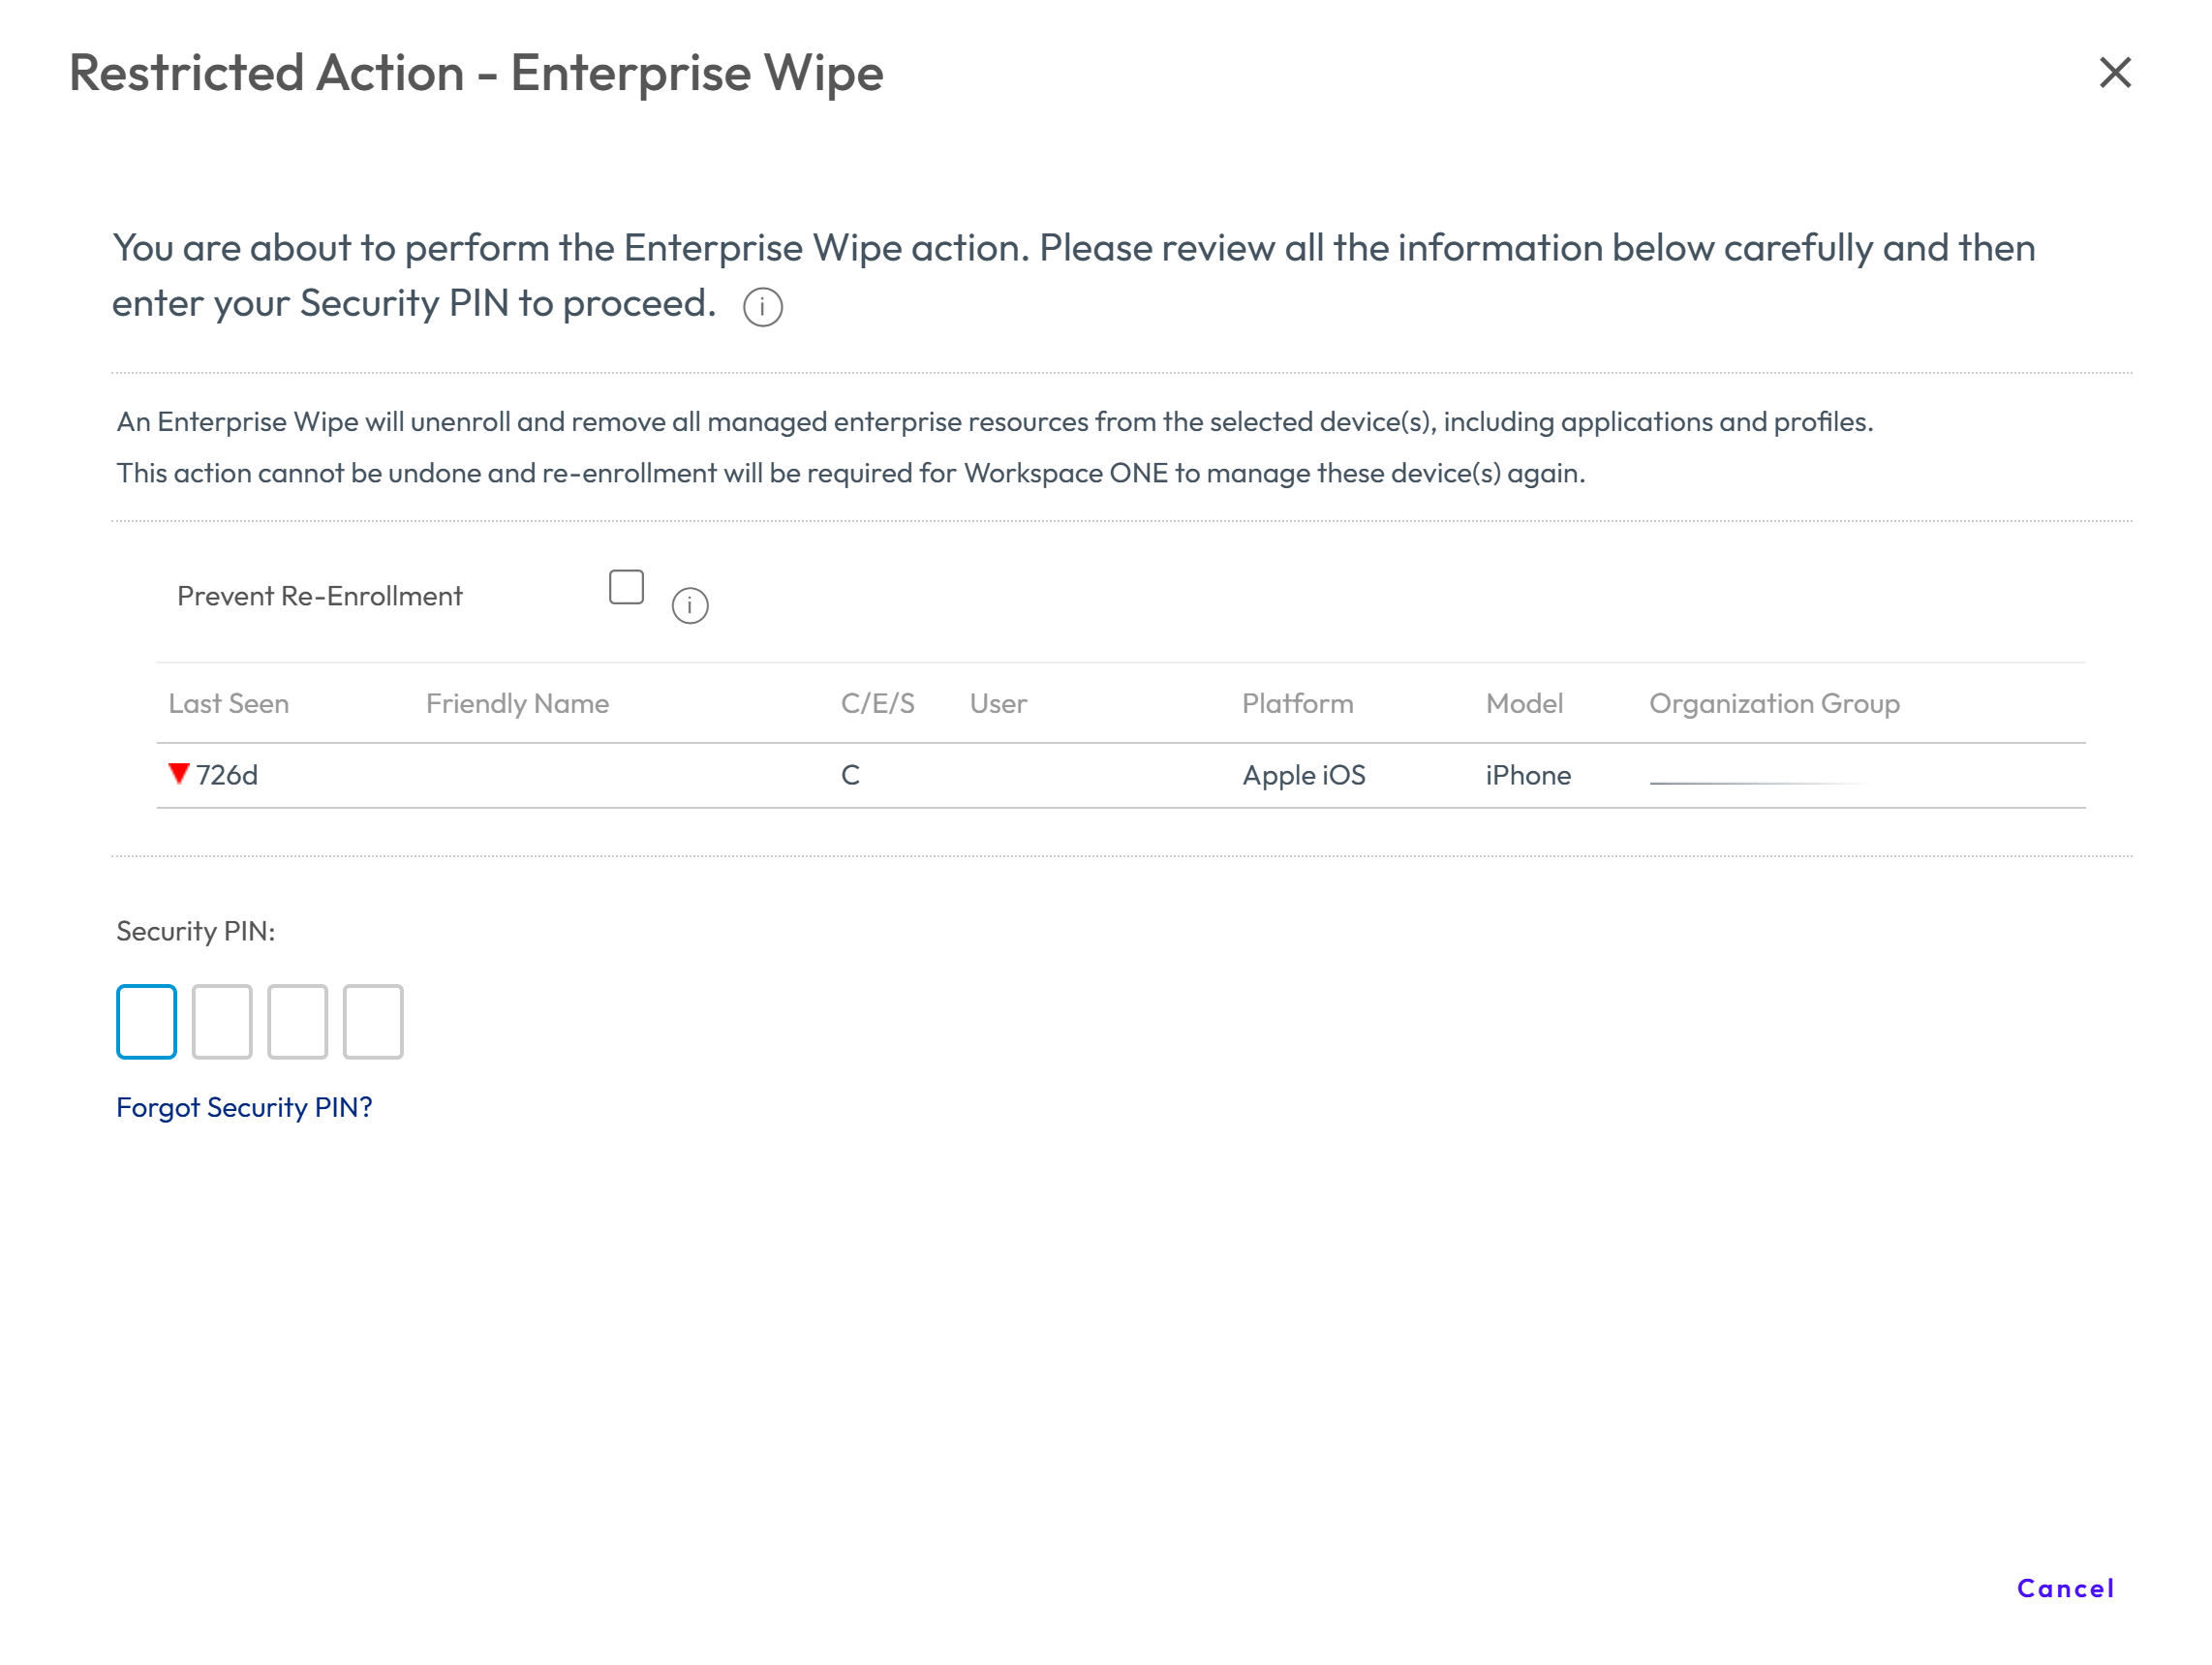
Select Release Device.
-
Enter the Security Pin and Continue.
You can also trigger Enterprise Wipe through Devices > Details View > More Actions > Management > Enterprise Wipe.
Release Device through Delete Device
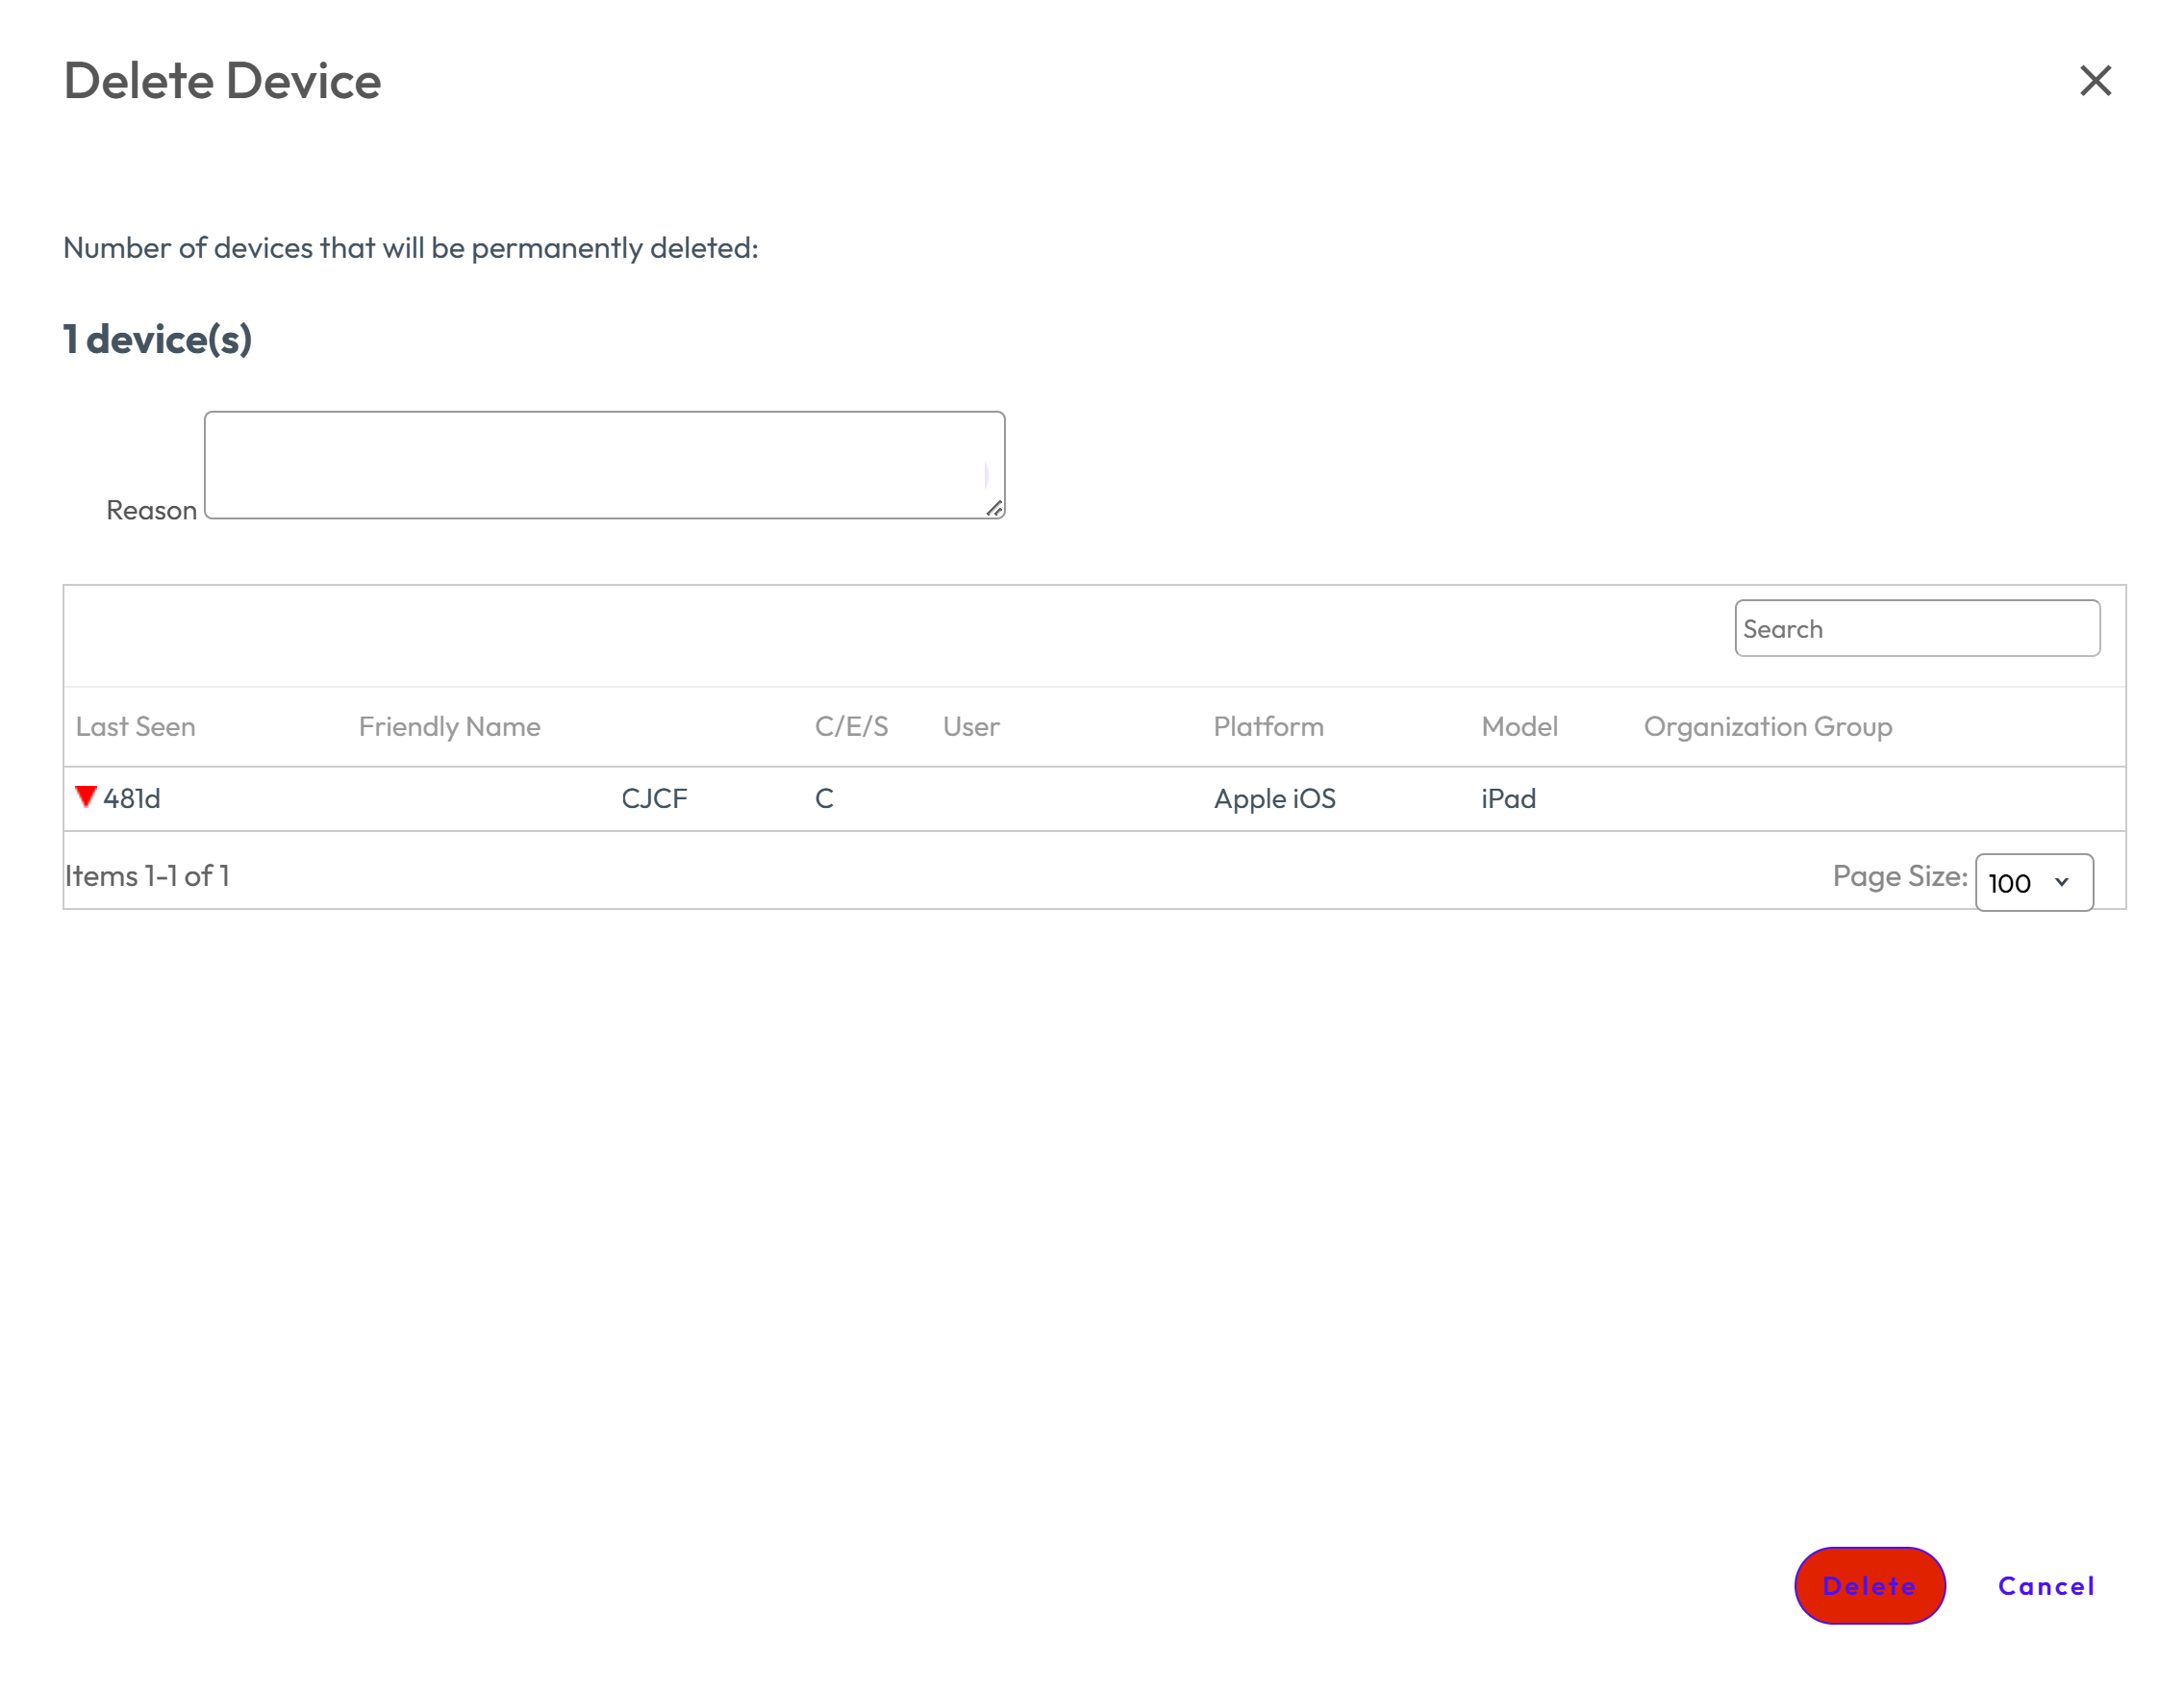
Use the Delete Device functionality to release a device from the organization.
-
Navigate to Workspace ONE UEM > Devices > Devices > More Actions > Delete Device.
-
Enter the reason and select Release Device.
-
Click Delete.
You can also trigger Delete Device operation through Devices > Details View > More Actions > Admin > Delete Device.
Release Device through Device Wipe
Use Device Wipe functionality to release a device from the organization.
- Navigate to Workspace ONE UEM > Devices > Devices > More Actions > Device Wipe.
- Select Release Device.
- Click Continue.
You can also trigger Device Wipe operation through Devices > Details View > More Actions > Management > Device Wipe.
View the Release Device Event Logs
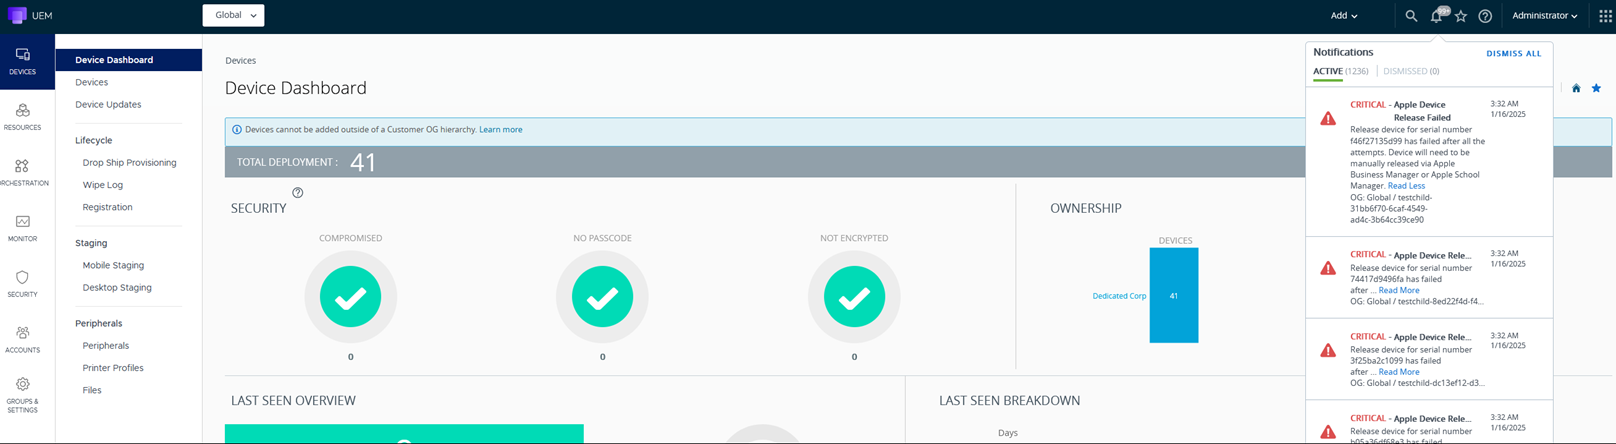
You can view the event logs for the release device action in the Workspace ONE UEM console. This log records when the Release Device action was triggered, along with the device's serial number and severity information.
To view the event logs, navigate to Devices > Details View > Troubleshooting. In the summary, you can see the events related to Release Device such as Release Device requested.
Scheduler job for Release Device
The scheduler queries the database to retrieve the list of devices scheduled for release. The Release Device from the ABM/ASM job includes the frequency, current status, and last successful completion.
Navigate to Admin > Scheduler in the Workspace ONE UEM console. 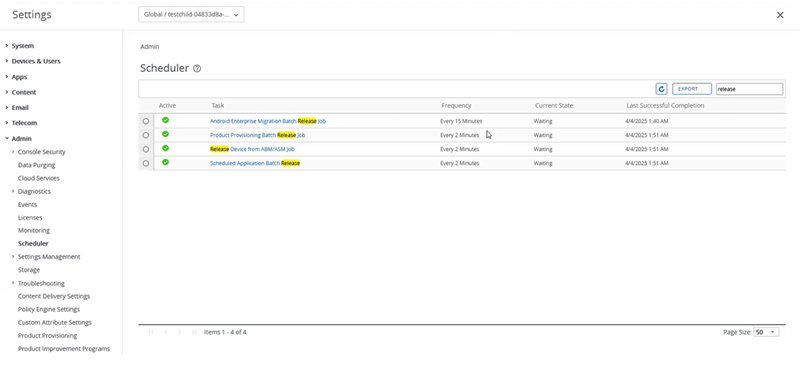
You will receive a notification in the UEM console if the Release Device Action fails continuously for 14 days. A retry will occur every 4 hours until 14-days.
Return to Service
Return to Service automates the re-provisioning process, allowing administrators to avoid manual Wi-Fi configuration after a device wipe. Supported on iOS 17 and tvOS 18 devices, this functionality enables organizations to erase user data and prepare devices for next use without requiring administrator intervention.
Note:
Return to Service does not work for custom ADE enorlled devices.
Procedure
- Navigate to Workspace ONE UEM > Devices > Devices > Select a device.
- Go to More Actions > Device Wipe, then select Return to Service.
- In the Wi-Fi Profile, choose the Wi-Fi profile you wish to use after wiping the device.
- If your device has ethernet connection, and you prefer not to send Wi-Fi data to the device, select Use Ethernet instead.
- Add the Note Description and click Continue.
- Confirm the security pin. The device is wiped.
- To verify the device wipe status in UEM Console, navigate to Devices > Details View > Troubleshooting.
You will notice that Return to Service is set to True.
- On your iOS device, the Wi-Fi network is automatically selected as your device activates. If there is a pop-up saying, Unable to Download Profile configuration, Select Try Again and Enrol this iphone.
- In the Remote Management page, enter your user credentials and click Turn On Location Services.
- Verify the Device Manager on your iOS device. It indicates that the device is enrolled, displays the Wi-Fi profile, and shows that applications are refreshing.
- On the UEM console, view the device's status as Enrolled and the Compromised Status as green.
The device is re-enrolled and is ready to be used.
App preservation during MDM migration
During MDM device migration, administrators can now control which applications remain available through the Setup Assistant phase. This feature provides enhanced control over application availability during device migration, ensuring that critical apps are preserved and accessible immediately after the migration process completes. Administrators can configure app preservation settings to minimize device setup time and ensure end users receive fully functional devices.
Prerequsites:
Before configuring app preservation for device migration, ensure the following requirements are met:
- The device needs to be enrolled through ADE.
- The device should have either VPP Device-Based License (DBL) apps or internal apps. By default, public apps that are installed on the device will be preserved.
Configuring App Preservation
-
Log in to the UEM Console.
-
Navigate to Devices & Users > Apple > Automated Device Enrollment
-
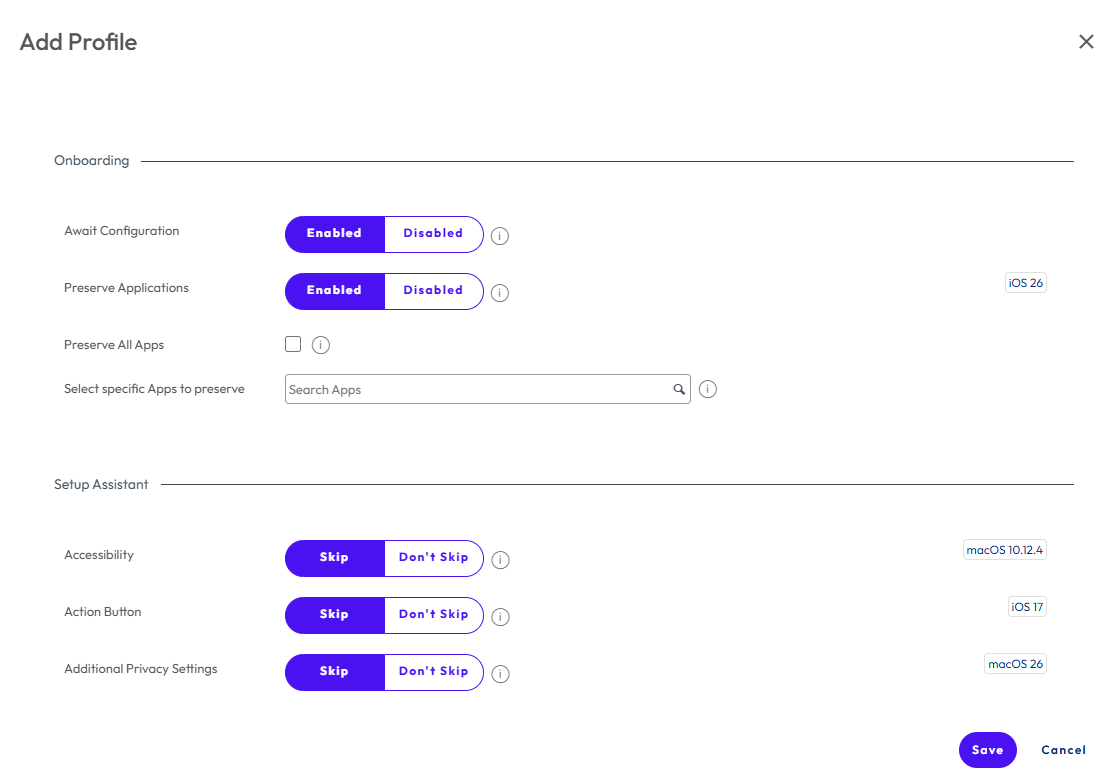
Click Add a Profile.
-
Locate the Preserve Applications setting in the ADE profile configuration.
-
You can select Enable or disable app preservation for the ADE profile. When enabled, choose between:
- Preserve all eligible apps
- Preserve specific selected apps only
-
Save the ADE profile configuration. Ensure that the ADE profile is assigned to the device.
-
Navigate to the destination Organization Group (OG) in the UEM Console.
-
Configure the same set of applications that exist in the source environment. Configure assignment types for each application:
- Set Auto Assignment for apps that should install automatically
- Set On-Demand Assignment for apps users can install as needed
If the device has any eligble assignment either auto or on-demand we will preserve those apps.
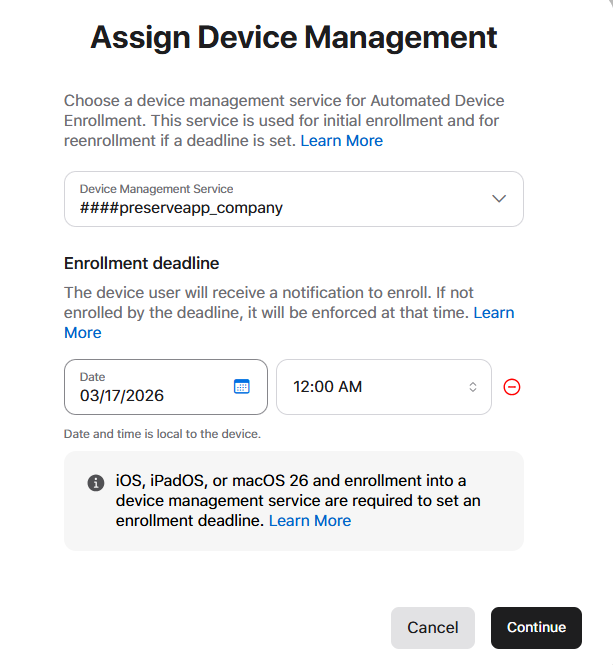
Update Device Assignment in Apple Business Manager
-
Log in to Apple Business Manager (ABM) and navigate to Devices and search for the enrolled device.
-
In the device details page, select the destination Organization Group from the dropdown.
-
Set the Migration Deadline. Select a future date (e.g., 10 days from today) and click Continue.
This determines when the device must complete the migration. The device will override the source OG DEP profile with the destination OG DEP profile.
Sync Device and complete the enrollment process
Once the device is synced with the destination service, the Start Enrollment prompt screen displays on the device.
- On the device's screen, tap the Start Enrollment button.
- The device will prompt for a restart. Confirm the restart to proceed with enrollment.
- After the device restarts, enter the destination OG enrollment user credentials when prompted.
- Follow the on-screen prompts to complete the enrollment process.
- Wait for the Enrollment Completed confirmation screen to appear.
- Tap the Exit button to finish the setup.
Verify App Preservation on the device
- Return to the device home screen.
- Verify that the following applications are still installed and available:
- Internal apps (in-house/custom applications)
- VPP apps (Volume Purchase Program applications)
- Confirm that preserved apps are functional and accessible. All preserved applications should remain installed and accessible on the device without requiring reinstallation.
Was this page helpful?