AWS VM Import/Export allows you to transfer virtual machine images from your on-premises infrastructure or other environments to Amazon EC2, converting these images to Amazon Machine Images (AMIs).
Import Image (OVA) to Amazon Machine Image (AMI) using VM Import/Export
The following steps outline the process of importing an OVA file to create an Amazon Machine Image (AMI) and subsequently converting that AMI to a WorkSpaces image. You can also check this link for detailed steps.
Best Practices for Importing an OVA into an AMI
- Validate the OVA: Ensure the OVA file is free of corruption before uploading it to AWS.
- Check Permissions: Your AWS IAM user must have permissions for S3 access and EC2 import tasks.
- Optimize File Size: Large OVA files take longer to upload and process. Consider trimming unnecessary components.
Procedure:
-
Upload the OVA file to an Amazon S3 bucket.
Upload the OVA file to an S3 bucket in your AWS account. The upload duration depends on the size of the file. Example using the AWS CL:aws s3 cp your-file.ovas3://your-bucket-name/After the upload completes, note the S3 URI of the file. For example:
s3://your-bucket-name/your-file.ova -
Create a JSON file to define the import configuration.
Create a file named
containers.jsonlocally with the following content:[ { “Description”: “My Server OVA”, “Format”: “ova”, “Url”: “s3://your-bucket-name/your-file.ova” } ]Save the JSON file (for example,
container.json) and note its full path. -
Run the AWS command to create an image.
Execute the following command in your terminal, ensuring you specify the correct path to the JSON file:
aws ec2 import-image –description “My server VM” –disk-containers“file://C:\path\to\containers.json” -
Monitor the AWS Create Image Progress
To track the import progress, copy the Import Task ID provided after running the import command.
Use the following command, replacing
import-task-idwith the actual ID:aws ec2 describe-import-image-tasks –import-task-ids import-task-idThe import process can take up to 30 minutes. Repeat this command periodically to monitor progress. Once the import completes, the status displays completed, and an ImageId will appear.
-
Access and Deploy the Imported AMI
After the import is successful, the AMI is stored in the My AMIs section of your AWS account.- Log in to the AWS Management Console.
- Navigate to EC2 > AMIs.
- Locate your imported AMI under the My AMIs tab.
Create a New Custom Image and Bundle
Creating a custom image involves preparing and configuring a base operating system with the required applications, settings, and integrations needed for desktop delivery. A bundle is then created from this image by defining the compute, storage, and performance characteristics required for end-user desktops.
For additional details, see the Amazon documentation, Create a custom image and bundle.
WorkSpaces Creation
There are 2 options available to create WorkSpaces. Select the option that best aligns with your preferences and the requirements of your environment:
- Using CLI
This option provisions WorkSpaces without assigning users, enabling deployment with the hourly billing model that charges only for active usage. Using the CLI option, you can use an RDP client to log in to the WorkSpaces instance. Check this topic for more information. - Using UI (Always On)
The UI process requires the admin to assign a specific user to each WorkSpace. When using this option, the Always On power setting must be selected, which will incur a full month's charge regardless of actual usage. For the UI option, you would need to use the AWS WorkSpaces app to log in to the WorkSpaces instance.
RDP into Workspace and Install Horizon Agent
See Install Horizon Agent on a Windows Virtual Machine for additional details.
Important: Do not reboot when prompted during the Horizon Agent installation to avoid issues with pending operations from previous installations. Instead, complete the installation and perform a separate reboot after the agent is fully installed. Rebooting prematurely can cause installation failure or an infinite loop of errors. See KB 1029288for more information.
- While downloading Horizon Agent, select Omnissa Horizon.
- Use the WorkSpaces console's Image Checker tool to fix any issues, especially removing unwanted Microsoft Appx packages.
Pair WorkSpaces Image to Horizon Connection Server
Pairing an image from WorkSpaces with the Horizon Connection Server is necessary to link a customized desktop image in AWS with the Horizon 8 environment, enabling it to be used for provisioning virtual desktops for end-users.
- Open the Horizon 8 Admin Console.
- Go to Settings > Registered Machines.
- Choose the Others tab. Your WorkSpaces Core instance should appear automatically (the Horizon Agent communicates with Horizon using the pairing process).
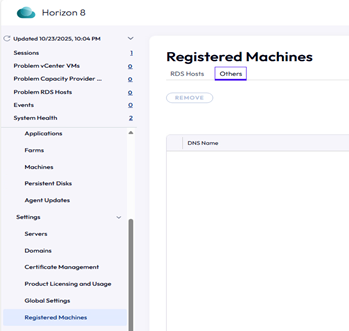
Set Golden Image to Connection Server
You need to "set" a golden image in Horizon to establish it as the template for creating new virtual desktops:
- Sign back into the WorkSpaces image via RDP.
- Verify Horizon Agent components are running (check services such as Horizon Blast, Broker Agent, etc.).
- Confirm the WorkSpace is registered in Connection Server.
Note: Before clicking Set Golden Image, verify the displayed DNS name matches the DNS name of the machine in the AWS console.
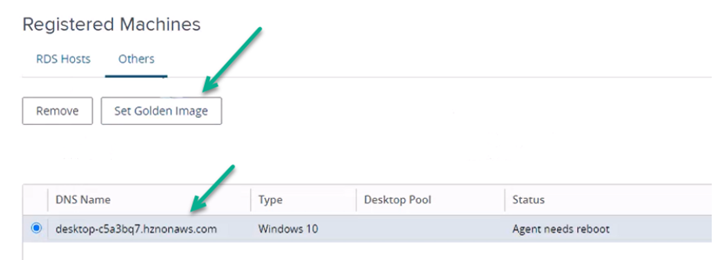
Create Image from WorkSpaces
This process uses the custom bundle to ensure the launched WorkSpace has the OS, software, and configurations defined in your custom image, enabling standardized desktop environments for users.
- Navigate to WorkSpaces > Personal.
- Select the WorkSpace you created in the previous step.
- Go to Action > Create Image.
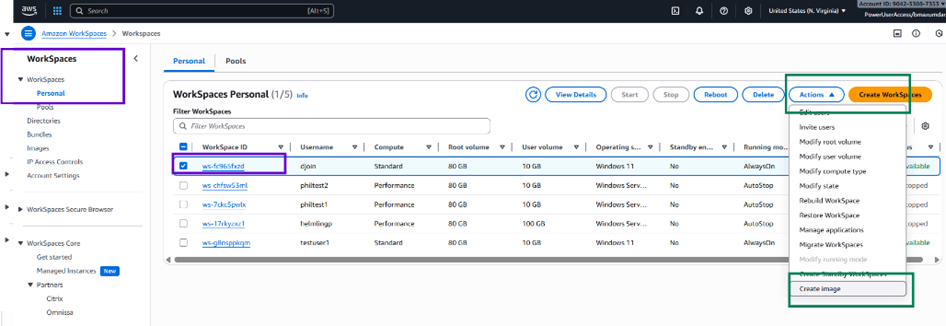
- Provide the required details:
- Image Name: Enter a unique name
- Image Description: Add a description suggesting this is a Gold Image
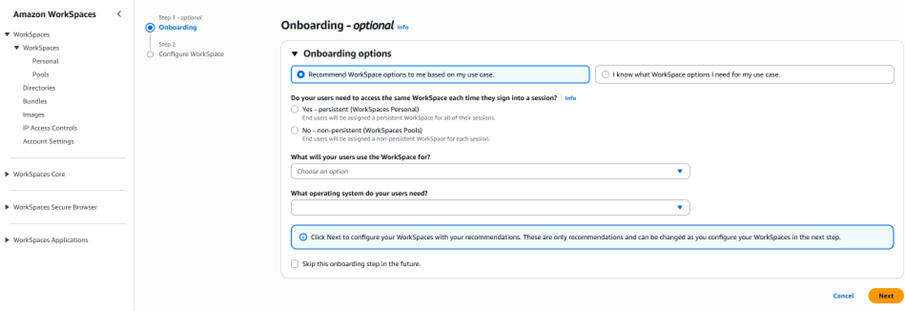
- Click Create Image.
### Create Bundle from Gold Image
Note: Two bundles will be created during the image creation process:
- Gold Pattern bundle: The Horizon Agent and other software are installed. This is the gold image virtual machine.
- Provisioning bundle: Created from the Gold Pattern bundle, used for the creation of automated pools (like a snapshot of the gold image VM).
For additional information on the following steps, see the Amazon documentation.
- In the AWS WorkSpaces console, navigate to WorkSpaces.
- Select Images.
- Choose Actions > Create bundle.
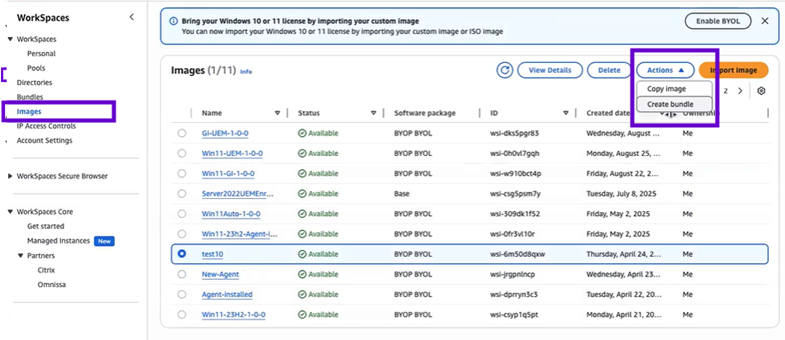
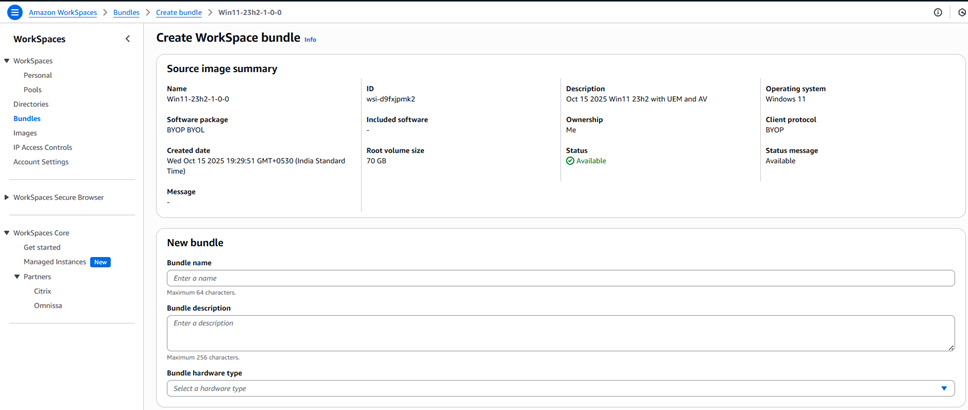
- Provide the following:
- Name and Description of the bundle
- Choose the appropriate Bundle Hardware type and Storage.

- Click Create Bundle.
- Confirm the bundle is created successfully and the status is Available.
### Create Automated Pool
Create an automated desktop pool on Horizon 8 using your registered golden image. This will provision virtual desktops for your users based on the imported and prepared image.
For additional details, see Amazon WorkSpaces Core - Create an Automated Full-Clone Desktop Pool.
Was this page helpful?