You can use keyboards, displays, microphones, and other external devices with remote desktops and published applications.
Keyboards and Monitors
You can use multiple monitors and all types of keyboards with a remote desktop. Certain settings ensure the best possible user experience.
Change the Display Mode for Remote Desktops
You can change the mode for remote desktops to display on all the monitors or on specific monitors connected to the client device. Remote applications always display on all the monitors connected to the client device.
If you have multiple monitors, you can display a remote desktop on all the monitors or on specific monitors. You can select up to three monitors.
Only one remote desktop can run in multiple-monitor mode at a time.
Prerequisites
- This feature requires Chrome OS 86 or later.
- This feature is not supported if Unified Desktop mode is enabled for the client device.
- For enrolled Chrome devices, this feature requires an administrator to configure the following setting in the JSON configuration file for the Horizon Client app.
- Add the
displaysetting to the list in theeditableproperty under thecommon-settingsection. See Client Features section.
- Add the
Procedure
-
Connect to a server.
-
Click the Settings toolbar button in the upper-right corner of the desktop and application selector window, scroll down to the Display setting, and click Set.
-
Select a display option and click OK.
Option Action Use all displays Displays the remote desktop window on all the connected monitors. Use single display Displays the remote desktop window on the primary monitor using the default window size. The default window size is the working area of the primary monitor, excluding the OS system tray. Use selected displays Displays the remote desktop on monitors that you select. You can select only adjacent monitors. Thumbnails of the monitors that are currently connected to the client system appear under Display arrangement. The display topology matches the display settings on the client system. To select or deselect a monitor on which to display the remote desktop window, click its thumbnail. When you click a thumbnail, it changes color. Use single display with small window Displays the remote desktop window on the primary monitor using a small window size (640 x 480 pixels). Use single display with large window Displays the remote desktop window on the primary monitor using a large window size (1680 x 983 pixels). Use single display with custom window Displays the remote desktop window on the primary monitor using a custom window size. You can specify a custom width of up to 1800 pixels and a custom height of up to 964 pixels. Use single display with fullscreen Displays the remote desktop on the primary monitor in full-screen mode. -
To display remote desktops on multiple monitors according to the client system's DPI setting, toggle the Enable DPI scale on extended monitors option to on.
If the High Resolution Mode setting is enabled, this option is deactivated. If only a single monitor is selected, this option is hidden.
-
Click Close.
What to do next
To exit multi-monitor mode, point to the top of the remote desktop window until the menu bar appears and click the Exit the multiple displays mode button.
The multiple-monitor feature supports only one desktop session at a time. To switch to a different desktop, first exit multiple-monitor mode for the current desktop. Then switch to the other desktop and enter multiple-monitor mode.
Certain actions, such as minimizing the display, can cause the session to exit multi-monitor mode automatically. To enter multi-monitor mode again, point to the top of the remote desktop window until the menu bar appears and click the Use Multiple Monitors button.
Setting the Screen Resolution
Horizon Client can resize the remote desktop to match the size of the browser window. To use this feature, an administrator must configure the remote desktop to have the correct amount of video RAM (VRAM). The default VRAM configuration is 36 MB. If you are not using 3D applications, the minimum VRAM requirement is 16 MB.
If you use a device that has a high pixel density resolution, such as a Google Chromebook Pixel, you can set the remote desktop or published application to use that resolution. Turn on the High Resolution Mode option in the Settings window. This option appears in the Settings window only if you are using a high-resolution display, or a normal display that uses a scale that is greater than 100 percent, and an administrator has not deactivated the feature.
For information about deactivating the High Resolution Mode feature, see Using the Google Admin Console to Configure Enrolled Chrome Devices section.
The High Resolution Mode feature cannot change the resolution for an active remote session. You must log out and log in again to make the feature take effect.
High Resolution Mode can take effect in either single-monitor or multi-monitor display mode.
Note: If the display resolution in High Resolution Mode is too high to support multi-monitor mode, the remote session displays in single-monitor mode instead.
To use the 3D rendering feature, an administrator must allocate sufficient VRAM for each remote desktop.
- With the software-accelerated graphics feature, you can use 3D applications, such as Windows Aero themes or Google Earth. This feature requires from 64 MB to 128 MB of VRAM.
- The shared hardware-accelerated graphics feature (vSGA), which is available with vSphere 5.1 or later, enables you to use 3D applications for design, modeling, and multimedia. This feature requires from 64 MB to 512 MB of VRAM. The default is 96 MB.
- The dedicated hardware-accelerated graphics feature (vDGA), which is available with vSphere 5.5 or later, dedicates a single physical GPU (graphical processing unit on an ESXi host to a single virtual machine. Use this feature if you require high-end hardware-accelerated workstation graphics. This feature requires from 64 MB to 512 MB of VRAM. The default is 96 MB.
When 3D rendering is enabled, the maximum number of monitors is one and the maximum resolution is 3840 x 2160.
Similarly, if you use a device that has a high pixel density resolution, such as a Google Chromebook Pixel, you must allocate sufficient VRAM for each remote desktop.
Important: Estimating the amount of VRAM that you need for the Blast display protocol is similar to estimating how much VRAM is required for the PCoIP display protocol. For more information on estimating the amount of VRAM needed see, Estimating Memory Requirements for Virtual Machine Desktops topic in the Horizon Overview and Deployment Planning guide.
Use Full-Screen Mode
You can display a remote desktop in full-screen mode.
Prerequisites
Connect to the remote desktop.
Procedure
- To display the remote desktop in full-screen mode, point to the top of the remote desktop window until the menu bar appears and click the Fullscreen button.
- To exit from full-screen mode, point to the top of the remote desktop window until the menu bar appears and click the Quit fullscreen button.
Using DPI Synchronization
The DPI Synchronization feature ensures that the DPI setting in a remote desktop or published application matches the client system's DPI setting.
An administrator can deactivate the DPI synchronization feature.
Like the Display Scaling feature, the DPI Synchronization feature can improve the readability of text and icons on high-DPI displays. Unlike the Display Scaling feature, which increases the size of fonts and images and can make them blurry, the DPI Synchronization feature increases the size of fonts and images, keeping them sharp. For this reason, the DPI Synchronization feature is generally preferred for an optimal user experience.
If DPI synchronization is deactivated, display scaling is used. The Display Scaling feature scales the remote desktop or published application appropriately.
The DPI Synchronization agent group policy setting determines whether the DPI Synchronization feature is activated. The feature is activated by default.
Behavior of DPI Synchronization
The default DPI synchronization behavior depends on the Horizon Agent version that is installed in the agent machine.
Beginning with Horizon Agent 2012, the client's per-monitor DPI setting is synchronized to the agent and changes take effect immediately during a remote session by default. This feature is controlled by the DPI Synchronization Per Monitor agent group policy setting. The DPI Synchronization Per Monitor feature is supported by default for virtual, physical, and RDSH desktops.
With earlier Horizon Agent versions, the client supports synchronization only to the system DPI setting. DPI Synchronization happens during the initial connection, and Display Scaling works in case of reconnection, if necessary. When DPI Synchronization works and the client system's DPI setting matches the remote desktop's DPI setting, Display Scaling cannot take effect, even if you select the Allow Display Scaling option in the user interface. DPI synchronization occurs only when users log in and start a remote session. If users change the DPI setting during a remote session, they must log out and log in again to make the remote desktop's DPI setting match the client system's new DPI setting.
The agent DPI setting is located in the Windows registry at Computer\HKEY_CURRENT_USER\Control Panel\Desktop: logPixels.
Note: The system DPI setting might not be the same as the main monitor's DPI setting. For example, if you close the main monitor and the system switches to an external display that has a different DPI setting than the main monitor, the system DPI setting is still the same as the DPI setting of the previously closed main monitor.
This version of the client does not support the DPI Synchronization Per Connection agent group policy setting, which is provided with Horizon Agent versions 7.8 through 2006.
For more information about the DPI synchronization group policy settings, see the Horizon Remote Desktop Features and GPOs document for your Horizon Agent version.
Supported Guest Operating Systems for Virtual Desktops
For virtual desktops, the DPI Synchronization feature is supported on the following guest operating systems:
- 32-bit or 64-bit Windows 7
- 32-bit or 64-bit Windows 8.x
- 32-bit or 64-bit Windows 10
- 32-bit or 64-bit Windows 11
- Windows Server 2008 R2 configured as a desktop
- Windows Server 2016 configured as a desktop
- Windows Server 2019 configured as a desktop
- Windows Server 2022 configured as a desktop
Note: For Windows server machines that are configured as a desktop, the DPI Synchronization Per Monitor feature is only supported on Windows Server 2022.
Supported RDS Hosts for Published Desktops and Published Applications
For published desktops and published applications, the DPI Synchronization feature is supported on the following RDS hosts:
- Windows Server 2016
- Windows Server 2019
Shortcut Key Combinations
You can enable certain settings that affect keyboard behavior for certain key combinations.
Chrome supports certain key presses and key combinations in the local operating system and the remote system. For other keys and key combinations when the user connects using a Windows keyboard, certain key combinations are not supported in the remote operating system. However, the local system does process the input. You can enable settings to change the behavior.
Without certain settings, the following keys and keyboard combinations often do not work in remote desktops.
-
Windows key combinations.
-
Alt+Backspace
Note: To input Ctrl+Alt+Del, point to the top of the remote desktop window until the menu bar appears and click the Send Ctrl+Alt+Delete button.
-
Caps Lock+modifier_key (such as Alt or Shift).
To enable the following shortcuts in Windows remote desktops, activate the corresponding shortcut mappings as described in Configure Keyboard Shortcut Mappings section.
- Alt+Backspace (simulates pressing the Delete key or Ctrl+Z in desktops)
- Ctrl+Search (simulates pressing the Windows key in desktops)
Windows key combinations do not work for published applications. These key combinations do work for Windows Server 2019/2022 and Windows 11 remote desktops and published desktops.
Some key combinations that work in remote desktops that have a Windows 8.x operating system do not work in remote desktops that have a Windows 7 or Windows 10 operating system.
Note: For a list of the default keyboard shortcuts for your client OS, refer to your client OS documentation. For a list of the default Windows shortcuts, refer to the Microsoft Windows website http://windows.microsoft.com.
Configure Keyboard Shortcut Mappings
You can customize how remote desktops and published applications interpret keyboard shortcuts entered on the client device by creating keyboard shortcut mappings. When you create a keyboard shortcut mapping, you map a keyboard shortcut on the client device to a Windows keyboard shortcut that triggers the associated action in the remote desktop or application.
A keyboard shortcut consists of one or more key modifiers, such as Control and Shift, and a key code. A key code can be any key on your keyboard. When you press a mapped keyboard shortcut on your client keyboard, the corresponding Windows keyboard shortcut and action occurs in the remote desktop or application.
Video
To get a quick introduction to keyboard shortcut mappings, watch this three-minute video.
Keyboard Shortcuts in Horizon Client for Chrome
Considerations for Mapping Operating System Keyboard Shortcuts
Many operating systems include default keyboard shortcuts. For example, Ctrl+W and Shift+Ctrl+W are common keyboard shortcuts on Chrome devices. If you attempt to map one of these operating system (OS) keyboard shortcuts in Horizon Client, the behavior of the shortcut on the client device and in the remote desktop or published application can be unpredictable.
Before you create a keyboard shortcut mapping, review the following considerations:
- The physical layout of keys on a keyboard can differ depending on the language of the keyboard. To ensure that keyboard shortcut mappings register correctly with Horizon Client, use the Language Setting to specify the language and layout of your keyboard.
- If you map a keyboard shortcut, how the shortcut behaves on the client device depends on how the OS manages the shortcut. For example, the keyboard shortcut might trigger an action in the OS and Horizon Client might not respond to the shortcut. Alternatively, the keyboard shortcut might trigger an action in both the OS and Horizon Client.
- Before you map an OS keyboard shortcut in Horizon Client, try to deactivate the shortcut in the client OS, if possible. Not all OS keyboard shortcuts can be deactivated.
- If you map a Windows keyboard shortcut in Horizon Client, the mapped action occurs when you use the shortcut in the remote desktop or published application.
- Shortcut mappings that include the Windows key are deactivated by default in the Horizon Client Key Mapping dialog box. To use one of these mappings, you must activate it by selecting its Open check box in the Key Mapping dialog box. These shortcuts are included with the mapping feature by default and cannot be deleted.
Note: For a list of the default keyboard shortcuts for your client OS, refer to your client OS documentation. For a list of the default Windows shortcuts, refer to the Microsoft Windows website http://windows.microsoft.com.
Create Keyboard Shortcut Mappings
Follow these steps to configure keyboard shortcut mappings.
-
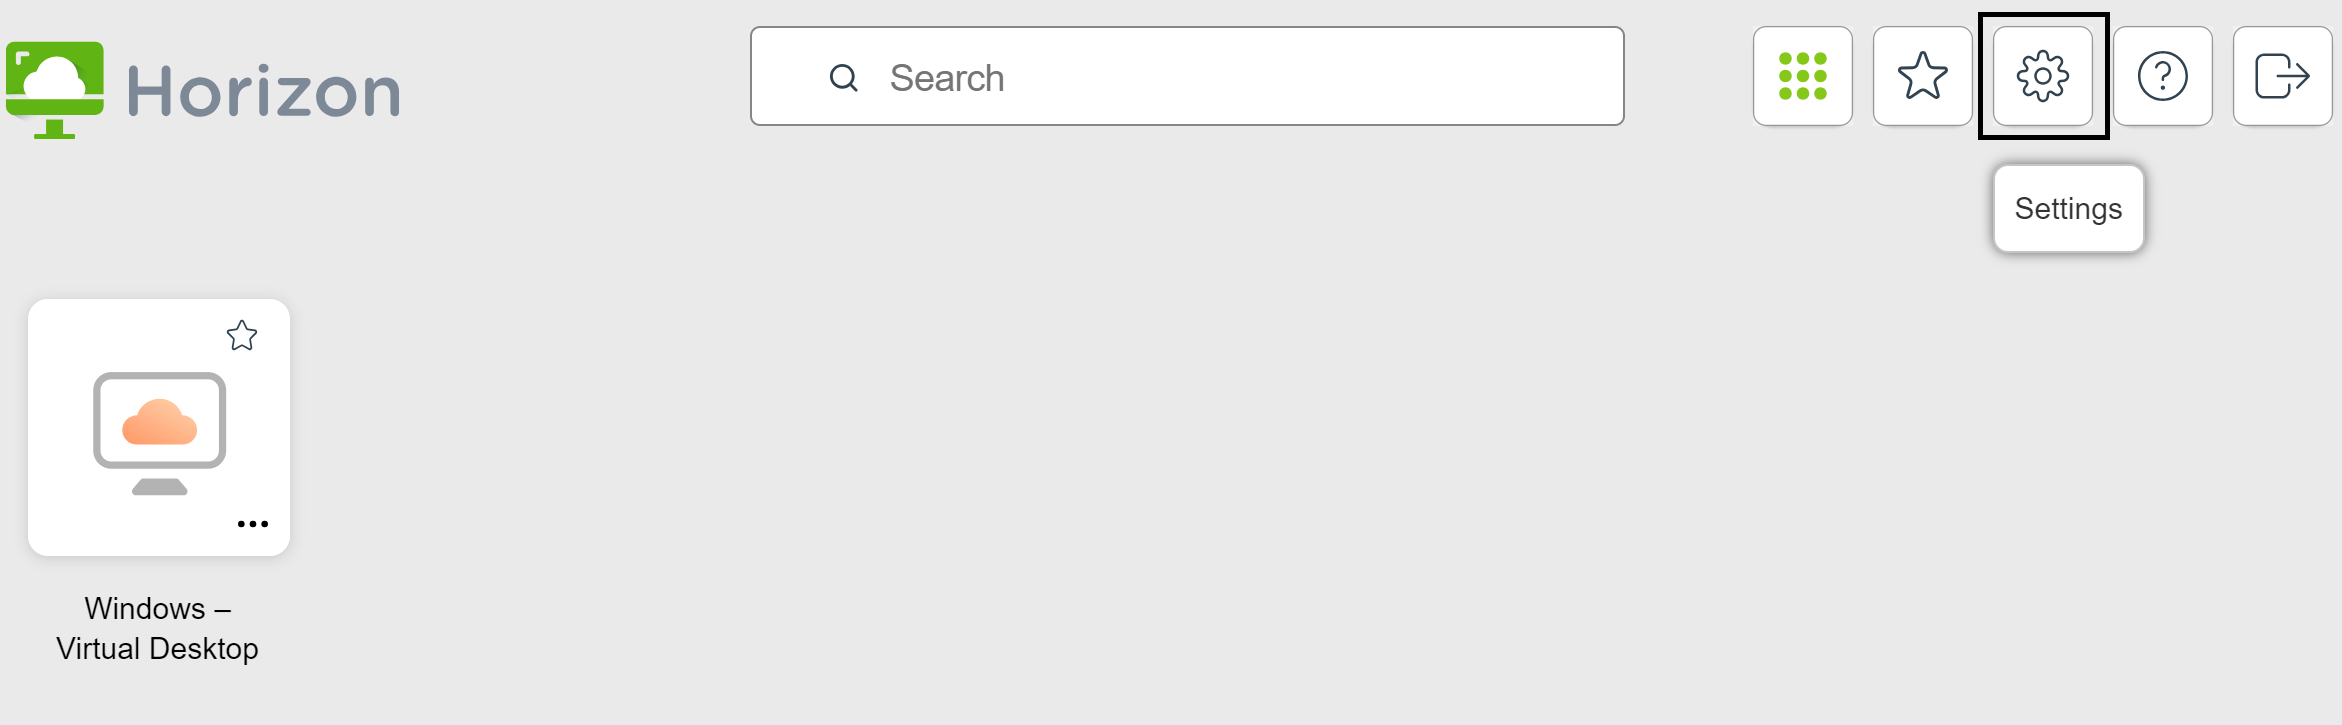
Connect to a server and click the Settings toolbar button in the upper-right corner of the desktop and application selector window.
-
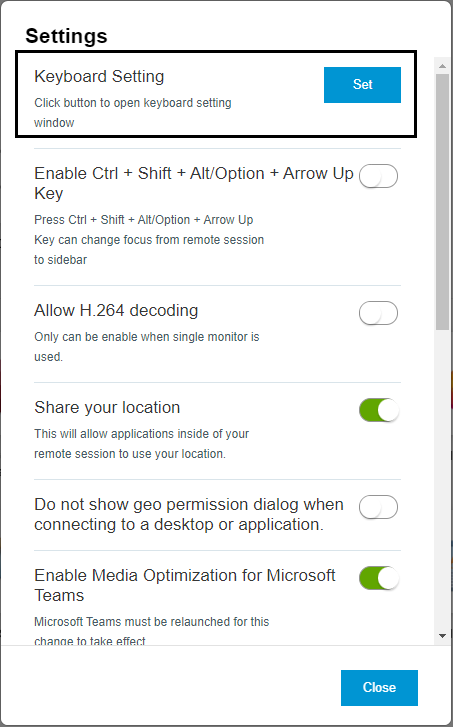
In the Settings window, find Keyboard Setting, and click Set.
-
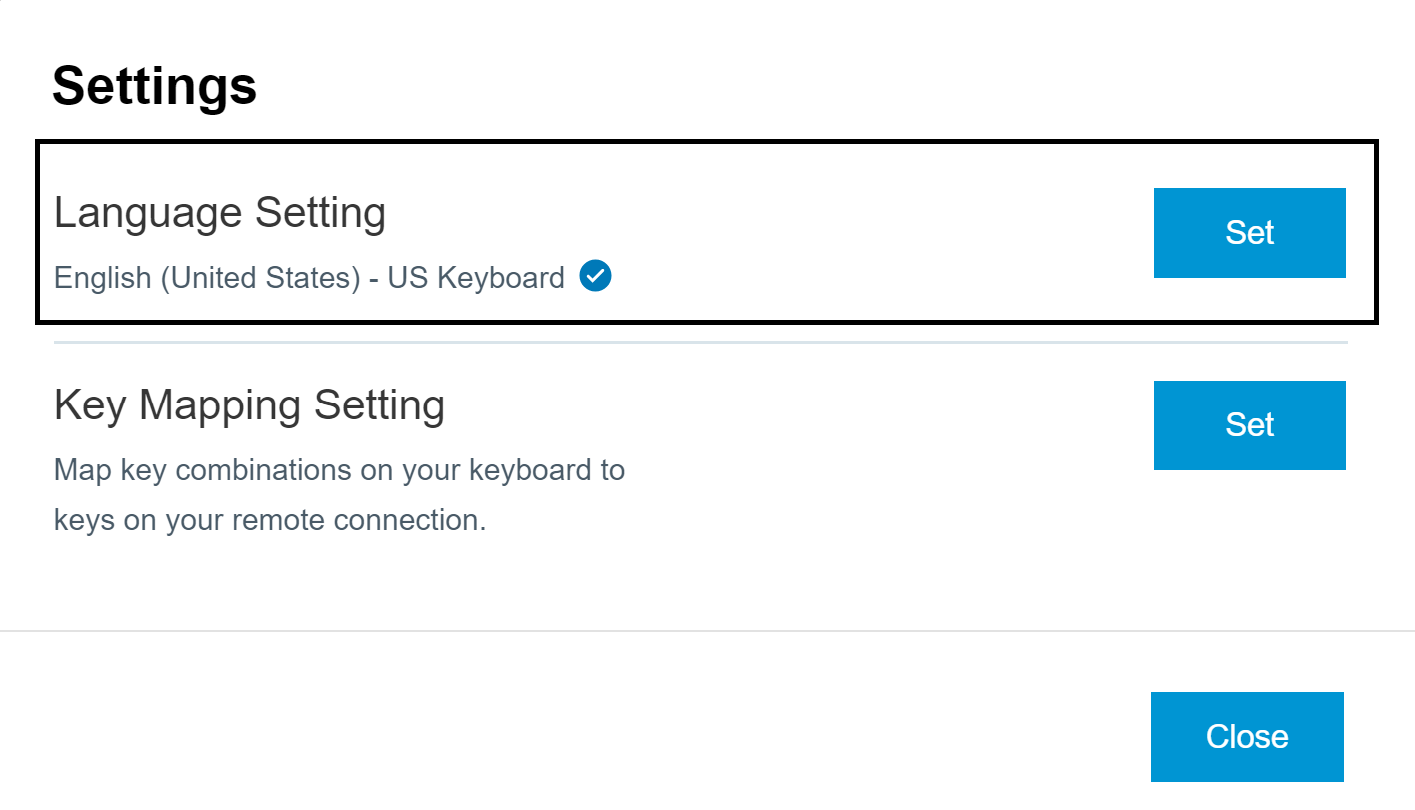
In the Keyboard Setting window, specify the language of your keyboard.
a. Find Language Setting, and click Set.
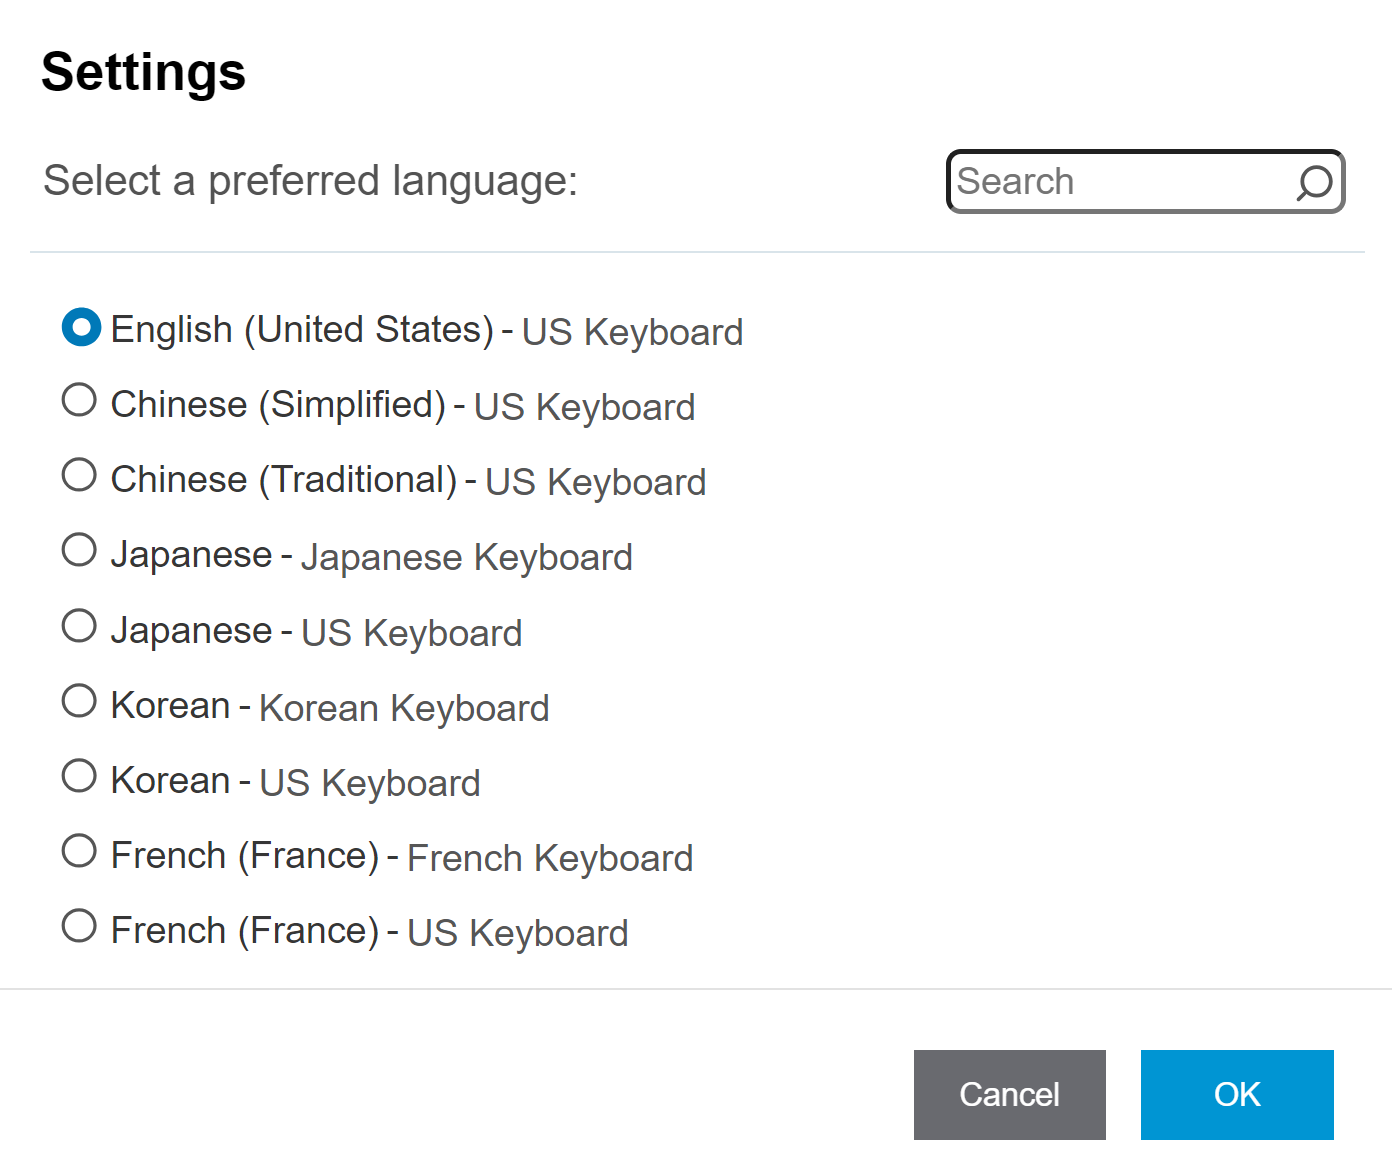
b. In the dialog box that appears, select the language and keyboard layout combination that matches your device, and click OK.
-
In the Keyboard Setting window, configure the keyboard shortcut mappings.
a. Find Key Mapping Setting, and click Set.
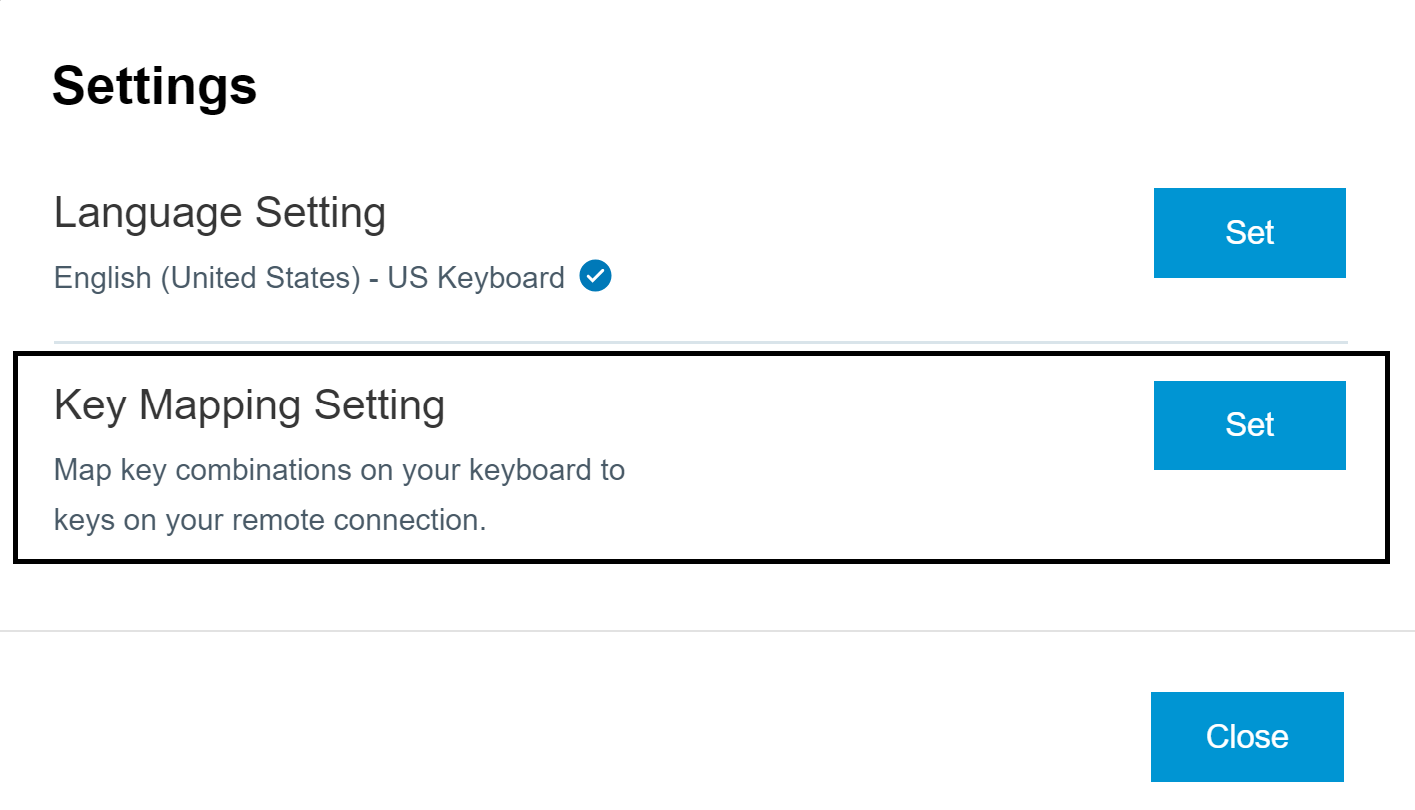
-
In the Key Mapping dialog box, configure the keyboard shortcut mappings.
Action Procedure Delete a keyboard shortcut mapping Select the mapping to delete and click the minus (-) button. Add a keyboard shortcut mapping Note: Certain rules and limitations can apply to mappings. See the descriptions in the next section of this article. - Click the plus (+) button.
- Under the From: section, specify the client keyboard shortcut sequence by selecting one or more keyboard modifiers and typing a key code in the text box. The From: field shows the client keyboard shortcut that you specified.
- Under the To: section, specify the corresponding Windows keyboard shortcut sequence by selecting one or more keyboard modifiers and typing a key code in the text box. The To: field shows the Windows keyboard shortcut that you specified.
- Click Add to save your changes.
Modify a keyboard shortcut mapping - Click the Edit button next to the mapping and make your changes to the From: and To: keyboard shortcut sequences.
- Click Update to save your changes.
Activate/deactivate a keyboard shortcut mapping Select/deselect the Open check box next to the mapping in the Key Mapping dialog box. Activate/deactivate language-specific key mappings Select/deselect the Enable Language Specific Key Mappings check box. When you select this check box, Horizon Client recognizes the default key mappings associated with the keyboard language that you specified. Restore the default mappings Click Restore default. Any changes that you made to the default keyboard shortcut mappings are deleted and the default mappings are restored.
c. Click Save to save your changes. Then click Close twice to exit the Settings screens.
-
-
To make your changes take effect, restart any remote desktops or published applications that you currently have open.
Shortcut Mapping Rules
The following rules and limitations apply to keyboard shortcut mappings.
- An error message appears if you try to add a mapping that duplicates an existing mapping.
- An error message appears if your origin and target shortcuts are identical.
- You can map a single modifier key to another modifier key, for example, Command key to Control key. However, you cannot creating mappings between combinations of modifier keys.
- You cannot map shortcuts that combine the Shift key with a letter key, for example, Shift+A.
- An error message appears if you try to add a mapping without specifying an origin or target shortcut.
- You cannot map combinations that include any of the LED keys: Caps Lock, Num Lock, Scroll Lock.
- You cannot map a combination of keys to a modifier key.
Printing From a Remote Desktop or Published Application
With the Integrated Printing feature, you can print to a network printer or a locally attached printer from a remote desktop or published application.
To use this feature, an administrator must install Horizon Agent on the virtual machine or RDS host with the Integrated Printing option activated. For more information, see the Desktops and Applications in Horizon 8 document.
An administrator can turn off the Integrated Printing feature by using the Disable printer redirection for non-desktop client group policy setting. For more information, see the Horizon Remote Desktop Features and GPOs document.
To support native printer redirection on the Chrome client:
-
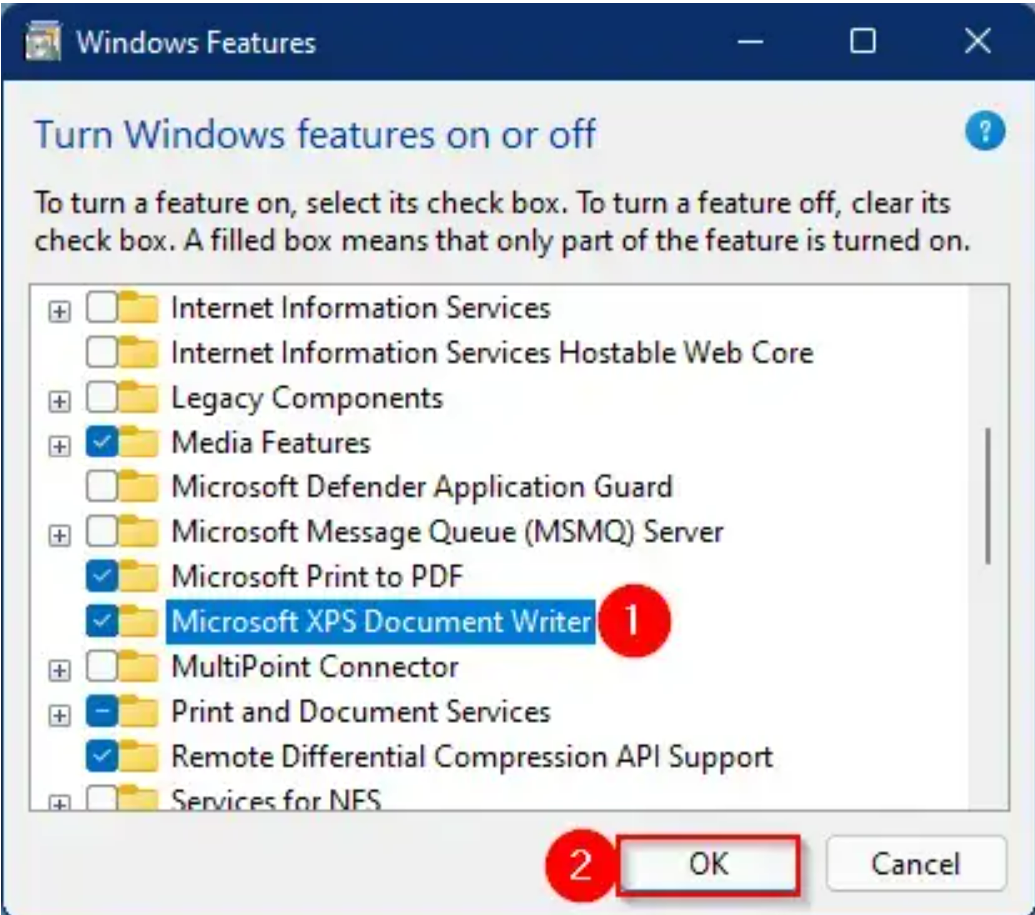
The Microsoft Print to PDF driver and Microsoft XPS document Writer driver must exist on the agent side. The Microsoft Print to PDF driver and Microsoft XPS document Writer driver are inbox drivers since Windows 10. The printers need not necessarily be installed but the driver has to be present. If the printer is not present then you need to add the printer, but the driver must exist in advance.
Navigate to the Windows Feature screen and select Microsoft Print to PDF and Microsoft XPS document Writer to add these drivers on the agent side.
-
The staple and finishing features are only supported on the vendor's driver as the agent only produces PDF files.
-
When a user selects multiple copies in the application on the agent, the file is decided and is always collated. For example, for a printing job with two pages and two copies, the output PDF is 1-2-1-2 always.
-
The maximum number of times the
getPrinterInfocan be called per minute is 20. Printer list is detected every one minute and if the printers number is more thanMAX_GET_PRINTER_INFO_CALLS_PER_MINUTEin thechrome.printing.getPrinterAPI response, then the available printers in the scope ofMAX_GET_PRINTER_INFO_CALLS_PER_MINUTEare supported.
Note: Printers that do not support PDF printing cannot support native printer redirection on the Chrome client.
Set Printing Preferences for the Integrated Printing Feature
You can set printing preferences in a remote desktop for the Integrated Printing feature. With the Integrated Printing feature, you can use local or network printers from a remote desktop without having to install additional printer drivers in the Windows remote desktop. For each printer available through this feature, you can set preferences for data compression, print quality, double-sided printing, color, and other settings.
In a single-user virtual machine desktop, each virtual printer appears as <printer_name>(vdi) by default. In a published desktop or published application, each virtual printer appears as <printer_name>(v<session_ID>) by default.
An administrator can use a group policy to modify the printer naming convention for client printers that are redirected. For information, see the Horizon Remote Desktop Features and GPOs document for your Horizon Agent version.
Prerequisites
To use Integrated Printing, an administrator must install the Integrated Printing feature in the remote desktop. This task involves enabling the Integrated Printing option in the Horizon Agent installer. For information about installing Horizon Agent, see the Desktops and Applications in Horizon 8 document. For information about configuring the Integrated Printing feature, see the Horizon Remote Desktop Features and GPOs document.
To determine whether the Integrated Printing feature is installed in a remote desktop, verify that the -print-redir-server.exe and -print-redir-service.exe files exist in the remote desktop file system.
Procedure
- In the Windows remote desktop, go to Control Panel > Hardware and Sound > Devices and Printers.
- In the Devices and Printers window, right-click the virtual printer and select Printer properties from the context menu.
- On the General tab, click Preferences.
- In the Printing Preferences dialog box, select the different tabs and specify which settings to use.
- To save your changes, click OK.
Using the Real-Time Audio-Video Feature for Webcams, Microphones, and Speakers
If an administrator has configured the Real-Time Audio-Video feature, you can use the client machine's audio-video devices in a remote desktop or published application. Real-Time Audio-Video is compatible with standard conferencing applications and browser-based video applications, and it supports standard webcams, audio USB devices, and analog audio input.
Overview of Real-Time Audio-Video
The default video resolution is 320 x 240 pixels. The default Real-Time Audio-Video settings work well with most webcam and audio applications.
For information about changing the Real-Time Audio-Video settings, see "Configuring Real-Time Audio-Video Group Policy Settings" in the Horizon Remote Desktop Features and GPOs document.
When a remote desktop or published application is connected to the client machine's audio-video device, before the remote desktop or published application can use the device, Chrome asks for permission the first time. If you allow the device to be used, Chrome does not ask for permission again.
If Real-Time Audio-Video is being used in a remote desktop or published application session and you open a connection to a second remote desktop or published application, and if a security warning appears (for example, if a valid certificate was not installed), ignoring the warning and continuing to connect to the second remote desktop or published application causes Real-Time Audio-Video to stop working in the first session.
Improving Real-Time Audio-Video Performance
When using Real-Time Audio-Video with certain data-intensive applications, such as video conferencing applications, you might encounter a lag in performance. To improve performance, you can enable the H.264 codec for Real-Time Audio-Video. You can also specify whether to use hardware acceleration for Real-Time Audio-Video.
Chrome client uses the Opus audio codec to handle a wide range of audio applications, including Voice over IP, videoconferencing, and so on. To improve the real-time audio performance, you can configure the Opus codec on the Chrome client.
The following sections describe how to configure these settings to improve Real-Time Audio-Video performance.
Enable the H.264 Codec for Real-Time Audio-Video
H.264 is an industry standard for video compression, which is the process of converting digital video into a format that takes up less capacity when it is stored or transmitted.
To support H.264 for Real-Time Audio-Video, your client device must be running ChromeOS 94 or later.
To enable the H.264 codec, set the Google Admin policy setting enableRTAVH264Codec to true (the default value). See Client Features section.
Configure Hardware Acceleration for Real-Time Audio-Video
Real-Time Audio-Video hardware acceleration works on your client only if the graphics processing unit (GPU) is supported on your device and is compatible with FFmpeg.
Enabling hardware acceleration can improve performance, but it can also result in feature limitations under certain use cases. A configuration setting lets you turn on or off hardware acceleration for Real-Time Audio-Video as needed.
To configure hardware acceleration, configure the Google Admin policy setting hardwareAccelerationOption as described in the Client Features section.
Configure Opus Codec to Improve the Audio Performance
On the Chrome Client, you can configure the Opus codec using the following steps:
- Login to your Google Admin Console using your Google admin account and navigate to Google admin policy.
- Navigate to common-setting and add
enableRTAVOpusCodec: "true"orenableRTAVOpusCodec: "false". - Set
enableRTAVOpusCodec: "true"to enable opus codec or setenableRTAVOpusCodec: "false"to disable opus codec.
Note: By default, enableRTAVOpusCodec is always set to true.
Enable Discontinuous Transmission Mode
Discontinuous transmission (DTX) mode provides a solution where there is a huge reduction in the audio traffic when the participant is silent. The reduction in audio traffic occurs as the audio packet is not transmitted. To enable Discontinuous Transmission mode, perform the following steps:
- Login to your Google Admin Console using your Google admin account and navigate to Google admin policy.
- Navigate to common-setting and add
enableRTAVDTX: "true"orenableRTAVDTX: "false". - Set
enableRTAVDTX: "true"to enable real-time audio video discontinuous transmission mode or setenableRTAVDTX: "false"to disable real-time audio video discontinuous transmission mode.
Note: By default, enableRTAVDTX is always set to true.
Select a Preferred Webcam, Microphone, or Speaker on a Chrome device
With the Real-Time Audio-Video feature, if multiple audio-video devices are connected to the local client system, only one of the devices is used in the remote desktop or published application. To specify which webcam or microphone is preferred, you can configure Real-Time Audio-Video settings in Horizon Client for Chrome.
If it is available, the preferred device is used in the remote desktop or published application. If the preferred device is not available, another device of that device type is used.
Prerequisites
- Verify that an administrator has configured the Real-Time Audio-Video feature, as described in Horizon Remote Desktop Features and GPOs on the Horizon 8 documentation portal.
- Verify that an audio-video device, such as a webcam, microphone, or speaker, is installed and operational on the local client system.
- Connect to a server.
Procedure
-
Click the Settings toolbar button in the upper-right corner of the desktop and application selector window and scroll down to the Real-Time Audio-Video settings.
-
From the Preferred microphone drop-down menu, select a preferred microphone.
-
From the Preferred webcam drop-down menu, select a preferred webcam.
-
From the Preferred speaker drop-down menu, select a preferred speaker.
Selecting All allows you to use multiple speaker redirection, as described in Using Multiple Speakers section. Selecting Default allows you to use only the client default speaker in remote sessions.
Results
The next time you start a remote desktop or published application, the preferred webcam, microphone, or speaker that you selected is redirected to the remote session.
Using Multiple Speakers
If more than one speaker is connected to the client computer, and the remote desktop supports multiple device redirection with the speaker feature, you can use all the speakers connected to the client computer in the remote desktop.
For administrators - this feature is supported only with virtual desktops. It is not supported with published desktops or published applications.
For end users - whether you can use more than one speaker depends on how an administrator has configured the remote desktop. To use this feature, you must select All for the preferred speaker setting. For more information, see Select a Preferred Webcam, Microphone, or Speaker on a Chrome device section.
Observe the following tips for using more than one speaker with device redirection.
- When you connect to a remote desktop, all speakers currently connected to the client computer are redirected.
- By default, the remote desktop uses the speaker that is configured as the client default speaker. You can switch to have the remote desktop use any speaker connected to the client computer.
- If you disconnect a speaker from the client computer, and the speaker is not being used in an application in the remote desktop, the speaker device is deleted from the remote desktop after you log out and log back in to the desktop. If the speaker is being used by an application in the remote desktop, the speaker device is deleted after the application releases it.
- The display name of a redirected speaker is the actual device name, but with (VDI) appended, for example, Acme Speaker (VDI).
- You can use multiple redirected devices simultaneously in a remote desktop.
Use USB Devices in a Virtual Desktop
With the USB redirection feature, you can use some locally attached USB devices in a virtual desktop. You can redirect multiple USB devices to a virtual desktop, but a device can be redirected to only one desktop session at a time. You cannot redirect USB devices to published desktops and published applications.
You can redirect USB devices to a virtual desktop manually or automatically.
If an administrator has allowed it, you can modify the automatic redirection behavior for all devices or for specific devices by configuring auto-connect settings. The auto-connect settings can be applied to all desktops or to specific desktops.
An administrator can also specify whether Horizon Client should split composite USB devices into separate interface components for redirection.
Supported USB Devices
Because of Chrome OS restrictions, many USB devices cannot be redirected to a virtual desktop. For this release, Omnissa tested the following USB devices. Other devices might be supported. If a USB device is not supported, Horizon Client returns an error message when you try to redirect the device.
- Printers
- Brother MFC 8710 DW
- Brother QL-720NW
- HP LaserJet Pro M201dw
- HP LaserJet Pro MFP M426dfw
- HP LaserJet P2055d
- HP Deskjet 3525
- HP OfficeJet 200 Mobile
- Ricoh SP C261SNFw
- Samsung C43x Print Series
- Xerox WorkCentre 6515
- Xerox Workcentre 3225/DNI Printer
- Zebra Label printer GC420-1005G0-000
- Scanners
- AmbirScanPro 490i
- Human interface devices (HID)
- Wacom 520A
- Wacom 500B
- Composite devices
- Nuance PowerMic II
- Nuance PowerMic III
Prerequisites
To support USB redirection to a virtual desktop, verify that your system environment meets the following requirements.
- The USB redirection feature requires ChromeOS version 87 or later. Auto-connect settings for the feature require ChromeOS version 107 or later.
- To enable the auto-detection of the USB, navigate to Google Admin Policy settings and select the WebUSB API allowed devices option.
- An administrator must configure the USB redirection feature for the remote desktop. For more information, see "Configuring USB Redirection for Chrome and HTML Access Clients" in the Horizon Remote Desktop Features and GPOs document.
- An administrator must specify whether to make USB auto-connect settings editable by end users. See Client Features section.
To support splitting of composite USB devices, verify that your system environment meets the following requirements.
- Client devices are running Horizon Client for Chrome 2306 or later.
- Either one of the following:
- An administrator has configured the USB redirection feature for the remote desktop. For more information, see "Configuring USB Redirection for Chrome and HTML Access Clients" in the Horizon Remote Desktop Features and GPOs document.
- An administrator has configured Google Admin policies as described in Split Composite USB Devices.
Split Composite USB Devices
The following configuration steps describe one method to enable the splitting of composite USB devices. Alternatively, you can enable USB device splitting by configuring the USB redirection feature for the remote desktop.
When you allow device splitting, Horizon Client treats a composite USB device as separate components for redirection.
-
Add the USB composite device to the Google Admin USB DetachableAllowList policy.
a. In the Google Admin console, go to Settings > Device >
> Device settings > USB access. b. Add the USB composite device using the format
: , where specifies the vendor ID and specifies the product ID of the device. Specify each ID as a hexadecimal value. c. Save your changes in the console.
-
Add the USB composite device to the Google Admin USBAllowDevicesForURL policy.
a. In the Google Admin console, go to Settings > Device >
> User & browser settings > USB access. b. Add the Horizon Client app extension ID.
c. Add the USB composite device using the format
: , where specifies the vendor ID and specifies the product ID of the device. Specify each ID as a hexadecimal value. d. Save your changes in the console.
e. To make the updated policies take effect, go to chrome://policy in your browser, and select Reload policies.
-
Add the USB composite device to the
allowListarray under thesplitUSBclient policy, as described in the Client Features section.
Procedure to Redirect USB Devices
The following procedure describes how to add a USB device and configure redirection settings to a virtual desktop.
-
Connect the USB device to the client system.
-
Start Horizon Client and connect to a server.
-
Optional: Configure settings for automatic redirection.
Note: An administrator must make the automatic redirection settings available to you for editing. If the settings are not available for editing, Horizon Client uses the default automatic redirection policies defined by the administrator.
a. Click the Settings toolbar button in the upper-right corner of the desktop and application selector window.
b. In the Settings window, find Auto Forward USB. Enable the toggle for this setting and click Select.
A dialog box appears with options for configuring auto-connect behavior for USB devices.
c. Select the virtual desktop to which you want to apply the auto-connect settings. To apply the settings to all desktops, select Apply to all desktops.
d. Configure the auto-connect settings.
Setting Description Auto-connect all devices at startup Select this option to redirect all inserted USB devices automatically when the desktop session starts. Auto-connect all devices when inserted Select this option to redirect all USB devices automatically when you insert the device in the USB port of the client system. Auto-connect options for specific devices Use these options to configure the automatic redirection behavior for specific USB devices. You can configure each device to be redirected automatically upon session startup or device insertion, or both. Note: The list of devices in the auto-connect dialog box is updated whenever you add a new device for USB redirection, as described in step 6. Alternatively, an administrator can define a global device list by configuring WebUSB API allowed devices in the Google Admin console.
You can configure automatic redirection to occur upon session startup or upon device insertion, or upon both session startup and device insertion. The following table describes how the automatic redirection feature behaves based on your auto-connect configuration.
Auto-connect configuration Automatic redirection behavior Auto-connect upon startup is enabled, and auto-connect upon insertion is not enabled Automatic redirection occurs only when the desktop session starts with the device already inserted in the client system. - If the device is not inserted at the time of session startup, redirection does not occur.
- If the device is inserted after the session starts, redirection does not occur.
- If the user starts multiple desktop sessions, only the first desktop started receives the redirected device. A device can be redirected to only one desktop session at a time.
Auto-connect upon insertion is enabled, and auto-connect upon startup is not enabled Automatic redirection occurs only when the device is actively inserted in the client system. - If the device is not inserted when the desktop session starts but is inserted later, redirection occurs.
- If the device is already inserted when the session starts, redirection does not occur.
- If the device is removed during the session and reinserted in the client system, redirection occurs.
- If multiple desktop sessions are open, only the focused desktop receives the redirected device. A device can be redirected to only one desktop session at a time.
Auto-connect upon startup is enabled, and auto-connect upon insertion is enabled Automatic redirection occurs when the desktop session starts or when the device is inserted in the client system. - If the device is already inserted when the session starts, redirection occurs.
- If the device is not inserted when the desktop session starts but is inserted later, redirection occurs.
e. Click Apply to save your changes.
-
Connect to the virtual desktop.
-
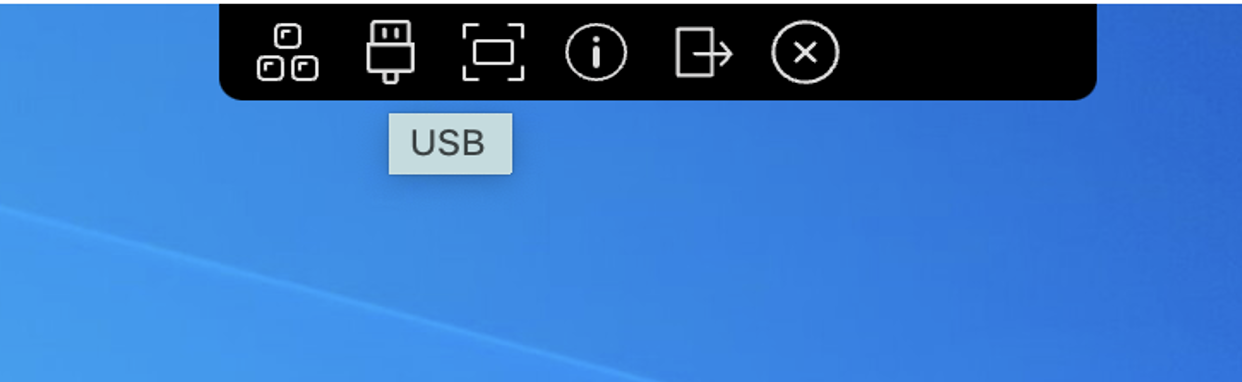
Move your mouse to the top of the virtual desktop window until the top menu bar appears and click the USB Device Redirection button.
-
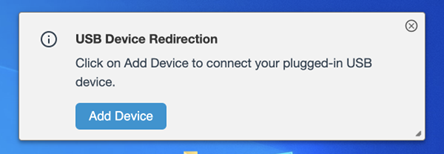
Click Add Device.
-
Select the device from the USB device list and click Select.
If the device is supported, it is redirected to the remote desktop and is available for use in the session. If the device is not supported, an error message appears.
-
Optional: Click Add Device again to redirect another USB device.
-
To release a USB device from the remote desktop, click Release.
USB Composite Device Redirection
USB redirection enables you to use locally attached USB devices in a virtual desktop. You can redirect multiple USB devices to a virtual desktop, but a device can be redirected to only one desktop session at a time. The following procedure describes the steps to enable USB redirection:
-
Install the USB component when you install the agent.
-
Enable UsbVirtualChannelEnabled and set UsbVirtualChannelEnabled in registry.
a. Path:
Agent\Configurationb. Key: UsbVirtualChannelEnabled
c. Value: true
-
Logoff from the desktop for the changes to take effect.
For the USB composite device redirection to work correctly, you must perform the following configurations on the agent GPO or the Google admin settings. You can either use the agent GPO or the Google admin, but the Google admin will overwrite the GPO if both the GPO and the Google admin exist.
Configure the Agent GPO as described in the following steps:
-
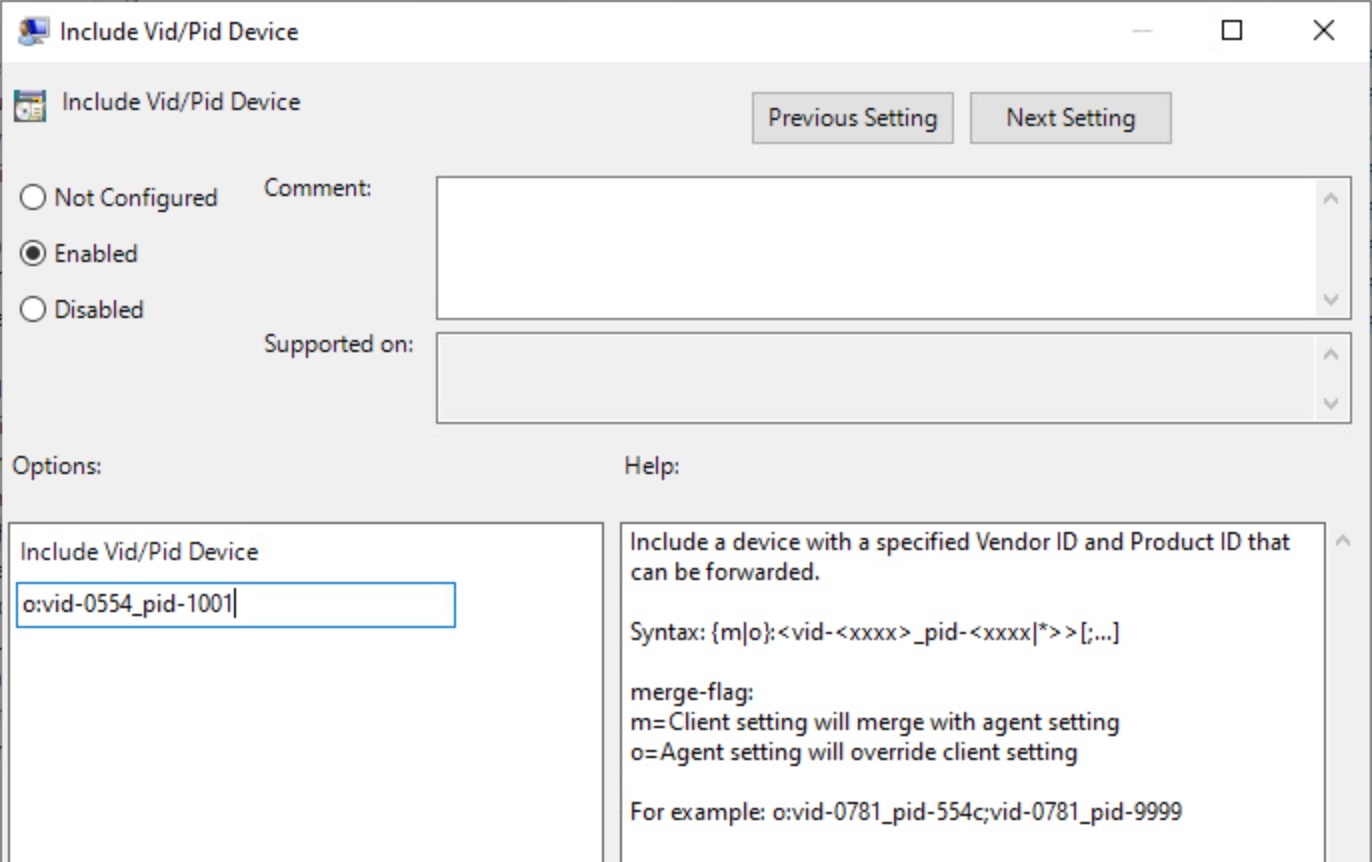
Include a Vid or Pid device, enable the device, and add Vid or Pid as shown in the following example. Here, Vid or Pid are hex numbers.
The following example shows a device with Vid or Pid 0554/1001, the configuration must be o:vid-0554_pid-1001.
-
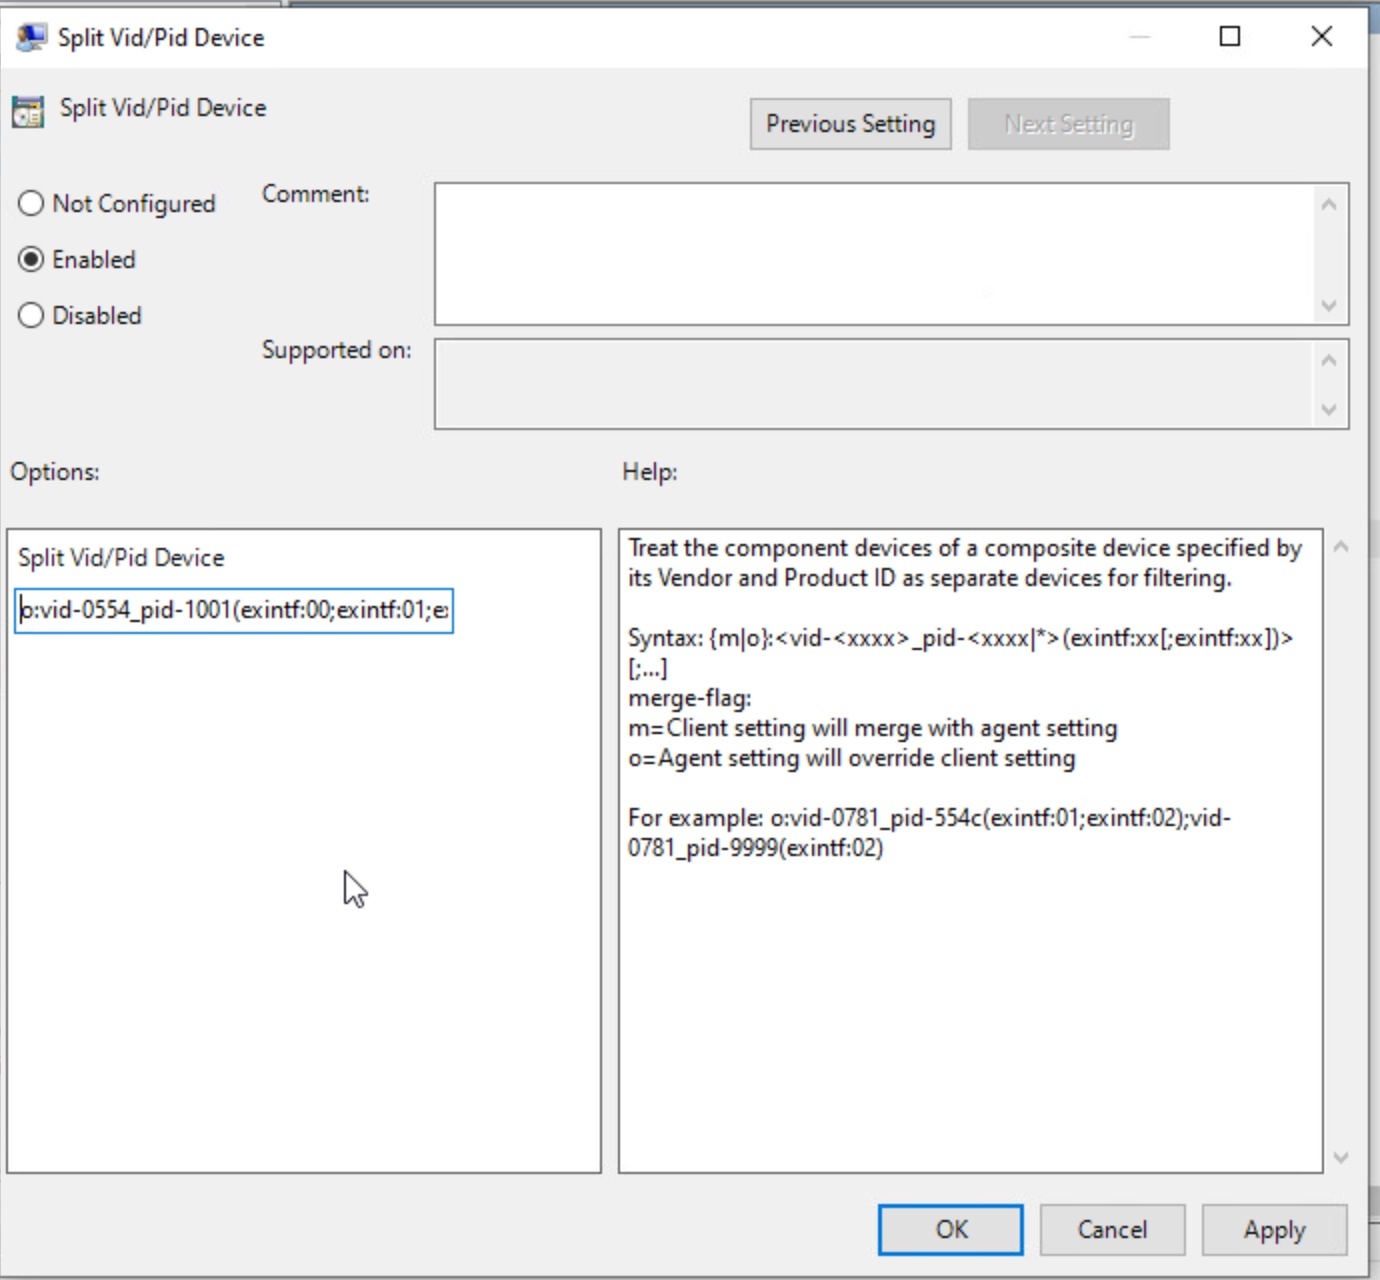
Split the Vid or Pid device, enable the device, and add the excluded interfaces as exintf. In the example, the excluded device is 0554:1001, excluded interface is 00, 01, 02, and the configuration must be o:vid-0554_pid-1001(exintf:00;exintf:01;exintf:02). To identify which interfaces to be excluded, see the Identifying the Interfaces to be Excluded section.
Configure the Google Admin Console as described in the following steps:
-
The Chromebook device must be a managed device in the organization.
-
Horizon Client Google policy - Add the following splitUSB key or value in the common setting of the Horizon client Google policy. The following is an example for PowerMic3, whose Vid or Pid is 0554:1001, audio interface is 00,01,02 which should not be redirected as USB HID interface.
{ "broker_list": { "Value": { "settings": { "server-list": [ { "server": "viewserver0.mydomain.com", "default": true, "description": "View Server 0", "username": "User0", "domain": "TestDomain0" } ], "common-setting": { "allowDataSharing": true, "allowFileDownload": true, "allowFileUpload": true, "autoForwardUSB": true, "autoForwardUSBPolicy": [ { "desktop": "HorizonAutoUsbAll", "autoConnectAllOnStart": true, "autoConnectAllOnInsert": true } ], "enableAdvancedTouch": true, "enableAnonymousLogin": false, "enableDisconnectionTriggeredQuit": true, "enableFileAssociation": false, "enableH264": true, "enableHighResolution": false, "enableLogoutTriggeredQuit": true, "enableMediaStream": false, "enableNetworkIndicator": true, "enableRTAVH264Codec": true, "enableScreenSharing": true, "enableWindowsKey": true, "display": "useAllMonitor", "forcePrivateMode": true, "hardwareAccelerationOption": "no-preference", "hideSecondaryServer": true, "ignoreCertErrors": false, "useAssetIdReplaceMachineName": false, "ws1WebviewMode": "secure-webview", "networkStateConfig": { "networkStateTcpRttMSLow": 2, "networkStateTcpRttMSHigh": 400, "networkStateQualityScoreTcpThresholdGood": 85, "networkStateQualityScoreTcpThresholdPoor": 40, "networkStateRttCheckPeriodMs": 15000 }, "splitUSB": { "allowList": [ { "device": "0554:1001", "excludedInterface": [ "00", "01", "02" ] } ] }, "urlFiltering": { "protocols": [ { "brokerHostname": "10.117.24.28", "protocol": "http", "remoteItem": "win2022_RDSH", "agentRules": ".*example1.com" }, { "brokerHostname": "10.117.161.109", "protocol": "https", "remoteItem": "win10_VDI", "agentRules": ".*example2.com" } ] }, "editable": { "allowDataSharing": true, "autoForwardUSB": true, "enableAnonymousLogin": true, "enableHighResolution": true, "enableH264": true, "enableWebRTCRedirection": true, "enableScreenSharing": true, "display": true } } } } } } -
a. Navigate to Settings > Device > Device Org > Device settings search for USB Access.
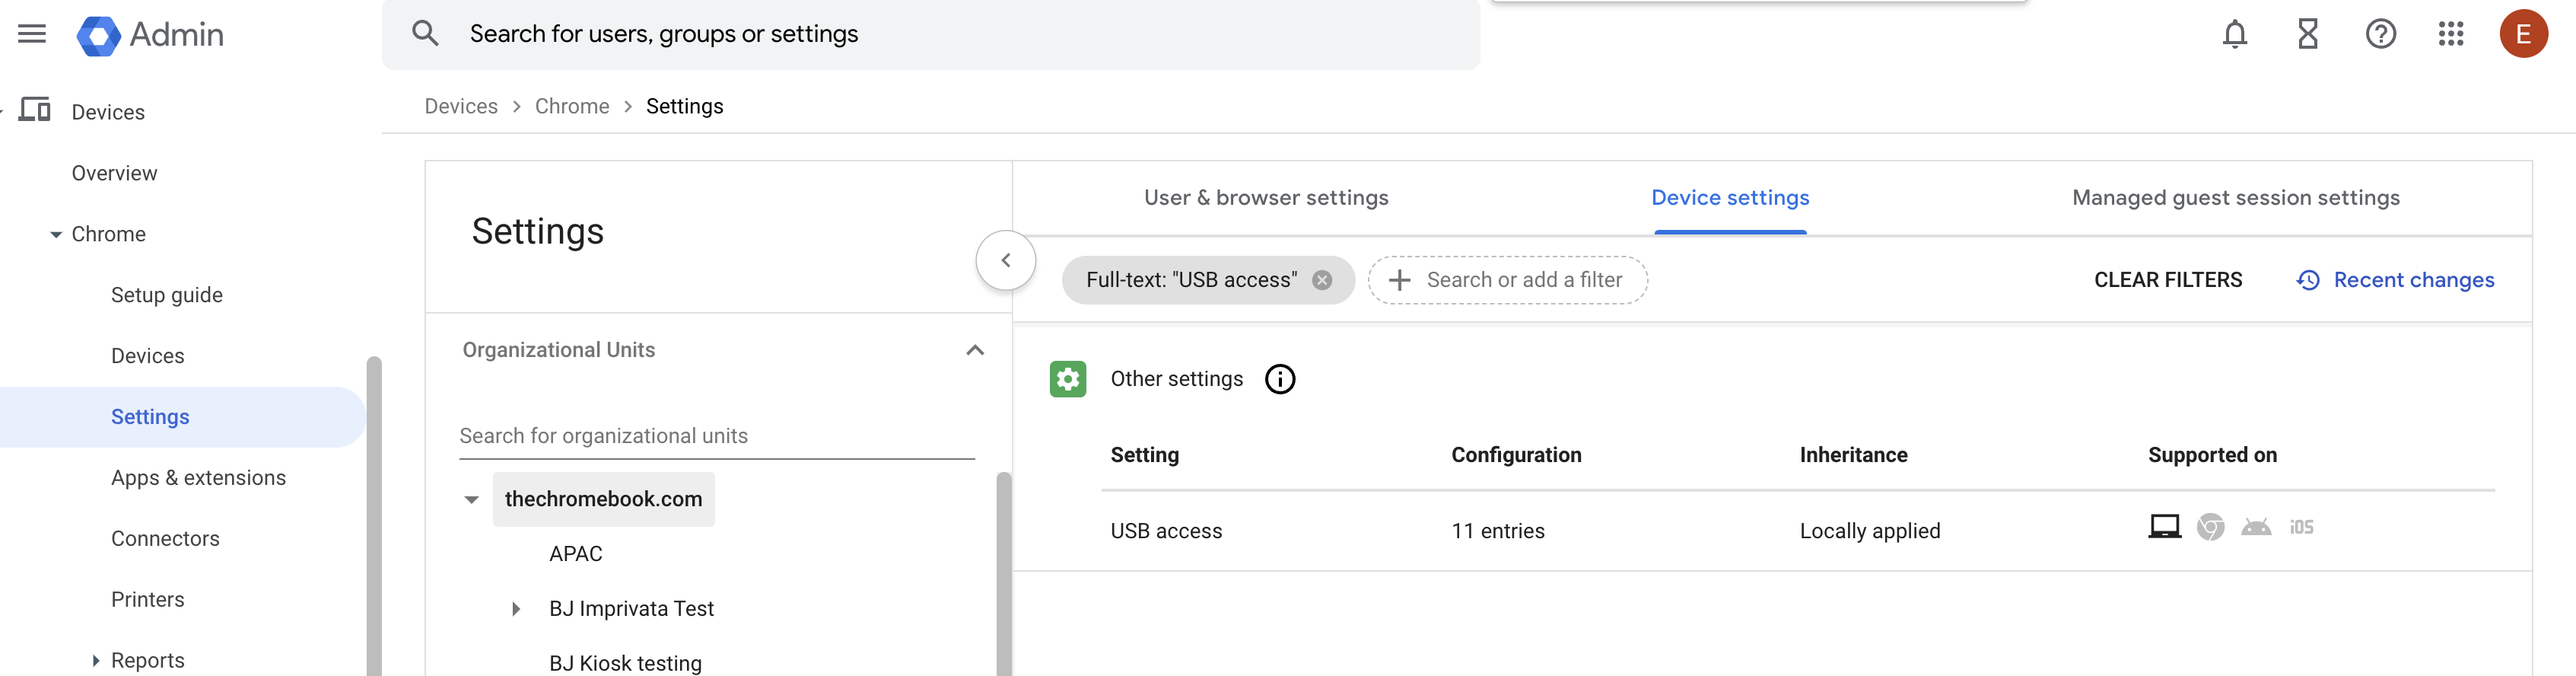
b. Add your device vid:pid.
Note: Vid and pid must be hexadecimal numbers.
c. Click Save on the Google admin. The following screenshot shows an example of Google Admin console.
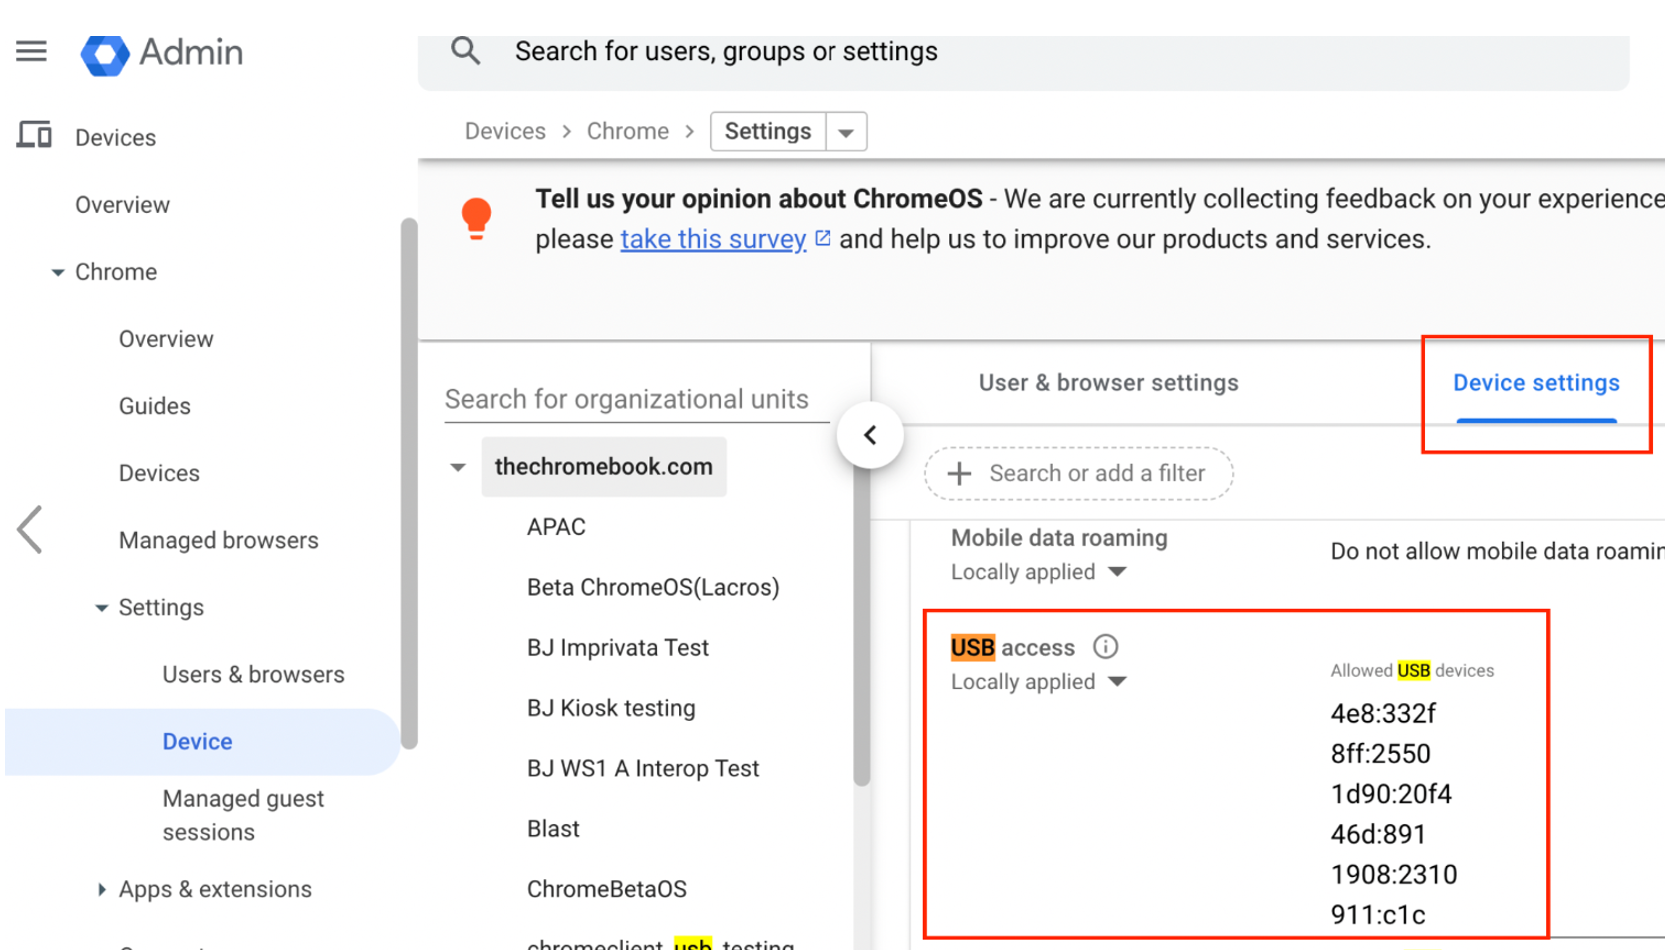
-
After the Google configuration, restart your Chromebook. The settings will be synced to your managed devices. You can verify if the USB configuration is synced from the Google admin:
a. Navigate to Settings > Device > Device Org > User & Browser Settings and search for WebUSB API allowed devices.
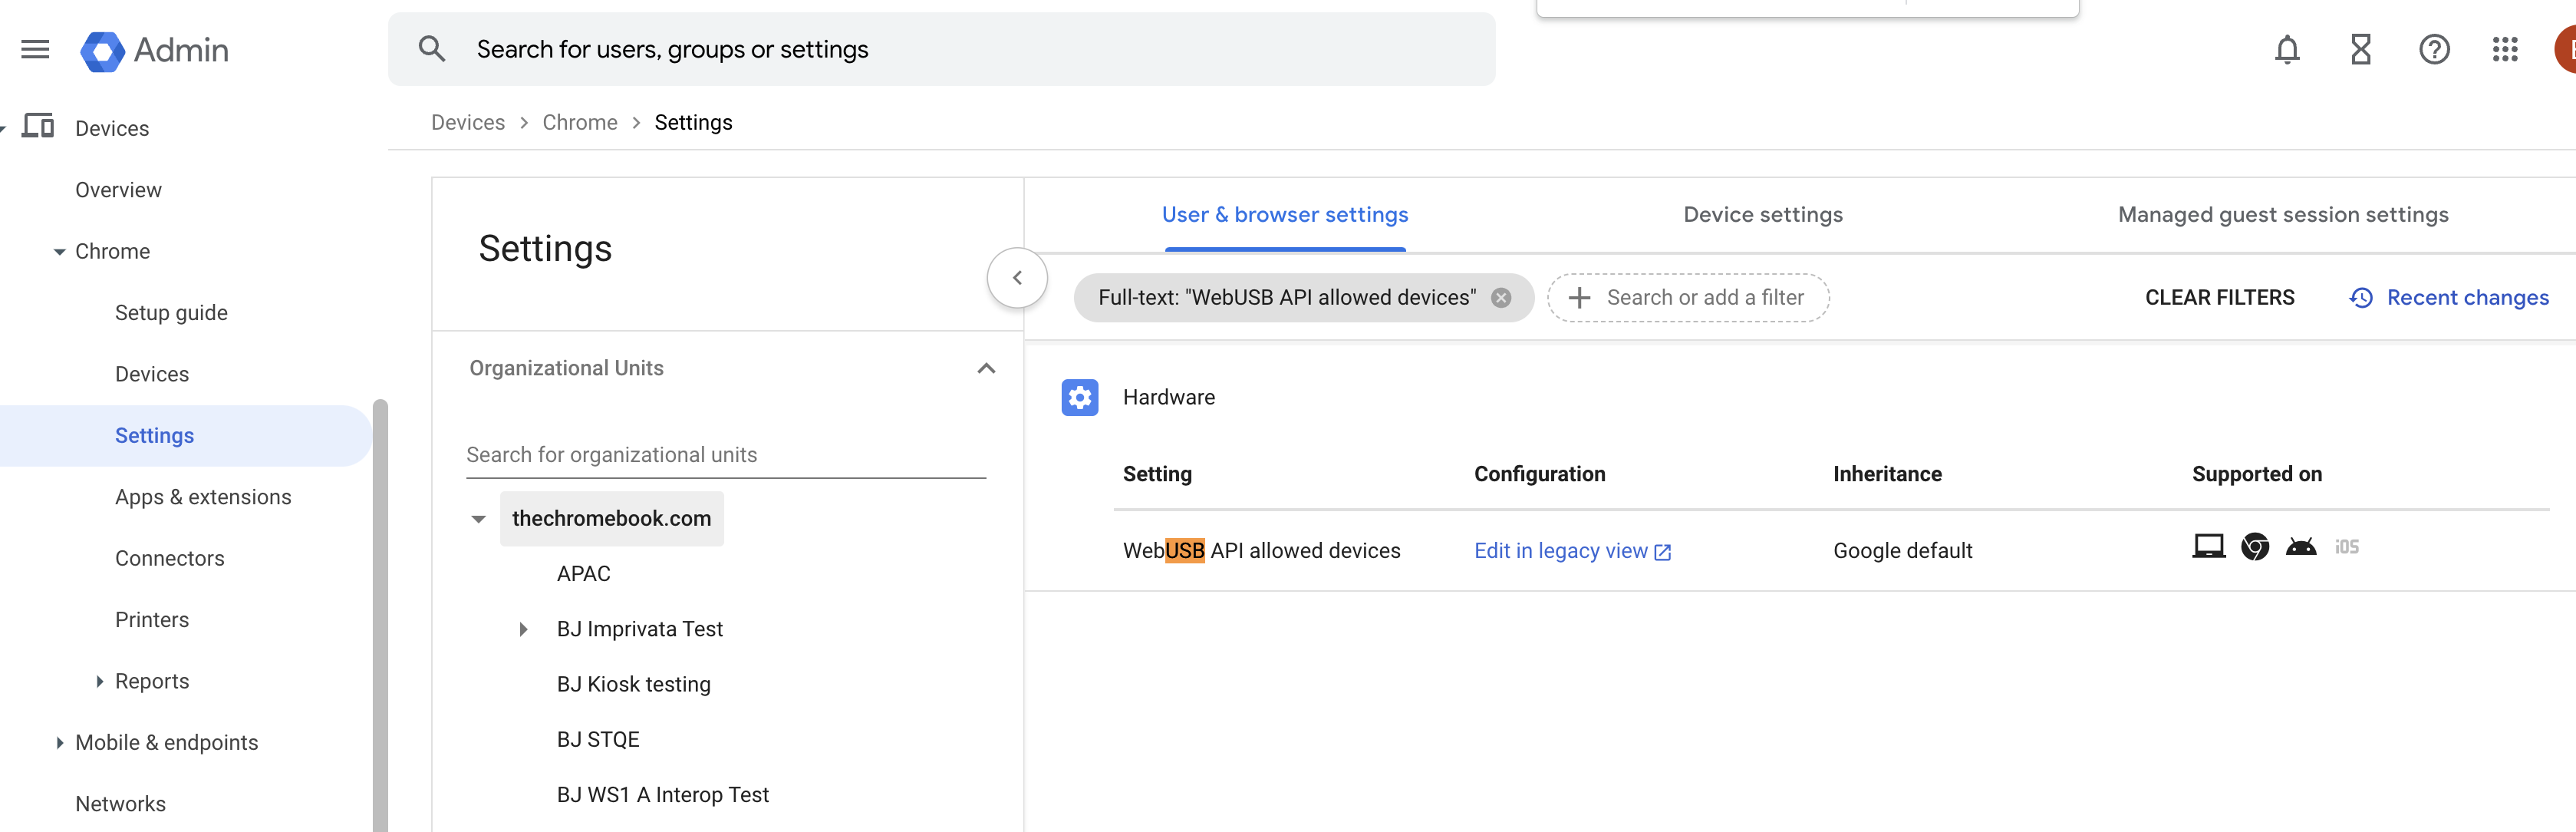
b. Add your applications extension ID.
c. Add your device vid:pid, vid and pid should be in hex.
d. Click Save on the Google admin. The following screenshot shows an example of Google admin console.
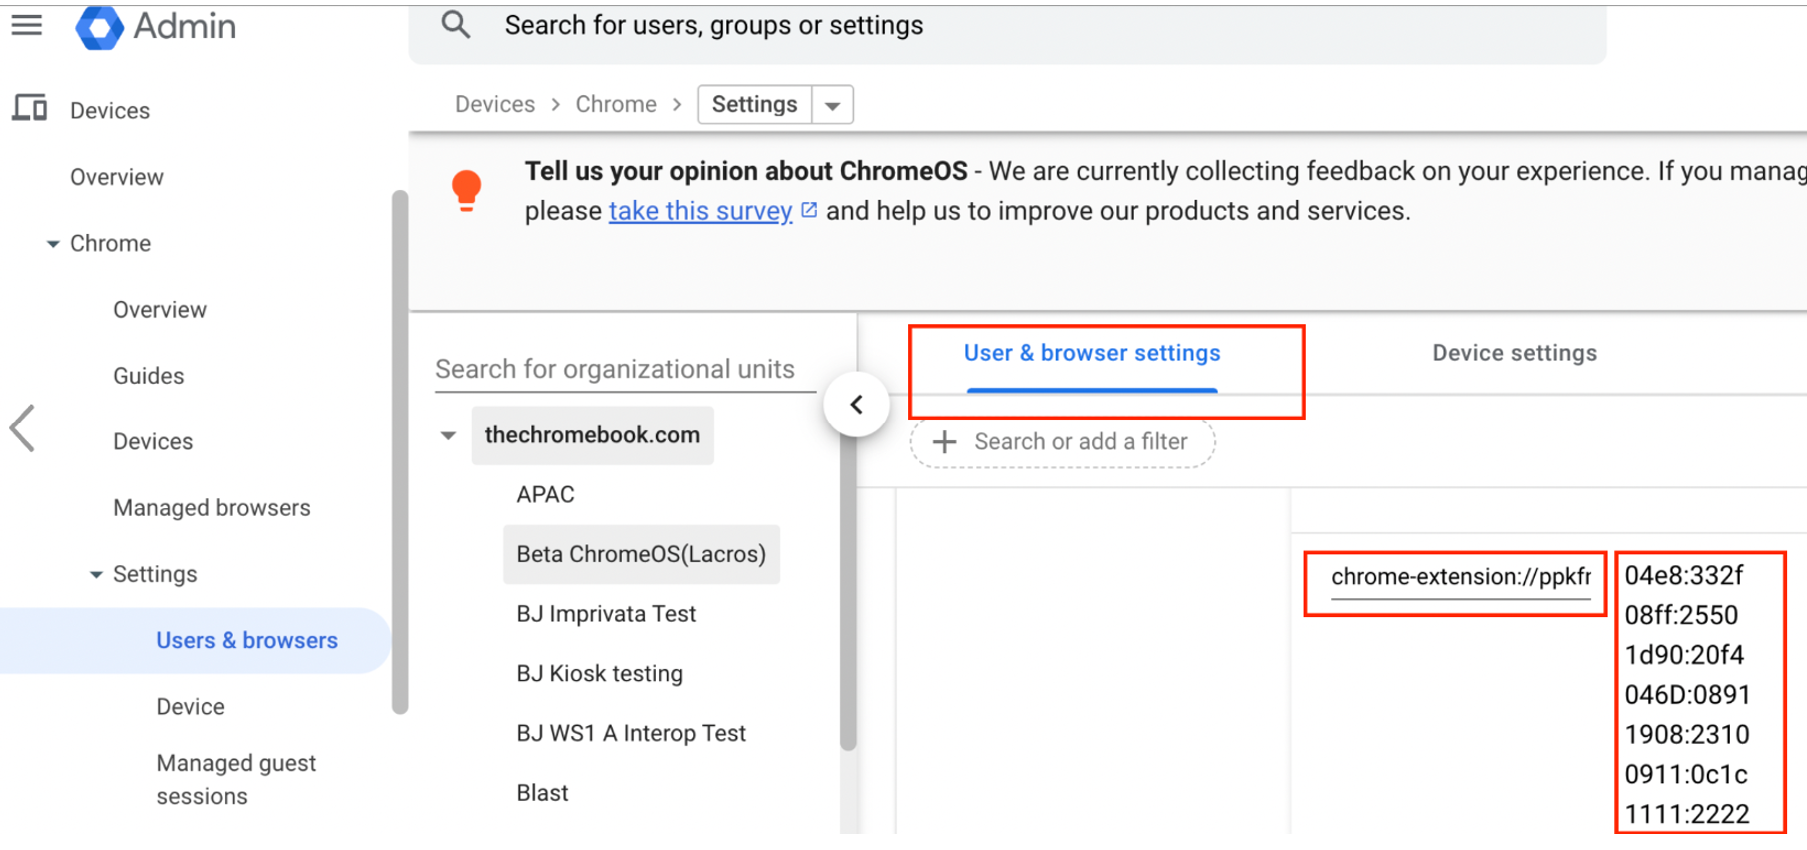
After the google configuration, restart your Chromebook to sync the settings to your managed devices. You can verify if the USB configuration is synced from the Google admin:
- Open a Chrome browser and enter chrome://policy.
- Search for USB in the browser. The USB configuration synced from the Google admin appears.
Identifying the Interfaces to be Excluded
You must identify the interfaces that must be excluded, such as, interfaces with keyboard and audio types. For this release, Omnissa has tested the following USB composite devices, such as, Nuance Powermic 2, Powermic 3, and Yubikey. Other devices might be supported. The following procedure describes the steps to identify the interfaces that must be excluded:
- Plug your device on a Windows PC.
- Open the software vmwUsbview.exe.
- In the USB list, identify your device and the interfaces information. For example, if you have audio interfaces 0, 1, and 2 which must be excluded, you must configure the Agent GPO as
o:vid-0554_pid-1001(exintf:00;exintf:01;exintf:02).
Using USB Redirection
-
Click the USB panel on the top bar.
-
Click Add device to connect your plugged-in USB device.
Was this page helpful?