You can change the appearance of the Horizon web portal page, which is the web page that end users see when they enter the URL for HTML Access. You can also set group policies that control the image quality, the ports used, and other settings.
Configure Horizon HTML Access
You can customize Horizon HTML Access to co-brand Horizon HTML Access with an Omnissa partner. As a result of co-branding, the user interface of the Horizon HTML Access will be a combination of the Omnissa brand and the brand of an Omnissa partner.
Create a Folder For Branding
Before you customize the HTML Access page, create a folder for branding and perform the following steps.
-
Install Omnissa Horizon Connection Server and navigate to the default installation directory.
Note: In the following steps, the installation directory is represented by {CS_INSTALL_DIR}.
-
Create a new folder called rebrandresource, within the C:\ drive.
-
Create the following new folders within
C:\rebrandresourcefolder at the following paths:Folder Name File Path icons C:\rebrandresource\icons bundle C:\rebrandresource\bundle -
Copy all the images to be used for branding into the icons folder. For more information, see the Client Logo section.
-
Copy all the files to be used for branding text into the bundles folder. For more information, see the Client Text section.
-
Navigate to appropriate directory and open the portal-links-html-access.properties file using a text editor.
Note: The
CommonAppDataFolderdirectory is usually in theC:\ProgramDatadirectory. To view theC:\ProgramDatafolder in Windows Explorer, use the Folder Options dialog box to show the hidden folders. -
Open the portal-links-html-access.properties configuration file and add the following lines at the end of the file:
# Configure whether it is rebranded rebrand.enable=true # The rebranding name string, rebrand client page title (ASCII characters only) rebrand.name={NEW_BRAND} # Add the URL of online help system for login page if necessary rebrand.helpURL={NEW_HELP_LINK} # Path to rebranding resource folder (Only ASCII characters and forward slash “/” are supported, e.g. c:/rebrandresource.) cobranding.location=C:/rebrandresource -
Modify the Client download and help links. For more information, see the Client Download and Help Links section.
-
Restart the Horizon Web Component service after all the modification is complete.
Configure the Omnissa Horizon 8 Web Portal Page
On the Horizon 8 Web portal page, the installer icon and the HTML Access icon is enabled by default and the links associated with these icons navigate to the client download page on the Omnissa website. To disable an icon and removea an icon from the web page, perform the following steps:
- Set the Disable HTML Access property to false.
- Use a text editor to open the portal-links-html-access.properties file and modify the properties in the file. For more information on locating the portal-links-html-access.properties file, see the Create a Folder for Branding section.
| Option | Property Setting |
|---|---|
| Disable HTML Access |
enable.webclient=false
If this option is set to false, but the enable.download option is set to true, the user is navigated to a web page for downloading the native Omnissa Horizon Client installer. If both options are set to false, the user receives the following message: "Contact your local administrator for instructions on accessing this Horizon Connection Server." |
| Disable downloading Horizon Client |
enable.download=false
If this option is set to false and the enable.webclient option is set to true, the user is navigated to the HTML Access login web page. If both options are set to false, the user receives the following message: "Contact your local administrator for instructions on accessing this Horizon Connection Server." |
Note: After you configure the Horizon 8 Web portal page, you must restart the Horizon Web Component service.
Client Download and Help Links
In certain scenarios, you might want the links on the Horizon 8 Web portal page to point to an internal web server, or you might want to make specific client versions available on your own server. You can reconfigure the Horizon 8 Web portal page to point to a different download URL by modifying the contents of the portal-links-html-access.properties file.
For example, if you browse to the Horizon 8 Web portal page from a macOS system, the link for the Horizon Client for Mac installer appears. For Linux clients, you can make separate links for 32-bit and 64-bit installers. For Chrome clients, you can substitute the link to Horizon Client for Chrome in the Chrome Web Store.
Note:
-
Privacy policy cannot be modified due to legal issue.
-
For the users to download installers from an external location other than the Omnissa website, copy the installer files on the HTTP server where the installer files reside. This location must correspond to the URLs that you specified in the
portal-links-html-access.propertiesfile or in theoslinks.propertiesfile from the previous step. -
Restart the Horizon Web Component service after the modification is complete.
Use a text editor to open the portal-links-html-access.properties file. For more information on accessing the portal-links-html-access.properties file, see Create a Folder for Branding section.
| Option | Property Setting |
|---|---|
| Change the URL of the Web page for downloading Horizon Client | link.download=https://url-of-web-server Use this property to create your own web page. |
| Change the URL for the Help link in the portal page | link.help By default, this link points to a help system hosted on the Omnissa website. The Help link appears at the bottom of the login page. |
| Change the URL for the Help link in the login page | rebrand.helpURL={NEW_HELP_LINK} Add this setting at the end of the portal-links-html-access.properties file. |
| Create links for specific installers | If you place the installer files in the downloads directory, you can use the relative URLs. |
Note: If the portal-links-html-access.properties file is unavailable or is empty, and the oslinks.properties file exists, then the oslinks.properties file determines the link value for the installer file.
The oslinks.properties file is installed in the installation-directory\..\..\Server\broker\webapps\portal\WEB-INF directory. If this file is missing during the HTML Access session, then by default, the download link directs the users to https://customerconnect.omnissa.com/downloads/#all_products. The file contains the following default values.
Note: The oslinks.properties file can be used only to configure the links to the specific installer files.
Use a text editor to open the oslinks.properties file.
Modifying the Logo in the Client User Interface
You can modify the logo in the client user interface. Before you begin, add any custom files you are using for this process to the C:\rebrandresource\icons folder. If you have not yet created this folder, see Create a Folder for Branding section.
Note: You must copy the new icons with the same size and format.
The following table lists the format and sizing information of the icons in the Horizon 8 Web portal page.
| Description | File Name | Format | Size |
|---|---|---|---|
| Horizon icon on portal page and login page. | logo.png | PNG | 181 x 105 px |
| Horizon icon on portal page and Log in page in 200 dpi | logo@2x.png | PNG | 362 x 210 px |
| Logo on portal, pre-login, and login pages | _logo_ footer.svg | SVG | 83 x 13 px |
The following table lists the format and sizing information of the icons in the Client page.
| Description | File Name | Format | Size |
|---|---|---|---|
| Logo used in the About Horizon Client dialog window. | horizon-icon.svg | SVG | 100 x 100 px |
| Logo on select pages. | logo-horizon.png | PNG | 161 x 57 |
| Logo on select pages in 200 dpi. | logo-horizon2x.png | PNG | 322 x 113 px |
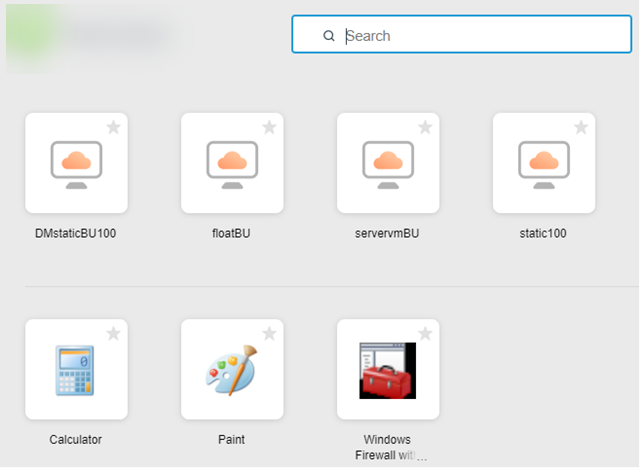
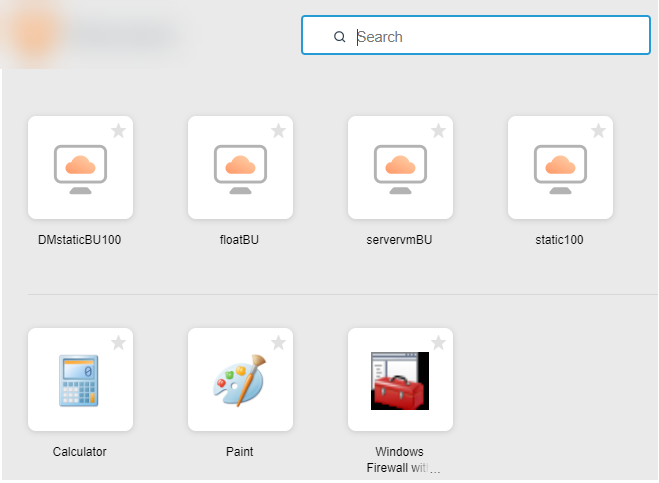
The following images show an example of the appearance of the Horizon 8 Web portal page before and after these changes.
Before applying the changes:
After applying the changes:
Modifying Client Text in the Client User Interface
You can modify the client text in the client user interface. Before you begin, add any custom files you are using for this process to the C:\rebrandresource\bundle folder. If you have not yet created this folder, see Create a Folder for Branding section.
Copy all the files in the folder and place the customized files in the C:\rebrandresource\bundle folder. Modify the following files according to the languages that are supported and convert non-ASCII characters to Unicode format.
| Language | File |
|---|---|
| English | bundle.properties |
| German | bundle_de.properties |
| French | bundle_fr.properties |
| Spanish | bundle_es.properties |
| Japanese | bundle_ja.properties |
| Korean | bundle_ko.properties |
| Chinese Simplified | bundle_zh_CN.properties |
| Chinese Traditional | bundle_zh_TW.properties |
| Others | bundle.properties |
For example, the following text strings in the bundle.properties file can be modified:
| Default Text String | New Text String |
|---|---|
| app.title=Horizon | app.title={NEW_BRAND} |
| logo.icon.alt=Horizon | logo.icon.alt={NEW_BRAND} |
| logo.label.alt=Horizon | logo.label.alt={NEW_BRAND} |
| install.message.first=You can connect to your desktop and applications by using the Horizon Client, or to your desktop through the browser. | install.message.first=You can connect to your desktop and applications by using the {NEW_BRAND}, or to your desktop through the browser. |
| install.message.second=The Horizon Client offers better performance and features. | install.message.second=The {NEW_BRAND}offers better performance and features. |
| native.button.title=Horizon Client | native.button.title={NEW_BRAND} |
| install.native.button.title=Install Horizon client | install.native.button.title=Install {NEW_BRAND}client |
| web.button.title=HorizonHTML Access | web.button.title={NEW_BRAND}HTML Access |
| install.web.button.title=HorizonHTML Access | install.web.button.title={NEW_BRAND}HTML Access |
| download.link.message=To see the full list of HorizonClients, click | download.link.message=To see the full list of {NEW_BRAND} Clients, click |
| download.link.title=Download Horizon | download.link.title=Download {NEW_BRAND} |
| help.link.message=For help with Horizon | help.link.message=For help with {NEW_BRAND}, click |
Modifying Client Text in the Client page
Before you begin, add any custom files for this process to the C:\rebrandresource\ folder. If you have not yet created this folder, see Create a Folder for Branding section. Copy all the files in the {CS_INSTALL_DIR}\webapps\portal\webclient\locale folder and place the customized files in the C:\rebrandresource\ folder. Modify the following files according to the languages that are supported.
| Language | File |
|---|---|
| English | en.json |
| German | de.json |
| French | fr.json |
| Spanish | es.json |
| Japanese | ja.json |
| Korean | ko.json |
| Chinese Simplified | zh_CN.json |
| Chinese Traditional | zh_TW.json |
For example, the following text strings in the en.json file can be modified:
| Default Text String | New Text String |
|---|---|
| "dialog_confirm_logout" : "Are you sure you want to log out of the Horizon Horizon Connection Server?" | "dialog_confirm_logout" : "Are you sure you want to log out of the {NEW_BRAND} Horizon Connection Server?" |
| "header_about_horizon" : "About Horizon " | "header_about_horizon" : "About {NEW_BRAND}" |
| "install_native_client": "Install Horizon Client" | "install_native_client": "Install {NEW_BRAND} Client" |
| "LOGOFF_BROKER": "Log off from Horizon" | "LOGOFF_BROKER": "Log off from {{NEW_BRAND}}" |
| "validation_server_name": "Enter the host name of the Horizon Horizon Connection Server." | "validation_server_name": "Enter the host name of the {{NEW_BRAND}} Horizon Connection Server." |
| "download_rich_client_os_win32": "Download the Horizon Client for Windows (x86)", "download_rich_client_os_win64": "Download the Horizon Client for Windows (x64)", "download_rich_client_os_winmobile": "Download the Horizon Client for Windows UWP", "download_rich_client_os_linux32": "Download the Horizon Client for Linux (x86)", "download_rich_client_os_linux64": "Download the Horizon Client for Linux (x64)", "download_rich_client_os_mac": "Download the Horizon Client for Mac OS X", "download_rich_client_os_android": "Download the Horizon Client for Android", "download_rich_client_os_ios": "Download the Horizon Client for iOS", "download_rich_client_os_chromeos": "Download the Horizon Client for Chrome OS", "download_rich_client_os_unknown": "Download the Horizon Client for a richer experience" | "download_rich_client_os_win32": "Download the {{NEW_BRAND}} Client for Windows (x86)", "download_rich_client_os_win64": "Download the {{NEW_BRAND}} Client for Windows (x64)", "download_rich_client_os_winmobile": "Download the {{NEW_BRAND}} Client for Windows UWP", "download_rich_client_os_linux32": "Download the {{NEW_BRAND}}" Client for Linux (x86)", "download_rich_client_os_linux64": "Download the {{NEW_BRAND}} Client for Linux (x64)", "download_rich_client_os_mac": "Download the {{NEW_BRAND}} Client for Mac OS X", "download_rich_client_os_android": "Download the {{NEW_BRAND}} Client for Android", "download_rich_client_os_ios": "Download the {{NEW_BRAND}} Client for iOS", "download_rich_client_os_chromeos": "Download the {{NEW_BRAND}} Client for Chrome OS", "download_rich_client_os_unknown": "Download the {{NEW_BRAND}} Client for a richer experience" |
Modify HTML Access Tab Logo
Before you begin to modify the HTML Access tab logo, add any custom files for this process to the C:\rebrandresource folder. If you have not yet created this folder, see Create a Folder for Branding section.
Copy the modified file in the C:\rebrandresource folder.
| Filename | Format | Size |
|---|---|---|
| favicon.ico | ICO | 32 × 32 px |
Note: To view the branding updates, end users must clear their browser cache and reload the portal page.
Upgrade HTML Access
Before you upgrade the HTML Access components, take a backup of any changes to the portal-links-html-access.properties file in the <CommonAppDataFolder> folder.
The upgrade process will overwrite any changes to this file.
Using URIs to Configure HTML Access Web Clients
You can use uniform resource identifiers (URIs) to create web or email links for end users. End users can click these links to start HTML Access, connect to a server, and start a remote desktop or published application with specific configuration options.
You create these links by constructing URIs that provide some or all the following information so that end users do not need to supply it.
- Server address
- Port number for the server
- Active Directory user name
- RADIUS or RSA SecurID user name, if different from the Active Directory user name
- Domain name
- Remote desktop or published application display name
- Actions, including browse, reset, log out, and start session
URI Specification
The required syntax includes a path part to specify the server, and, optionally, a query to specify a user, remote desktop or published application, and actions or configuration options.
To create URIs for starting HTML Access, use the following syntax:
https://authority-part[/?query-part]
authority-part
Specifies the server address and, optionally, a non-default port number. Server names must conform to DNS syntax.
To specify a port number, use the following syntax:
server-address:port-number
query-part
Specifies the configuration options to use or the actions to perform. Queries are not case-sensitive. To use multiple queries, use an ampersand (&) between the queries. If queries conflict with each other, the last query in the list is used. Use the following syntax:
query1=value1[&query2=value2...]
Observe the following guidelines when creating the query part:
-
If you do not use at least one of the supported queries, the default Horizon web portal page appears.
-
In the query part, some special characters are not supported, and you must use the URL encoding format for them, as follows: For the pound symbol (#) use
%23, for the percent sign (%) use%25, for the ampersand (&) use%26, for the at sign (@) use%40, and for the backslash (\) use%5C.For more information about URL encoding, go to http://www.w3schools.com/tags/ref_urlencode.asp.
-
In the query part, non-ASCII characters must first be encoded according to UTF-8 [STD63], and then each octet of the corresponding UTF-8 sequence must be percent-encoded to be represented as URI characters.
For information about encoding for ASCII characters, see the URL encoding reference at http://www.utf8-chartable.de/.
Supported Queries
This topic lists the queries that are supported for HTML Access. If you are creating URIs for multiple types of clients, such as desktop clients and mobile clients, see the guide document for each type of client system.
action
| Value | Description |
|---|---|
| browse | Displays a list of available remote desktops and published applications hosted on the specified server. You are not required to specify a remote desktop or published application when you use this action. |
| start-session | Starts the specified remote desktop or published application. If no action query is provided and the remote desktop or published application name is provided, start-session is the default action. |
| reset | Shuts down and restarts the specified remote desktop. Unsaved data is lost. Resetting a remote desktop is the equivalent of pressing the Reset button on a physical PC. This action is not valid for a published application. |
| logoff | Logs the user out of the guest operating system in the remote desktop. This action is not valid for a published application. |
| restart | Shuts down and restarts the primary remote desktop after the user confirms the restart operation request. This action is not valid for a published application. |
applicationId
The published application display name. The display name is the name specified in Omnissa Horizon Console when the application pool was created. If the display name contains a space, the browser uses %20 to represent the space.
args
Specifies command-line arguments to add when starting a published application. Use the syntax args=value, where value is a string. Use percent encoding for the following characters:
- For a colon (:), use
%3A - For a back slash (\), use
%5C - For a space ( ), use
%20 - For a double quotation mark ("), use
%22
For example, to specify the filename "My new file.txt" for the Notepad++ application, use %22My%20new%20file.txt%22.
desktopId
The remote desktop display name. The display name is the name specified in Horizon Console when the desktop pool was created. If the display name contains a space, the browser uses %20 to represent the space.
domainName
The NETBIOS domain name associated with the user who is connecting to the remote desktop or published application. For example, use mycompany rather than mycompany.com.
tokenUserName
The RSA or RADIUS user name. Use this query only if the RSA or RADIUS user name is different from the Active Directory user name. If you do not specify this query and RSA or RADIUS authentication is required, the Windows user name is used.
userName
The Active Directory user who is connecting to the remote desktop or published application. The user name can be in one of the following formats:
- userName
- domainName%5CuserName
- user principal name (UPN), that is, userName@domainName
unauthenticatedAccessEnabled
When this option is set to true, the Unauthenticated Access feature is enabled by default. HTML Access starts and an anonymous user account appears. An example of the syntax is unauthenticatedAccessEnabled=true.
unauthenticatedAccessAccount
Sets the account to use if the Unauthenticated Access feature is enabled. If Unauthenticated Access is deactivated, then this query is ignored. An example of the syntax using the anonymous1 user account is unauthenticatedAccessAccount=anonymous1
webviewMode
When this option is set to true, the remote session starts in webview mode. In webview mode, the HTML Access sidebar is hidden. Webview mode also enables certain third-party mobile apps to do the following:
- Send events from the soft keyboard to the remote desktop
- Use the mobile app interface to switch between native touch mode and trackpad touch mode in HTML Access
URI Syntax Examples
Each of the following URI examples is followed by a description of what the end user sees after clicking the URI link. Queries are not case-sensitive, for example, you can use domainName or domainname.
-
https://horizon.mycompany.com/?domainName=finance&userName=fred
HTML Access starts and connects to the horizon.mycompany.com server. In the login box, the User name text box is populated with the name fred, and the Domain text box is populated with finance. The user must supply only a password.
-
https://horizon.mycompany.com/?userName=finance%5Cfred
HTML Access starts and connects to the horizon.mycompany.com server. In the login box, the User name text box is populated with the name finance\fred. The user must supply only a password.
-
https://horizon.mycompany.com/?userName=fred@finance
HTML Access starts and connects to the horizon.mycompany.com server. In the login box, the User name text box is populated with the name fred@finance. The user must supply only a password.
-
https://horizon.mycompany.com/?desktopId=Primary%20Desktop&action=start-session
HTML Access starts and connects to the horizon.mycompany.com server. The login box prompts the user for a user name, domain name, and password. After a successful login, the client connects to the remote desktop that has the display name Primary Desktop and the user is logged in to the guest operating system.
-
https://horizon.mycompany.com/?applicationId=Notepad&action=start-session
HTML Access starts and connects to the horizon.mycompany.com server. The login box prompts the user for a user name, domain name, and password. After a successful login, the Notepad application starts.
-
https://horizon.mycompany.com:7555/?desktopId=Primary%20Desktop
This URI has the same effect as the previous example, except that it uses the non-default port 7555 for the server. The default port is 443. Because a remote desktop identifier is provided, the remote desktop starts even though the start-session action is not included in the URI.
-
https://horizon.mycompany.com/?applicationId=Primary%20Application&desktopId=Primary%20Desktop
This URI specifies both a published application and a remote desktop. When you specify both a published application and a remote desktop, only the remote desktop starts.
-
https://horizon.mycompany.com/?desktopId=Primary%20Desktop&action=reset
HTML Access starts and connects to the horizon.mycompany.com server. The login box prompts the user for a user name, domain name, and password. After a successful login, the client displays a dialog box that prompts the user to confirm the reset operation for Primary Desktop.
Note: This action is available only if an administrator has allowed end users to reset their machines.
-
https://horizon.mycompany.com/?My%20Notepad++&args=%22My%20new%20file.txt%22
Opens My Notepad++ on server horizon.mycompany.com and passes the argument My new file.txt in the application start command. The filename is enclosed in double quotes because it contains spaces.
-
https://horizon.mycompany.com/?Notepad++%2012&args=a.txt%20b.txt
Opens Notepad++ 12 on server horizon.mycompany.com and passes the argument a.text b.txt in the application start command. Because the argument is not enclosed in double quotes, a space separates the filenames and the two files are opened separately in Notepad++.
Note: Applications can differ in the way that they use command-line arguments. For example, if you pass the argument a.txt b.txt to WordPad, WordPad opens only one file, a.txt.
-
https://horizon.mycompany.com/?desktopId=Primary%20Desktop&action=restart
HTML Access starts and connects to the horizon.mycompany.com server. The login box prompts the user for a user name, domain name, and password. After a successful login, the client displays a dialog box that prompts the user to confirm the restart operation for Primary Desktop.
Note: This action is available only if an administrator has allowed end users to restart their machines.
-
https://horizon.mycompany.com/?unauthenticatedAccessEnabled=true&unauthenticatedAccessAccount=anonymous_user1
HTML Access starts and connects to the horizon.mycompany.com server using the anonymous_user1 account.
HTML Code Examples
You can use URIs to make hypertext links and buttons to include in emails or on web pages. The following examples show how to use the URI from the first URI example to code a hypertext link that reads Test Link and a button that reads TestButton.
<html>
<body>

<a href="https://horizon.mycompany.com/?domainName=finance&userName=fred">Test Link</a><br>

<form><input type="button" value="TestButton" onClick="window.location.href=
'https://horizon.mycompany.com/?domainName=finance&userName=fred'"></form> <br>

</body>
</html>
Configure Horizon 8 to Remove Credentials From Cache
You can configure Horizon 8 to remove a user's credentials from cache when a user closes a tab that connects to a remote desktop or published application, or closes a tab that connects to the desktop and application selection window.
When this feature is turned off (the default setting), the credentials remain in cache.
When you enable this feature, the credentials are also removed from cache when a user refreshes the desktop and application selection page or the remote session page, or runs a URI command in the tab that contains the remote session. If the server presents a self-signed certificate, the credentials are removed from cache after a user starts a remote desktop or published application and accepts the certificate when the security warning appears.
Enabling this feature also affects how HTML Access behaves when it is launched from Omnissa Workspace ONE. For more information, see the Workspace ONE documentation.
Procedure
- In Horizon Console, select Settings > Global Settings, click the General Settings tab, and click Edit.
- Select the Clean Up Credential When Tab Closed for HTML Access check box.
- To save your changes, click OK.
Results
Your changes take effect immediately. You do not need to restart Horizon Connection Server.
HTML Access Group Policy Settings
HTML Access uses the Omnissa Horizon Blast protocol. You configure group policies for HTML Access by configuring group policies for the Horizon Blast protocol.
For more information, see Configuring Policies for Desktop and Application Pools and Horizon Blast Policy Settings sections in the Horizon Remote Desktop Features and GPOs guide.
Configuring Autoplay in Safari
When using HTML Access in Safari, users might see the Click to enable audio dialog box when they start a remote desktop or published application for the first time, or when they refresh the browser while using a remote desktop or published application. If users click OK in this dialog box, audio plays normally.
You can prevent this dialog box from appearing by configuring the autoplay policy in the browser. For example, for Safari on a Mac, select Safari > Settings for This Website, move the mouse to the right of Auto-Play, click the drop-down menu, and select Allow All Auto-Play.
Configure Media Optimization for Microsoft Teams in HTML Access
This topic describes how to configure the Media Optimization for Microsoft Teams feature for the HTML Access Web client. Support for Media Optimization for Microsoft Teams in HTML Access is dependent on the launch of the WebRTC 1.0 update for Microsoft software.
The Media Optimization for Microsoft Teams feature redirects media processing of audio calls, video calls, and desktop shares to be handled by the client machine instead of the agent machine. For detailed information about the feature, see Configuring Media Optimization for Microsoft Teams section.
Prerequisites
The Media Optimization for Microsoft Teams feature is dependent on Microsoft's launch of the WebRTC 1.0 update for its products. At the time of this writing, Microsoft has released WebRTC 1.0, so this feature is turned on by default for HTML Access. You can view the current status of the WebRTC 1.0 update by visiting the Microsoft website, navigating to the Microsoft 365 roadmap page, and searching for "VDI".
Procedure
-
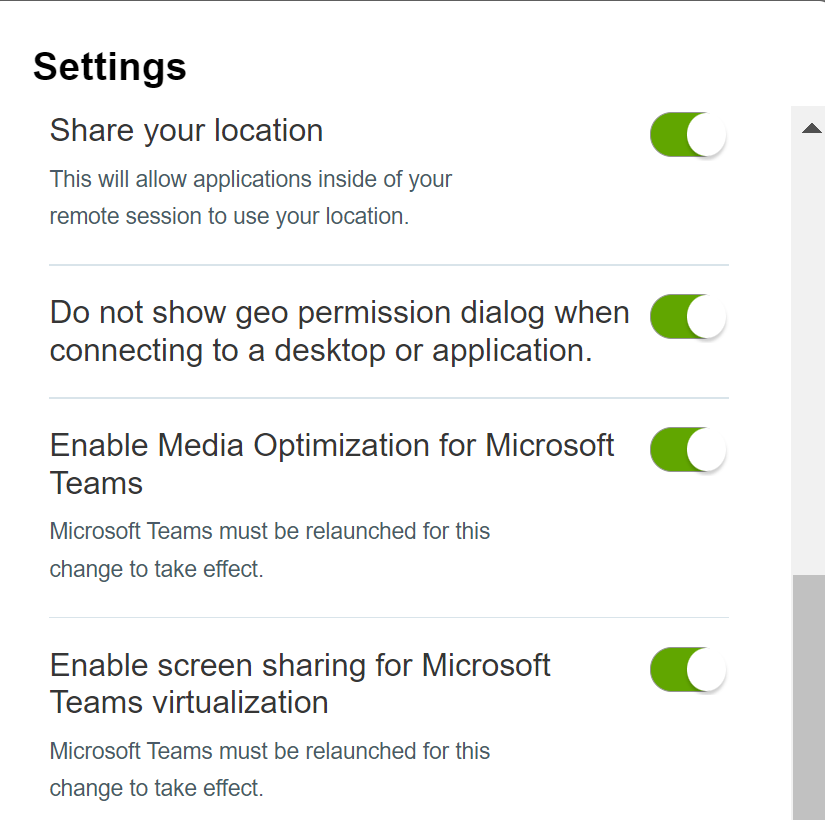
Click the Settings toolbar button in the upper-right corner of the desktop and application selector window.
-
Turn on or turn off the Enable Media Optimization for Microsoft Teams option.
This option is turned on by default.
-
If you have enabled Media Optimization for Microsoft Teams, specify whether to allow screen-sharing capabilities in Microsoft Teams.
- To allow screen-sharing capabilities, turn on the Enable screen sharing for Microsoft Teams virtualization option. Screen shares will be redirected to the client machine for media processing.
- To block screen-sharing capabilities, turn off the Enable screen sharing for Microsoft Teams virtualization option. Screen-sharing controls will be unavailable in Microsoft Teams.
-
Click Close to save your changes.
Configure Horizon 8 Client Data Sharing With the CEIP
If an administrator has opted to participate in the Omnissa Customer Experience Improvement Program (CEIP), Omnissa collects and receives anonymous data from client systems through Horizon Connection Server. You can configure whether to share this client data with Horizon Connection Server.
For information about configuring Horizon 8 to join the CEIP, see the Horizon 8 Administration document.
Data sharing is enabled by default in HTML Access. You cannot change the data sharing setting after you connect to a server.
A Horizon administrator can turn off data sharing in HTML Access for all users and prevent users from changing the data sharing setting in HTML Access. For more information, see Turning off Horizon 8 Data Sharing With the CEIP for all HTML Access Users section.
The following table shows the Client Data Collected for the CEIP.
| Description | Field name | Is This Field Made Anonymous? | Example Value |
|---|---|---|---|
| Company that produced the application | <client_vendor> | No | Omnissa |
| Product name | <client_product> | No | Horizon HTML Access |
| Client product version | <client_version> | No | 2012-8.1.0-xxxxxxxx |
| Client binary architecture | <client_arch> | No | Examples include the following values:
|
| Native architecture of the browser | <browser_arch> | No |
Examples include the following values:
|
| Browser user agent string | <browser_user_agent> | No |
Examples include the following values:
|
| Browser's internal version string | <browser_version> | No | Examples include the following values:
|
| Browser's core implementation | <browser_core> | No |
Examples include the following values:
|
| Whether the browser is running on a handheld device | <browser_is_handheld> | No | true |
- Click Settings (gear icon) on the Horizon web portal page.
- Toggle the Allow data sharing option to on or off.
Was this page helpful?