This section describes the required steps to prepare the Azure environment before creating any Unified Access Gateway instances and PowerShell commands to deploy Unified Access Gateway 2111 or later to Microsoft Azure.
Procedure
- Prepare the Windows or Ubuntu client for the PowerShell deployment
- Prepare the Microsoft Azure Environment
- Upload the Unified Access Gateway Image to Microsoft Azure and create managedImage
- Prepare an INI file for Microsoft Azure deployment
- Deploy Unified Access Gateway to Azure with the uagdeployaz.ps1 PowerShell command
Step 1: Prepare your Windows or Ubuntu client for the PowerShell deployment
-
Open the PowerShell command window with administrative rights.
-
Run the command
Install-Module -Name Az -Force. -
To log in to your Azure environment, run the command
connect-AzAccount.
Recommended Operating Systems for running the PowerShell deployment script
The following table lists the operating systems from which PowerShell based Unified Access Gateway deployment to Microsoft Azure can be executed. This does not refer to the operating system of the Unified Access Gateway appliance itself.
| Operating System | Recommended OS Version |
|---|---|
| Windows | 10 and 11 |
| Ubuntu | 20.04, 22.04, 24.04 |
Step 2: Prepare the Microsoft Azure Environment
- Register UseStandardSecurityType feature in the subscription.
Currently, Unified Access Gateway supports Standard launch method. Microsoft recommends to explicitly register theUseStandardSecurityTypefeature in the subscription to enable Standard launch. For more information, see the note mentioned in the Microsoft FAQ Can I disable Trusted Launch for a new VM deployment?.
- Check if the
UseStandardSecurityTypefeature is already registered.
Get-AzProviderFeature -FeatureName UseStandardSecurityType -ProviderNamespace Microsoft.Compute - If the feature is in
Unregisteredstate, run this command.
Register-AzProviderFeature -FeatureName UseStandardSecurityType -ProviderNamespace Microsoft.Compute - Wait for registration to complete. Run this command to check the status.
Get-AzProviderFeature -FeatureName UseStandardSecurityType -ProviderNamespace Microsoft.Compute
The status should showRegistered. - When the registration is complete, refresh the resource provider.
Register-AzResourceProvider -ProviderNamespace Microsoft.Compute
-
Add a group named Azure Resource Group in to which Unified Access Gateway appliances are deployed. You can add using the Azure Portal web interface, or by running the PowerShell command as in this example:
$resourceGroup="uagrg" $location="uk south" New-AzResourceGroup -Name $resourceGroup -Location $location -
Add a storage account, and a blob container called
virtual-diskwithin that storage account. It is to store the Unified Access Gateway images. You can add using the Azure Portal web interface, or by running the PowerShell commands as in this example:New-AzStorageAccount -ResourceGroupName $resourceGroup -AccountName uagstore ` -Location $location -SkuName Standard_LRS New-AzRmStorageContainer -Name virtual-disk -ResourceGroupName $resourceGroup ` -StorageAccountName uagstore
4. Create a Virtual Network with a default subnet.
```
New-AzVirtualNetwork -Name VirtualNetwork -ResourceGroupName $resourceGroup `
-Location $location -AddressPrefix "10.0.0.0/16"
```
5. Alternatively, the virtual network can have specified subnets so they can be specified as follows.
```
$frontendSubnet = New-AzVirtualNetworkSubnetConfig -Name frontendSubnet `
-AddressPrefix "10.0.1.0/24"
$backendSubnet = New-AzVirtualNetworkSubnetConfig -Name backendSubnet `
-AddressPrefix "10.0.2.0/24"
New-AzVirtualNetwork -Name VirtualNetwork -ResourceGroupName $resourceGroup `
-Location $location -AddressPrefix "10.0.0.0/16" -Subnet $frontendSubnet,$backendSubnet
```
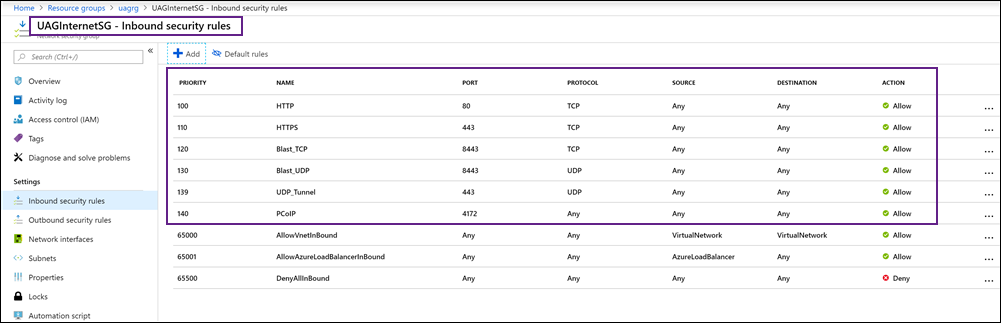
6. If the Unified Access Gateway appliance is to be directly accessed from the Internet, add a security group called UAGInternetSG to control the inbound port access from the Internet to each Unified Access Gateway. You can add a security group using the portal or with PowerShell. This security group can be shared by several Unified Access Gateway appliances. For example, with the Horizon access, allow the following ports:
-   HTTPS - TCP 443
-   HTTP - TCP 80
-   Blast -TCP 8443
-   Blast/BEAT UDP 8443
-   UDP Tunnel - UDP 443
-   PCoIP - TCP and UDP 4172
-
(Optional) Run either of the following commands to add a public IP address object.
Option 1:
New-AzRmPublicIpAddress -Name UAG1PublicIP -ResourceGroupName $resourceGroup -AllocationMethod Static -Location $locationOption 2: To create IP on a specific zone
$ipName="UAG1PublicIP"
$alloc="Static"
$sku="Standard"
$zone="3"

New-AzPublicIpAddress -ResourceGroupName $resourceGroup -Name $ipName -Location
$location -AllocationMethod $alloc -Sku $sku -Zone $zone
For more information about the PowerShell commands, see Microsoft Azure PowerShell Documentation.
Results
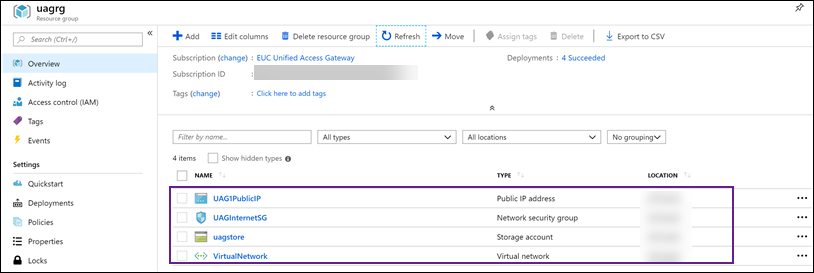
The objects are displayed in the Azure portal.
Step 3: Upload the Unified Access Gateway Image to Microsoft Azure and create managedImage
-
Obtain a Unified Access Gateway
.vhdimage file of the specific Unified Access Gateway version from Omnissa. -
Use the following example PowerShell commands to upload the
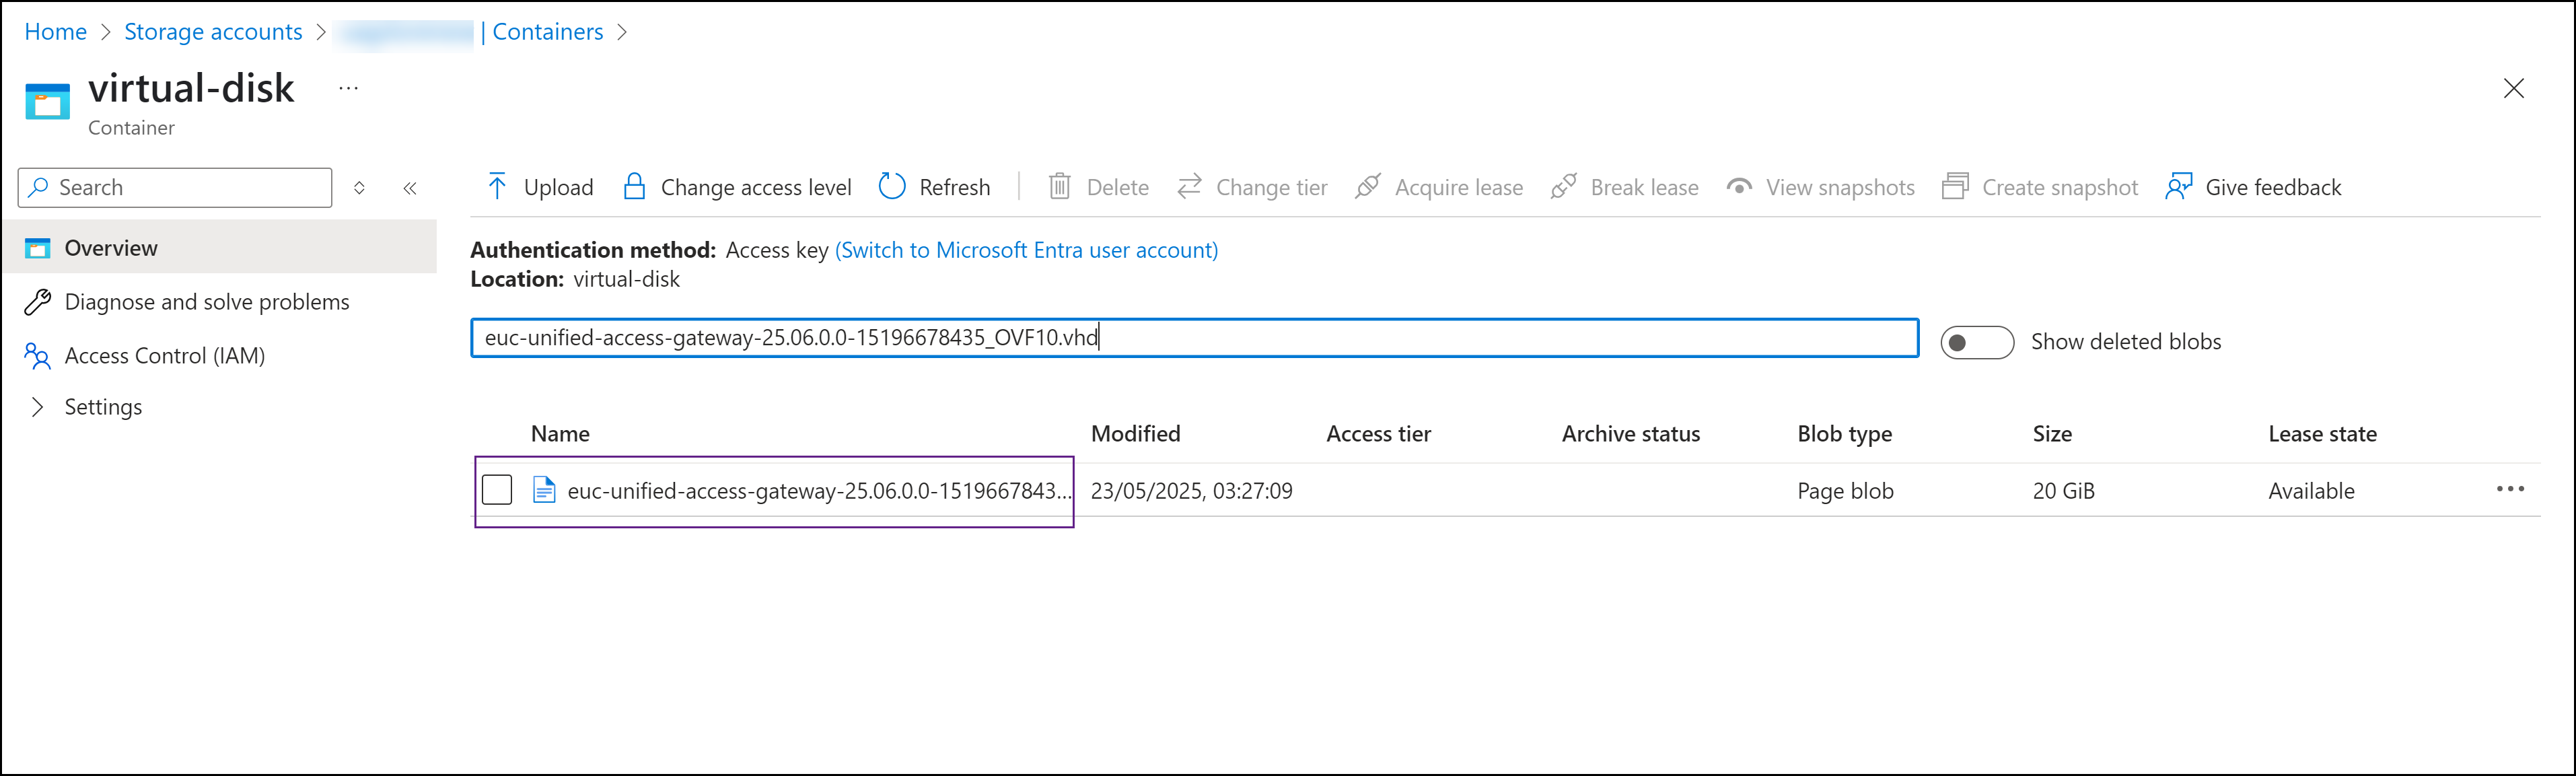
.vhdimage to thevirtual-diskcontainer created earlier and create a managed image.$imageURI = "https://<storage_account_name>.blob.core.windows.net/virtual-disk/euc-unified-access-gateway-25.06.0.0-15196678435_OVF10.vhd"$imagePath = "E:\UAGImages\euc-unified-access-gateway-25.06.0.0-15196678435_OVF10.vhd"$location="<Azure region name>"$imageid= "euc-unified-access-gateway-25.06.0.0-15196678435_OVF10.vhd"Add-AzVhd -ResourceGroupName $resourceGroup -LocalFilePath $imagePath ` -Destination $imageURI -NumberOfUploaderThreads 32$imageConfig = New-AzImageConfig -Location $location $imageConfig = Set-AzImageOsDisk -Image $imageConfig -OsType Linux -OsState Generalized -BlobUri $imageURI $image = New-AzImage -ImageName $imageName -ResourceGroupName $resourceGroup -Image $imageConfigThe uploaded .vhd image is listed in the virtual-disk container.
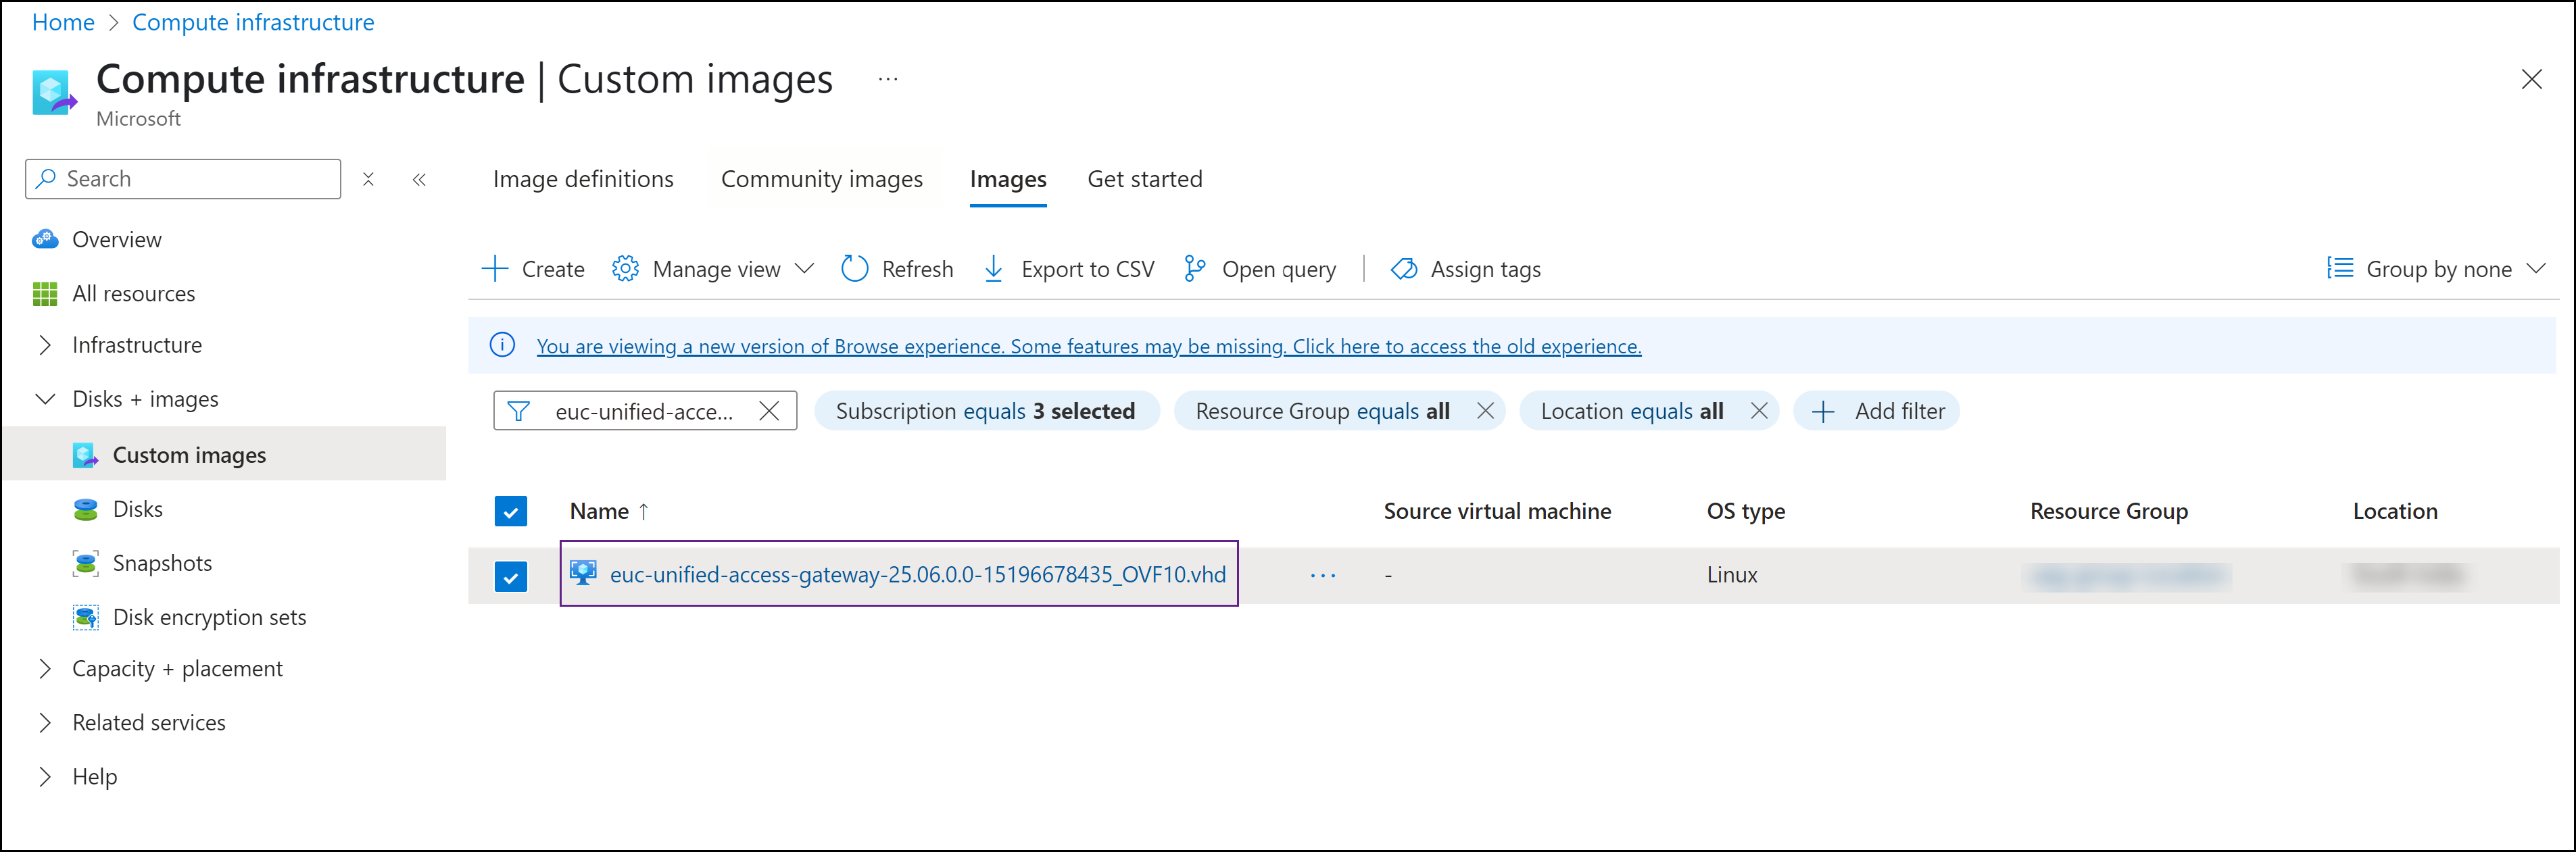
The new image created is listed in the Custom images section.
Step 4: Prepare an INI file for Microsoft Azure deployment
Most sections of the INI file are identical to the standard INI settings for Unified Access Gateway as supported for vSphere, Hyper-V, and Azure deployments.
For Microsoft Azure deployments, the following settings in the General section are not used. For more information about the other settings in the General section, see PowerShell Deployment Parameters.
diskModedsfoldernetInternetnetManagementNetworknetmask0,netmask1,netmask2netBackendNetworksourcetargetip0,defaultGateway,netmask0,ipmode0v6ip0,v6ipprefix0,v6DefaultGateway
For Microsoft Azure, there is a new group called [Azure] that contains all the settings specific to Microsoft Azure deployments.
Settings Specific to Azure Deployments
| Value | Example | Description |
|---|---|---|
location | location=uksouth | Azure location for the Unified Access Gateway deployment. |
networkSecurityGroupName0 | networkSecurityGroupName0=UAGInternetSG | (Optional) Azure network security group name for the eth0 NIC. |
networkSecurityGroupName1 | networkSecurityGroupName1=UAGManagementSG | (Optional) Azure network security group name for the eth1 NIC. |
networkSecurityGroupName2 | networkSecurityGroupName2=UAGBackendSG | (Optional) Azure network security group name for the eth2 NIC. |
publicIpAddrResourceGroupName | publicIpAddrResourceGroupName=UAG1PublicIP0 | (Optional) Azure public IP address object name for eth0 NIC. |
publicIPAddressName1 | publicIPAddressName1=UAG1PublicIP1 | (Optional) Azure public IP address object name for eth1 NIC. |
publicIPAddressName2 | publicIPAddressName2=UAG1PublicIP2 | (Optional) Azure public IP address object name for eth2 NIC. |
resourceGroupName | resourceGroupName=uagrg | Name of the resource group for the Unified Access Gateway deployment. |
subnetName0 | subnetName0=subneta | (Optional) Subnet name for eth0 NIC subnet within the specified virtual network. If it is not set, it uses the default subnet for the virtual network. |
subnetName1 | subnetName1=subnetb | (Optional) Subnet name for eth1 NIC subnet within the specified virtual network. If it is not set, it uses the default subnet for the virtual network. |
subnetName2 | subnetName2=subnetc | (Optional) Subnet name for eth2 NIC subnet within the specified virtual network. If it is not set, it uses the default subnet for the virtual network. |
subscriptionID | subscriptionID=12345678-1234-1234-1234-123456788901 | Azure account subscription ID. |
virtualNetworkName | virtualNetworkName=vnet1 | Azure Virtual Network name. |
vmSize | vmSize=Standard_A2_v2 | Azure VM image size. |
zone | zone=2 | Zone number of the location. |
managedImageName | managedImageName=euc-unified-access-gateway-xx.xx.0.0-xxxx | Azure managed image name. |
vNetResourceGroupName | vNetResourceGroupName=uagtest | (Optional) Network resource group name. If key is not provided, the resourceGroupName is considered. |
nsgResourceGroupName | nsgResourceGroupName=resourceGroupName | (Optional) Resource group of network security group. If key is not provided, the resourceGroupName is considered. |
publicIpAddrResourceGroupName | publicIpAddrResourceGroupName=UAG1PublicIP0 | (Optional) Azure network security group name for the resource group. If key is not provided, the resourceGroupName is considered. |
Example of an INI File
[General]
#name indicates the name of the Azure virtual machine
name=UAG11

#uagName indicates the UAG OS hostname and must be the same as the Azure virtual machine name
uagname=UAG11

deploymentOption=twonic

[Azure]
subscriptionID=12345678-1234-1234-1234-123456788901
resourceGroupName=uagrg
location=uk south
managedImageName=euc-unified-access-gateway-xx.0x.0.0-xxxxx
vmSize=Standard_A2_v2
virtualNetworkName=vnet1

# eth0 settings
subnetName0=subneta
publicIpAddrResourceGroupName=UAGPublicIP0
networkSecurityGroupName0=UAGInternetSG

# eth1 settings
subnetName1=subnetb
Step 5: Deploy Unified Access Gateway to Azure with the uagdeployaz.ps1 PowerShell command
-
From the Omnissa Customer Connect, go to Unified Access Gateway (UAG) PowerShell Scripts file and click DOWNLOAD NOW.
A zip fileuagdeploy-xx.xx.x.x-xxxxxxxxis downloaded on your local machine. -
Extract the files from the zip file. Ensure that the following PowerShell scripts are available on your machine.
uagdeployaz.ps1anduagdeploy.psm1 -
Open PowerShell window and run the command.
uagdeployaz.ps1 <file_name>.ini
Where,<ini-filename>is the name of the.inifile prepared in the earlier tasks.
For example:.\uagdeployaz.ps1 uag1.ini -
Enter the admin and root password when prompted. For more information about the root user and admin password requirements, see Password requirements.
Alternatively, you can use non-interactive mode to deploy. See Non-Interactive mode deployment parameters.
After a successful deployment, a virtual machine is created on Microsoft Azure.
What to do next
Using the IP information, login to the virtual machine to ensure all services are working as expected.
Login to the admin UI with https://uag-ip:9443 and configure the settings based on your requirement. See Configure Horizon Settings.
Was this page helpful?