Omnissa Workspace ONE XR Hub lets you customize the user environment on VR devices by using your own image files, stylesheets, and 3D models. These files can be hosted by your company at an internet-accessible URL or deployed to devices using Workspace ONE UEM.
Note: 3 Degrees of Freedom (3DoF) devices track only 3 degrees of rotational movement for the device and controller(s). 6 Degrees of Freedom (6Dof) devices track both translational and rotational movement for both the device and controllers.
Customize the 360 Photo Environment
For 3DoF devices or to save memory/performance on 6DoF devices a 360 degree cubemap photo can be used for the "3D" in-headset XR Hub environment. The 360 cubemap photo for VR devices can be changed by following these instructions in Workspace ONE UEM
Create a Cubemap Photo
Create a cubemap named custom_skybox.png of the new environment using the PNG image format with dimensions of 4000 x 3000 pixels. The image cannot exceed 5000 x 3750 pixels.
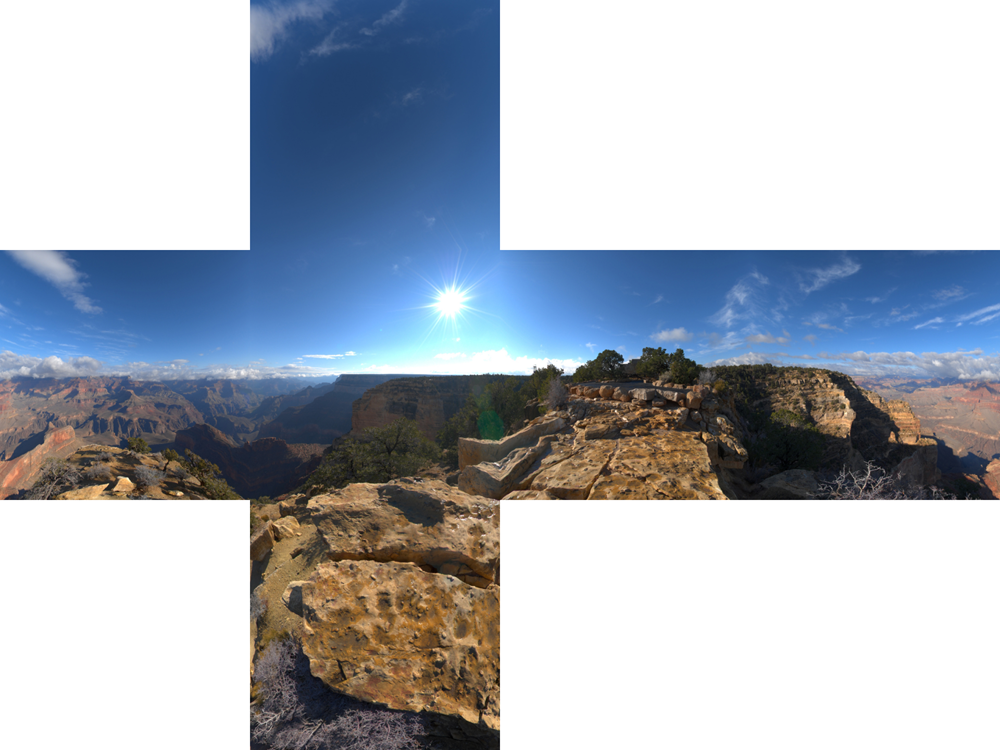
The file can either be hosted at an internet-accessible URL or deployed using UEM to the device. There are two methods for deploying a cubemap. Both are configured in the XR Hub app configuration.
-
Configuring a cubemap deployed to the device (recommended)
- XR Environment Custom Skybox URL setting uses the local
file://naming format - Deployed to devices using Workspace ONE UEM Product Provisioning.
- XR Environment Custom Skybox URL setting uses the local
-
Configuring a cubemap downloaded from a URL
- XR Environment Custom Skybox URL setting uses the internet
https://naming format - Downloaded to devices from an internet-accessible URL hosted by your company.
- XR Environment Custom Skybox URL setting uses the internet
Note: Both methods require configuring the XR Environment Custom Skybox URL setting in the XR Hub app configuration.
Configure Cubemap Deployment
-
In the Workspace ONE UEM console, move to the organization group (OG) that manages your VR headsets.
-
Navigate to Devices > Provisioning > Components > Files/Actions.
a. Select the ADD FILES/ACTIONS button at the top of the page and Select Android.
b. Configure the General tab
Setting Value Name Descriptive name of the file being sent to the device. Description Optional description of the file being sent to the device. Managed By Prepopulated with the correct OG. c. Move to the Files tab and Select the +ADD FILES button.
d. Select Choose Files and browse for the "custom_skybox.png" file that you created.
e. Specify the download path such as
/storage/emulated/0/ws1/and select Save.Note: If the path entered does not exist on the device, the installation creates the folder structure.
-
Navigate to Devices > Provisioning > Product List View.
a. Select the ADD PRODUCT button at the top of the page and select Android for the platform.
b. Configure the General tab with the following settings.
Setting Value Name "360 cubemap photo" or something similar. Description Optional description. Managed By Prepopulated with the correct OG. Smart Groups Enter the Smart Group(s) that the Product is applied to. c. Move to the Manifest tab and select the +ADD button, and configure these settings.
Setting Value Actions(s) to Perform "File/Action - Install" Files/Actions Select the File/Action created for the tutorial d. Select Save to save the product.
e. Select Activate to give the product an active status.
Configure XR Hub Settings for Cubemap
-
In the Workspace ONE UEM console, navigate to Resources > Apps > Native then select the Internal tab.
-
Select the current version number of XR Hub (for example "23.4.0.0") in the UEM Version column. The App Details View displays.
-
Select the Assign button at the top right of the Details View to launch the assignment window.
-
Select the Assignment Name to edit the XR Hub configuration for that assignment.
-
Select the Application Configuration tab. If not already enabled, click on the Send Configuration slider to edit the XR Hub settings.
-
Scroll to XR Environment Type and configure these settings.
Setting Value XR Environment Type If using a 6DoF device set the setting to 2D / CubemapCustom Skybox URL If using a file on the device, use the file URL filepath format: file:///storage/emulated/0/ws1/custom_skybox.png
If using an internet-accessible URL, use the URL format:https://my.domain.com/path/custom_skybox.png -
Select Save then Save and then Publish
Note: XR Hub receives the new configuration and prompts the user to restart. Once XR Hub is restarted, it picks up the new settings.
Customize the 3D Environment for 6DoF Devices
For 6DoF VR devices XR Hub supports multiple 3D environment customization options. The existing 3D environment can be customized or a completely custom 3D environment can be used.
These settings are controlled by the XR Hub application configuration (App Config) settings for an assignment within Workspace ONE UEM.
- In the Workspace ONE UEM console, navigate to Resources > Apps > Native then select the Internal tab.
- Select the current version number of XR Hub (for example "23.4.0.0") in the UEM Version column. The App Details View displays.
- Select the Assign button at the top right of the Details View to launch the assignment window.
- Select the Assignment Name to edit the XR Hub configuration for that assignment.
- Select the Application Configuration tab. If not already enabled, click on the Send Configuration slider to edit the XR Environment settings.
- The following XR Environment settings are available for editing.
- XR Enviroment Theme
- XR Environment Type
- XR Environment Custom Skybox URL
- XR Environment Custom Models
- XR Environment Custom Artwork
Configure a Custom Environment
In the XR Hub App Configuration Settings above.
-
Select a XR Environment Theme by selecting the appropriate choice in the dropdown:
- Default Office - branded open office with green hills in the background.
- Default Office without logo - Same as Default Office but without the brand logo.
- Desert - Open office with a desert in the background.
- Mountain - Open office with mountains in the background.
- City at Night - Open office with a city at night as the background.
- Snow - Open office with snow landscape in the background.
- Default Office with Custom Logo - Default office with custom logo and/or custom artwork.
- Custom Environment with Baked Lighting - for a custom 3D environment that has baked lighting and no real time lighting. This is more performant that the custom environment with real time lighting.
- Custom Environment with Real Time Lighting - for the custom 3D environment with a single real time light.
-
Select a XR Environment Type by selecting from the following choices.
- Default - 360 cubemap for 3DoF devices and 3D environment for 6DoF devices.
- 2D / Cubemap - To force a 360 cubemap for 6DoF devices. The cubemap must be called "custom_skybox.png" and installed on the device.
- 3D Environment - To force a 3D environment.
Customize Artwork for 6DoF Devices
The preset 3D environment includes 3 pieces of art hanging on the virtual office walls. This artwork can be customized but only when using the real time environment. Custom artwork can be hosted by your company at an internet-accessible URL or deployed to devices using Workspace ONE UEM.
There are two methods for deploying custom artwork. Both are configured in the XR Hub app configuration.
-
Configure custom artwork deployed to the device (recommended).
- XR Environment Custm Artwork settings, which use the local
file://naming format - Deployed to devices using Workspace ONE UEM Product Provisioning.
- XR Environment Custm Artwork settings, which use the local
-
Configure custom artwork downloaded from a URL.
- XR Environment Custom Artwork settings, which use the internet
https://naming format - Downloaded to devices from an internet-accessible URL hosted by your company.
- XR Environment Custom Artwork settings, which use the internet
Note: Both methods require configuring the XR Environment Custom Artwork settings in the XR Hub app configuration.
Creating Custom Artwork files
Create a new JPG or PNG texture according to the specifications in this table.
| Artwork Position | Filename (.jpg or .png) | Aspect Ratio |
|---|---|---|
| Top | topart | 3.456:1 |
| Left | leftart | 1:1 |
| Right | rightart | 1:1 |
Configure Custom Artwork Deployment
-
In the Workspace ONE UEM console, move to the organization group (OG) that manages your VR headsets.
-
Navigate to to Devices > Provisioning > Components > Files/Actions.
a. Select the ADD FILES/ACTIONS button at the top of the page, then select Android.
b. Configure the General tab
Setting Value Name "Custom Artwork" or something similar. Description Optional description of the files being sent to the device. Managed By Prepopulated with the correct OG. c. Move to the Files tab, repeating each of the following steps for each custom artwork file
- Select the Files tab and Select ADD FILES.
- Select Choose Files and browse for the artwork file that you created.
- Specify the download path such as
/storage/emulated/0/ws1/artworkand select Save.
Note: If the path entered does not exist on the device, the installation creates the folder structure.
-
Navigate to Devices > Provisioning > Product List View.
a. Select the ADD PRODUCT button at the top of the page and select Android.
b. Configure the General tab
Setting Value Name "Custom Artwork" or something similar. Description Optional description Managed By Prepopulated with the correct OG. Smart Groups Enter the Smart Group(s) that the product is applied to. c. Move to the Manifest tab, select ADD, and configure these settings.
Setting Value Actions(s) to Perform "File/Action - Install" Files/Actions Select the File/Action created for the tutorial. d. Select Save to save the product.
e. Select Activate to give the product an active status.
Configuring Custom Artwork in XR Hub Settings
Note: The XR Environment Theme must be set to Default Office with Custom Logo for the custom art to be displayed.
-
In the Workspace ONE UEM console, navigate to Resources > Apps > Native then select the Internal tab.
-
Select the current version number of XR Hub (for example "23.4.0.0") in the UEM Version column. The App Details View displays.
-
Select the Assign button at the top right of the Details View to launch the assignment window.
-
Select the Assignment Name to edit the XR Hub configuration for that assignment.
-
Select the Application Configuration tab. If not already enabled, click on the Send Configuration slider to edit the XR Hub settings.
-
Scroll to XR Environment Custom Artwork and Select CONFIGURE.
-
Set the XR Environment Custom Models Details
a. Set the Model Type and Model URL
Setting Value Top Art URL If using a file on the device, use the file URL filepath format: file:///storage/emulated/0/ws1/artwork/filename.png
If using an internet-accessible URL, use the URL format:https://my.domain.com/path/filename.pngLeft Art URL If using a file on the device, use the file URL filepath format: file:///storage/emulated/0/ws1/artwork/filename.png
If using an internet-accessible URL, use the URL format:https://my.domain.com/path/filename.pngRight Art URL If using a file on the device, use the file URL filepath format: file:///storage/emulated/0/ws1/artwork/filename.png
If using an internet-accessible URL, use the URL format:https://my.domain.com/path/filename.png
Note: XR Hub will received the new configuration and prompt the user to restart. Once XR Hub is restarted, it picks up the new settings
Customize Logos for 6DoF Devices
XR Hub supports loading a customer created 3D environment logo when using the XR Environment Theme "Default Office with Custom Logo". The custom logo file can either be hosted at an internet-accessible URL or deployed using UEM to the device.
There are two methods for deploying a logo file. Both are configured in the XR Hub app configuration.
-
Configuring a logo file deployed to the device (recommended)
- XR Environment Custom Models > Model URL setting uses the local
file://naming format - Deployed to devices using Workspace ONE UEM Product Provisioning.
- XR Environment Custom Models > Model URL setting uses the local
-
Configuring a logo file downloaded from a URL
- XR Environment Custom Models > Model URL setting uses the internet
https://naming format - Downloaded to devices from an internet-accessible URL hosted by your company.
- XR Environment Custom Models > Model URL setting uses the internet
Note: Both methods require configuring the XR Environment Custom Models > Model URL setting in the XR Hub app configuration.
Creating a Custom Logo
- Logos must be scaled to the correct size and orientation. Ensure that you create the logo with the center point (origin) in the middle of the logo, with Z axis as "up" and the model facing the Y axis. Logos must be 3-4m in width and 0.5-1m in height. You can create your own logo with Blender (a free 3D design application) by converting an SVG file of your logo to a 3D model.
- Logos must be in GLB format.
Configuring Custom Logo Deployment
-
In the Workspace ONE UEM console, move to the organization group (OG) that manages your VR headsets.
-
Navigate to Devices > Provisioning > Components > Files/Actions.
a. Select the ADD FILES/ACTIONS button at the top of the page and Select Android.
b. Configure the General tab
Setting Value Name Descriptive name of the logo file being sent to the device. Description Optional description of the file being sent to the device. Managed By Prepopulated with the correct OG. c. Move to the Files tab.
- Select ADD FILES.
- Select Choose Files and browse for the logo file that you have created.
- Specify the download path
/storage/emulated/0/ws1/logos/and click Save.
Note: If the path entered does not exist on the device, the installation creates the folder structure.
-
Navigate to Devices > Provisioning > Product List View.
a. Select the ADD PRODUCT button at the top of the page and select Android.
b. Configure the General tab
Setting Value Name "Custom Logo" or something similar. Description Optional description. Managed By Prepopulated with the correct OG. Smart Groups Enter the Smart Group(s) the product is applied to. c. Move to the Manifest tab, select ADD, and configure these settings.
Setting Value Actions(s) to Perform "File/Action - Install" Files/Actions Select the File/Action created for the tutorial. d. Select Save to save the product.
e. Select Activate to give the product an active status.
Configuring Custom Logos in XR Hub Settings
Note: The XR Environment Theme must be set to "Default Office with Custom Logo" for the custom logo to be displayed.
-
In the Workspace ONE UEM console, navigate to Resources > Apps > Native then select the Internal tab.
-
Select the current version number of XR Hub (for example "23.4.0.0") in the UEM Version column. The App Details View displays.
-
Select the Assign button at the top right of the Details View to launch the assignment window.
-
Select the Assignment Name to edit the XR Hub configuration for that assignment.
-
Select the Application Configuration tab. If not already enabled, click on the Send Configuration slider to edit the XR Hub settings.
-
Scroll to XR Environment Custom Models and Select CONFIGURE.
-
Set the XR Environment Custom Models Details
a. Set the Model Type and Model URL
Setting Value Model Type Select "Custom Logo" Model URL If using a file on the device, use the file URL filepath format: file:///storage/emulated/0/ws1/logos/filename.png
If using an internet-accessible URL, use the URL format:https://my.domain.com/path/filename.pngb. Set the Position Offsets, Rotation Modifiers, and Scale Modifiers
The position, rotation and scale of the 3D logo can be manipulated on a per axis basis by setting the following in the XR Hub Application Configuration:
Setting Description Position Offset X-axis Move the logo to the left (positive) or the right (negative). In meters Position Offset Y-axis Move the logo up (positive) or down (negative). In meters Position Offset Z-axis Move the logo forward (positive) or backward (negative). In meters Rotation Modifier (X) Rotate the logo in the x axis. Rotation Modifier (Y) Rotate the logo in the y axis. Rotation Modifier (Z) Rotate the logo in the z axis. Scale Modifier (X) Scale the logo in the x axis. Scale Modifier (Y) Scale the logo in the y axis. Scale Modifier (Z) Scale the logo in the z axis. 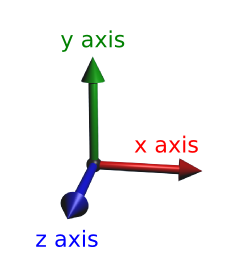
c. If you have more settings to configure, move back to the Application Configuration Settings by Selecting the
back arrownext to APPLICATION CONFIGURATION under the XR Environment Custom Models Title. -
Finish by Selecting Create/Save then Save then Publish
Note: XR Hub will receive the new configuration and prompt the user to restart. Once XR Hub is restarted the new environment will be displayed.
Customize 3D Environments for 6DoF Devices
XR Hub supports loading a customer created 3D environment file on 6DoF VR devices. The custom environment file can either be hosted at an internet-accessible URL or deployed using UEM to the device.
Note: The XR Environment Theme must be set to "Custom Environment with Baked Lighting" or "Custom Environment with Realtime Lighting".
There are two methods for deploying an environment file. Both are configured in the XR Hub app configuration.
-
Configuring an environment file deployed to the device (recommended)
- XR Environment Custom Models > Model URL setting uses the local
file://naming format - Deployed to devices using Workspace ONE UEM Product Provisioning.
- XR Environment Custom Models > Model URL setting uses the local
-
Configuring an environment file downloaded from a URL
- XR Environment Custom Models > Model URL setting uses the internet
https://naming format - Downloaded to devices from an internet-accessible URL hosted by your company.
- XR Environment Custom Models > Model URL setting uses the internet
Note: Both methods require configuring the XR Environment Custom Models > Model URL setting in the XR Hub app configuration.
Creating a Custom Environment
- 3D environments must be scaled to the correct size and orientation. Ensure that you create the environment with the center point (origin) where you wish the user to stand. A sample environment is included in the XR Hub downloads, use this as reference.
- The model should be scaled to human size, i.e. ceiling heights should be more than 2m.
- Keep in mind users will be opening spatial window UI and so there should be plenty of empty space around the user so that the UI does not intersect with 3D geometry.
- Environments must be in GLB format and we recommend no larger than 100MB.
Configuring a Custom Environment Deployment
-
In the Workspace ONE UEM console, move to the organization group (OG) that manages your VR headsets.
-
Navigate to Devices > Provisioning > Components > Files/Actions.
a. Select the ADD FILES/ACTIONS button at the top of the page and Select Android.
b. Configure the General tab and configure these settings.
Setting Value Name Descriptive name of the environment file being sent to the device Description Optional description of the file being sent to the device Managed By Prepopulated with the correct OG. c. Move to the Files tab
- Select the Files tab and Select ADD FILES.
- Select Choose Files and browse for the environment file that you have created.
- Specify the download path
/storage/emulated/0/ws1/environment/and click Save.
Note: If the path entered does not exist on the device, the installation creates the folder structure.
-
Navigate to Devices > Provisioning > Product List View.
a. Select the ADD PRODUCT button at the top of the page and select Android.
b. Configure the General tab
Setting Value Name "Custom Environment" or something similar. Description Optional description. Managed By Prepopulated with the correct OG. Smart Groups Enter the Smart Group(s) the Product is applied to. c. Move to the Manifest tab, select ADD, and configure these settings.
Setting Value Actions(s) to Perform "File/Action - Install" Files/Actions Select the File/Action created for the tutorial. d. Select Save to save the product.
e. Select Activate to give the product an active status.
Configure a Custom Environment in XR Hub Settings
-
In the Workspace ONE UEM console, navigate to Resources > Apps > Native then select the Internal tab.
-
Select the current version number of XR Hub (for example "23.4.0.0") in the UEM Version column. The App Details View displays.
-
Select the Assign button at the top right of the Details View to launch the assignment window.
-
Select the Assignment Name to edit the XR Hub configuration for that assignment.
-
Select the Application Configuration tab. If not already enabled, click on the Send Configuration slider to edit the XR Hub settings.
-
Scroll to XR Environment Custom Models and Select CONFIGURE.
-
Set the XR Environment Custom Models Details
a. Set the Model Type and Model URL
Setting Value Model Type Select "Custom Environment" Model URL If using a file on the device, use the file URL filepath format: file:///storage/emulated/0/ws1/environment/filename.png
If using an internet-accessible URL, use the URL format:https://my.domain.com/path/filename.pngb. Set the Position Offsets, Rotation Modifiers, and Scale Modifiers
The position, rotation and scale can be manipulated on a per axis basis by setting the following in the XR Hub Application Configuration:
Setting Description Position Offset X-axis Move the environment to the left (positive) or right (negative). In meters Position Offset Y-axis Move the environment up (positive) or down (negative). In meters Position Offset Z-axis Move the environment forward (positive) or backward (negative). In meters Rotation Modifier (X) Rotate the environment in the x axis. Rotation Modifier (Y) Rotate the environment in the y axis. Rotation Modifier (Z) Rotate the environment in the z axis. Scale Modifier (X) Scale the environment in the x axis. Scale Modifier (Y) Scale the environment in the y axis. Scale Modifier (Z) Scale the environment in the z axis. c. If you have more settings to configure, move back to the Application Configuration Settings by selecting the "back arrow" next to APPLICATION CONFIGURATION under the XR Environment Custom Models Title.
-
Finish by Selecting Create/Save then Save then Publish
Note: XR Hub will receive the new configuration and prompt the user to restart. Once XR Hub is restarted the new environment will be displayed.
Customize the User Interface
Workspace ONE XR Hub lets you customize some elements of the user interface by modifying the global.txt stylesheet. There are two methods for deploying the stylesheet. Both are configured in the XR Hub app configuration.
-
Configuring a stylesheet deployed to the device (recommended)
- StyleSheet URLs setting uses the local
file://naming format - Deployed to devices using Workspace ONE UEM Product Provisioning.
- StyleSheet URLs setting uses the local
-
Configuring a stylesheet downloaded from a URL
- StyleSheet URLs setting uses the internet
https://naming format - Downloaded to devices from an internet-accessible URL hosted by your company.
Note: Both methods require configuring the StyleSheet URLs setting in the XR Hub app configuration.
- StyleSheet URLs setting uses the internet
Edit the Global Stylesheet
The global stylesheet file, global.txt, can be edited to change color definitions for globally occurring UI elements. Font types cannot be changed. global.txt must adhere to the following structure (edit as necessary):
@font-face {
font-family: Light;
src: resource(Fonts/Metropolis-Light);
}
@font-face {
font-family: LightItalic;
src: resource(Fonts/Metropolis-LightItalic);
}
@font-face {
font-family: Medium;
src: resource(Fonts/Metropolis-Medium);
}
@font-face {
font-family: Regular;
src: resource(Fonts/Metropolis-Regular);
}
@font-face {
font-family: SemiBold;
src: resource(Fonts/Metropolis-SemiBold);
}
@font-face {
font-family: Bold;
src: resource(Fonts/Metropolis-Bold);
}

.Pointer {
color: #1ADE25;
}

Text {
color: white;
}
.GreyText {
color: #747474;
}

.WindowBackground {
color: rgba(34, 52, 60, 0.87);
}
.WindowOutline {
color: #1EFAF9;
}

.OpaqueBackground {
color: rgb(34, 52, 60);
background-color: rgb(34, 52, 60);
}
.OpaqueBackground:hover {
background-color: rgb(34, 52, 60);
}

.DivisionBar {
color: #1EFAF9;
}

.ButtonOutline {
color: #1EFAF9;
}
.TextButtonOutline {
color: #49AFD9;
}
.TextButton:hover {
background-color: rgb(227, 245, 252);
}
.TextButtonText {
font-family: SemiBold;
font-size: 5pt;
text-align: Center;
vertical-align: Middle;
color: #57CFFF;
}
Configure Custom Stylesheet Deployment
-
In the Workspace ONE UEM console, move to the organization group (OG) that manages your VR headsets.
-
Navigate to Devices > Provisioning > Components > Files/Actions.
a. Select the ADD FILES/ACTIONS button at the top of the page and Select Android.
b. Configure the General tab
Setting Value Name Descriptive name of the stylesheet being sent to the device Description Optional description of the file being sent to the device Managed By Prepopulated with the correct OG. c. Move to the Files tab
- Select ADD FILES.
- Select Choose Files and browse for the "global.txt" file that you created.
- Specify the download path
/storage/emulated/0/ws1/Stylesheets/and select Save.
Note: If the path entered does not exist on the device, the installation creates the folder structure.
-
Navigate to Devices > Provisioning > Product List View.
a. Select the ADD PRODUCT button at the top of the page and select Android.
b. Configure the General tab
Setting Value Name "Global Stylesheet" or something similar. Description Optional description Managed By Prepopulated with the correct OG. Smart Groups Enter the Smart Group(s) the product is applied to. c. Move to the Manifest tab, select ADD, then configure these settings.
Setting Value Actions(s) to Perform "File/Action - Install" Files/Actions Select the File/Action created for the tutorial d. Select Save to save the product.
e. Select Activate to give the product an active status.
Configure XR Hub Settings For Stylesheet
-
In the Workspace ONE UEM console, navigate to Resources > Apps > Native then select the Internal tab.
-
Select the current version number of XR Hub (for example "23.4.0.0") in the UEM Version column. The App Details View displays.
-
Select the Assign button at the top right of the Details View to launch the assignment window.
-
Select the Assignment Name to edit the XR Hub configuration for that assignment.
-
Select the Application Configuration tab. If not already enabled, select the Send Configuration slider to edit the XR Hub settings.
-
Scroll to StyleSheet URLs and select CONFIGURE.
-
Edit the URL setting, and select more if adding additional stylesheets.
-
If using a file on the device, use the file URL filepath format:
file:///storage/emulated/0/ws1/Stylesheets/global.txt -
If using an internet-accessible URL, use the URL format:
https://my.domain.com/path/global.txt -
If you have more settings to configure, move back to the Application Configuration Settings by selecting the "back arrow" next to APPLICATION CONFIGURATION under the XR Environment Custom Models Title.
-
-
Select Create/Save then Save and then Publish
Note: XR Hub receives the new configuration and prompts the user to restart. Once XR Hub is restarted, the new stylesheet is used.
Was this page helpful?