After you click Validate & Proceed, the system verifies your specified values. If everything validates, the wizard displays a summary of the information for your review. Then you start the deployment process.
Important: Use this page solely when you have access to a first-gen tenant environment in the first-gen control plane. As described in KB-92424, the first-gen control plane has reached end of availability (EOA). See that article for details.
Procedure
-
Click Validate & Proceed.
The system validates your specified values, such as:
- Are the specified address ranges for the to-be-created subnets valid and non-overlapping with other addresses in the selected region within your subscription.
- Are there enough virtual machine (VM) and cores in your subscription's quota to build out the pod.
- Are any uploaded certificate files in the correct PEM format.
- If you selected to use an existing management subnet, does it have the
Microsoft.Sqlservice endpoint enabled on that subnet? Important: Starting with the September 2019 service release, new pod deployments require theMicrosoft.Sqlservice endpoint enabled on the management subnet to support use of the pod's Microsoft Azure PostgreSQL database. If you see a validation error that describes that the endpoint must be enabled on your management subnet, you must log in to the Microsoft Azure portal and enable theMicrosoft.Sqlservice endpoint on the subnet. Then you can resubmit the wizard to deploy the pod. For some details on how to enable that endpoint, see First-Gen Tenants - In Advance of Pod Deployment, Create the Horizon Cloud Pod's Required Subnets on your VNet in Microsoft Azure.
If everything validates, the summary page displays.
If you see an error message about overlapping network addresses, verify whether you have existing subnets using the same values already in your subscription.
-
On the final wizard step, review the summarized information and click Submit.
The system starts deploying the pod into your Microsoft Azure environment.
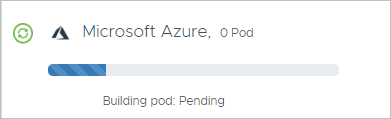
Results
The deployment can take between 30 to 45 minutes, depending on network traffic between Microsoft Azure Cloud and the Horizon Cloud control plane.
Until the pod is successfully deployed, a progress icon is displayed in the console's Getting Started screen. You might need to refresh the screen in your browser to see the progress. The browser-based user interface can time out after approximately 30 minutes and ask you to log back in.
Important: When deploying a pod in Microsoft Azure China cloud, the overall deployment process can take up to seven (7) hours to complete. The process is subject to geographic network issues that can cause slow traffic to host names that the deployer needs access to, as listed in the DNS Requirements page.
If the pod has not moved from Pending to Downloading state after 20 minutes, and you are not deploying into Microsoft Azure China, the system automatically puts the pod into Error state and displays a message that states the pod cannot connect to the cloud services and to check the networking connectivity in your Microsoft Azure environment.
If the display shows the pod is in Error state, the likely cause is something about your environment's network configuration or firewall that is disallowing access to one or more of the required locations listed in the DNS Requirements page. For example, the VNet's configured DNS might not be resolving internal or external names or the required outbound ports are not open or are blocked by your firewall. Sometimes there is a temporary loss of connectivity to the *.azure.com host names. You can run some tests to verify if your environment's networking is configured properly for the pod's requirements. See the content in the pages starting with Troubleshooting If You Encounter Pod Deployment or First-Time Domain Bind Issues.
Throughout the pod deployment process, the Getting Started page's Capacity section indicates the various stages the process goes through (pending, downloading, building, connecting, and so on).
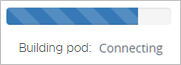
The following table gives some approximate sample durations for the stages in building the pod.
Important: The actual durations you experience in your deployment's progress will vary depending on the network latencies that exist at the time.
| Stage | Sample duration |
|---|---|
| Pending | A minute or two |
| Downloading | A minute or two |
| Building | 20 minutes |
| Connecting | 10 minutes |
When the pod is successfully deployed:
- Horizon Cloud sends a notification email to the account owner that is identified in the corresponding Horizon Cloud customer account record. The email states the pod onboarding is complete.
- A green checkmark is displayed in the Getting Started screen.
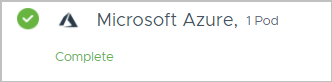
At this point, because your Active Directory domain is not yet registered with the pod, a Delete Pod option is available in the Manage menu. If the deployment process fails for some reason or if you dislike the values you used and want to start over before registering your Active Directory domain, you can click Manage > Delete Pod to delete the artifacts that were deployed. When the screen indicates the pod is successfully deleted, you can start the process over by clicking Manage > Add Pod again. The following screenshot illustrates the location of the Manage > Delete Pod option.
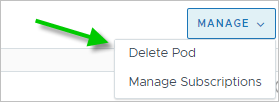
If you choose to the delete the pod from this point, due to network latency, the Getting Started page might indicate the pod is fully deleted before all of the pod-related artifacts are completely deleted from your Microsoft Azure environment. Before running the pod deployment wizard again after deleting the new pod, take the following steps:
- Log out of the Horizon Cloud user interface.
- Log in to the Microsoft Azure portal.
- Navigate to your VNet.
- If you had the deployer automatically create the pod's subnets, verify that no pod-created subnets exist and that the address ranges that you specified for the pod's subnets have been removed from the VNet's address space.
Then you can log back in to Horizon Cloud to run the pod deployment wizard again.
What to do next
Expand the General Setup section of the Getting Started screen and complete the required task of registering an Active Directory domain. Registering Active Directory is the next required step. After registering the domain and setting the Super Administrator role for a domain group, the system makes all of the console accessible to you. Then you continue management of this pod in the console. See the Getting Started chapter of the Horizon Cloud Administration Guide. After registering the Active Directory domain, follow the Getting Started wizard to see which task to complete next.
You must set up the appropriate CNAME records in your DNS server according to the type of gateway you specified. See the CNAME information described in How to Obtain the Horizon Cloud Pod Gateway's Load Balancer Information to Map in Your DNS Server.
When both the external and internal gateway configurations use the same FQDN, after the pod is deployed you must configure the routing of the incoming end-user client traffic to the appropriate load balancer resource in the gateways' resource groups. The goal is to set up the routing so that client traffic from the Internet is routed to the external gateway's Microsoft Azure Public Load Balancer and client traffic from your intranet is routed to the internal gateway's Microsoft Azure Internal Load Balancer. When both gateways have the same FQDN, you configure Split DNS (Split Domain Name System) to resolve the gateway address either to the external gateway or internal gateway depending on the origin network of the end-user client's DNS query.
If you specified two-factor authentication for the pod's gateway configurations, you must complete the following tasks.
-
If the pod's external gateway has two-factor authentication configured and the two-factor authentication server is not reachable within the same VNet topology into which the gateway's Unified Access Gateway instances are deployed, configure that two-factor authentication server to allow communication from the IP address of the external gateway's load balancer.
In this scenario where the two-factor authentication server is not reachable within the same VNet topology as the gateway deployment, the Unified Access Gateway instances attempt contact with that server using that load balancer address. To allow that communication traffic, ensure the load balancer resource's IP address that is in that external gateway's resource group is specified as a client or a registered agent in your two-factor authentication server's configuration. Refer to the documentation for your two-factor authentication server for the specifics on how to allow that communication.
-
If your two-factor authentication server is reachable within the same VNet topology, configure the two-factor authentication server to allow communication from the appropriate NICs that were created for the deployment's Unified Access Gateway instances in Microsoft Azure.
Your network administrator determines the two-factor authentication server's network visibility to the Azure VNet topology and its subnets used for the deployment. The two-factor authentication server must allow communication from the IP addresses of the Unified Access Gateway instances' NICs that correspond to the subnet for which your network administrator has given network visibility to the two-factor authentication server.
The gateway's resource group in Microsoft Azure has four NICs that correspond to that subnet, two that are currently active for the two Unified Access Gateway instances and two that are idle and will become the active ones after the pod and its gateways go through an update.
To support communication traffic between the gateway and the two-factor authentication server both for ongoing pod operations and after each pod update, ensure the IP addresses of those four NICs are specified as clients or as registered agents in that server's configuration. Refer to the documentation for your two-factor authentication server for the specifics on how to allow that communication.
For information on how to obtain those IP addresses, see Update Your Two-Factor Authentication System with the Required Horizon Cloud Pod Gateway Information topic.
Previous topic:First-Gen Tenants - Specify Two-Factor Authentication Capability for the Pod
Was this page helpful?