With the macOS update management system, admins can restrict and require macOS updates on their macOS devices to keep all devices on a common macOS version for a consistent management experience. Omnissa Workspace ONE UEM runs the macOS update commands periodically on the devices to ensure that the device update is successful.
macOS update management offers the following solutions for admins:
- Identify available macOS versions that can be deployed to devices, and list them in the Device Updates Dashboard.
- Assign and deploy minor and major macOS updates to devices through a Device Updates dashboard.
- Automatically retry the deployment of assigned updates, until each assigned device confirms that the update is successful.
- View available macOS updates for individual devices, and see the status of in-progress updates in the Device Details page.
Prerequisites
-
Devices with macOS 12 and later
-
UEM Console connectivity to https://gdmf.apple.com/v2/pmv
View the macOS Updates
View the list of latest or active macOS updates available from Apple for all your managed and eligible devices.
- Navigate to the Devices > Device Updates > Apple > macOS page.
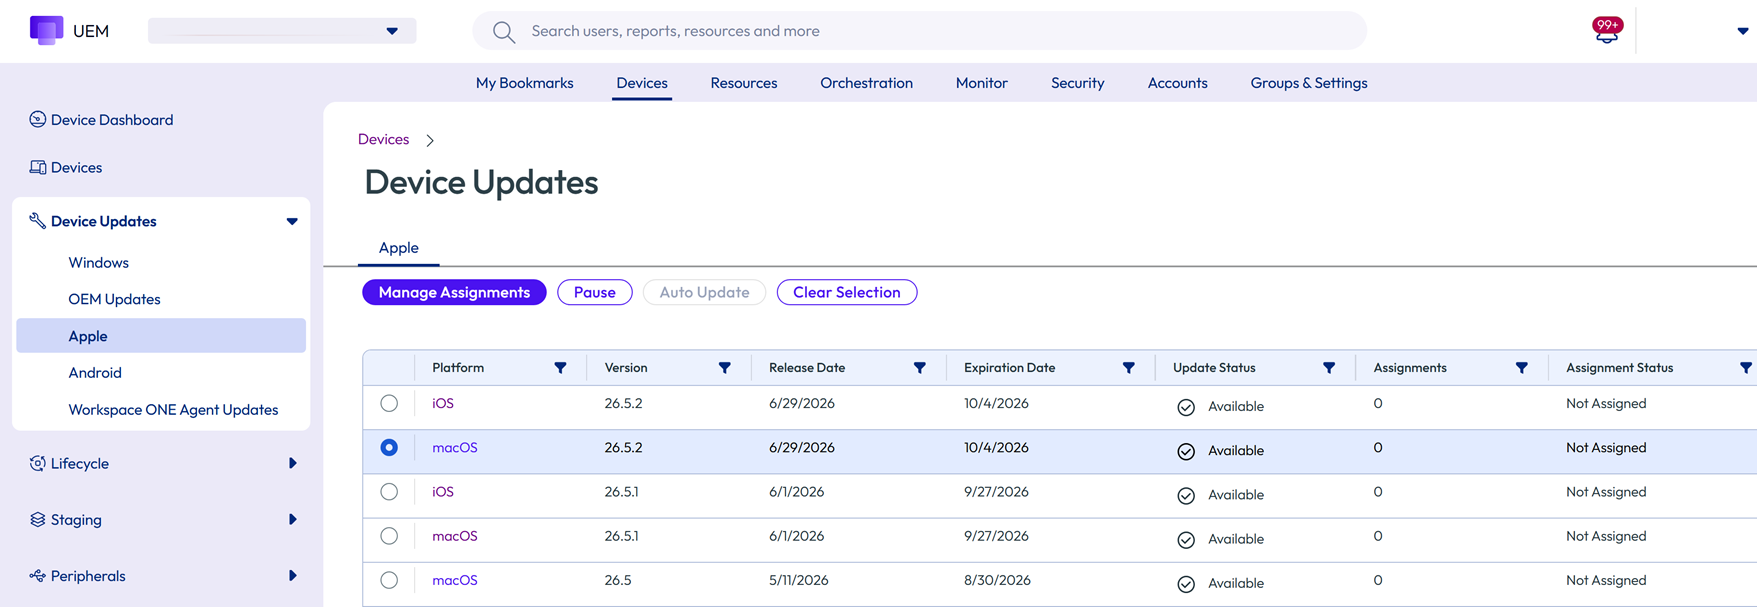
- View the list of available macOS updates and other related details, including:
- Update – Name of the update.
- Version – Version of the update.
- Release Date – Date when the update is released.
- Expiration Date – Date when the update expires.
- Update Status – Status of the macOS update if available or not available from Apple.
- Assignments – Number of assignments applied to an update.
- Assignment Status – Status of the assignments applied to the update such as Assigned, Not Assigned, or Paused.
The list of macOS update details is automatically pulled from the Apple using the Sync Device Updates scheduler job at the specified interval,typically set for every 6 hours.
Assign and Publish macOS Updates
To deploy an OS Update, assign one or more smart groups to a macOS update and publish to the device.
To assign smart groups and deploy the macOS updates:
-
Navigate to the Devices > Device Updates > Apple > macOS page.
-
Select a macOS Update by selecting the corresponding radio button. The Manage Assignments option appears on top of the page.
-
Select Manage Assignments for the assignment page to display.
-
Select New Assignment under the Assignment section. The Add Assignment page appears.
-
In the Definition tab, enter the assignment name and select one or more smart groups. Select Next.
-
In the Deployment tab, enter the date and time for the deployment to begin and select one deployment method.
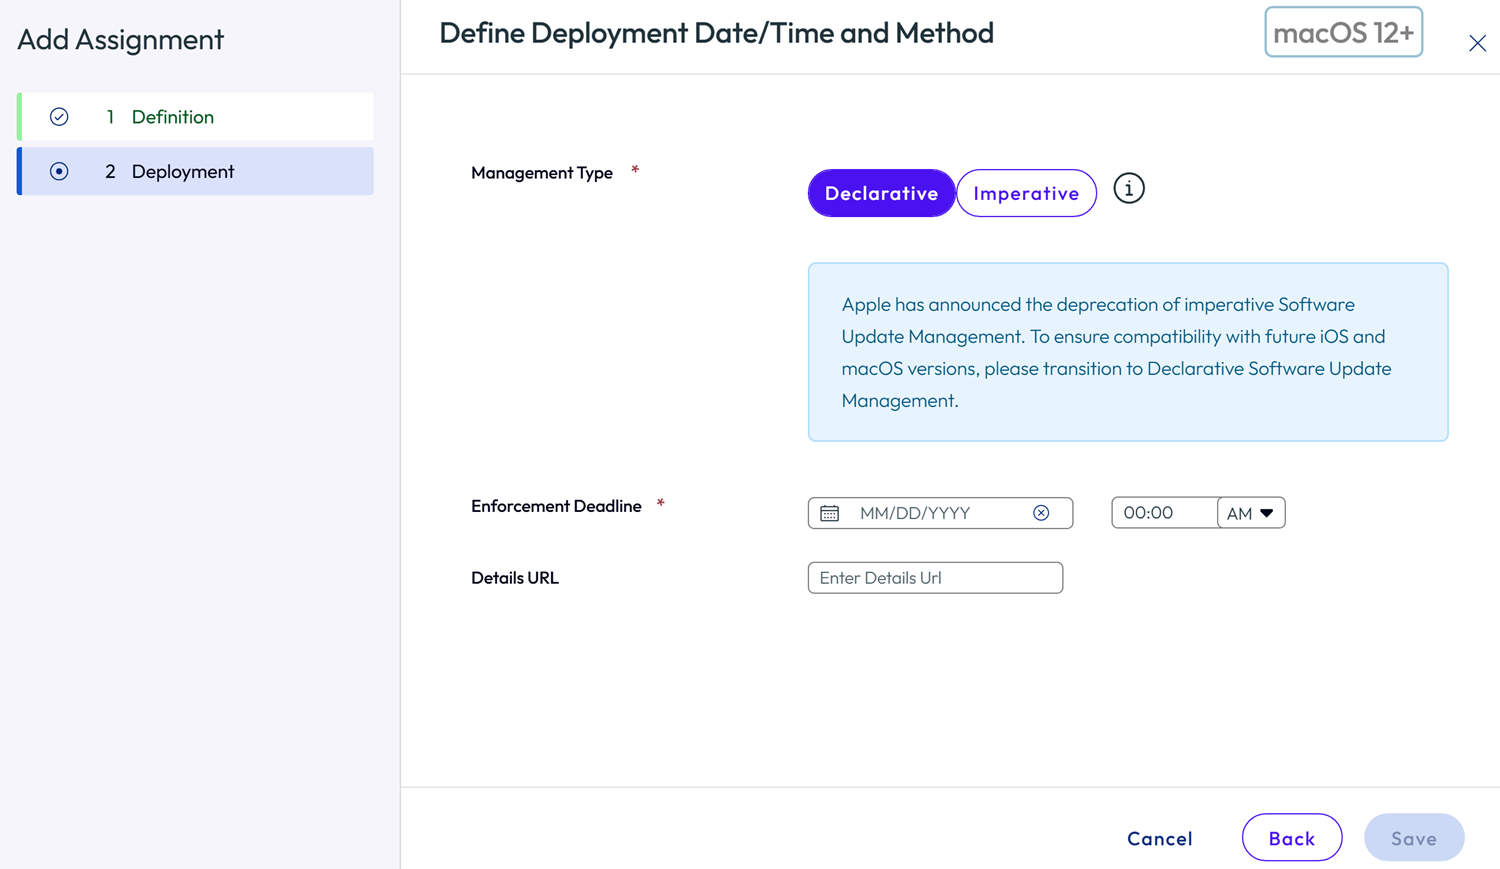
The available deployment methods match those that are defined in Apple’s MDM protocol for macOS. Additionally, note that while these options reflect the range of options available when initiating an update to macOS devices, it is possible that certain devices may behave in unexpected ways depending on the combination of defined Install Action, macOS version on the device, and device hardware and model. It is recommended to test out any configurations to a small group of test devices that reflect the start of your overall device environment to fully understand the expected experience before deploying those same configurations to the full device fleet.
| Method | Description |
|---|---|
| Download Only | Download the macOS update without installing it. |
| Default | Download or install macOS update, depending on the current state |
| InstallAsap | Downloads the macOS update, and notifies the user that a restart will occur in 60 seconds.If the device is being actively used, the user can cancel the restart. |
| NotifyOnly | Downloads the macOS update and notifies the user that it is available. |
| InstallLater | The user will be periodically notified that the update is available. |
| InstallForceRestart | Downloads the macOS update, and then forces a device restart if the device requires it. Note: The restart does not require user consent and can result in data loss. |
- Enter the scheduling priority for download. Click Next.
- Enter the User Deferral and Maximum number of Deferrals. This option is only available if InstallLater is defined as the Install Action.
- In the Notification tab, activate or deactivate the notification for the successful download and enter the notification text in the Push Notification field.
- Click Save.
For each macOS update version, multiple different assignments can be specified, each having a unique combination of Deployment time and Install Action. These individual assignments will be listed in a ranked order; if a device is assigned to more than one, only the highest ranked behaviour will occur. Also, if a device is assigned to more than one macOS version, only the highest version will be deployed.
When an update is assigned to a device, the configuration will not be deployed immediately. The configuration will be issued the next time each assigned device responds to a normally scheduled Device Information query (by default this will be within 4 hours). Following each processed command, additional retry or follow up configurations will issued only after a 24 hour cooldown period.
Auto Update
The Auto-Update feature eliminates the need for administrators to manually create a new update assignment every time Apple releases a new OS version. Instead, once configured, the system automatically evaluates eligible devices and delivers the appropriate OS update configuration via DDM (Declarative Device Management) based on a set of predefined timing rules.
When a new OS version becomes available in GDMF (Apple's software update feed), the system checks whether each enrolled device is eligible for that update. If the device qualifies and the configured timing conditions are met, the software update enforcement configuration is automatically pushed to the device — no manual intervention required.
The auto-update assignment operates on two key timing parameters:
-
Deployment Begins — Specifies the number of days after the OS release date before the configuration is delivered to the device.
-
Enforcement Delay — Specifies the number of days after the deployment begins date by which the update must be installed on the device. This becomes the enforcement deadline stamped on the configuration delivered to the device.
To create a new Auto-Update assignment:
-
Navigate to the Devices > Device Updates > Apple > Auto Update tab.
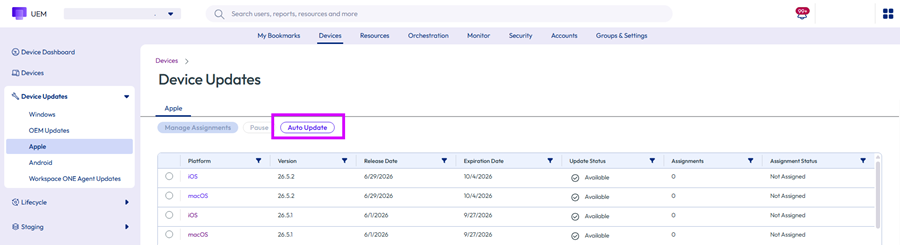 .
. -
On Apple OS Automatic Updates page, click New Assignment.
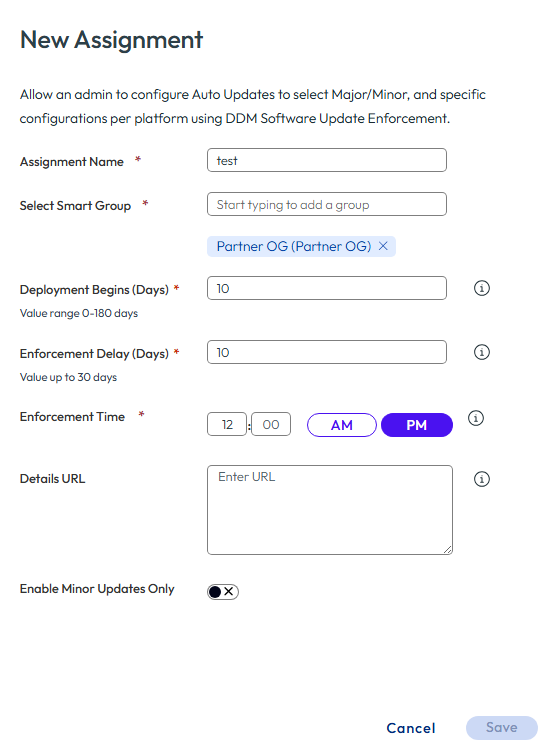 .
. -
Enter the following options:
| Settings | Description |
|---|---|
| Assignment Name | A descriptive name to identify the assignment. |
| Select Smart Group | The smart group of devices to which the assignment applies. Multiple groups can be added. Start typing to search; select from suggestions. |
| Deployment Begins (Days) | Number of days after the OS release date when the configuration starts being delivered to devices. Enter a value between 0-180 days. |
| Enforcement Delay (Days) | Number of days after the Deployment Begins date by which the update must be installed on the device. Enter a value upto 30 days. |
| Enforcement Time | The time of day at which the update enforcement takes effect. |
| Details URL(Optional) | A URL pointing to additional information or documentation about the update. |
| Enable Minor Updates Only | Controls whether only minor updates or all updates (minor and major) are delivered to devices. Choose ON — Minor updates only . OFF — Minor and major updates. |
- Click Save.
To view Auto-Updates:
Auto-update assignments do not have a separate reporting dashboard. All devices receiving updates via auto-update appear in the same OS version-level reporting dashboard used for manual declarative assignments. The dashboard shows:
- Install status — State reported by the device (e.g., downloading, installing, installed, failed, not eligible, none).
- Install reason — The reason or trigger behind the current install state as reported in the device's status sample.
- Device grid — A list of all devices assigned the update, along with user information, current install status, and assignment details.
The device reporting tracks the OS version being updated to, and not which specific declaration (manual or auto) triggered it.
Pause and Unpause macOS Updates
As an administrator, you can even pause any updates that have been assigned. This holds any updates that have not been sent to macOS devices until the update is unpaused.
To pause a macOS update:
-
Navigate to the Devices > Device Updates > Apple > macOS page.
-
Select an assigned macOS update.
-
Select the Pause option at the top of the page.
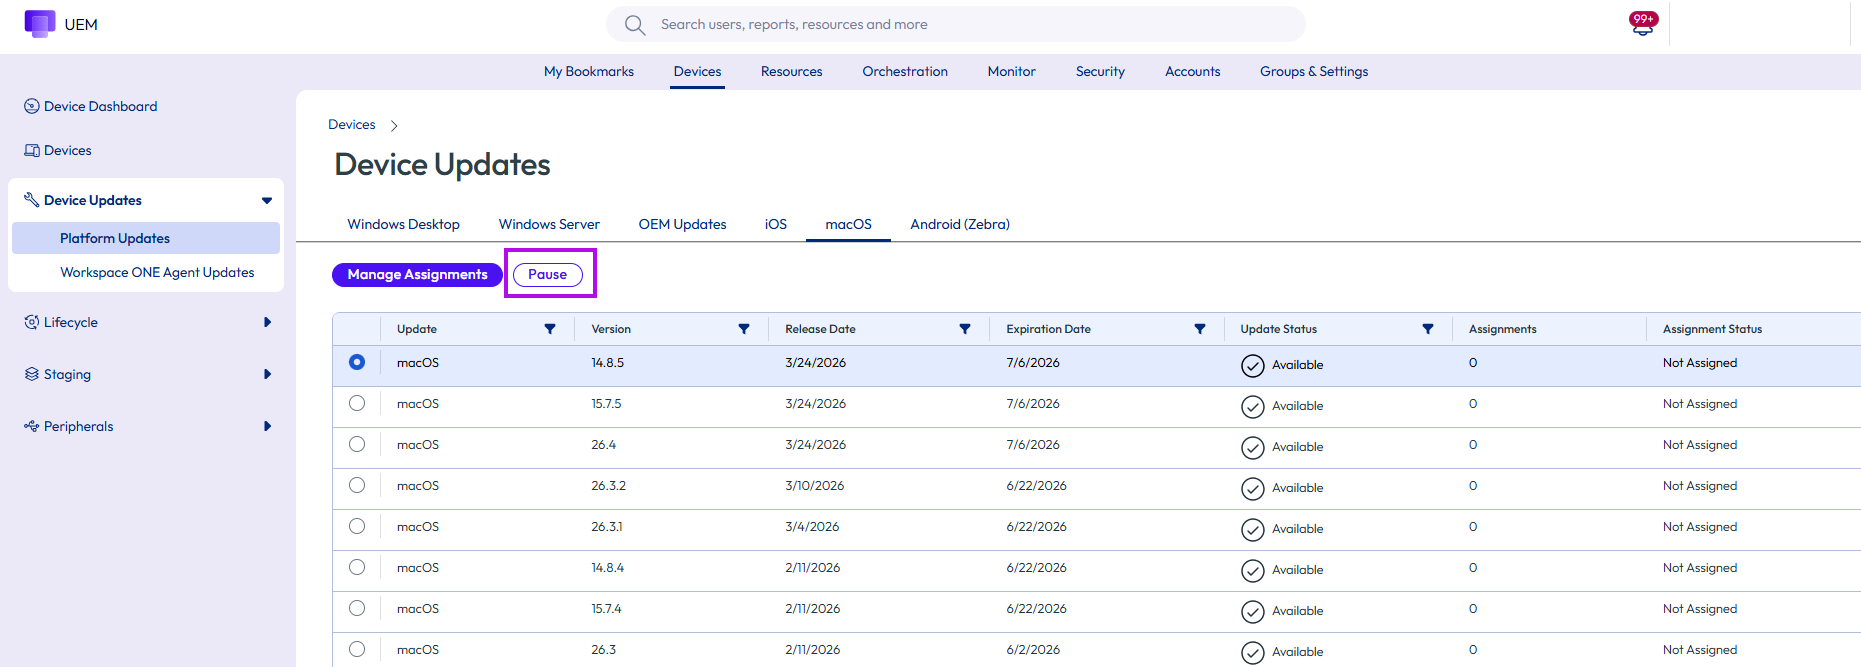
Note: Pausing does not stop the updates that have already been processed on the device such as already downloading the update. Pause only stops the assigned future downloads of the update.
View Availability and Status of macOS Updates for Individual Devices
You can view the available updates for an individual macOS device and see the status of any in-progress updates. Navigate to Devices > Devices > Select Device > Updates.
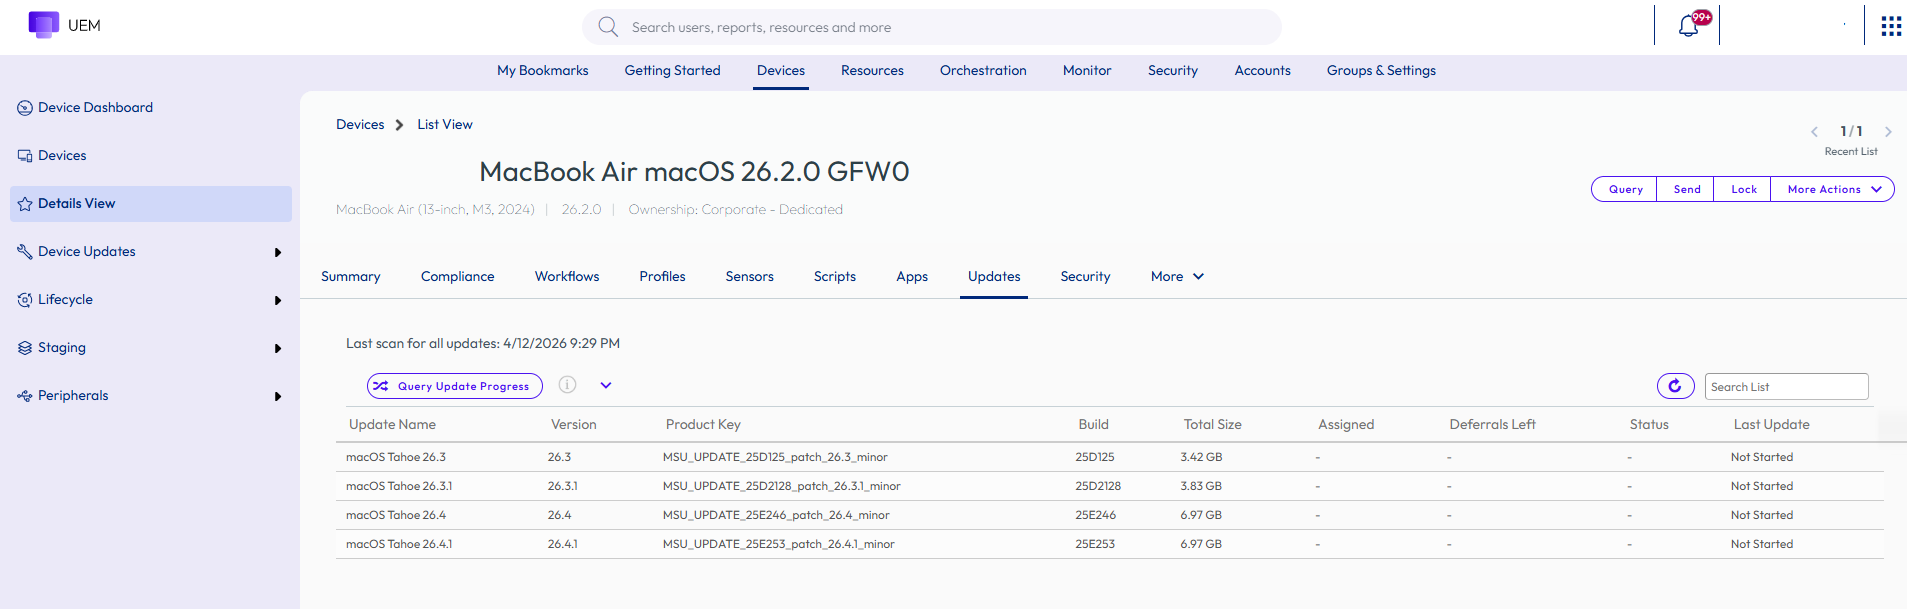
Here, you can see a list of all updates the device has reported as available to it.If a particular update has been assigned through the Device Updates Dashboard, it will be indicated in the Assigned column.
Select Query Update Progress to request the status of any updates currently in progress.The device may return information related to the assigned updates, but could possibly return information related to other listed updates as well if they are currently in progress on the device. Depending on the information reported by the device, you may see the Deferrals Left, Status, and Last Update columns updated in the list view in response to this query.
Troubleshooting
All commands and responses can be seen in event data by navigating to Device Details > More > Troubleshooting tab.In a situation where you want to confirm exactly when an update command was sent to a device, as well as the device’s response, or when you want to see exactly what the device reported in response to a Query Update Progress, you should be able to find the relevant entries in this view.
Was this page helpful?