To install the Directory Sync, User Auth, Kerberos Auth, and Virtual App services from the command line instead of the graphical user interface, run the Omnissa Access connector installer in silent mode. You can either specify installation options in an XML file or enter them on the command line directly.
Prerequisites
-
See the installation prerequisites listed in Prerequisites for Installing the Omnissa Access Connector.
-
In the Omnissa Access console, select Integrations > Connectors to go to the Connectors page.
Then click New to run the New Connector wizard. The wizard guides you to download the Omnissa Access connector installer and a configuration file that establishes communication between the connector and the tenant. The configuration file is named
es-config.jsonby default.While setting the password for the configuration file, make sure it has a minimum of 14 characters and includes at least one number, one uppercase character, and one special character. Only the following special characters are allowed:
@ ! , # $ { } ( ) _ + . < > ? *All characters must be visible, printing ASCII characters.
Transfer the files to the Windows server on which you are installing the connector.
Caution: The configuration file contains sensitive information such as the tenant URL, tenant ID, the client ID and client secret for each of the enterprise services, and the password hash. It is critical that you do not share the file or expose it publicly.
Note: You might need to use a browser other than Internet Explorer to download the files. Default Internet Explorer settings might prevent you from downloading the files.
-
If you want to specify your installation options in an XML file instead of entering them on the command line, create the XML file first. See Creating an XML File for Omnissa Access Connector Silent Mode Installation.
Procedure
-
Log in to the Windows server.
-
Open a command prompt window.
-
Go to the directory that contains the Omnissa Access connector installer.
-
Run the Omnissa Access connector installer in silent mode.
-
If you are using an XML file to specify your installation options, run the following command:
Workspace-ONE-Access-Connector-Installer-23.09.exe /s /v” /qn WS1_CONFIG_FILE_PASSWORD=password WS1_SETUP_CONFIG_FILE=filepath /l*v logfilepath"/s /v” /qnspecifies silent mode.WS1_CONFIG_FILE_PASSWORDspecifies the password of the configuration file that you downloaded from the New Connector wizard in the Omnissa Access console.WS1_SETUP_CONFIG_FILEspecifies the path to your installation settings XML file./l*vspecifies the path to the installer log file to create.
Also, if you specified any installation options in the XML file that require a password, you must enter the password on the command line. Passwords are not stored in the XML file. For example, to specify a proxy server that requires authentication, you specify the proxy host name, port, and user name in the XML file, and enter the proxy user password on the command line.
For example:
Workspace-ONE-Access-Connector-Installer-23.09.exe /s /v” /qn WS1_CONFIG_FILE_PASSWORD=password WS1_PROXY_PASSWORD=password WS1_SETUP_CONFIG_FILE=C:\MyConnector\connectorinstall.xml /l*v C:\MyConnector\connectorinstall.log” -
If you want to enter your installation options directly on the command line instead of using an XML file, run the following command:
Workspace-ONE-Access-Connector-Installer-23.09.exe /s /v” /qn WS1_CONFIG_FILE_PATH=configFilepath WS1_CONFIG_FILE_PASSWORD=password OtherInstallationOptions /l*v logfilepath”/s /v” /qnspecifies silent mode.WS1_CONFIG_FILE_PATHspecifies the path to the configuration file that you downloaded from the New Connector wizard in the Omnissa Access console. The default name of the file ises-config.json.WS1_CONFIG_FILE_PASSWORDspecifies the password of the configuration file./lspecifies the path to the installer log file you want to use.OtherInstallationOptionsincludes one or more of the properties listed in Omnissa Access Connector Silent Mode Installation Properties. You must specify the required properties. Use the formatpropertyname=propertyvalue.
For example:
Workspace-ONE-Access-Connector-Installer-23.09.exe /s /v” /qn WS1_CONFIG_FILE_PATH=C:\ConnectorInstaller\es-config.json WS1_CONFIG_FILE_PASSWORD=*********** ADDLOCAL=UserAuthService WS1_IS_PROXY_ENABLED=1 WS1_PROXY_HOSTNAME=myproxy.example.com WS1_PROXY_PORT=443 /l*v C:\MyConnector\connectorinstall.log”
-
-
After the command completes successfully, verify that the services are running on the Windows server.
Service names:
- Directory Sync Service
- User Auth Service
- Kerberos Auth Service
- Virtual App Service
-
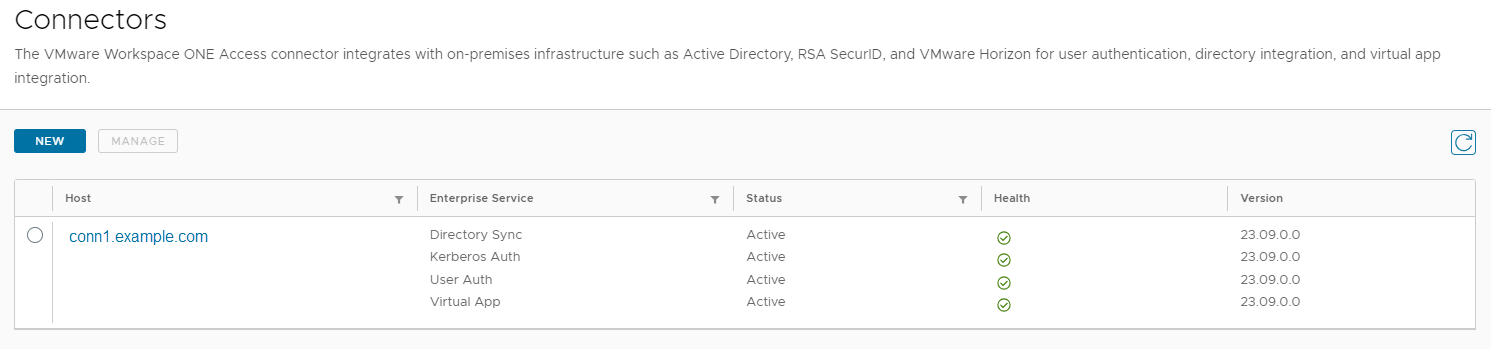
Go to the Omnissa Access console, refresh the Connectors page, and verify that the new services appear and are in Active state.
If the installation fails, delete both the installer and the configuration file that you downloaded from the Omnissa Access console, then start the installation process again.
Results
After successful installation, the enterprise services that you installed are registered with the Omnissa Access tenant and appear on the Connectors page in the Omnissa Access console.
What to do next
-
In the Omnissa Access console, configure the enterprise services you installed. For information about integrating directories using the Directory Sync service, see Directory Integration with Omnissa Access. For information about configuring authentication using the User Auth or Kerberos Auth service, see Managing User Authentication Methods in Workspace ONE. For information about integrating Horizon, Horizon Cloud Service on Microsoft Azure with Single-Pod Broker or Horizon Cloud Service on IBM Cloud, Citrix, and ThinApp virtual apps, see Setting up Resources in Omnissa Access.
-
(Kerberos Auth service only) If you are using the Omnissa Access generated self-signed certificate for the Kerberos Auth service, you need to add the root certificate generated by Omnissa Access to clients' truststores. You can get the root certificate,
root_ca.cer, fromINSTALLDIR\Workspace ONE Access\Kerberos Auth Service\conf.While you can use the self-signed certificate for testing purposes, trusted SSL certificates signed by a public or internal CA are recommended for production usage. See Uploading an SSL Certificate for the Kerberos Auth Service.
Was this page helpful?