The Agent Auto Upgrade feature is available to use in Horizon Console when your Horizon 8 deployment meets the requirements, the feature is enabled, and the agent installer packages are registered with your deployment.
OS Support: Agent Auto Update is only available for Windows agents. It is not supported for Linux agents.
Prerequisites
Your Horizon Console must:
- Display that the Auto Agent Upgrade feature is enabled
- Show that agent installer builds are registered.
If you need to complete those steps, see the Enable the feature and Register the agent sections. Otherwise, you can skip to Create and Verify Agent Upgrade Jobs.
- Licensing
- User Privilege Requirements
- Machines and RDS hosts status
- Agent Version Requirements
- VM or RDS Host Requirements
For more information about unsupported functionality, see What is not supported.
Licensing
To use the Agent Auto Upgrade feature, you must have Horizon 8 version 2312 or later and an appropriate license that includes access to this feature.
- Horizon 8 versions 2503 or later: Horizon Term and Horizon Universal Subscription include access to this feature.
- Horizon 8 versions 2312 - 2412: Horizon Universal Subscription and the Horizon Enterprise Plus Subscription include access to this feature.
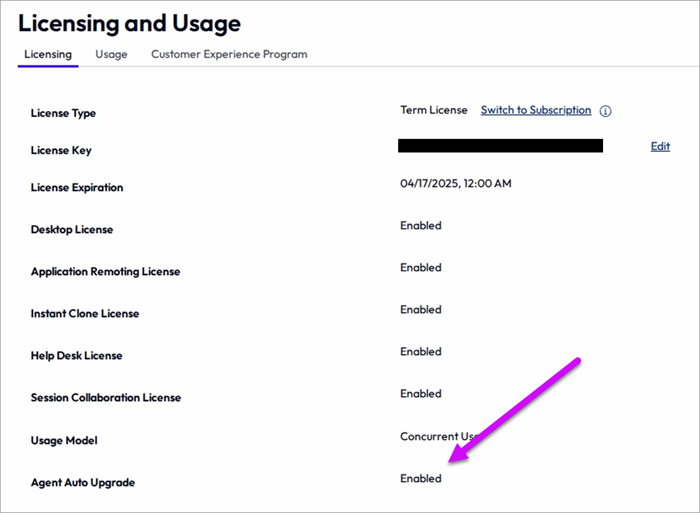
This screenshot shows the location where you can verify the feature is enabled. See the Enable the feature section.
Horizon Connection Server User Privilege Requirements
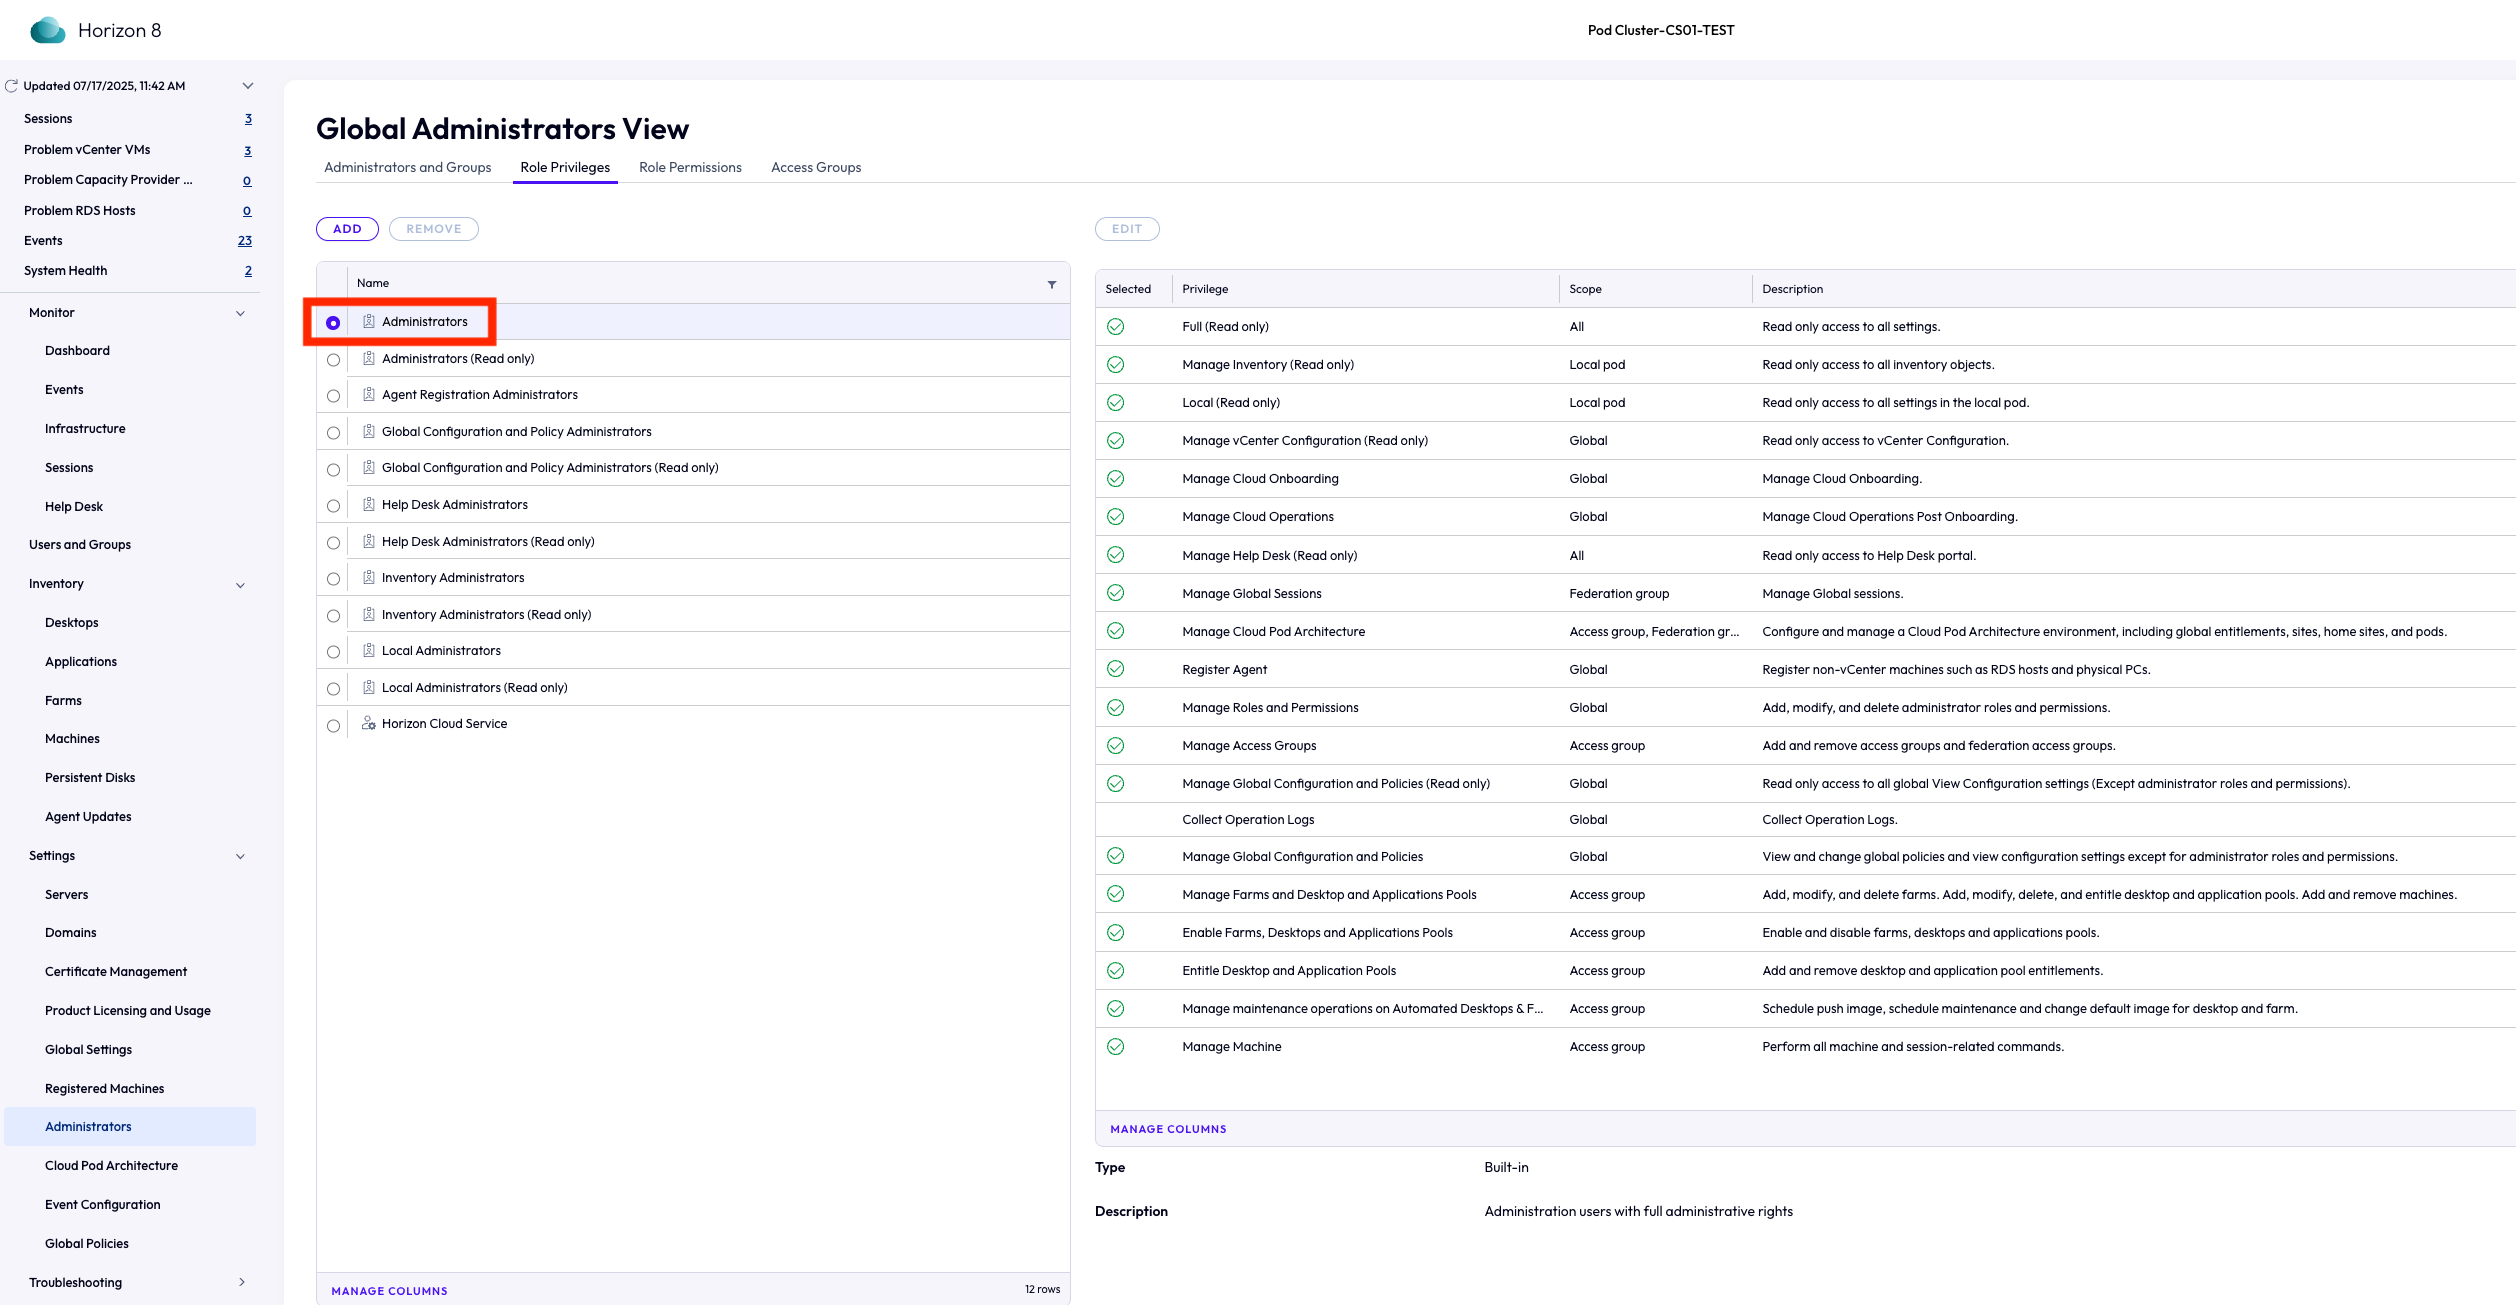
Only users with Administrators privileges can create and manage Agent Upgrade features. Feature-specific privileges are not available for customization.
This screenshot shows the Global Administrators View.
Machines and RDS hosts status
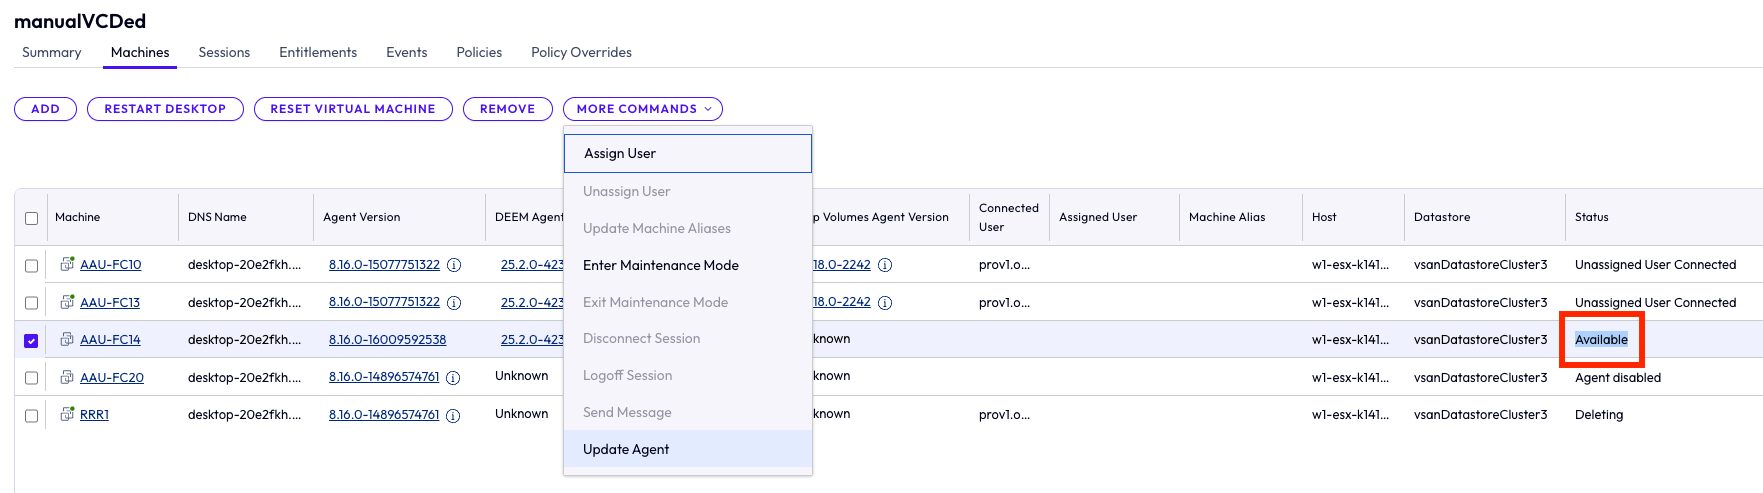
The machine or RDS host must also be in an available state to successfully schedule the agent upgrade. This feature is only supported at the Machines or RDS Hosts level and cannot be triggered at the Desktop Pool or Farm level.
This screenshot shows the machine status before running an update.
Horizon Agent Version Requirements
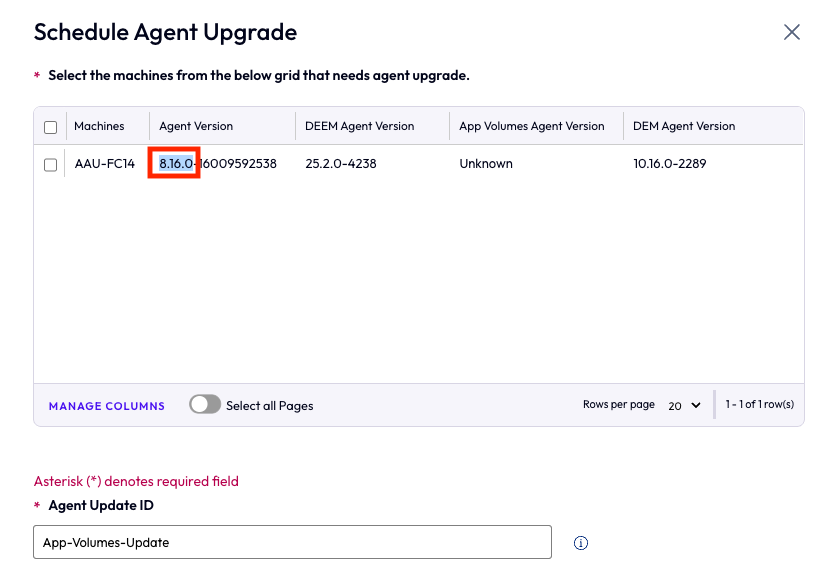
To upgrade Omnissa Telemetry Agent (DEEM), App Volumes, and DEM Agents, the machine or RDS host must have Horizon Agent version 8.16 or later installed.
This screenshot shows the current agent version.
Skip and Force Logoff of Connected Sessions
When scheduling a Horizon Agent upgrade, Horizon also evaluates whether the machine or RDS host has active user sessions.
- Skip Connected Sessions (default)
This option allows the upgrade to skip machines that have active user sessions and continue with the Agent Upgrade on the remaining machines in the job. If the job contains only one machine and it has a connected session, the job will fail due to the active session. - Force Logoff Connected Sessions
This option forces connected sessions to log off, displaying the default Windows alert (as shown below), and then proceeds with the Agent Upgrade on the machine.
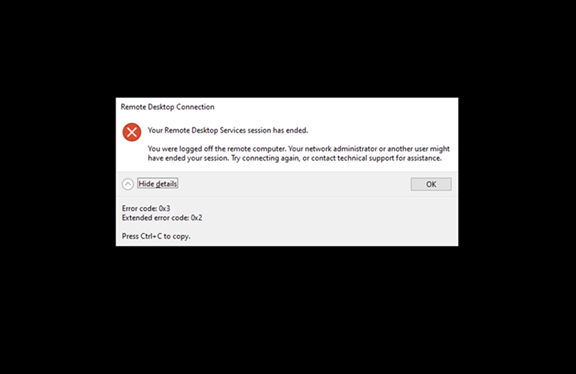
These options apply to both machines and RDS hosts.
VM or RDS Host Requirements
Before proceeding, verify the following for each VM or RDS host to ensure a successful Agent upgrade:
- Connectivity to the Connection Server
The Connection Server FQDN and IP address are resolvable and reachable (e.g., through ping). - Domain Configuration
The VMs or RDS hosts are in the same domain, or if in different domains, a domain trust is established. - Download URL Accessibility
The VMs or RDS hosts can resolve and access the external or internal download URL. - If using an internal download location, ensure the following:
- The URL is resolvable by the Agent VMs and RDS hosts.
- The server certificate is trusted.
- The VM or RDS host has sufficient available disk space.
- There are no pending or active Windows Update jobs. These should be resolved before proceeding.
What is Not Supported
Here is a list of functionality that is unsupported.
| Functionality | Description |
|---|---|
| Agent Upgrade |
Agent Upgrade for the following is not supported:
|
| Agent Downgrade |
|
| Bulk Operations | Simultaneous actions such as agent registration, removal, and cancellation of scheduled (but not yet started) jobs are not supported. Each operation must be performed individually. |
Expanded Agent Support
The Agent Auto Upgrade supports a broader set of agent installers beyond the core Horizon Agent, provided the relevant prerequisites and licensing requirements are met.
This expanded support allows admins to perform seamless upgrades management across additional Omnissa and third-party components installed on Horizon Agent machines, increasing operational efficiency and reducing manual upgrade efforts.
You can automatically update these Agents on the following:
- An automated desktop pool of full clones
- A manual desktop pool
- Manual farms RDS hosts (Upgrading an RDS host requires passing additional parameters. See KB article 6000992.)
Ensure that the Horizon Server and the Horizon Agent machine are both running version 2506 to support this feature for the following extended agents. For more information, see the Omnissa Interoperability Matrix.
| Agent Types | Agent Installer Name | Download Path | Documentation Link |
|---|---|---|---|
| Omnissa Telemetry Agent 2503 and above |
Installer:Omnissa-Telemetry-Agent-x86_64-a.b.c-d.exeMetadata: Omnissa-Telemetry-Agent-x86_64-a.b.c-d.exe-metadata.json |
Customer Connect Telemetry Agent Downloads | Omnissa Workspace ONE Experience Management |
| App Volumes 2506/4.18 and above |
Installer:Omnissa-AppVolumes-Agent-x64-yymm-a.b.c-d.msiMetadata: Omnissa-AppVolumes-Agent-x64-yymm-a.b.c-d-metadata.json |
Omnissa Customer Connect App Volumes downloads | - Install App Volumes Agent Silently - Upgrade App Volumes Agent Silently |
| DEM
2506/10.16 and above |
Installer:Omnissa-Dynamic-Environment-Manager-Enterprise-a.b.c.d-x64.msiMetadata: Omnissa-Dynamic-Environment-Manager-Enterprise-a.b.c.d-x64.msi-metadata.json |
Omnissa Customer Connect DEM downloads |
- Upgrade Omnissa Dynamic Environment Manager
- Unattended Installation of Omnissa Dynamic Environment Manager |
Note: The listed versions of Telemetry Agent, DEM, and App Volumes can be freshly installed or upgraded. However, Horizon Agent version 2506 or later must already be present on the machine and can only be upgraded.
App Volumes
To ensure a successful installation or upgrade of App Volumes, the following additional steps are required:
- When installing App Volumes agent, the following Command Line Arguments are mandatory: MANAGER_ADDR, MANAGER_PORT, and /forcerestart.
where MANAGER_ADDR is the FQDN or IP address of App Volumes Manager - When upgrading App Volumes agent, the following Command Line Argument is mandatory: /forcerestart.
- Before upgrading App Volumes agent, restart the virtual machine where you intend to run the Agent Auto Upgrade feature and ensure that no user is logged into the virtual machine.
Enable the feature
The enablement steps are different depending on your Horizon 8 deployment version and the active license type, either Horizon Term, Horizon Universal Subscription, or Horizon Enterprise Plus Subscription.
Enabling under Horizon Term
Note: If you are using Horizon Term, you can enable the Agent Auto Upgrade feature when your Horizon 8 deployment is version 2503 or later.
In the Horizon Console, verify that your Omnissa Horizon license key is added and the Licensing and Usage page confirms that Auto Agent Upgrade is enabled. For more information, see Add or Update Horizon 8 License in the Horizon Administration guide.
After you've enabled the feature, register the agent installer builds in the Horizon Console. See the Register the agent installer for more information.
Enabling under SaaS licenses
Note: If you have Horizon Universal Subscription or Horizon Enterprise Plus Subscription, you can enable the Agent Auto Upgrade feature when your Horizon 8 deployment is version 2312 or later.
Before you can enable the feature, the SaaS license must be activated in your Horizon 8 deployment.
- Verify your SaaS license is active on the Licensing and Usage page in the Horizon Console.
- If active, confirm that the page shows Auto Agent Upgrade is enabled. If it is, then proceed to Register the agent installer builds.
- If the license is inactive or missing, activate it by following the steps in Enabling Horizon 8 for SaaS Subscription Licenses. Complete the relevant steps according to whether or not you are deploying the Horizon Edge.
Edgeless activation: Verify that the Auto Agent Upgrade is enabled on the Licensing and Usage page. You must then register the agent installer builds in Horizon Console as described in Register the agent installer.
Horizon Edge Deployment: Enable the feature using the Horizon Universal Console by completing the steps in Managing the Agent Auto Upgrade Feature for a Horizon 8 Edge. (You log in to the Horizon Universal Console using Omnissa Connect and launch Horizon Cloud from your services.)
Register Installer Packages
The available registration method depends on whether or not Horizon Edge is deployed in your environment.
Edgeless (no Horizon Edge)
If your deployment has an active Horizon Term license or an applicable SaaS edition without Horizon Edge, you are responsible for hosting the Horizon Agent builds on your own web server.
You must then manually register them using the steps below.
Note: For Horizon 8 versions 2312 - 2503, web (URL) hosting is the only supported option for internal or on-premises network deployments. Support for hosting packages on a UNC (SMB) share was introduced in Horizon Connection Server 2512. See Register Installer Packages from a UNC Share (SMB) for details.
Internal Web Server Requirements
If you host installer packages on an internal web server, ensure that the following requirements are met:
Certificate Requirements
- The web server certificate must be trusted by all Horizon Connection Servers.
- The TLS certificate presented by the internal web server must chain to a trusted root certificate authority on each Connection Server.
If you use a self-signed certificate:
- Import the certificate into the Trusted Root Certification Authorities certificate store on each Connection Server.
- Restart the Horizon Connection Server service on each server for the changes to take effect.
Network Requirements
All Agent machines (virtual desktops and RDS hosts) must be able to:
- Resolve the hostname of the internal web server
- Access the internal web server URL over the network
Installer packages are downloaded directly by Agent machines and are not proxied through Connection Servers. Ensure that all Agent machines have network connectivity to the internal web server.
Download the Required Files
Download the Horizon Agent installer and its corresponding metadata file from Omnissa Customer Connect.
- Navigate to Horizon Service > Horizon Subscription.
- Click the download link for Horizon 8 yymm Subscription, where
yymmis the Horizon 8 release version.
Installer File Naming Format
Installer
Omnissa-Horizon-Agent-x86_64-yymm-z.z.z-xxxxxxxx.exeyymm= the Horizon 8 release versionz.z.z= the internal version numberxxxxxxxx= build number
Metadata
Omnissa-Horizon-Agent-x86_64-yymm-z.z.z-xxxxxxxx.exe-metadata.jsonyymm= the Horizon 8 release versionz.z.z= the internal version numberxxxxxxxx= build number
Horizon Edge Deployment
When Horizon Edge is deployed in your environment and the Agent Auto Upgrade feature is enabled, the Horizon Edge service automatically registers the three most recent Horizon Agent release versions.
Specifically, it registers the current Horizon Agent version and the two preceding versions.
This automatic registration is triggered when you enable the Agent Auto Upgrade feature by following the steps outlined in Managing the Agent Auto Upgrade Feature for a Horizon 8 Edge.
Horizon Connection Server Console Registration
- Log in as an administrator to complete the Agent Installer Package registration.
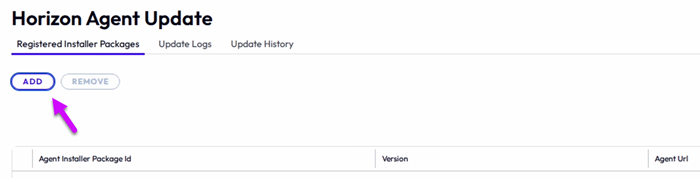
- Navigate to Agent Updates > Installer Packages. Click the Add button.
This screenshot illustrates the location of the registered agent installer builds. The added packages are listed in this Horizon Console page.
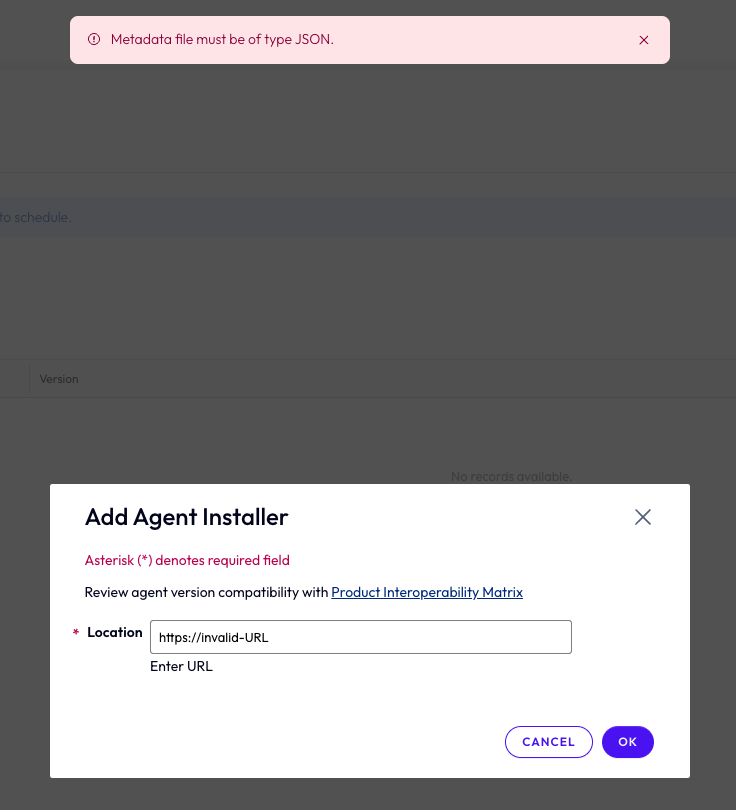
- Enter the Agent Installer metadata JSON URL in the Location text box, then click OK. Invalid URLs will not be allowed to register and will be rejected with the error message: "Metadata file must be of type JSON," as shown below:
Review agent version compatibility using the Product Interoperability Matrix.
- After adding a valid Agent Installer URL, the corresponding installer will appear in the Agent Updates data grid, displaying its Installer Name, Version, and Agent Location.
Here is the list of automated installer names and sample URL formats corresponding to the supported agent types:
| Agent Type | Installer Name | Sample URL format |
|---|---|---|
| Horizon | Horizon-Enterprise-Agent | https://valid-url/Omnissa-Horizon-Agent-x86_64-yymm-release.version-buildnumber.exe |
| DEEM | Omnissa-Telemetry-Agent | https://valid-url/Omnissa-Telemetry-Agent-x86_64-yymm-release.version-buildnumber.exe |
| App Volumes | App-Volumes-Agent | https://valid-url/Omnissa-AppVolumes-Agent-x64-yymm-release.version-buildnumber.msi |
| DEM | DEM-Agent | https://valid-url/Omnissa-Dynamic-Environment-Manager-Enterprise-release.version.buildnumber-x64.msi |
Register Installer Packages from a UNC Share (SMB)
Beginning Horizon Connection Server 2512 and Agent 2506, you can host Horizon Agent installer packages on an internal UNC (SMB) share and register them with Agent Auto Upgrade (AAU). This option is intended for environments where Connection Servers or Horizon Edge appliances cannot access external sources such as CDS, or where administrators prefer to manage agent builds internally.
To register installer packages from a UNC share:
-
Place the Horizon Agent installer and its associated metadata JSON file on an SMB share that is accessible using a UNC path.
Example:\\fileserver\HorizonAgent\Build_YYMM\ -
Verify the following preconditions:
- Minimum Horizon Agent version: 2506
- The Connection Server and the Agent machines must be joined to the same Active Directory domain.
- The administrator initiating the upgrade must have read permissions on the SMB share.
- SMB share access permissions:
- Read: Horizon administrators and AAU services
- Write: Only the account responsible for uploading installer packages
- Read: Horizon administrators and AAU services
-
Create an Active Directory security group containing the computer accounts of the Agent machines that require access to the SMB share:
a. Open Active Directory Users and Computers on a domain controller.
b. Navigate to the organizational unit where you want to create the group.
c. Right-click the OU and select New > Group.
d. Enter a group name and configure:
- Group scope: Global or Universal
- Group type: Security
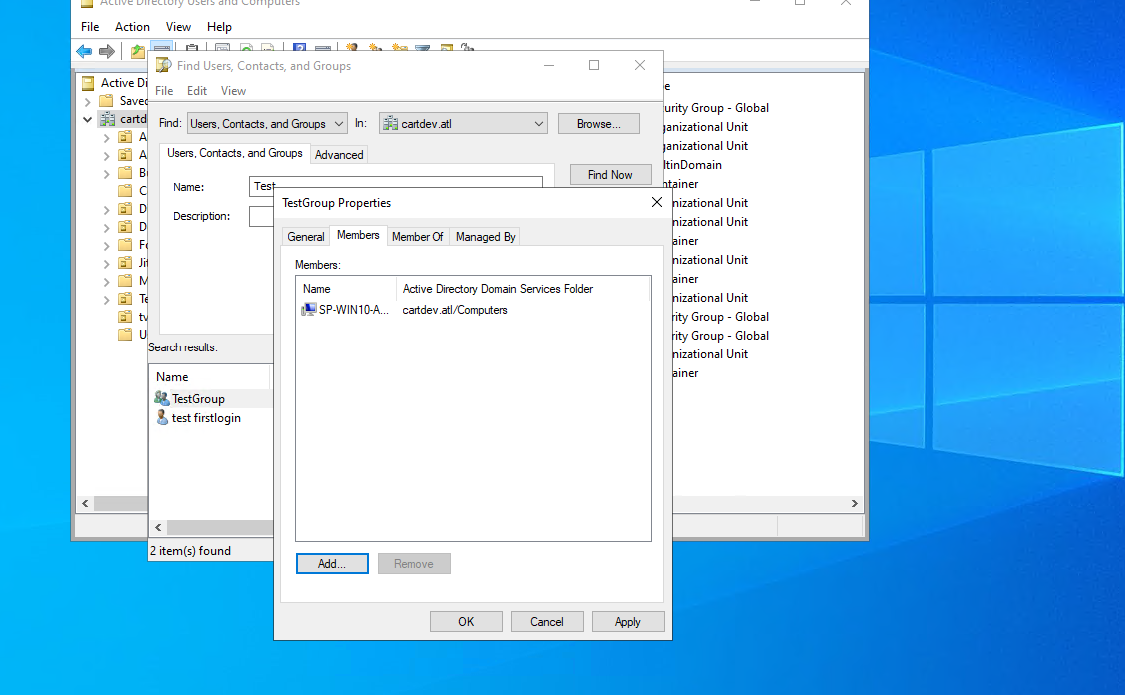
- Click OK.e. Open the properties of the group and select the Members tab.
f. Click Add, then select Object Types and enable Computers.
g. Enter the names of the Agent machines and click Check Names.
h. Click OK, then click Apply.
The selected Agent machines are now members of the access group. -
Create an SMB shared folder for hosting the installer packages:
a. Create a new folder on a Windows Server machine.
b. Right-click the folder and select Properties.
c. On the Sharing tab, click Advanced Sharing.
d. Select Share this folder, then click Permissions.
e. Remove Everyone from the ACL.
f. Click Add, enter the name of the security group created earlier, and validate it with Check Names.
g. Assign at least Read permissions to the group and click OK.
h. In the folder properties, open the Security tab.
i. Click Edit, add the same security group, and assign the required NTFS permissions.
j. Click Apply and OK.
Using a Windows Server machine is recommended to support higher SMB connection limits.
-
Ensure that both the Connection Server and the Update Tool have network connectivity and read permissions to the SMB share.
-
When registering the installer package, specify the UNC path that contains the installer and metadata JSON file. The Connection Server reads the metadata file and records the package details for use with AAU upgrade jobs.
-
During an upgrade job, the Update Tool downloads the installer directly from the UNC path and applies the agent update to the target machine or RDS host.
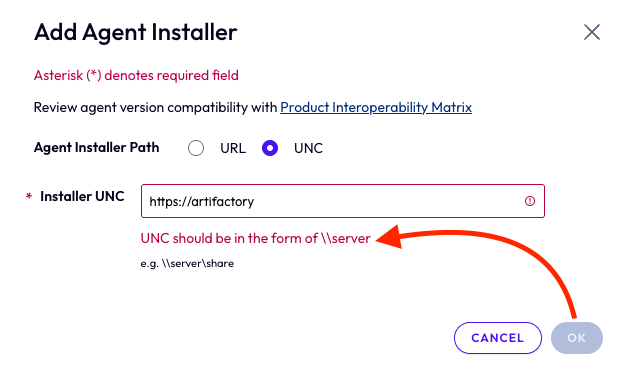
- UNC registration is supported for all agent types.
- The UNC path must be in the form
\\serverfor a successful registration, otherwise, the OK button will not be enabled to finish registration.
Create and Verify Agent Upgrade Jobs
The steps to create an Agent Upgrade job for any supported agent type, including Horizon, DEEM, App Volumes, and DEM, are largely the same for both vCenter desktop pools and farms. Jobs can be created for a single or multiple machines and RDS hosts. The Horizon Console UI provides two workflows for each supported type of vCenter desktop pool and farm to create an Agent Upgrade job. See the details for navigating the Horizon Console UI and creating Agent Upgrade jobs using the two supported workflows:
Agent Upgrade Workflow for vCenter Desktop Pools
There are two navigation paths to initiate and verify an agent upgrade for automated full-clone pools, manual vCenter pools (with dedicated or floating user assignments), and manual unmanaged pools. The upgrade process is the same across both workflows. The only difference is how you access the Machines tab.
- Navigate to Inventory > Machines > vCenter tab for automated full clone pools or manual vCenter pools, or to the Others tab for manual unmanaged pools.
- Navigate to Inventory > Desktops, click the respective Desktop Pool ID, and then go to the Machines tab.
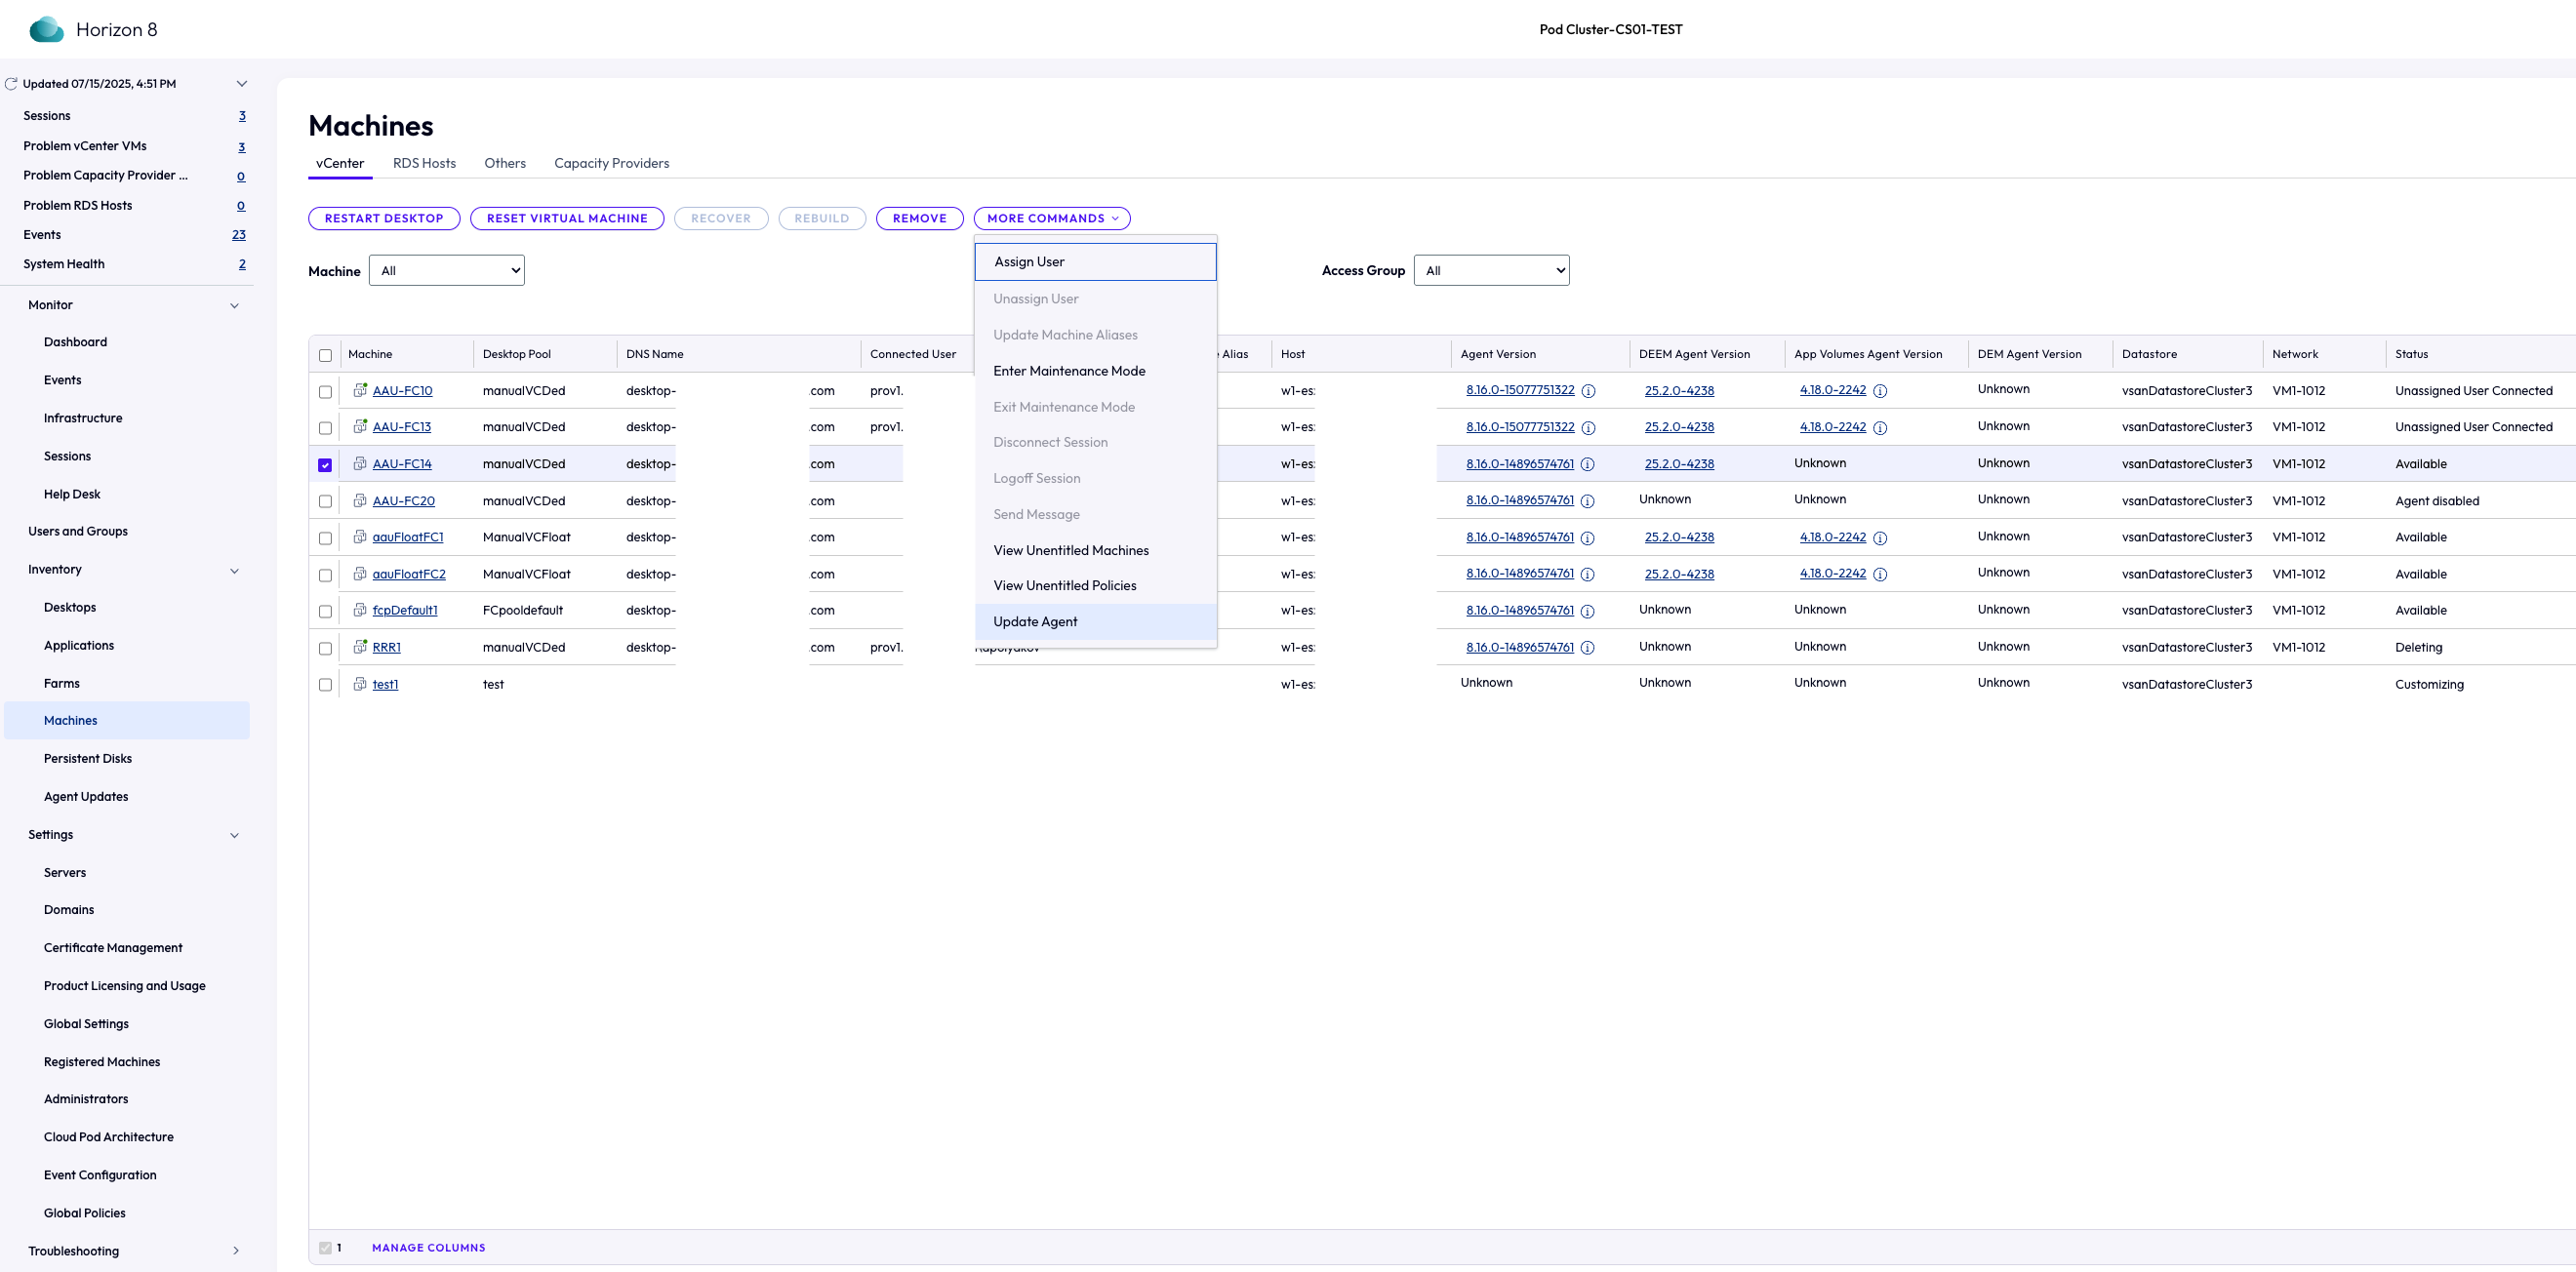
- Navigate to the applicable Machines tab, and select a machine with Status: Available.
The Update Agent button will be enabled. Click Update Agent to open the Schedule Agent Upgrade wizard.
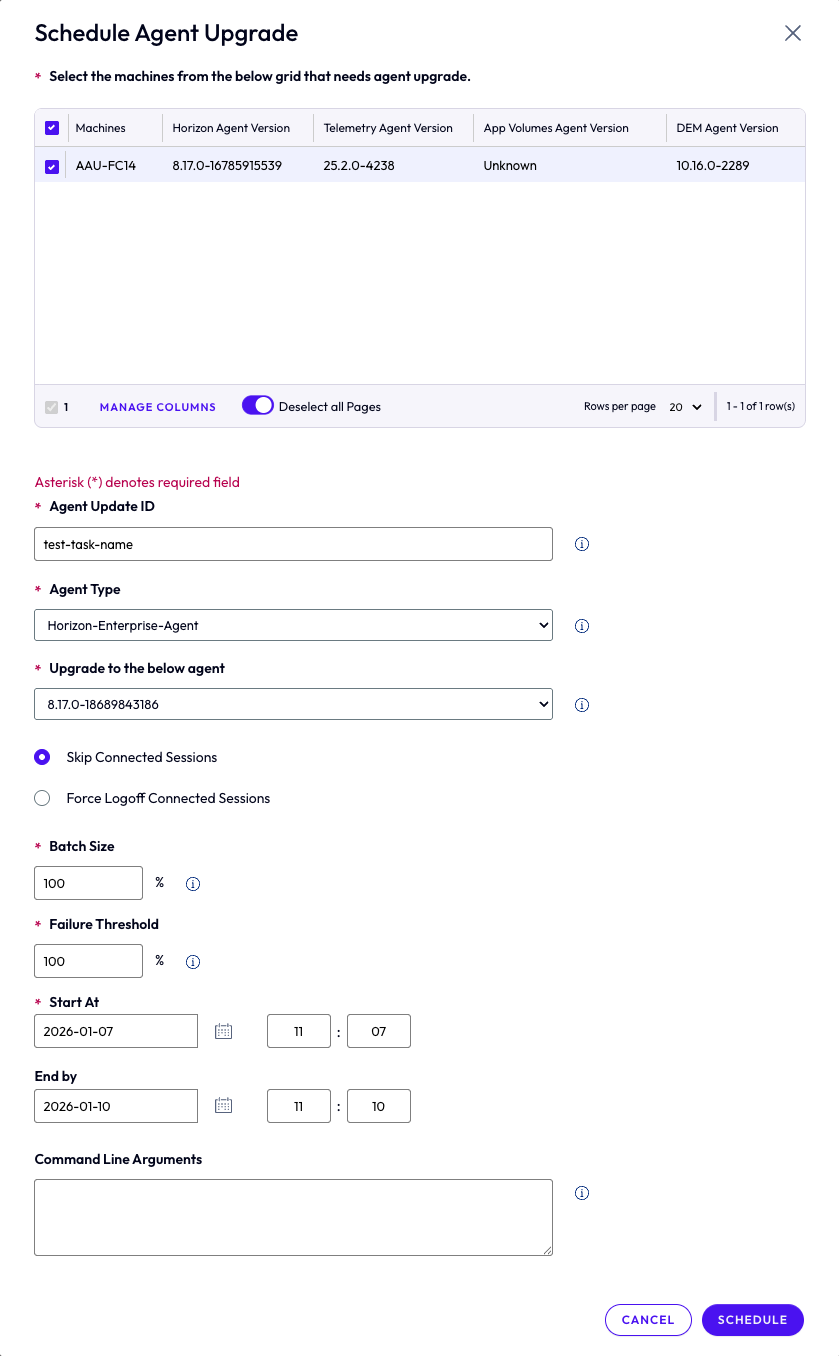
- Schedule agent upgrade Complete the required fields in the wizard:
| Field | Description |
|---|---|
| Agent Update ID* | Required |
| Agent Type* | Required |
| Upgrade to the below agent* | Required |
| Skip Connected Sessions | Optional |
| Batch Size* | Required |
| Failure Threshold* | Required |
| Start At | Optional, must be earlier than End By |
| End By | Optional |
| Command Line Arguments | Optional |
You can upgrade only one agent per upgrade task. To upgrade several agents, you must create a separate task for each one.
You can select agents in any order, and every agent is available each time you open the Schedule Agent Upgrade wizard. Tasks run at their scheduled times, and no agent takes priority over another.
For example, to upgrade all four supported agents (Horizon, DEEM, DEM, and App Volumes) on 100 machines, create four upgrade tasks, each with its own schedule. Schedule the tasks at even intervals so they run one after another.
Even without set intervals, the tasks don’t overlap, because each task waits for the previous one to finish. If a machine is busy with another task, the upgrade waits and retries for a period of time before it moves on to the next upgrade task.
Note: Fields marked with * are mandatory.
Click Schedule after completing all required fields. A success message will confirm that the Agent Update has been scheduled.

Click the Schedule button after filling in all the required fields.
The Agent Update has been scheduled successfully.
3.Track Scheduled Jobs
Navigate to Agent Updates > Scheduled Jobs tab. The Machines filter is selected by default. The data grid shows jobs created for all desktop pools, including unmanaged machines and the values provided during Agent Upgrade job creation.
Jobs are initially Not Started, then In Progress (based on the scheduled start time and with a 30-second delay before the job begins), and Completed once the job has finished.
Note: The Completed state does not indicate a successfully completed job. It only indicates that the process has ended.
- View Final Resolution Remarks
Click the Hosts Count number for the respective job in the data grid. The Selected Hosts for Job 'Job-Name' window opens, showing the final status under the Remarks column.
The Remarks column is empty while the job is in progress. Once completed, it displays "Agent upgrade job has ended." The upgraded agent version is shown in the corresponding agent version column.
Here are a few self-explanatory remarks that may appear for failed jobs:
- "Upgrade process is not paused but the machine is skipped for upgrade."
- "The job did not complete within the specified time limit and was automatically terminated."
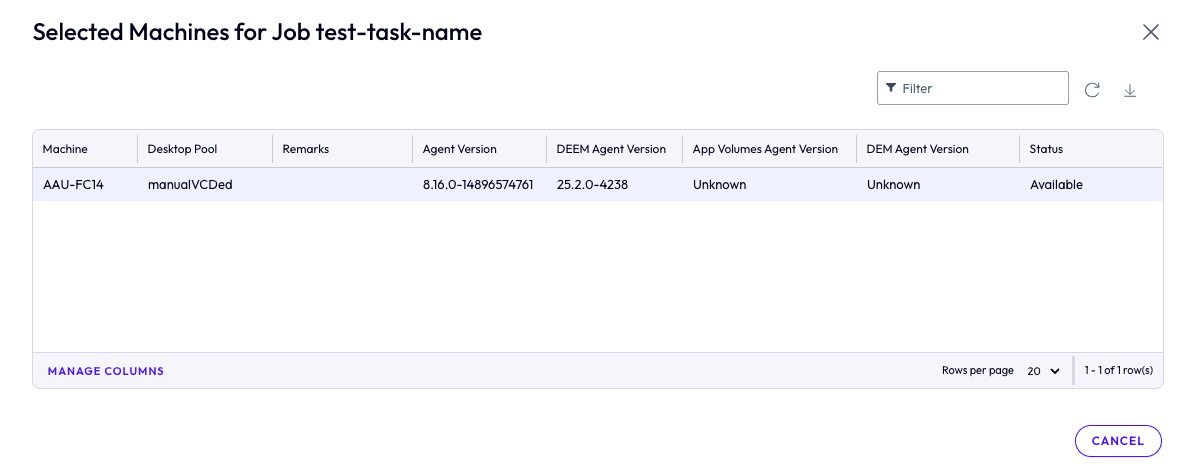
5.Verify the Agent Upgrade
- Return to Inventory > Machines > vCenter for automated full clone pools or manual vCenter pools with dedicated or floating user assignments, or to Inventory > Machines > Others tab for manual unmanaged machines.
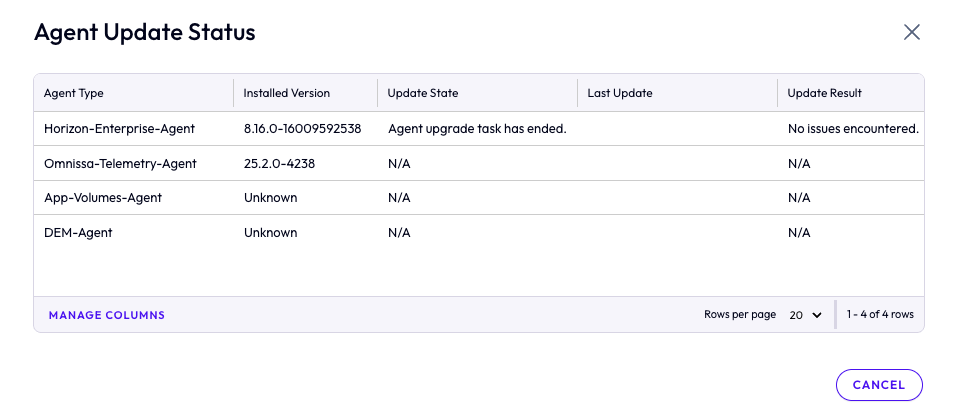
- Check the applicable Agent Version column (Agent Version, DEEM Agent Version, App Volumes Agent Version, or DEM Agent Version) for the completed upgrade job. The upgraded agent version appears as a clickable link.
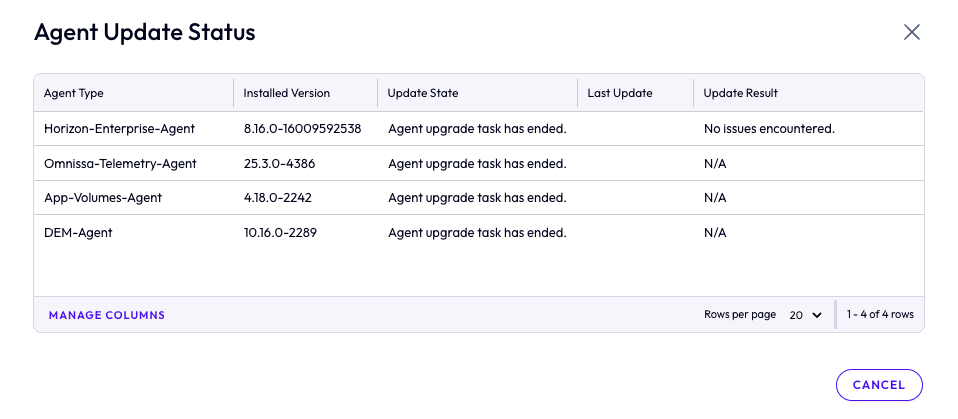
- Click the link to open Agent Update Status. For a successfully completed job, the Update State should be "Agent upgrade job has ended," and the Update Result should be "No issues encountered."
Agent Upgrade Workflow for vCenter Farms (Manual)
There are two navigation paths to initiate and verify an agent upgrade for manual vCenter farms. The upgrade process is the same across both workflows. The only difference is how you access the RDS Hosts tab.
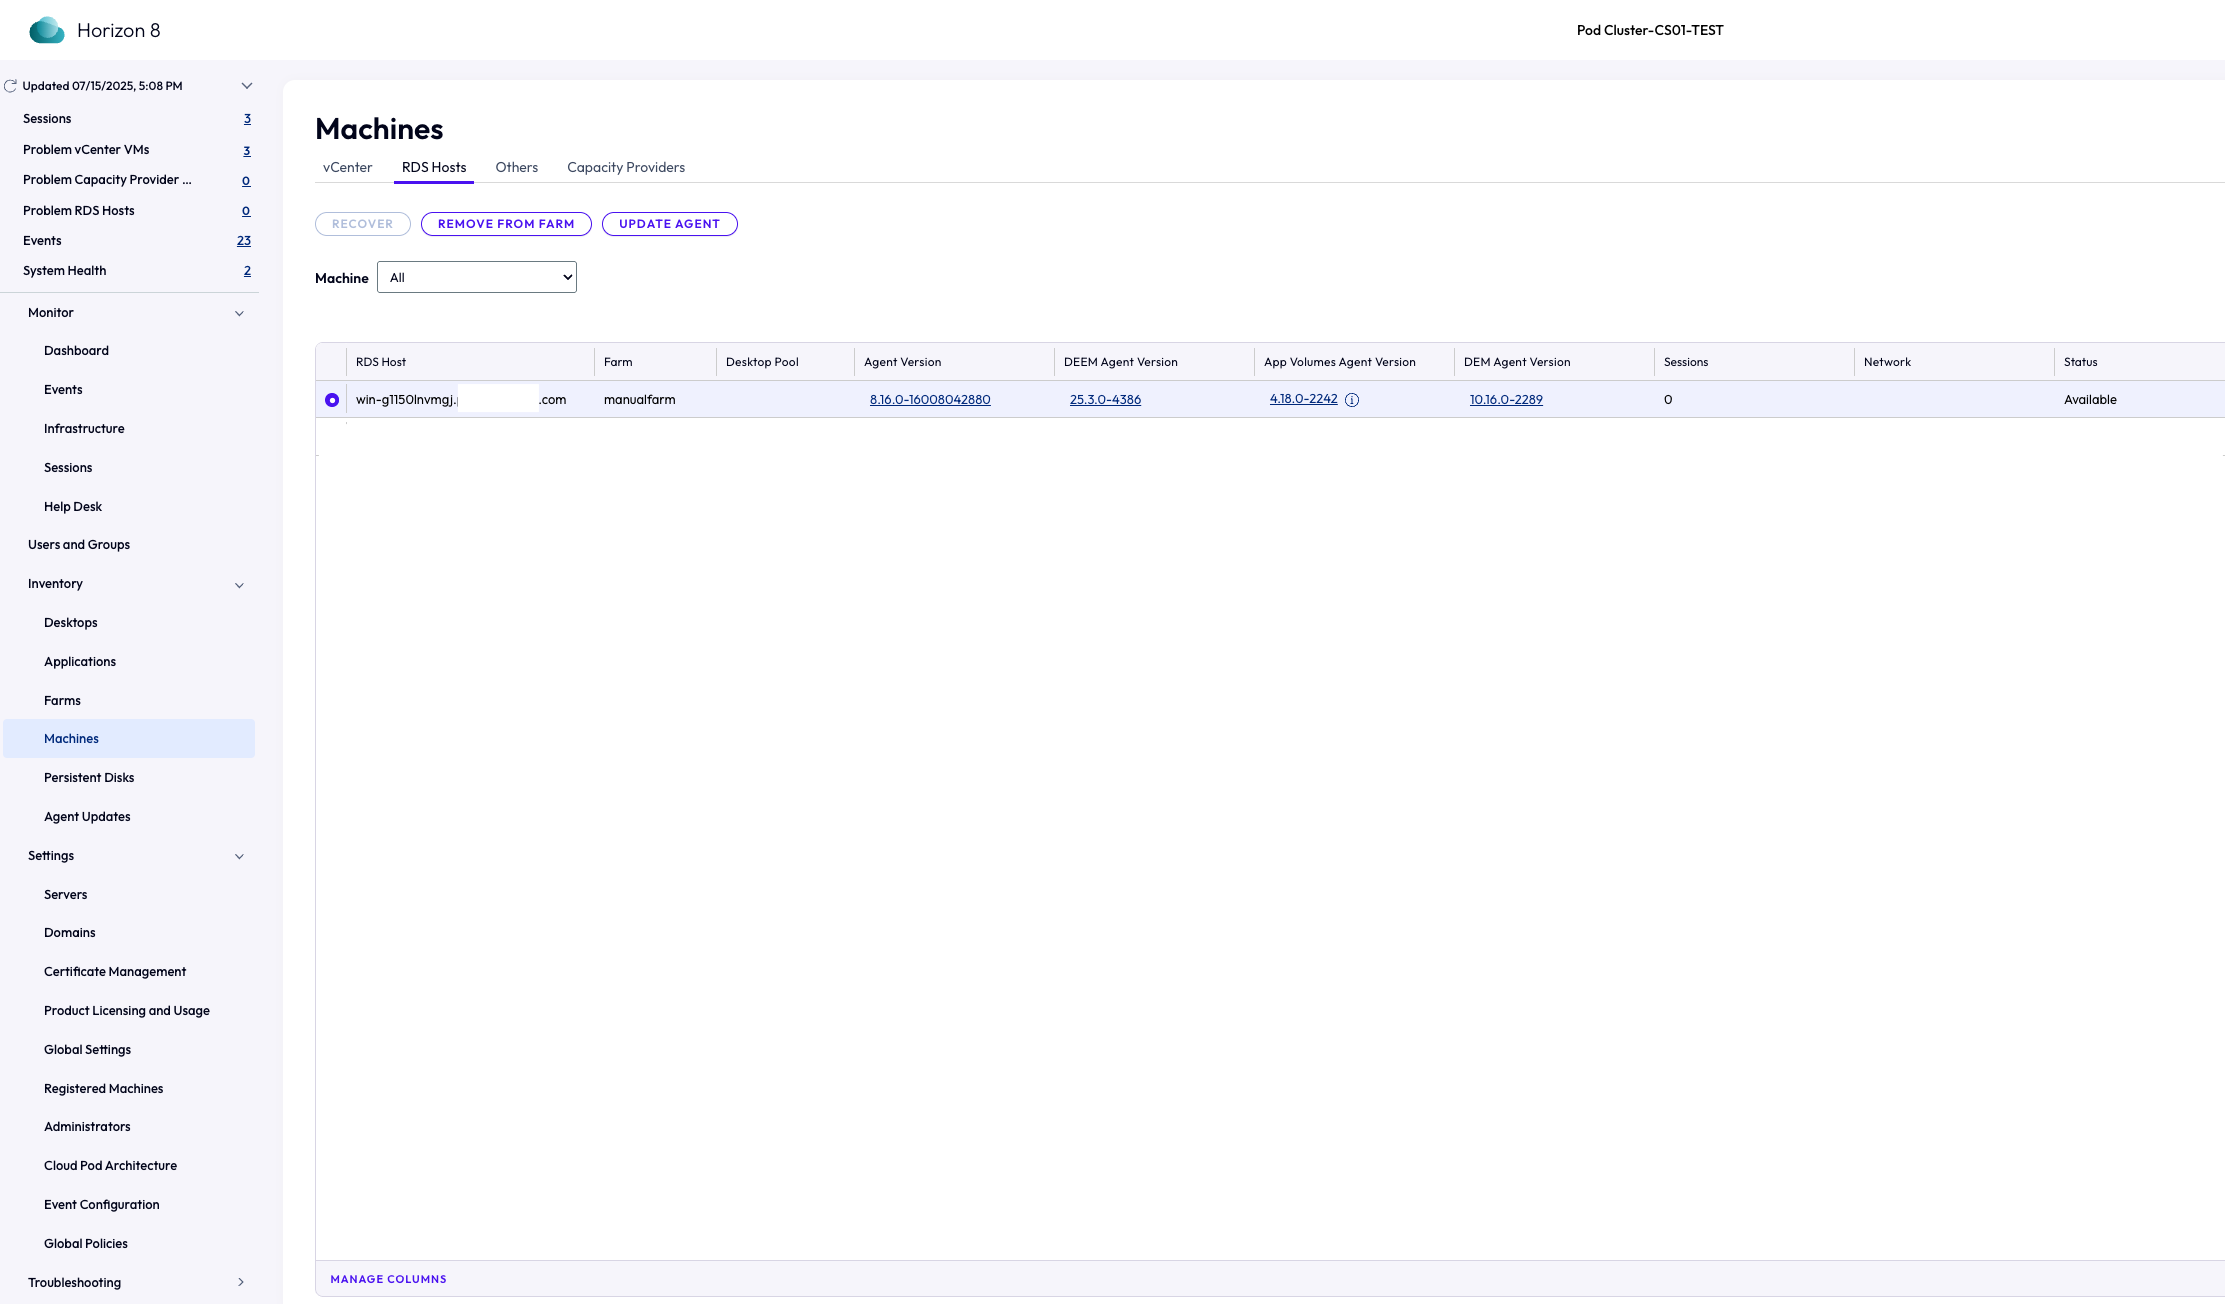
- Navigate to Inventory > Machines > RDS Hosts tab for manual vCenter farms.
- Navigate to Inventory > Farms, click the respective Farm ID, and then go to the RDS Hosts tab for manual vCenter farms.
- Navigate to Inventory > Machines > RDS Hosts tab for manual vCenter farms, and select an RDS Host with Status: Available.
The Update Agent button will be enabled. Click Update Agent to open the Schedule Agent Upgrade wizard.
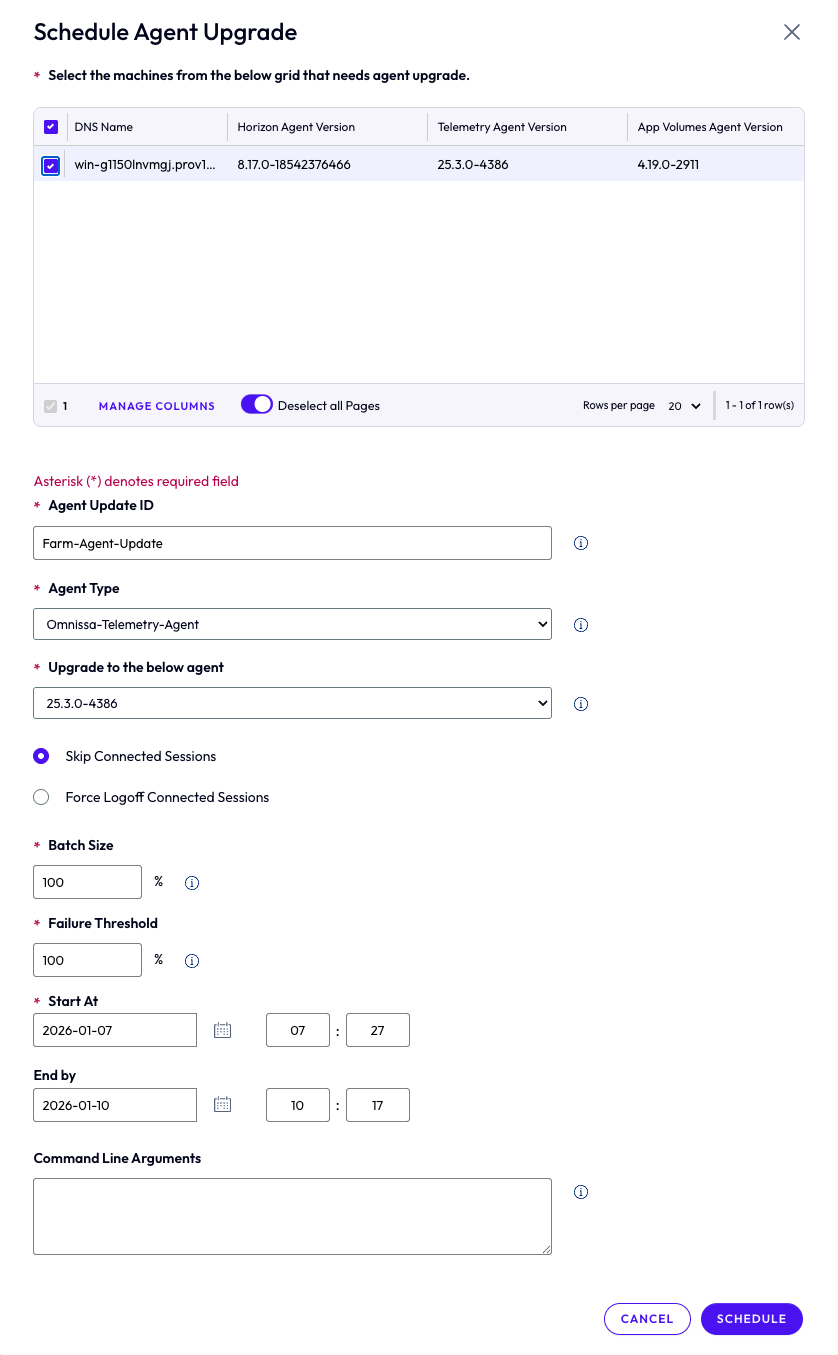
- Schedule agent upgrade Complete the required fields in the wizard:
| Field | Description |
|---|---|
| Agent Update ID* | Required |
| Agent Type* | Required |
| Upgrade to the below agent* | Required |
| Skip Connected Sessions | Optional |
| Batch Size* | Required |
| Failure Threshold* | Required |
| Start At | Optional, must be earlier than End By |
| End By | Optional |
| Command Line Arguments | Optional (see note below) |
Note: Fields marked with * are mandatory.
For manual farms, if the Agent Type is Horizon-Enterprise-Agent, enter the following in the Command Line Arguments field:
HORIZON_AGENT_AAU=1 HORIZON_CLOUD_DEPLOYMENT=1 VDM_SKIP_BROKER_REGISTRATION=1 VDM_SKIP_ADD_LDAP_MACHINE_ENTRY=1
This command is not required for other agent types.
Click Schedule after completing all required fields. A success message will confirm that the Agent Update has been scheduled.
Click the Schedule button after filling in all the required fields.
The Agent Update has been scheduled successfully.
- Track Scheduled Jobs
Navigate to Agent Updates > Scheduled Jobs tab and click the RDS Hosts filter. The datagrid shows jobs created for all farms, including the values provided during Agent Upgrade job creation.
Jobs are initially Not Started, then In Progress (based on the scheduled start time and with a 30-second delay before the job begins), and Completed once the job has finished.
Note: The Completed state does not indicate a successfully completed job. It only indicates that the process has ended.
- View Final Resolution Remarks
Click the Hosts Count number for the respective job in the data grid. The Selected Hosts for Job 'Job-Name' window opens, showing the final status under the Remarks column.
The Remarks column is empty while the job is in progress. Once completed, it displays "Agent upgrade job has ended." The upgraded agent version is shown in the corresponding agent version column.
Here are a few self-explanatory remarks that may appear for failed jobs:
- "Upgrade process is not paused but the machine is skipped for upgrade."
- "The job did not complete within the specified time limit and was automatically terminated."
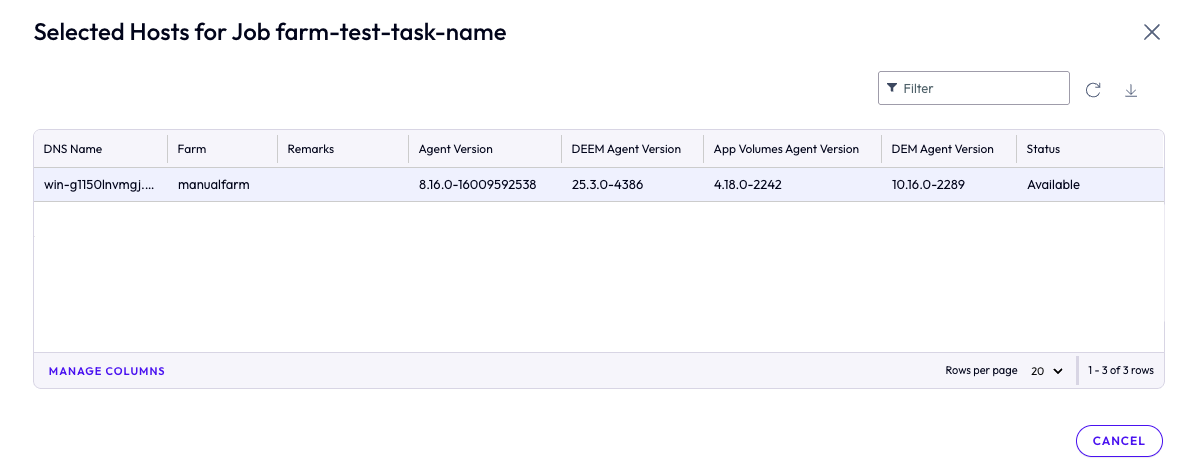
- Verify the Agent Upgrade
- Return to Inventory > Machines > RDS Hosts for manual farms.
- Check the applicable Agent Version column (Agent Version, DEEM Agent Version, App Volumes Agent Version, or DEM Agent Version) for the completed upgrade job. The upgraded agent version appears as a clickable link.
- Click the link to open Agent Update Status. For a successfully completed job, the Update State should be "Agent upgrade job has ended," and the Update Result should be "No issues encountered."
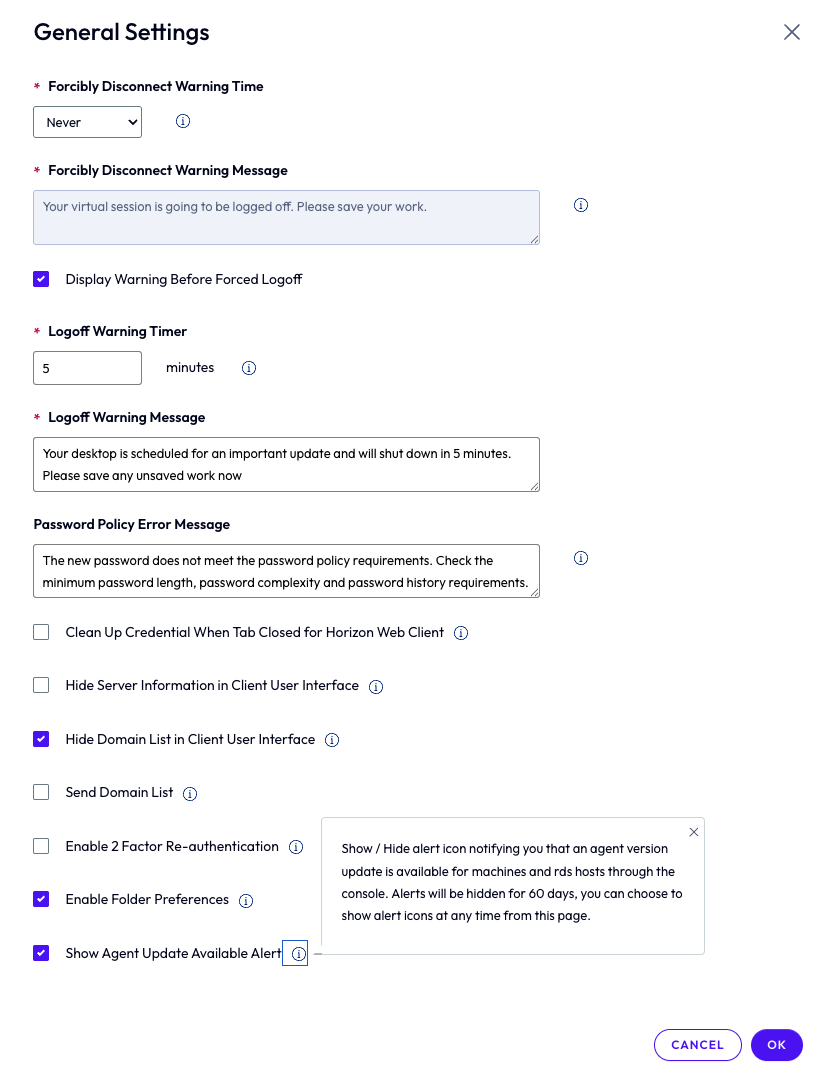
Agent Update Notification
Enable/Disable Show Agent Update Available Alert controls whether the balloon notification is shown when updates are available for Horizon, DEEM, App Volumes, and DEM agents. By default, the Show Agent Update Available Alert option is checked.
This option does not display the info icon instantly; it appears gradually and may impact the loading time of the Machines/RDS Hosts data.
Settings > Global Settings tab: Click Edit > Show Agent Update Available Alert
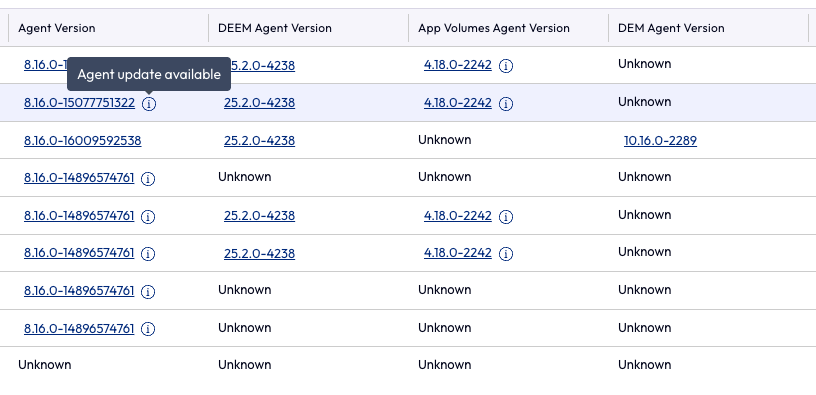
View (Horizon Connection Server Console Path) An info icon appears next to the agent version in the Machines and RDS Hosts data grids when updates are available. Hovering over the info icon displays a tooltip that reads "Agent update available."
- Inventory > Machines > vCenter tab
- Inventory > Desktops: Click the respective Desktop Pool ID, then go to the Machines tab
- Inventory > Machines > RDS Hosts tab
- Inventory > Farms: Click the respective Farm ID, then go to the RDS Hosts tab
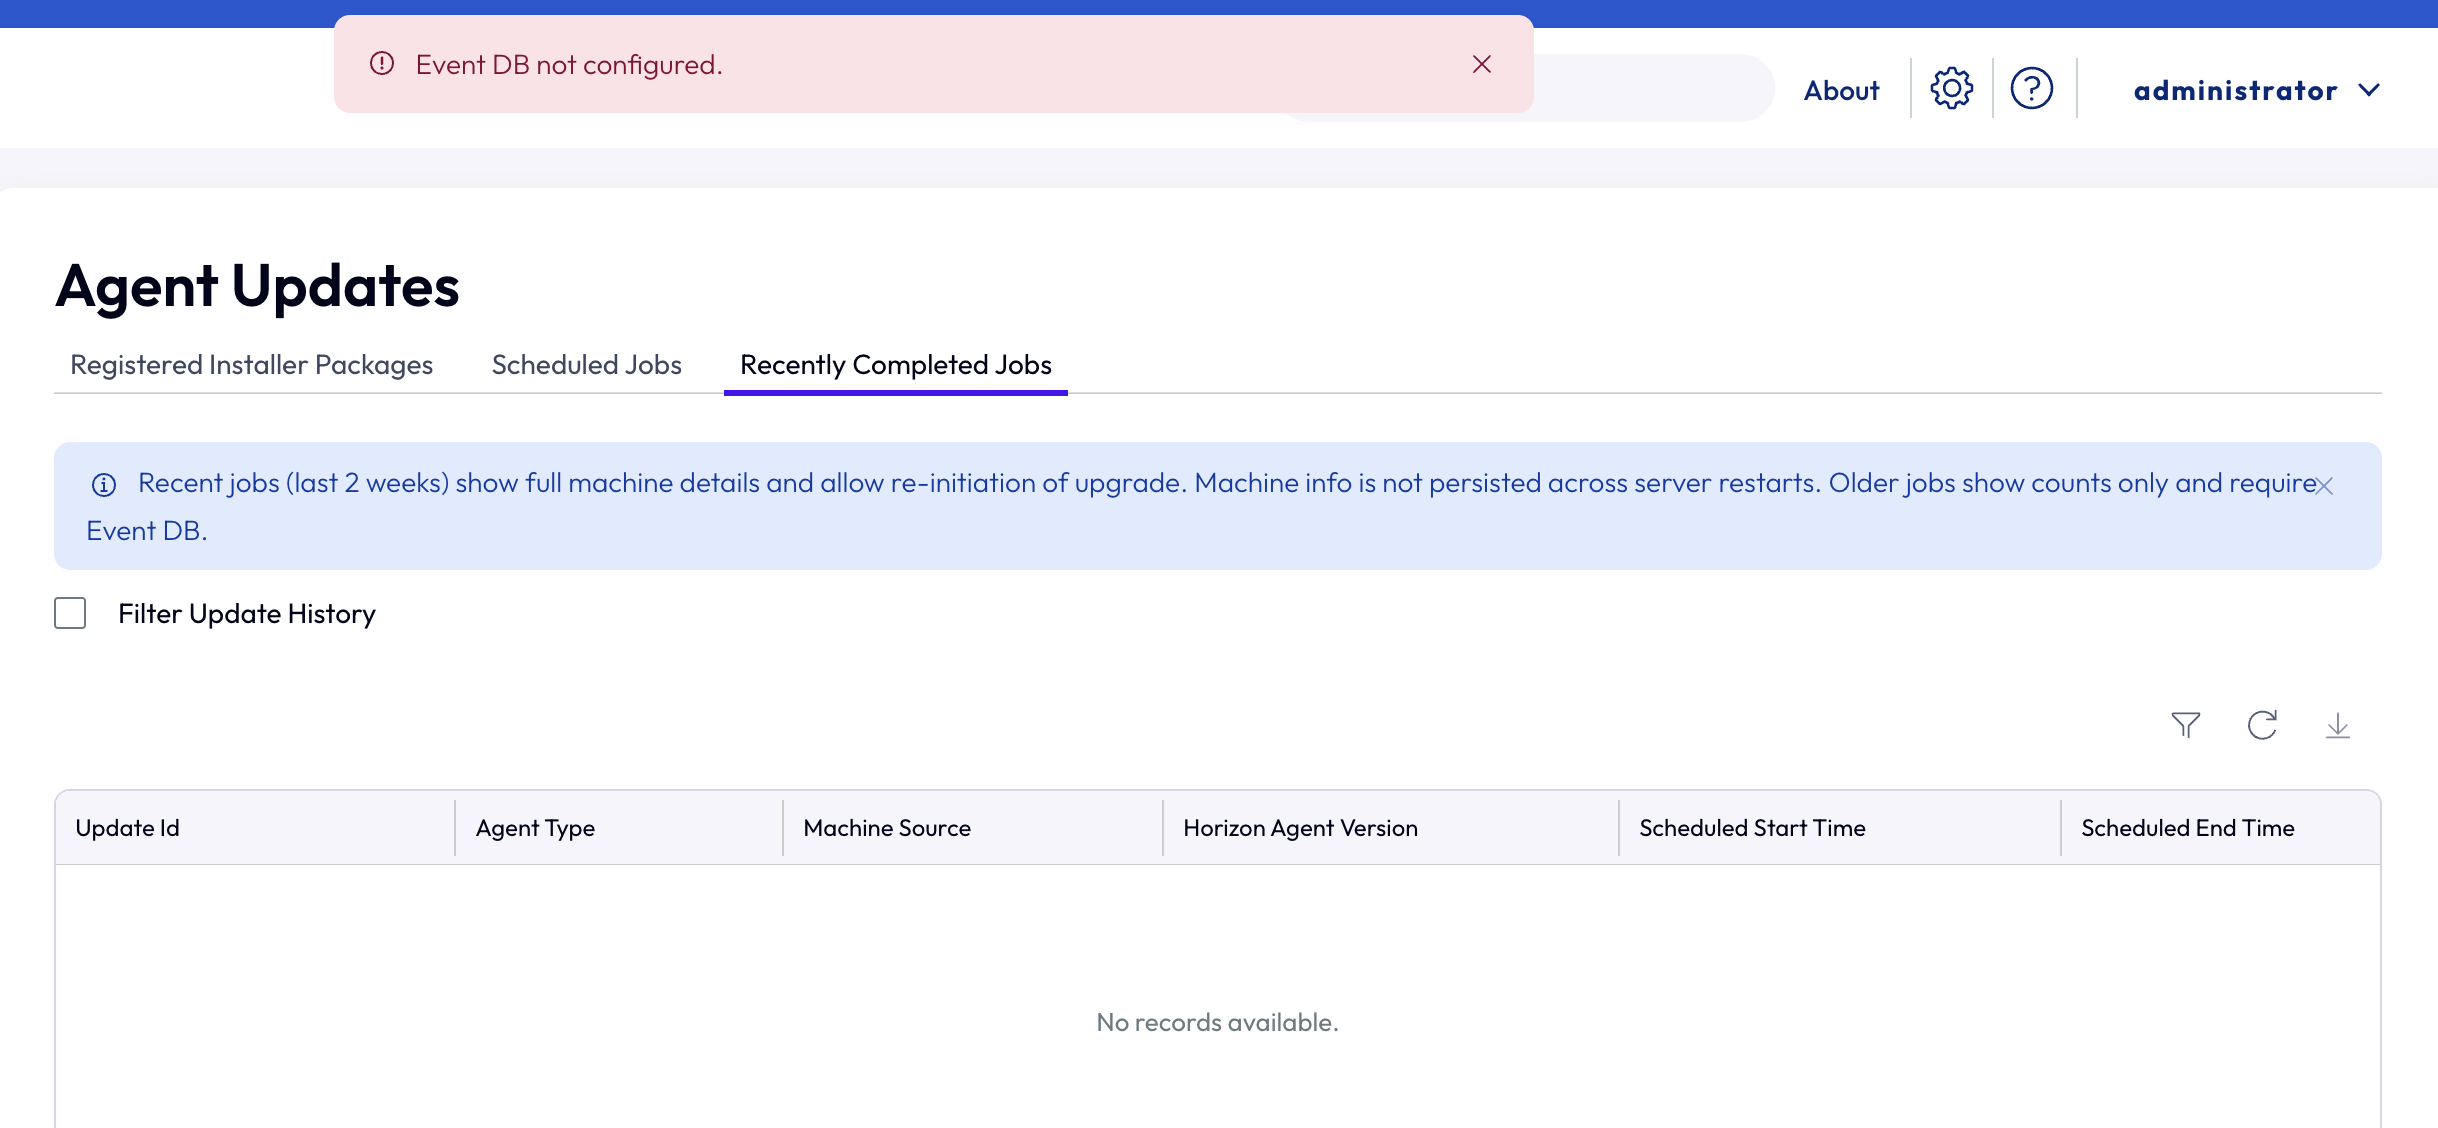
Agent Update Tabs
The agent update tabs allow you to review registered installer packages, manage scheduled jobs, and view recently completed jobs.
Note: Agent upgrade job data under the Scheduled Jobs and Recently Completed Jobs tabs is permanently lost if the event database is not configured and any of the following actions occur: a Connection Server machine restart, a Connection Server upgrade, or a restart of the Omnissa Horizon Connection Server service.
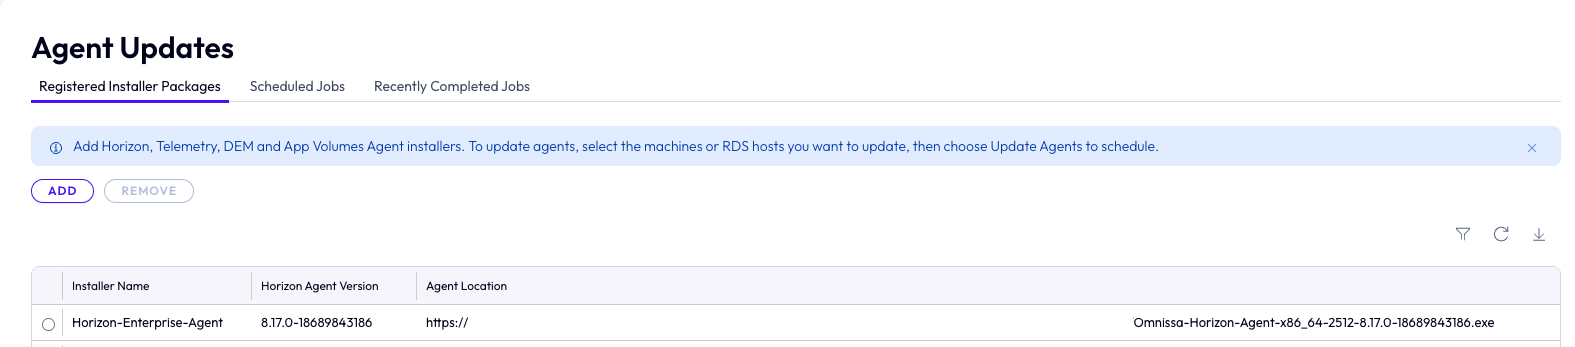
Registered Installer Packages
The Registered Installer Packages tab lets you add, remove, and view agent installer URLs for supported Horizon, DEEM, App Volumes, and DEM agents.
Add: Use this button to register installer URLs for the supported agents.
Remove: Use this button to deregister previously registered installer URLs for the supported agents, one at a time.
Scheduled Jobs
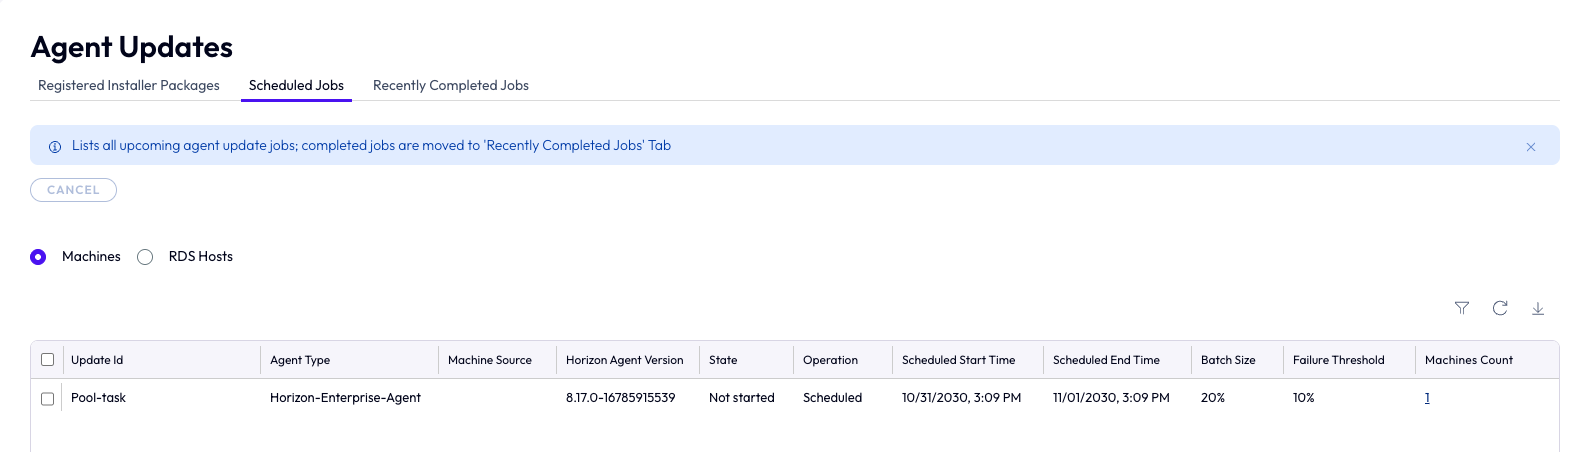
The Scheduled Jobs tab allows you to track and cancel scheduled agent update jobs for supported Horizon, DEEM, App Volumes, and DEM agents.
Cancel: Jobs can only be canceled before their scheduled start time. Once a job has started or completed, it cannot be canceled.
Machines: Filter to display jobs related to supported vCenter and unmanaged pools.
RDS Hosts: Filter to display jobs related to manual farms.
Recently Completed Jobs
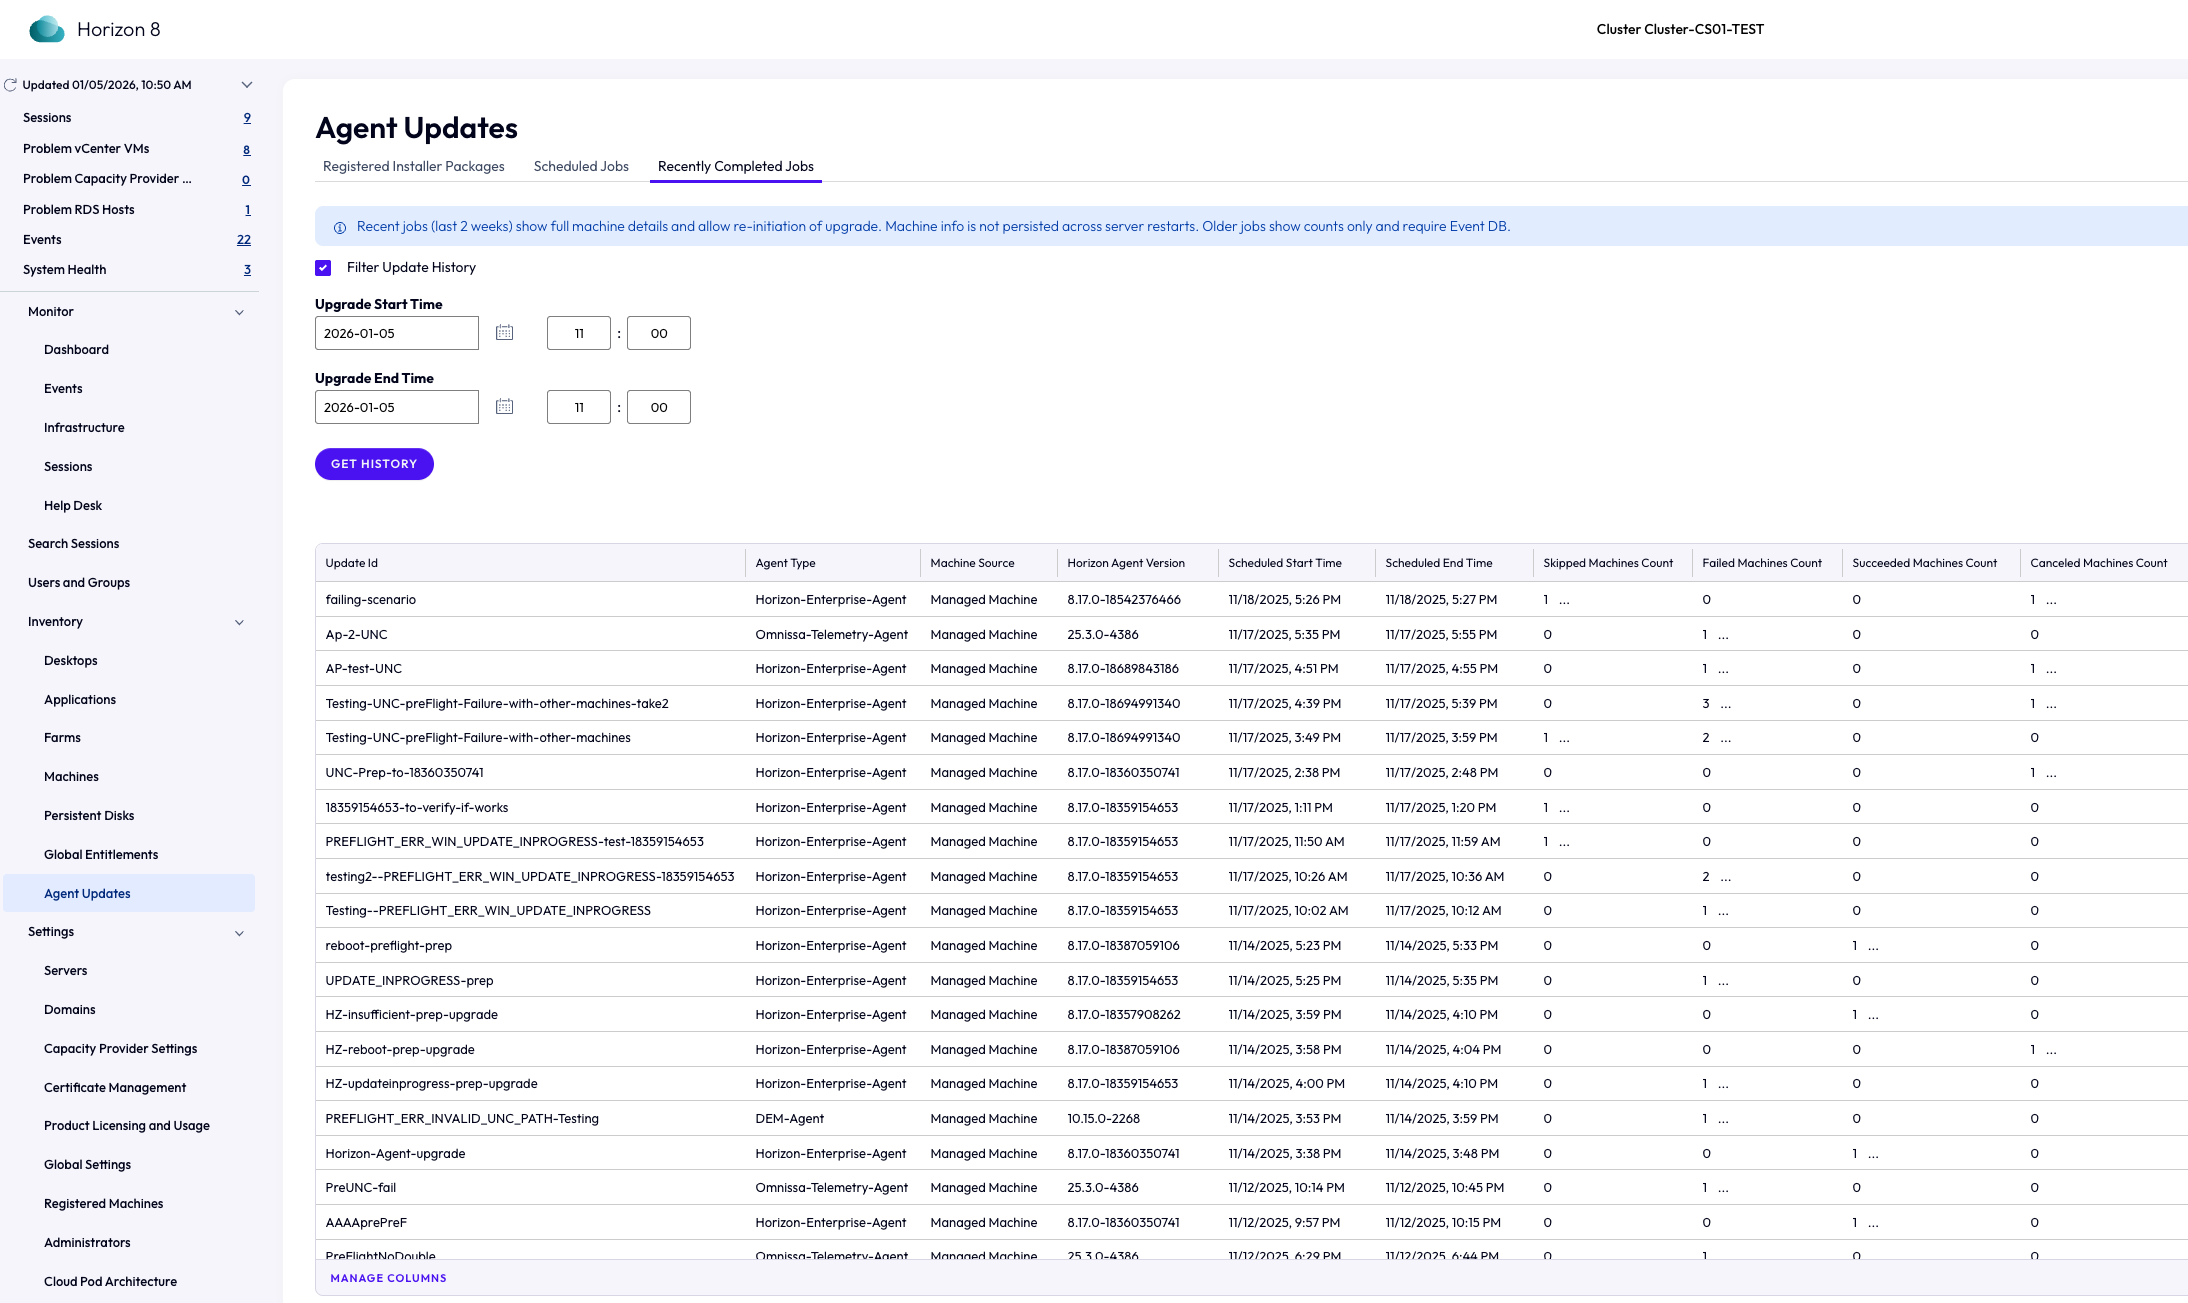
The Recently Completed Jobs tab shows all skipped, failed, successful, and canceled jobs completed for supported agents. Note: It may take a few minutes for completed jobs to move from the Scheduled Jobs tab to the Recently Completed Jobs tab. During this transition period, the respective job data will not be accessible from the admin console. This data is available only if the event database is configured and machines/RDS host data is available.
The clickable Skipped Machines Count, Failed Machines Count, Succeeded Machines Count, and Canceled Machines Count are available for two weeks after the upgrade job. During this period, you can click these counts to view details of the corresponding machines or RDS hosts included in the job. For example, if the Succeeded Machines Count is 2, you can click it within two weeks to see details of the two machines. After two weeks, the counts will still be displayed, but they will no longer be clickable, and detailed information will not be accessible.
Filter Recently Completed Jobs: Use this filter to view job history between specific Upgrade Start Time and Upgrade End Time.
Schedule Agent Upgrade REST API Behavior
When using the Bulk REST API to schedule Agent Upgrade (AAU) jobs, the response behavior depends on machine eligibility:
- No eligible machines: If none of the machines in the request are eligible for AAU, the Schedule AAU API request fails with a 400 – Bad Payload error, returning the message: "There are no valid machines found to schedule agent upgrade(s)." This error indicates only that the overall request failed — it does not identify the specific reason for each machine (reasons can vary, such as version mismatch, missing permissions, or unsupported machine type).
- At least one eligible machine: If at least one machine is eligible, the Schedule AAU API request succeeds, and the response includes individual messages per machine ID indicating either eligibility or the specific reason for ineligibility.
This is expected, by-design behavior for the Bulk REST API (consistent with similar bulk APIs) and applies to all comparable scenarios for this API.
Support for Amazon WorkSpaces Core
AWS Pools with Dedicated and Floating user assignments support Agent Auto Upgrade only when the following conditions are met:
- Spare (Powered On) Machines >= 1
- Remote Machine Power Policy is set to “Always Powered On: Monthly Billing”
AWS Pools with Spare (Powered On) Machines = 0 and/or the Remote Machine Power Policy set to “Power Optimized: Hourly Billing” do not support Agent Auto Upgrade from the Admin Console.
To start an Agent Upgrade from the Admin Console, a machine must be in the Available state. However, machines provisioned with the “Power Optimized: Hourly Billing” policy remain in the Provisioned state rather than Available. As a result, the Upgrade Agent option is not enabled in the Admin Console for these machines.
AWS Pool Agent Upgrade Support Matrix
| AWS User Assignments / Spare (Powered On) Machines | Dedicated | Floating |
|---|---|---|
| Spare (Powered On) Machines = 0 Note: When Spare (Powered On) Machines is set to 0, the Remote Machine Power Policy is automatically disabled and defaulted to “Power Optimized: Hourly Billing.” | Not Supported | Not Supported |
| Spare (Powered On) Machines ≥ 1 and Remote Machine Power Policy = “Always Powered On: Monthly Billing” | Supported | Supported |
| Spare (Powered On) Machines ≥ 1 and Remote Machine Power Policy = “Power Optimized: Hourly Billing” | Not Supported | Not Supported |
AWS Automated and Manual Farms fully support Agent Upgrade regardless of their settings.
The Admin Console paths used to trigger Agent Upgrade for AWS pools and farms are the same as those for vCenter pools and farms. However, to access AWS machines for all existing pools, navigate to Machines and then select the Capacity Providers tab (instead of the vCenter tab). AWS RDS hosts for all farms are still accessible under Machines > RDS Hosts.
Bulk Agent Auto Upgrade for RDS hosts across all farms or for an individual farm at the farm level is supported for both AWS and vCenter farms. For example, if you have 5 farms with 20 RDS hosts, you no longer need to create 5 separate Agent Upgrade jobs targeting 20 RDS hosts in each farm. You can now create a single job that includes all 100 RDS hosts across all farms.
Was this page helpful?