Software Distribution in Omnissa Workspace ONE UEM allows you to deliver Windows applications and adhere to the application life cycle. Software Distribution enables your organization to deploy applications, track the installation statuses, debug and troubleshoot installation issues, and easily maintain applications.
Add Internal Applications as a Local File
You can upload Win32 applications as either main files or dependency files. You can use the same process for EXE, MSI, and ZIP files. If you are using a ZIP file, you can compress the application packages that are 4GB or larger using 7-Zip. Workspace ONE UEM does not decompress ZIP packages containing application packages of 4GB or larger when compressed using the native Windows zip compressor. Software Distribution engine (SFD) requires an MSI or EXE file inside the ZIP file to deploy a PowerShell script file. Complete the following steps to upload Win32 Files for Software Distribution:
Follow the procedure to upload an internal application to the Workspace ONE UEM console as a local file.
-
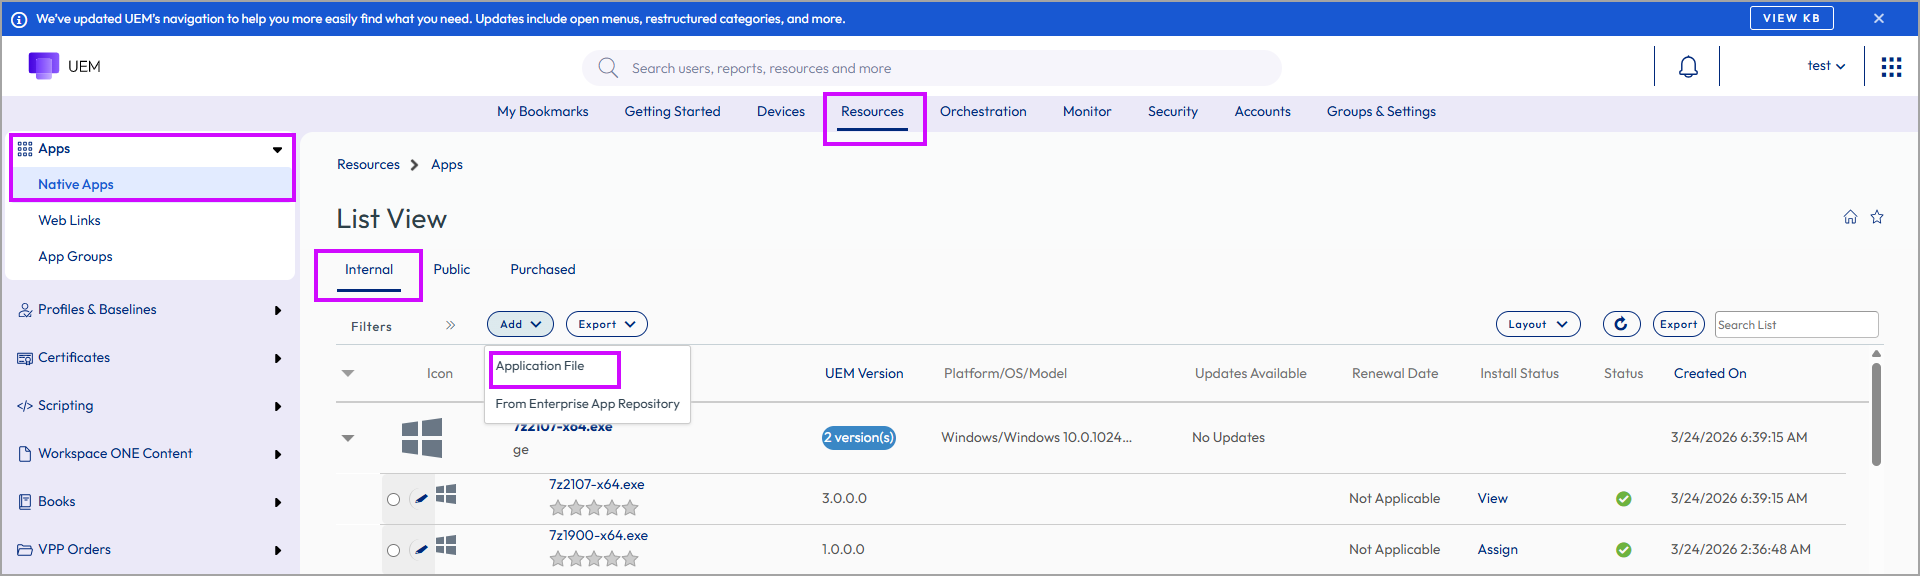
Navigate to Resources > Apps > Native Apps > Internal and select ADD > Application File.
-
Select UPLOAD.
-
Select Local File and then select Choose File. You can browse for the application file on your system.
-
Select an answer to Is this a dependency file.
-
Select Yes to tag a dependency file and associate it with Win32 applications. Examples of dependency files are libraries and frameworks.
-
Select Continue to go to the next phase in the life cycle.
-
-
Configure the Details tab options.
Workspace ONE UEM cannot parse data from an EXE or ZIP file. Enter the information for the EXE and ZIP files on this tab. The system parses the listed information for MSI files.
Details Setting Details Description Name Enter a name for the application. Managed By View the organization group (OG) that the application belongs to in your Workspace ONE UEM OG hierarchy. Application ID Represents the application with a unique string. This option is pre-populated and was created with the application. Workspace ONE UEM uses the string to identify the application in systems like application whitelists and blacklists. Actual File Version If you are using Omnissa Workspace ONE UEM console 2005 or above, you can enter the actual file version of the application. If you are using a Workspace ONE UEM console version before 2005, the version number displays the coded version of the application set by the application's developer. When you add an application version, the version field appears as read-only for the newer version that is added. Build Version Displays an alternate "File Version" for some applications. This entry ensures Workspace ONE UEM records all version numbers coded for applications because developers have two places within some applications where they can code a version number. Version If you are using Workspace ONE UEMconsole 2005 or later, you can enter the actual file version of the application. Note: - If you want the existing applications in the Workspace ONE UEM catalog to display version information that is consistent with the version you are deploying, you must create a new application in the catalog, provide the appropriate actual version information, and then choose to retire the existing application.
- You can edit the application version only when you initially upload the zip or exe file. Once you save, the application version is not editable unless you add a new application version.
Supported Processor Architecture Select the bit-architecture value for applicable Windows applications. Is Beta Tags the application as still under development and testing, a BETA version. Update Notifications Enable this to get notifications when a new version of an existing app in your catalog becomes available. Change Log Enter notes in this text box to provide comments and notes to other admins concerning the application. Categories Provide a category type in the text box to help identify how the application can help users. You can configure custom application categories or keep the application's pre-coded category. Minimum OS Select the oldest OS that you want to run this application. Supported Models Select all the models that you want to run this application. Default Scheme Indicates the URL scheme for supported applications. The application is packaged with the scheme, so Workspace ONE UEM parses the scheme and displays the value in this field. A default scheme offers many integration features for your internal applications, including but not limited to the following options: - Use the scheme to integrate with other platforms and web applications.
- Use the scheme to receive messages from other applications and to initiate specific requests.
- Use the scheme to start Apple iOS applications in the AirWatch Container.
Description Describe the purpose of the application. Do not use '<' + String in the Description, as you might encounter an Invalid HTML content error. Keywords Enter words that might describe features or uses for the application. These entries are like tags and are specific to your organization. URL Enter the URL from where you can download the application and get information about it. Support Email Enter an email to receive suggestions, comments, or issues concerning the application. Support Phone Enter a number to receive suggestions, comments, or issues concerning the application. Internal ID Enter an identification string, if one exists, that the organization uses to catalog or manage the application. Copyright Enter the publication date for the application. -
Complete the Files tab options by uploading dependencies, transforms, patches, and uninstallation processes.
File Description Configurations App Dependencies MSI, EXE, ZIP The environment and devices need these applications to run the Win32 application. - Select dependency files in the Select Dependent Applications option.
- Enable the system to apply dependencies in a specified order. The system works from top to bottom.
App Transforms MST file type These files control the installation of the application and can add or prevent components, configurations, and processes during the process. Select Add to browse to the MST file on the network. App Patches MSP file type These files add changes that are fixes, updates, or new features to applications. The two types are additive and cumulative. - Additive – Includes only changes developed after the latest version of the application or the last additive patch.
- Cumulative – Includes the entire application including any changes since the latest version of the application or the last patches.
- Select Add.
- Identify the patch as cumulative or additive.
- Select File to browse to the MSP file on the network.
App Uninstall Process These scripts instruct the system to uninstall an application under specific circumstances. Customized scripts are optional for MSI files. - Select the Use Custom Script option.
- Select to upload or enter a script to the system for Custom Script Type.
- Select Upload and browse to the script file on the network.
- Select Input and enter the custom script.
-
Complete the settings in Deployment Options > When To Install.
This tab instructs the system to install the application with specific criteria. The system can parse information for MSI files. However, for EXE and ZIP files, the system requires you to enter this information. These criteria are used at uninstallation as well.
Important: Data contingencies should not be used to detect the application itself being installed as this will block uninstallation. For example, the package installs acmesoftware version 2310, and data contingencies try to detect acmesoftware.exe version 2310, which is true at installation but false at uninstallation, thereby blocking uninstallation.
-
Select Data Contingencies > Add and complete the options that depend on the criteria type you select.
Set contingencies for instruction and completion scenarios.
-
Instruction – Contingencies instruct the system to install applications when the device meets specific criteria.
-
Completion – Contingencies identify when an installation is complete.
Setting - App Description - App Criteria Type App exists App does not exist - Instruction – Configure the system to install the application when a specific application is or is not on devices.
- Completion – Configure the system to identify whether the installation is complete when a specific application is or is not on devices.
Application Identifier Enter the application identifier so the system can recognize the existence or non-existence of the auxiliary application. This value is also known as the product code of the application. Version Enter the specific version. Use a comparison operator to specifically target an app version or to target a range of app versions. Setting - File Description - File Criteria Type File exists File does not exist - Instruction – Configure the system to install the application when a specific file is or is not on devices.
- Completion – Configure the system to identify whether the installation is complete when a specific file is or is not on devices.
Path Enter the path on the device where you want the system to look for the file and include the filename. Version Enter the specific version. Use a comparison operator to target a specific file version or a range of file versions. Modified On Enter the date the file was last modified. Setting - Registry Description - Registry Criteria Type Registry exists Registry does not exist - Instruction – Configure the system to install the application when a specific registry value is or is not on devices.
- Completion – Configure the system to identify whether the installation is complete when a specific registry value is or is not on devices.
Path Enter the path on the device where the system can find the keys and values. Include the entire path, beginning with HKLM\ or HKCU\. Configure Registry Values - Value Name- Enter the name of the key. This container object stores the value and it displays in the file structure of the device.
- Value Type- Select the type that corresponds to the registry value.
- Value Data - Enter the value of the key.
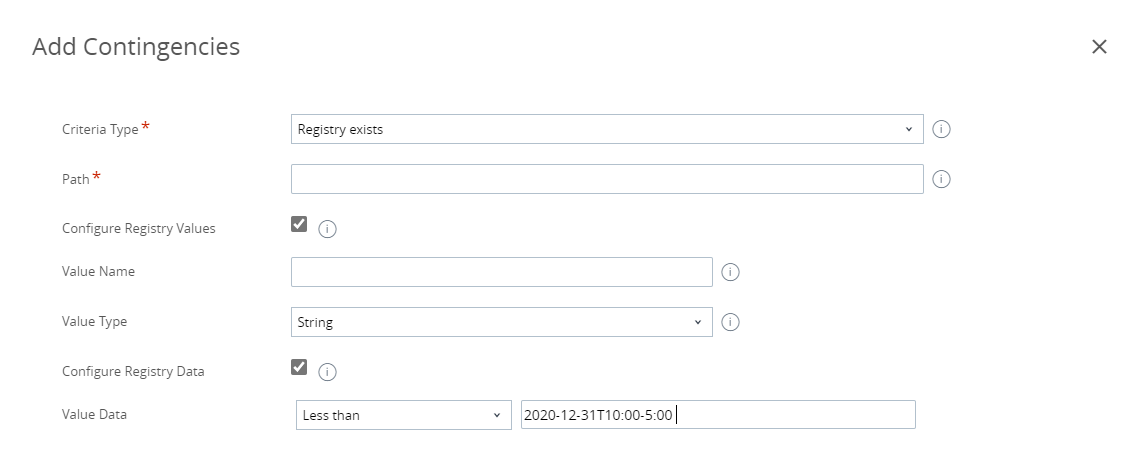
Note: To correctly parse data values, use decimals when defining a DWORD/QWORD value type. Hex is not supported and if used results in incorrect data parsing. You can use comparison operators to target registry values by date and time. However, you must use the ISO Date and Time standard. Access information about the standard, ISO 8601, on the W3C (W3 Consortium) website at Date and Time Formats. Here is an example of targeting registries existing before 10 am Eastern Standard Time on December 31, 2020.
-
-
Set the disk space that must be available for the system to install the application for Disk Space Required.
-
Set the battery power that must be available for the system to install the application for Device Power Required.
-
Set the random access memory devices that must be available for the system to install the application for RAM Required.
-
-
Complete the settings in Deployment Options > How To Install.
Define the installation behavior on devices. While configuring the Win32 applications in the Workspace ONE UEM console, you have different combinations that you can select while setting the Run as and Admin Privileges under the Deployment tab. Your installation process might vary based on the settings.
Setting Description Run as Select how the system applies the installation. - System - Define the installation by the device and all the users of that device.
- User- Define the installation by particular user accounts (enrolled).
Install Command Enter a command to control the installation of the application. - MSI- The system automatically populates the installation commands, and the commands include patches and transforms.
- Patches- To update the order in which the patches are installed on devices, update their listed order in the install command.
- Transforms- The order in which the system applies transforms is set when you assign the application. You see a placeholder name for the transform until you associate the transform during the assignment process.
- EXE and ZIP- Populate the install command and specify the patch names and their order of application in the command. You must also enter the install command that triggers the installation of the Win32 application. If you do not package the patches and transforms in the EXE or ZIP file and you add them separately, ensure to add the patch filenames and the transform lookup text boxes in the install command.
Admin Privileges Select whether the installation window is visible to the user or not. Device Restart The values for Device Restart options for Win32 applications allow the user to defer the device reboot for "x" days with a maximum limit of 7 days. The values allow admins to have much better control over the application management lifecycle. Admins can choose to force restart applications or create application restarts that require user engagement and provide a friendly user experience while installing the admin-mandated applications. By default, Device Restart is set to User engaged Restart which allows you to configure the Restart Deadline for each application. To set the Restart Deadline, enter the deadline date. You can also choose Do Not Restart or Force Restart options if you choose not to restart or force the device to restart. Note: - Restart deadline has a maximum limit of 7 days.
- The Device Restart options are also available for configuration in the Distribution tab of the Assignment page when you create assignments for your applications. When activated, the Override Reboot Handling setting on the assignment page displays the restart options. The restart options configured at the Assignment level override the options you configure at the application level.
Retry Count Enter the number of times the system attempts to install the application after an unsuccessful attempt. Retry Interval Enter the time, in minutes, the system waits when it tries to install the application after an unsuccessful attempt. Install Timeout Enter the maximum time, in minutes, the system allows the installation process to run without success. Installer Reboot Exit Code Enter the code the installer outputs to identify a reboot action. Review the entry for Device Restart. If you selected Do not restart but you enter a reboot exit code, the system considers the installation a success after the reboot completes even though the Device Restart settings do not require a restart for success. Installer Success Exit Code Enter the code the installer outputs to identify a successful installation. -
Complete the settings in Deployment Options > When To Call Install Complete.
Configure Workspace ONE UEM to identify the successful installation of Win32 applications. The system requires this information for EXE and ZIP files.
-
Configure the system to use specific criteria to recognize the completion of the installation process for Use Additional Criteria.
-
To identify the installation completion or use custom scripts, add specific criteria for Identify Application By.
Setting - Defining Criteria - App Description - Defining Criteria - App Criteria Type App exists App does not exist - Instruction – Configure the system to install the application when a specific application is or is not on devices.
- Completion – Configure the system to identify whether the installation is complete when a specific application is or is not on devices.
Application Identifier Enter the application identifier so the system can recognize the existence or non-existence of the auxiliary application. This value is also known as the product code of the application. Version Enter the specific version. Use a comparison operator to specifically target an app version or to target a range of app versions. Setting - Defining Criteria - File Description - Defining Criteria - File Criteria Type File exists File does not exist - Instruction – Configure the system to install the application when a specific file is or is not on devices.
- Completion – Configure the system to identify whether the installation is complete when a specific file is or is not on devices.
Path Enter the path on the device where you want the system to look for the file and include the filename. Version Enter the specific version. Use a comparison operator to target a specific file version or a range of file versions. Modified On Enter the date the file was last modified. Setting - Defining Criteria - Registry Description - Defining Criteria - Registry Criteria Type Registry exists Registry does not exist - Instruction – Configure the system to install the application when a specific registry value is or is not on devices.
- Completion – Configure the system to identify whether the installation is complete when a specific registry value is or is not on devices.
Path Enter the path on the device where the system can find the keys and values. Include the entire path, beginning with HKLM\ or HKCU\. Configure Registry Values - Value Name- Enter the name of the key. This container object stores the value and it displays in the file structure of the device.
- Value Type-Select the type that corresponds to the registry value.
- Value Data - Enter the value of the key.
Note: To correctly parse data values, use decimals when defining a DWORD/QWORD value type. Hex is not supported and if used results in incorrect data parsing. You can use comparison operators to target registry values by date and time. However, you must use the ISO Date and Time standard. Access information about the standard, ISO 8601, on the W3C (W3 Consortium) website at Date and Time Formats. Here is an example of targeting registries existing before 10 am Eastern Standard Time on December 31, 2020.
Setting - Using Custom Script Description - Using Custom Script Script Type Select the type of script. Command to Run the Script Enter the value that triggers the script. Custom Script Type. For example, you can run a script such as powershell -executionpolicy bypass -file script.ps1Custom Script File Select Upload and navigate to the custom script file on the network. Success Exit Enter the code that the script outputs to identify the successful installation.
Note: If you are required to edit the When to Call Installation Complete criteria after an app has been deployed, select the Edit button in this section. Enter the Admin PIN to complete the action. If you change the criteria to an invalid value, the app will be removed from all the systems where it is deployed. Be cautious while editing the Call Installation Complete criteria.
-
-
Select Save & Assign to configure flexible deployment options.
Add Internal Applications as a Link
Omnissa Workspace ONE UEM console allows you to add applications as a link. If you have application packages stored in a repository internal to your network, you can use links to these repositories to add the application to the Workspace ONE UEM console.
Follow the procedure to add internal applications to the UEM console as a link.
- Navigate to Resources > Apps > Native Apps > Internal.
- Select ADD and then select Application File.
- Select Upload and then select Link. Enter the link to the application package in the Link text box.
- Click Save.
The Download and Distribute Via Workspace ONE UEM Platform setting, when activated, lets Workspace ONE UEM retrieve the application package file from the link and store it, rather than distributing the link directly to end users. This functionality is useful for customers who use Workspace ONE UEM for continuous integration between systems to distribute applications.
When the Download and Distribute Via Workspace ONE UEM Platform setting is deactivated, no application binary data is uploaded to Workspace ONE UEM. In addition, Workspace ONE UEM does not attempt to retrieve or collect any information about the application. Administrators must manually provide all required application metadata during the app creation process.
This option is recommended for binaries hosted on-premises that should not be uploaded to Workspace ONE UEM due to size, security, or compliance requirements. Devices download the application directly from the provided link without fallbacks to the Workspace ONE UEM CDN or any other Workspace ONE UEM–managed source.
What to do next
-
You can now monitor your Win32 applications deployed through software distribution with the statistics on the Details View and by reviewing installation status codes. View the reasons in the Details View to track the progression of an installation. The reason codes help identify the status of an installation and if there is an issue with an installation, so that you can easily track and troubleshoot application deployments.
-
You can remove Win3 applications from your devices. Workspace ONE UEM includes several methods to remove Win32 applications from your devices. Choose from deleting the application, devices, organization group, assignment group, or user. Several admin functions impact multiple assets. You need to understand the impact before making any changes.
Win32 Application Deletion Methods
Deletion Method Description Details View Select the Delete Application function in the details view of the application. This action removes the Win32 application from devices in smart groups assigned to the application. Device Delete the applicable device from the console. Organization Group Delete the organization group. This action impacts all assets and devices in the organization group. Assignment Group Delete the smart or user group assigned to the Win32 application. This action impacts every device in the group. User Delete the applicable user account from the console.
Was this page helpful?