Overview
This section explains how to install and configure print server.
Prerequisites
Print server installation requires:
-
IIS, ASP.NET, and .NET Framework 4
-
CSR (Certificate Signing Request)
-
SSL certificate and SSL connection
-
Omnissa Workspace ONE UEM console version 7.3 or later
-
TOSHIBA AirWatch Connector Installer executable file (.msi) downloaded and saved to the computer that you want to use as the print server.
Create CSR
This section describes the procedure to create CSR (Certificate Signing Request) in the print server.
Procedure
-
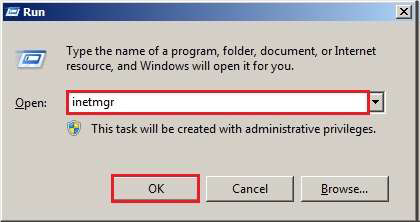
Select Start, and click Run…, the RUN prompt appears.
-
Type inetmgr in the Open field and select OK.
-
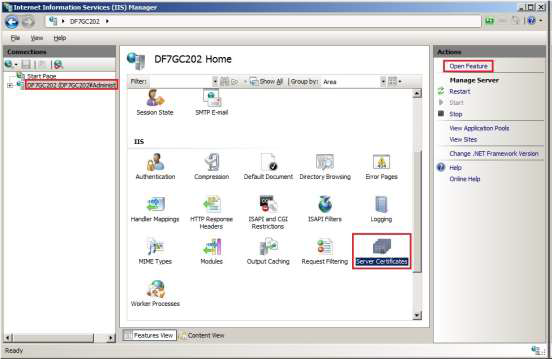
Select the host name icon on the left-hand screen. Select the Server Certificates icon and then select Open Feature.
-
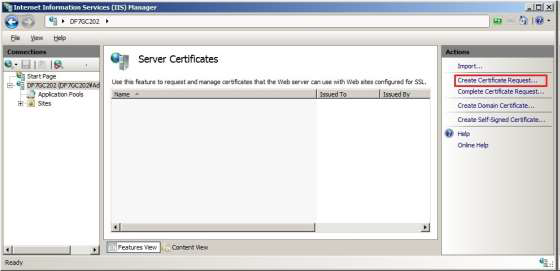
Select the Create Certificate Request option.
-
Enter the necessary details in the form and click Next.
Note: Regarding the detail about the entry, please refer to your SSL certificate provider website. SSL certificate provider means provider such as Verisign, GlobalSign, and Cybertrust.
- Common name – Enter Host name or Global IP address of your print server.
- Organization – Enter your company name.
- Organizational unit – Enter your division name in your office.
- City/locality – Enter the name of city or locality in which your office is located.
- State/province – Enter the name of state or province in which your office is located.
- Country/region – Select abbreviation of country in which your office is located.
-
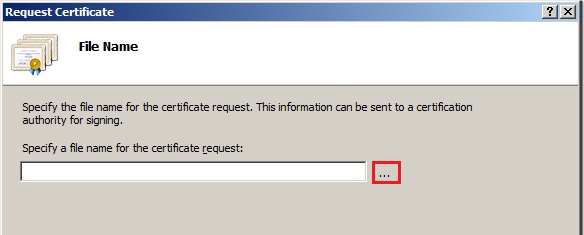
Select the Bit length drop-down menu and choose bit length as 2048 and select the button shown in the following screen.
-
Choose the location to save CSR file. Provide a file name for CSR and Select Finish.
Obtain SSL Certificate
Submit the generated CSR to the SSL certificate provider and obtain SSL certificate. SSL certificate provider are Verisign, GlobalSign, and Cybertrust. The way to obtain SSL certificate depends on SSL certificate provider. In one case, you mayt need to open CSR file with any text editor, and copy the content and paste the designated form displayed on website of SSL certificate provider. In another case, you may need to submit CSR file to SSL certificate provider. For details, refer to the website of the SSL certificate provider.
Install SSL Certificate
This section describes the procedure to install SSL certificate on the print server.
Procedure
-
Select Start, and click Run…, the RUN prompt appears.
-
Type inetmgr in the Open field and select OK.
-
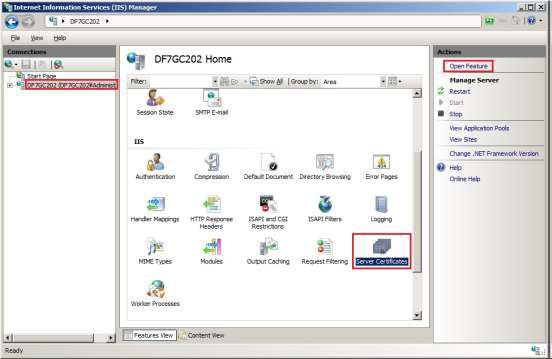
Select the host name icon on the left-hand screen. Select the Server Certificates icon and the select the Open Feature from the Actions panel.
-
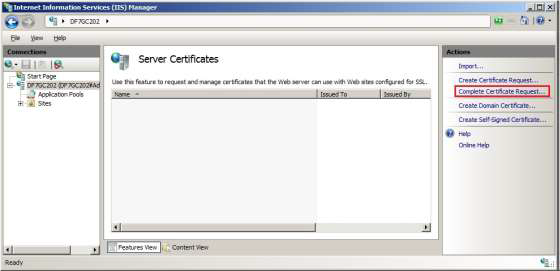
Select the Complete Certificate Request... from the Actions panel.
-
Select the following button.
-
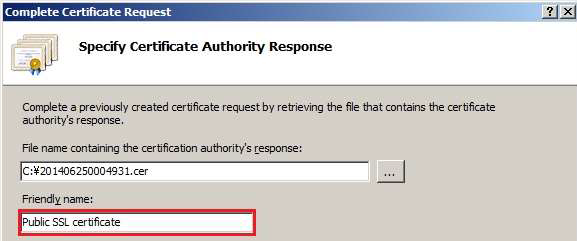
Enter the SSL certificate code. The following screenshot shows the sample SSL code of “201406250004931.cer”. The actual SSL code that you enter comes from the file name of SSL certificate obtained in the Obtain SSL Certificate section. Then select the Open button.
-
Enter the Public SSL certificate in the Friendly name field. Select OK and confirm that SSL certificate is installed.
Enable SSL Connection
This section describes the procedure to enable SSL connection in the print server.
Procedure
-
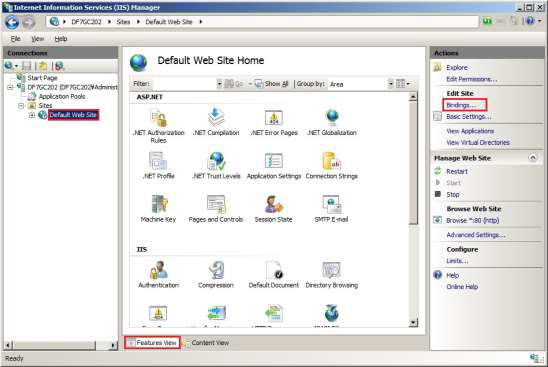
Select the Default Web Site icon and select the Features View icon and then select the Bindings..
-
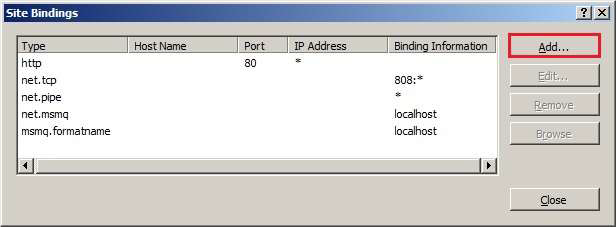
Select the Add… button.
-
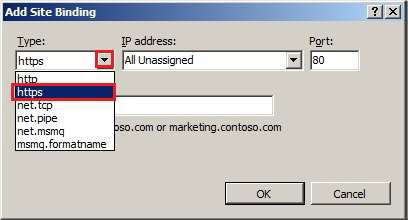
Select the down-arrow menu in the Type field. Select https.
-
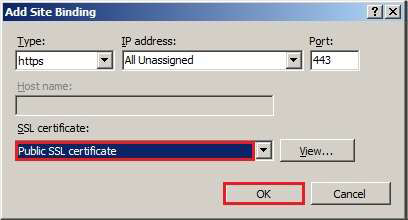
Select the down-arrow menu in the SSL certificate field, and select the Friendly Name Public SSL certificate.
-
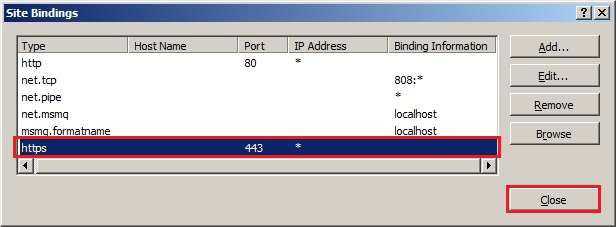
Confirm that https is newly added and then select Close.
Install Workspace ONE UEM Server on the Print Server
Procedure
-
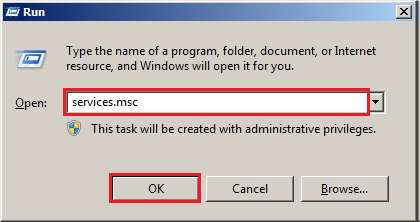
Select Start > Run and type services.msc in the Open field, and select OK.
-
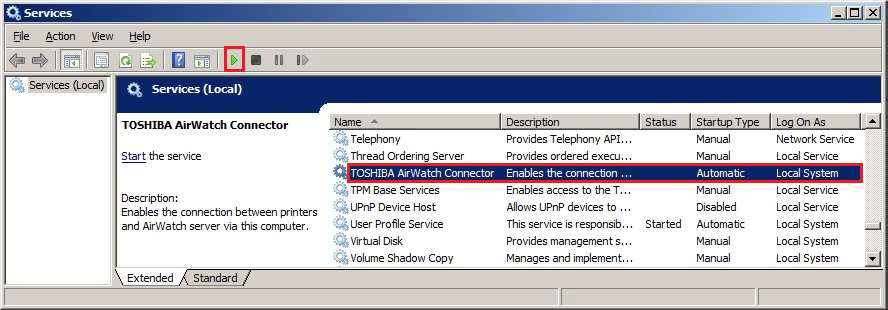
On the following screen, confirm the Status field displays TOSHIBA AirWatch Connector.
-
If Started is not displayed in the Status field, select the name TOSHIBA AirWatch Connector, and select the Start icon. Wait for about 15 seconds.
-
On the following screen, confirm that the status of TOSHIBA AirWatch Connector is Started.
If Started is displayed in the Status field, then the installation is successful. Started means that TOSHIBA AirWatch Connector has started and the connection to Omnissa Workspace ONE UEM server is complete at startup.
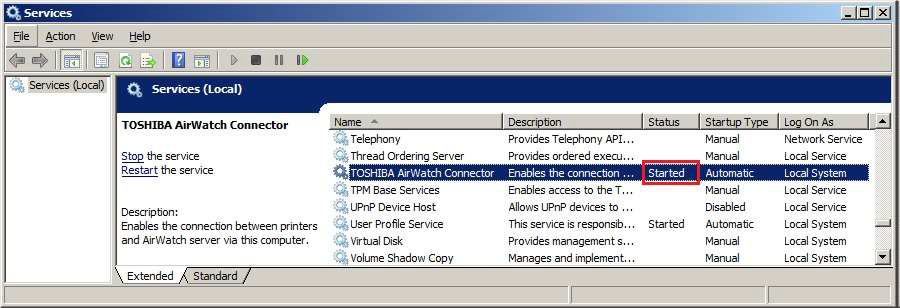
Non-display of a status means that TOSHIBA AirWatch Connector has not started and cannot connect to Workspace ONE UEM server at startup.
-
If Started is not displayed, uninstall TOSHIBA AirWatch Connector and try the installation again.
-
Go back to UEM console, and select Refresh icon to refresh UEM console information and to update the notification endpoint.
Install Workspace ONE UEM Server on the UEM Console
This section describes the procedure to install the Print server application required to manage printers through Omnissa Workspace ONE UEM.
Procedure
-
Log into the UEM console.
-
On the UEM console, navigate to Devices > Peripherals > Settings > Server and then select Add Server. The Add Server page appears.
-
On the Add Server page, take these steps.
-
Enter a friendly name for the print server.
-
Note the HMAC Token (HMAC Token is automatically generated by Workspace ONE UEM).
-
your User id.
Note: Do NOT close the Add Server page. In subsequent step you will be populating the ServiceUID field.
-
-
Locate and copy the TOSHIBA AirWatch Connector Installer file to the desktop of the print server. Double-click the icon to install.
-
On the License Agreement screen, select I Agree and then select Next.
-
>On the Request User Form, enter the details and then select Next.
Location of the TOSHIBA Endpoint Change the Domain name to your server name. Example - https: //xxcompany.com/TOSHIBA_AWConn/wakeup/ Location of the Workspace ONE UEM Endpoint Change to the Workspace ONE UEM Device Services Endpoint URL obtained from Workspace ONE UEM. Example - https: //api.airwatchmdm.com/deviceservices/peripheralservice/v1/register Workspace ONE UEM Server Token Enter the HMAC Token which you noted in Step 3. Group ID used by UEM console Enter the basic Group ID for your company from Workspace ONE UEM. 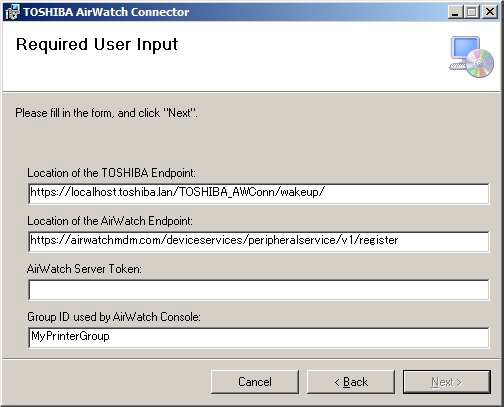
-
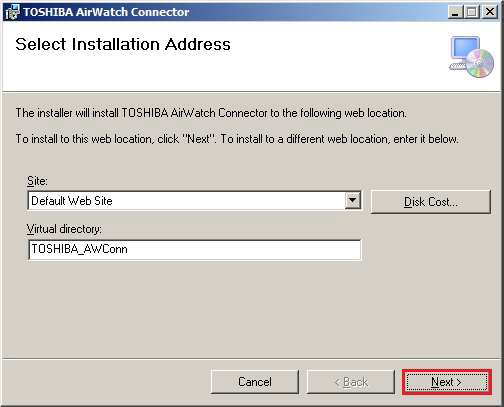
On the Select Installation Address screen, select Next.
Unless you have a specific reason, do not edit the entry TOSHIBA_AWConn in the Virtual directory field. TOSHIBA_AWConn means the first directory name of the TOSHIBA Endpoint URL. This step cannot use Back. If you need to go back, please start over by selecting Cancel.
-
On the Confirm Installation screen, select Next to start the installation.
The Unique ID for the Toshiba Server Installation is displayed.
-
Make a note of the Unique ID and select OK.
-
Switch to Step 3. and enter the Unique ID in the Service UID field on the Add Server page and select Save.
Was this page helpful?