This section describes the use of PowerShell command to deploy Unified Access Gateway 2111 or later to Amazon Web Services Elastic Compute Cloud (EC2) and the steps to prepare the EC2 environment before creating any Unified Access Gateway instances.
Recommended Operating Systems and PowerShell Versions
| Operating System | Recommended OS Version | PowerShell Version |
|---|---|---|
| Windows | 10 and 11 | 5 and 7 |
| Ubuntu | 20.04, 22.04, 24.04 | 7 |
Prerequisites
-
AWS account with adequate privileges to deploy EC2 instance. For detailed information, see Amazon AWS Documentation.
-
Ensure to allow the following policies in the IAM roles for successful deployment.
s3:PutObject
s3:PutObjectAcl
s3:GetBucketLocation
ec2:DescribeNetworkInterfaces
ec2:ModifyNetworkInterfaceAttribute
ec2:CreateNetworkInterface
ec2:DescribeInstances
ec2:RunInstances
ec2:TerminateInstances
ec2:DescribeSubnets
ec2:DescribeSecurityGroups
ec2:DescribeAddresses
ec2:AssociateAddress
ec2:DescribeRegions
ec2:DescribeImages
ec2:CreateTags
Procedure
- Prepare the Client Machine for Powershell
- Setup AWS profile and region on the client machine
- Upload the Unified Access Gateway image with PowerShell
- Prepare an INI file for AWS
- Deploy Unified Access Gateway to Amazon AWS EC2
Step 1. Prepare the Client Machine for Powershell
Install AWSPowerShell on your machine. See Installing the AWS Tools for PowerShell on Windows.
- Open the Powershell command window with administrative rights.
- Run these commands.
Windows Ubuntu Install-Module -Name AWSPowerShell -Force
Install-Package 7Zip4PowerShellInstall-Module -Name AWS.Tools.Common
Install-AWSToolsModule
AWS.Tools.EC2,AWS.Tools.S3 -CleanUp
Step 2. Setup AWS profile and region on the client machine
- On the AWS Console, create an Access Key and obtain the Access Key ID and Secret Access Key. Set them in the profile.
- Run this command to store the credentials.
- To store the credential in a profile
- When the credential has a sessionToken
Set-AWSCredential -AccessKey <accesskey> -SecretKey <secretkey> -StoreAs <profile_name>Set-AWSCredential -AccessKey <accesskey> -SecretKey <secretkey> -sessionToken <sessionToken> -StoreAs <profile_name> - Run this command to initialize the profile.
- Set your AWS region.
Note: You can use the Get-AWSRegion command to identify the region you want to use.Set-DefaultAWSRegion -Region us-west - Create a bucket in Amazon S3 to store Unified Access Gateway
.vmdkimages if one does not already exist. For more information, see Creating a bucket.
For example, consider creating bucket with name “uag-images”.$bucket="uag-images"
New-S3Bucket -BucketName $bucket -Region us-east-2 - Create an IAM role in Amazon AWS called
vmimportand apply a policy to the role.$importPolicyDocument = @" { "Version":"2012-10-17", "Statement":[ { "Sid":"", "Effect":"Allow", "Principal":{ "Service":"vmie.amazonaws.com" }, "Action":"sts:AssumeRole", "Condition":{ "StringEquals":{ "sts:ExternalId":"vmimport" } } } ] } "@New-IAMRole -RoleName vmimport -AssumeRolePolicyDocument $importPolicyDocument $bucket="uag-images" $rolePolicyDocument = @" { "Version": "2012-10-17", "Statement": [ { "Effect": "Allow", "Action": [ "s3:GetBucketLocation", "s3:GetObject", "s3:ListBucket" ], "Resource": [ "arn:aws:s3:::$bucket", "arn:aws:s3:::$bucket/*" ] }, { "Effect": "Allow", "Action": [ "ec2:ModifySnapshotAttribute", "ec2:CopySnapshot", "ec2:RegisterImage", "ec2:Describe*" ], "Resource": "*" } ] } "@Write-IAMRolePolicy -RoleName vmimport -PolicyName vmimport -PolicyDocument $rolePolicyDocument
- (Optional) Prepare the network environment in EC2.
Note: These steps can be performed from the EC2 Management Console or with PowerShell. They just need to be done once to prepare the EC2 environment for Unified Access Gateway deployments. For this, at least one subnet is needed. For multi NIC Unified Access Gateway deployments, each NIC can either be on the same subnet or on different subnets. - (Optional) Create a subnet. For more information, see Create Subnets.
- (Optional) Create a Security Group for each type of NIC.
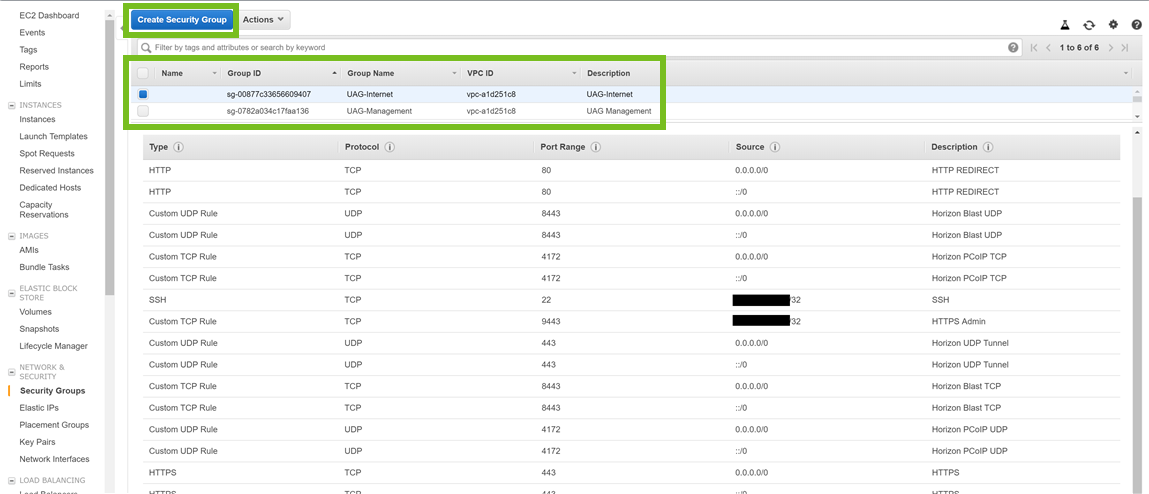
A security group contains a set of firewall rules to restrict TCP and UDP port access. A security group can be shared among multiple Unified Access Gateway appliances. For example, you can create a security group called UAG-Internet for
eth0and associate with the first NIC automatically when the Unified Access Gateway appliance is created.
For Horizon use, the first (UAG-Internet) could allow TCP ports 80, 443, 8443, 4172 and UDP ports 443, 8443, 4172 from any client. If you want to allowsshaccess to Unified Access Gateway then you must specifysshEnabled=truein the [General] section of each.inifile. SSH should generally only be enabled for testing purposes and not for a production deployment. You should also make sure that access tosshon TCP port 22 is restricted in the security group to individual source IP addresses so that it is not open to all. For more information, see Creating a security group.
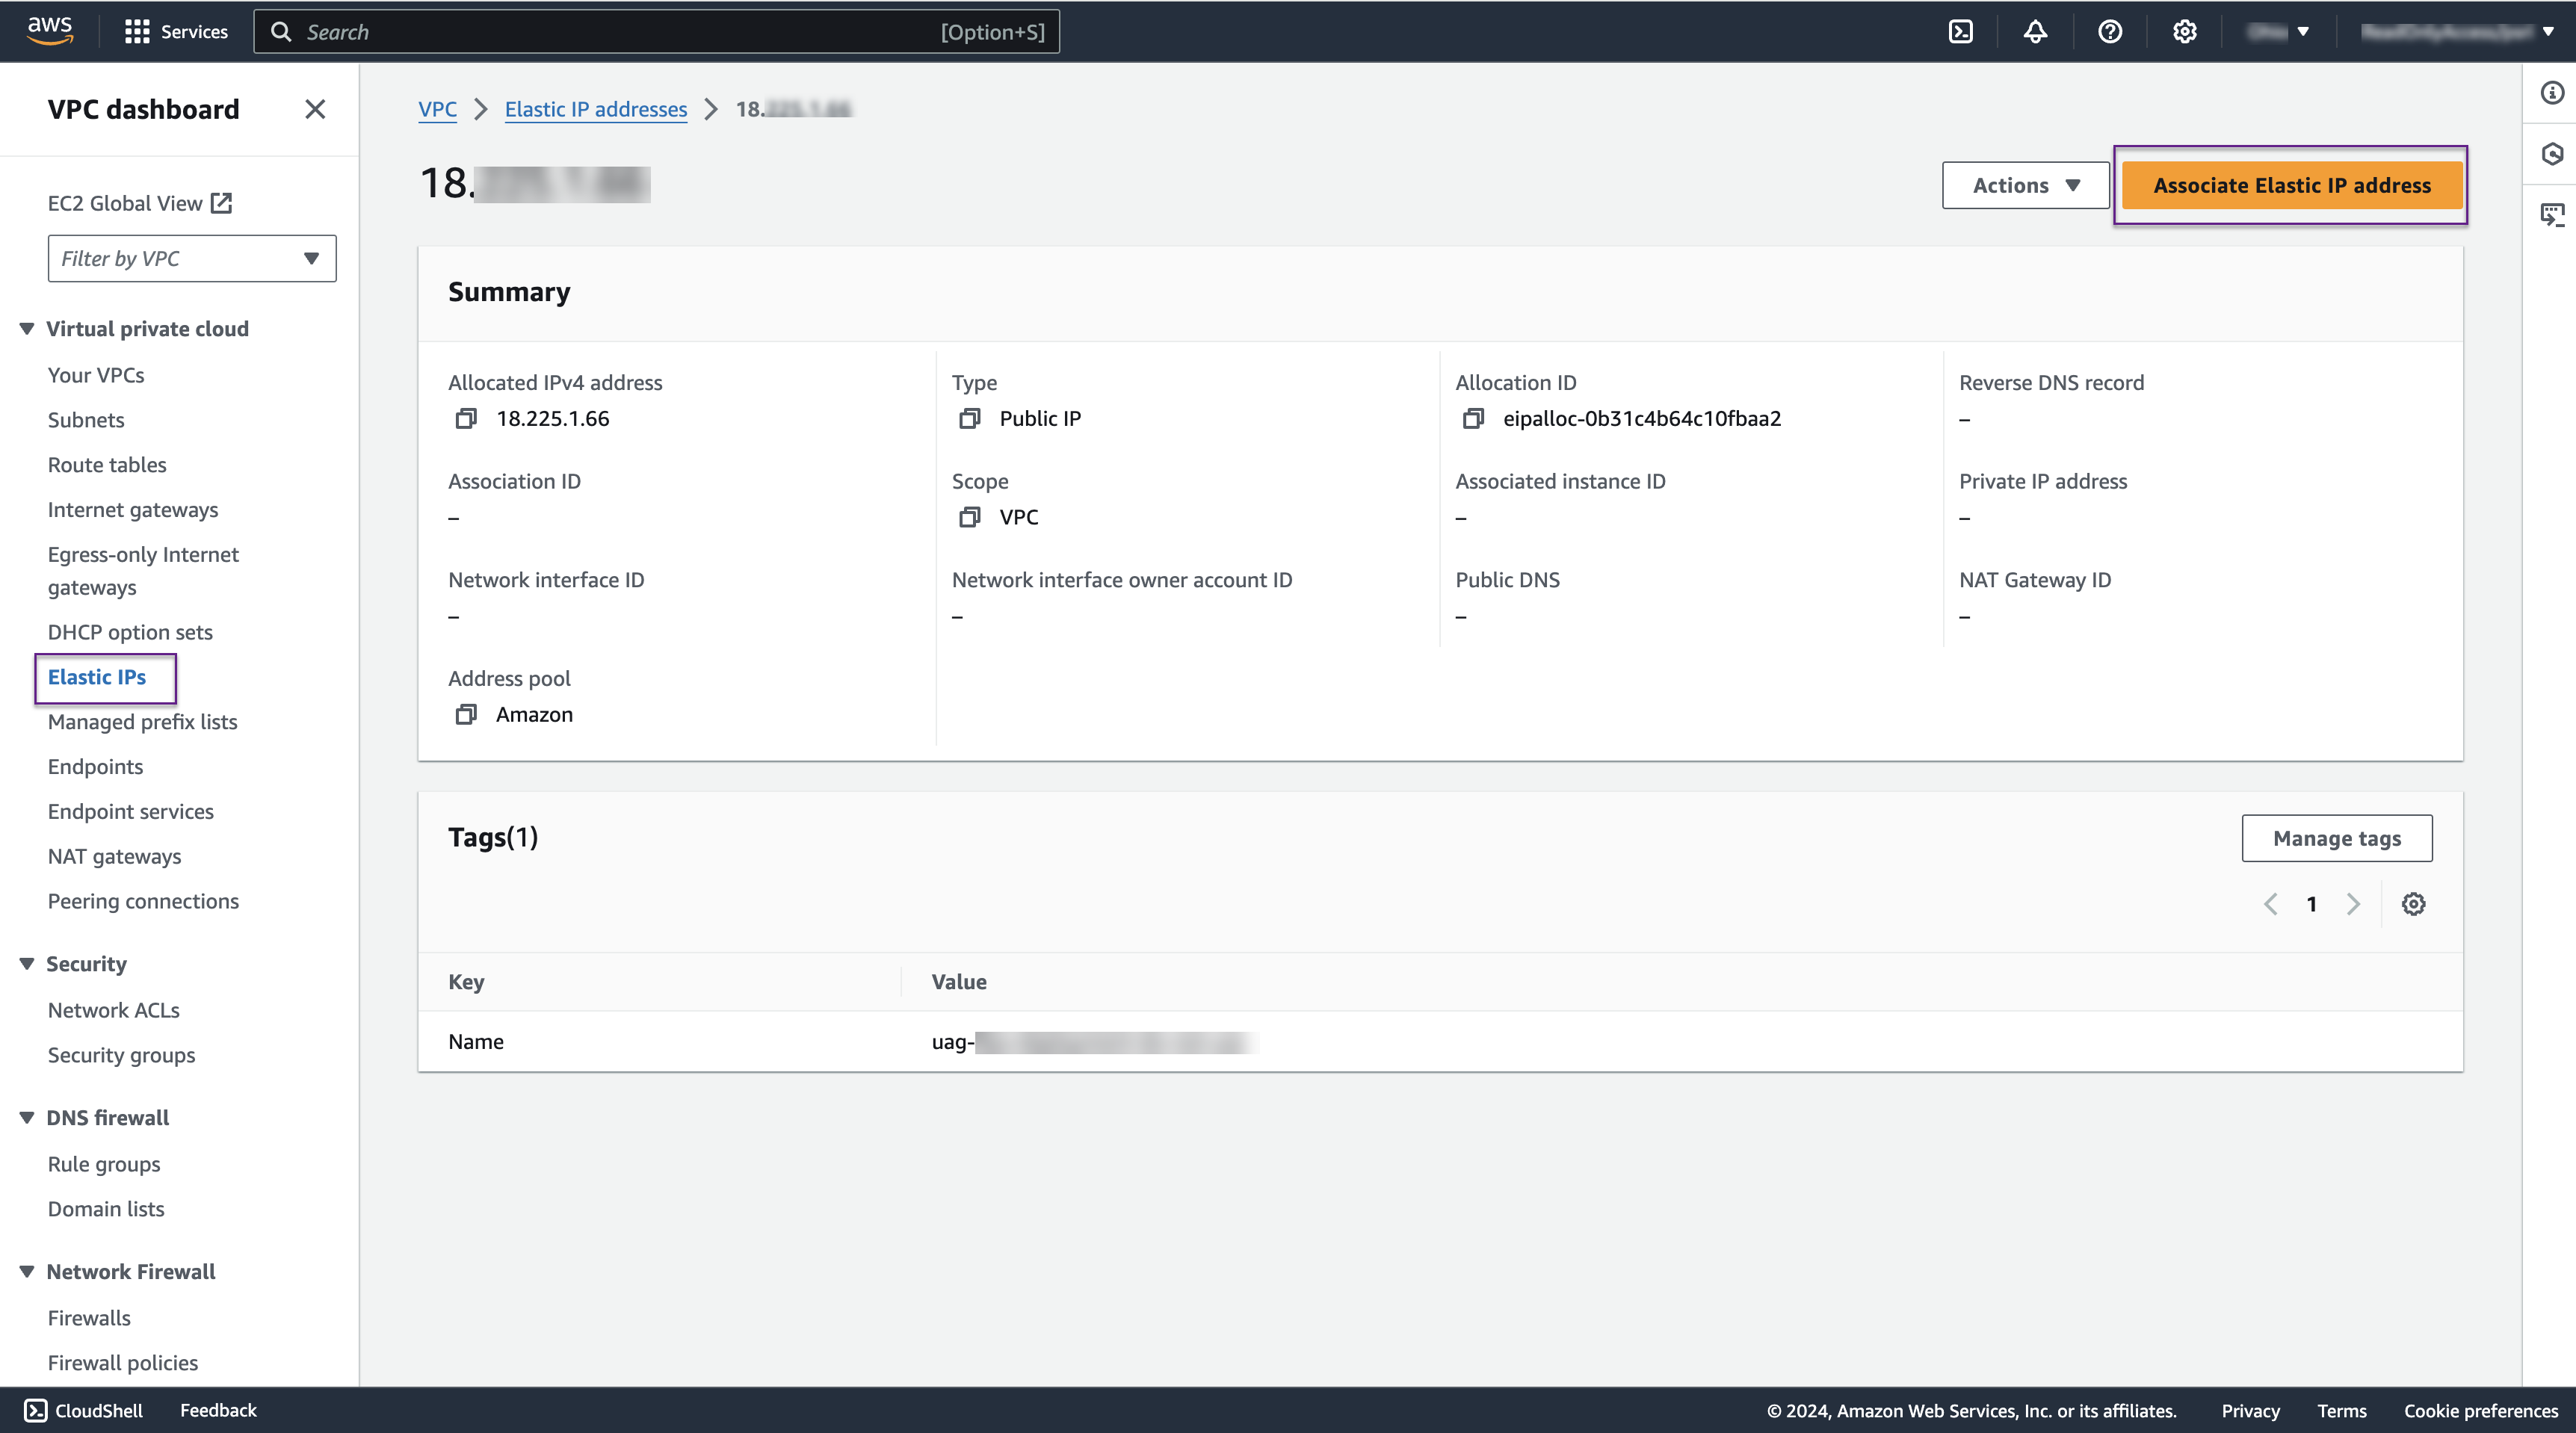
- If the Unified Access Gateway appliance is directly accessible from the Internet, then each NIC requiring access must also have an associated public IP address known as Elastic IPs. For more information, see Allocate an Elastic IP address.
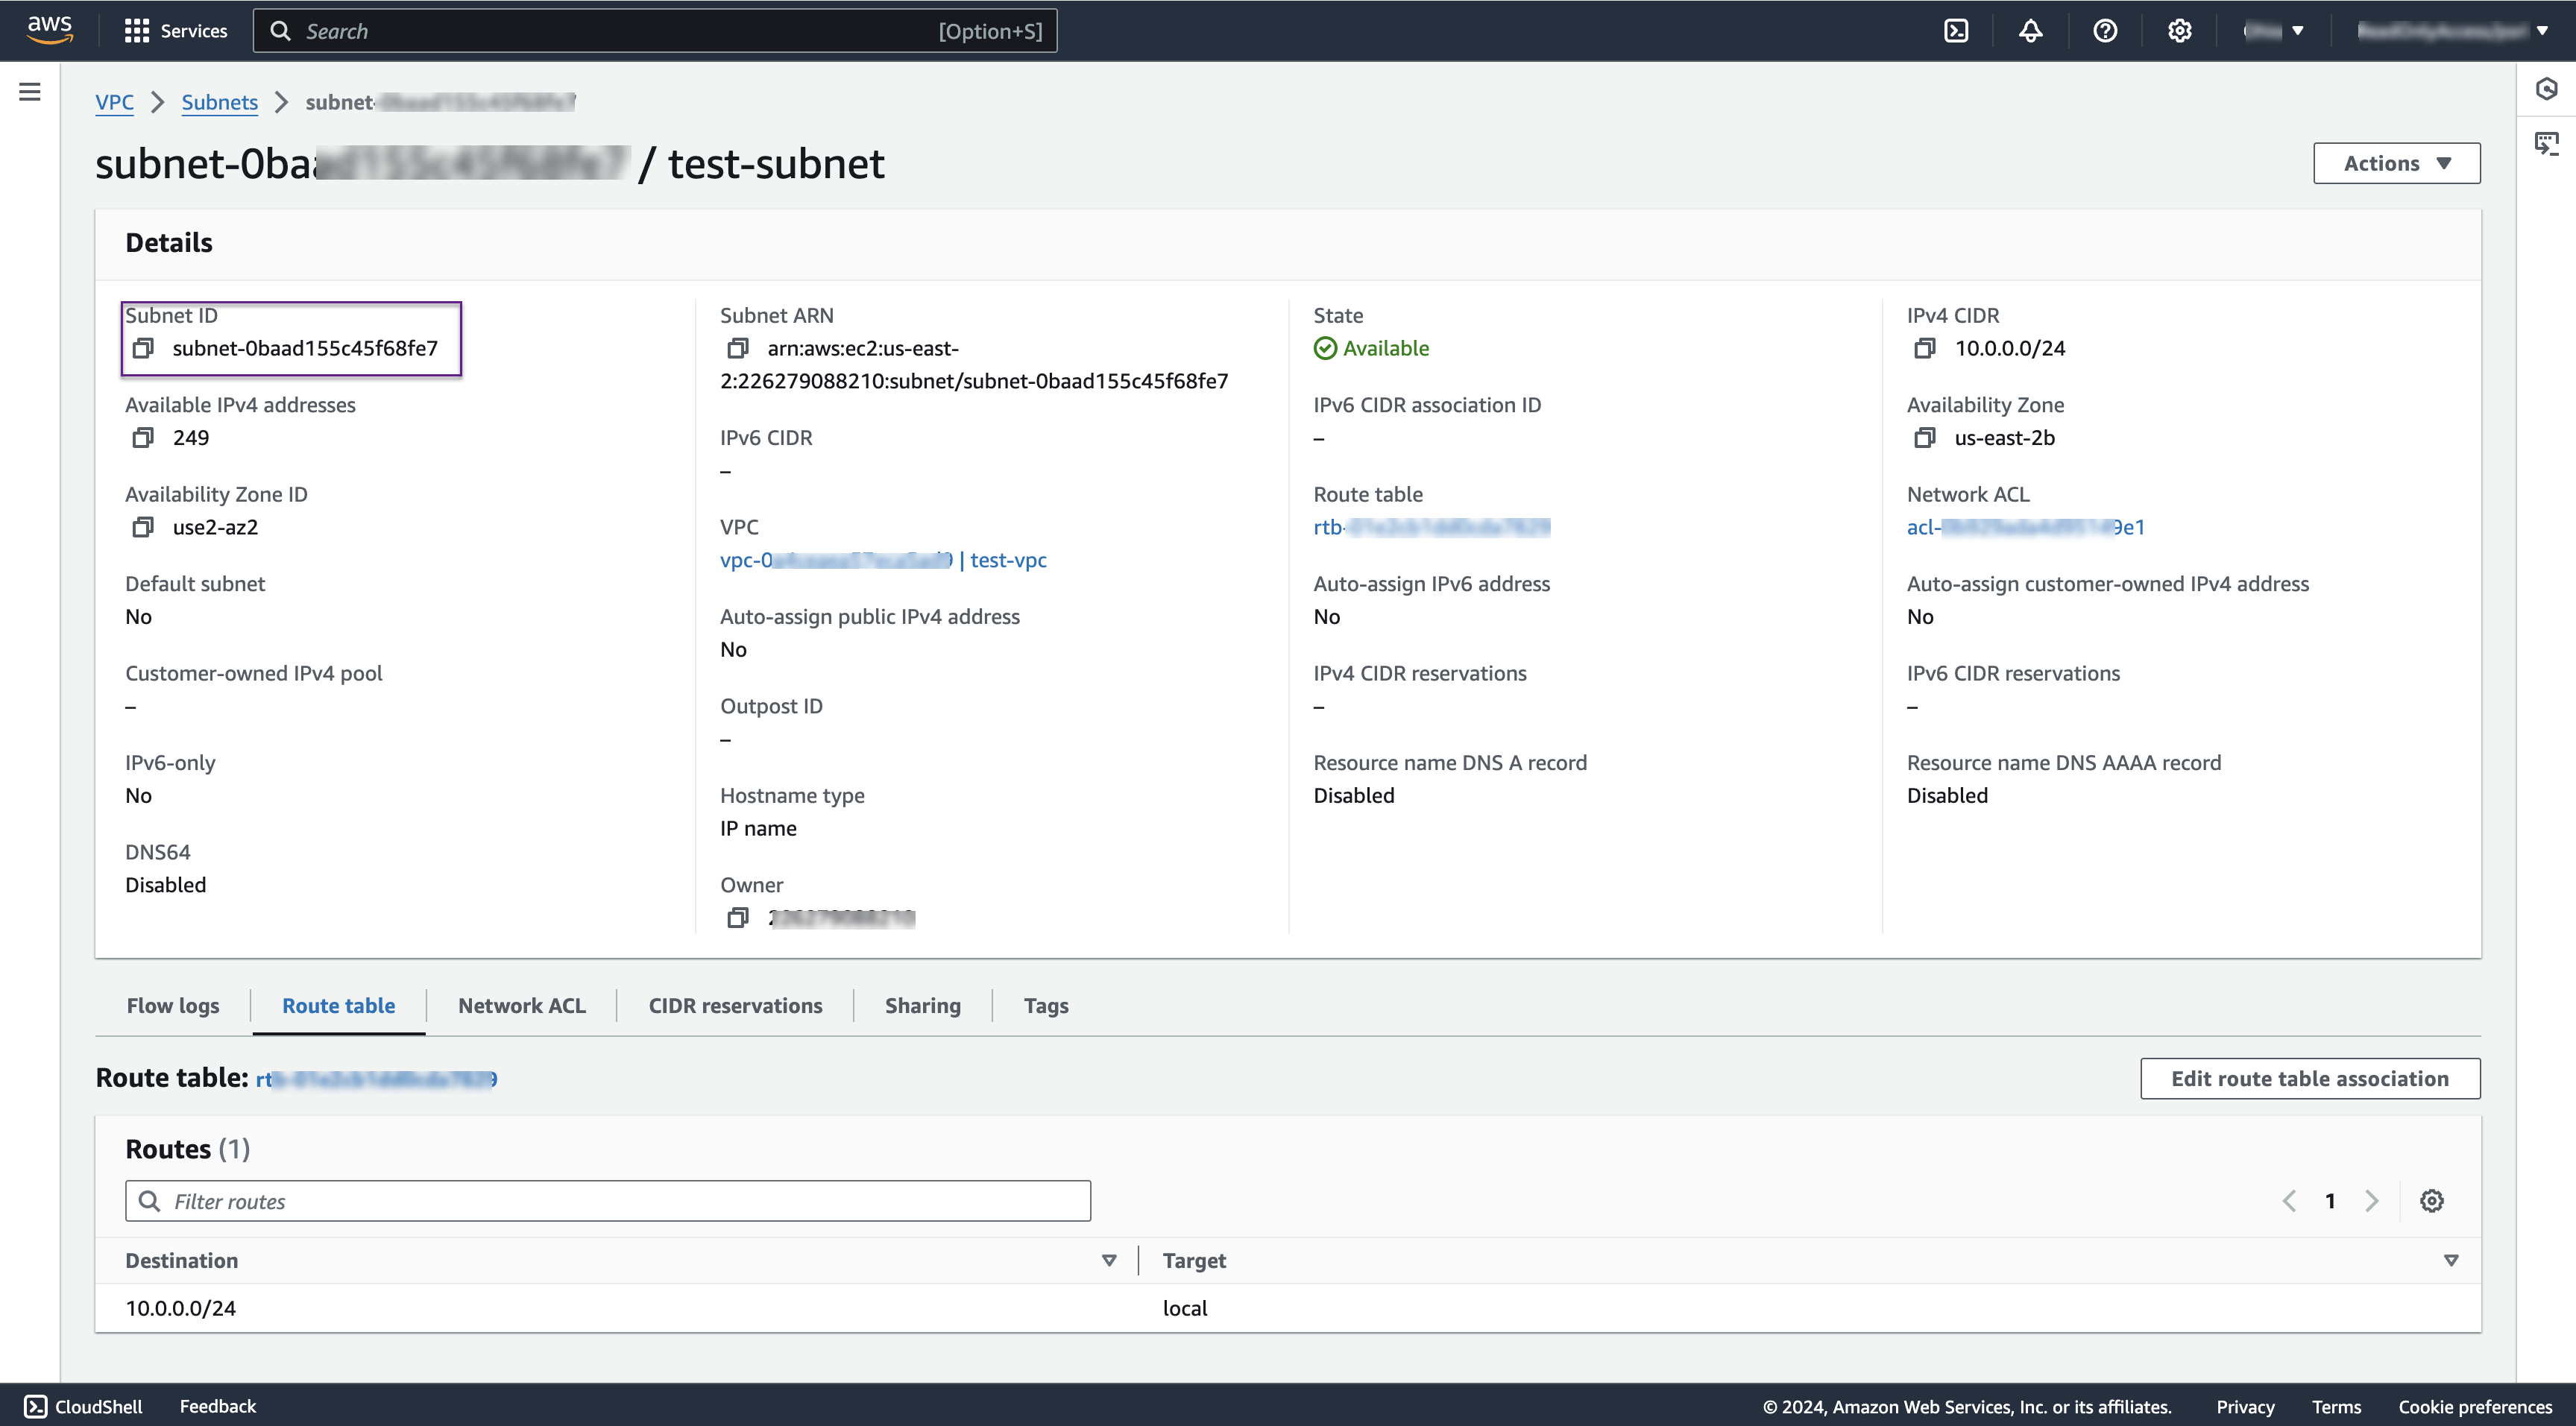
- For each NIC, determine the Subnet ID, the Security Group ID and the Public IP Allocation ID.
If you do not specify a Security Group ID for any NIC then the default Security Group will be used.
If you do not specify a Public IP ID then there won't be a public IP address for that NIC and it won't be directly accessible from the Internet. This might be the case if a load balancer is used in front of a group of Unified Access Gateway appliances.
Set-AWSCredential -ProfileName <profile_name>
Step 3. Upload the Unified Access Gateway image with PowerShell
Download the Unified Access Gateway .ova image file from the Customer Connect portal.
Option 1: Use the in-built script to automatically create a new AMI. Go to Step 4 to continue.
Option 2: Manually create a new AMI using the .vmdk image.
-
Extract the
.vmdkimage from the.ovafile.Windows Ubuntu
For example,expand-7zip ova-filename target-locationeuc-unified-access-gateway-x.y.0.0-12345678_OVF10.ovais the downloaded file, wherex-yis the version number and12345678is the build number. To extract the.vmdkfile toC:\temp, run the following command:expand-7zip C:\uag\euc-unified-access-gateway-x.y.0.0-12345678_OVF10.ova C:\uag\
For example,tar -xvf ova-filenametar -xvf euc-unified-access-gateway-x.y.0.0-12345678_OVF10.ova -
Upload the .
vmdkimage into the S3 bucket.$vmdkImage="euc-unified-access-gateway-x.y.0.0-12345678-system.vmdk" $bucket="uag-images" $region="us-east-2" $params = @{ "BucketName"=$bucket "File"="C:\uag\"+$vmdkImage "key"="/"+$vmdkImage "Region"=$region } Write-S3Object @params -
Import the EC2 snapshot.
$params = @{ "DiskContainer_Format"="VMDK" "DiskContainer_S3Bucket"=$bucket "DiskContainer_S3Key"=$vmdkImage "Region"=$region } $impId=Import-EC2Snapshot @params -
To track the import, periodically run the following command to obtain progress status.
Note: The import will take several minutes.(Get-EC2ImportSnapshotTask -ImportTaskId ` $impId.ImportTaskId).SnapshotTaskDetail -
When complete, the following command must show the SnapshotId.
(Get-EC2ImportSnapshotTask -ImportTaskId ` $impId.ImportTaskId).SnapshotTaskDetail.SnapshotId -
Register the Image as an Amazon Machine Image (AMI).
$bdm=New-Object Amazon.EC2.Model.BlockDeviceMapping
$bd=New-Object Amazon.EC2.Model.EbsBlockDevice
$bd.SnapshotId=(Get-EC2ImportSnapshotTask `
-ImportTaskId $impId.ImportTaskId).SnapshotTaskDetail.SnapshotId
$bd.DeleteOnTermination=$true
$bdm.DeviceName="/dev/sda1"
$bdm.Ebs=$bd
$params = @{
"BlockDeviceMapping"=$bdm
"RootDeviceName"="/dev/sda1"
"Name"=$vmdkImage
"Architecture"="x86_64"
"VirtualizationType"="hvm"
"EnaSupport"=$true
}
Register-EC2Image @params
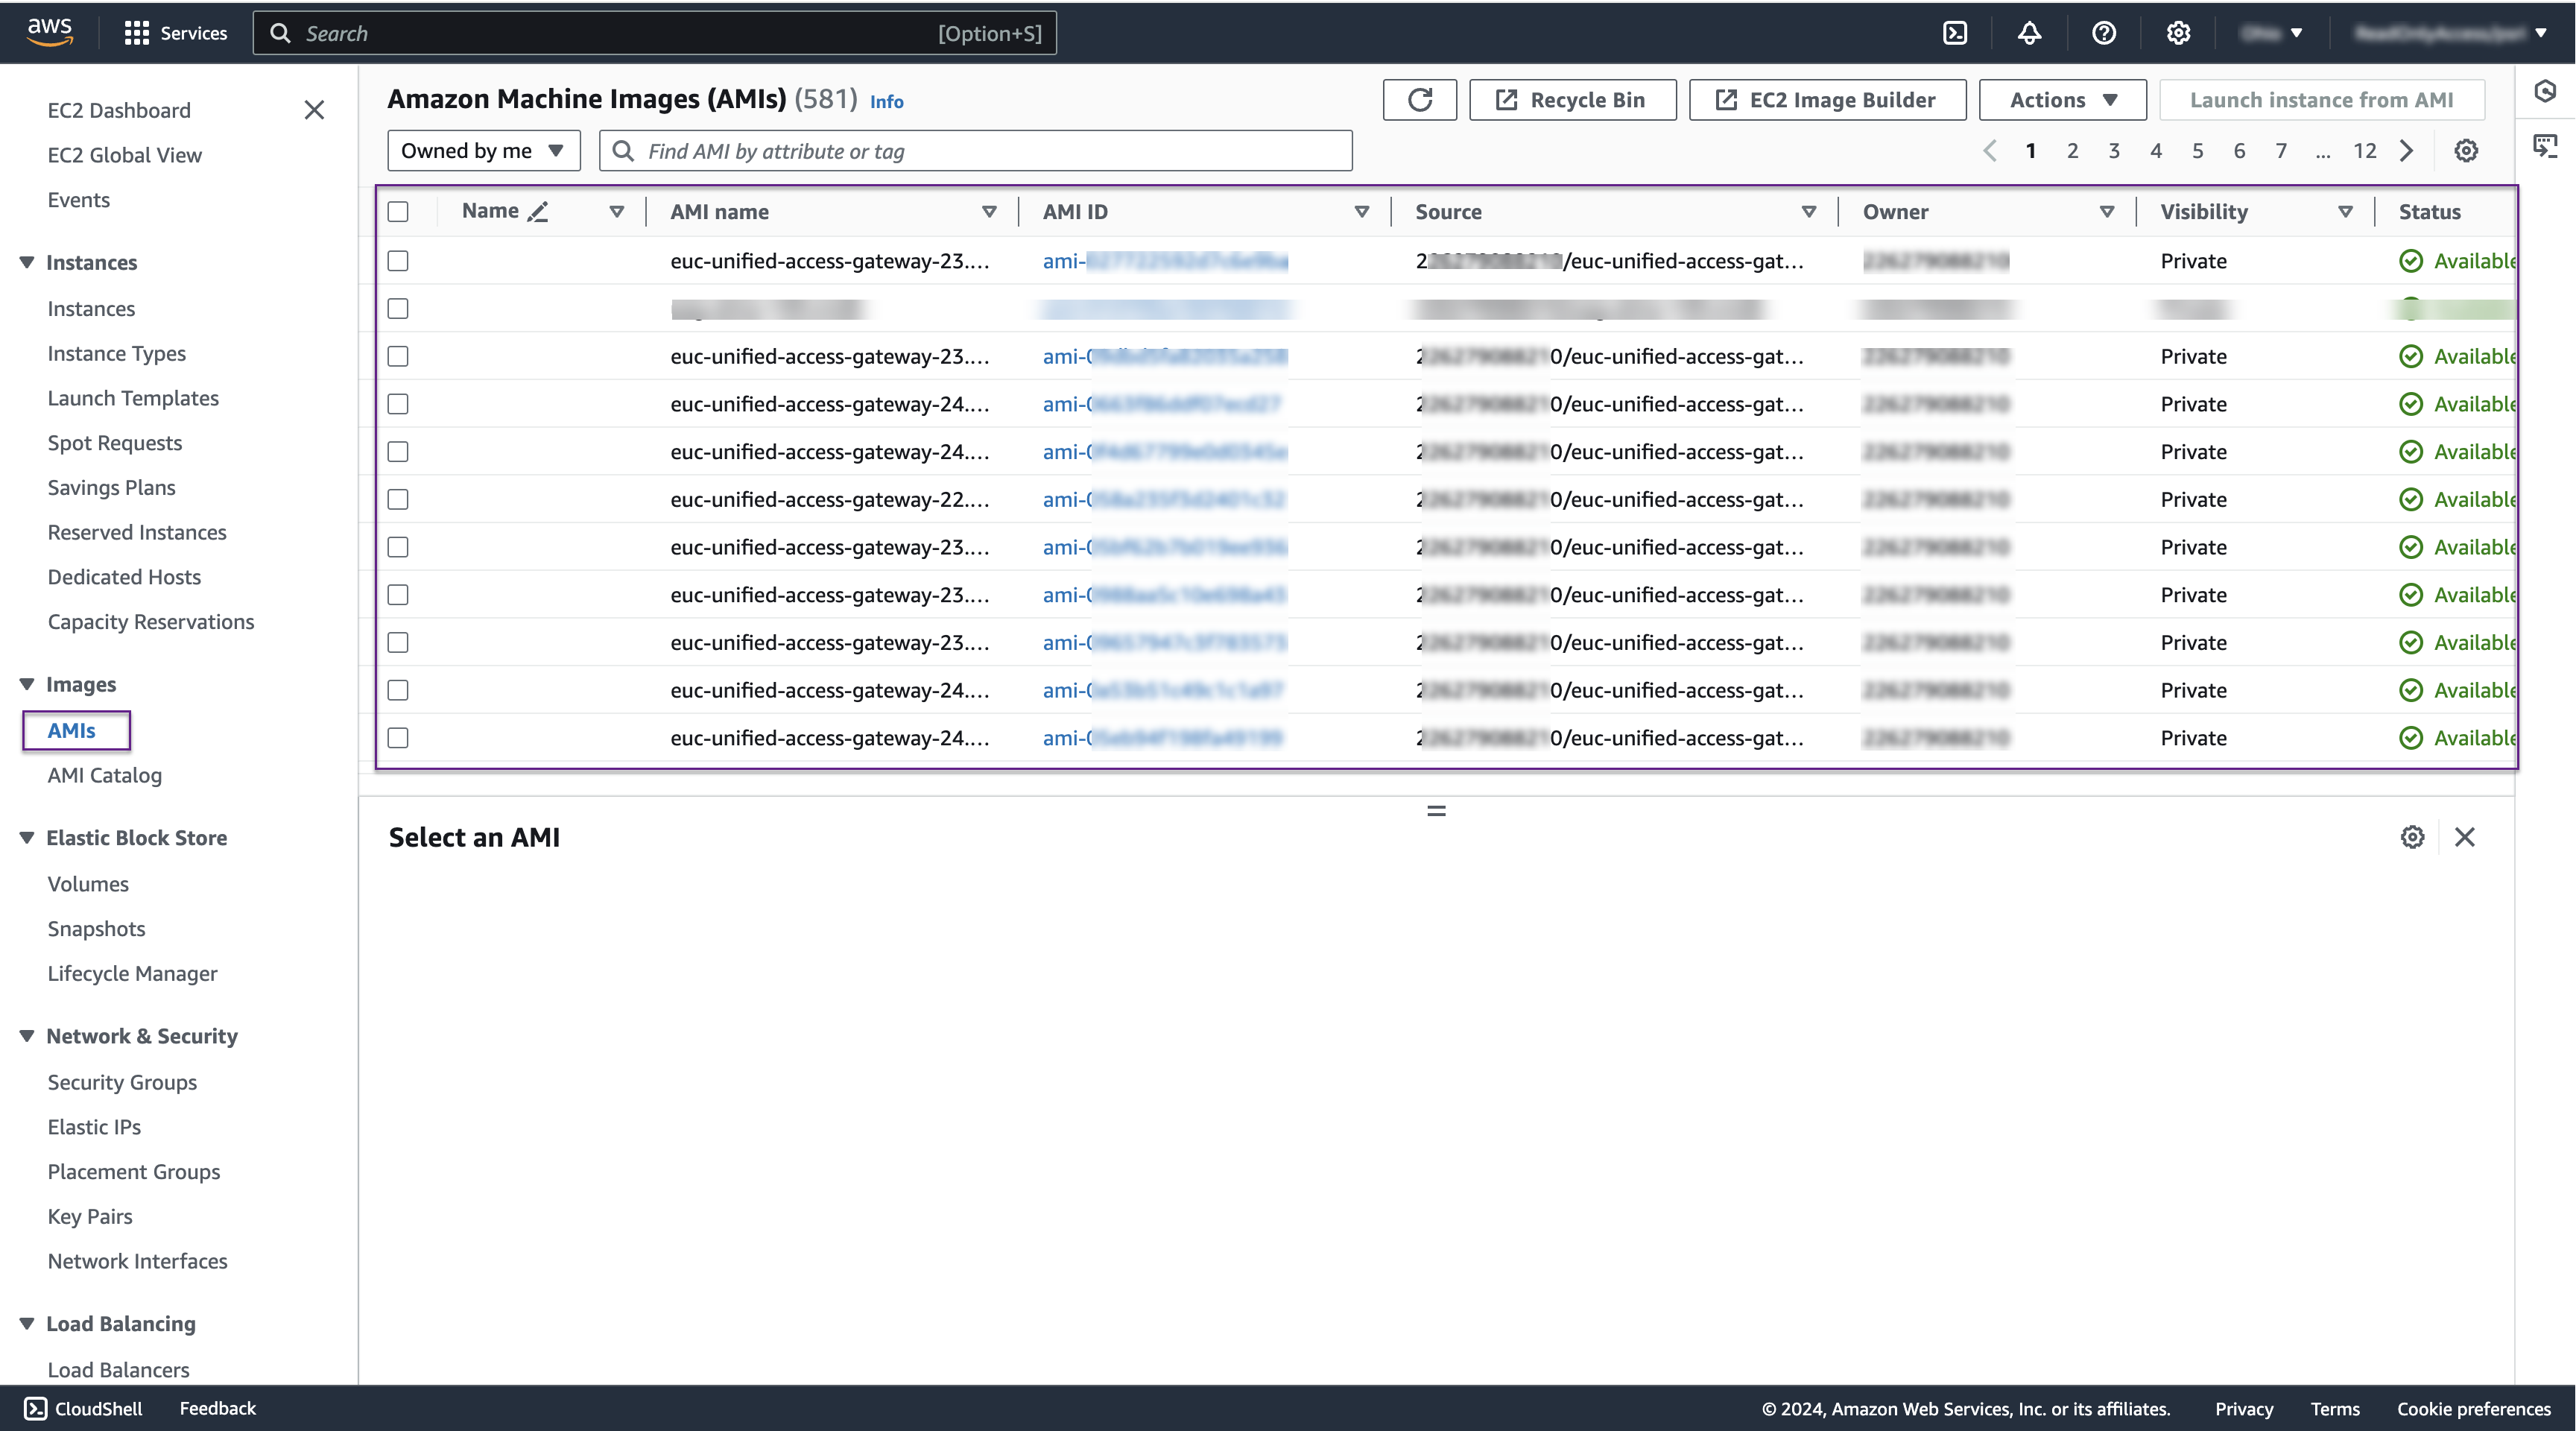
In AWS Console you should see your imported image in EC2 AMI Images.
Step 4. Prepare an INI File for AWS
[General] section settings
Configure the required settings in the [General] section. See PowerShell deployment parameters.
Additional settings in the [General] section used to run the script
| Setting | Description |
|---|---|
| source | Enter the location of the source ova file.
Example: C:\Users\User1\Downloads\ova\euc-unified-access-gateway-25.03.0.0-13143769531_OVF10.ova |
| vmdkExtractionDir | Enter the location of the extracted vmdk file. If you do not specify the path, the vmdk file will be downloaded to the location where the ova file resides. |
Settings in the [General] section that are not used
For AWS EC2 deployments, these settings in the [General] section are not used.
| Setting | Description |
|---|---|
| diskMode | Not used |
| ds | |
| folder | |
| netInternet | |
| netManagementNetwork | |
| netmask0,netmask1, netmask2 | |
| netBackendNetwork | |
| target | |
| All of the IPv4 and IPV6 settings |
[AmazonEC2] section settings
| Value | Example | Description |
|---|---|---|
s3Bucket | s3Bucket=uag-bucket | Enter the name of the S3 bucket to store Unified Access Gateway .vmdk image. |
amiId | amiId= |
The Amazon Machine Image (AMI) of Unified Accedd Gateway.
|
credentialProfileName | credentialProfileName=MyUAGProfile | The name of the credential profile containing the Access Key ID and Secret Access Key. This must be setup first. If this is not set, the deployment will attempt to use the default credential profile. |
instanceType | instanceType=c4.large | AWS EC2 instance type. Default is c4.large. |
region | region=us-east-2 | The AWS EC2 region name.
Note: This is a mandatory setting. |
ipv6AddressCount0
ipv6AddressCount1
ipv6AddressCount2 | ipv6AddressCount0=1 | Count of IPv6 addresses used by EC2 DHCP for eth0, eth1, or eth2.
This is an optional field. If IPv6 is required for any NIC, the value of this field can be set to 1.
If no value is specified, then the default is 0 for each NIC. |
privateIPAddress0
privateIPAddress1
privateIPAddress2 | privateIPAddress1= 172.31.7.222 |
Optional fixed IP address used by EC2 DHCP for eth0, eth1, or eth2. Normally this is not required but can be used to set a static private IP address instead of a dynamic one. |
publicIPId0
publicIPId1
publicIPId2 |
publicIPId0=eipalloc-027afa45f34984c87
|
AWS EC2 Elastic Public IP address ID associated with eth0, eth1 or eth2. This setting is optional for each NIC. |
securityGroupId0
securityGroupId1
securityGroupId2 | securityGroupId0=sg-00877c33656609407 |
AWS EC2 Security Group ID associated with eth0, eth1, or eth2. The same Security Group can be used by multiple Unified Access Gateway instances.
Note: This setting is optional. If this setting is not specified, the default EC2 Security Group will be used. |
subnetId0
subnetId1
subnetId2 | subnetId1=subnet-5c980935 |
AWS EC2 Subnet ID associated with eth0, eth1 or eth2.
|
INI File Definition Example
[General]
name=uag-auto-deployment
uagName=uag-auto-deployment
deploymentOption=onenic
sshEnabled=true
sshKeyAccessEnabled=true
sshPasswordAccessEnabled=true
allowedHostHeaderValues=ws1uag.uagad.com,userws1.uagad.com,encrypted.uagad.com,unencrypted.uagad.com,adminsaml.uagad.com,uagsaml.uagad.com,104.211.224.216
source=C:\Users\User1\Downloads\ova\euc-unified-access-gateway-25.03.0.0-13143769531_OVF10.ova
vmdkExtractionDir=C:\Users\User1\Downloads\ova\vmdk

[AmazonEC2]
s3Bucket=uag-bucket
# authentication
credentialProfileName=profile1
# type, region and image
instanceType=c5.2xlarge
instanceType=c4.large
region=us-east-2
amiId=

# eth0 settings
ipv6AddressCount0=0
subnetId0=subnet-04dfec81f4eeb7722
securityGroupId0=sg-0fb1c6059c7e3e1f2
publicIPId0=eipalloc-07a5b07b13ced2a45
Step 5: Deploy Unified Access Gateway to Amazon AWS EC2
-
From the Omnissa Customer Connect, go to Unified Access Gateway (UAG) PowerShell Scripts file and click DOWNLOAD NOW.
A zip fileuagdeploy-xx.xx.x.x-xxxxxxxxis downloaded on your local machine. -
Extract the files from the zip file. Ensure that the following PowerShell scripts are available on your machine.
uagdeployec2.ps1anduagdeploy.psm1 -
Open PowerShell window and run the command.
uagdeployec2.ps1 <file_name>.iniWhere,
file_nameis the name of your INI file.
4. Enter the admin password.
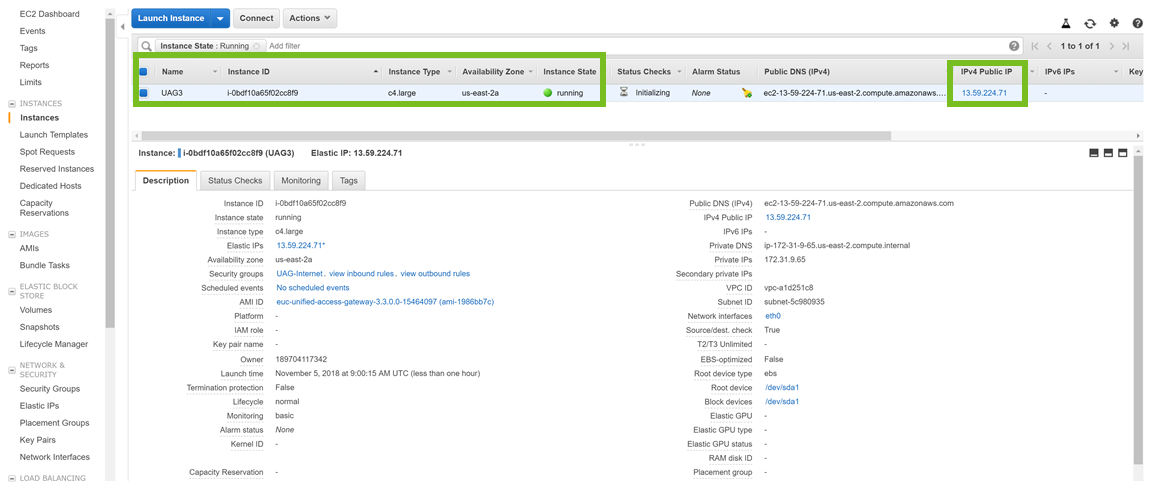
You can now access the UAG Admin UI using the Public IP.
-
To verify if the deployment is complete, log in to UAG using SSH and run the command:
tail /opt/omnissa/gateway/logs/admin.log -
Login to the admin UI using
https://uag-iporFQDN:9443/adminand configure the settings based on your requirement.
What to do next
- Stop the Unified Access Gateway instance.
- Clear the
userDatavalue from the current instance of Unified Access Gateway by using the following command:
edit-EC2InstanceAttribute -InstanceId i-12345678 -Attribute userData -Value "blank"
Was this page helpful?