Phishing and Content Protections in the MTD Console (Optional)
Phishing is the method of choice for cybercriminals to infect and infiltrate computers and end user devices. Corporate device users are especially vulnerable since they are heavily targeted. Phishing is the ultimate social engineering attack, giving a hacker the ability to go after hundreds or even thousands of devices all at once.
The Phishing and Content Protection (PCP) option from Workspace ONE Mobile Threat Defense provides an additional layer of valuable protection for supported devices. The following table lists the Phishing and Content Protection requirements across different device modes.
| Device Modes | Workspace ONE Intelligent Hub | Workspace ONE Tunnel |
|---|---|---|
| iOS Fully Managed | ✅ | ✅ |
| Android Managed (Fully Managed, COPE, COBO, and so on) | ✅ | ✅ |
| Android Unmanaged (Hub Registered) | ✅ | ✅ |
| iOS Account-Driven User Enrollment (ADUE) management mode | ✅ | ❌ |
| iOS Unmanaged (Hub Registered) | ✅ | ❌ |
For devices using per-app or full-device VPN with Workspace ONE Tunnel and the Tunnel Service on Unified Access Gateway, the following limitations apply:
- iOS MDM-managed devices support both per-app and full-device Tunnel.
- Android devices (MDM-managed and Hub-registered) support both per-app and full-device Tunnel.
- Mobile Threat Defense does not support Phishing and Content Protection when third-party VPNs are used across any platform.
Prerequisites
Phishing and Content Protection requires new versions of Omnissa Workspace ONE Intelligent Hub and Workspace ONE Tunnel.
- For the devices you intend to protect with PCP, direct your device end users to visit https://getwsone.com/ on their devices.
- Direct end users to download and install the newest version of Omnissa Workspace ONE Intelligent Hub.
Instructions for installing the Workspace ONE Tunnel app on devices are included in the platform specific instructions that follow.
-
While logged in to the Mobile Threat Defense Console, navigate to the Protections menu.
-
Ensure that you have selected the the group that you want in Manage settings for: and that this group has the devices for which you want Phishing and Content Protection to be enabled.
-
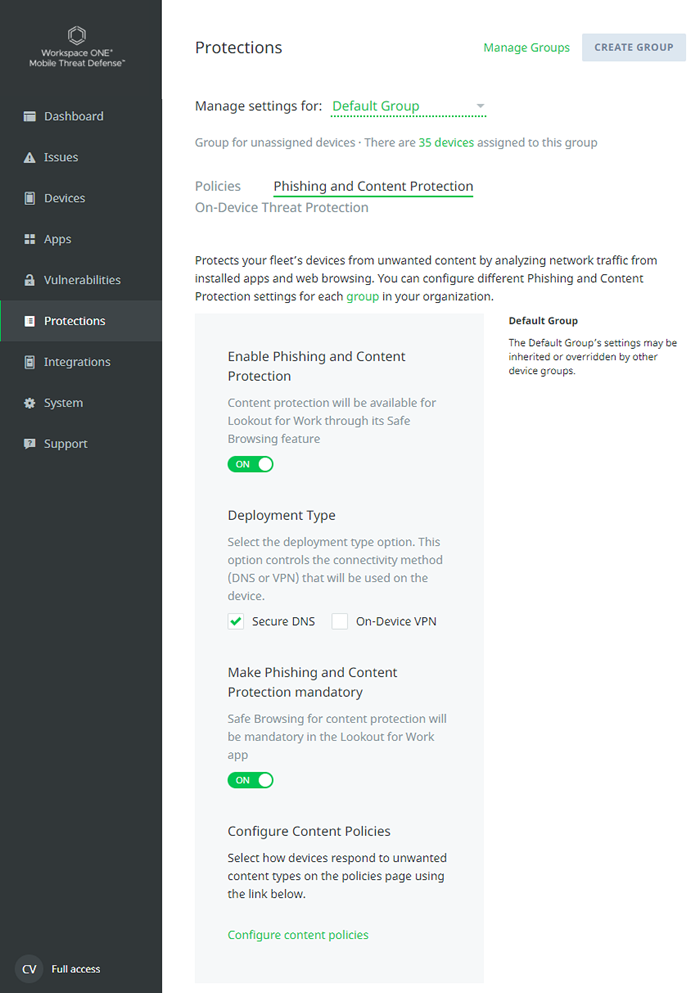
Select the Phishing and Content Protection tab and apply the following settings.
-
Activate the Enable Phishing and Content Protection slider.
-
Ensure that the Secure DNS option is checked.
-
Determine whether to make PCP mandatory.
- You can optionally Make Phishing and Content Protection mandatory, and if you do, PCP is activated automatically on the device and a PCP disabled threat is generated in the Mobile Threat Defense console and on the device if PCP fails to activate.
- However, if not set to mandatory, the device receives a notification that PCP is available to be activated and requires end user set up on the device.
-
Scroll further down on the Phishing and Content Protection tab to reveal more sections.
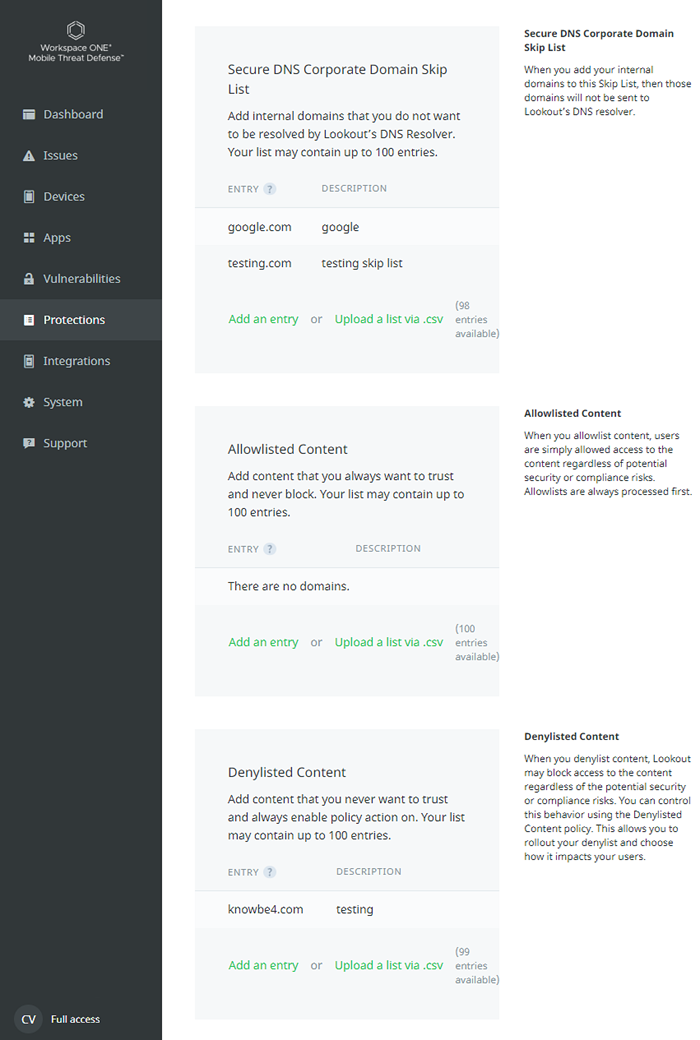
- Secure DNS Corporate Domain Skip List - Admins should enter corporate or internal domains that they would not want to be resolved by the DNS Resolver as part of the skip list. Instead, the Device Traffic Rules configured in UEM are applied. If a domain is not in the Skip List, it is routed through the MTD DNS resolver and hence undergos PCP checks. Add all your corporate domains here.
- Allowlisted - Add a list of content that you are certain does not represent a threat.
- Denylisted - Add a list of content that you want to make sure never is accessible to your device end users.
-
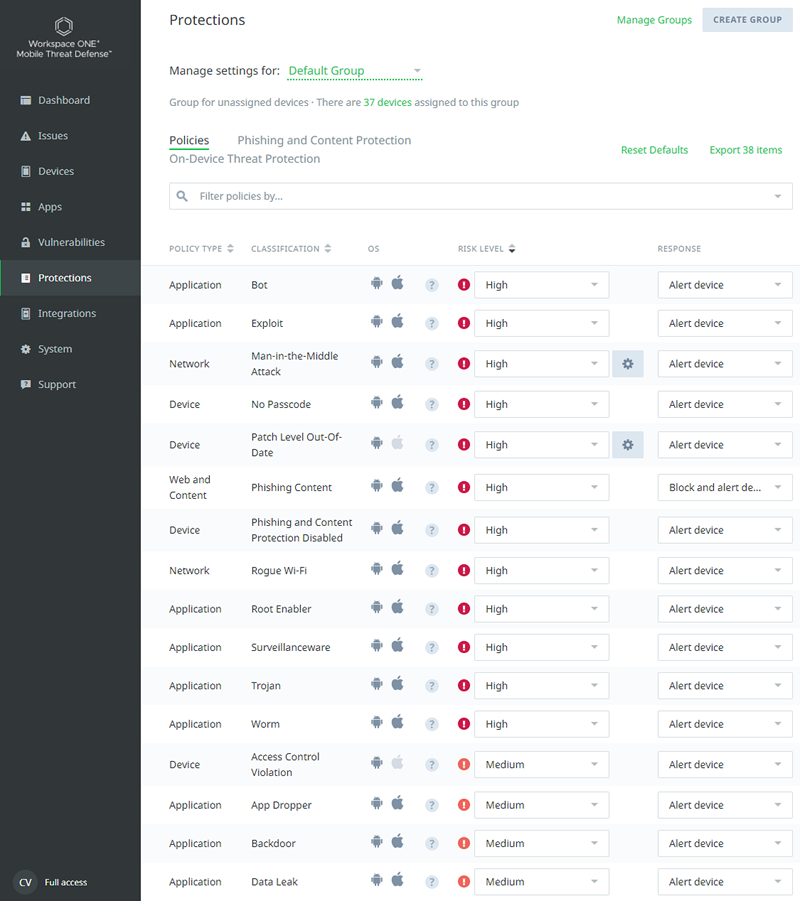
Select the Policies tab.
-
Scroll all the way to the bottom to view the Disabled Policies section. All the policies in this section are not enabled. All the policies listed above this section are enabled.
You must enable all disabled policies that you want by adding a check mark in each disabled policy's check box, scrolling back to the top of the listing, then selecting the Enable button.
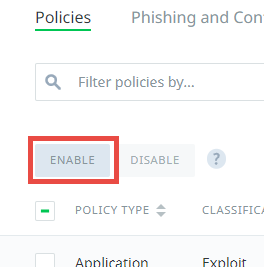
Similarly, you must disable all enabled policies that you want by adding a check mark in each enabled policy's check box, scrolling back to the top, then selecting the Disable button.
-
Configure content policies by specifying the Risk Level and Response for each unwanted content type in the policies listing. Define categories of content you would like to include in your content policy e.g., adult content, criminal content, etc.
-
After enabling policies and defining content categories, you must confirm these actions by selecting the Save Changes button located at the bottom-right of the policy listing.
Configure Android Devices, Phishing and Content Protections
The Workspace ONE Intelligent Hub with the PCP functionality should already be installed on Android devices per the Prerequisites step. Older versions of Intelligent Hub do not support Phishing and Content Protection so if you have not already done so, please follow the Deploy the Workspace ONE Intelligent Hub App.
Workspace ONE Tunnel must be present in the Work Container, on devices with both Personal and Work Profile, in order for PCP to be activated. If you want to assign Tunnel as an internal app, you can upload the Tunnel APK file in Workspace ONE UEM and assign the application to all targeted Android devices. The Tunnel app is pushed to the device after it is enrolled in Workspace ONE UEM. You can also enable Tunnel VPN, enable secure access options, and mobile SSO.
For any scenario, whether it be...
-
Android device with PCP only
OR
-
Android device with PCP + Tunnel VPN / Secure Access
OR
-
Android device with PCP + Mobile SSO
OR
-
Android device with PCP + Tunnel VPN / Secure Access + Mobile SSO
...take the following steps to configure iOS devices with PCP protection.
-
In Workspace ONE UEM, move to the organization group (OG) that directly manages or is a parent of OGs that manage the Android devices you intend to protect with PCP.
-
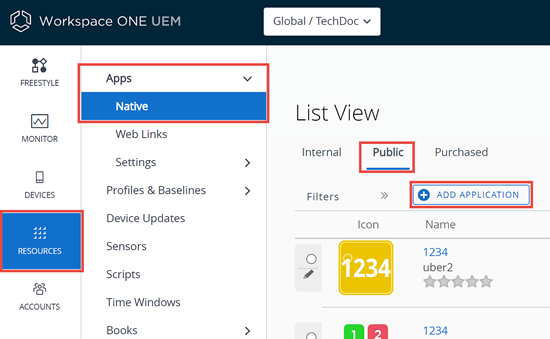
Navigate to Resources > Apps > Native and select the Public tab.
-
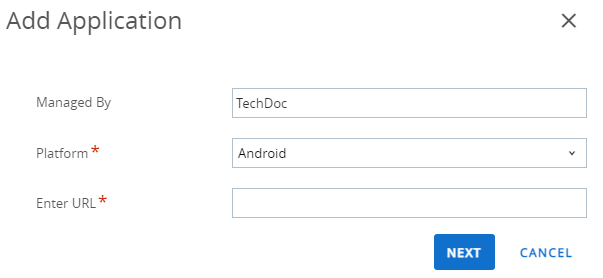
Select the Add Application button. The Add Application screen displays.
-
For Platform, select Android.
-
Open a new tab in your browser and visit the Google Play store (https://play.google.com/).
-
Initiate a search by selecting the magnifying glass at the top-right corner of the Google Play Store. Use "Workspace ONE Tunnel" as the search parameter.
-
Select the app from the search results so that the URL looks similar to this: https://play.google.com/store/apps/details?id=com.airwatch.tunnel. This is the URL you can use for the Add Application screen.
-
For Enter URL, enter the URL of the Google Play Store page for the app in the previous step.
-
Select the Next button. An expanded version of the Add Application screen displays.
-
For the required text box Name, enter "Workspace ONE Tunnel".
-
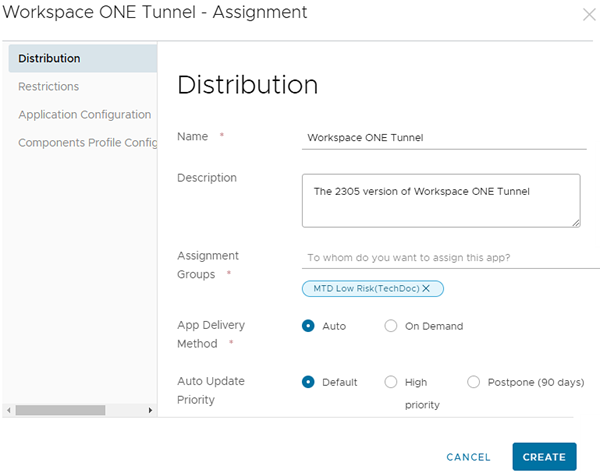
Select the Save & Assign button. The Workspace ONE Tunnel- Assignment screen displays.
-
In the Distribution tab, enter a Name, Description, and for Assignment Groups, select the name of the smart group you are using to deliver Mobile Threat Defense to devices.
-
For App Delivery Method, select the Auto radio button.
-
For Auto Update Priority, hover your mouse cursor over the info badge to the far right of the screen to determine which option you want.
-
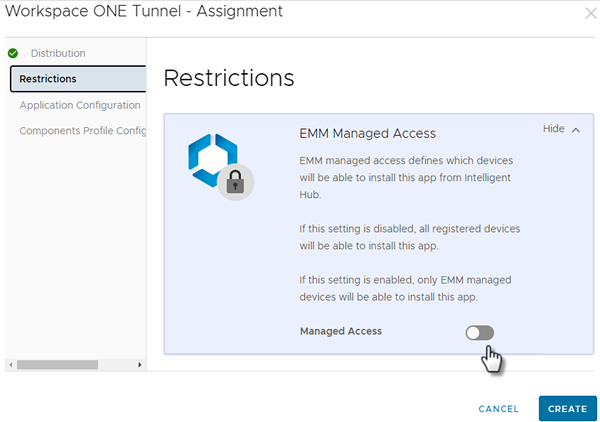
Move to the Restrictions tab and based on the EMM Managed Access description you see in the blue box, you must determine whether you want to enable Managed Access.
-
Select Create
-
Select Save or Save & Publish Android device end users will receive a prompt to install Workspace ONE Tunnel, which you should direct them to accept.
-
Direct your Android device end users to launch the Workspace ONE Intelligent Hub app. Once activated, they receive a notification on the Android device from Hub that reads "Safe Browsing is activated."
-
In the Intelligent Hub app, navigate to the Support tab and select Device Details where a short card notice reports that PCP is activated.
-
If you have configured PCP to be not mandatory, then the Safe Browsing toggle must be enabled on the device by the end user.
-
If you have a device profile assigned to your Android devices that includes a Restriction payload, YOU MUST ENSURE that the Allow VPN Changes slider is enabled. This is not optional.
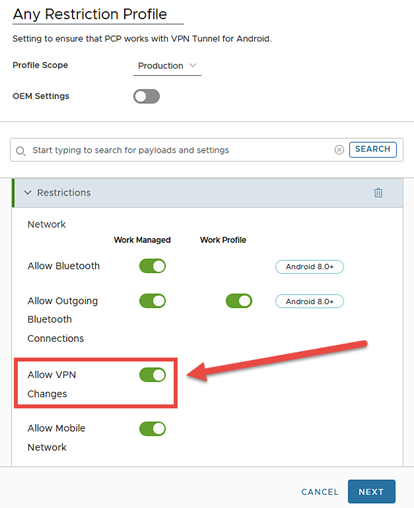
If you have a Restriction profile on your Android device and you do not enable the Allow VPN Changes slider, then Phishing and Content Protections will not function for that device.
-
If you are configuring your Android devices with Phishing and Content Protection ONLY, then you are done.
.
.
If you are interested in adding Tunnel VPN / Secure Access or Mobile SSO or both, continue with the following.
VPN Tunnel functionality is compatible with Mobile Threat Defense and Workspace ONE UEM. If you want to activate this functionality and you have a valid VPN Tunnel license, you can make it work with Mobile Threat Defense. To configure this functionality, see the following topics, in order.
Configure Mobile SSO OR VPN Tunnel: You can also configure Mobile Single Sign-On (SSO) with Workspace ONE Tunnel and PCP. For detailed documentation and instructions, see Implementing Mobile Single Sign-On Authentication for Workspace ONE UEM Managed Android Devices
Configure iOS Full Managed Devices with Phishing and Content Protections
On iOS devices, Phishing and Content Protection is delivered by configuring a custom DNS provider using the provided custom profile configuration in Workspace ONE UEM. You can also enable Tunnel VPN and enable secure access options.
For any scenario, whether it be...
-
iOS device with PCP only
OR
-
iOS device with PCP + Tunnel VPN / Secure Access
...take the following steps to configure iOS devices with PCP protection.
-
In Workspace ONE UEM, move to the parent organization group (OG) that is the parent of all child OGs that manage iOS devices you intend to protect with PCP. It is important that you do not skip this step.
-
Navigate to Resources > Apps > Native and select the Public tab.
-
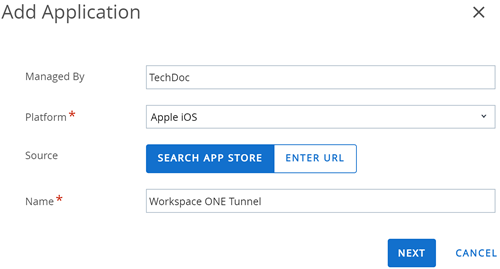
Select the Add Application button. The Add Application screen displays.
-
For Platform, select Apple iOS and enable the Search App Store option.
-
For Name, enter "Workspace ONE Tunnel"
-
Select the Next button. The Search results display.
-
Click the +Select button next to the correct result, making sure the version is at least 23.05. The Add Application screen displays again.
-
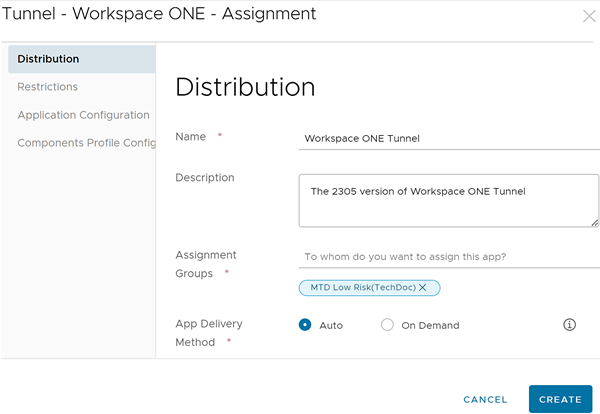
Select the Save & Assign button. The Tunnel - Workspace ONE - Assignment screen displays.
-
In the Distribution tab, enter a Name, Description, and for Assignment Groups, select the name of the smart group you are using to deliver Mobile Threat Defense to devices.
-
For App Delivery Method, select the Auto radio button.
-
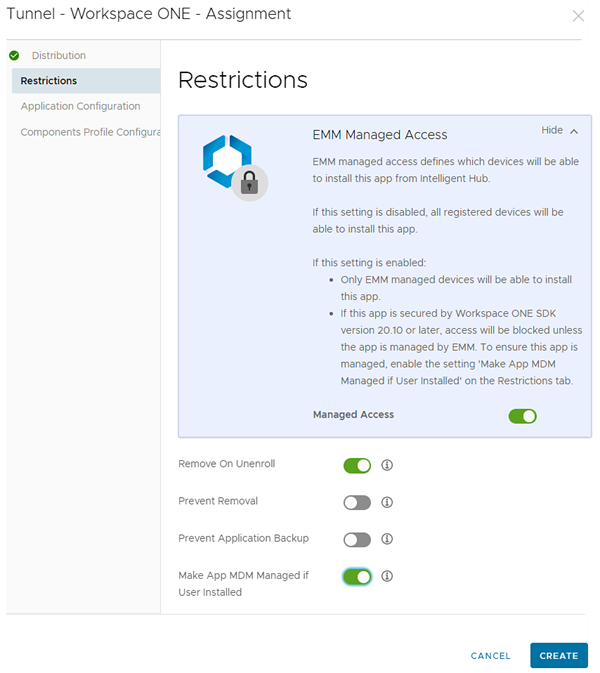
Move to the Restrictions tab and enable the following options.
- Managed Access
- Remove on Unenroll
- Make App MDM Managed if User installed
-
Select Create
-
Select Save or Save & Publish iOS device end users will receive a prompt to install Workspace ONE Tunnel, which you should direct them to accept.
-
Navigate to Resources > Profiles & Baselines > Profiles and select Add > Add Profile > iOS > Device Profile.
-
Name the profile
iOS-MTD-PCP. -
In the left panel listing of profile payload elements, scroll down and select the Custom Settings payload. Select the Add button to the right to add the following XML code in the custom settings text box.
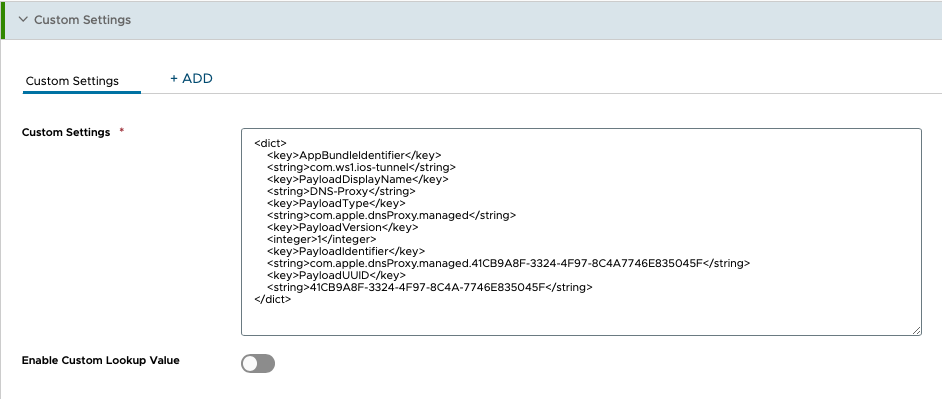
<dict> <key>AppBundleIdentifier</key> <string>com.ws1.ios-tunnel</string> <key>PayloadDisplayName</key> <string>DNS-Proxy</string> <key>PayloadType</key> <string>com.apple.dnsProxy.managed</string> <key>PayloadVersion</key> <integer>1</integer> <key>PayloadIdentifier</key> <string>com.apple.dnsProxy.managed.41CB9A8F-3324-4F97-8C4A7746E835045F</string> <key>PayloadUUID</key> <string>41CB9A8F-3324-4F97-8C4A-7746E835045F</string> </dict> -
Select the Next button. The Assignment-Deployment screen displays.
-
Apply the following settings.
Setting Recommended Entry Smart Group Select the name of the smart group that contains all the iOS devices in this OG. Deployment Managed Assignment Type Auto Managed By The entry here should be pre-populated with the parent OG you moved to in step 1 of the larger step for iOS. If it is not, then select Cancel, return to step 1, and restart the iOS config step, following its instructions. 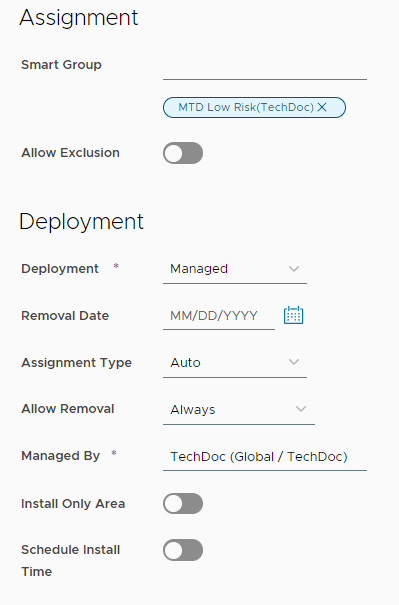
Complete other fields per your preferences or leave as default.
-
Select the Save and Publish button.
-
Direct your iOS device end users to launch the Workspace ONE Intelligent Hub app. Once activated, they receive a notification on the iOS device from Hub that reads "Safe Browsing is activated."
-
In the Intelligent Hub app, navigate to the Support tab and select Device Details where a short card notice reports that PCP is activated.
-
If you have configured PCP to be not mandatory, then the Safe Browsing toggle must be enabled on the device by the end user.
-
If you are configuring your iOS devices with Phishing and Content Protection ONLY, then you are done.
However, VPN Tunnel functionality is compatible with Mobile Threat Defense and Workspace ONE UEM. If you have the desire to activate this functionality and a valid VPN Tunnel license, you can make it work with Mobile Threat Defense. To configure this functionality, see the following topics, in order.
Configure iOS ADUE and Unmanaged Devices for Phishing and Content Protections
To configure Phishing and Content Protections (PCP) on iOS ADUE and unmanaged devices, install and activate the Workspace ONE Intelligent Hub on the device. Admin setup requires only enabling MTD and PCP in the MTD console.
For iOS ADUE devices, the Intelligent Hub can be deployed as a managed application or installed by the user from the App Store. For iOS unmanaged devices, users must download the Intelligent Hub from the App Store and complete enrollment through the application.
Verify that Phishing and Content Protections is enabled on your device by performing the following steps.
-
Open Workspace ONE Intelligent Hub app on your device and click to Support tab.
-
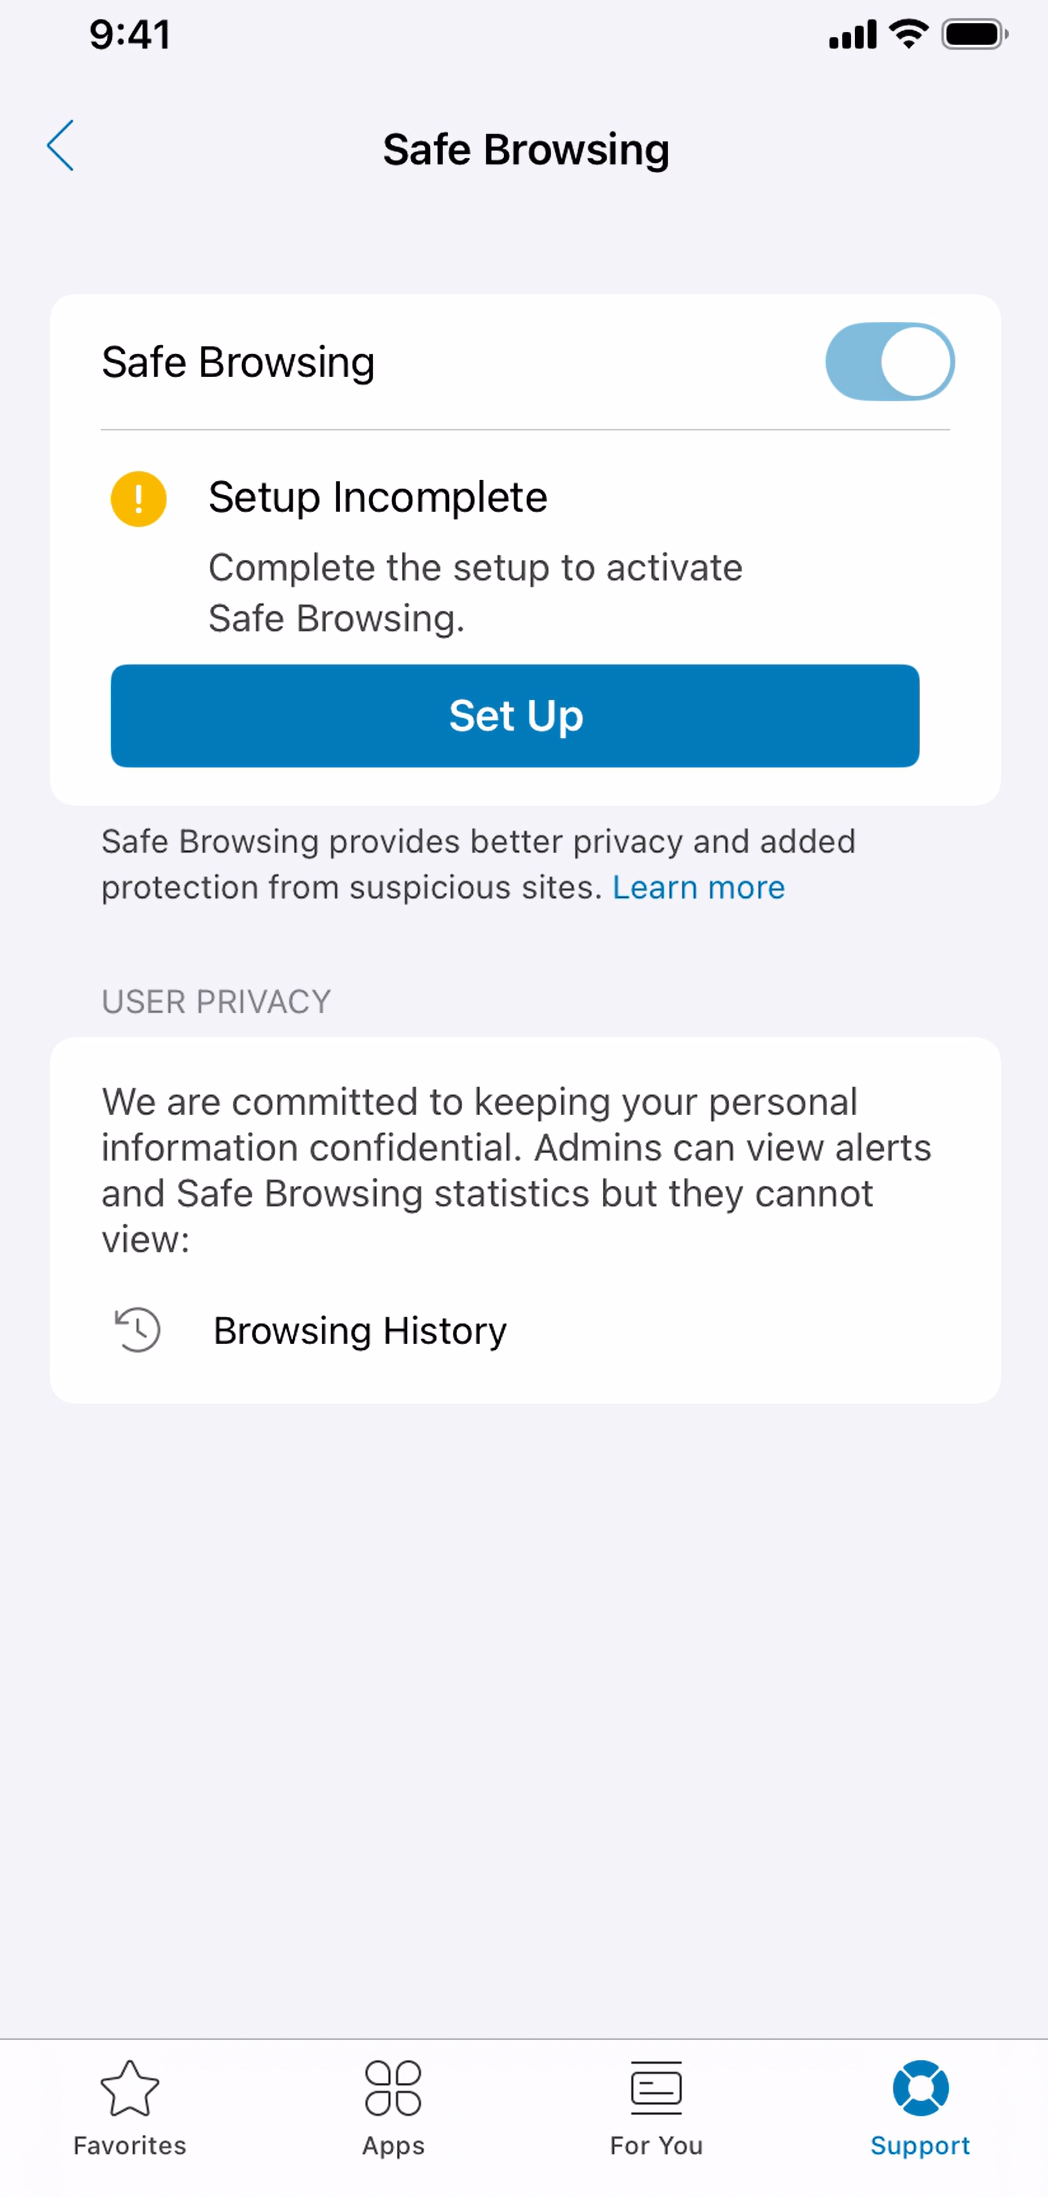
In the Support tab, tap on the Safe Browsing is turned off to activate safe browsing.
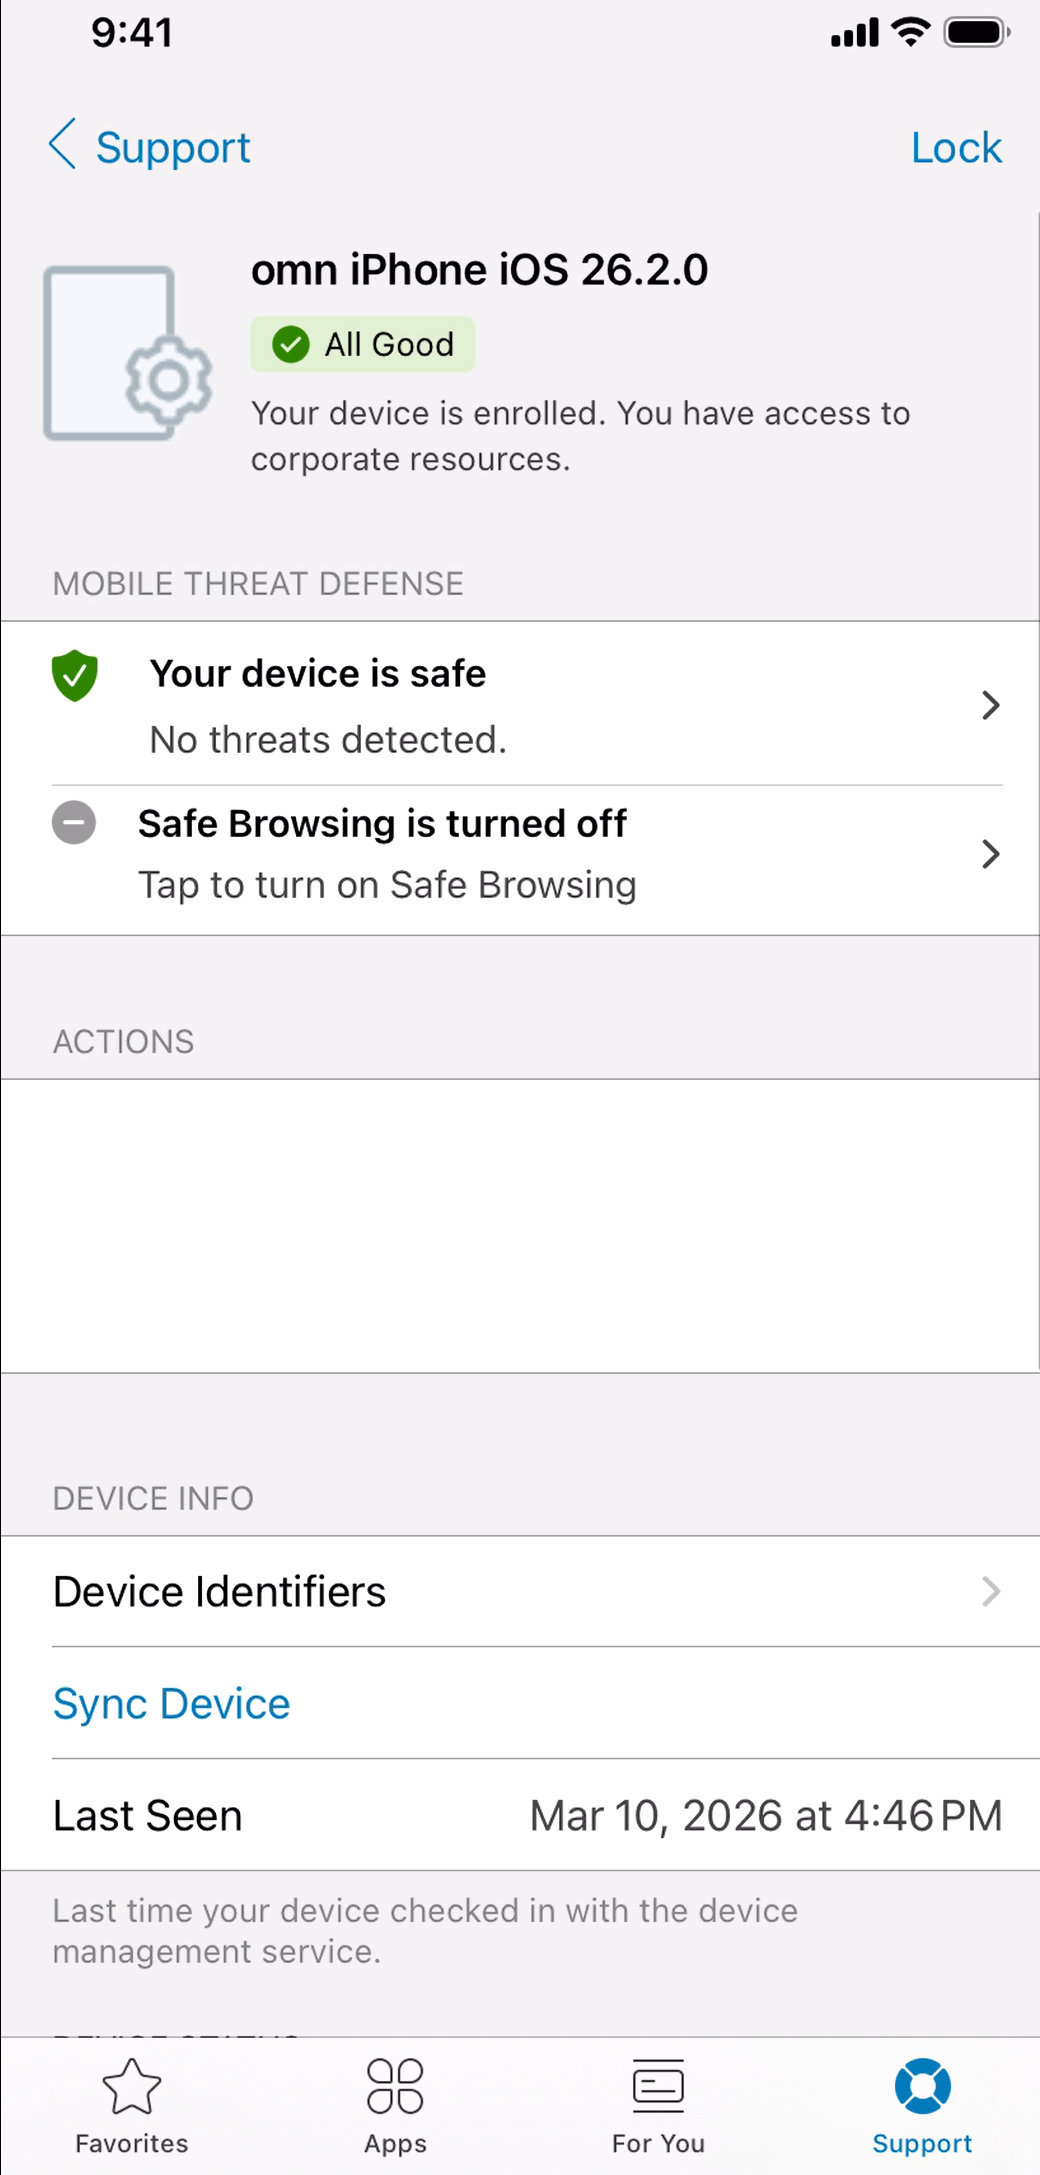
-
Toggle on the Safe Browsing option to enable safe browsing on your device. A Safe browsing activation in progress screen appears.
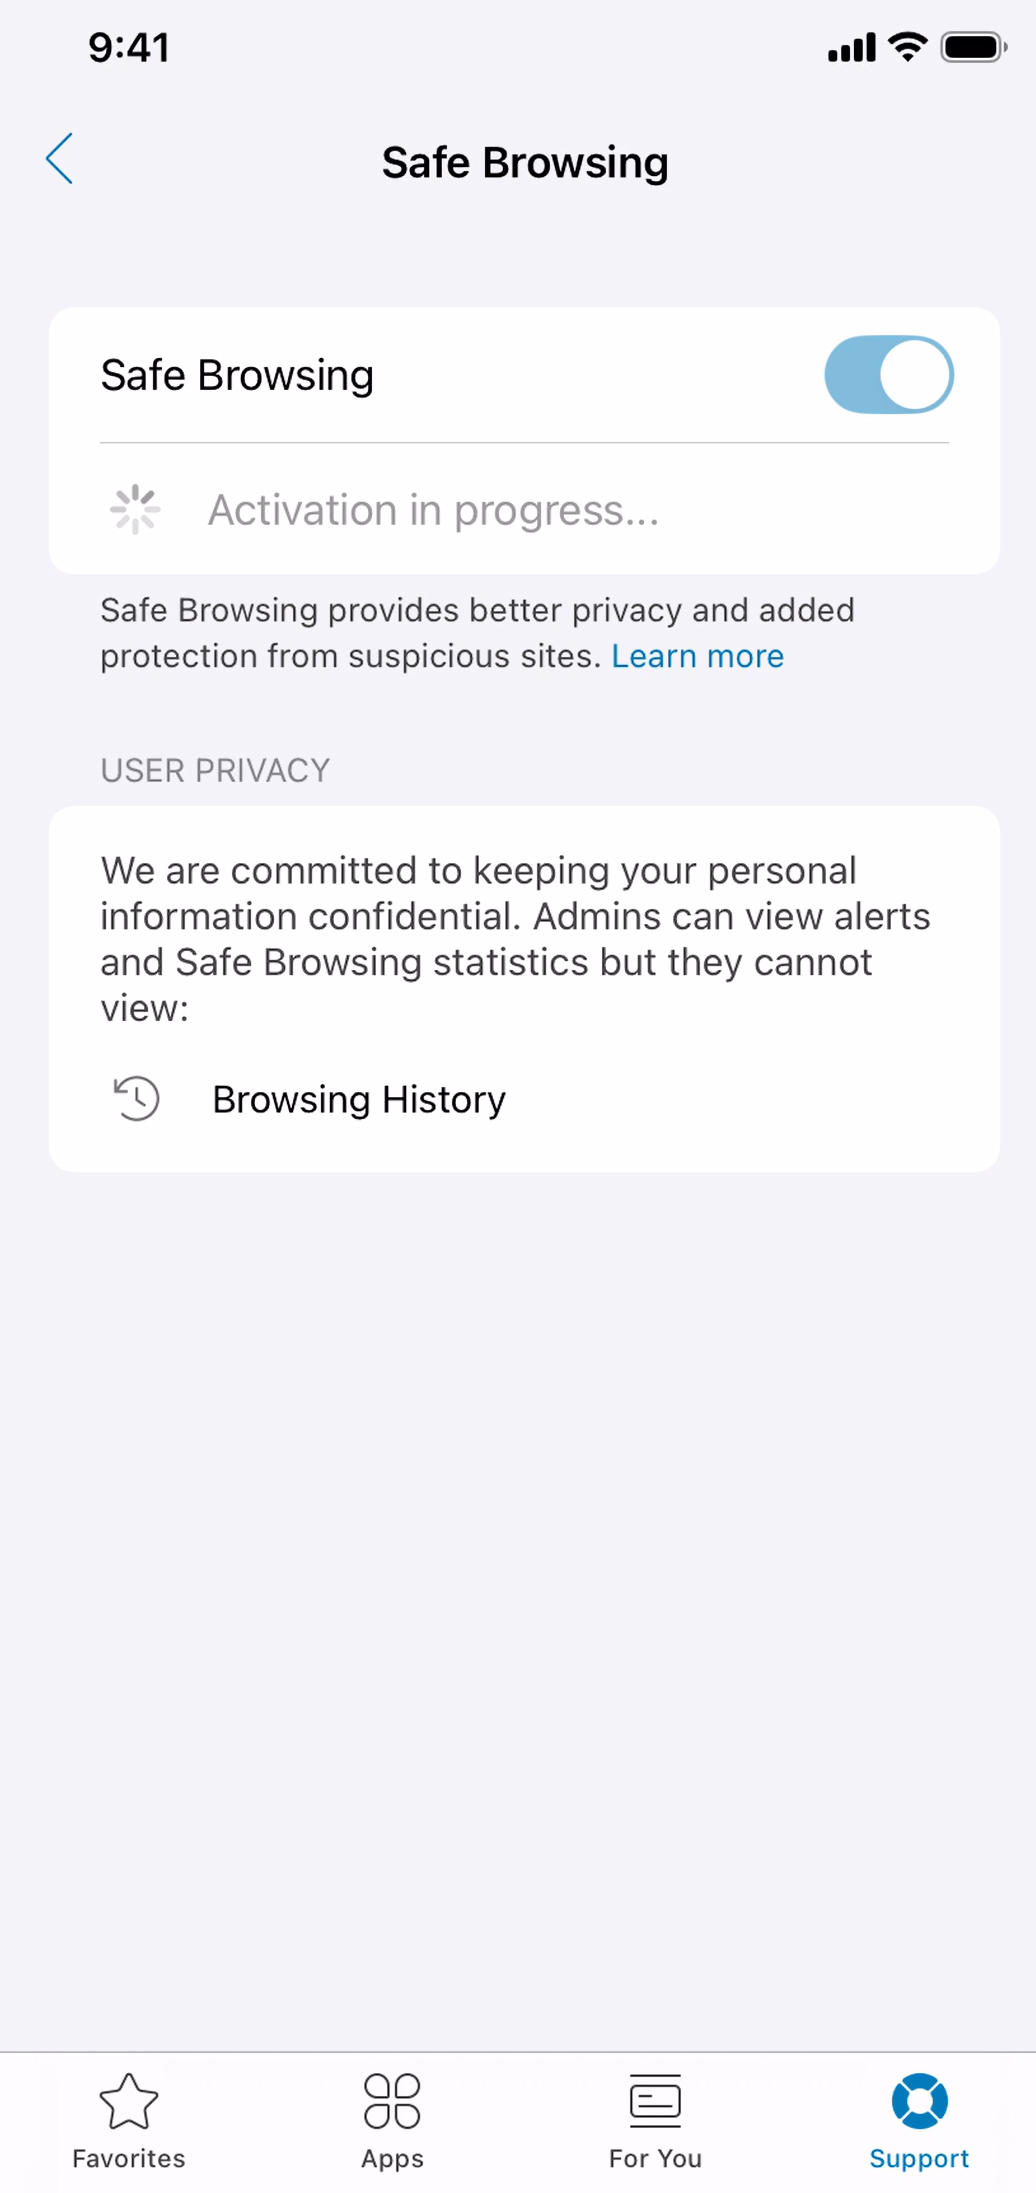
-
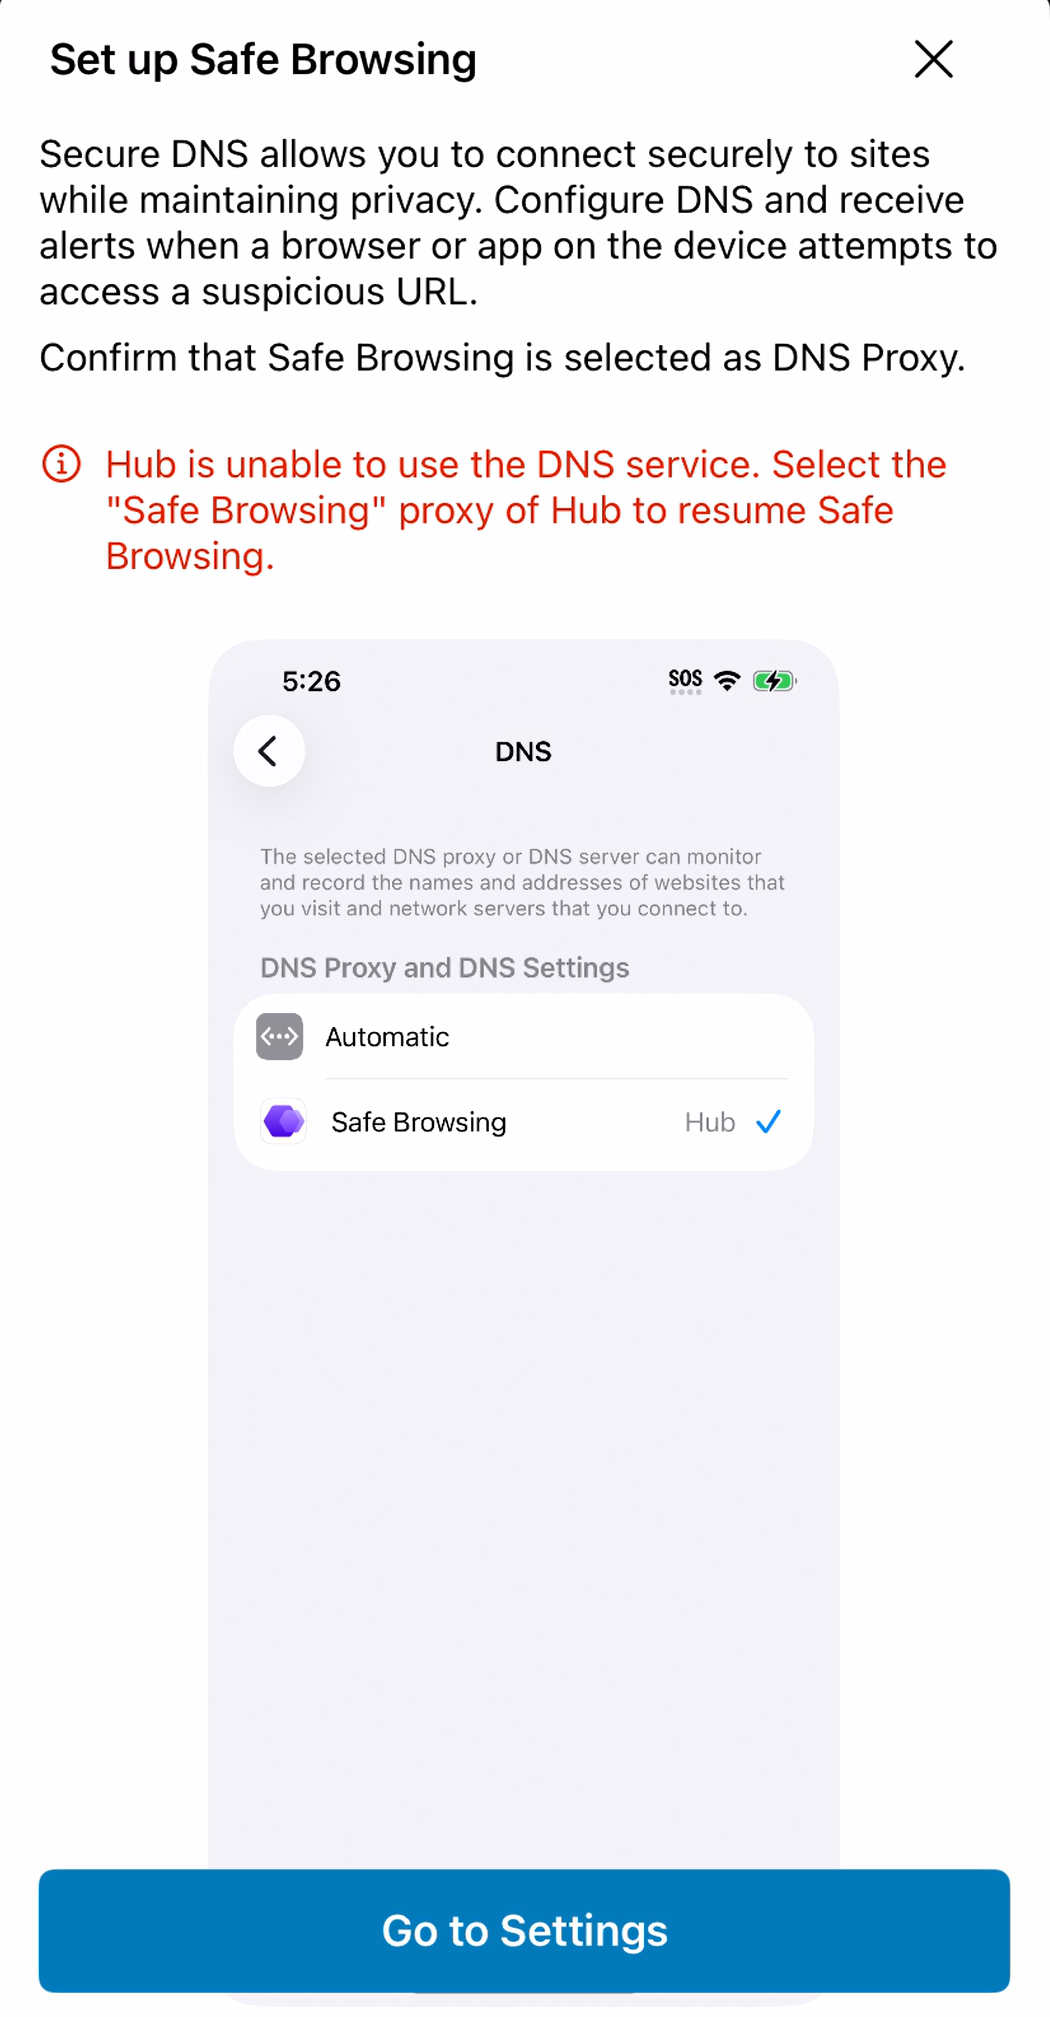
Click Set Up to activate safe browsing. Note: You need to activate safe browsing option on Workspace ONE Intelligent Hub to set up the safe browsing option.
-
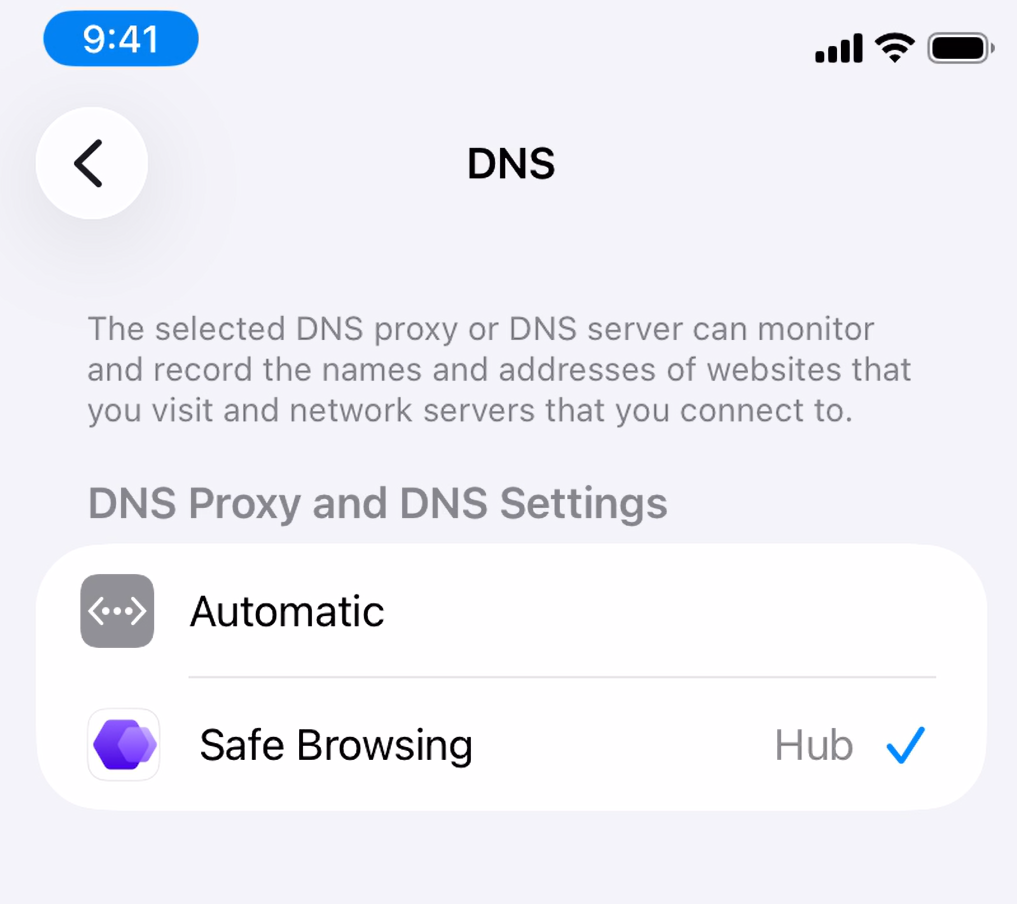
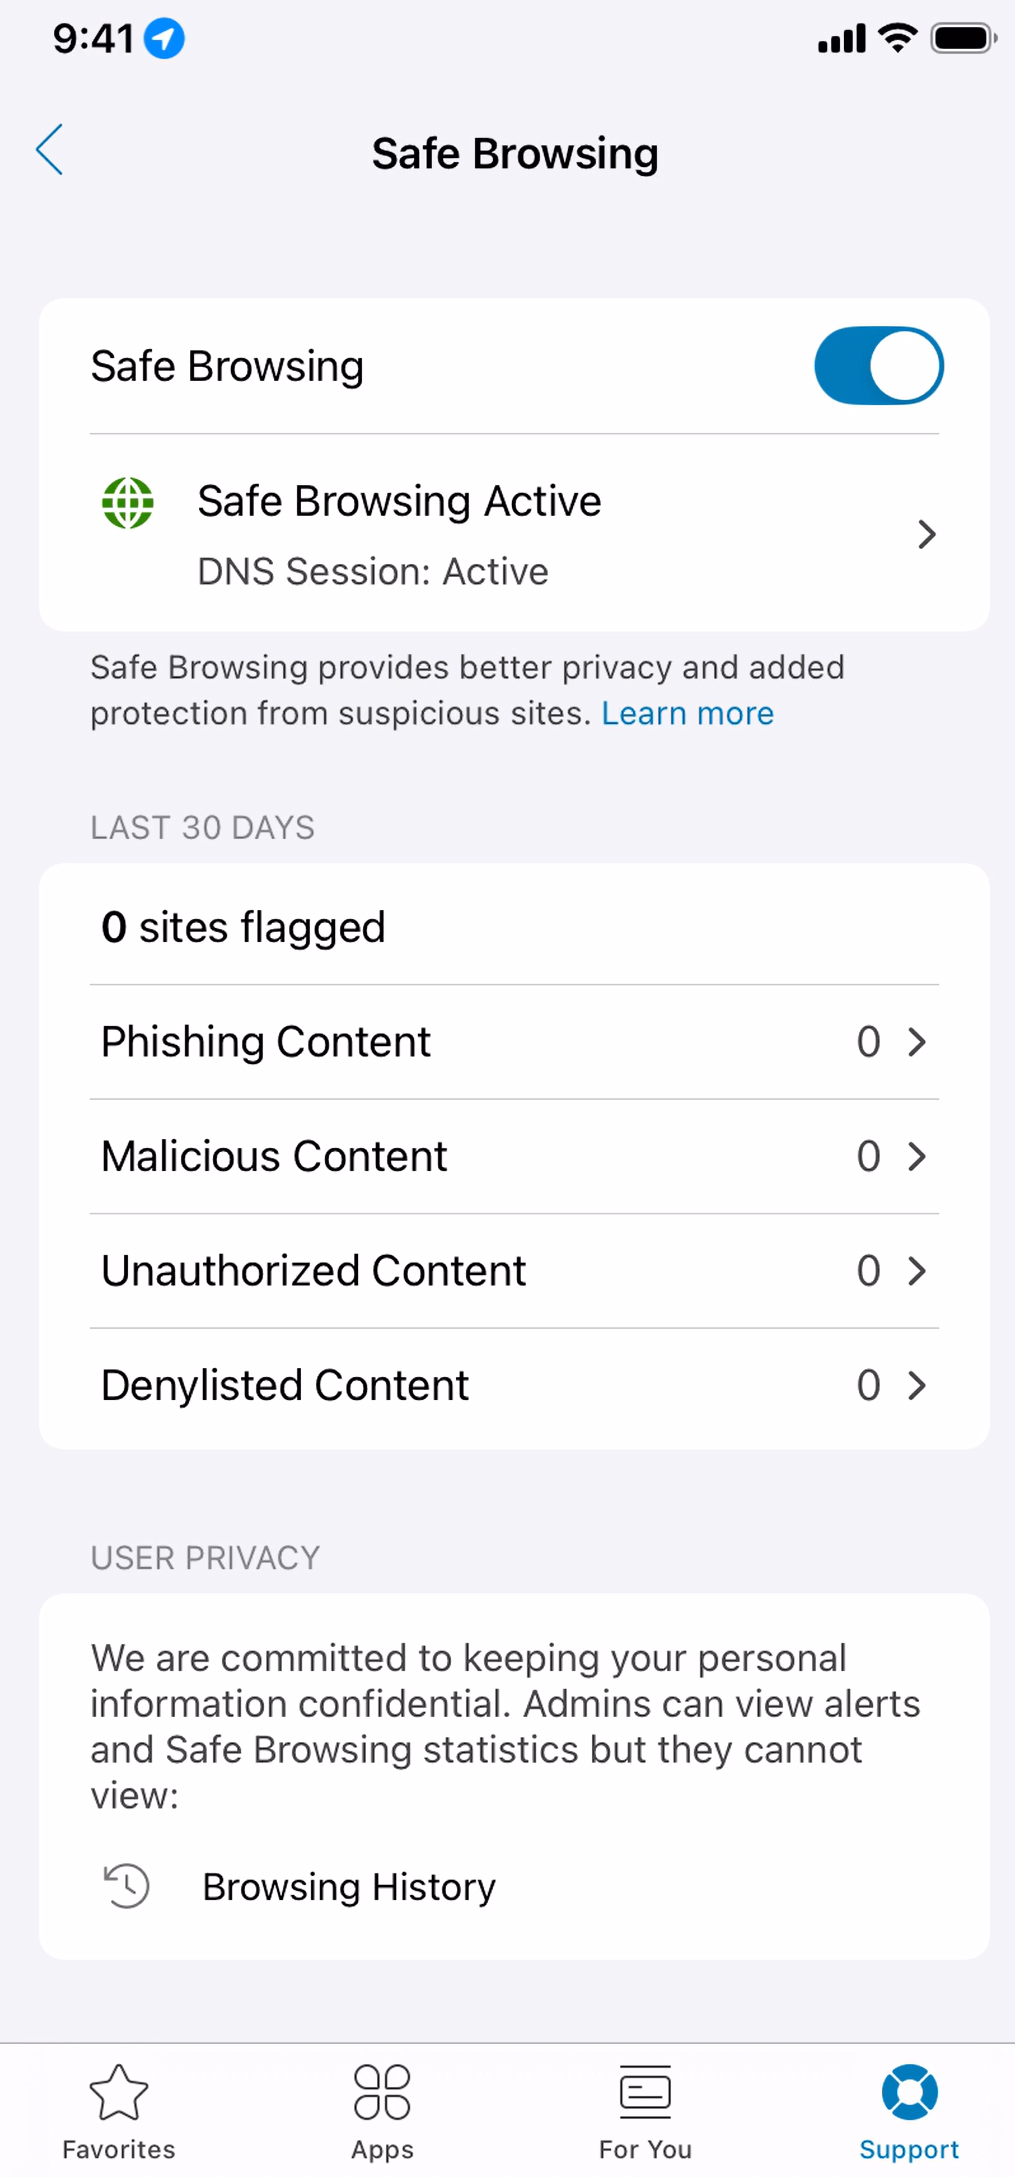
Navigate to Settings > General > VPN & Device Management > DNS and click Safe Browsing to activate. The following screen appears displaying that safe browsing is active.
Was this page helpful?