The Workspace ONE Mobile Threat Defense (MTD) console is the main interface for analyzing and responding to threats and vulnerabilities affecting your company's mobile devices. It monitors mobile devices from threats by malicious applications, or potential risks from benign apps that may be installed on a device. The MTD console provides a comprehensive view of applications installed on any device enrolled in MTD.
The Omnissa Workspace ONE Intelligent Hub mobile application is the device-side agent, detecting threats on mobile devices and reporting the information to the end user and also to the console. Workspace ONE Intelligent Hub is available for iOS from the App Store and for Android from the Google Play Store. Enter getwsone.com into the browser window of any device and you can download the correct Workspace ONE Intelligent Hub installer for that device.
NOTE: If you are deploying Workspace ONE Mobile Threat Defense for the first time, refer to the requirements at the beginning of this documentation and follow the steps in the Integrate Workspace ONE Mobile Threat Defense with Workspace ONE UEM section.
Log in to the MTD Console
You can log in to the Workspace ONE MTD console at https://omnissa.lookout.com/a/.
MTD console administrator accounts are created for the users your company requests during initial setup. New Administrators receive a welcome email that directs them to the console and prompts them to set a password with the following minimum requirements.
- Uppercase letters (A-Z).
- Lowercase letters (a-z).
- Numbers (0-9).
- Symbols, including accented characters.
You can also request that SAML SSO integration in order to enable access to the MTD Console with your Identity Provider (IDP) by raising a Support Request (SR) with Omnissa.
Multifactor Authentication for Console Sign-in
Local administrator accounts that sign in using Mobile Threat Defense credentials rather than through an identity provider are required to use multifactor authentication (MFA). After entering your username and password, you must provide a one-time passcode generated by an authenticator app. Any TOTP (Time-based One-Time Password) authenticator that generates standard TOTP codes is supported. Once MFA is configured, it applies to all tenants associated with your account.
During initial Multifactor Authentication (MFA) setup, the console generates 12 single-use recovery codes. Store these codes in a secure location, such as a password manager, in case you lose access to your authenticator app.
Note: Administrators who sign in through SAML or SSO use the MFA configured in their identity provider instead of the console MFA.
Perform the following steps to set up MFA:
- Sign in with your username and password.
- Follow the prompts to pair your authenticator app.
- Download the recovery codes and store them securely.
- Sign out, then sign back in using MFA to confirm it works.
Session Limits
The console automatically ends your session after 30 minutes of inactivity. If you remain active, your session stays open for up to 10 hours, after which the console terminates the session regardless of activity. Administrators who authenticate through an identity provider are reauthenticated seamlessly, provided their identity provider session remains valid.
Switch the Active Console for Multiple Tenants
If you have the MTD console for multiple tenants, such as test and production environments, you are prompted to select a single tenant at login time. Once you are logged in, you can switch between tenants using the Switch Console option in your user menu.
- Select your initials at the bottom of the Navigation Bar and select Switch Console. A dialog displays that lists your available consoles.
- Select the console you want to view.
The Main Menu for Mobile Threat Defense
The Navigation Bar on the left side of the MTD Console lists the available modules.
| Module | Description |
|---|---|
| Dashboard | The landing module for the MTD Console. The Dashboard provides an overview of Devices, Risks, and Active Issues across your fleet. It also features App Analysis information. |
| Issues | Lists both Active and Resolved Issues, as well as the affected device and the detection date. You can select an issue for additional information. You can also filter the list as described in Searching & Filtering Lists. |
| Devices | Lists Active, Inactive, and Disconnected devices. You can select a device for more information. You can also filter the list as described in Searching & Filtering Lists. |
| Apps | Lists apps detected on enrolled devices, including the app version, operating system, number and percentage of devices running the app, detection date, and detected security violations. You can select an app for more information. You can also filter the list as described in Searching & Filtering Lists. |
| Vulnerabilities | Lists active OS versions or security patches across your device fleet and shows what percentage of enrolled devices are on each. You can select a patch for more information. You can also filter the list as described in Searching & Filtering Lists. |
| Protections | Review and set the policies for different issue classifications, including assigning a severity level (None, Advisory, Low, Medium, or High) and setting a Response (Alert or Don't Alert the user on the affected device). Advisory notifies the user that a security issue needs attention but does not notify an administrator, sync with UEM, or log an issue in the console. Review and configure Phishing and Content Protection settings. |
| Integrations | Review and configure integration with Workspace ONE UEM. |
| System | Replaces the Navigation Bar with the System bar, providing access to all the System modules. |
| System > Account | Displays your company account information including organization, license usage, and the global enrollment code for adding devices to the default device policy group in your MTD console. |
| System > Manage Admins | Lists all MTD Console Administrators. You can add new Administrators from here or search the list by name or email. NOTE: For the purpose of SAML SSO integrations, you cannot modify Admin users with this module. |
| System > Manage Enrollment | Devices should be enrolled with the Intelligent Hub application and Workspace ONE UEM as described earlier in this documentation. In the Enrollment settings tab, you can set the disconnection period before a device is considered to disconnected. |
| System > Audit Trail | Review changes made by MTD Console administrators. |
| System > Application Keys | Review and generate application keys for ingesting Workspace ONE Mobile Threat Defense data into Workspace ONE Intelligence and integrating your Workspace ONE Mobile Threat Defense console with your SIEM application. |
| Support | Opens the Workspace ONE Support Portal in a new browser tab. From here, you can access the knowledge base or raise a support request. |
Search and Filter Lists
Most of the modules in the MTD Console support text search as well as filtering based on the available columns. You can also sort many of the columns in ascending or descending order. You can search or filter a list on a module.
- Select the search field. A list displays with the available filters, as well as the searchable fields at the bottom.
- Enter your query text. When selected, the filter list is replaced with a list of available values.
- Select a value. The list is filtered based on the value, and the search bar updates to indicate the active filter.
- To apply multiple filters, repeat steps 1-3 as many times as desired. You can also add multiple values for the same filter by checking the filter value boxes.
- For multiple values, such as Risk: Medium and Risk: Low, the results display items matching any of the values. A filter for OS: Android, Risk: Medium, Risk: Low returns Android devices that are Risk: Medium and Android devices that are Risk: Low.
- To remove a filter, select its X icon.
The console preserves your filter selections within a browser session. When you return to a list, such as Apps or Issues, using the navigation bar or the browser's back and forward buttons, your last applied filters, sort order, and page position are restored automatically.
To reset a page to its default state, click the trash icon in the filter controls, or click the same navigation item again while already on that page.
Note: Filters are stored per browser tab and per tenant. They are cleared when you close the tab, restart the browser, or sign out.
Export Items
Several modules have an Export items link located in the top-right. This operation exports information to a CSV (comma separated values) file. Exported items reflect any filter applied at the time the list is exported. For example, if you view the Issues page with the filter set to Risk: High, then the MTD Console exports a list of only High risk issues.
Admin Notifications and Summary Emails
By default, new MTD Console Administrators receive notification emails for any Medium or High severity issues, plus weekly summary emails. You can modify these settings from your My Preferences module.
- Select your username at the bottom of the Navigation Bar and select My Preferences.
- Toggle the notification and summary emails you want to receive.
- NOTE: Issue Notification emails that occur in close succession are grouped in order to reduce the number of emails sent for a continuous stream of alerts during a widespread event. If you have notifications enabled for Low, Medium, or High risk issues, you receive a batched notification e-mail whenever any included issues match that severity level.
- Select Save.
Device Status and Workspace ONE UEM
When you deploy Workspace ONE Mobile Threat Defense, MTD reports the device's status back to Workspace ONE UEM using the device tag feature.
Device Status: Whether MTD activation on a device is "Pending", "Activated", or "Deactivated"
- Pending - The device is marked for enrollment in the MTD Console because it is part of the UEM smart group that has been configured in the UEM Integration settings. However, MTD has not been activated on the device.
- Activated - MTD has been activated on the device.
- Deactivated - MTD was previously activated on the device but is no longer active.
Connection Status: Whether a device is "Unreachable" or "Disconnected"
- Unreachable - MTD has attempted to communicate with the device and received an unreachable response.
- Disconnected - MTD has attempted to communicate with the device and received no response for a specified amount of time (30 days by default), indicating that the device may be off, out of Wi-Fi range, or some other temporary cause such as the Hub agent being terminated for an extended period. You can configure the minimum time before a device is considered disconnected in the Enrollment Settings tab in the Manage Enrollment module.
Risk Status: Whether a device is "Secured", or has "Threats Present" that are "Low Risk", "Medium Risk", or "High Risk"
- Secured - The device has no threats present, or the only threats present have a Risk Level of "None" in the MTD Console Protections module.
- Threats Present - The device has a threat present. This status is accompanied by one of three device states based on the threat risk level in the MTD Console Protections module. You can also configure device tags based on the specific threat or policy violation to be applied to the device in Workspace ONE UEM.
- Low Risk - The device has a Low Risk threat present.
- Medium Risk - The device has a Medium Risk threat present.
- High Risk - The device has a High Risk threat present.
Threat Lab
Access Lookout’s online Threat Lab resource, where you can get details and analyses about recent threats such as zero-day vulnerabilities, trojans, surveillanceware, and more. You can also get information on threats that impact a large audience, vulnerabilities with active exploits, and other threats discovered by Lookout’s research team.
Each threat analysis contains the following.
- A general overview and description of the threat or vulnerability.
- Lookout and Workspace ONE Mobile Threat Defense coverage and recommendations for administrators.
- Suggestions to further protect your organization.
You can also sign up for Threat Lab emails, which deliver the latest threat research and analyses directly to your inbox. For more information, see Lookout Threat Guidances (https://www.lookout.com/threat-intelligence/topics/threat-guidances)
Threat Response Actions
Android and iOS devices, together with Workspace ONE Intelligent Hub 24.07, offers additional functionality to improve end user experience when responding to threats.
| Threat Category | Threat Policy | WS1 MTD Recommendation | iOS & iPadOS available action | Android available action |
|---|---|---|---|---|
| Device | * No Passcode/PIN * Unencrypted Device | Set a passcode/PIN to secure the device | Go to Face ID & Passcode settings page to set passcode | Go to Security & Privacy settings page to set Screen Lock |
| OS Out of Date | Update to the latest OS version supported on the device | Go to Software Update settings page to check for updates | Go to System Settings page to check for updates | |
| Patch Level Out-of-Date (Android only) | Update to the latest available security patch | N/A | Go to System Settings page to check for updates | |
| USB Debugging Enabled (Android only) | Disable USB debugging | N/A | Go to USB Debugging page to disable USB Debugging | |
| Developer Mode Enabled | Disable Developer Mode | Go to Developer Mode page to disable Developer Mode | Go to Developer Mode page to disable Developer Mode | |
| Phishing & Content Protection Disabled | Enable Phishing and Content Protection | Got to Safe Browsing overview page in Intelligent Hub to enable Safe Browsing | Go to Safe Browsing overview page in Intelligent Hub to enable Safe Browsing | |
| * Side-loaded App * Non-App Store Signed App | Uninstall the app immediately | N/A | Uninstall application | |
| Notification Permissions Not Accepted | Enable Notification Permissions | Go to app settings page to enable notification permissions | Go to app settings page to enable notification permissions | |
| Storage Permissions Not Accepted (Android only) | Enable Storage Permissions | N/A | Go to app settings page to enable storage permissions | |
| Application | Application Vulnerability | * Update app if an update is available and app is managed * Uninstall app if no update is available | Go to App Store to check if there is an update available. Otherwise user will need to uninstall application | Go to Play Store to check if there is an update available. If no update, uninstall application |
| Other Application threats - prohibited, exploit, spyware, riskware, etc. | Uninstall the app immediately | N/A | Uninstall application | |
| Network | * Man-in-the-Middle Attack (MiTM) * Rogue WiFi | Disconnect from network immediately | Go to Wi-Fi Settings page to disconnect from network | Go to Network & Internet Settings page to disconnect from network |
| Web & Content | Phishing, Malicious, Denied or Unauthorized Content | N/A | Content is automatically blocked based on Threat policy settings | Content is automatically blocked based Threat policy settings |
If a threat is detected, you can empower end users to take the prescribed action (usually tapping a button) in response to the detected threat, all from the Workspace ONE Intelligent Hub app.
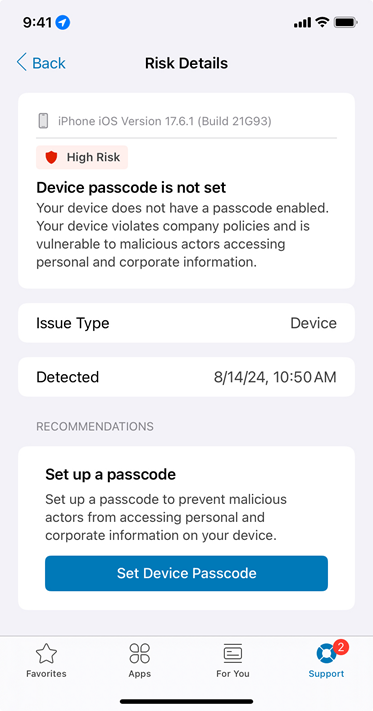
Detect End Users That Have Not Accepted the Notification Permission
The notification permission allows MTD to alert users when a threat is detected and provide guidance on how to resolve it. If this permission has not been granted, MTD cannot deliver notifications to the user. However, the user can still view detected threats by opening Workspace ONE Intelligent Hub manually. Use the Notification Permission Not Accepted classification to identify affected devices and users.
To enable and use the Notification Permission Not Accepted classification:
-
Select Protections in the console navigation pane.
-
Enable the Notification Permission Not Accepted classification if it is not already active. Note: It may take up to 24 hours for a newly enabled classification to take effect.
-
Navigate to the Issues module and filter by the Notification Permission Not Accepted classification to view affected users.
Detect End Users that have not Accepted the Storage Permission (Android)
On Android, MTD requires the storage permission to scan device files, including installed apps and associated app files, for threats such as malware, trojans, and viruses. These threats will only be detected on devices which the user has not granted this permission after the APK file has been installed as an application on the device. Use the Storage Permission Not Accepted classification to identify affected devices and users.
To enable and use the Storage Permission Not Accepted classification:
-
Select Protections in the console navigation pane.
-
Enable the Storage Permission Not Accepted classification if it is not already active. Note: It may take up to 24 hours for this classification to take effect after it is enabled.
-
Navigate to the Issues module and filter by the Storage Permission Not Accepted classification to view affected devices.
Module Details
Each module in the Mobile Threat Defense console, accessible by the main menu buttons, is presented here for reference.
Dashboard Module
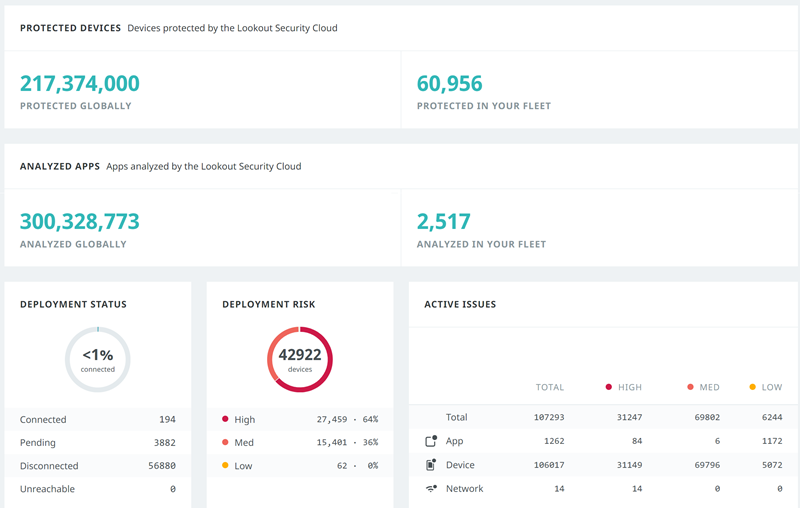
The MTD Console Dashboard presents a summary of your enrolled devices, as analyzed by the Lookout Security Cloud.
Automated Threat Reporting
Automated Threat Reporting streamlines security management by automatically gathering and processing mobile threat intelligence, replacing manual data collection. This provides continuous, visual insights into your security posture and validates how your mobile fleet is protected from evolving threats.
The threat reporting engine provides an admin-driven workflow:
- Admin Distribution: Reports are generated through an admin-requested workflow using readily available data.
- Metric Calculation Engine: Processes research-backed data to calculate key metrics: fleet health, app threats, and vulnerability risks.
- Visual Report Generation: Delivers clear charts and tables detailing Known Exploited Vulnerabilities (KEV), threat classifications, and risk descriptions.
- Email Notifications: Automated alerts are sent with a secure download link once the report is ready.
Note: Administrators can opt in for report delivery in My Preferences in the lower left corner of the console.
Perform the following steps to generate a report:
-
Click Generate Report in the upper right of the Dashboard Module.
-
Choose either of the following options:
-
Dashboard Snapshot:
- Instantly capture your current dashboard view for recordkeeping or immediate sharing.
- Can be exported as a PDF file or printed as needed.
-
Protection Impact
-
Generate a customized, high-level summary of your organization’s security posture and MTD protection over the past year.
-
Metrics included:
- Fleet Connectivity: Detailed breakdown of devices that are "Protected" (activated and connected), "Disconnected" (no telemetry sent), or "Pending" (awaiting user activation).
- Usage Health: An assessment of your deployment status (e.g., "At Risk" or "Healthy") based on protection coverage.
- Security Detections: Comprehensive data on blocked URLs, phishing encounters, and malicious detections.
- Vulnerability Insights: Identification of high-risk vulnerabilities and specific alerts for the CISA Known Exploited Vulnerabilities (KEV) catalog.
- App Threat Analysis: Visual summaries of sideloaded apps analyzed and identified malware families such as Trojans, Spyware, and Adware.
-
-
Review Past Reports
Previously generated Protection Impact reports are accessible in the Reports module of the Workspace ONE Mobile Threat Defense console. From this module, you can:
- View a list of previously generated reports
- Review report generation dates
- Access report history for trend analysis
- Download previously generated reports
- Verify report delivery status
Device Deployment
Device Deployment reflects a summary of the devices enrolled in Workspace ONE Mobile Threat Defense, the risk to each device, and active issues across devices. This summary is a "quick view" to understand what you should address to mitigate threats to the organization.
Issue Trends
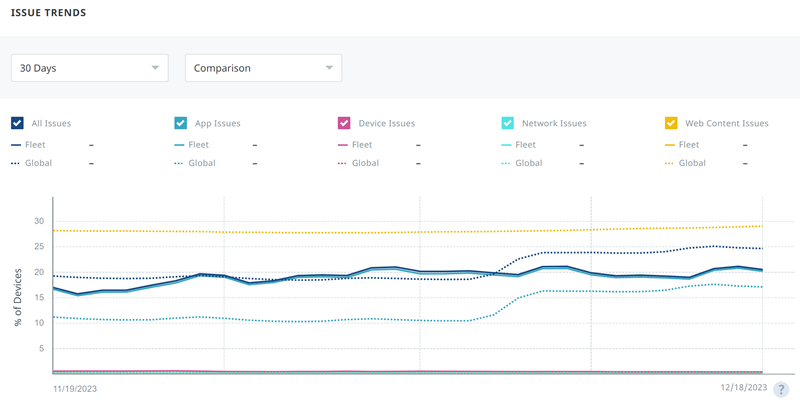
Issue Trends displays trends in the issues affecting your enrolled devices. Trends are displayed across these categories.
- Application Issues
- Configuration Issues
- File Issues
- Network Issues
- Operating System Issues
You can change the displayed time period using the dropdown at the top of the section, or mouseover the X-axis to display the number and severity of issues for a given date. NOTE: Modifying the displayed time period also affects the Issue Detections Breakdown below.
Top 10 Most Prevalent Issues in your Fleet
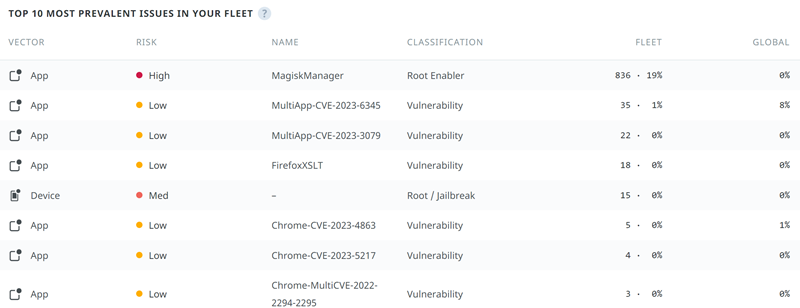
This panel displays issue information by classification. The information uses the same time period that you set in the Issue Trends dropdown.
- Vector - whether the issue comes from apps, the device, network, or web content.
- Risk - Issue risk level.
- Name - Issue name.
- Classification - Issue classification.
- Fleet - The percentage of your fleet affected by the issue.
- Global - The percentages of global devices affected by the issue.
App Analysis
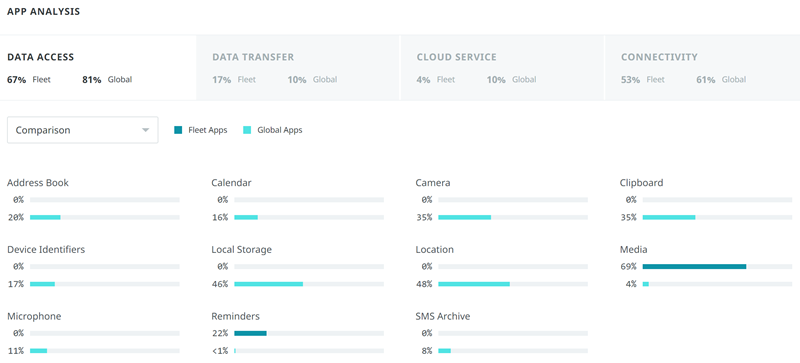
Contains information on major vulnerability categories for apps on enrolled devices, as well as details on specific vulnerabilities. The four major categories are Data Access, Data Transfer, Cloud Service, and Connectivity. The center of each graph shows the percentage of enrolled devices with installed apps in that category. Select any category to view the issue types for that category.
Select an issue type in the lower list to immediately navigate to the Apps module, with filters applied to show only Apps with issues of that type.
Issues Module
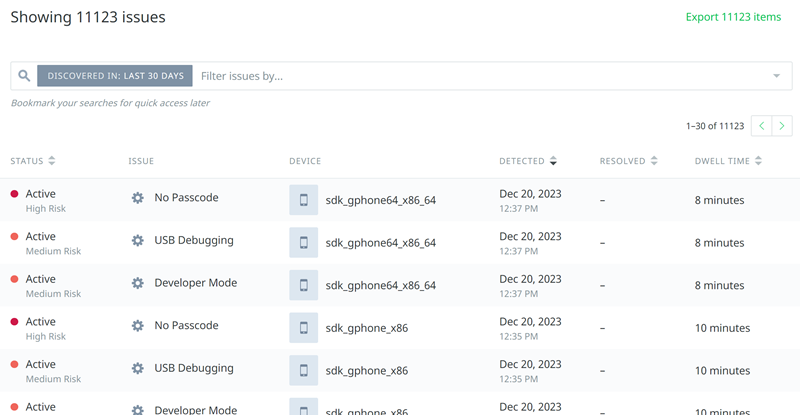
The Issues module displays a list of all issues against enrolled devices so that you can review attacks or vulnerabilities across issue types, operating systems, and other categories.
- Status: Active or Resolved, and the Risk Level as determined by your Policies settings.
- Issue: A summary of the issue or the cause (such as the network name for a Rogue Wi-Fi detection), with the Issue Classification listed below.
- Device: The end user email associated with the compromised device. If you have Privacy Controls enabled, this column is present, but left blank.
- Detected: The date and time that the issue was detected.
- Resolved: The date and time that the issue was resolved. A null value displays if the issue is still active.
- Dwell Time: The time between detection and resolution.
You can export issue information to a CSV file by selecting the Export items link in the upper-right.
Filter the Issue List
You can filter the listing using these options.
- Discovered In Last (30 days/60 days/90 days/12 months): View recent issues only. The "Last 30 days" filter is applied by default.
- Risk: View High, Medium, or Low severity issues, based on the assigned risk levels from the Protections module.
- Status: View Active or Resolved issues.
- OS: View only iOS or Android issues to get a better idea of operating system vulnerability across your enrolled users.
- Issue Type: View one or more types of issues.
- Application: Installed apps that pose a risk.
- Configuration: Device settings that leave the device exposed to attack.
- File: Issues on the file system, such as downloaded third party apps (IPA or APK).
- Network: Issues that allow a malicious actor to intercept data sent between two parties.
- OS: Compromised operating systems, such as those on jailbroken or rooted devices.
- Web Content: If you have enabled Phishing and Content Protection on your fleet, MTD detects when a device attempts to access Malicious, Offensive, or Phishing content from the Web browser or via app traffic.
- Classification: View specific classes of issues, such as Spyware or Trojans. For a description of each classification, see the Protections module in the MTD Console.
Issue Details
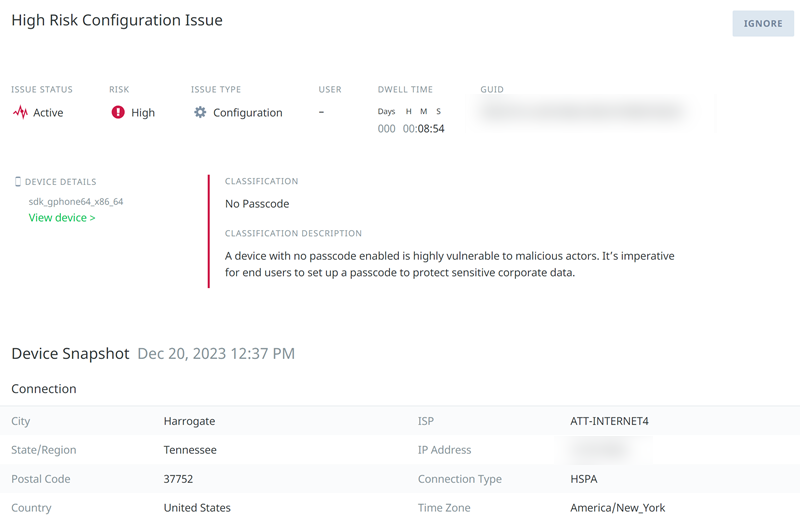
Select any issue to see the Issue Details page.
Issue Summary The Issue Summary reports these parameters.
- Issue Status: Active or Resolved. For "Active" issues, an MTD Console Administrator can ignore the threat by selecting on “Ignore” button on the top right of the issue’s details page.
- Risk: High, Medium, or Low.
- Issue Type: The high-level category, such as Application, Configuration, File, Network, OS, or Web Content.
- User: Typically, the email address for the user associated with the device.
- Dwell Time: The time between detection and resolution.
- Detection Count: Applies to Web Content issue type only. How many times in a 24-hour period the device attempted to load the content.
- Classification: The specific category, such as Spyware or Trojan.
- Classification Description: A definition of the issue classification that describes the general capabilities and behaviors.
The Issue Summary can also include:
- Family Name: Issues are often grouped into families based on shared authorship, code, and purpose.
- Subclassification: A more specific class, such as Banking Trojan.
- About
: More detail on the issue and its potential impact. - Anomalies: The indicators of compromise (IOCs) that point to the issue.
NOTE: For some network attacks, the Intelligent Hub application may not be able to communicate with the MTD console until after the threat is resolved. In this case, because the MTD Console receives the issue after it is already resolved, the Dwell Time may be listed as 0s.
Additional information may be present for certain issue types.
- Application Issues
- Application Details: Lists the app package and includes a link to the app analysis results.
- Risk Summary: For Application issues, this lists a summary of risks and vulnerabilities as taken from the app's App Details page. Select View Full App Details to navigate to the page.
- Network Issues
- Network Details: The name of the network that the device was connected to at the time of the detection.
- Network Anomalies: Detected anomalies with the network itself.
- Network: Detailed information about the network, including the SSID, network type, MAC address, TLS protocol version, proxy information, and VPN information.
- Certificate Details: Information about relevant certificates.
Ignore Issues
To ignore one or more issues, select them from the Issues list and click Ignore. The console treats ignored issues as inactive, with the following effects:
- Risk level: Ignored issues do not affect the device's risk level. If all issues on a device are ignored, the device status changes to Secured.
- On-Device Threat Protection: Ignored issues do not trigger On-Device Threat Protection. If a device was blocked due to an active threat, ignoring that threat restores the device's access.
- Alerts: Ignored issues do not generate alerts in the console.
- Summary emails: Ignored issues are excluded from summary emails.
To review ignored issues, filter the Issues list by Status > Ignored. To reopen an ignored issue, select the issue and click Reopen.
Device Snapshot
The Device Snapshot shows the following information at the time of detection.
- Connection: Approximate location information, including the ISP and IP Address. The MTD Console displays a map of the nearby area. Location information does not track the device itself. Instead, it uses the WAN IP address location, and can be off by several miles. If you wish to disable this section for privacy or compliance reasons, contact your Workspace ONE support team.
- Configuration: Device configuration settings that impact security.
- Device Admin: Apps that have Administrator privileges on the device.
- Software: The device OS, version, and patch information, including the number of known, unpatched vulnerabilities in the active patch.
- Agent App: Device MTD and Lookout IDs and details of the Intelligent Hub application installed on the device including app package and version, as well as the MTD activation and deactivation date if applicable.
- Specs: The device manufacturer and model, as well as Workspace ONE UEM device ID.
Device Issue History
The Device Issue History lists security events associated with the device that occurred at a similar time to the selected issue.
- Time: The time of the event.
- Event: The type of event.
- Current Status: Whether the issue is Active or Resolved, as well as the risk level based on your Policies settings.
- Issue: The issue classification.
- Actor: Each action has an associated actor, who may be the MTD Console Administrator or the device end user. For App or File issues that are resolved by the endpoint, the actor is listed as the MTD Client.
Devices Module
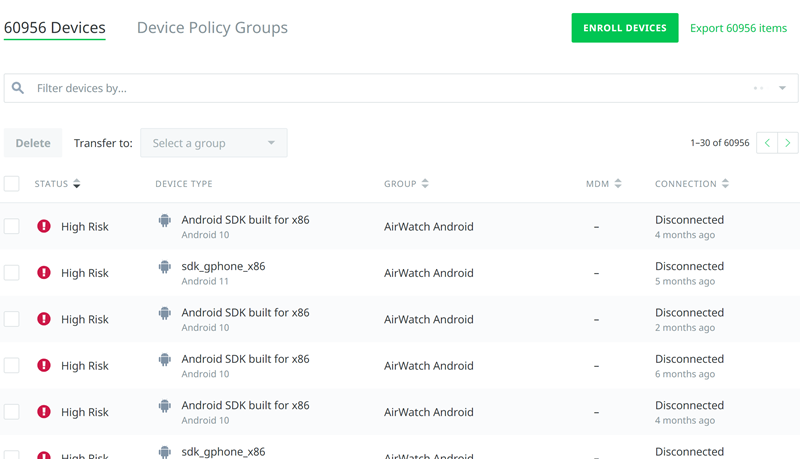
The Devices module lets you view all devices that are currently enrolled in Workspace ONE MTD or were previously enrolled but not deleted. You can create, edit, and delete device groups using the Manage Device Groups tab. You can also search for devices meeting criteria you choose from the Search dropdown menu.
The Devices Tab
- Status: Activated, Pending, Deactivated, and Unreachable.
- Device Type: The device model and operating system.
- User: Typically, the email address for the user associated with the device. This data is unavailable if your tenant has Privacy Controls enabled.
- Device Group: The device group that the device is in.
- MDM: Indicator that the device is enrolled and managed by Workspace ONE UEM and the associated UEM Device ID. MTD learns this UEM Device ID by polling the UEM smart group that has been configured in the UEM Integration setting and syncing the records of devices that have been marked for MTD activation.
- Connection: Whether the device is Connected, Disconnected, or Unreachable.
You can export this information to a CSV file by selecting the Export items link in the upper-right.
You can delete a device record by checking it and selecting the Delete button at the top of the list, or by selecting the device and selecting the button on the Device Details page. Note that if the device is still in the UEM smart group that has been configured in the UEM Integration setting, the device record reappears in the MTD console after the next MTD and UEM console sync.
Device Details
Select any device to see the Device Details page.
- Status, Connection, User, Group, Device Type, and MDM as in the Devices table. User data is unavailable if your tenant has Privacy Controls enabled.
- Issues: The issue history of the device.
- Features: The status of Phishing and Content Protection on the device.
- Configuration: Whether the device has a lock screen or device encryption, and if it has Developer Mode, USB debugging, or apps from unknown sources enabled.
- Device Admin: Apps that have Administrator privileges on the device.
- Software: The device OS including the current version, latest available version, the number of unpatched known CVEs, and any RSRs (Rapid Security Responses) applied to iOS devices.
- Agent App: The device IDs, app package, and app version. The table also lists the date and time that the user activated or deactivated the MTD on the device and when the device became disconnected, or unreachable by the MTD console, if applicable. NOTE: For Disconnected devices, the listed date and time are the last recorded check-in with MTD before the device stopped communicating with the MTD Console, not the date at which the device status changed to Disconnected.
- Specs: General device data.
The Device Policy Groups Tab
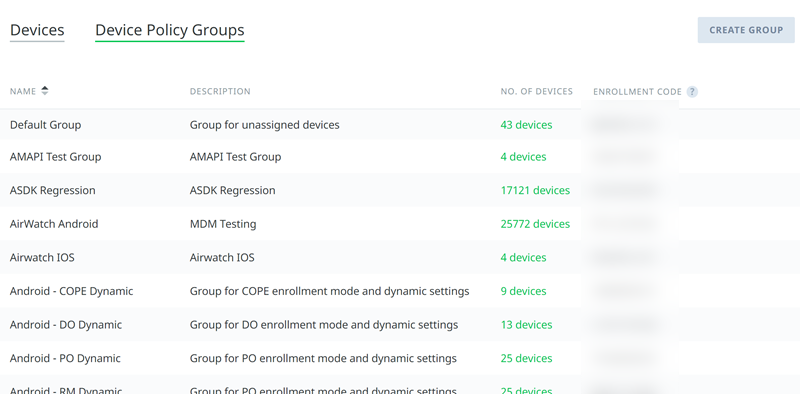
View, create, edit, and delete Device Groups using this tab. You can separate devices in the MTD Console into groups if you want to enforce different security policies between groups. A maximum of 40 device groups is supported. Here are a few suggestions for device groups.
- An "Executive" group that never alerts the device during threats, so that the security team can follow up before issuing recommendations.
- A "Developer" group that sets the risk level to "None" for threats that are commonly encountered during development. These could include Debugging Mode, Man-in-the-Middle attacks, Root/Jailbreak, Non-App Store Signer, OS Out-of-Date, and Patch Level Out-of-Date, to name a few.
- A "Corporate Devices" group with strict enforcement and generally high risk levels.
- A "Bring Your Own Device" group with lower risk levels for selected issues, and less restrictive enforcement actions.
Each group in the list includes the following information.
- Name: The name of the group.
- Description: A summary of the group purpose.
- No. of Devices: The number of devices in the group.
- Enrollment Code: Devices that activate using this group enrollment code automatically enroll as part of this group. Update the enrollment code in your MTD configuration in UEM to move devices between MTD console device policy groups.
- View Protections: Shown when hovering over a row, this is a shortcut to set protections for the device group.
Create, Edit, or Delete a Device Group
You create device groups manually. Note that you cannot delete the "Default Group". In addition to the default group, the MTD Console supports a maximum of 20 device groups.
- Navigate to Devices and select the Device Policy Groups tab.
- You can create a device group.
- Select Create Group. The Create a new group dialog appears.
- Enter a Name and an optional Description.
- Select Create Group.
- You can edit an existing device policy group.
- Select the device group from the list.
- Rename the group or modify the description by selecting the pencil icon next to the group name or description in the details pane.
- You can delete a device group.
- Highlight the device group from the list.
- Select the trashcan icon.
Assign Devices to a Device Group
By default, all devices are enrolled in the Default Group. If you remove a non-default device group, all devices in that group return to the Default Group. To assign devices to a different group, update the enrollment code in your MTD configuration in UEM for those devices to the enrollment code for the target device group.
Unsupported Devices Filter
The Unsupported status filter identifies devices in your fleet that Mobile Threat Defense cannot support due to outdated hardware or an operating system that is no longer supported. You can export this list as a CSV file for audit purposes or to notify users that they need to upgrade to a supported device.
To export the list of unsupported devices:
- Navigate to Devices and Filter by Status > Unsupported.
- Click Export Items and follow the onscreen prompts.
- When the export is ready, download the CSV file from the onscreen banner.
Apps Module
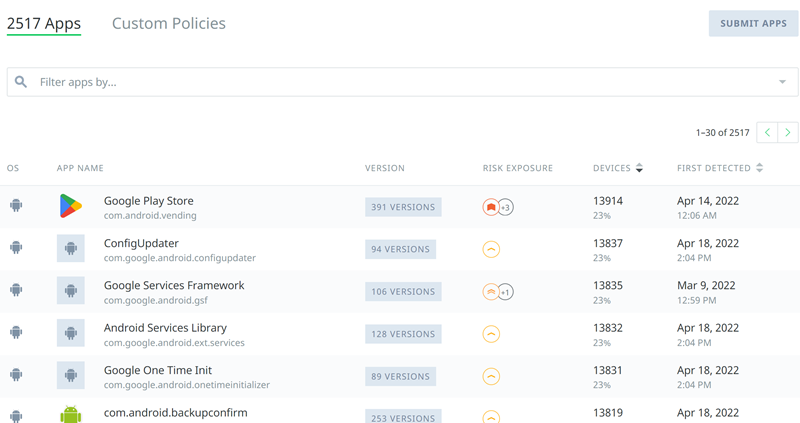
The Apps Explorer shows all apps present across your enrolled devices as analyzed by the Workspace ONE Mobile Threat Defense solution. The list is sorted in descending order of the percent of devices with an app installed.
- OS: Android or iOS
- App Name: The app name and app package.
- Version: The version(s) present. For apps with multiple versions, selecting the row expands the table to show all versions and their corresponding version numbers.
- Risk Exposure: Application risk exposure as determined by Workspace ONE MTD. Can be Low, Medium, High, Critical and/or Malware
- Devices: The percentage of total enrolled devices running the app. If you expand an app to view versions, this column lists the prevalence for each specific version across your fleet.
- First Detected: The date and time the app was first detected on any of your enrolled devices.
- Denylisting: Noting if the app or app version is denylisted.
Note: The determined application risk exposure is based on the capabilities of the app in relation to data handling, combined with the permissions requested by the app.
Filter the Apps List
You can filter the listing using these options.
- Data Access: View apps that access any of the following user data; Address Book, Calendar, Camera, Clipboard, Device Identifiers, Local Storage, Location, Media, Microphone, Reminders, and SMS Archive.
- Malware: View apps with detected malware such as Spyware or Trojans. For a description of each classification, see the Protections module.
- Data Transfer: View apps that transfer any of the following user data; Address Book, Calendar, Clipboard, Device Identifiers, Location, Media, Microphone, Reminders
- Cloud Service: View apps that use a cloud service from the following list; Amazon Cloud Services, Amazon S3, Box, Dropbox, Evernote, Facebook, Google Cloud Storage, Google Drive, iCloud, Instagram, LinkedIn, Microsoft OneDrive, Twitter, Weibo.
- Connectivity: View apps with connectivity vulnerabilities.
- Access Bluetooth: The app accesses the device's Bluetooth capabilities.
- Accept incoming traffic: The app accepts incoming network traffic.
- Access NFC: The app access the device's Near Field Communication capabilities.
- Official Store: Show only apps that are in the official Apple App Store, or apps that aren't.
- Source: Show either publicly available apps, or apps that have been uploaded directly to your MTD tenant for analysis.
- Analysis Status: Show apps where analysis is In Progress, or apps where it is Unavailable. "In Progress" and "Unavailable" apps do not show up in the Apps list unless you specifically include this search filter. By default, they are omitted.
- OS: View only iOS or Android apps.
- Denylisted: View only apps you have Denylisted from the Protections module.
- Custom Policies: View only apps for which you have created a specific custom policy in the Protections module.
- Risk Exposure: View app versions with chosen risk exposure (Low, Medium, High, Critical)
- Timeframe: View apps that were first detected in your fleet in the Last [day/7 days/30 days/60 days/12 months].
- Country: View apps from a specific country.
- Component: View apps by component association.
App Details
Select any app in the Apps Explorer to see the App Details page. You must select a specific version if you wish to review the details.
- Risk Exposure: Low, Medium, High, Critical and/or Malware.
- Developer: The app developer.
- OS, Version, Version Prevalence, App Prevalence, First Detected as in the Apps Explorer.
- File Size: The size of the IPA or APK file.
- Official Store: (iOS only) Whether the app is or was present in any supported version of the Apple App store. This helps identify unofficial iOS apps that may present a risk to your organization.
- Identification: ID information such as the Object ID, Bundle ID, and certificates and hashes associated with the app.
- Store Metadata: General information about the app from its app store, including the Store ID and Publisher.
- Risk Summary and Exposure: A summarized version of the detected issues and vulnerabilities, along with links to the relevant sections of the page.
- Violations: A list of detected security violations.
- Data Handling Security: Whether the app transports and stores data securely.
- Storage Security: Whether encrypted files may be accessed after the device has been unlocked for the first time.
- Capabilities: A list of the app's capabilities, including Risk Exposure (Normal, Elevated, or unavailable). For Android apps, a Popularity indicator shows how common a capability, component, or permission is across apps released or updated in the past year.
- Components: A list of components that have the potential for malevolent use. Android apps also show Popularity.
- Network: A map showing network activity by country.
- Network Activity: A list of hosts the app communicates with.
- Cloud Services in Use: A list of Cloud services the app communicates with.
- Permissions: A list of permissions required by the app. Android apps also show Popularity.
- OWASP Mobile Top 10: If applicable, a list of violations included in the Open Web Application Security Project (OWASP) Top Ten Most Critical Mobile Security Risks, available here: https://www.owasp.org/index.php/Mobile_Top_10_2016-Top_10.
If an app is currently under analysis, or if analysis is unavailable, a status box appears at the top of the page stating: UNABLE TO ANALYZE – Lookout was unable to analyze the app due to an unforeseen technical problem.
Analyze an App
You can upload an IPA or APK file or submit a URL to analyze an app even if it isn't present in your fleet. Note that in some cases, analysis can take up to 24 hours.
- In the upper-right corner of the Apps page, select SUBMIT APPS. The Submit apps for analysis window appears.
- Drag or upload APK or IPA files. To analyze an app from an Apple App Store or Google Play Store URL, take the following steps.
- Select the URLs tab.
- Enter the app store URL and select Add.
- Optionally, continue to add URLs to analyze multiple apps. You can submit a maximum of 10 URLs. Any apps analyzed via URL appear in your Apps list even if they are not present in your device fleet.
- Select Submit. Analysis is typically brief, but may take up to 24 hours if Lookout has not previously encountered the app. A progress ring displays while Lookout analyzes the app.
- Upon successful submission, the MTD console displays a confirmation screen.
While an app is currently under analysis, or if analysis is unavailable, the App Details page includes a status message that lists the app as either IN PROGRESS or UNABLE TO ANALYZE. UNABLE TO ANALYZE – Lookout was unable to analyze the app due to an unforeseen technical problem.
App analysis may be unavailable for several reasons.
- Lookout is still in the process of acquiring or analyzing the app (such as when Facebook releases a new version of its app and it takes a few hours for Lookout to acquire and analyze it).
- Lookout can't acquire the app because it isn't available in an official app store and can't be found from other sources.
- Lookout can't acquire the app because it's only available in an unsupported iOS App Store, such as the Chinese app store.
- Lookout can't acquire the app because it's a paid app.
- Lookout can't acquire the app via URL because it's a macOS app, iTunes album, or other
- Unsupported format with a valid App Store URL. In this case, the URL passes validation but the analysis process fails silently.
You can define custom policies for apps where analysis is in progress or unavailable. For more information, refer to the Defining Custom Policies for Apps section.
Denylist and Allow Apps
You can denylist an app from its App Details page. To help identify apps that should be on your denylist, you may wish to create a custom policy that scans apps for risky behavior. For details, see the Defining Custom Policies for Apps section.
- Navigate to the App Details page for the selected app.
- To denylist an app, in the upper-right corner, select DENYLIST.
- To remove an app from the denylist, select ALLOW.
NOTE: Adding or removing an app from the Denylist affects all versions of that app.
Denylists are device-group aware, so you can retan separate app lists for different device policy groups, each with its own risk level and response. A group can inherit the denylist from the default group, or maintain its own.
To denylist an app for specific groups:
- Navigate to Apps and select the app or a specific version.
- Click Denylist.
- To denylist in the default group, follow the onscreen prompts. To target specific groups, clear the Denylist in Default group option and select individual groups from the dropdown.
Inheritance rules:
- An app inherited from the default group follows the default group's risk settings and response configuration. To modify these settings, remove the app from the default group and add it to child groups individually.
- An app can be inherited from the default group or added directly to a child group, but not both.
- Each group's policy-level risk and response settings serve as the default for all apps in that group. If you modify an individual app's risk or response settings, that app no longer inherits those values and is removed from the policy's escalation path.
Auto-Ignore App Issues
Some widely used apps are risky enough that MTD flags them, but common enough that removing them would flood users with alerts and force admins to clear each issue by hand. Auto-Ignore App Issues lets you ignore all threats tied to a chosen app family or package name. MTD still records every threat, whether or not it is ignored.
Enable the feature for a device group:
- Navigate to Protections and open the Device Protection tab.
- Choose the device policy group.
- Scroll to Enable Auto-Ignore App Issues and set the toggle to On.
Add an app to the ignore list:
- Open the Issues module and find the app issue you want to ignore.
- Select the issue to see the details.
- Select Add app to auto-ignorelist, choose the target group (default group for all inheriting groups, or a specific group), and select Add to Ignorelist.
Remove an app from the ignore list:
- Navigate to Protections > Device Protection > Auto Ignore App Issues.
- Locate the app, hover over the row, and click the trash icon.
- Click Save Changes.
Defining Custom Policies for Apps

The Custom Policies tab allows you to identify and flag apps that exhibit risky behavior. For example, you can flag apps that access a user's Contacts, or only apps that actually transmit that Contacts data. You can add your own policies for apps that fit specific criteria. The MTD Console currently has a maximum limit of 20 custom policies.
- Select the Custom Policies tab at the top of the screen.
- Select Add Policy.
- Enter a name for the policy.
- Use the Search and Filter field to add app filters. For example, to add a policy for submitted apps that access either the user's Address Book or their Location, select Source > Submissions then Data Access > Address Book then Data Access > Location.
- Select Add policy. Creating the policy causes the App Explorer module to flag all apps that violate the policy. Once you have reviewed a questionable app in App Explorer, you can choose to denylist it by selecting the Denylist button. For more information, see the Denylisting and Allowing Apps section.
- To configure a risk level, return to the Protections module Policies tab and set the policy for the Denylisted App classification. This classification only applies to apps that you explicitly denylist. It does not automatically apply to apps in violation of a custom policy.
You can delete an existing custom policy by highlighting the row and selecting the trashcan icon.
Vulnerabilities Module
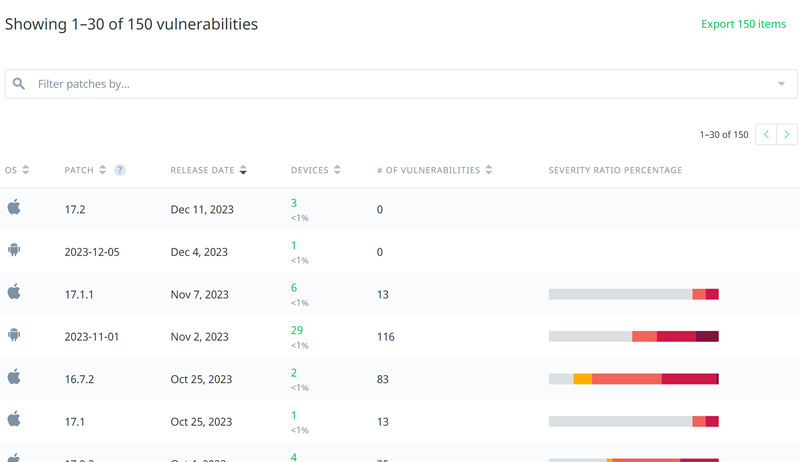
The Vulnerabilities Explorer displays known vulnerabilities and shows which security updates (for Android) or OS versions (for iOS) are active in your fleet of devices. The listing shows the following information for each patch or update.
- OS: iOS or Android.
- Patch: The Apple OS version or the Android monthly security update.
- Release Date: The date the OS version was released or the security update was applied.
- Devices: The number of devices running the specified OS version or security update, and the percentage of total enrolled devices that represents.
- # of Vulnerabilities: The number of known vulnerabilities in the OS version or security update.
- Severity Ratio Percentage: The number of vulnerabilities addressed by the patch or update with a severity rating of Pending, Low, Medium, High, or Critical.
You can sort on any of the columns or filter by OS in the search bar. To export this information to a CSV file, select the Export items link in the upper-right.
To configure which OS versions and security patches are considered Out-Of-Date for your fleet, refer to the Setting Minimum OS Versions and Patch Levels section.
Vulnerability Details
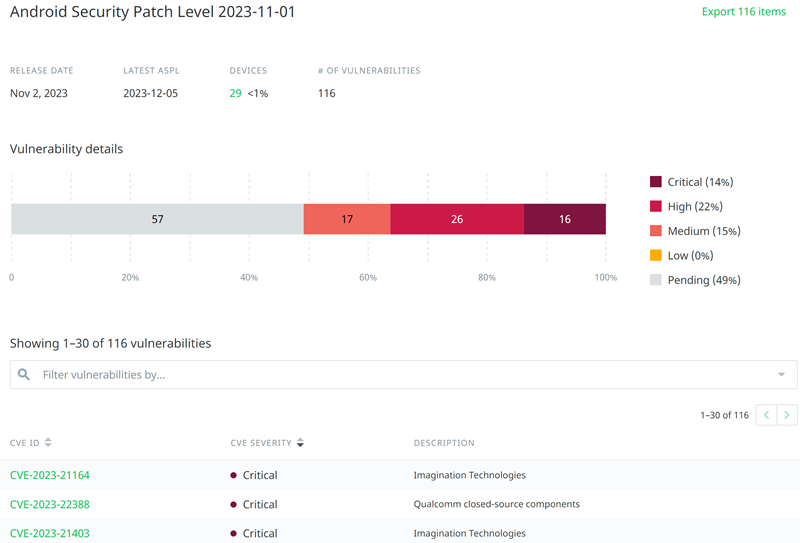
Select any line in the Vulnerabilities table to see the Vulnerability Details page for that OS version or security update.
- Version or Patch and Release Date as in the Vulnerabilities table.
- Latest iOS Patch or Android Security Update release date.
- Vulnerability Summary: The number of known CVEs ordered by Critical, High, Medium, Low, and Unknown severity.
- Vulnerability Details: This table lists all known CVEs in detail.
Select a CVE ID (Common Vulnerabilities and Exposures Identifier) to view the National Vulnerability Database description of that vulnerability.
Reports Module
The Reports Module lets you access these Mobile Threat Defense reports.
Mobile Threat Defense Protection Impact Reports
Whenever you generate a Protection Impact Report, MTD stores the report in the Reports Module. See Automated Threat Reporting for report details and steps to generate a new Protection Impact Report.
Perform the following steps to access past Protection Impact Reports:
- On the MTD navigation pane, click Reports > Protection Impact.
- Click on a report to review it.
- View or download the report as a PDF.
Mobile Threat Defense Threat Intelligence Reports
The Intelligence module provides access to a comprehensive library of mobile threat intelligence, helping you stay informed about the latest malware campaigns, zero-day exploits, nation-state surveillanceware activities, and phishing campaigns targeting the mobile ecosystem. The Lookout Threat Intelligence team refreshes this library at least monthly, drawing on cutting-edge research from the industry's leading mobile security experts.
Workspace ONE Mobile Threat Defense customer administrators have access to threat intelligence executive summaries, which offer high-level overviews of trending mobile threat campaigns along with actionable recommendations for safeguarding your device fleet.
Protections Module
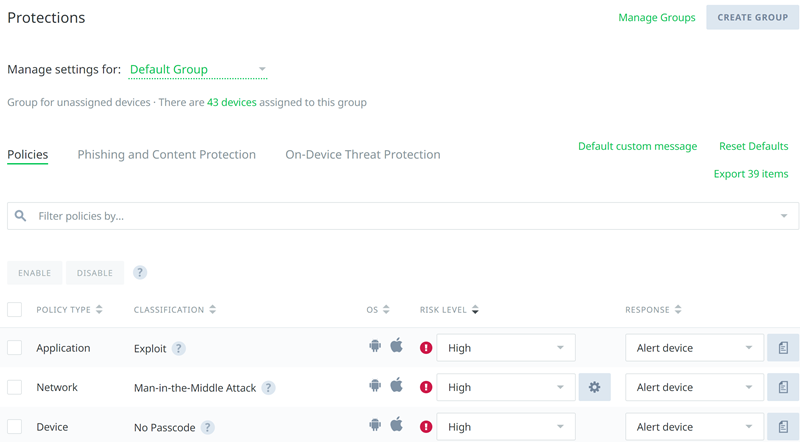
The Protections module is where you set the risk levels associated with different Issue classifications, and where you can enable and configure Phishing and Content Protection. Protection settings apply to the device group chosen from the Manage settings for dropdown at the top of the page.
The Policies Tab
Use the Policies tab to customize, enable and disable policies for device groups in your tenant. You can discard customizations and restore the default settings at any time by selecting the Reset Defaults link in the upper-right.
Note: Changing the risk level of an issue classification also applies to any existing, unresolved issues. For example, if you have open Spyware detections and you change Spyware from "Moderate" to "High" risk, those open detections become High risk.
Use caution when modifying policy classifications as changes affect all users in the current device group and can trigger issues across many devices in your fleet. The default settings are generally appropriate for many organizations.
Each threat policy classification includes the following information:
- Classification: The name of the issue classification.
- OS: Whether the issue affects Android devices, Apple devices, or both.
- Description: A brief summary of the classification. You can hover over the ? icon for more details.
- Risk Level: The risk level represents the severity of that issue classification. The Mobile Threat Console is provisioned with a set of default risk levels, such as None, Advisory, Low, Medium, or High, but you can use the dropdown to set the risk levels appropriate to your organization. Review and set the policies for different issue classifications, including assigning a severity level and setting a Response (Alert or Don't Alert the user on the affected device).
A device is given the highest risk level from any issues it has. For example, if a device has both a “Low” and a “High” risk issue, it is considered High risk. Workspace ONE Mobile Threat Defense does not issue alerts or notifications for “None” severity issues, and devices with only “None” severity issues are still considered Secured. Advisory notifies the user that a security issue needs attention but does not notify an administrator, sync with UEM, or log an issue in the console. Review and configure Phishing and Content Protection settings.
-
Response: The following are the response actions available.
- Alert device: Alerts the device that a policy violation has occurred and includes instructions to remove the threat. Issues a threat in the MTD Console.
- Don’t alert device: Does not send an alert to the device. Issues a threat in the MTD console. When this is set for Web & Content threats, the content is not blocked, no alert is sent to the device and the threat is logged in the MTD console.
- Block and alert device: For Web & Content threats only, this will block access to the content and alert the device of the blocked content. The threat is logged in the MTD console.
- Block but don’t alert: For Web & Content threats only, this will block access to the content but not alert the device of the blocked content. The threat is logged in the MTD console.
You can export policy settings to a CSV file by selecting the Export items link in the upper-right.
Precalculate the Impact of Policy Changes
In large groups of devices, a change in policy can cause a sudden increase in threat detections, resulting in issues that require immediate tracking and resolution. The Impact Assessment feature Impact Assessment calculates, before you save, how many groups and devices a change will affect.
Note the following behaviors when adjusting risk levels:
- Raising a risk level (for example, from medium to high) increases the number of threats detected across your device fleet.
- Lowering a risk level (for example, from medium to low) reduces the risk status of existing issues and does not trigger additional threat detections.
Customize Notification Messages
You can set the default custom message that is included in all notifications to end users for policy violations. This content could include a link to your support organization. You can further customize messages for any Policy classification.
- Select the custom message (page) icon in the far-right column of the policy classification.
- Uncheck Inherit parent custom message.
- Enter or modify content as needed. This content appears just after the threat/policy description on the threat details page in the Intelligent Hub application.
To precalculate the impact of policy changes, perform the following steps:
- In the console, select Protections.
- Modify one or more policies.
- Select Review and Save to see the per-policy impact, then save or discard. You can drop individual policies from the list and retain the other policies.
- To skip the assessment, select Save changes.
Policy changes may take up to 24 hours to complete. In multi-tenant environment, the Impact Assessment lists each affected tenant along with its corresponding device count. However, it does not perform a granular assessment at the individual device or group level.
Using Policy Escalations
Policy escalation in the Workspace ONE Mobile Threat Defense console is designed to give users extra time to handle a detected threat before an intended compliance action or response is triggered. Policy escalation lets administrators gently nudge users to address an issue over a reasonable amount of time, sending reminders and gradually elevating the urgency.
Policy escalation is intended for compliance-related issues such as out-of-date OS and out-of-date patch threats which have a rather low security risk. Machine-in-the-middle type threats present a higher security risk and users must handle them immediately. A grace period is not appropriate in these cases.
To set up a policy escalation, follow this example procedure that gradually escalates the out-of-date OS classification.
-
In the MTD console, select Protections. This shows the Default Group policy classifications.
-
Choose the group from the Manage settings for: dropdown menu where you want to set up a policy escalation.
-
Scroll down to the OS Out-Of-Date policy classification. The default settings are Medium Risk and Alert Device. On detecting a threat, Workspace ONE MTD notifies the device user of the threat, directs the user to upgrade the OS to a compliant version, and logs the issue in the Issues module. Workspace ONE MTD also sends an email to the administrator provided Medium Risk Device Issue Notifications are enabled.
- You can instead give users a grace period and avoid emailing an administrator and logging an issue.
-
On the OS Out-Of-Date policy classification, select the Risk Level dropdown, and choose Advisory. If the classification was inheriting its settings from the Default group, notice that it is now listed near the top of the policy classification listing in the UNIQUE POLICIES FOR THIS DEVICE GROUP category.
- Advisory risk level only notifies the device user that a security issue needs their attention. It does not notify an administrator or log an issue in the console.
-
Scroll down and select Save Changes on the Protections module lower right corner.
- Now you can set up an escalation.
-
Select in the Escalation column to the left of the Advisory risk level. Then select + Add Escalation.
- Choose the number of days to wait before issuing an escalation notification.
- Choose Low from the Risk Level dropdown (if it’s not already selected by default), This triggers an email to the administrator if they have set email preferences to be notified of Low Risk device notifications.
- Choose Alert Device from the Response dropdown (if it’s not already selected by default),
- You can also include a Custom Message as part of the Policy Escalation. To do this, select the custom message icon, located to the far-right of the listing in the Response column, uncheck the Inherit parent custom message checkbox, and enter the message you want presented to the user. Then Save the custom message.
-
Scroll down and select Save Changes on the Protections module lower right corner.
-
Add another escalation setting the number of days before the Risk level becomes Medium. Leave the Response as Alert Device to notify the device user and set a Custom Message if you would like to.
-
Scroll down and select Save Changes on the Protections module lower right corner.
-
Prepare the next escalation to update the Risk Level to High if the threat remains active after the accepted number of days and take action as needed.
Policy escalation with custom messaging and admin-assisted remediation
You can assign a custom message to each escalation stage, with the tone and urgency of the message reflecting the associated risk level. To configure a custom message at any stage:
- Select the custom message icon for that stage.
- Clear the Inherit parent custom message option.
- Enter a Description and a How to fix this issue section.
For example, you can give the user progressively less time to act at each stage, 21 days at the first stage, 14 days at the second, and 7 days at the third, to communicate increasing urgency.
Set Minimum OS Versions and Android Patch Levels
You can configure Workspace ONE Mobile Threat Defense to flag OS versions below a certain threshold as "OS Out-Of-Date" issues. For Android devices, you can also configure the minimum acceptable security patch level. MTD reports any earlier security patches as "Patch Level Out-Of-Date" issues.
Take the following steps to set these thresholds from the Protections module.
- Select the gear icon next to the issue classification (OS Out-Of-Date or Patch Level Out-Of-Date). Note that you cannot configure a minimum version if the issue classification has a severity of None.
- The Configure OS Out-Of-Date Policy or Configure Patch Level Out-Of-Date Policy dialog appears.
- For OS-Out-Of-Date issues, select the Minimum Compliant iOS Version or Minimum Compliant Android OS Version dropdown and select the desired value.
- For Patch Level Out-Of-Date issues, select the Minimum Compliant ASPL dropdown and select the desired value.
- Select Save changes.
Automatic Minimum OS and Patch Levels
MTD provides two methods for flagging out-of-date OS and patch levels:
- Manual: Requires you to specify a minimum supported version. You must update this setting each time a new OS version is released.
- Automatic: Tracks supported versions relative to the current release, eliminating the need to update settings when a new version ships.
Platform-Specific Automatic Detection Settings
iOS
- Supported range: Current version only, or up to the last two major releases.
- For minor updates: Up to the last three minor releases (iOS n.x).
- Optional setting: Ignore devices for which no OS upgrade is available, such as older iPhone models that have reached their maximum supported version.
Android
- Supported range: Current version only, or the last 2, 3, or 4 major releases.
- Patch level: The last 2, 3, or 4 Android Security Patch Levels (ASPLs) relative to the current patch.
Mixing Detection Methods
You can use different detection methods for different platforms. For example, you can configure automatic detection for iOS and manual detection for Android.
To set the detection method for a platform, select the gear icon on the OS Out-Of-Date or Patch Level Out-Of-Date classification.
Allow Non-App Store Signers and Sideloaded Apps
For 64-bit iOS devices, Workspace ONE Mobile Threat reports the presence of apps that don't originate from the App Store. On iOS 11 and later they are classified as non-App Store signers. On Android these issues are classified as sideloaded apps. For either classification, you can add signers or approved apps to an allow list to resolve any existing issues and prevent future issues and alerts.
NOTE: If you have existing issues against a non-App Store signer or sideloaded app, you can go to the Issues module and select the issue to add the app or signer without having to input the information manually.
You can add approved apps or signers from the Protections module.
- Select the gear icon next to the issue classification. The Configure Non-App Store Signer Policy or Configure Sideloaded App Policy dialog appears.
- Select Add an Entry.
- Do one of the following.
- For non-App Store signers, input the exact Developer Name and an optional Custom Label to distinguish the signer.
- For sideloaded apps, input the Package Name, and an optional Signature Hash to distinguish the app
- Select Add, then select Save Changes.
Allow a Certificate Authority to Suppress Man-in-the-Middle Threats
If an allow-listed certificate authority is present in a certificate chain as a root, intermediate, or leaf certificate, that connection does not generate Man-in-the-Middle threats in the Workspace ONE MTD Console. There are two ways to allow a certificate.
- Navigate to the Issue Details page for an MitM detection and select to allowlist the certificate.
- From the Issues module, select the MitM attack with the certificate that you wish to allowlist.
- Select Trust certificates.
- Optionally, in the Trust certificates dialog box, uncheck any certificates you do not wish to trust, then select Trust these certificates:.
- Select Okay.
- Manually upload the certificate.
- Navigate to the Protections module and scroll down to the Man-in-the-Middle Attack issue classification, then select the configuration gear.
- Select Add an Entry and browse to the certificate file you wish to upload.
- Select Save changes.
You can remove an allowlisted certificate.
- Navigate to the Protections module and scroll down to the Man-in-the-Middle Attack issue classification, then select the configuration gear.
- Remove a certificate by highlighting its row and selecting the trash icon.
- Select Save changes.
The Phishing and Content Protection Tab
Workspace ONE Mobile Threat Defense utilizes an on-device VPN on Android devices and Secure-DNS on iOS devices to provide Phishing and Content Protection. On both platforms, this requires the Workspace ONE Tunnel application which is available in the mobile app stores and can be assigned to the device via Workspace ONE UEM.
The Workspace ONE Tunnel application is used to obtain domain information when a user or application tries to connect to a site. If the domain accessed is determined to be safe, then it is allowed. If it is unsafe, the user is blocked or warned from accessing the domain based on administrator policy. Flagged URLs are reported back to the MTD Console so that the administrator has visibility into the detected threats.
Only the domain information is used for classification and detection, actual URLs, and traffic data are not sent off of the device. This preserves the user's privacy while still informing you of how often your users encounter malicious sites and URLs.
NOTE: See Step 8 in the Integrate Workspace ONE Mobile Threat Defense with Workspace ONE UEM section for detailed steps to configure and deploy Phishing and Content Protection.
You can optionally configure Secure DNS Corporate Domain Skip List, Allowlisted Content and Denylisted Content.
-
The Secure DNS Corporate Domain Skip List specifies domains that should not be resolved by the Lookout Secure DNS resolver. These domains are resolved by the default DNS resolver of the network to which the device is connected. Typically, admins can configure their internal domains using this option. When the device is also using Workspace ONE Tunnel for VPN, these internal domains are marked for tunneling and resolved by the corporate DNS resolver where applicable.
-
Allowlisted Content specifies domains that are trusted and never blocked.
-
Denylisted Content specifies domains that are not trusted and always enable policy action.
To configure what types of content should be classified as Unauthorized content policies, take the following steps.
- Navigate to the Policies tab directly or by selecting Configure content policies in the Phishing and Content Protection tab.
- When MTD detects unauthorized content (for example, a site known to contain criminal content), it blocks access to the URL and notifies the user if applicable, based on the responses you configure.
- Select the gear icon next to the Risk Level dropdown. The Configure Unauthorized Content Protection dialog appears.
- Select the checkboxes of unauthorized content you want to respond to. Content subcategories are described in the Unauthorized Content Policy Categories section below.
Use the Secure DNS Skip List to Allow In-Flight Wi-Fi
When a user connects to an in-flight Wi-Fi network, the device may attempt to reach the airline's captive portal before a full internet connection is established. In this state, Secure DNS cannot resolve the portal's domain, causing the connection to stall.
Skip lists address this by instructing MTD to bypass DNS resolution for specified airline domains, allowing the captive portal to load without interference. Once the internet connection is established, Secure DNS resumes normal domain resolution automatically.
The console provides three prebuilt skip lists that you can enable on a per-device-group basis:
- US Airlines
- International Airlines
- Regional Airlines and Miscellaneous
- Navigate to Protections > Phishing and Content Protection and select the device group.
- Scroll to the Secure DNS Skip List section.
- Enable the airline lists you want. To view a list, select Download List and open the CSV.
- To customize, edit a downloaded CSV and select Upload a list via .csv, or select Add an entry to paste domains manually.
The lists are not exhaustive, and changes can take up to 24 hours to reach a device. You can add your own domains as needed.
Check and Review Site Classification
To check how a site or domain is classified:
- Navigate to Protections > Phishing and Content Protection.
- Scroll to Check Site Classification Status.
- Enter one or more sites or domains, comma-separated.
- Select Check Status.
To request a review of a classification, select Request review in the results, explain why, and submit. Expect an email response within 24 hours, with status updates of In progress, Completed - Changed, Completed - Unchanged, or Cancelled Request.
PCP Notification Throttling
By default, when a user attempts to access a phishing or malicious site, MTD generates one console issue per 24-hour period from the time of the first attempt. Each subsequent attempt to reach the same URL within that window increments the detection count but does not generate a new issue.
You can configure how frequently the user receives notifications for repeated attempts to the same site. The following frequency options are available:
| Frequency | Behavior |
|---|---|
| Once a day | One notification per URL within a 24-hour period. |
| Twice a day | Up to two notifications per URL, with a minimum 12-hour interval between them. |
| Four times a day | Up to four notifications per URL, with a minimum 6-hour interval between them. |
| Every time | A notification is sent each time the user attempts to reach the URL, with a 3-minute pause before the next notification can be triggered. |
To configure notification frequency:
- Navigate to Protections > Policies and select the target device group.
- Set the risk level and response for the Phishing content classification.
- Select the gear icon for the Phishing content classification.
- Select the desired notification frequency and click Save.
- Repeat steps 2–4 for the Malicious content classification.
Unauthorized Content Policy Categories
Violent Content
- Aggressive Sites that depict forceful and hostile behavior, whether physical or psychological.
- Violence Sites that depict violence or violent methods, or advocate violence. Includes game/comic violence and suicide.
- Weapons Sites that depict or advocate using weapons for violent or harmful purposes.
Adult Content
- Gambling Sites that directly participate in gambling, lotteries, and real or virtual sports betting, or share information and advice for placing wagers.
- Nudity Nude or seminude depictions of the human body, whether or not they are sexual in nature.
- Pornography Sexually explicit material, products, or social forums. This includes images, videos, text stories, adult toys, escort services, and sexually explicit art.
- R rated Sites that contain content that may be unsuitable for a work environment or certain audiences.
- Sexually Suggestive Sites that include swimsuits, intimate apparel, or other suggestive clothing.
- Sex erotica Sites that contain sexual content.
Personal Content
- Games Sites providing online games for recreational use.
- Media search and sharing Sites that enable users to store and share multimedia files (photos, videos, music) with other users.
- Social networking Sites used to build or maintain social networks or social relationships with other people who share similar interests.
- Streaming media and downloads Sites providing streaming content such as movies, music, and TV shows.
Criminal Content
- Child abuse images Sites that depict or advocate child neglect or the physical, emotional, or sexual abuse of children.
- Criminal activities Sites that depict or advise on criminal activity including copyright and intellectual property theft.
- Criminal skills Sites advocating or providing guidance around bribery, blackmail, theft, and other crimes.
- Hacking Sites advocating or providing guidance on illegal or questionable use of communications equipment/software, or sites that promote or aid the development and distribution of hacking tools or pirated software.
- Hate speech Sites that host content and language supporting hate crimes and racism.
- Illegal drugs Sites that advocate the use of drugs that are unlawful to possess or distribute.
- Piracy Sites that unlawfully share copyright protected content.
- School cheating Sites that support and aid in academic cheating, including those hosting plagiarized essays, copies of exams and course materials, or offering essay writing services.
- Self harm Sites advocating or providing guidance on self harm.
- Terrorism Sites advocating the use of violence and intimidation in pursuit of political objectives. Torrent repository Sites that share torrent files for distributing movies, games, and software.
Web-based Communication Content
- Web-based email Sites hosting public email services.
- Internet communications Sites providing message services including SMS text messaging, chat services, blogs.
- Peer-to-peer Applications enabling direct person-to-person interaction without using a central server.
- Generative AI Sites hosting AI-generated content including articles, blogs, videos, and graphics.
- Proxy avoidance and anonymizers**** Proxy servers or sites that bypass content filtering or strip identifying parameters for anonymous access. IPFS nodes often rely on these. Note that mask.apple-dns.net belongs here; it is the proxy domain for Apple Private Relay and can drive high detection volume if heavily used.
Unknown Category Content
- No Content Registered sites that provide no content.
- Parked Domains Domains that are registered but unused, often held for the purpose of selling the domain name to an interested buyer or reserving it for future use.
- Uncategorized Sites that are newly registered and uncategorized by DNS. Uncategorized sites are often the source of malware/phishing attacks and Illegal content.
View Phishing and Content Protection Usage
Use the Devices module to view Phishing and Content Protection usage in your fleet.
- To see which devices are using Phishing and Content Protection, set the Devices module search filter to Phishing and Content Protection > Enabled.
NOTE: Phishing and Content Protection with the On-Device VPN mode specified in the MTD console is not applicable to Workspace ONE Mobile Threat devices. Only the Secure-DNS mode is supported for both Android and iOS devices with the Workspace ONE Intelligent Hub and Tunnel applications.
Mobile Threat Defense Protection Policies Matrix
The following matrix outlines the Mobile Threat Defense (MTD) protection policies, detailing classifications, applicable operating systems, descriptions, policy types, and agent applicability.
| Classification | Applicable OS | Description | Policy Type | Hub Integrated Agent | Lookout for Work Agent |
|---|---|---|---|---|---|
| ACCESS_CONTROL_VIOLATION | ANDROID | Access Control Violation due to a possible device compromise | device | YES | YES |
| ACTIVE_MITM | ANDROID IOS | Allows a malicious actor to intercept data sent between two parties | network | YES | YES |
| ADWARE | ANDROID IOS | Serves intrusive ads or sends excessive PII to ad networks | application | YES | YES |
| AGENT_OUTDATED | ANDROID IOS | Device is running an old version of the Lookout for Work app | device | NO | YES |
| APP_DROPPER | ANDROID IOS | Downloads malicious apps to the device | application | YES | YES |
| BACKDOOR | ANDROID IOS | Opens up protected components to an attacker | application | YES | YES |
| BLACKLISTED_APP | ANDROID IOS | App denylisted as it violates policies or is unsafe | application | YES | YES |
| BLACKLISTED_CONTENT | ANDROID IOS | The device encountered denylisted content either through user activity in apps or browsers or through background app activity | web_content | YES | YES |
| BOT | ANDROID IOS | Enables remote access and control of the device | application | YES | YES |
| CHARGEWARE | ANDROID IOS | Misleadingly charges the device user | application | YES | YES |
| CLICK_FRAUD | ANDROID IOS | Defrauds ad networks by faking clicks or downloads | application | YES | YES |
| DATA_LEAK | ANDROID IOS | Leaks PII or other sensitive data off the device | application | YES | YES |
| DEVELOPER_MODE_ENABLED | ANDROID IOS | Device has developer mode enabled | device | YES | YES |
| DEVICE_ADMIN_NOT_ACTIVATED | ANDROID | A device that does not have the admin activated | device | NO | YES |
| EXPLOIT | ANDROID IOS | Leverages OS flaws to gain escalated device privileges | application | YES | YES |
| MALICIOUS_CONTENT | ANDROID IOS | The device encountered malicious content either through user activity (in apps or browsers) or through background app activity | web_content | YES | YES |
| NO_DEVICE_LOCK | ANDROID IOS | Device does not have a lock screen or passcode enabled | device | YES | YES |
| NON_APP_STORE_SIGNER | IOS | There is a trusted signing identity on the device that may be used to install and execute 3rd party apps not from the iOS App Store | device | YES | YES |
| NOTIFICATION_PERMISSION_NOT_ACCEPTED | ANDROID IOS | Notification Permission acceptance is required to alert users of security threats. Notification is also used for device check ins and waking up app | device | YES | YES |
| OFFENSIVE_CONTENT | ANDROID IOS | The device encountered unauthorized content either through user activity (in apps or browsers) or through background app activity | web_content | YES | YES |
| OUT_OF_DATE_ASPL | ANDROID | Device has an out-of-date Android security patch level | device | YES | YES |
| OUT_OF_DATE_OS | ANDROID IOS | Device has an out-of-date OS version | device | YES | YES |
| PCP_DISABLED | ANDROID IOS | The phishing and content protection feature has been disabled on the device | device | YES | YES |
| PCP_PAUSED | ANDROID IOS | Content protection on the device is paused due to presence of another VPN. We will be unable to provide full security when it is paused | device | YES | YES |
| PHISHING_CONTENT | ANDROID IOS | The device encountered phishing content either through user activity (in apps or browsers) or through background app activity | web_content | YES | YES |
| RISKWARE | ANDROID IOS | Engages in risky behavior | application | YES | YES |
| ROGUE_WIFI | ANDROID IOS | A wireless access point that imitates a known Wi-Fi to intercept and modify users private data by executing Man-in-the-Middle attacks | network | YES | YES |
| ROOT_ENABLER | ANDROID IOS | Enables root access to the device | application | YES | YES |
| ROOT_JAILBREAK | ANDROID IOS | Device has been rooted or jailbroken | device | YES | YES |
| SECURE_DNS_NOT_ENABLED | IOS | Lookout Secure DNS profile, used for DNS privacy and resolution, phishing and content protection, is not enabled on the device | device | NO | YES |
| SIDELOADED_APP | ANDROID | Apps installed by sources other than official app stores that may be untrusted and risky | device | YES | YES |
| SMISHING_PERMISSIONS_NOT_ACCEPTED | ANDROID | Android SMS and Contacts permissions has not been completed for the device | device | NO | YES |
| SPAM | ANDROID IOS | Uses device to send spam email or SMS | application | YES | YES |
| SPYWARE | ANDROID IOS | Engages in broad-based data collection | application | YES | YES |
| STORAGE_PERMISSION_NOT_ACCEPTED | ANDROID | The storage permission which allows us to scan device files for security threats was not accepted on the device | device | YES | YES |
| SURVEILLANCEWARE | ANDROID IOS | Engages in targeted data collection | application | YES | YES |
| TOLL_FRAUD | ANDROID IOS | Fraudulently charges user through premium SMS or carrier fees | application | YES | YES |
| TROJAN | ANDROID IOS | Performs malicious activities that are not disclosed | application | YES | YES |
| UNENCRYPTED | ANDROID IOS | Device does not have storage encryption enabled | device | YES | YES |
| UNKNOWN_SOURCES_ENABLED | ANDROID | Device can install applications from unofficial app stores (supported on Android 4.1-7.1) | device | YES | YES |
| USB_DEBUGGING_ENABLED | ANDROID | Device has USB debugging enabled | device | YES | YES |
| VIRUS | ANDROID IOS | A test application used to prove detection efficacy | application | YES | YES |
| VPN_NOT_ENABLED | ANDROID IOS | The permission for the local VPN used for phishing and content protection and on-device threat protection was not accepted on the device | device | NO | YES |
| VULNERABILITY | ANDROID IOS | App has an exploitable vulnerability | application | YES | YES |
| WORM | ANDROID IOS | Replicates malicious code from one device to another | application | YES | YES |
Integrations Module
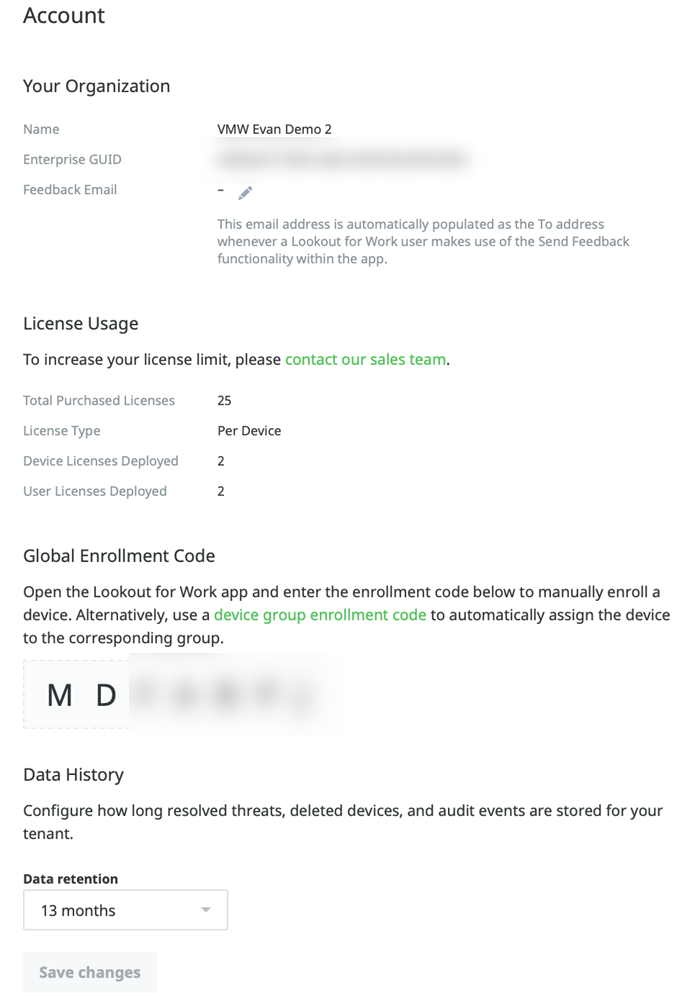
The Integrations module is where you connect your Workspace ONE Mobile Threat Defense tenant to your Workspace ONE UEM environment. If you have already completed this step, this is where you can see your active Workspace ONE UEM connectors. See the Integrate Workspace ONE Mobile Threat Defense With Workspace ONE UEM section for detailed steps on how to complete this step.
Get In-Console Help from the Lookout Copilot
Lookout Copilot is a conversational AI assistant built into the Workspace ONE Mobile Threat Defense console. It simplifies cybersecurity operations by answering questions drawn from Lookout's extensive database, which includes millions of data points, product documentation, and publicly available information.
Copilot supports the following use cases:
- Platform navigation and operational efficiency: Helps new users get up to speed with the console by guiding them through platform features and answering onboarding questions directly in the assistant. Users can navigate the platform, view results, and take action without leaving the assistant window. For example: "Help me add a new admin to the system."
- Security status: Enables users to query specific tenants and assess their organization's security posture. For example: "Find high and medium-risk iOS devices that have anti-phishing features enabled."
- Security education: Provides up-to-date information on both foundational and emerging cybersecurity topics. For example: "What is Secure DNS?"
Perform the following steps to use Lookout Copilot:
- Click the Copilot icon in the bottom-right corner of the Workspace ONE Mobile Threat Defense console.
- Review and accept the Terms of Use (required on first use only). You can resend or re-accept the Terms of Use at any time in the Assistant Settings.
- Type your question in the Assistant window.
- Click the Close (X) icon to close the assistant window.
System > Account Module
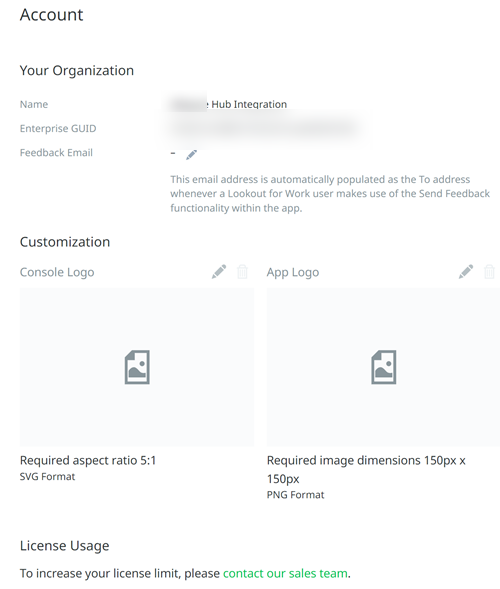
The Account module displays your organization name, tenant identification number (GUID) and license status. This includes the number of purchased licenses, the license type, and the number of active users and devices. Contact your Omnissa Sales representative if the license information is not what you expect.
The module also displays your Global Enrollment Code, which is the code you enter in Workspace ONE UEM when configuring Workspace ONE Mobile Threat Defense to enroll devices in the default policy group.
Set the Data Retention Period
Workspace ONE Mobile Threat Defense retains threat, device, and audit data for reporting purposes. By default, data is retained for 13 months, after which the system automatically purges the following records from your tenant:
- Resolved threats: Purged when the resolution timestamp exceeds the retention period.
- Deleted devices: Purged when the deletion date exceeds the retention period.
- Audit events: Purged when the event timestamp exceeds the retention period.
To configure the retention period:
- Go to System > Account.
- Scroll to Data History.
- Select a retention period between 3 and 36 months.
- Click Save Changes.
Note: Alert data, including web content and smishing alerts, is retained for 90 days due to its high volume. The dashboard, however, continues to display a one-year aggregation. Threat history for deleted devices is partially preserved on the back end and is not lost before the retention window closes; however, user data associated with a deleted device is removed upon deletion.
System > Manage Admins Module
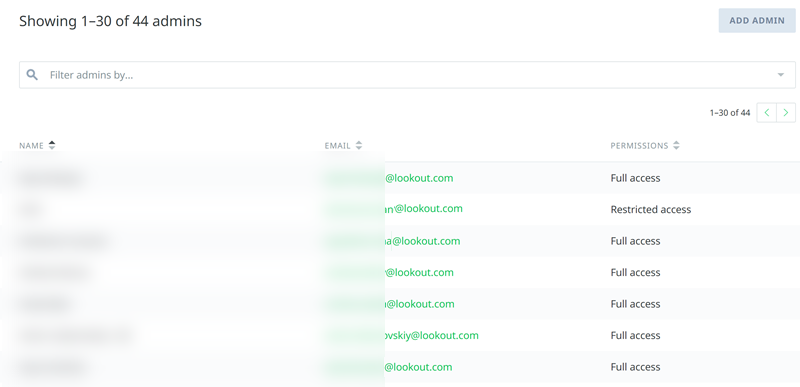
The Manage admins module displays a list of all MTD Console Administrators for your MTD tenant. You can add new Administrators from here by selecting ADD ADMIN or search the list by name or email.
NOTE: If your tenant is integrated with a Single Sign-On Identity Provider, this list omits any administrators who sign on via SSO. It only lists Administrators who use MTD credentials to access the console. Any Administrators included via SSO must be managed from the corresponding Identity Provider.
Access Levels
- Full Access: No restrictions.
- Restricted access: The Admin can manage devices and issues, export content, or edit personal preferences. They can't edit security policies, enroll devices, or edit system preferences.
- Read-Only access: The Admin can only export content or edit personal preferences.
If a local administrator loses their authenticator and their recovery codes, another administrator can reset their MFA:
- Sign in to the console.
- Go to System > Manage Admins.
- Find the administrator in the list.
- Select Reset MFA.
At their next sign-in, the administrator is prompted to set up MFA again.
System > Manage Enrollment Module
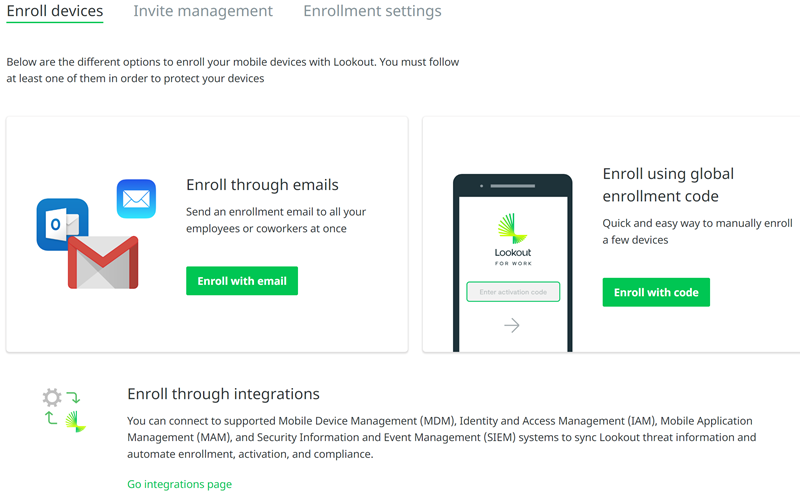
The Manage Enrollment Module is not applicable to Workspace ONE Mobile Threat Defense customers using the Workspace ONE Intelligent Hub and Tunnel applications. Devices are enrolled into the Mobile Threat Defense Console using Workspace ONE UEM and the connector described in the Integrations Module.
System > Audit Trail Module
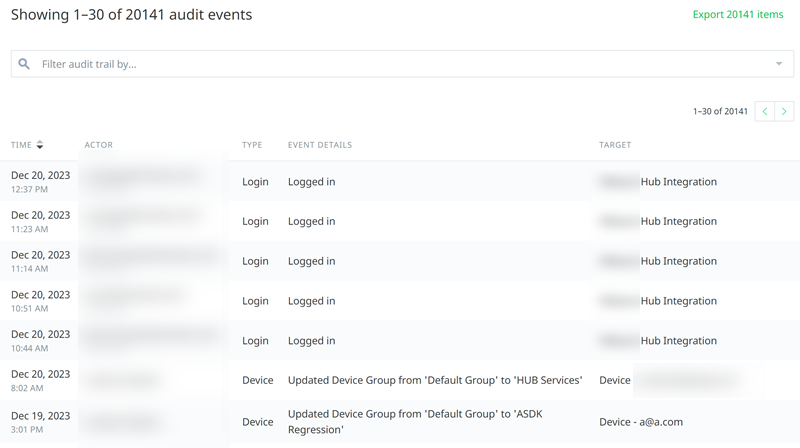
The Audit Trail module logs actions taken on your Workspace ONE Mobile Threat Defense tenant.
-
Time: The time of the action, displayed in local time. When you export audit events as a CSV file, the listed times are in UTC.
-
Actor: The administrator who took the action, including their access level.
-
Type: The event type.
- Admin: Created a new MTD Console administrator. See the "Tenancy" audit event type to review when the new administrator is actually assigned to the current tenant.
- Login: User logged in to the console.
- Policy: Changed a security policy in the Protections module, either by modifying the severity level or by adding a trusted signer / modifying the minimum OS Out-of-Date version, etc.
- Device: Marked a device as Disconnected, removed the Disconnected status from a device, or deleted a device.
- Device Group: Changed a device's Device Group.
- Invite: Sent an email invite.
- Enterprise: Modified the tenant. This action is typically taken by the Support team and has an Actor of "Lookout System".
- Export: An administrator exported data from the console.
- Feature: Enabled or disabled a feature on the tenant. This action is typically taken by the Support team and has an Actor of "Lookout System".
- Product Settings: Modified product settings on the tenant. This action is typically taken by the Support team and has an Actor of "Lookout System".
- Issue: Updated or ignored an issue.
- Tenancy: Added an administrator to the active MES Console tenant or removed them from it.
-
Event Details: Additional information, such as the permissions level change for an administrator.
-
Target: The target of the change. This might be the tenant itself, the modified issue, or the administrator who had their access level modified. For users, this is the email address if available, otherwise it is the device GUID.
You can sort the columns by Time or export this information to a CSV file by selecting the Export items link in the upper-right. You can search the list by email and event type.
System > Application Keys Module
If your integration communicates with platform APIs, you can manage and generate application keys from this section. Supported APIs include the Mobile Risk API for sending MTD threat events, the Management API, the Connector API and the Threat Feeds API.
The console monitors key expiration and notifies Full Access administrators by email starting 30 days before a key expires, with follow-up reminders at 21, 14, 7, 5, 3, and 2 days. When a key expires, API access is immediately suspended until you generate and deploy a replacement key.
Was this page helpful?