Use the Device List View in Workspace ONE UEM to see a full listing of devices in the currently selected organization group. You can also filter the view to show only the types of devices you want to see.
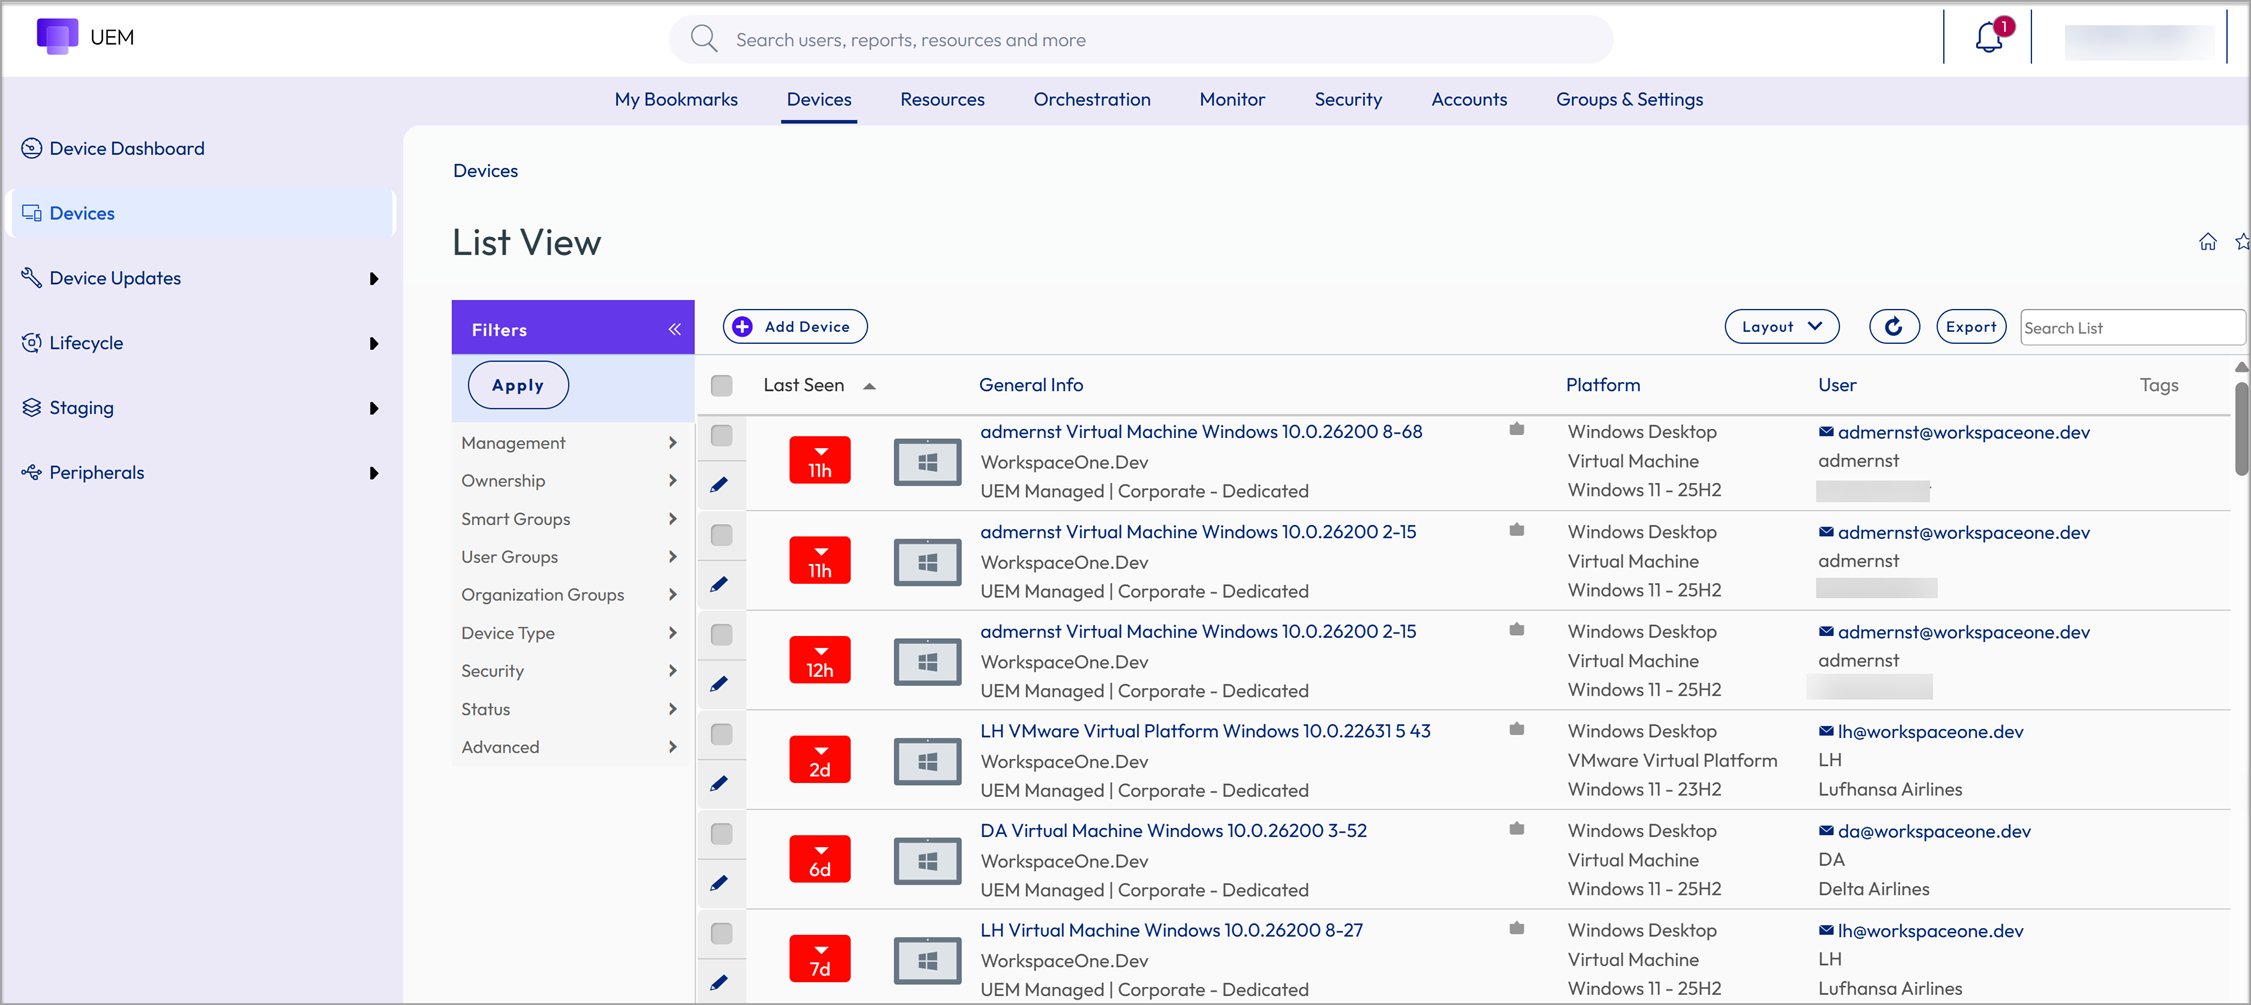
The Last Seen column displays an indicator showing the number of minutes elapsed since the device checked in. The indicator is red or green, depending on how long the device is inactive. The default value is 480 minutes (8 hours) but you can customize this value by navigating to Groups & Settings > All Settings > Devices & Users > General > Advanced and change the Device Inactivity Timeout (min) value.
Select a device-friendly name in the General Info column at any time to open the details page for that device. A Friendly Name is the label you assign to a device to help you differentiate devices of the same make and model.
Sort by columns and configure information filters to review activity based on specific information. For example, sort by the Compliance Status column to view only devices that are currently out-of-compliance and target only those devices. Search all devices for a friendly name or user name to isolate one device or user.
In modern SaaS architecture enabled UEM environments, the console can display up to 10,000 devices at once. If your environment has more than 10,000 devices enrolled, you can apply filters or use the sort and search functionality to refine the data set you want to view. Filters, sorting, and searching apply to all devices in the database.
Device Check In Processing
For device check in, Workspace ONE UEM uses a pull based resource delivery model, where the device pulls content from the server rather than the server pushing a wave of content to devices. This model places the device at the center of a chain of calculations that supply the content that the device needs.
Allowing the device to determine the data it needs from the server in this way means that there is no redundant or otherwise unneeded content being pushed from the server. This pull-based model represents a significant savings in data being transferred when compared to push models.
Device Check In Processing Sequence
- Device checks into the UEM Server.
- The UEM Server samples the existing status of the device as well as its desired status.
- The UEM Service calculates what the device needs by comparing its existing status to its desired status and in the process, making the following types of content available to the device.
- Device Profiles,
- Smart Group membership and all related content,
- Applications,
- User Group sync data,
- Compliance calculations and resulting actions,
- The UEM Server responds to the device, letting it know that it has completed the desired status calculation.
- The device pulls content that fulfills its desired status from the UEM server.
Offline Device Processing
The pull-based device check-in model, where devices call the shots in terms of what they need to fulfill their desired status, only reaches optimum efficiency when all devices in your fleet check in, including offline devices.
To ensure that offline devices check in with their online counterparts, the UEM server initiates a check in request to devices whose time since last check in has exceeded the offline threshold setting. You can edit this threshold by changing the Device Inactivity Timeout (min) value found at Groups & Settings > All Settings > Devices & Users > General > Advanced.
After contact from the UEM server succeeds, offline devices check in and follow the same processing sequence as online devices.
Hover-Over Pop-Up Window in Device List View
Each device in the General Info column features a tool-tip icon in the shape of a folder located in the upper-right corner next to the device friendly name. When this icon is hovered over with a mouse pointer, it displays a Hover-Over pop-up window. This pop-up window contains information such as Friendly Name, Organization Group, Group ID, Management, and Ownership.
You can find similar tool tip icons in the Enrollment and Compliance Status columns in the Device List view. These tool tip icons feature Hover-Over Pop-Up windows displaying Enrollment Date and Compliance Violations respectively.
Customize Device List View Layout
Display the full listing of visible columns in the Device List view by selecting the Layout button and select the Custom option. This view enables you to display or hide Device List columns per your preferences.
There is also an option to apply your customized column view to all administrators at or below the current organization group (OG). For instance, you can hide 'Asset Number' from the Device List views of the current OG and of all the OGs underneath.
Once all your customizations are complete, select the Accept button to save your column preferences and apply this new column view. You can return to the Layout button settings at any time to tweak your column display preferences.
Some notable device list view custom layout columns include the following.
- Android Management
- SSID (Service Set Identifier or Wi-Fi network name)
- Wi-Fi MAC Address
- Wi-Fi IP Address
- Public IP Address
Exporting List View
You can save a CSV (comma-separated values) file of the entire Device List View that can be viewed and analyzed with MS Excel. If you have a filter applied to the Device List View, the exported listing reflects the filtered results.
Select the Export button, then navigate to Monitor > Reporting > Exports to view and download the resulting report.
Search in Device List View
You can search for a single device for quick access to its information and take remote action on the device. Understanding how the search bar matches your text helps you predict your results and refine a search that returns too many or too few devices.
To run a search:
- Navigate to Devices > Devices, and then select the Search List bar.
- Enter a user name, device-friendly name, or other device-identifying element. This action initiates a search across all devices, using your search parameter, within the current organization group and all child groups.
A single search checks your text against the listed attributes:
| Searched device attributes | |
|---|---|
| UDID | Cost Center |
| Model | Public IP Address |
| Device Friendly Name | Device MAC Address |
| Phone Number | Hardware Identifier |
| Serial Number | Network SSID |
| Platform | WiFi IP Address |
| Asset Number | Ethernet IP Address |
| Display Name | WiFi MAC Address |
| First Name | User Domain |
| Middle Name | OEM Information |
| Last Name | Cellular IP Address List |
| Employee Identifier | Email Address |
A match in any one of these attributes returns the device. The attributes are searched together, but each attribute keeps its own value — the search never joins two attributes into a single line of text.
How matching works
The Search List bar performs a 'contains' search rather than a whole-word search:
- Case does not matter.
john,JOHN, andJohnreturn the same results. - Partial values match. Your text appears at the start, middle, or end of a stored value, but it must appear as one continuous fragment.
- Punctuation and spacing are matched exactly as stored. Hyphens, colons, underscores, and spaces are ordinary characters, not separators. They are neither ignored nor interchangeable.
- Wildcards are not supported. Characters such as * and ? are searched as literal text.
| Stored value | Search text | Result |
|---|---|---|
| John Doe | john | Match — start of the value |
| John Doe | doe | Match — end of the value |
| John Doe | johnathan | No match — the search text contains characters the stored value does not |
| R5GL33T950B | 950b or gl33t9 | Match — any continuous fragment |
| R5GL33T950B | r5gl950b | No match — the fragments are not continuous in the stored value |
| 44:9E:8B:79:57:68 | 8b:79 | Match — colon included, as stored |
| 44:9E:8B:79:57:68 | 8b79 | No match — the colon is missing |
| Finance-Laptop-042 | finance-laptop | Match — hyphen included, as stored |
| +14163177896 | 4163177896 | Match — a leading symbol can be omitted |
Searching for two or more words
When your search text contains a space and is not enclosed in quotation marks, the search behaves differently. Instead of looking for the phrase, it breaks your text into small character sequences — including those that span spaces — and requires every sequence to exist somewhere on the device. Those sequences can come from different attributes.
The following example uses one device with these values:
Example device — Friendly name: Finance-Laptop-042 · Model: Latitude 5540 · Serial number: R5GL33T950B · User display name: John Doe
| Search text | Matched attribute (value) | Result | Why |
|---|---|---|---|
| john doe | User display name (John Doe) | Match | The display name stores both words in this order, separated by a space. |
| doe john | — | No match | The reversed order requires a space followed by j, which no attribute on this device contains. |
| latitude 5540 | Model (Latitude 5540) | Match | The model stores both values in this order, separated by a space. |
| finance laptop | — | No match | The friendly name (Finance-Laptop-042) separates the words with hyphens, so no attribute contains a space followed by l. |
Three consequences follow from this behavior:
- Word order matters, because the character sequences that span a space are direction-specific.
- Two words held in separate attributes do not match together. If a user's first and last names are stored in separate attributes, john doe matches only when some attribute stores both words together, with a space, in the same order. The same applies to two values in one list, such as two MAC addresses on the same device.
- A search can occasionally return an unrelated device. Since any searched attribute can supply the required character sequences, a device can match a two-word search even though neither word appears anywhere on it. Short sequences like do, oe, and hn may be scattered across the model, location, and asset tag. The console shows no indication of which attribute produced the match, because no attribute contains the search text.
To avoid all three behaviors, search for a single value, or enclose the full phrase in quotation marks.
Using quotation marks
Enclose your search text in double quotation marks to search for an exact phrase. A quoted search requires the whole phrase, in order, in one device attribute. This makes it easier to understand for names and other multi-word values.
Quotation marks apply only when they wrap the whole entry. The console checks whether the text begins and ends with a quotation mark, removes only the outermost pair, and searches the remainder as one phrase.
| Search text | Interpreted as | Result |
|---|---|---|
"john doe" | Quoted phrase | Matches devices where one attribute contains john doe |
john "doe" | Unquoted text | The quotation marks are searched as literal characters, usually returning no results |
"john" "doe" | Quoted phrase, outer pair removed only | The inner quotation marks remain part of the phrase, usually returning no results |
Search best practices
- To find a specific device quickly, search a single unique value such as the serial number, IMEI, UDID, or asset tag.
- To find a user's devices, search one name, or enclose the full display name in quotation marks.
- When a value contains punctuation, include the punctuation exactly as it appears in the console.
- To retrieve an exact match or filtered list, use the filters in the Device List View instead of the Search List bar. Filters compare complete values and are the reliable choice for reporting and bulk actions.
Troubleshooting search results
- A search returns no devices, but you can see the value in the console. Your search text likely spans two attributes, uses a space where the data uses a hyphen, or reverses the stored word order. Search a single word from the value, or enclose the full phrase in quotation marks exactly as it appears.
- A search returns far more devices than expected. The search text is short enough to appear inside many values. Add characters, search a more unique attribute, or apply a filter.
- A device unrelated to the search appears in the results, or reversing the words changes the results. Both are expected for unquoted multi-word searches. Repeat the search with the phrase enclosed in quotation marks.
Device List View Action Button Cluster

With one or more devices selected in the Device List View, you can perform common actions with the action button cluster, including Query, Send (Message), Lock, and other actions accessed through the More Actions button.
Available Device Actions vary by platform, device manufacturer, model, enrollment status, and the specific configuration of your Workspace ONE UEM console.
For a full listing of remote actions an admin can invoke using the console, see Device Action Descriptions.
Remote Assist
You can start a Remote Assist session on a single qualifying device, allowing you to remotely view the screen and control the device. This feature is ideal for troubleshooting and performing advanced configurations on devices in your fleet.
To use this feature, you must satisfy the following requirements.
- You must own a valid license for Workspace ONE Assist.
- You must be an administrator with a role assigned that includes the appropriate Assist permissions.
- The Assist app must be installed on the device.
- Supported device platforms:
- Android
- iOS
- macOS
- Windows 10
- Windows Mobile
- Windows Server
Select the check box to the left of a qualifying device in the Device List View and the Remote Assist button displays. Select this button to initiate a Remote Assist session.
For more information, see the Workspace ONE Assist Guide.
Unenrolled Devices
Unenrolled devices might or might not be viewed in the Workspace ONE UEM console depending upon whether they were registered or held an enrolled status in the past. You can also get access to troubleshooting logs made before a device's unenrollment from the UEM console.
Unenrolled Status
An unenrolled device is a device in one of three possible scenarios.
- The device is new to Workspace ONE UEM and is not registered, not enrolled, and therefore not managed. A device in this scenario cannot be seen in the UEM console.
- The new device has begun the Workspace ONE enrollment process and is registered with the UEM console but not yet fully enrolled. This scenario normally occurs during a wave of new enrollments where devices are registered as a way of restricting enrollment. The mechanism that allows registered devices to enroll is a device allowlist. You can see a device in this state when you see 'unenrolled' as its status in the UEM console. Given that a registered device is traditionally a part of the enrollment process, a device does not remain in this state for long.
- A device can also become unenrolled if the device end user manually removes the MDM profile from the device.
For more information, see the section on this page entitled Deleting Devices.
Access Troubleshooting Logs Made Before Unenrollment
You can access Troubleshooting/Commands logs made before the device was unenrolled. These logs can be useful to get a full picture of a device history.
-
Navigate to Devices > Devices.
-
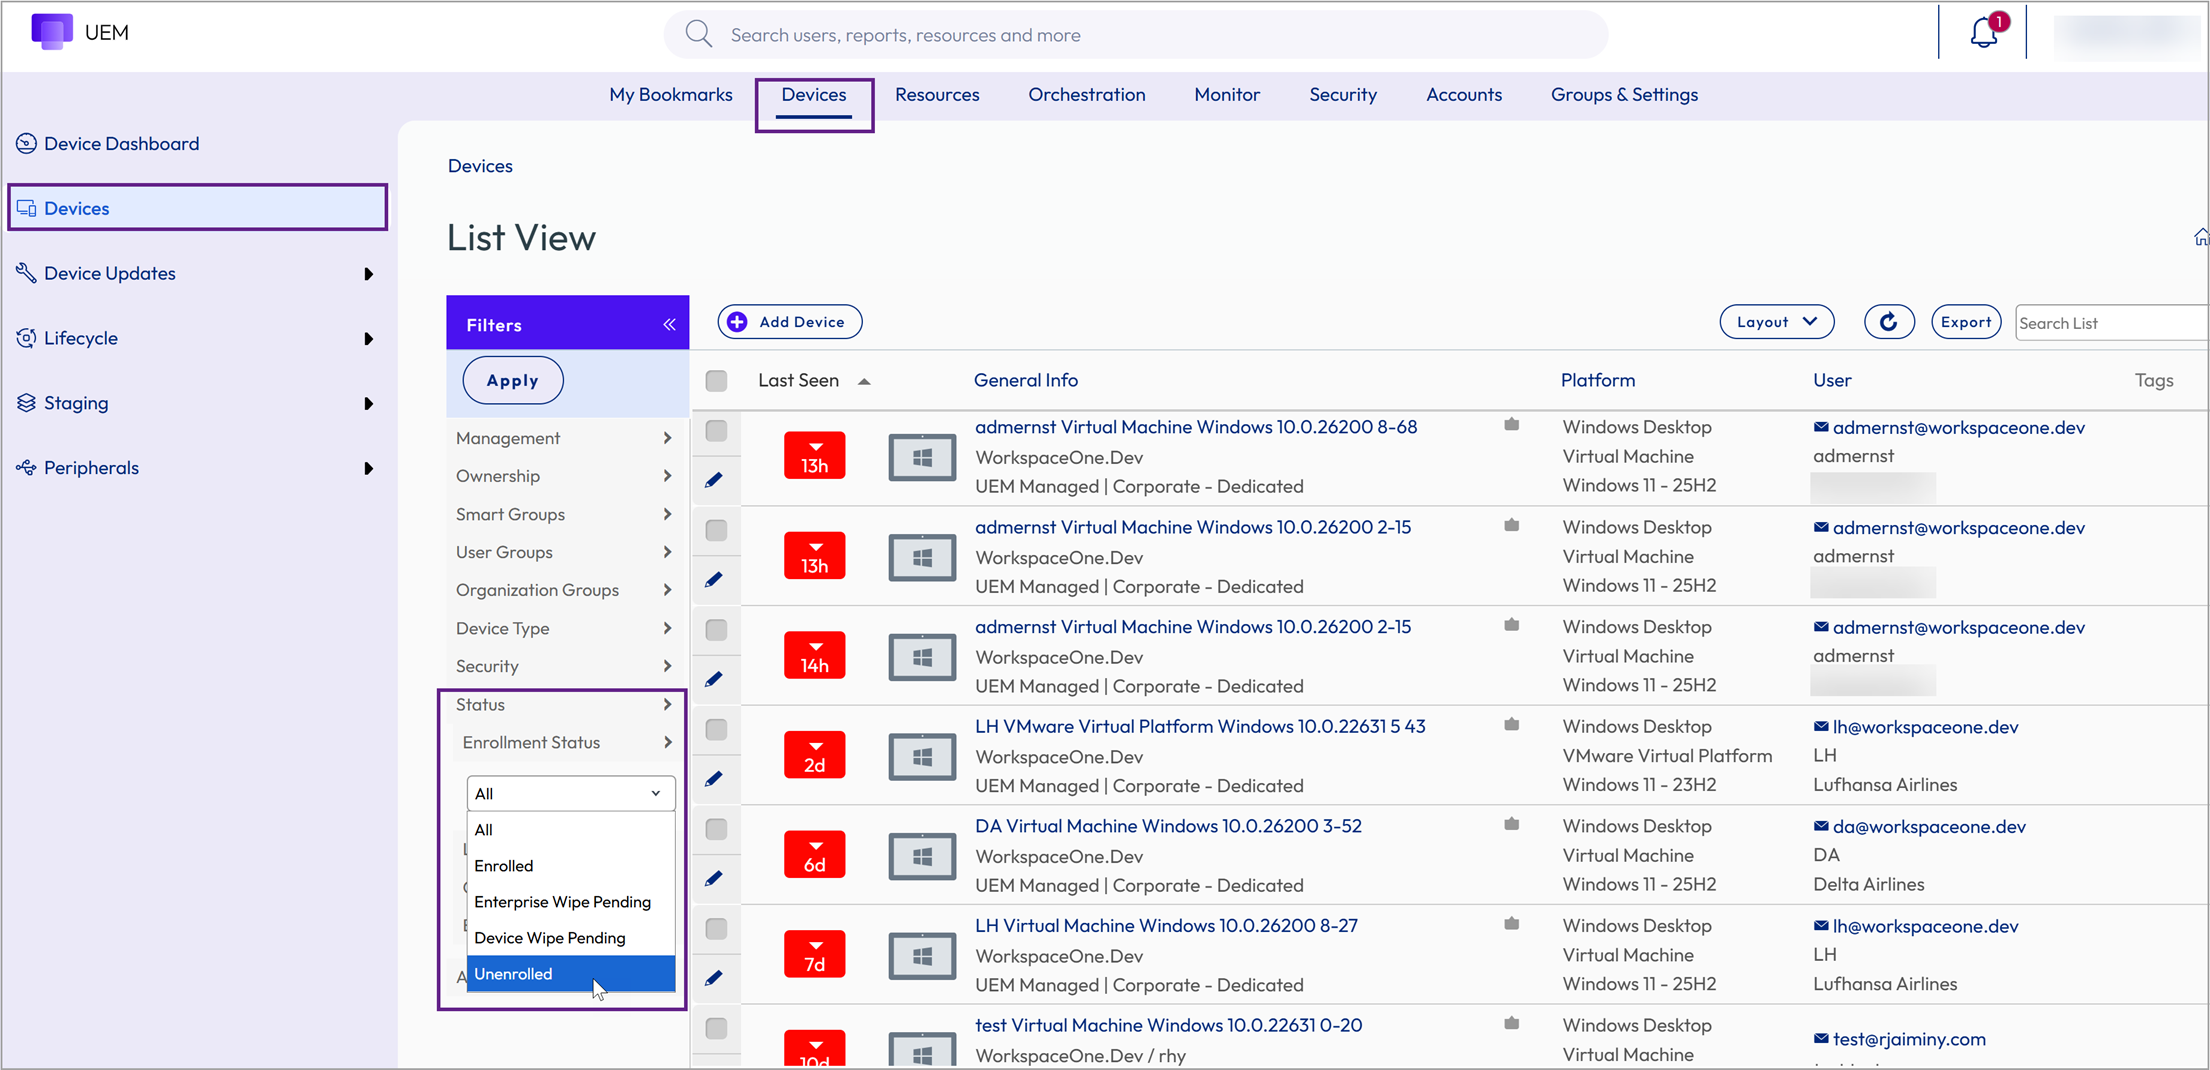
Select a device you know was unenrolled in the past. You have the option to Filter the list view to show only devices with a Status of Unenrolled.
Result: When you select a device, the Details View displays.
-
Select the More tab drop-down, then select Troubleshooting, followed by the Commands tab.
What to do next: If you do not intend to re-enroll a previously unenrolled device to the same customer organization group again, consider deleting the device record permanently so the device history is clear upon re-enrollment. Contact Workspace ONE Support to make this arrangement.
Bulk Actions in Device List View
Once you filter a subset of devices, you can perform bulk actions to multiple devices by selecting devices and then selecting from the action button cluster.

You must enable bulk actions from system settings before they are available in the Device List View. Navigate to Groups & Settings > All Settings > System > Security > Restricted Actions. Password Protect Actions require a PIN to perform.
With devices selected in the List View, the number of devices selected is displayed next to the action buttons. This number includes filtered devices that are selected as well.
For more information about affected actions, see Device Action Descriptions and for details about selection methods, see the section on this page entitled Selecting Devices in Device List View.
Bulk Management Limit in Device List View
You can ensure smooth operations when managing a large device fleet by setting a maximum number of devices that can receive a bulk action command.
Change this bulk action limit by navigating to Groups & Settings > All Settings > Devices & Users > Advanced > Bulk Management. There are several device actions listed for which you can change the maximum devices allowed for that action.
When a bulk management limit is in place and multiple devices are selected, a link appears next to the 'number of items selected' message, which reads: Some actions deactivated due to bulk limits. This means that the number of devices you have selected exceed the maximum number of devices allowed for certain device actions.
You can select this link to learn which actions have been deactivated.
Queued Bulk Action Warning in Device List View
Bulk actions take time to process. When you initiate a new bulk action while the Workspace ONE ™ UEM console is processing an existing bulk action, a warning message displays.
"Your previous bulk actions requested are still being processed. This request is run once the previous actions are complete. Do you want to continue with the current request?"
Select Yes to add the new bulk action to the queue. Select No to cancel the new bulk action.
Selecting Devices in Device List View
You can select individual devices on a page by ticking individual check boxes to the left of each device. You can also select a block of devices across multiple pages. You can even select all devices in your entire fleet, which might trigger the restricted actions warning.
Selecting a Block of Devices
You can select a contiguous block of devices, even across multiple pages, by selecting the device check box at the beginning of the block. Next, hold down the shift key, then select the device check box at the end of the block. This action is similar to the block selection in the Windows and Mac environments, and it lets you apply bulk actions to those selected devices.
There are certain device actions that can be applied to multiple devices only when you use the block select method. For more information, see Device Actions and look for the Multiple Devices Note: under specific device actions.
Selecting All Devices
The Global check box, located to the left of the Last Seen column header, can be used to select or deselect all devices in the listing. If your List View contains a filtered listing of devices, the Global check box can be used to select or deselect all filtered devices.
When the Global check box features a green minus sign ( ), it means at least one but not all devices are selected. Select this icon again, and it changes to a check mark sign (
 ), indicating that all devices in the listing (either filtered or unfiltered) are selected. Select it a third time, and it changes again to an empty check box (
 ), indicating that no devices in the listing are currently selected.
For more information about affected actions, see Device Action Descriptions.
Restricted Action Warning on All Devices Selected
When you initiate an action with all devices in your fleet selected, a warning message is displayed.
You are attempting to act on [number of selected] devices. This action might not apply to all devices. Certain limitations of this action include enrollment status, management type, device platform, model, or OS.
This warning is an acknowledgment of the diverse nature of a large device fleet featuring a multitude of different manufacturers, operating systems, and capabilities. It is unrelated to the Bulk Management Limit and any warnings it might generate. If you have a Bulk Management Limit in place, then this Restricted Action Warning message does not display.
Deleting Devices
You can delete an enrolled device from the Workspace ONE UEM console.
Deleting a device has the following three impacts.
- It removes the device from the Device List View.
- An Enterprise Wipe is executed, removing any sensitive corporate content from the device.
- See the note below about Deleting Devices and Wipe Protection.
- The device is thereby excluded from all device management functions and features.
However, a deleted device is still registered with the UEM console and gets added to the allowlist. This addition means that the deleted device can be re-enrolled easily. A device can remain in this scenario indefinitely. You can retain up to approximately 150,000 devices on this allowlist. Contact support if your needs exceed this amount.
You can remove the registration record of any allowlisted device at any time, which makes the device unseen and unknown by the UEM console. A device in this scenario can be enrolled at a future date.
Alternately, you can remove the device from the allowlist and add the device to a denylist, preventing future enrollment and effectively banning the device from your fleet.
For more information about Denylisting and Allowlisting devices, see Denylist and Allowlist Device Registrations.
You can delete a device from the Device List View or the Device Details View.
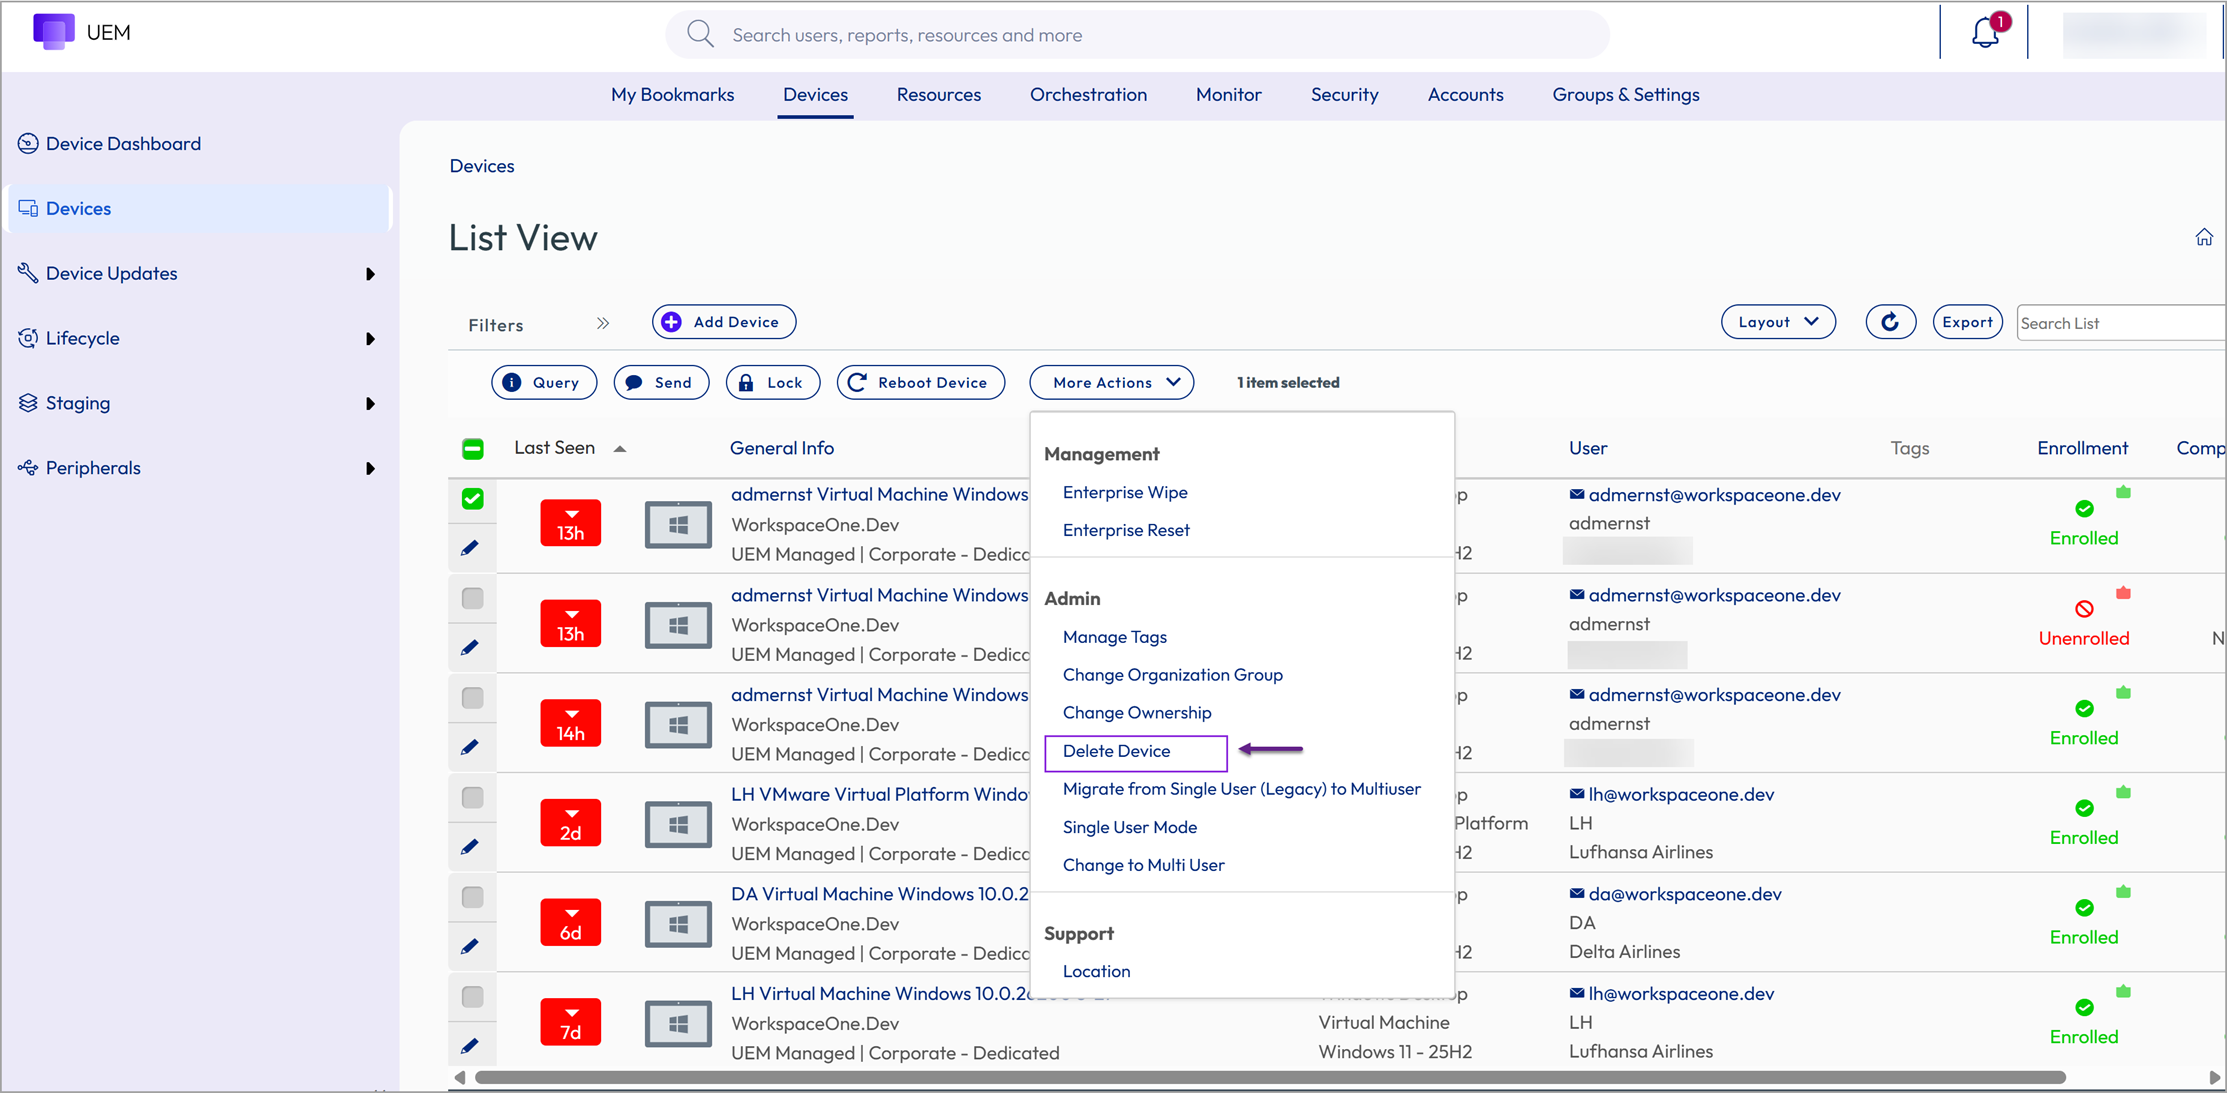
- Navigate to Devices > Devices and select the device you want to delete by clicking the check box to the left of the device listing.
- Some devices cannot be deleted from the list view. If you want to delete such a device, navigate to Devices > Devices and instead, select the device Friendly Name in the General Info column. This action displays the Details View. The Friendly Name is the label you assign to a device to help you differentiate devices of the same make and model.
- Locate the More Actions button and select it.
- Select Delete Device and select OK at the confirmation prompt.
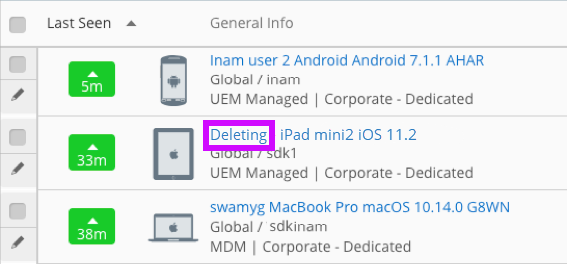
Results: The Device List View entry for the deleted device includes the "Deleting" indicator.
Deleting Devices and Wipe Protection
When you select multiple devices to be deleted, you might trigger the Wipe Protection feature. When triggered, the Wipe Protection feature places a temporary hold on any remaining devices to be wiped. As the administrator, you must unlock the Wipe Protection and allow the remaining devices in the queue for deletion to be wiped. Once this happens, the remaining devices are automatically enterprise wiped and then deleted.
For example, if you select 25 devices to be deleted and Wipe Protection is triggered after 10 deletions, the remaining 15 devices are enterprise wiped and deleted from UEM after you unlock wipe protection and approve wipes in the Wipe Log.
For details, see Wipe Protection.
Was this page helpful?