You can see details for a single device and access user & device management actions quickly by viewing the Device Details page in Workspace ONE UEM.
Access Device Details by selecting a device-friendly name from one of the available Dashboards, or by using the available search tools in the Workspace ONE UEM console. A Friendly Name is the label you assign to a device to help you differentiate it from devices of the same make and model.
Main Page Major Sections
- Notification Badges – Displays the Compromised State, Compliance Violations, Enrollment Date, time Last Seen for the selected device, and GPS/Location Service Availability (for Android devices only).
- Security – Displays security settings such as which management software was used for enrollment, passcode status, and data protection.
- If you enroll a device with the Browser Web app and later download and run the Omnissa Workspace ONE Intelligent Hub app on the device, the 'Managed by' indicator changes to 'Hub Registered' to reflect the presence of the Workspace ONE Intelligent Hub.
- User Info – Displays basic user information, including full name and email.
- Device Info – Displays device details such as organization group, location, smart groups, serial number, and other identifying labels, power status, storage capacity, physical memory, warranty information, last reboot time (Android only), and device tags in alphabetical order. Battery health applies to Zebra Android devices only.
- Profiles – Displays all profiles such as installed (active), assigned (inactive), and unmanaged (sideloaded).
- Apps – Displays all installed apps, both automatic apps and on-demand apps.
- Content – Displays content marked as 'Required' by the administrator in the Workspace ONE UEM Managed Repository and in the admin repository.
- Certifications – Displays all installed certificates, including certifications near their expiration date.
- Admin Applications – Displays the installed Workspace ONE Intelligent Hub information, including version number.
- Zebra Battery Information (for Zebra Android devices only) – Displays detailed battery information, including battery health, manufacture date, serial number, and part number.
Device Details Dashboard
The dashboard displays basic device information, such as the device's friendly name. Other detailed information includes device type, device model, OS version number, ownership type, device action button cluster, and Recent List indicator.

Selecting the arrow buttons in the Recent List indicator changes the selected device based on its position in the filtered List View.
You can also initiate a Remote Assist session on qualifying devices. For details, see Remote Assist.
Menu Tabs
| Menu Tab | Description |
|---|---|
| Summary | View general statistics such as Apps, Available OS Updates, Certificates, Content, Device Info, Security, Time Windows, and User Info. |
| Compliance | Display the status, policy name, date of the previous and forthcoming compliance check, and the actions already taken on the device. The Compliance tab includes advanced troubleshooting and convenience features. * Non-Compliant devices, and devices in pending compliance status, have troubleshooting functions available. You can reevaluate compliance on a per-device basis (  ) or get detailed information about the compliance status on the device ( ) or get detailed information about the compliance status on the device ( ). ). * Users with Read-Only privileges can view the specific compliance policy directly from the Compliance tab while Administrators can make edits to the compliance policy. |
| Workflows | Display all the device's assigned Workflows, made with the Freestyle Orchestrator. |
| Profiles | View all profiles currently assigned, installed, and unmanaged on a device. |
| Baselines | View this Windows device's Baseline, which is a starting image from which you can easily set up and keep the operating system up to date. |
| Sensors | Review a listing of all the sensors for a Windows device. For more information, see Collect Data with Sensors for Windows Desktop Devices. |
| Scripts | Review all the Windows desktop device's Scripts, which enable you to run PowerShell code for endpoint configurations. |
| Apps | View all apps currently assigned and installed on the device. The App Compliance column identifies SDK-built applications that are non-compliant with SDK App Compliance settings. Find these settings in Groups & Settings > All Settings > Apps > Settings and Policies > SDK App Compliance. For Windows devices, the Apps tab displays separate sections for Managed applications and All installed applications. For more information about the details available in the Apps tab for a Windows device, see Assign Applications to your Windows Device. |
| Updates | Review all the Device Updates available on the device. |
| Content | View the status, type, name, version, priority, deployment, last update, date, time of views, and content on the device marked 'Required' by the administrator in the Workspace ONE UEM Managed Repository. This tab also provides a toolbar for administrative action (install or delete). |
| Location | View current location or location history of a device. Select the Period or length of time you are looking back in Search of location data points. The Custom Period enables you to select a range of dates and times in 5-minute increments. You can also review latitude and longitude coordinates of these data points by moving the pointer over location markers on the map. Enable the collection of location data by navigating to Groups & Settings > All Settings > Devices & Users and selecting the platform-specific Hub Settings page. For more information about location data as it relates to privacy, see Privacy Best Practices. Edit the number of location data points collected and the minimum distance between locations by navigating to Groups & Settings > All Settings > Installation > Maps. |
| User | Access details about the user of a device and the status of the other devices enrolled to this user. |
| Time Window | View details about the time window assigned to the device, including its sync status, applied status, time, and schedule details. You can direct end users to select Sync Device from the Workspace ONE Intelligent Hub app, which updates the sync status. Time window events are logged by the event logger when the minimum logging level is set to Information or Debug. For details, see Event Logs. |
| Roles and Features | Applicable to Windows Server devices only. View a listing of all the features the server supports, the roles that are enabled, and the file path and status of each. |
| More | These additional menu tabs vary based on the device platform. |
| * Alerts – View all alerts associated with the device. | |
| * Attachments – Use this storage space on the server for screenshots, documents, display Hub logs sent from the Intelligent Hub, and links for troubleshooting and other purposes without taking up space on the device itself. | |
| * Books – View all internal books on the device. | |
| * Certificates – Identify device certificates by name and issuer. This tab also provides certificate expiration dates. | |
| * Compromised Detection – View details about the compromised status of the device, including the specific Reason for the status and how Severe the status is. | |
| * Network – View current network information (Cellular, Wi-Fi, Bluetooth, IMEI) of a device. | |
| * Notes – View and add notes regarding the device. For example, note the shipping status or whether the device is in for repair and out of commission. | |
| * Products – View the complete history and status of all product packages provisioned to the device and any provisioning errors. You can also Force Reprocess (redeploy) a product. | |
| * Restrictions – View all restrictions currently applied to a device. This tab also shows specific restrictions by Device, Apps, Ratings, and Passcode. | |
| * Security – View the current security status of a device based on security settings. | |
| * Shared Device Log – View the history of the shared device, including past check-ins, check-outs, and status. | |
| * Status History – View the history of the device in relation to enrollment status. | |
| * Targeted Logging – View the logs for the Console, Catalog, Device Services, Device Management, and Self-Service Portal. You must enable Targeted Logging in the settings, and a link is provided for this purpose. You must then select the Create New Log button and select the length of time the log is collected. | |
| * Telecom – View the number of calls, data, and messages sent and received. | |
| * Terms of Use – View a list of End-User License Agreements (EULAs) that are accepted during enrollment. | |
| * Troubleshooting – View Event Log, Commands, Device Operations, and Pending Actions logging information that is useful while troubleshooting. This page features export and search functions, enabling you to perform targeted searches and analysis. Detailed information is available in the Troubleshooting section below. |
Troubleshooting
The tabs under Troubleshooting on the Device Details page help diagnose and resolve device issues, view pending actions, and track command execution status.
Event Log
View detailed debug information and server check-ins, including a Filter by Event Group Type, Date Range, Severity, Module, and Event Action. In the Event Log listing, the Event Data column might display hypertext links that open a separate screen with even more detail surrounding the specific event. This information enables you to perform advanced troubleshooting, such as determining why a profile fails to install.
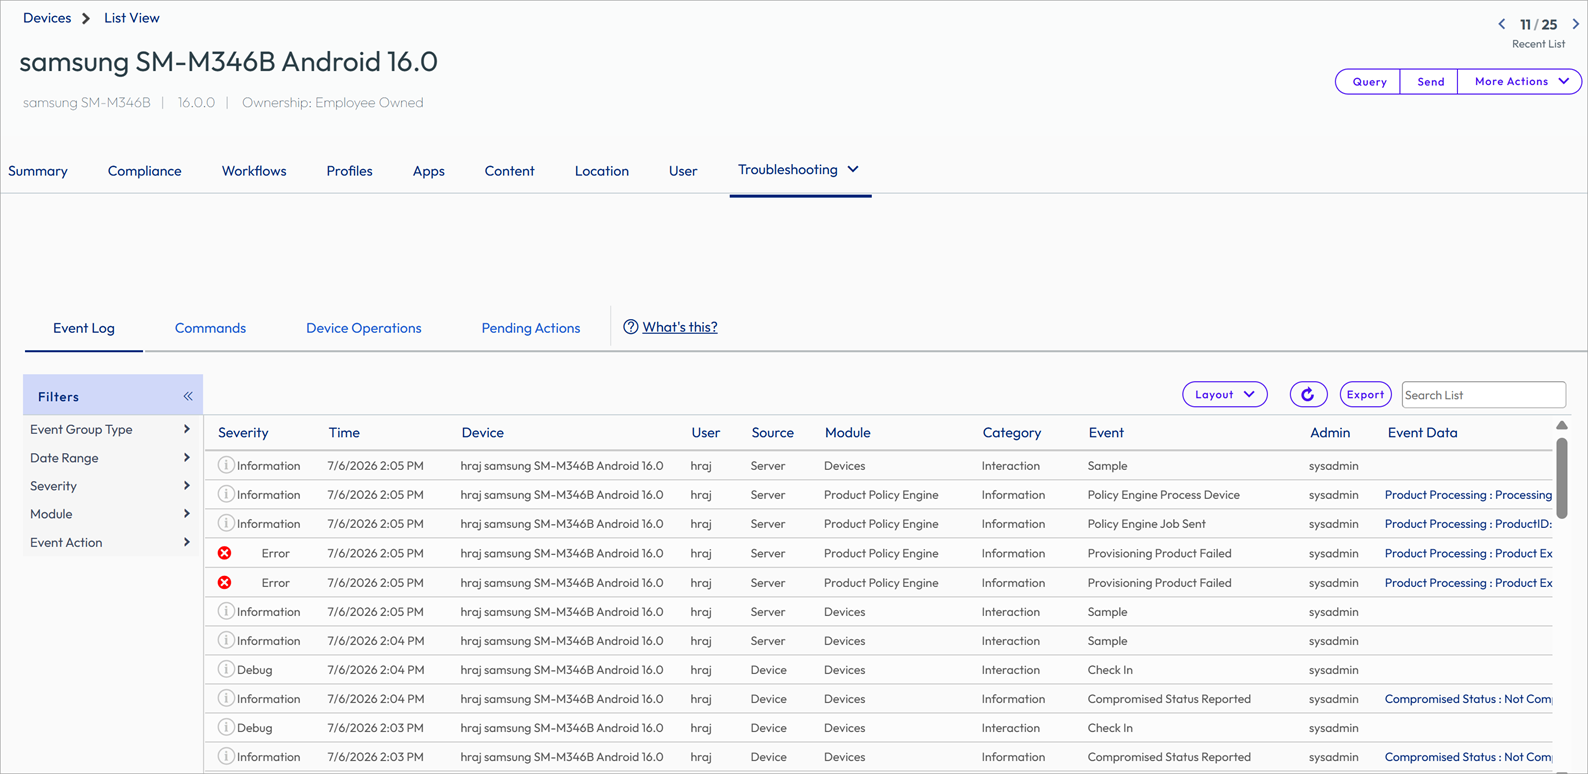
Searching Event Log Data
The Event Log search bar supports matching on field names such as Device, Module, Event, Admin, Event Name, and Event Description. You can look up events using a value you remember, even if you don't know which attribute it belongs to. This value-based search relies on tokenization, which has been in place since 2410 and later with Mod Stack enabled.
How tokenization works
Instead of requiring an exact match on the full stored value, UEM breaks both the stored value and your search text into individual words ("tokens") using the same rules, then checks whether your search tokens appear in the same order, next to each other, within the stored value's tokens. This is a token match, not a wildcard or substring search.
Values are split into tokens at:
- Spaces (User Profile Name → user, profile, name)
- Underscores (user_profile_name → user, profile, name)
- Capital letters, when the preceding character isn't already uppercase (UserProfileName → user, profile, name)
- Case doesn't matter once tokens are formed — User, user, and USER are treated the same.
Values are not split when:
- The text is hyphenated (Non-Compliant stays as one token: non-compliant)
- The text is all lowercase or all uppercase with no spaces (userprofilename and USERPROFILENAME both stay as one token: userprofilename)
Search examples by use case
| Use case | Stored value | Example search that works | Why |
|---|---|---|---|
| CamelCase/PascalCase or underscore-separated field | UserProfileName | User Profile | Splits the value at capital letters into user, profile, name. Search tokens appear in order. |
| Single glued-together word (no delimiters) | Userprofilename | Userprofilename | No capital letters or separators to split on, so it's indexed as one token. The search must match that single token exactly. |
| Multi-word value where order matters | John Smith | John Smith | Tokens must appear in the same order as stored. The search value, Smith John, would not match. |
| Hyphenated value | Non-Compliant | Non-Compliant | Hyphens are preserved as part of the token. The search value 'Non Compliant'with a space would not match. |
| Partial word | ENROLLMENT | enrollment and not ENROLL) | Search only matches whole tokens. Partial words are not supported. |
| Alphanumeric / ID-like value | A12BC34D5 | A12 BC34 | Splits at capital-letter boundaries, even within alphanumeric strings, into a12, bc34, d5; a12bc34d5 (all lowercase, no separators) would not match. |
| Acronym followed by a version-style value | iOS 18.0 | iOS or 18.0 | Splits at the space and at the capital OS, into i, os, 18.0; note that ios (lowercase, glued) would not match since it's a single token versus two. |
A few points to note:
- Search tokens must appear in the same order and directly adjacent to each other within the stored value, rather than appearing anywhere within it.
- There's no wildcard or partial-word support (ENROLL won't match ENROLLMENT).
- For exact matches on IDs, UUIDs, or enum/module names, use an Equals filter instead of free-text search.
Commands
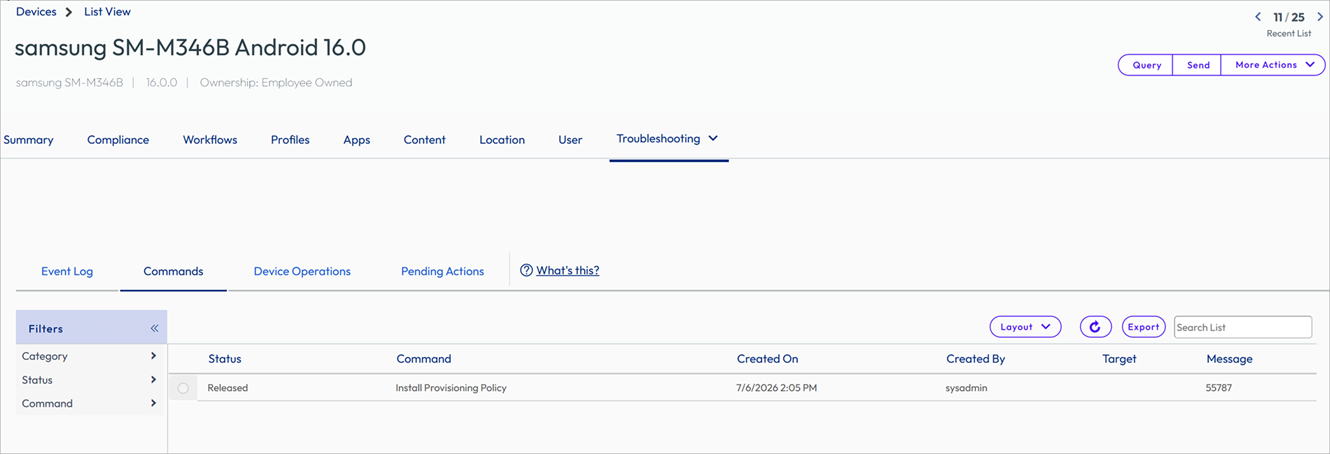
View a detailed listing of pending, queued, and completed commands sent to the device. Includes a Filter that lets you filter commands by Category, Status, and a specific Command.
Device Operations
The Device Operations tab combines the legacy commands and the Desired State Management (DSM) actions into a single, unified view. This consolidated view helps you track and troubleshoot device actions end‑to‑end without switching between multiple tabs, such as Event logs, Commands, and Pending Actions, while troubleshooting issues.
To access the Device Operations tab:
-
Navigate to Devices > Devices > List View.
-
From the device list, select the device you want to troubleshoot. The Details View page is displayed.
-
From the More drop-down menu, select Troubleshooting and then click the Device Operations tab.
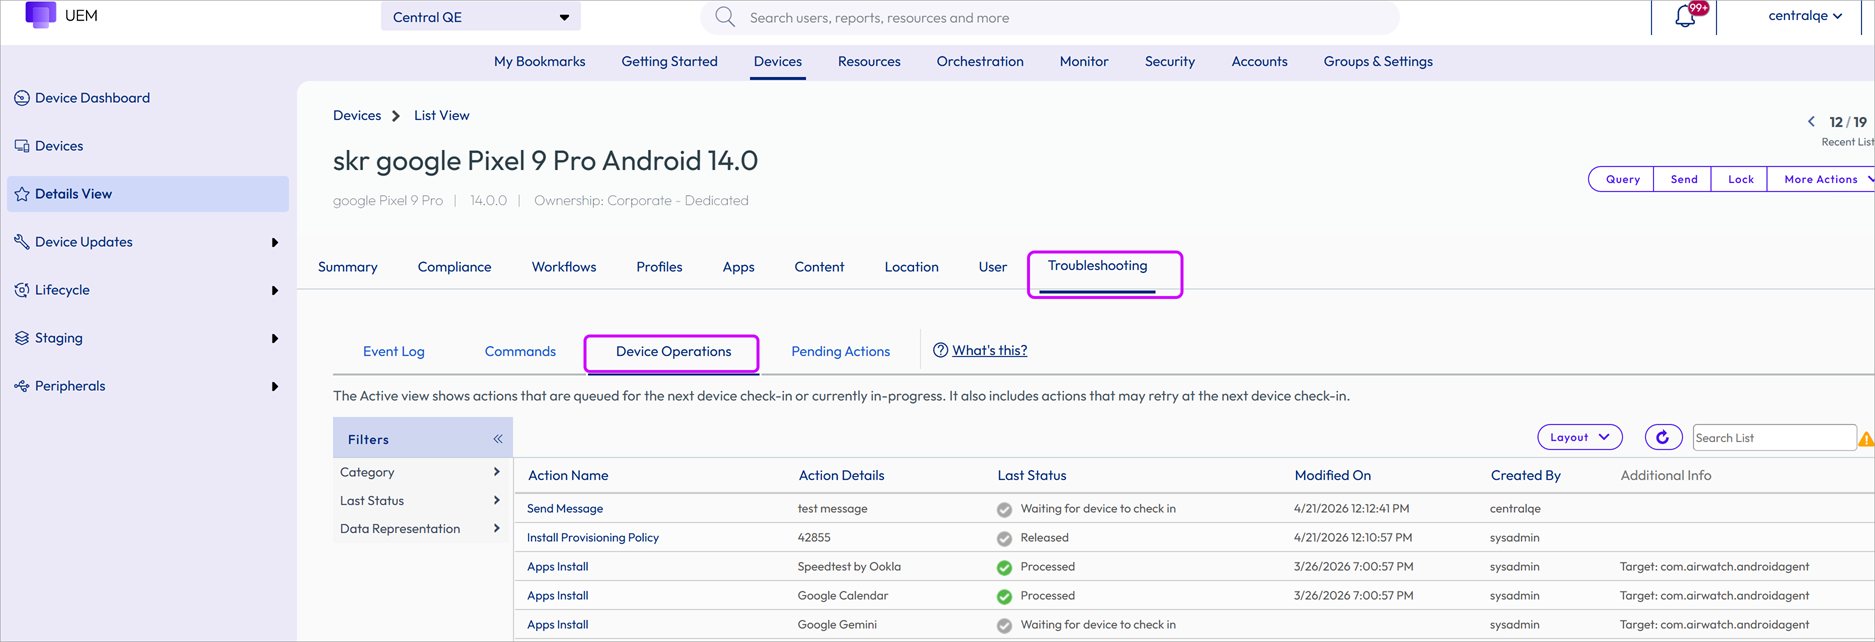
The Device Operations tab displays the list of actions initiated for the selected device along with other details such as the action execution status and timestamp.
Use the Filters panel to quickly narrow down actions and focus on what is most relevant for troubleshooting. The Category filter provides you with two views:
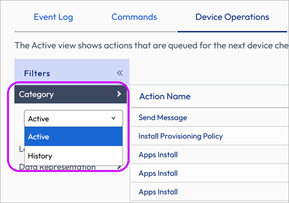
- Active - Shows actions that are queued for the next device check-in or that are currently in progress. It also includes actions that may retry at the next device check-in.
- History - Shows actions that the system has marked as complete or may retry at the next device check-in.
Selecting the hyperlink in the Action Name column displays the detailed timeline for that action.
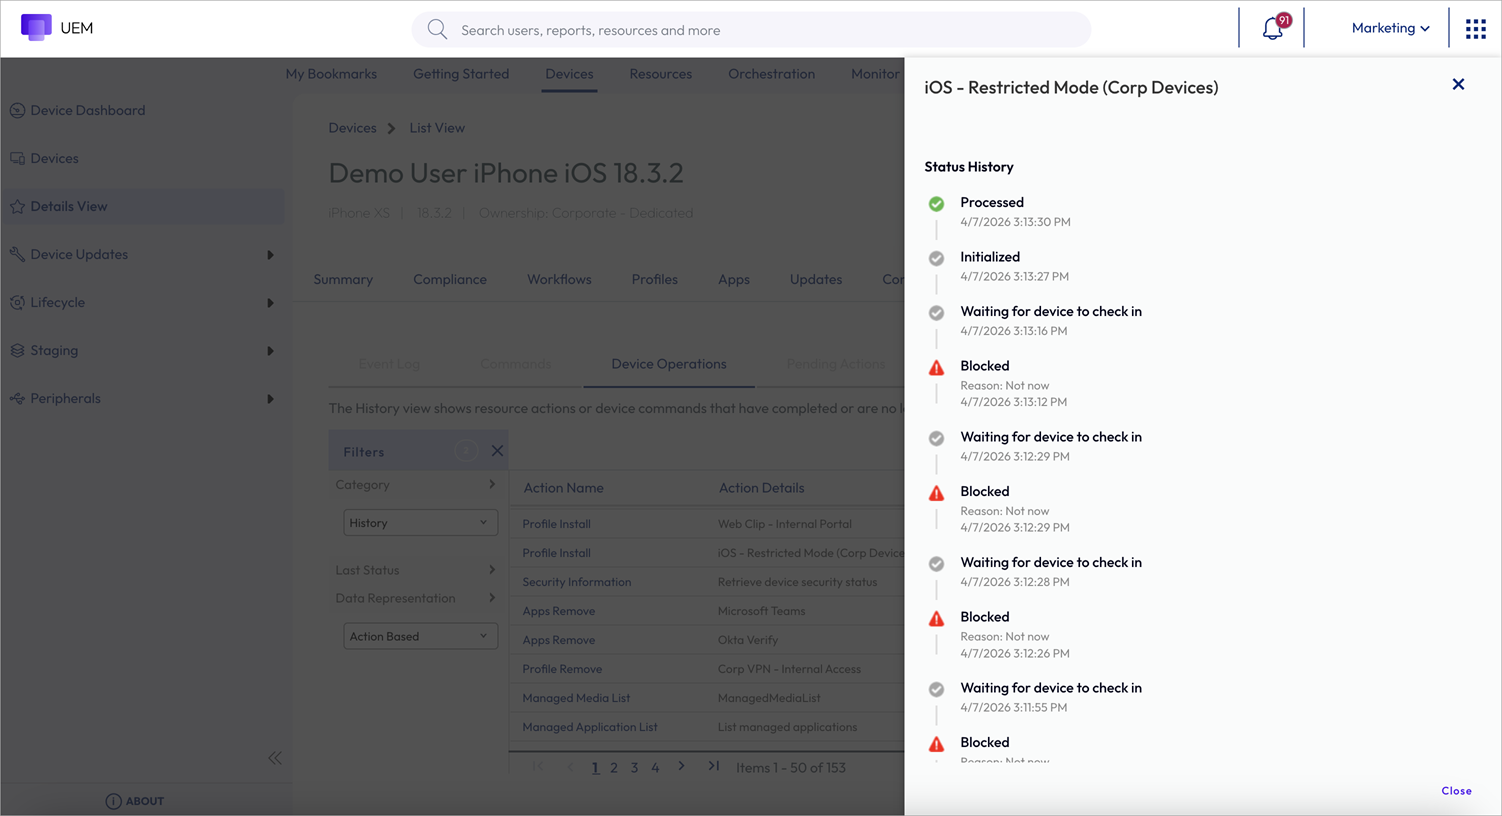
The timeline shows execution stages, status transitions, timestamps, and any available failure or error details. Reviewing this timeline helps identify where an action has stalled or failed and provides the necessary context for efficient troubleshooting.
Pending Actions
Workspace ONE UEM works on a Desired State Management (DSM) model, which means administrators define the desired state for apps, profiles, and workflows, and UEM continuously works to bring each device in line with that state. The Pending Actions tab shows administrators which of these changes are still waiting to be applied on the device.
How It Works
Whenever a resource assignment changes, whether it is through auto-deploy, on-demand assignment, or workflow execution, UEM works to reconcile the device with the new desired state. This happens either during the device's next check-in or through an automatic offline evaluation performed every 4 hours.
-
Step 1: Commands are queued while the device is offline.
-
Step 2: Once the device comes online, queued commands begin processing. For resources that require confirmation (see scenarios below), UEM waits until the device reports back successfully.
-
Step 3: Once every pending command for a device has been confirmed, it's cleared from the Pending Actions tab.
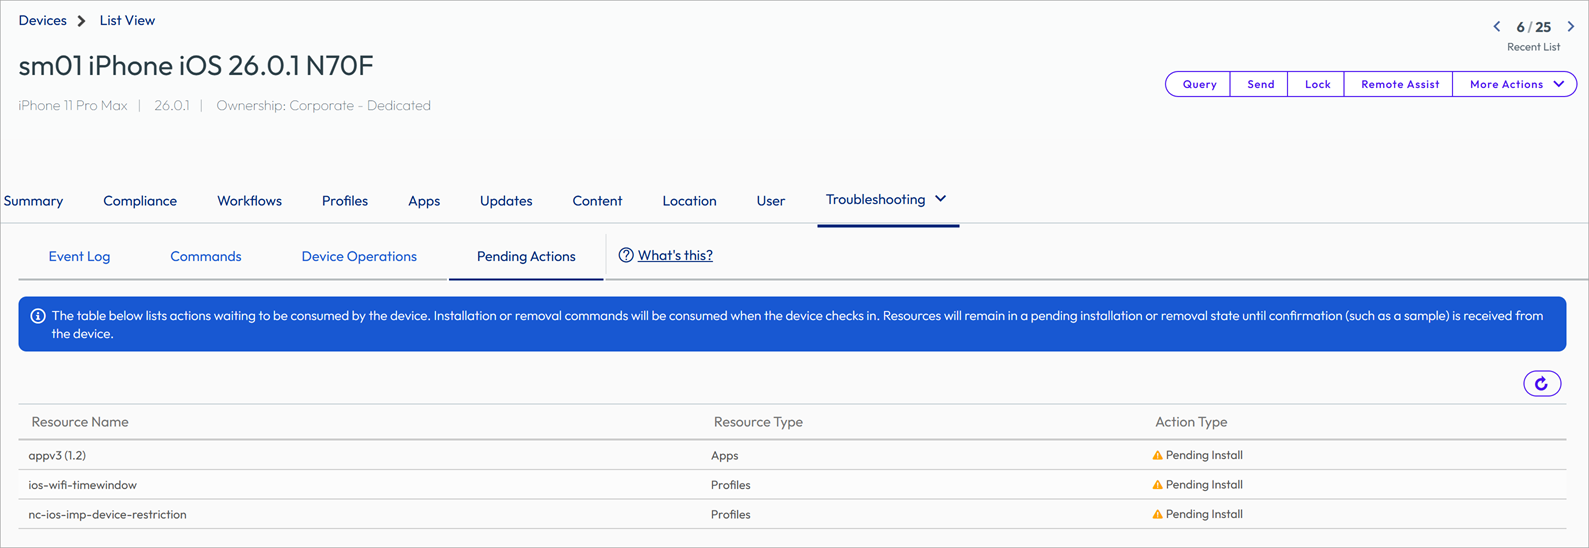
Not every change behaves the same way in the Pending Actions tab. Some actions are cleared from the queue immediately once they are superseded, while others remain visible as "Pending" until the device confirms the change was applied. The scenarios below explain which behaviour applies in each case.
Common Scenarios
-
Auto-Deploy Resources
-
Assignment Published - When a resource is auto-deployed, the tab shows 'Pending Install' until the device checks in, installs the resource, and reports back successfully. If a device checks in but fails to process the command, the status remains 'Pending Install' until it's executed successfully. Since this resource has an 'Auto' deployment method, UEM requires confirmation from the device before clearing the pending status — the same confirmation requirement applies to installs or removals forced from the console, from the Hub app, or triggered by a workflow.
-
Assignment Removed - If a resource is unassigned before the device checks in, the queued command is discarded immediately and never appears in the Pending Actions tab. If the resource was already installed (through auto-deploy or on-demand) and is then unassigned, the tab shows 'Pending Removal' until the device confirms the resource has been removed.
-
Forced Removal - If an admin forces the removal of an auto-deploy resource, the tab first shows "Pending Removal." Once the device processes that command, the resource may reappear as "Pending Install" — this happens because the resource is still part of the device's desired state (it remains assigned), so UEM reconciles the device back toward that desired state by reinstalling it.
-
-
On-Demand resource assignment published or removed - Creating an on-demand resource assignment does not, by itself, produce any status in the Pending Actions tab. The resource becomes available for installation. A status only appears once an admin or end user explicitly initiates an install or removal for that resource; the tab then shows 'Pending Install' or 'Pending Removal' until the device processes the command. Because this action is applied once rather than continuously enforced, UEM does not wait for a confirmation the way it does for auto-deployed resources.
-
Forced Reinstall Action - When an admin triggers a forced reinstall, the tab shows "Pending Install" until the device checks in and processes the command.
-
Workflow Scenarios
- Desktop Workflows - If a workflow installs or removes an on-demand app or profile on a desktop device, the status of that action is not shown in the Pending Actions tab. Desktop devices do not report workflow-driven changes through this tab.
- Mobile Workflows - For mobile devices, on-demand apps or profiles deployed through a workflow appear in the Pending Actions tab with the appropriate 'Pending Install' or 'Pending Removal' status.
Was this page helpful?