Use the following steps to diagnose and resolve connectivity issues between the Zebra printer and the Omnissa MQTT broker.
Step 1: Verify printer firmware version
Print a Printer Configuration Report to confirm that the Link-OS version on your printer is 6.7 or greater.
-
Make sure the media is loaded and the printer cover is closed.
-
There are two choices to print the report here.
-
If printer power is OFF, press and hold the CANCEL button while turning the printer power ON.
-
If printer power is ON, press FEED + CANCEL buttons for two seconds.
-
-
The Printer and Network Configuration Reports (below) is printed, and the printer returns to READY status.
While reviewing the report, also confirm that the printer has a valid IP address assigned. An unresolved or missing IP address will prevent the printer from reaching the MQTT broker.
Note: Refer to your Zebra printer manual for the key sequence required to print the Configuration Report.
Step 2: Open USB communications with Zebra Setup Utilities
To send diagnostic commands directly to the printer:
-
Connect the printer to your PC using a USB cable.
-
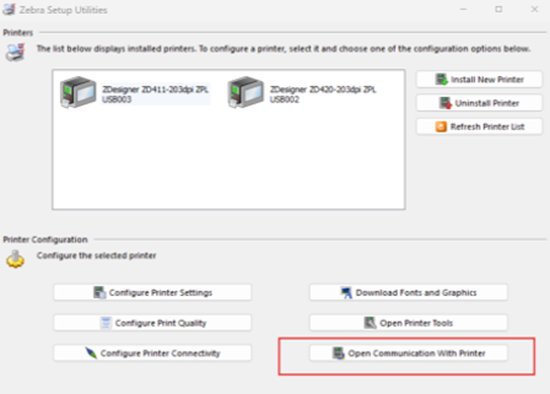
Open the Zebra Setup Utilities application.
-
Click Open Communications With Printer.
-
Send each of the following SGD (Set/Get/Do) commands one at a time.
Note: If communication commands appear unresponsive, restart the Zebra Setup Utilities application and try again.
-
Send the following SGD command to confirm that MQTT is enabled on the printer. A result of on indicates MQTT is active:
! U1 getvar "mqtt.enable"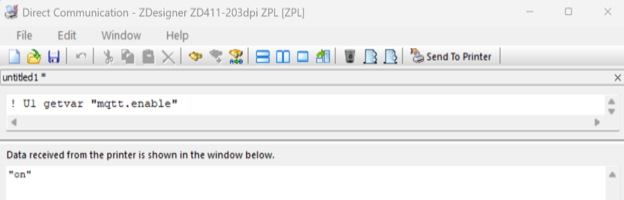
-
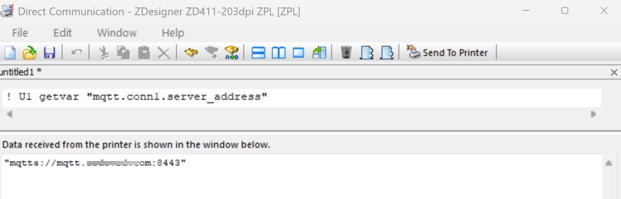
Send the following SGD command to confirm the URI the printer client uses to connect to the MQTT broker:
! U1 getvar "mqtt.broker"Verify that the returned URI matches the intended MQTT server address.
Step 3: Perform network checks from a PC
From a PC on the same network or VLAN as the printer, run the following checks to validate DNS resolution and port reachability.
DNS Resolution Check
nslookup {FQDN of the MQTT Server}
Example: nslookup mqtt.xyz.com
Port Reachability Check
Test-NetConnection {FQDN of the MQTT Server} -Port 8443
Example: Test-NetConnection mqtt.xyz.com -Port 8443
Note: If Test-NetConnection fails from the PC, the printer will also fail to connect. The issue is network-level and must be resolved before the printer can communicate with the broker.
Step 4: Pull the MQTT log file from the printer
To get a closer look at what the printer is attempting when connecting to the MQTT broker, retrieve the MQTT log file using the following command:
UI getvar "mqtt.logging.entries"
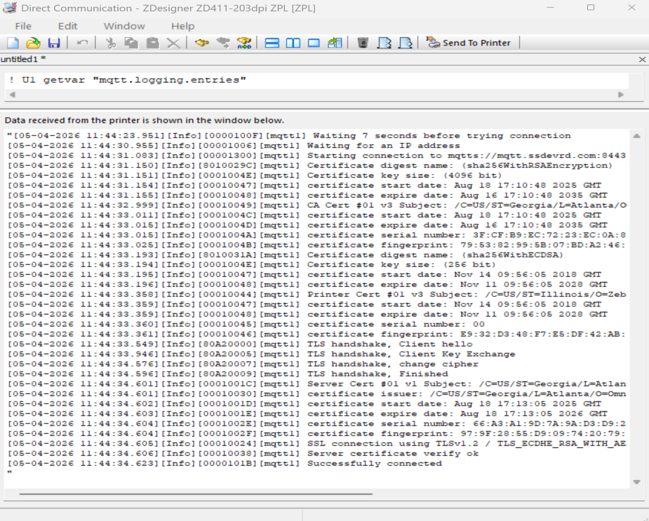
Review the log output for entries that match the conditions below to identify the root cause of the issue.
MQTT log indicators and possible reasons
| Log Entry | Likely Meaning |
|---|---|
DNS lookup failure / cannot resolve host | The printer cannot resolve hostname. Check DNS configuration and reachability. |
TCP connection failure / timeout | A network, routing, firewall, or port issue is blocking the connection. |
TLS / certificate / trust error | The CA certificate is missing, incorrect, expired, or the server certificate chain does not match the CA. |
Authentication failed / not authorized | The username, password, or tenant ID is incorrect or missing. |
Connected / subscribed / published | The printer is successfully reaching the MQTT broker. No action required. |
Reconnect / retry loop | The broker is intermittently reachable, or a TLS, authentication, or session issue is causing repeated failures. |
Step 5: Verifying certificate configuration during enrollment
If enrollment doesn't complete and the MQTT log from Step 4 shows a certificate-related entry - for example:
[Error][00001301][mqtt1] CA file not present
Or
[Error][00010051][mqtt1] Unsupported certificate format
Use the following steps to confirm the certificate files on the printer and retry provisioning.
Note: A printer reboot after sending the staging record confirms the file transfer step ran, but on its own doesn't confirm the certificate file arrived and is valid. Use the check below to confirm directly before considering enrollment complete.
5.1 Confirm that the certificate file is present on the printer
Send either of the following:
! U1 getvar "file.dir" "E:"
! U1 getvar "allcv"
Look for MQTT1_CA.NRD (and MQTT1_CERT.NRD / MQTT1_KEY.NRD if using mutual TLS) in the response.
5.2 Watch for the expected response when sending the provisioning file
When you send the provisioning/staging file, a successful transfer returns a response similar to:
[{"filename":"E:MQTT1_CA.NRD","size":<n>,"crc32":<n>}]{"mqtt.conn1.qos":...}
If you don't see a response like this, resend the file.
5.3 Confirm firmware and tenant configuration
- Confirm the printer is running the latest available Link-OS firmware.
- If the device stays in "Enrollment in Progress" for an extended period, confirm the tenant ID applied correctly.
! U1 getvar "mqtt.conn1.tenant_id"
5.4 Retry the transfer
The following steps have resolved certificate-related enrollment issues for customers and internal testers:
-
Use both staging methods. Send the staging record through the Windows Zebra Setup Utilities app (wired/USB) and the mobile app (Bluetooth/wireless), rather than relying on a single method.
-
Resend the staging record multiple times.A single attempt does not always succeed — resending a few times is often necessary.
-
Fully restart Zebra Setup Utilities between attempts. Close and reopen the entire application, not just the "Open Communications" terminal window.
-
Confirm a terminal response on every send. Ensure a response appears in the terminal each time you send the file (see section 5.2).
-
Increase the Communication timeout. In Zebra Setup Utilities, go to Options and raise the Communication timeout value before resending. The default is 50 seconds; the valid range is 1–100 seconds.
-
Reboot the printer between attempts. A full reboot can clear transient issues that prevent the staging record from being applied.
-
Clear residual certificate files before resending. If a previous attempt may have left a partial file behind, clear the certificate files first to force a clean write, then resend the staging record (commands below).
-
Perform an Enterprise Wipe as a last resort. If all other steps fail, perform an Enterprise Wipe on the device in the UEM console and re-enroll from scratch.
! U1 do "file.delete" "E:MQTT1_CA.NRD"! U1 do "file.delete" "E:MQTT1_CERT.NRD"! U1 do "file.delete" "E:MQTT1_KEY.NRD"
5.5 Contact Support
If certificate errors continue after the steps above, contact Omnissa Support with the MQTT log output and the response received when the provisioning file was sent.
Was this page helpful?