Each device in your organization's deployment must be enrolled in your organization's environment before it can communicate with Omnissa Workspace ONE UEM and access internal content and features.
Prerequisites
-
Apple device running macOS version 10.13 or later
-
Omnissa Workspace ONE Intelligent Hub for macOS version 19.04 or later
-
Workspace ONE UEM version 9.4 or later
Enrollment Methods
There are four ways to initiate enrollment for macOS devices:
-
Hub-Based Enrollment - Enroll a device using the Omnissa Workspace ONE Intelligent Hub
-
Web-Based Enrollment - Enroll a macOS device using web-based enrollment
-
Automated Enrollment - Utilize Apple Business Manager's Automated Enrollment
-
Registered Mode - Register a device with Workspace ONE UEM without full enrollment
End user Enrollment Using the Workspace ONE Intelligent Hub
The Hub-based enrollment process secures a connection between macOS devices and your Omnissa Workspace ONE UEM environment through the Workspace ONE Intelligent Hub app. The Workspace ONE Intelligent Hub application facilitates User-Approved Device Enrollment, and then allows for real-time management and access to device information and resources.
For more information, see:
-
macOS Intelligent Hub in Apps for macOS Devices section.
-
Enroll with macOS Intelligent Hub
Admin Enrollment Using a Sideloaded Staging Profile
Device Staging on the Omnissa Workspace ONE UEM console allows a single admin to outfit devices for other users on their behalf, which can be particularly useful for IT admins provisioning a fleet of devices. Admins can sideload a staging profile for a single-user devices and multi-user devices.
Single-User Staging
Single-user staging allows an admin to stage devices, such as a company-issued laptop, for a single user. LDAP binding or pre-registration is required when staging devices for single users.
For more information, see Stage Single User Domain-Bound Agent-Based macOS Enrollment in Introduction to Managing macOS Devices.
Single Staging with Pre-Registration and Local User
Omnissa Workspace ONE UEM also supports a new single staging enrollment flow for a local macOS user with pre-registration to help macOS admins who are moving towards a deployment model without domain join. For more information, see Pre-Register Single-User Staging Using Agent-Based Enrollment in Introduction to Managing macOS Devices.
Multi-User Staging
Multi-user device staging allows an admin to provision devices intended to be used by more than one user, such as a shared computing lab computer. Multi-user staging allows the device to dynamically change its assigned user as different network users log into that device.
For more information, see Stage Multi-User Domain-Bound macOS Enrollment in Introduction to Managing macOS Devices.
Bulk Enrollment with Apple Business Manager
Depending on your deployment type and device ownership model, you may want to enroll devices in bulk. Omnissa Workspace ONE UEM provides bulk enrollment capabilities for macOS devices using the Apple Business Manager and Automated Enrollment.
Deploying a bulk enrollment through the Apple Business Manager's automated enrollment allows you to install a non-removable MDM profile on a device. You can also provision devices in Supervised mode to access additional security and configuration settings.
For more information about Apple Business Manager, see Integration with Apple Business Manager.
Enrollment with macOS Intelligent Hub
The Hub-based enrollment process secures a connection between macOS devices and your Omnissa Workspace ONE UEM environment. Install the Workspace ONE Intelligent Hub application to facilitate the User-Approved enrollment process to enable real-time management and access to relevant device information and resources.
Download the Workspace ONE Intelligent Hub installer from https://getwsone.com. When the Workspace ONE Intelligent Hub is installed, the device begins prompting the user for the enrollment authentication. For different methods that are available to download Intelligent Hub, see macOS Workspace ONE Intelligent Hub Download.
Procedure
-
Navigate to https://getwsone.com and download the Workspace ONE Intelligent Hub installer on the device.
-
Open the pkg file and install the Intelligent Hub by following the system prompts. After installation completes, the Intelligent Hub enrollment screen appears shortly later, or click on the Intelligent Hub icon in the macOS Menu Bar and click Enroll.
-
Enter the enrollment URL and Group ID, or enter your email address.
If the email autodiscovery is set up, select the email address option for authentication, instead of entering the enrollment URL and Group ID. For information about configuring autodiscovery, see the Autodiscovery Enrollment topic of the Managing Devices documentation.
If your user account is not allowed or blocked because your account is denylisted and not approved for enrollment, you will get a message preventing enrollment from continuing.
-
Follow the system prompts in the Workspace ONE Intelligent Hub. For devices running macOS versions between 10.12.6 and 10.13.1, proceed to Step 7. For devices running macOS 10.13.2 and above, proceed to Step 5.
-
Enter the admin user name and password to install the MDM profile.
-
Once the process is complete, the Workspace ONE Intelligent Hub displays an Enrollment Complete screen and the device immediately begins receiving the configurations assigned by the administrator.
-
Follow the Onboarding Experience UI in Workspace ONE Intelligent Hub that displays the status information on the progress of active installation of apps and resources and notifies the user. The Onboarding Experience UI is displayed only if the admin has enabled Post-Enrollment Onboarding Experience in the console.
For more information, see Enable Post Enrollment Onboarding Settings.
-
Click Continue to transition to the Hub's default Account screen.
For more information on Workspace ONE Intelligent Hub for macOS and its deployment, see Enable the Workspace ONE Intelligent Hub Post-Enrollment Installation section.
macOS Workspace ONE Intelligent Hub Download
The quickest and the easiest option available for downloading the Omnissa Workspace ONE Intelligent Hub is from getwsone.com. The most recent version of the Workspace ONE Intelligent Hub is present and requires no authentication. However, you can also download the Workspace ONE Intelligent Hub for macOS devices at any time by logging into UEM console.
Download options:
- Workspace ONE UEM console – Navigate to Groups & Settings > All Settings > Devices & Users > Apple > Apple macOS > Hub Application and select Download Hub.
If the hub is installed after the device enrollment, then the Hub icon  appears in the macOS Menu Bar indicating it is active and no additional end-user interaction is necessary.
If the hub is installed before the device enrollment, then after the installation the device begins prompting the user for the enrollment authentication.
Enable the Workspace ONE Intelligent Hub Post-Enrollment Installation
If you are using web-based enrollment, enable the Omnissa Workspace ONE Intelligent Hub to be installed on devices after enrollment through the Web.
If you are enrolling using a method that does not use the Workspace ONE Intelligent Hub such as web-enrollment or automated enrollment via Apple Business Manager, you can configure Workspace ONE to automatically install the Workspace ONE Intelligent Hub.
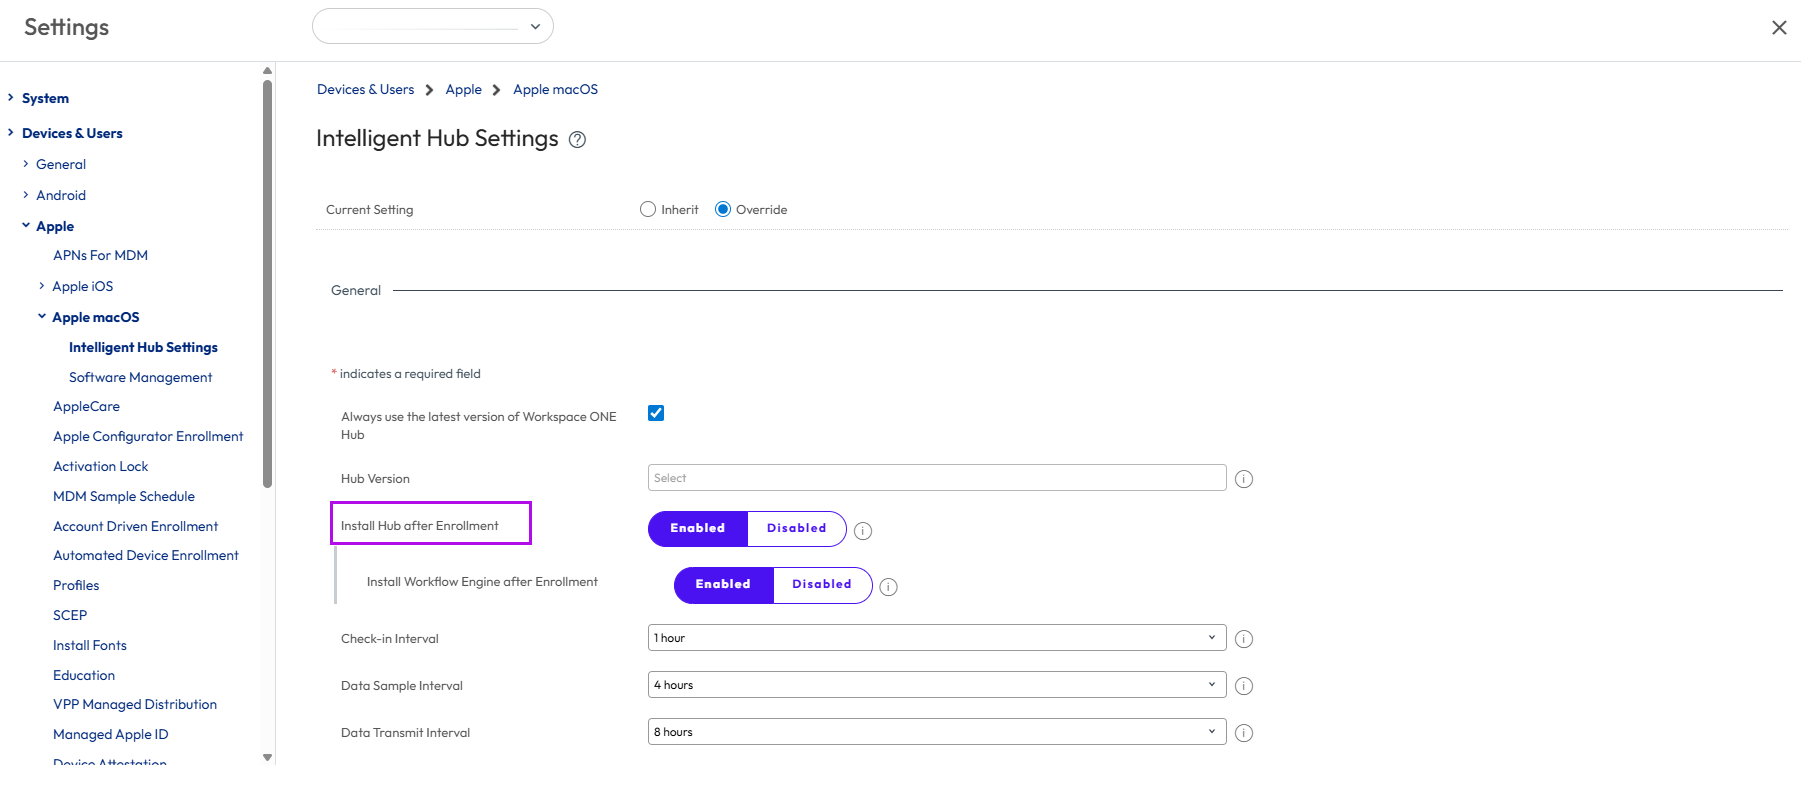
- From the UEM console Dashboard, navigate to Devices > Device Settings > Apple > Apple macOS > Intelligent Hub Settings.
- Click Enabled for Install Hub after Enrollment to automatically install Hub on devices after enrollment.
- Select Save.
Enable Post Enrollment Onboarding Settings
For the past few years, administrators have been shifting from imaging-based workflows to just-in-time provisioning over-the-air. It is important to be able to inform end-users of what's happening while their device is getting set up. Omnissa Workspace ONE Intelligent Hub now displays and notifies the status of applications that are actively being downloaded and installed when enrolling a macOS device. This feature also provides administrators a basic way to customize an experience to greet the user during setup.
Enable and Customize the Post-Enrollment Onboarding Experience
This feature can only be activated or deactivated at an Organization Group level.
-
Navigate to the Enrollment Settings page. Navigate through Settings>Devices & Users> General> Enrollment> Optional Prompt> macOS> Enable Post-Enrollment Onboarding Experience.

-
Click Enable.
-
Customize the Header, Subheader, and Body Text fields as necessary. Use UEM lookup values for personalization.
-
Configure and assign some Internal Apps or Apple Business Manager (VPP) apps with Deployment Type set to Auto.
-
Enroll a device with Workspace ONE Intelligent Hub 21.04 and later.
Note: Enrolling through Intelligent Hub is not required. This feature works for any enrollment method, including Apple Business Manager (DEP) or Web Enrollment. When installed, Intelligent Hub, will automatically detect the enrollment and automatically launch the experience.
Directly after enrollment, Intelligent Hub will automatically launch, displaying your customizations and tracking all apps which are set to Automatic deployment.
Stage Single User Domain-Bound Web-Based macOS Enrollment
Single-User Device Staging on the Omnissa Workspace ONE UEM Console allows a single administrator to outfit devices for other users on their behalf, which can be useful for IT administrators provisioning a fleet of devices.
Prerequisites
- Create a basic user account enabled for Single User Staging.
- Create a basic user account or directory user account. See Basic User Accounts and Directory-Based User Accounts in Console Basics guide.
The following steps describe how to configure single-user staging for devices enrolling with Apple Business Manager:
-
Configure a macOS device profile with the Directory Payload assigned to your devices that must be staged. See Configure a Directory Profile in macOS Device Profiles section.
-
On your Mac device, create a local administrative macOS account.
-
Log in to macOS using the local macOS account and enroll with Safari using the staging credentials you created in Prerequisites section. See Enrollment with macOS Intelligent Hub.
-
To check if the device is domain bound, perform the following steps:
-
Navigate to Terminal.app.
-
Enter id
intended user's AD username.The command returns information about the user.
-
-
Log out of the local administrative macOS account.
-
At the macOS Login Window, the end-user must log in with their domain-based username and password.
Workspace ONE UEM assigns the device to the end user and begins sending profiles and apps which are assigned to the user.
Stage Single User Domain-Bound macOS Enrollment Using Apple Business Manager
Configure single-user staging for devices enrolling with Apple Business Manager.
Prerequisites
- Create a basic user account enabled for Single User Staging.
- Create a basic user account or directory user account. See Basic User Accounts and Directory-Based User Accounts in Console Basics guide.
- Enable automated device enrollment. Sign up for Apple Business Manager in https://business.apple.com/. Enroll devices using Apple Business Manager. See Apple Business Manager - Device Enrollment Program in Apple Business Manager guide.
-
In your device enrollment profile, set the following options:
- Authentication setting: ON
- Await Configuration : ENABLED
- Account Setup: SKIP
- Create New Admin Account : YES and configure Admin Account details
-
Configure a macOS device profile with the Directory Payload assigned to your devices that must be staged. See Configure a Directory Profile in macOS Device Profiles section.
-
Start the Mac device to Setup Assistant and begin the enrollment process into Workspace ONE UEM when prompted.
- Authenticate to Workspace ONE UEM using the user account configured for Single-User Staging (from Prerequisites section).
- When the device enrolls during the Setup Assistant, the profile containing the directory payload is installed during the AwaitConfiguration phase. This binds macOS to your network-based directory service.
- Any other profiles and apps assigned to the device using assignment group are sent to the device.
-
At the macOS login window, a green dot indicates that network accounts are avaible.
-
When the user logs in with their domain-based username and password, Workspace ONE UEM assigns the device to the end user and begins sending profiles and apps which are assigned to the user.
-
Validate the device record has synced from Apple Business Manager:
- Navigate to Devices > Lifecycle > Enrollment Status in the Workspace ONE UEM console and change the layout to Custom.
- Ensure the device to be staged has synced from Apple Business Manager.
- Ensure that Token Type is Apple Enrollment.
- If the device has no Token Type, navigate to Devices > Devices Settings > Apple > Device Enrollment Programand click Sync Devices.
-
Validate the device record has the correct Device Enrollment profile:
- Navigate to Devices > Lifecycle >Enrollment Status in the Workspace ONE UEM console and change the layout to Custom.
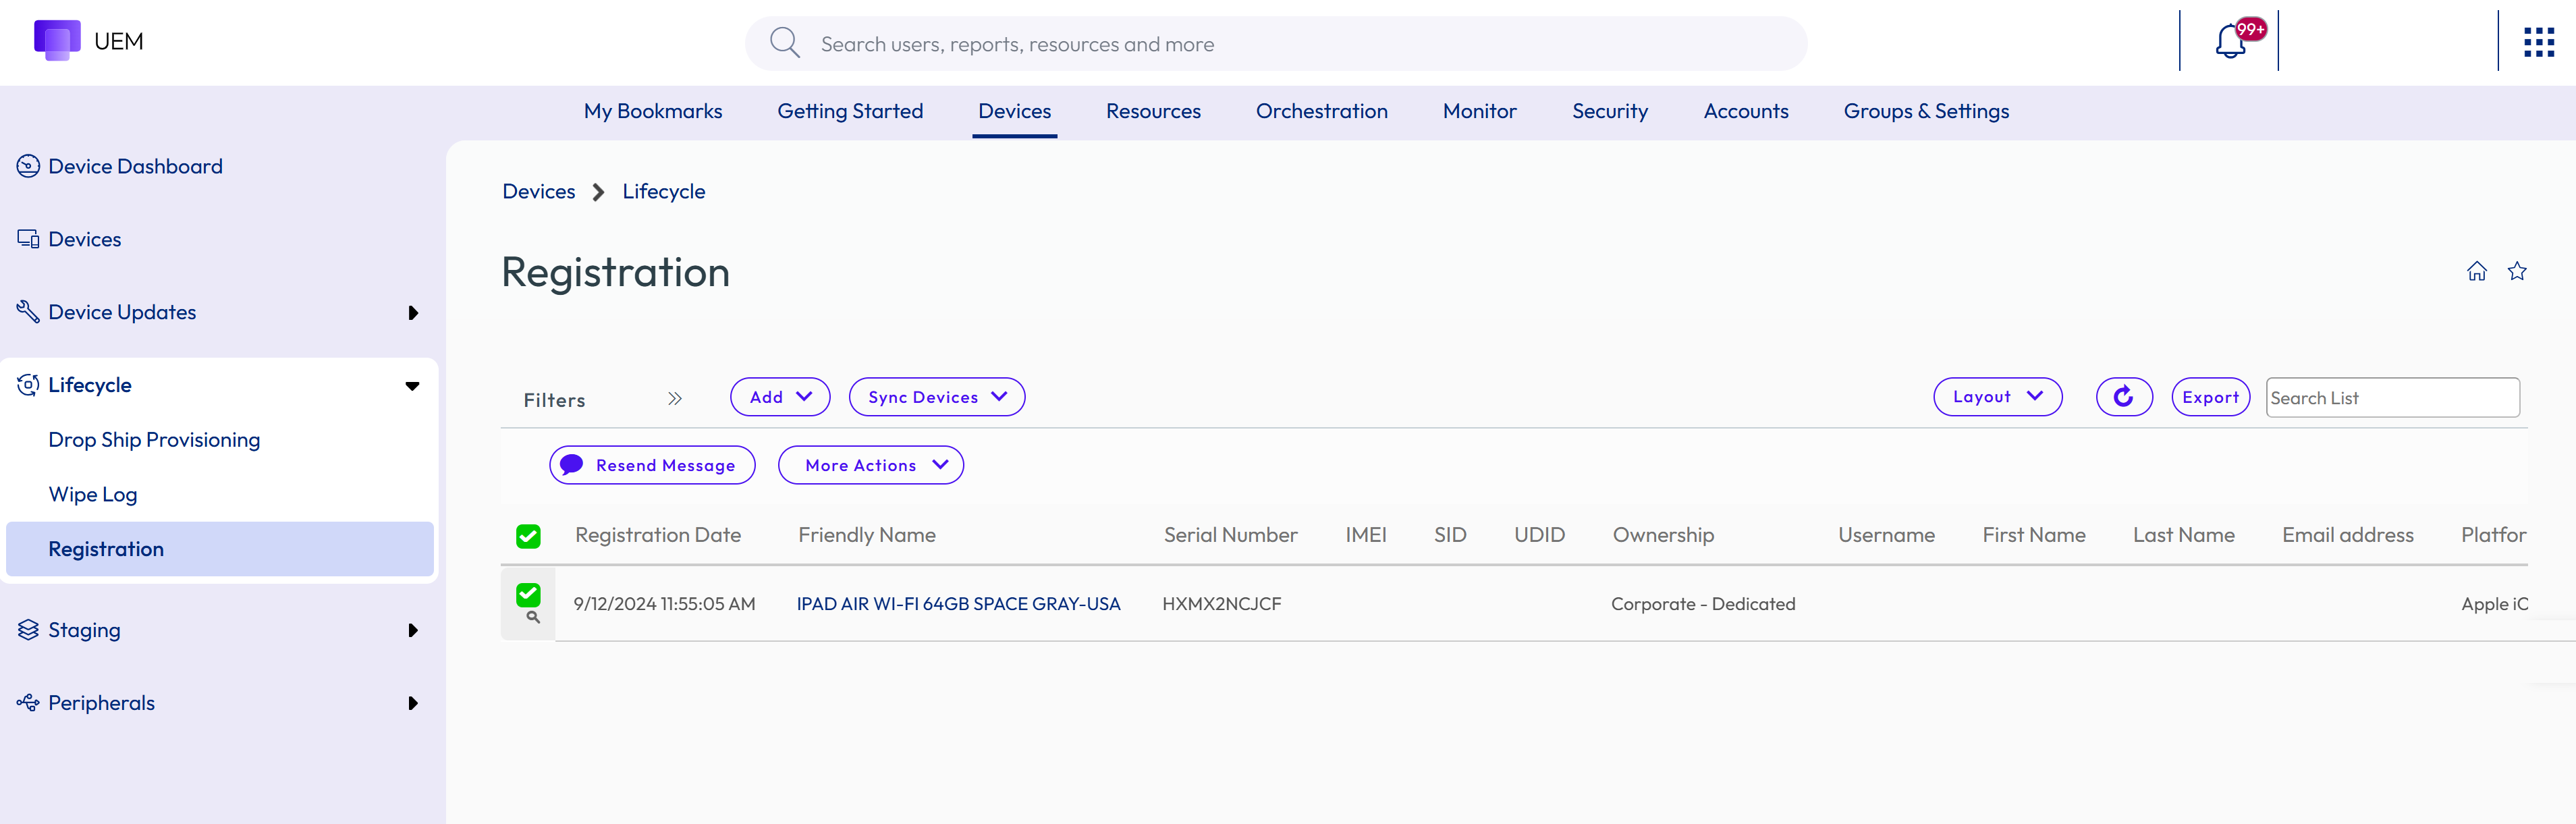
- Ensure that the Profile Name matches the profile you created in Step b.
- If Profile Name is incorrect, select the check box next to the devices to be enrolled and navigate to More Actions > Assign Profile > select the profile you created in while you created device enrollment profile > Save. Note: In single-user staging, only the first network-based user to log in will be the Workspace ONE managed user account. Any logins by subsequent or different network-based users will not receive user-based profiles and apps.
Note: When the device is enrolled to the Single User Staging user, the logged-in user is not yet associated to the enrollment user. Once the first network directory-based account logs in to the Mac, Workspace ONE UEM associates the logged-in user to a user account in Workspace ONE UEM. The new directory account becomes both the enrollment user and managed user.
It is not recommended to set the Authentication setting set to OFF in your DEP profile. For more information, see Best Practices using Apple Device Enrollment Program (DEP)
- Navigate to Devices > Lifecycle >Enrollment Status in the Workspace ONE UEM console and change the layout to Custom.
Stage Multi-User Domain-Bound macOS Enrollment
Multi-user device/shared device staging allows an IT administrator to provision devices intended to be used by more than one user. Multi-User staging allows the device to change its assigned user dynamically as the different network users log into that device.
Multi-User Staging Using Web-Based Enrollment
Configure multi-user staging for devices enrolling with Web-Based enrollment.
Prerequisites
- Apple device running macOS version 10.13.0 (High Sierra) or later
- Omnissa Workspace ONE UEM version 9.4 or later
- Create a basic user account enabled for multi-user staging.
To configure Multi-User Staging Using Web-Based Enrollment, perform the Steps from 1-6 as described in Stage Single User Domain-Bound Web-Based macOS Enrollment.
Multi-User Staging Using Apple Business Manager Enrollment
Configure multi-user staging for devices enrolling with Apple Business Manager.
To configure multi-user staging using Apple Business Manager, perform the Steps 1-7 as in Stage Single User Domain-Bound macOS Enrollment Using Apple Business Manager.
Note: When the device is enrolled to the multi-user staging user, the logged-in user is not yet associated to the enrollment user. Once the first network directory-based account logs in to the Mac, Workspace ONE UEM associates the logged-in user to a user account in Workspace ONE UEM. The new directory account becomes both the enrollment user and managed user.
It is not recommended to set the Authentication setting set to OFF in your DEP profile. For more information, see Best Practices using Apple Device Enrollment Program (DEP).
Stage Single-User Non-Domain macOS Enrollment
When staging without domain binding, the only local macOS user account that can be managed by Omnissa Workspace ONE UEM is the local user that installs the enrollment profile.
Pre-Register Single-User Staging Using Agent-Based Enrollment
By pre-registering a user-to-device manually or through batch import, the IT Admin can enroll the device and assign it to the user without needing to know the end user's directory credentials. In this way, the IT administrator delivers the device ready to go with only a known set of local macOS login credentials. Once the user logs into the known local macOS account given to them by the IT admin, they can change the password to match their directory credentials (or by using the built-in Kerberos SSO extension, the user can be guided through syncing the local account to their directory account).
Prerequisites
- Create a basic user account enabled for Single User Staging.
- Create a basic user account or directory user account. See Basic User Accounts and Directory-Based User Accounts in Console Basics guide.
- Enable automated device enrollment. Sign up for Apple Business Manager in https://business.apple.com/. Enroll devices using Apple Business Manager. See Apple Business Manager - Device Enrollment Program in Apple Business Manager guide.
Agent or Web Single-User Staging for Local Users with Pre-Registration
- Bulk import Device-to-User registration record within the Devices > Lifecycle > Enrollment Status page:
- Click Add > Batch Import and use the simple template and example for users and devices listed on the Batch Import page.
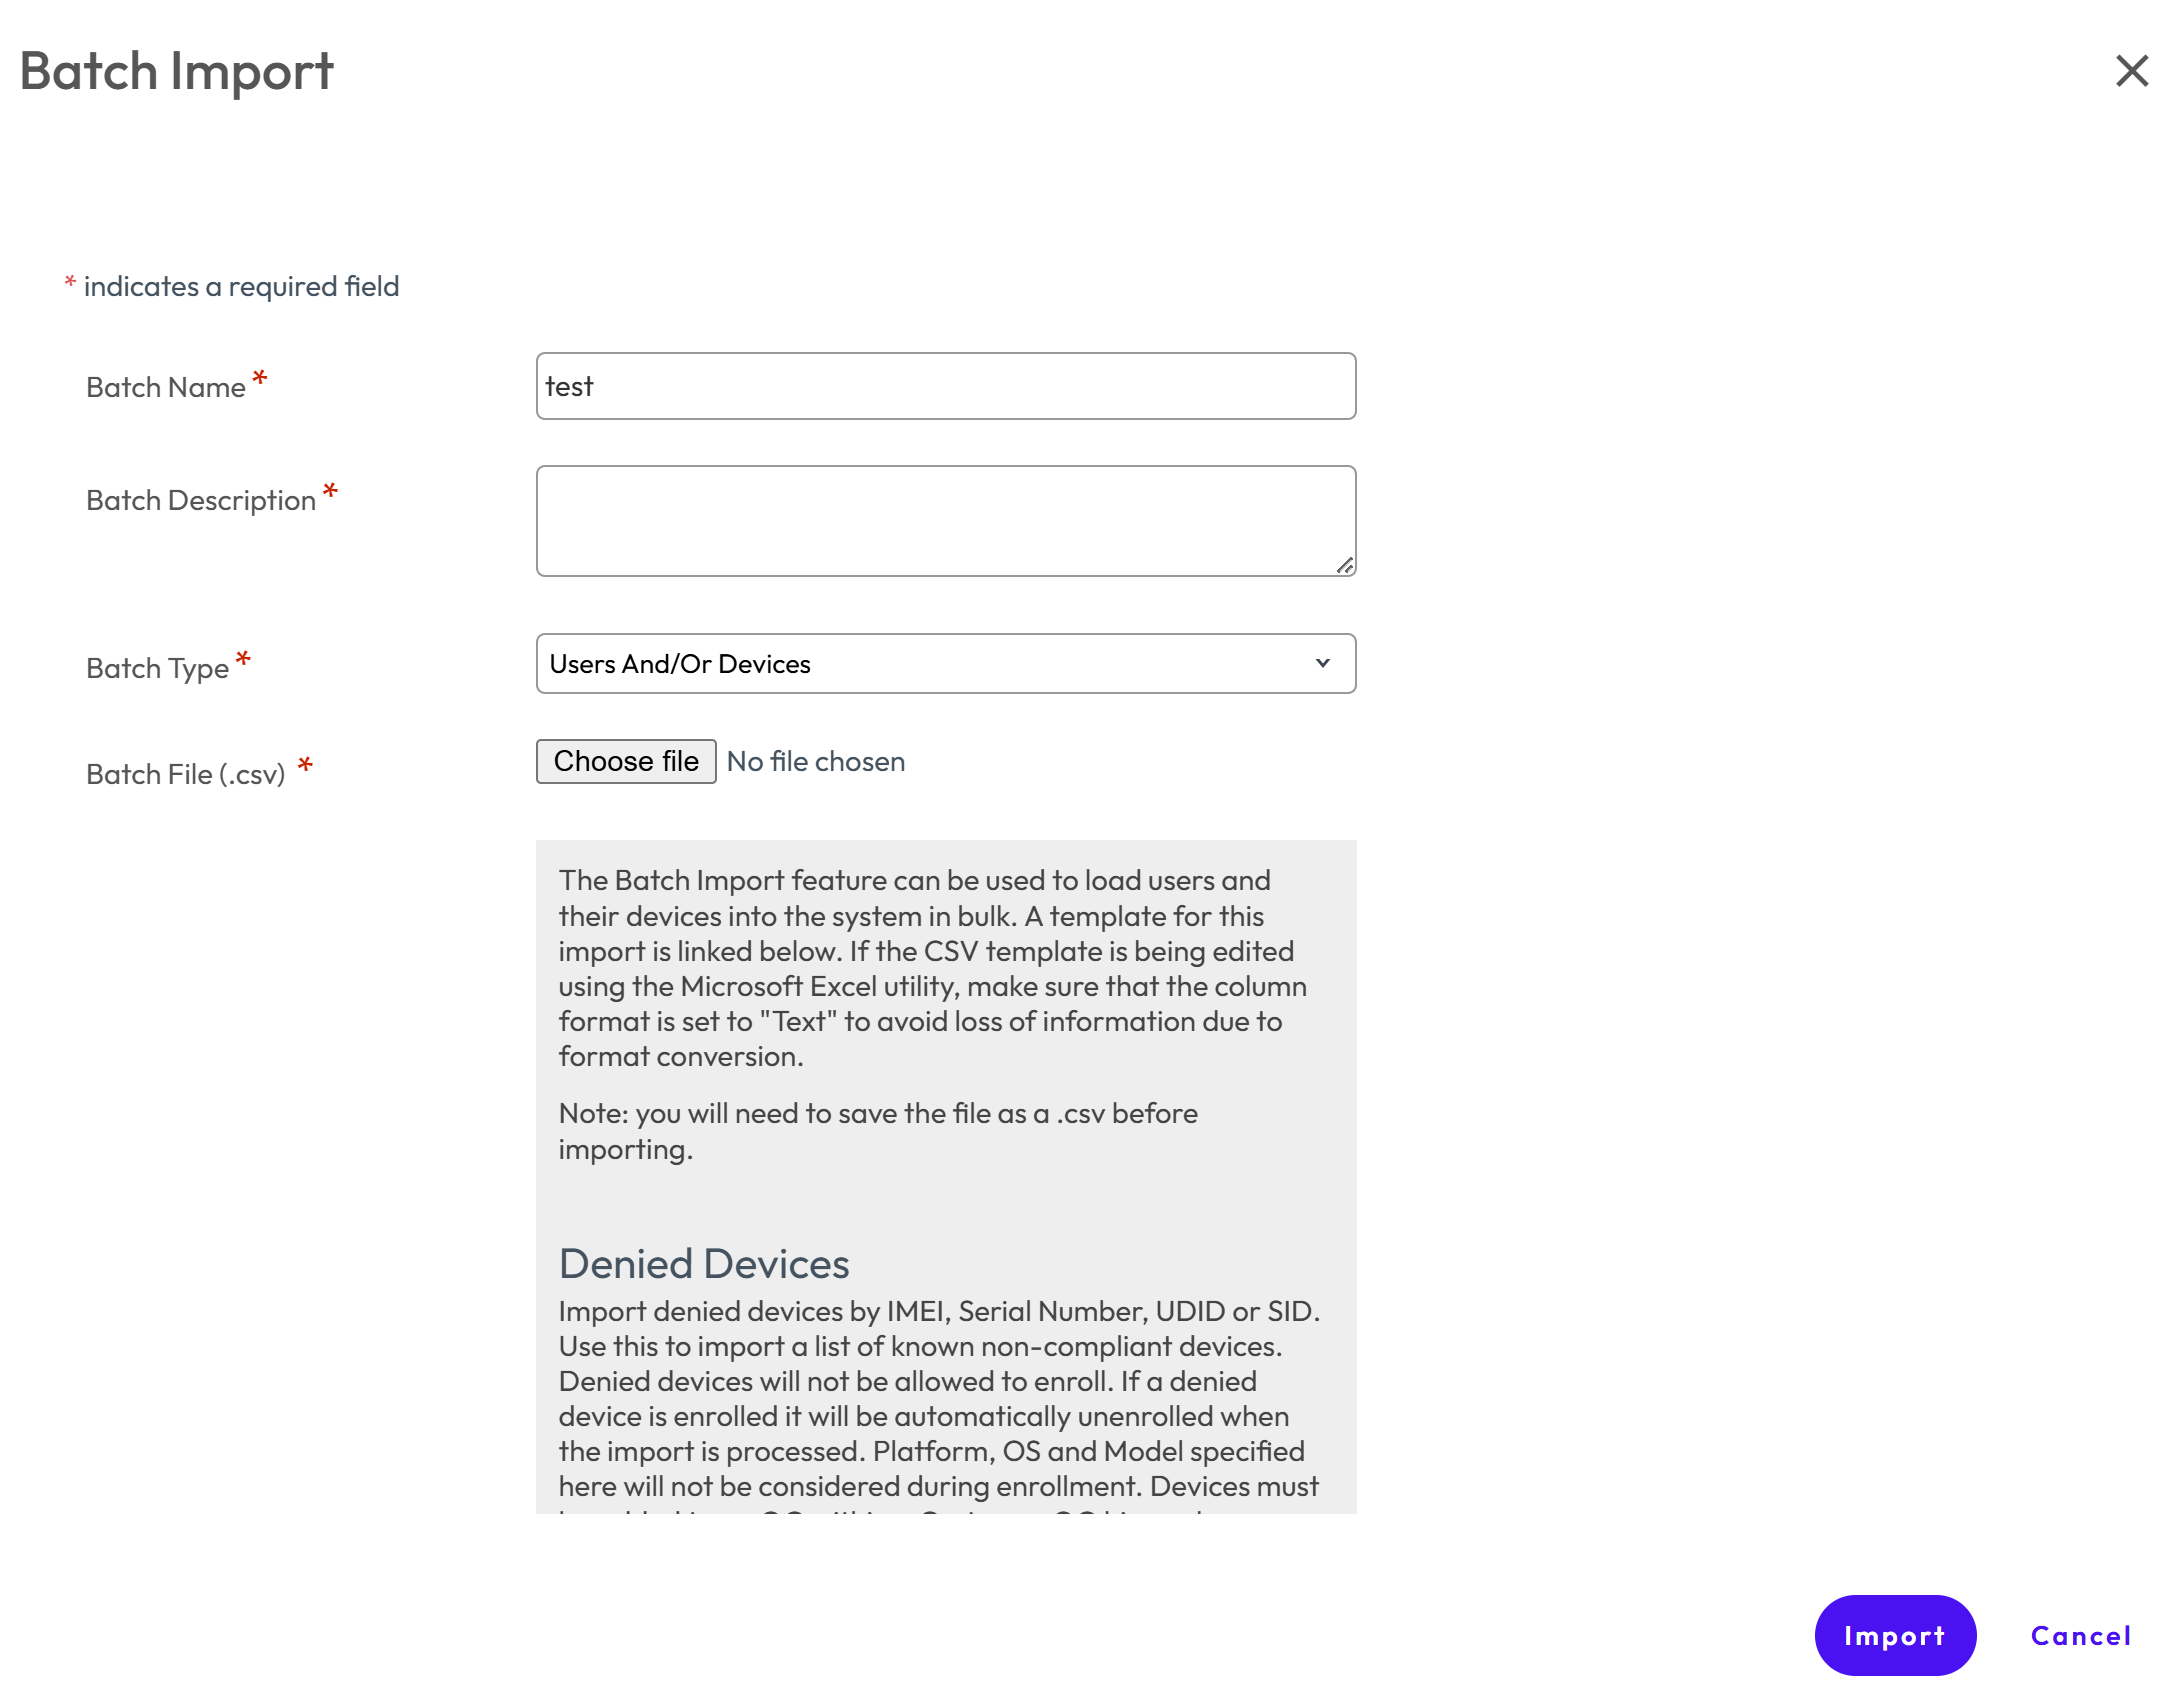
- Modify the sample CSV by entering only the Username, FirstName, LastName, GroupID, Security Type (Directory or Basic), and DeviceSerial.
- Note: Devices can be manually added individually from the Enrollment Status page by clicking Add > Register Device and enter the same required information described above.
- Click Add > Batch Import and use the simple template and example for users and devices listed on the Batch Import page.
- On your Mac device, proceed through the Setup Assistant as normal. Ensure the local macOS account created is the username you want to give the end user of the machine.
- Enroll with macOS Hub using the Staging User credentials you created in Step 1.
- When the device enrolls, Workspace ONE UEM assigns the device from the staging user to the user you specified in Step 1 using bulk import.
- Any profiles and apps assigned to the enrollment user (specified by bulk import) are sent to the device when the local macOS user account you used in Step 3 is logged-in.
Agent or Web Single-User Staging for Local Users with API
Note: The process to check out a device to an enrollment user can be used when the device-to-user assignments are not known. In this use case, the code mentioned in Step 6 is included in a larger onboarding workflow and native application.
- Create a basic user account configured for single user staging in Workspace ONE UEM.
- Create a local administrative macOS account.
- Ensure that the local macOS account created is the username you want to give the end user of the machine.
- Log into macOS with the newly created local user account.
- Using the Staging User credentials you created in Step 1, enroll with macOS Intelligent Hub
- While logged in as the user that enrolled in Step 5, call the Workspace ONE UEM REST API to check out the device to the correct enrollment user.
REST API details:
https://%3CAPI\_Server%3E/api/help/\#!/DevicesV2/DevicesV2\_CheckOutDeviceToUser
PATCH /api/mdm/devices/{id}/enrollmentuser/{enrollmentuserid}
* {id} - Workspace ONE UEM Device ID
* {enrollmentuserid} - Workspace ONE UEM Enrollment User ID
* Accept - application/json:version=2
Note: When the end-user logs in with the new local user, Workspace ONE UEM considers that macOS user to be the managed user and automatically sends any new apps/profiles targeted to the enrollment user.
Pre-Register Single-User Staging Using Apple Business Manager Enrollment
Configure single-user staging for local users with pre-registration using Apple Business Manager enrollment.
- Apple Business Manager Single-User Staging for Local Users with Pre-Registration
- Create a basic Workspace ONE UEM user account configured for single-user staging.
- In your Device Enrollment profile, set the following options:
- Authentication setting: OFF.
- Staging Mode : Single User Device
- Default Staging User : Basic User
- Await Configuration : ENABLED.
- Account Setup: DON'T SKIP
- Optionally, set Create New Admin Account to YES and configure Admin Account details for a hidden IT administrator account.
- Validate the device record has synced from Apple Business Manager:
- Navigate to Devices > Lifecycle > Enrollment Status in the Workspace ONE UEM console and change the layout to Custom.
- Ensure the device to be staged has synced from Apple Business Manager.
- Ensure that Token Type is Apple Enrollment.
- If the device has no Token Type, navigate to Devices > Devices Settings > Apple > Device Enrollment Programand click Sync Devices.
- Validate the device record has the correct Device Enrollment profile:
- Navigate to Devices > Lifecycle > Enrollment Status in the Workspace ONE UEM console and change the layout to Custom.
- Ensure that the Profile Name matches the profile you created in Step b.
- If Profile Name is incorrect, select the check box next to the devices to be enrolled and navigate to More Actions > Assign Profile > select the profile you created in Step b > Save.
- Bulk import the Device-to-User registration record within the Devices > Lifecycle> Enrollment Status
- Click Add > Batch Import and use the simple template and example for users and devices listed on the Batch Import page.
- Modify the sample CSV by entering only the Username, FirstName, LastName, GroupID, Security Type(Directory or Basic), and DeviceSerial.
- Note: Devices can be manually added individually from the Enrollment Status page by clicking Add > Register Device and enter the same required information described above.
- Reload the Enrollment Status page and ensure that device to be staged has a User name assigned and still has a Token Type of Apple Enrollment.
- On your Mac device, proceed with the enrollment process in Setup Assistant and when the device enrolls, Workspace ONE UEM automatically assigns the device from the staging user to the user you specified in Step e using bulk import (the enrollment user).
- Apple Business Manager Single-User Staging for Local Users with API
-
Follow the steps from Step a to Step d as described in Apple Business Manager Single-User Staging for Local Users with Pre-Registration.
-
Use the Workspace ONE UEM REST API to check out the device from the staging user to the correct enrollment user.
REST API details:
https://%3CAPI\_Server%3E/api/help/\#!/DevicesV2/DevicesV2\_CheckOutDeviceToUserPATCH /api/mdm/devices/{id}/enrollmentuser/{enrollmentuserid} * {id} - Workspace ONE UEM * {enrollmentuserid} - Workspace ONE UEM Enrollment User ID * Accept - application/json:version=2
-
Apple Business Manager
Devices can also be staged through Apple Business Manager's Device Enrollment Program (DEP). DEP is a streamlined staging method that is best for corporate-owned devices.
DEP on macOS enables you to:
- Apply standard staging to devices.
- Configure Setup Assistant panes to skip during installation.
- Enforce enrollment for all end users.
- Customize and streamline the enrollment process to meet your organization's needs.
- Hold a device in the Awaiting Configuration state when it reaches the Setup Assistant screen.
- Create a local Hidden Admin account and allow end users to skip the Account Creation screen.
For additional Apple information, see the Apple Business Manager Guide or contact your Apple Representative.
Custom Bootstrap Packages for Device Enrollment
In a typical device enrollment, the Omnissa Workspace ONE Intelligent Hub must be installed on a device before any other installer packages can be run. The Bootstrap Package allows installer packages to deploy to a device immediately after the device is enrolled.
Bootstrap Packages
Omnissa Workspace ONE UEM uses the latest Apple MDM commands for deploying Bootstrap Packages. For enrolled devices on macOS 10.13.6 and higher, the InstallEnterpriseApplication command is used. For macOS 10.13.5 and lower devices the legacy InstallApplication command is used.
Historically, the Workspace ONE Intelligent Hub handles the download and installation of application files. Bootstrap Packages allow .pkg files to install immediately after enrollment whether or not the Workspace ONE Intelligent Hub is installed.
You may want to use alternative tools for device and application management. Bootstrap package enrollment comprises an enrollment flow paired with a bootstrap package that installs the alternative tooling and configures the device before the end user begins using the device.
Bootstrap Package Use Cases
Bootstrap Packages may be useful in certain deployment scenarios. This list is not exhaustive.
-
You want to create a custom-branded end user experience, such as launching a window as soon as enrollment completes, to inform the user about the installation process and instruct them to wait to use the device until provisioning and installation complete.
-
Your deployment does not include the Workspace ONE Intelligent Hub, but you still have critical software to deploy to devices.
-
You want to use Munki for Application Management, and need the Munki client to install immediately after enrollment so the user can begin installing apps, rather than going through the Workspace ONE Intelligent Hub and AirWatch Catalog.
-
Your deployment only uses MDM for certificate management and software management, and uses Chef or Puppet for configuration management. In this configuration, Chef or Puppet must be installed as soon as enrollment completes to finish configuring the device.
Bootstrap Package Creation
Bootstrap packages are deployed to the device as soon as enrollment completes. Bootstrap packages deployed from the Console will not deploy to existing enrolled devices unless the devices are specifically queued using the Assigned Devices list for the package.
You must create packages before you deploy them. There are several tools available that can create a package for use in the Bootstrap Package functionality. Created packages must meet two criteria:
- The package must be signed with an Apple Developer ID Installer Certificate. Only the package needs to be signed, not the app, since the Apple Gatekeeper does not check apps installed through MDM.
- The package must be a distribution package (product archive), not a flat component package.
When you have created a bootstrap package, you must deploy the package to your devices. For more information, see Deploy a Bootstrap Package.
Deploy a Bootstrap Package
Bootstrap packages allow you to make your end users' devices usable sooner after the device enrolls than a traditional enrollment. Once you have created a bootstrap package, you must deploy the package to your devices.
Prerequisites
You must create bootstrap packages before you deploy them. There are several tools available that can create a package for use in the Bootstrap Package functionality. For more information, see Custom Bootstrap Packages for Device Enrollment.
-
Navigate to Resources > Apps > Internal > Add Application.
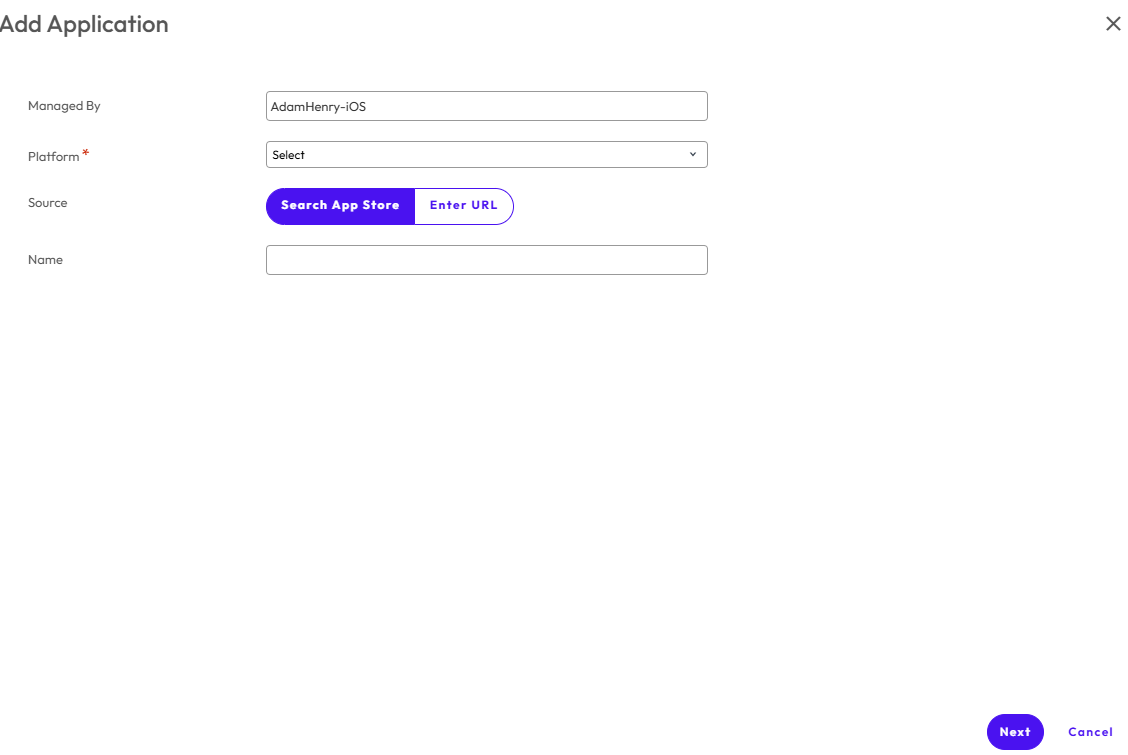
-
Upload a .pkg file that meets these requirements:
-
Package must be signed with an Apple Developer ID Installer certificate.
-
Package must be a distribution package.
For more information about the bootstrap package requirements, see Custom Bootstrap Packages for Device Enrollment
-
-
Select Continue and modify the items in the Details tab and the Images tab if necessary.
-
Select Save & Assign, and then select Add Assignment to configure the App Delivery Method.
By default, the App Delivery Method is set to Auto. In this configuration, the assigned bootstrap package will only install on newly-enrolled devices.
To install the bootstrap package on enrolled devices, select On Demand. On-Demand package deployments require you to manually push the package to devices.
To manually deploy a bootstrap package to enrolled devices, navigate to Applications > Internal Apps > List View. Select the package you want to assign to open the Application Details. Use the Devices tab to select devices to push the package to.
Bootstrap Package Status Messages
Omnissa Workspace ONE UEM displays the status that describes the bootstrap package installation progression.
To view the App status, Navigate to Apps tab in Device Details.
For each managed application, the following messages are displayed based on the assignment type when you hover the mouse over the App status:
| Action | Assignment Type | App Status | Bootstrap Package Status |
|---|---|---|---|
| Install Command Dispatched | Auto/OnDemand | Bootstrap Package Assigned and Install command dispatched, Last Action Taken: Install Command Dispatched, Timestamp: Date/Time | Bootstrap Package assigned and install command acknowledged. |
| Install Command Ready For Device | Auto/OnDemand | Bootstrap Package assigned but install command not acknowledged yet, Last Action Taken: Install Command Ready for Device, Timestamp: Date/Time | Bootstrap Package assigned but install command not acknowledged yet. |
| None | Auto | Bootstrap Package assigned but device was already enrolled. It is available for on-demand deployment but has not been requested, Last Action Taken: None, Timestamp: None | Bootstrap Package assigned but device was already enrolled. It is available for on-demand deployment but has not been requested. |
| None | Auto/OnDemand | Bootstrap Package assigned for on-demand deployment but has not been requested, Last Action Taken: None, Timestamp: None | Bootstrap Package assigned for on-demand deployment but has not been requested. |
Registered Mode
Registered Mode allows you to deploy Workspace ONE capabilities to macOS devices without requiring full mobile device management (MDM) enrollment. This mode is ideal if your organization uses a third-party MDM solution to manage macOS devices but wants to enable Workspace ONE capabilities such as DEX without replacing their existing device management solution.
Registered Mode allows devices to register with Workspace ONE UEM to access a set of managed capabilities without full enrollment. With Registered Mode, You can have access to following:
- Software Distribution - Distribute software to devices, starting with Digital Employee Experience (DEX).
- Scripts - Deploy and execute scripts on registered devices to automate configuration and management tasks.
- Sensors - Collect device data and telemetry using sensors for monitoring and reporting purposes.
- Hub Services - Provide end users access to Hub Services, including the Intelligent Hub app experience.
Devices appear in the Workspace ONE UEM console as Registered rather than MDM-enrolled.
This feature is designed for two primary scenarios:
- Organizations already using Workspace ONE as their MDM solution but want to extend their fleet without fully managed devices.
- Organizations with an existing third-party MDM solution that want to adopt Workspace ONE capabilities without replacing their current MDM.
Prerequisites
Before you configure Registered Mode for macOS, ensure that you have the following:
- Access to the Workspace ONE UEM console with administrator privileges.
- A staging user and password created in Workspace ONE UEM.
Enable Registered Mode in Workspace ONE UEM
To allow macOS devices to register without full MDM enrollment, you must first enable Registered Mode in the Workspace ONE UEM console.
- Log in to the Workspace ONE UEM console.
- Navigate to Groups and Settings > All Settings > Devices and Users > General > Enrollment.
- Select the Management Mode tab.
- Enable Registered Mode for macOS.
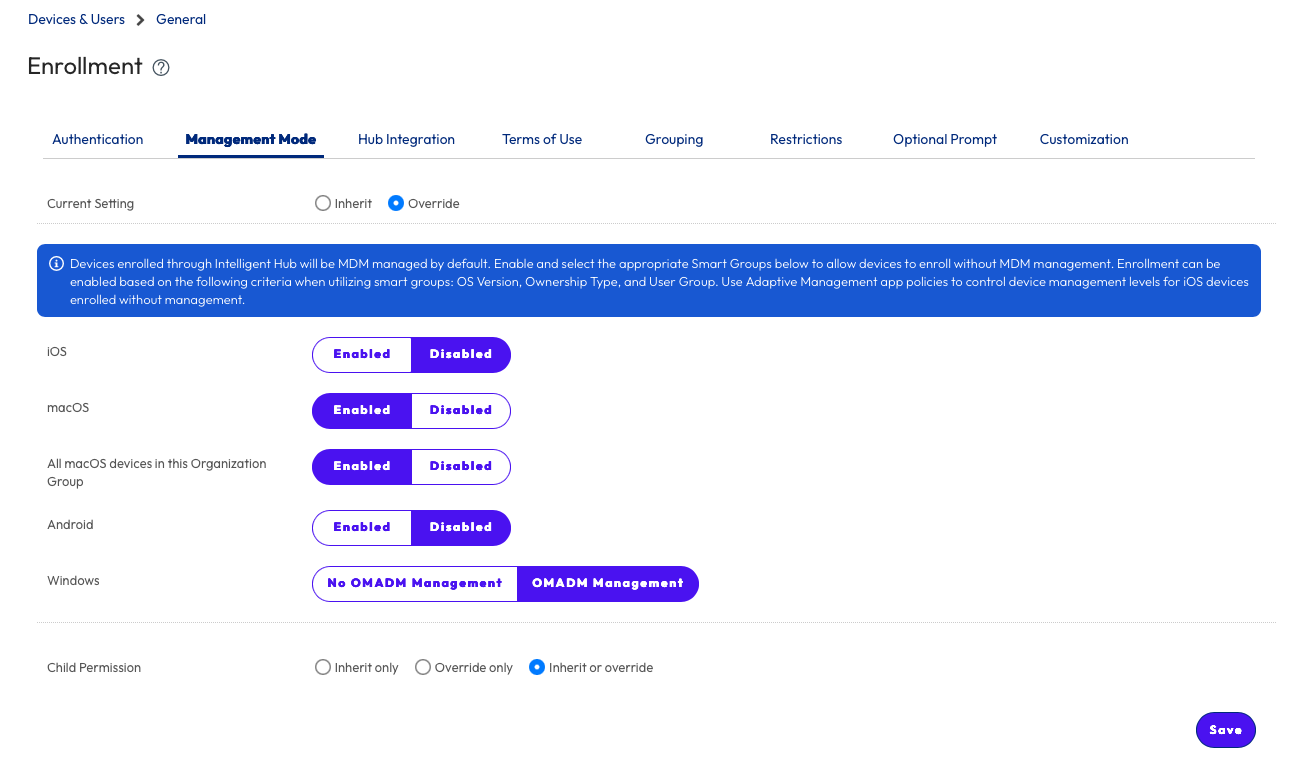
- Configure the applicable organization groups (OGs) or smart groups that will support Registered Mode.
- Save your changes.
Enroll macOS Devices in Registered Mode
To register devices with Workspace ONE, you can download Intelligent Hub package from Customer Connect portal and install it in the system or use your third part MDM solution to deploy it along with enrollment script.
Silent Enrollment with third party MDM solution
Silent enrollment uses your existing third-party MDM to push the Workspace ONE Intelligent Hub as an internal Application and an enrollment script to managed macOS devices. The Hub enrolls the device into Workspace ONE UEM automatically, without requiring any action from the end user.
How silent enrollment works:
- Your third-party MDM pushes the Workspace ONE Intelligent Hub as an internal Application to the target macOS devices.
- The MDM also pushes the enrollment script, which triggers the Hub to silently register the device with Workspace ONE UEM.
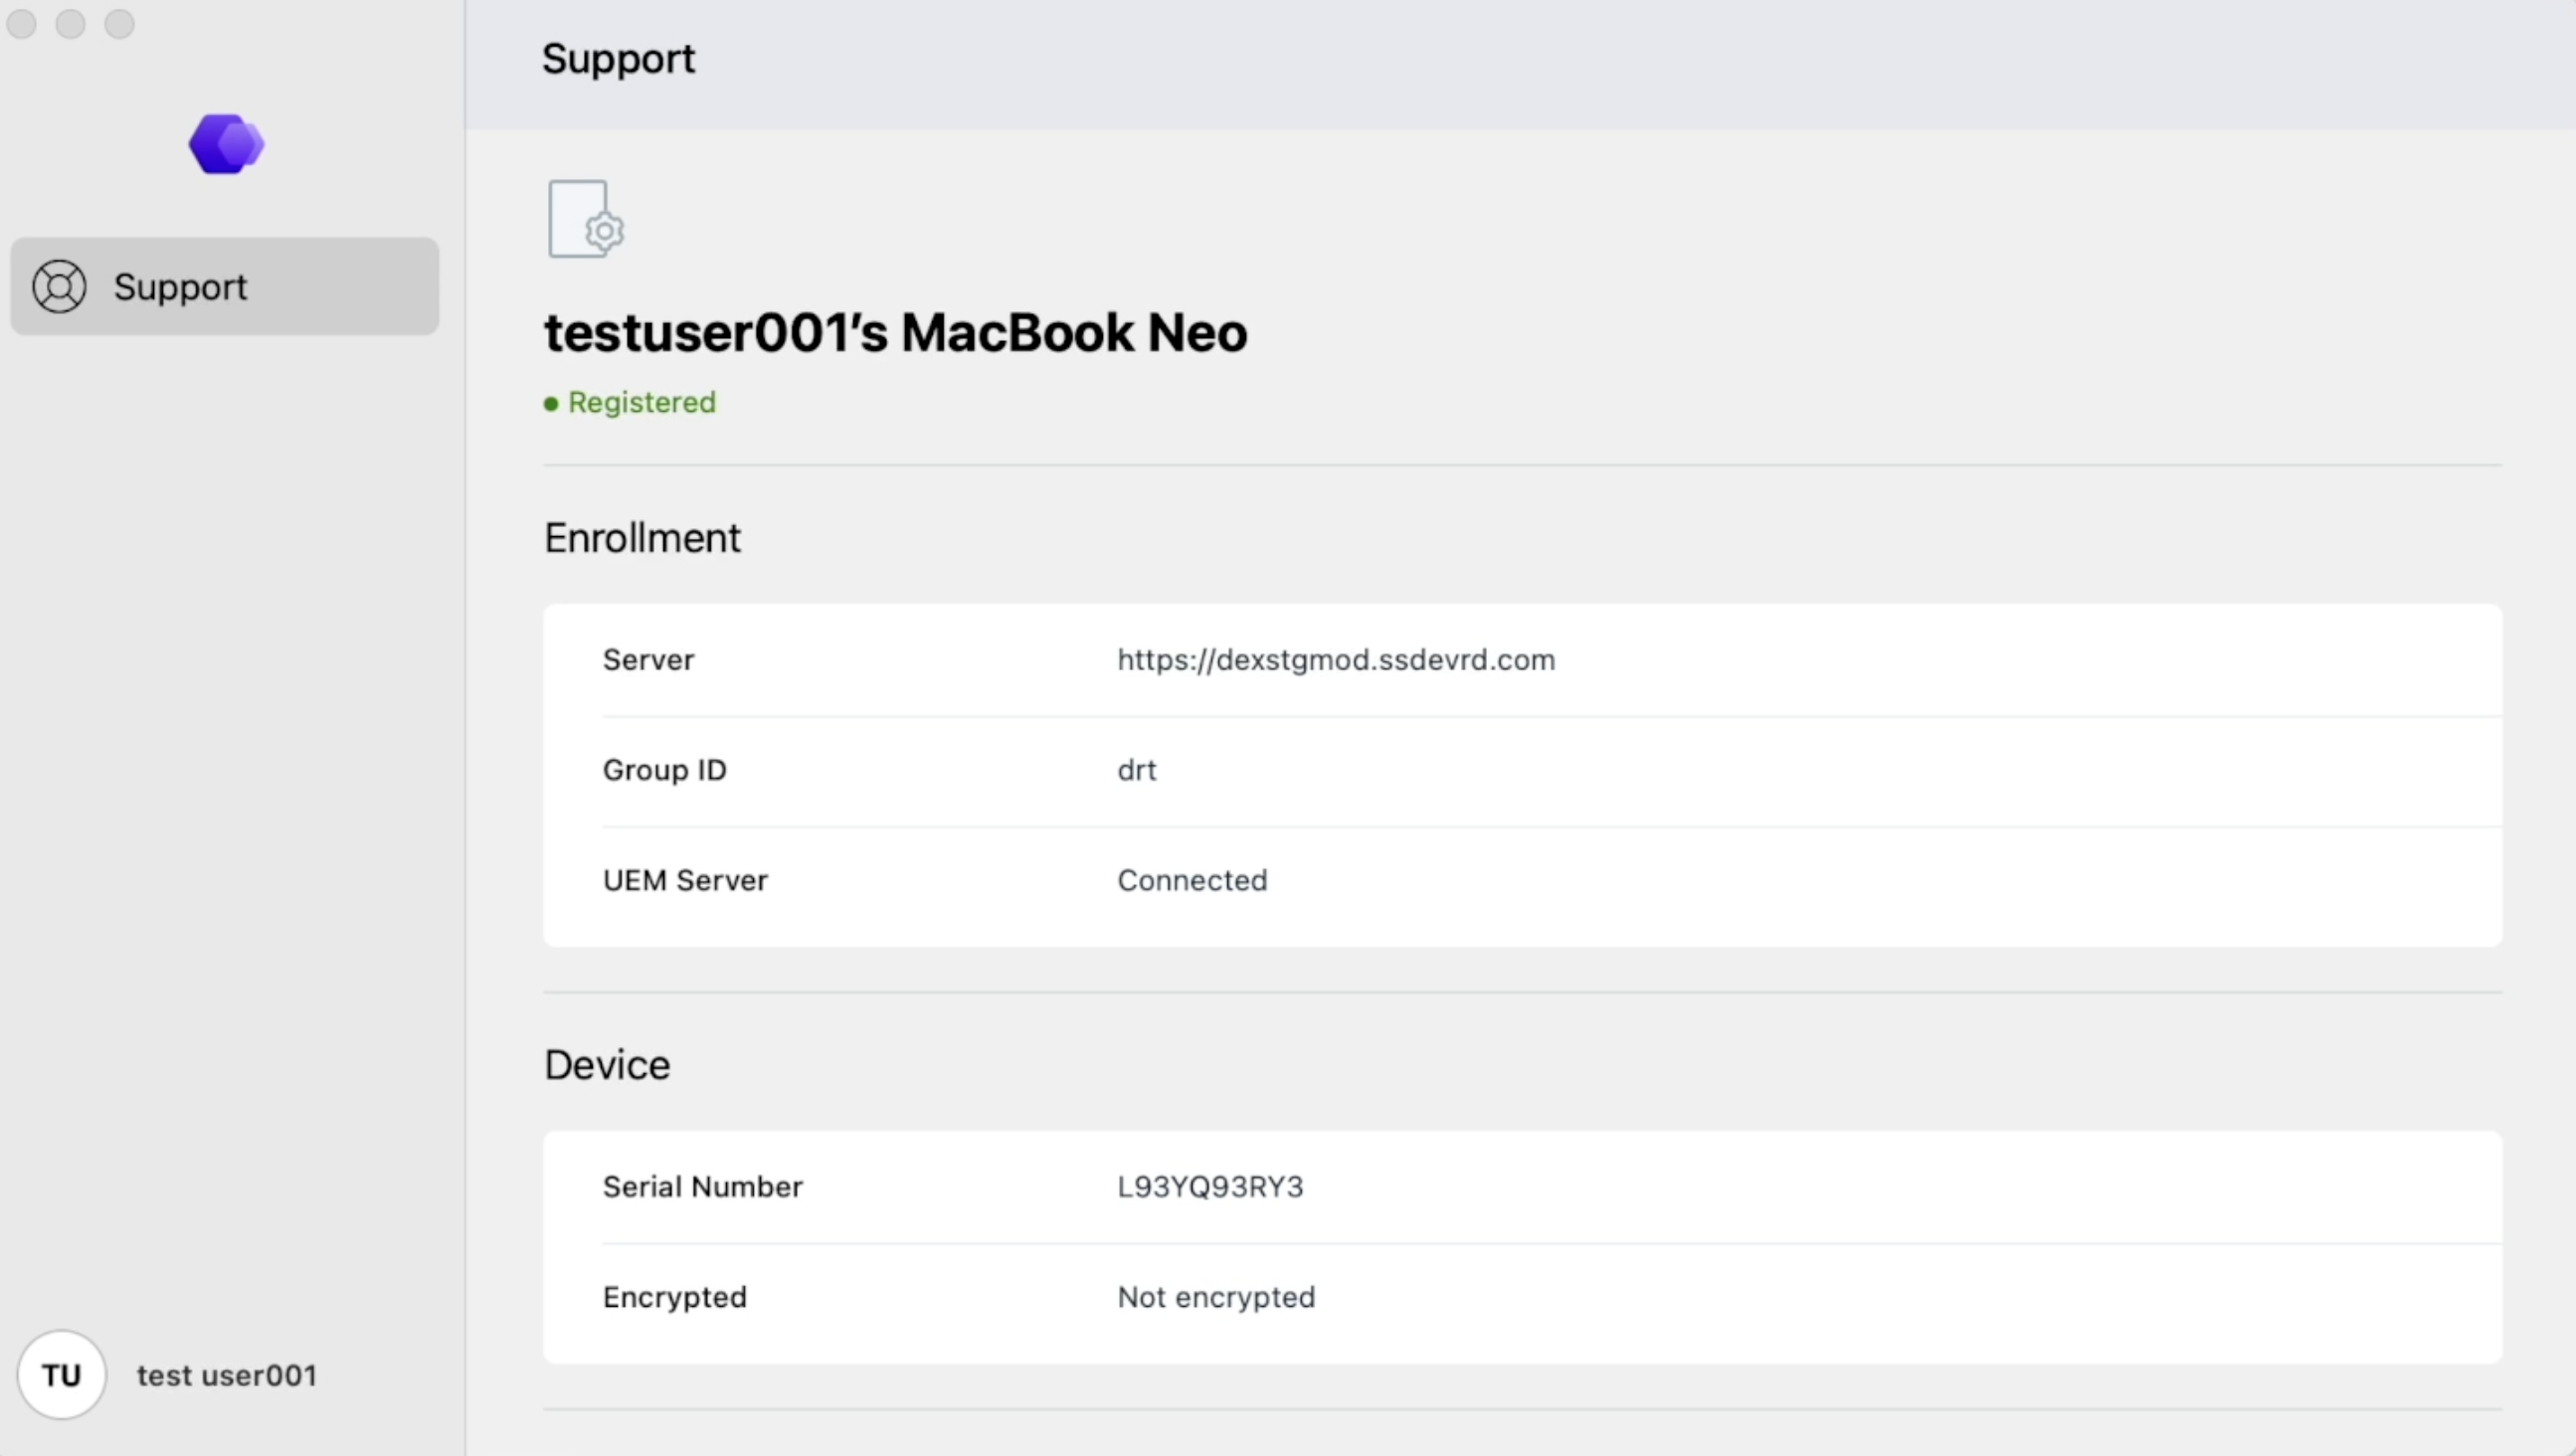
- Workspace ONE UEM records the device as Registered.
To configure silent enrollment:
-
Step 1: Create a deployment in your third-party MDM
In your third-party device management console, create a deployment that includes the Workspace ONE Intelligent Hub package.
Add the following Silent enrollment script as a post-install script in the same deployment.
#!/bin/sh

UEM_SERVER="<<UEM_SERVER_URL_PLACEHOLDER>>"
OG="<<OG_PLACEHOLDER>>"
STAGING_USER_NAME="<<STAGING_USER_NAME_PLACEHOLDER>>"
STAGING_USER_PASSWORD="<<STAGING_USER_PASSWORD_PLACEHOLDER>>"

LOGDIR="/Library/Logs/ws1"
LOGFILE="$LOGDIR/hub_postinstall.log"

mkdir -p "$LOGDIR" 2>/dev/null || sudo mkdir -p "$LOGDIR"
touch "$LOGFILE" 2>/dev/null || sudo touch "$LOGFILE"

# Function for writing to log
WriteLog() {
    # Treat first parameter as the message if no second parameter is provided
    if [ -z "$2" ]; then
        TYPE="INFO"
        MESSAGE="$1"
    else
        TYPE="$1"
        MESSAGE="$2"
    fi

    TIMESTAMP=$(date "+%Y-%m-%d %H:%M:%S")
    if [ "$(id -u)" -eq 0 ]; then
        echo "$TIMESTAMP $TYPE: $MESSAGE" | tee -a "$LOGFILE" >/dev/null
    else
        echo "$TIMESTAMP $TYPE: $MESSAGE" | sudo tee -a "$LOGFILE" >/dev/null
    fi
}

# Start logging
WriteLog "Postinstall started"
WriteLog "Starting WS1 silent enrolment..."
sleep 5

ATTEMPT=1
MAX_ATTEMPTS=5
RETRY_DELAY_SECONDS=60

while [ "$ATTEMPT" -le "$MAX_ATTEMPTS" ]; do
    if command -v /usr/local/bin/hubcli >/dev/null 2>&1; then
        WriteLog "INFO" "hubcli found on attempt $ATTEMPT"
        sudo /usr/local/bin/hubcli enroll --server $UEM_SERVER --og-name $OG --username $STAGING_USER_NAME --password $STAGING_USER_PASSWORD --assign-to-login-user
        WriteLog "SUCCESS" "Hub enrolled successfully on the device"
        exit 0
    fi

    if [ "$ATTEMPT" -lt "$MAX_ATTEMPTS" ]; then
        WriteLog "WARN" "hubcli not available on attempt $ATTEMPT. Retrying in $RETRY_DELAY_SECONDS seconds"
        sleep "$RETRY_DELAY_SECONDS"
    fi

    ATTEMPT=$((ATTEMPT + 1))
done

WriteLog "ERROR" "hubcli is not available after $MAX_ATTEMPTS attempts"
exit 1
Note: Replace the placeholder values with your specific server URL, organization group name, and UEM staging credentials.
| Placeholder | Description |
|---|---|
| UEM_SERVER | The URL of your Workspace ONE UEM server |
| OG | Your Organization Group name in Workspace ONE UEM |
| STAGING_USER_NAME | Username of the UEM administrator staging account |
| STAGING_USER_PASSWORD | Password of the UEM administrator staging account |
- Step 3: Required pre-deployment configuration
Before deploying the script, complete the following configuration in Workspace ONE UEM:
Create a Staging User
-
In the Workspace ONE UEM console, create a staging user account.
This account is used for the initial device enrollment before the device is automatically reassigned to the signed-in user.
-
Update STAGING_USER_NAME and STAGING_USER_PASSWORD in the script with the staging account credentials.
Configure SAM Account Name Mapping
- Navigate to All Settings > Devices & Users > Microsoft > Windows > Intelligent Hub Settings.
- Under Attributes for Unique Identifier, set Client Attributes to SAM Account Name.
- Select Save.
Note: This setting maps the signed-in user to their Active Directory account, ensuring devices enrolled through Silent Registration are correctly assigned to the appropriate user. Support for this setting under macOS will be available in an upcoming UEM release.
-
Step 4: Assign and push the deployment to target macOS devices
- Assign the deployment to the target macOS devices using your third-party MDM.
- Push the deployment from your third-party MDM.
Once Workspace ONE Intelligent Hub is installed on the target devices, Silent Registration runs automatically. The entire process requires no user interaction. Once complete, the device is registered in Workspace ONE UEM and associated with the correct user.
Use the following checklist to verify that Silent Registration completed successfully:
- Workspace ONE Intelligent Hub opens without prompting for enrollment credentials. The device appears in Workspace ONE UEM with a status of Registered.
- The device is associated with the signed-in user, not the staging account.
- The post-install script completed without errors. Review
/Library/Logs/ws1/hub_postinstall.logfor details.
Support Software Distribution starting with Experience Management Agent
You can deploy the Experience Management agent to registered devices by adding it as an internal application in Workspace ONE UEM.
- In the Workspace ONE UEM console, upload the Experience Management package as an internal application.
- Assign the application to the smart groups you configured for Registered Mode.
The DEEM agent installs silently on the registered macOS devices without requiring user intervention.
Was this page helpful?