To set up FIDO2 authentication in the Omnissa Access service, you enable FIDO2 authentication, configure the FIDO2 settings, and enable FIDO2 in the built-in identity provider. You then configure access policy rules to authenticate with FIDO2.
FIDO2 authentication is available to access web apps through the Workspace ONE Intelligent Hub app and Hub web portal.
Note: FIDO2 as the primary authenticator is not supported on the Google Chrome browser on Android devices.
Prerequisites
System Requirements
| Browser | Operating System | Authenticator Type |
|---|---|---|
| Google Chrome 85 or later | MacOS 10.15.7 | TouchID External (Yubikey) |
| Windows 10 | Windows Hello External (Yubikey) | |
| Safari 14.02 or later Note: Currently, users cannot register their FIDO2 authenticator from the Safari web browser because of a recent change from Apple. Users can use another supported browser to register their FIDO2 authenticator for the first time. After the authenticator is registered, users can log in with the authenticator from Safari. | MacOS 10.15.7 | External (Yubikey) |
| Microsoft Edge Chromium 85 or later | Windows 10 | Windows Hello External (Yubikey) |
| Firefox 81 or later | Windows 10 | External (Yubikey) |
Procedure
-
In the Omnissa Access console, select Integrations > Authentication Methods.
-
Select FIDO2 and click CONFIGURE.
-
Configure the FIDO2 settings.
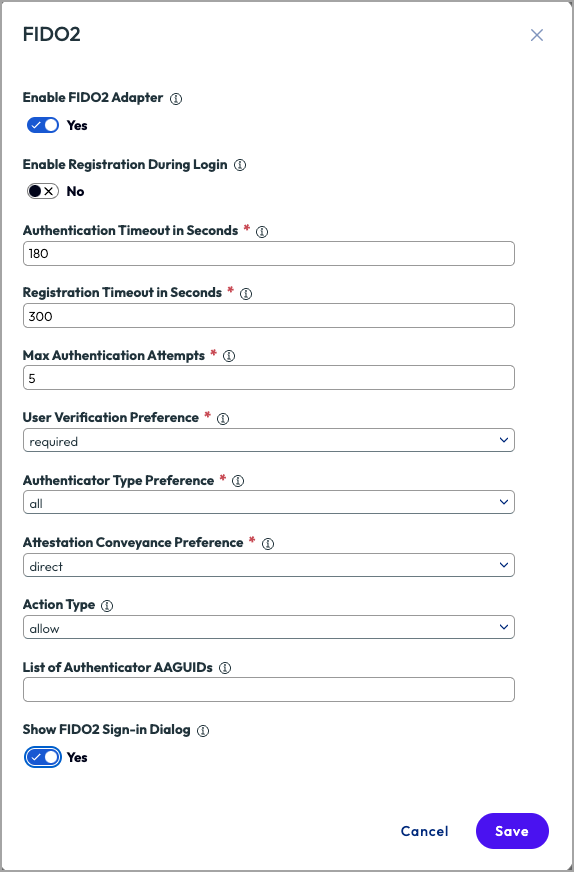
Enable FIDO2 Adapter Enable FIDO2 authentication on the built-in identity provider. Enable Registration During Login Deactivated by default. If this option is enabled, users are asked to register their FIDO2 authenticator the first time they log in. The following text appears on the initial FIDO2 Sign-in dialog:
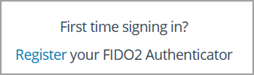
If you are going to set up the security key directly in the Omnissa Access console Accounts > Users page, you can deactivate this setting.
Note: The FIDO2 Sign-in dialog appears only if the FIDO2 Sign-in Dialog option is enabled.
Authentication Timeout in Seconds Enter the time in seconds within which the user has to authenticate before the request expires. The recommended time is 180 seconds (3 minutes). Registration Timeout in Seconds Enter the time in seconds within which the user has to register before the request expires. Max Authentication Attempts The number of times a user can attempt to authenticate before they receive an Access Denied message. User Verification Preference Configure how you want the user verification to be handled. Required is the default value. This option offers the highest security. - discouraged. This value indicates that the Relying Party does not want user verification used during the authentication.
- preferred. This value indicates that the Relying Party prefers user verification if possible, but will not fail the operation if the response does not have the UV flag set.
- required. The default. This value indicates that the Relying Party, requires user verification for the operation and fails the operation if the response does not have the UV flag set.
Authenticator Type Preference Select cross-platform, if admins are registering users. Select platform, if users are registering devices. Select all to use both options. - platform. Authenticators that are attached to a device. For example a laptop running Windows Hello.
- cross-platform. Authenticators that are removable and cross-platform. For example, a YubiKey. These authenticators can be used on multiple devices.
- all
Attestation Conveyance Preference The attestation data that is returned from the authenticator has information that could be used to track users. This option allows the Omnissa Access server to indicate how important the attestation data is to the FIDO2 registration event. - none. This value indicates that the Relying Party is not interested in authenticator attestation. None is the recommend value to set.
- indirect. This value indicates that the Relying Party prefers an attestation conveyance yielding verifiable attestation statements, but allows the client to decide how to obtain such attestation statements.
- direct. The default. This value indicates that the Relying Party wants to receive the attestation statement as generated by the authenticator.
Note: If the attestation conveyance preference is direct or indirect, the TouchID authenticator does not work.
Action Type (Optional) You can configure restrictions for users to allow specific FIDO2 security keys based on their AAGUID or to block specific FIDO security keys based on their AAGUID.
If you selected an action type, configure the Authenticator List of AAGUIDs to manage.
Block is the recommend value to set.List of Authenticator AAGUIDs List the FIDO2 security key AAGUID of all the types of authenticators that you want to allow or block.
Each authenticator should provide an Authenticator Attestation GUID (AAGUID) during registration. An AAGUID is a 128-bit identifier that indicates the type, for example make and model of the authenticator. The AAGUID is represented as a string, for example7a98c250-6808-11cf-b73b-00aa00b117a7, consisting of 5 hex strings separated by a dash (-).Show FIDO2 Sign-in Dialog Enabled by default. If this option is enabled, when users log in, they are shown the following dialog that gives them the option of signing in with a FIDO2 authenticator or signing in another way.
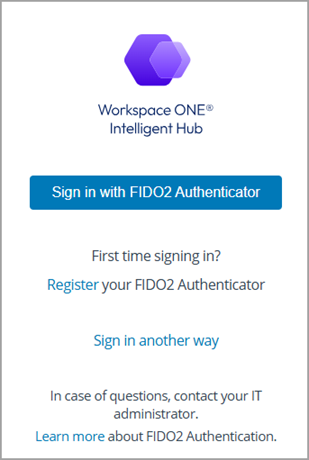
Note: The information and link to register the FIDO2 authenticator appears on this dialog only if the Enable Registration During Login option is selected.
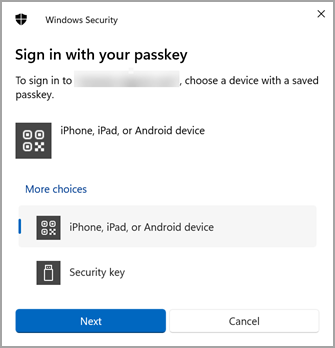
If the Show FIDO2 Sign-in Dialog option is deactivated, when users log in, the above dialog does not appear and users are prompted directly for FIDO2 authentication. For example, the following dialog appears on Windows:
-
Click SAVE.
-
Navigate to the Integrations > Identity Provider page and select the built-in identity provider that you already configured.
-
In the Authentication Methods section, select FIDO2.
-
Click Save.
-
What to do next
Create a FIDO2 registration policy rule and a FIDO2 authentication policy rule in Policies. See Create FIDO2 Authentication Policies in Omnissa Access.
Was this page helpful?