The tool's built-in template contains a list of properties and recommended values for optimizing a standard operating system. The template is an XML file located within a folder whose name contains the string Templates which resides within the Horizon Windows OS Optimization Tool's %ProgramData area. You can edit the template file in the tool UI or with text editor such as Notepad. You can also export the file to another location to edit it.
As of this writing, the default name of the built-in template file is Windows 10, Windows 11, and Server 2019, 2022.xml. Commas and spaces are in the file name.
Note: You can use this same built-in template file (Windows 10, Windows 11, and Server 2019, 2022.xml) when optimizing Windows 11 23H2 and Windows 11 24H2.
You can view the detail of what action is taken by a particular setting by looking at the template in My Templates in the Windows OS Optimization Tool for Horizon. Optionally, you can export the template to an XML file and use an editor, such as Notepad++, to search for the entry you are interested in.
Customizing templates
Beyond its built-in optimization capabilities, the Windows OS Optimization Tool for Horizon enables you to create custom templates. Using the Windows OS Optimization Tool for Horizon template editor, you can create and apply your own optimizations.
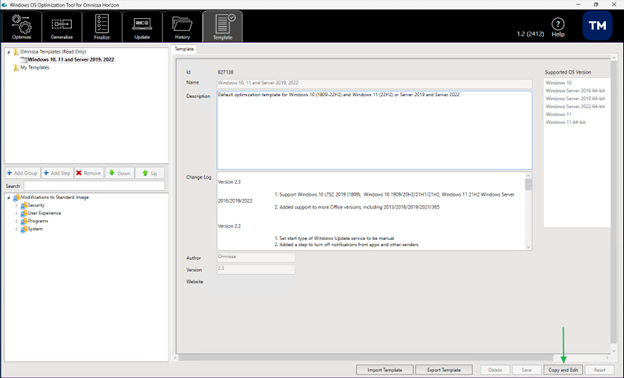
The built-in templates are read-only, so you do not have to worry about accidentally changing them. You can copy a built-in template to create your own version that is editable.
You can customize templates in the following ways:
- Add or remove a group or step
- Change the order of the steps
- Edit the properties of steps and their action types
- Execute particular steps on different operating systems
Note: If you have not saved your changes, you can remove all your changes by clicking the Reset button.
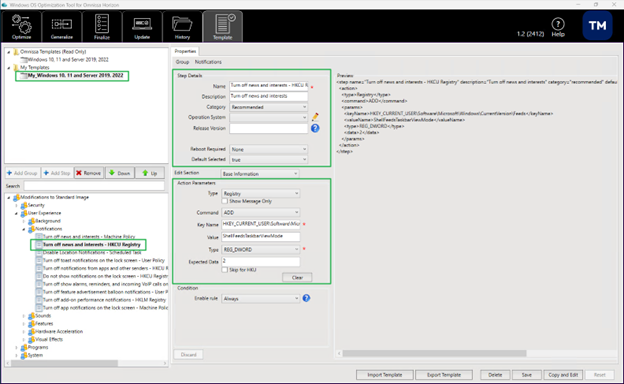
In the example above, the built-in Windows 10, 11 and Server 2019, 2022 template has been copied. This allows you to edit and change settings.
- Note the Default Selected option in the Step Details area. This defines whether this item and setting will be selected in the template by default.
- The Preview section shows the setting that will be applied.
Note: All of the steps below describe actions using the Windows OS Optimization Tool for Horizon user interface.
Groups
A group is a set of optimization settings that are organized as a category, such as Apply HKLM Settings. You can add, edit, or remove a group to customize a template.
Add groups
You can add a group to an existing or new template.
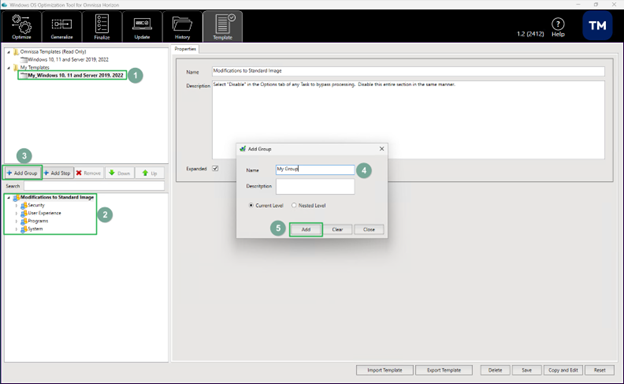
- Click the Template tab, and from the Template list, select the template you want to modify.
- Select an existing group or level where you want to create the group.
- Click the Add Group button.
- In the Add Group dialog box:
- Enter a name for the group.
- Enter a description.
- Select either Current Level or Nested Level:
- The current level option adds the group to the same level as the selected group.
- The nested level option adds the group as a subgroup of the selected group.
- Click Add.
- Click Save.
Rename existing groups
You can rename an existing group.
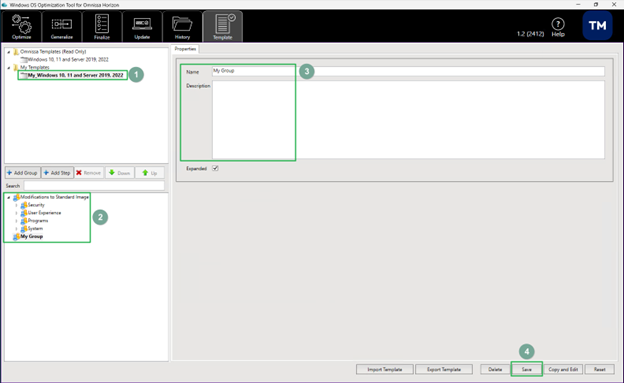
- Click the Template tab, and from the Template Name menu, select the template.
- Select the group to edit.
- Change the name and description of the group.
- Click Save.
Remove groups
You can remove a group from a template. You can also remove a group that is nested in another group.
- Click the Template tab, and from the Template Name menu, select the template.
- Right-click the group to remove and click Remove.
- Click Save.
Steps
A step is an optimization setting within a group. You can create and add Steps and edit, reorder, or remove them to customize a template.
Add steps
You can add a new step under a group.
- Click the Template tab, and from the Template Name menu, select the template to edit.
- Right-click the Group to which you want to add a step and click Add Step.
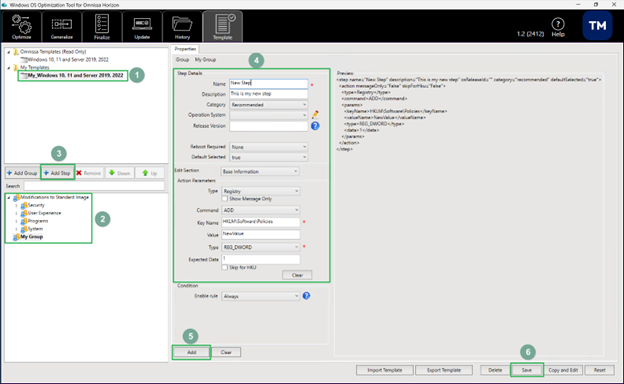
- In the Step Details section, add information about the step.
- Provide a name and optional description for the step.
- Select the values for Category, Reboot Required, Operating System, Release Version, and Default Selected.
Release Version allows you to specify which versions of Windows 10 this setting applies to.
- To apply to all versions, leave blank.
- Specify multiple entries, comma separated.
- If the setting applies to a certain version, specify the version number (for example, 1709).
- If the setting applies to a certain version and later, use the + symbol after the version number (for example, 1809+).
- Specify a range of versions to include (for example, 1809-2004).
- Specify a certain version to omit (for example, !1903).
- Specify a list of versions to omit (for example, !(1607,1809,1909)).
- Specify a range of versions to omit (for example, !1507-1809).
- Combine the above, separated with commas to specify more complex scenarios:
- 1709+, !(1809-1909) – Apply to 1709 and all versions after apart from 1809, 1903 and 1909.
- 1809-2004, !1903 – Apply to 1809, 1909 and 2004 but not 1903. It would also not apply to any version after 2004.
- Select what type of step this is. In most cases, this can be left as the default Base Information:
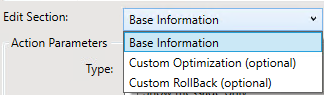
Note: Custom Optimization is used to add an additional operation during optimization, and Custom RollBack is used to add an additional operation during rollback. Entering information for one Action Type does not negate any information already entered for another Action Type. These operations are additive.
- Select the Action parameters.
After you select the action parameter type from the Type drop-down menu, the text box names change according to your selection.
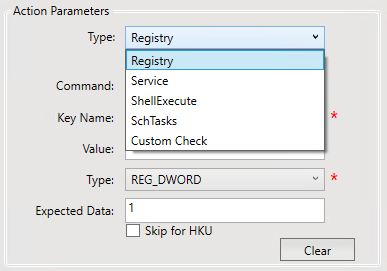
The text box names and values for each action parameter type are described in the following sub-steps and tables.
If configuring a registry setting, provide the following information for the Registry action parameter type.
Parameters for a registry step type
| Text Box | Description and Values |
|---|---|
Command | Command to execute. The options are:
|
Key Name | The registry path where the registry key is located |
Value | The name of the registry key being edited |
Type | Data type of the specified value. The supported data types are:
|
Expected Data | The value of the registry key |
Caution: Do not use a DELETEKEY or DELETEVALUE command unless you are certain of the effect it will have.
If configuring a service, provide the following information for the Service action parameter type:
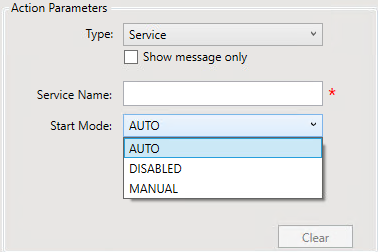
Parameters for a service step type
Text Box | Description and Values |
|---|---|
Service Name | Name of a service |
Start Mode | Startup mode for the service. The options are:
|
If running a command, provide the following information for the ShellExecute action parameter type:
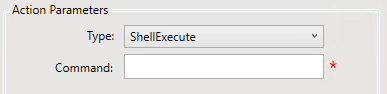
Parameters for the ShellExecute type
| Text Box | Description and Values |
|---|---|
| Command | The command to execute |
If configuring a Scheduled Task, provide the following information for the SchTasks action parameter type:
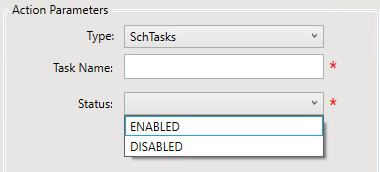
Parameters for the SchTasks type
Text Box | Description and Values |
|---|---|
Task Name | The full path of the task as it appears in Task Scheduler. For example: Microsoft\Office\Office Automatic Updates |
Status | The supported status values are:
|
- Click Add to save the new step.
- Click Save to save the template.
Edit steps
You can edit an existing step under a group.
- Click the Template tab, and from the Template Name menu, select the template to edit.
- Click the step to edit.
- Edit the step information.
- Click Save, to save the template.
Remove steps
You can remove a step from a template.
- Click the Template tab, and from the Template Name drop-down menu, select the template to edit.
- Click the Step to remove and click Remove.
- Click Save, to save the template.
Change the order of steps
You can change the order of the Steps within a template.
- Click the Template tab, and from the Template Name drop-down menu, select the template to edit.
- Click a Step to move and click Up or Down to move it.
- Click Save, to save the template.
Create a Custom Template by Exporting the Default Template
You can create a new template by editing the built-in template.
You export the default template, edit it, and then import it into the Windows OS Optimization Tool for Horizon.
-
In the tool's UI, click Export Template.
-
Select the folder where you want to save the template.
-
Edit the XML file as appropriate and save it.
Note: You can revert the changes you made by clicking Reset. This works only if you click Revert before saving the edited file.
-
Click Import Template and select the edited XML file.
The imported template is now available for use with the tool.
Was this page helpful?