After your Windows Desktop and Windows Server devices are enrolled and configured, manage the devices using the Workspace ONE UEM console. The management tools and functions enable you to monitor your devices and remotely perform administrative functions. Monitoring and administrative management functions on Windows Desktop and Windows Server devices are largely the same. Differences are called out in the respective capability sections. The term Windows devices is used to describe both Windows Desktop and Windows Server devices.
You can manage all your devices from the Workspace ONE UEM console. The Dashboard is a searchable, customizable view that you can use to filter and find specific devices. This feature makes it easier to perform administrative functions on a particular set of devices. The Device List View displays all the devices currently enrolled in your Workspace ONE UEM environment and their status. The Device Details page provides device-specific information such as profiles, apps, Workspace ONE Intelligent Hub version and which version of any applicable OEM service currently installed on the device. You can also perform remote actions on the device from the Device Details page that are platform-specific.
Device Dashboard
As devices are enrolled, you can manage them from the Device Dashboard in Workspace ONE UEM.
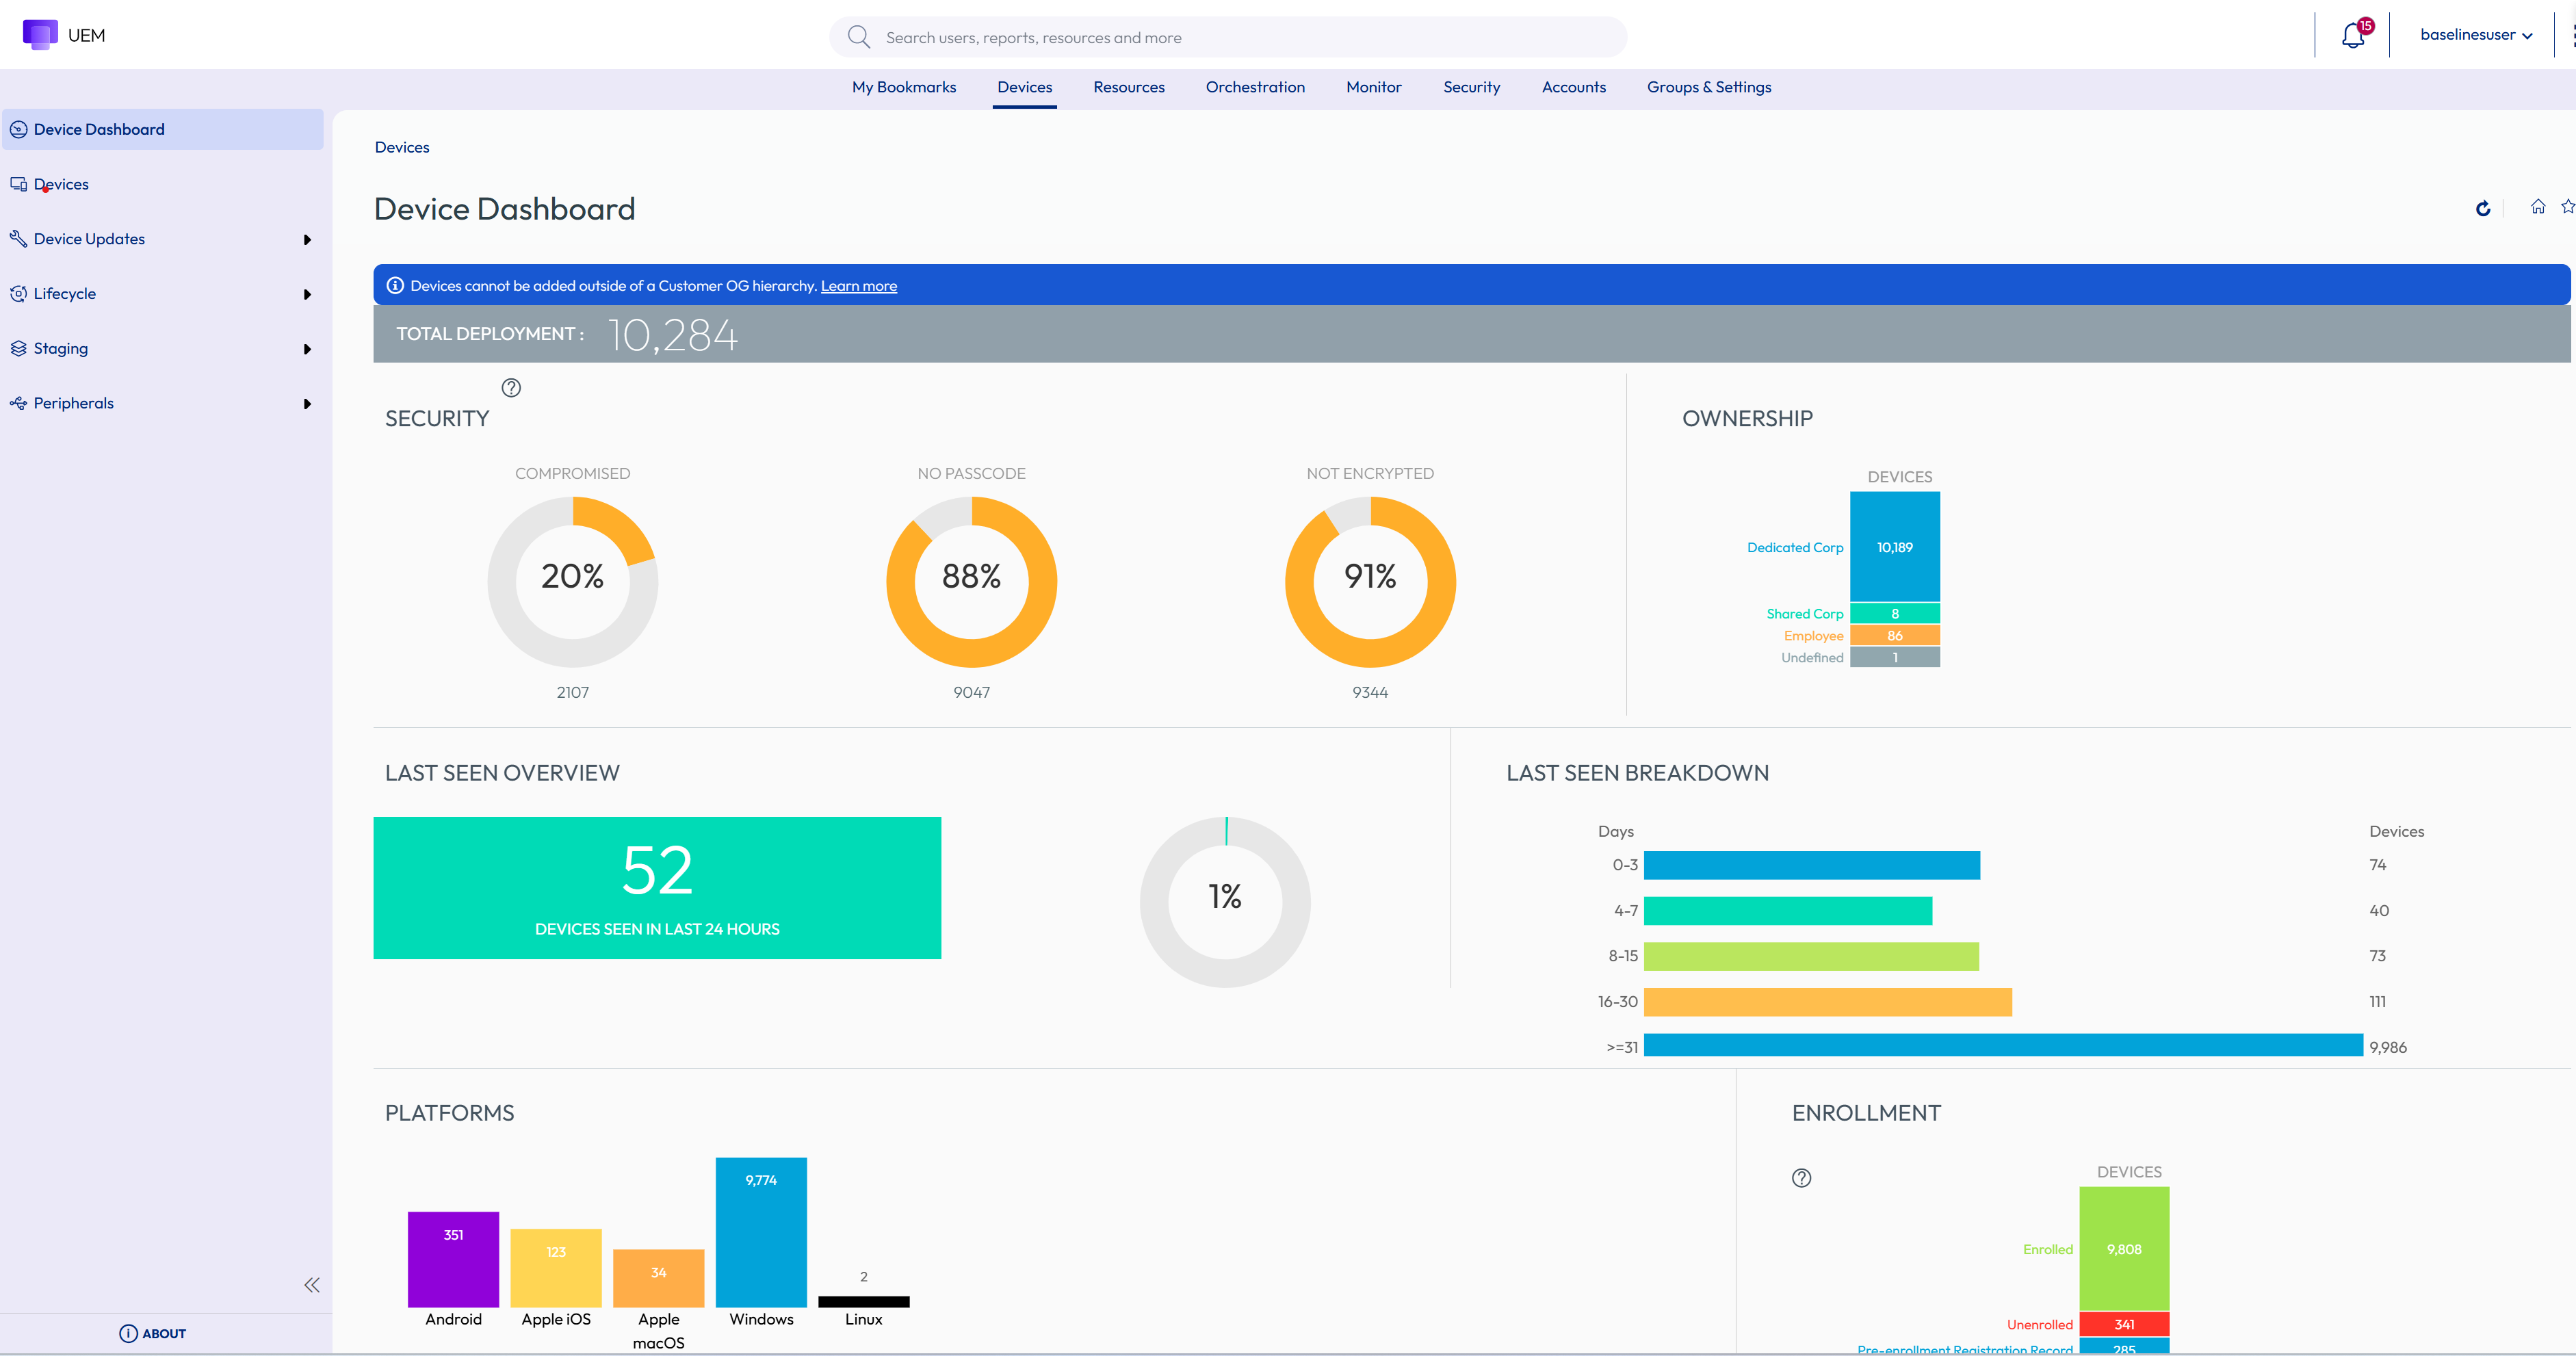
The Device Dashboard provides a high-level view of your entire fleet and allows you to act on individual devices quickly.
You can view graphical representations of relevant device information for your fleet, such as device ownership type, compliance statistics, and platform and OS breakdowns. You can access each set of devices in the presented categories by selecting any of the available data views from the Device Dashboard.
From the List View, you can take administrative action: send messages, lock devices, delete devices, and change groups associated with the device.
-
Security – View the top causes of security issues in your device fleet. Selecting any of the doughnut charts displays a filtered Device List view comprised of devices affected by the selected security issue. If supported by the platform, you can configure a compliance policy to act on these devices.
- Compromised – The number and percentage of compromised devices (jailbroken or rooted) in your deployment.
- No Passcode – The number and percentage of devices without a passcode configured for security.
- Not Encrypted – The number and percentage of devices that are not encrypted for security purposes. This reported figure excludes Android SD Card encryption. Only those Android devices lacking disc encryption are reported in the donut graph.
-
Ownership – View the total number of devices in each ownership category. Selecting any of the bar graph segments displays a filtered Device List view comprised of devices affected by the selected ownership type.
-
Last Seen Overview/Breakdown – View the number and percentage of devices that have recently communicated with the Workspace ONE UEM MDM server. For example, if several devices have not been seen in over 30 days, select the corresponding bar graph to display only those devices. You can then select all these filtered devices and send out a query command so that the devices can check-in.
-
Platforms – View the total number of devices in each device platform category. Selecting any of the graphs displays a filtered Device List view comprised of devices under the selected platform.
-
Enrollment – View the total number of devices in each enrollment category. Selecting any of the graphs displays a filtered Device List view comprised of devices with the selected enrollment status.
-
Operating System Breakdown – View devices in your fleet based on operating system. There are separate charts for each supported OS. Selecting any of the graphs displays a filtered Device List view comprised of devices running the selected OS version.
Device List View
Use the Device List View in Workspace ONE UEM to see a full listing of devices in the currently selected organization group.
The Last Seen column displays an indicator showing the number of minutes elapsed since the device has checked-in. The indicator is red or green, depending on how long the device is inactive. The default value is 480 minutes (8 hours) but you can customize this value by navigating to Groups & Settings > All Settings > Devices & Users > General > Advanced and change the Device Inactivity Timeout (min) value.
Select a device-friendly name in the General Info column at any time to open the details page for that device. A Friendly Name is the label you assign to a device to help you differentiate devices of the same make and model.
Sort by columns and configure information filters to review activity based on specific information. For example, sort by the Compliance Status column to view only devices that are currently out-of-compliance and target only those devices. Search all devices for a friendly name or user name to isolate one device or user.
Customize Device List View Layout
Display the full listing of visible columns in the Device List view by selecting the Layout button and select the Custom option. This view enables you to display or hide Device List columns per your preferences.
There is also an option to apply your customized column view to all administrators at or below the current organization group (OG). For instance, you can hide 'Asset Number' from the Device List views of the current OG and of all the OGs underneath.
Once all your customizations are complete, select the Accept button to save your column preferences and apply this new column view. You can return to the Layout button settings at any time to tweak your column display preferences.
Some notable device list view custom layout columns include the following.
- Android Management
- SSID (Service Set Identifier or Wi-Fi network name)
- Wi-Fi MAC Address
- Wi-Fi IP Address
- Public IP Address
Exporting List View
Select the Export button to save an XLSX or CSV (comma-separated values) file of the entire Device List View that can be viewed and analyzed with MS Excel. If you have a filter applied to the Device List View, the exported listing reflects the filtered results.
Search in Device List View
You can search for a single device for quick access to its information and take remote action on the device.
To run a search, navigate to Devices > List View, select the Search List bar and enter a user name, device-friendly name, or other device-identifying element. This action initiates a search across all devices, using your search parameter, within the current organization group and all child groups.
Device List View Action Button Cluster

With one or more devices selected in the Device List View, you can perform common actions with the action button cluster including Query, Send [Message], Lock, and other actions accessed through the More Actions button.
Available Device Actions vary by platform, device manufacturer, model, enrollment status, and the specific configuration of your Workspace ONE UEM console.
Remote Assist
You can start a Remote Assist session on a single qualifying device allowing you to view the screen and control the device. This feature is ideal for troubleshooting and performing advanced configurations on devices in your fleet.
To use this feature, you must satisfy the following requirements.
- You must own a valid license for Workspace ONE Assist.
- You must be an administrator with a role assigned that includes the appropriate Assist permissions.
- The Assist app must be installed on the device.
- Supported device platforms:
- Android
- iOS
- macOS
- Windows Desktop
- Windows Server
- Windows Mobile
Select the check box to the left of a qualifying device in the Device List View and the Remote Assist button displays. Select this button to initiate a Remote Assist session.
Device Details Page
Use the Device Details page in Workspace ONE UEM to track detailed device information for Windows devices and quickly access user and device management actions. You can access Device Details by selecting the Friendly Name from the Device List View, using one of the Dashboards, or with any of the search tools.
Windows Notification Service Details
You can see the status of device communications with the Windows Notification Service(WNS) from the Network tab of the Device Details page. The WNS supports sending your devices notifications and it is not used for sensitive information. If a device is not currently online, the service caches the notifications until the device connects again. For more information on WNS, refer to Push notification support for device management.
Note: Enhanced Push Notification Reliability: Beginning 2410, the Workspace ONE Intelligent Hub silently auto-launches in the background following a fresh install or upgrade. This ensures the reliable delivery of push notifications—even on devices where the app hasn’t been manually opened—keeping your employees informed and connected without additional effort. The minimum UEM version necessary to support this is 2410 and is supported on Windows Desktop devices only. The WNS statuses include the following:
- WNS Server Status - displays the state of your WNS server.
- Last WNS Renewal Request - The date and time of last attempt made to renew the Windows Notification Services (WNS) connection with the device. This connection allows Workspace ONE UEM to query and push policies to the device (Networking, Battery Sense, and Data Sense conditions permitting).
- Next WNS Get Request: - The date and time of the next scheduled attempt to renew the connection between WNS and the device.
- WNS Channel URI- The WNS communication endpoint that devices and Workspace ONE UEM use. This endpoint uses the following format:
https://*.notify.windows.com/?token=_{TOKEN}.
More Actions
The More Actions drop-down on the Device Details page enables you to perform remote actions over the air to the selected device.
The actions vary depending on factors, such as Workspace ONE UEM console settings, enrollment status and platform. For example, Windows Server devices do not support or have the Device Wipe command as this is an OMA-DM and therefore Windows Desktop only command.
-
Lock Device – Send an MDM command to lock a selected device, rendering it unusable until it is unlocked.
Important: When locking a device, an enrolled user must be signed into the device for the command to process. The lock command locks the device and any user signed in must reauthenticate with Windows. If an enrolled user is signed-in to the device, a lock device command locks the device. If an enrolled user is not signed in, the lock device command is not processed.
Query:
-
Device Information (Query) – Send a query command to the device to return information on the device such as friendly name, platform, model, organization group, operating system version, and ownership status.
-
Apps (Query) – Send a query command to the device to return a list of installed applications.
The Apps (Query) action requires an active enrolled user login.
-
Certificates (Query) – Send a query command to the device to return a list of installed certificates.
The Certificates (Query) requires an active enrolled user login.
-
Baselines (Query) – Send a query command to the device to return a list of samples.
-
Security (Query) – Send a query command to the device to return the list of active security measures (device manager, encryption, passcode, certificates, and so on).
-
Query All – Send a query command to the device to return a list of installed applications (including Workspace ONE Intelligent Hub, where applicable), books, certificates, device information, profiles, and security measures.
Management:
-
Enterprise Wipe – Enterprise Wipe a device to unenroll and remove all managed enterprise resources including applications and profiles.
- This action cannot be undone and re-enrollment is required before Workspace ONE UEM can manage this device again.
- This device action includes options to prevent future re-enrollment and a Note Description text box for you to add information about the action.
- Use the Managed Resources profile to control which resources are kept after a device is unenrolled as part of an Enterprise Wipe or Delete Device action. Keep Managed Apps On Device, Keep Hub-managed Profiles on Device and Keep Baselines on Device enable each respective resource type to be kept on the device, depending upon the Windows OS of the device. Windows Desktop devices only support Keep Managed Apps On Device, whilst Windows Server devices support all three resource types.
The Managed Resources profile must be deployed and installed to the device prior to executing the Enterprise Wipe or Delete Device action. This feature is helpful on Windows Desktop devices when you want to quickly enroll a device to a new user and you do not want to wait for large apps to install on the reassigned Windows device. You cannot access this feature unless your Windows devices and apps meet these requirements below. - Workspace ONE UEM enables Software Distribution (SFD) by default for SaaS and on-premises deployments. The Software Distribution feature automatically deploys the App Deployment agent to Windows devices managed in your Workspace ONE UEM environment. If you disabled this feature, you must re-enable it to ensure the latest App Deployment agent is deployed to devices. The console sends the latest App Deployment agent with every console update and devices receive the update automatically.
- The apps you want to keep on devices after an enterprise wipe must be managed in Workspace ONE UEM. This feature does not work for unmanaged apps.
Note: Enterprise Wipe is not supported for cloud domain-joined devices.
-
Reboot Device – Reboot a device remotely, reproducing the effect of powering it off and on again.
-
Device Wipe – Send an MDM command to wipe a device clear of all data and operating system. This action cannot be undone.
-
Enterprise Reset – Enterprise Reset a device to factory settings, keeping only the Workspace ONE UEM enrollment.
Enterprise Reset restores a device to a Ready to Work state when a device is corrupted or has malfunctioning applications. It reinstalls the Windows OS while preserving user data, user accounts, and managed applications. The device will resync auto-deployed enterprise settings, policies, and applications after resync while remaining managed by Workspace ONE.
Admin:
-
Change Organization Group – Change the device's home organization group to another existing OG. Includes an option to select a static or dynamic OG.
If you want to change the organization group for multiple devices at a time, you must select devices for the bulk action. Use the Block selection method (using the shift-key) instead of the Global check box (next to the Last Seen column heading in the device list view).
-
Change Passcode - Change the device password on a Windows Desktop device enrolled with a basic user. This menu item does not support directory services. When you select to use this option, Workspace ONE UEM generates a new password and displays it in the Workspace ONE UEM console. Use the new password to unlock the device.
-
Delete Device – Delete and unenroll a device from the console. Sends the enterprise wipe command to the device that gets wiped on the next check-in and marks the device as Delete In Progress on the console. If the wipe protection is turned off on the device, the issued command immediately performs an enterprise wipe and removes the device representation in the console. Use the Managed Resources profile to control which resources are kept after a device is unenrolled as part of an Enterprise Wipe or Delete Device action. Keep Managed Apps On Device, Keep Hub-managed Profiles on Device and Keep Baselines on Device enable each respective resource type to be kept on the device, depending upon the Windows OS of the device. Windows Desktop devices only support Keep Managed Apps On Device, whilst Windows Server devices support all three resource types. The Managed Resources profile must be deployed and installed to the device prior to executing the Enterprise Wipe or Delete Device action. This feature is helpful on Windows Desktop devices when you want to quickly enroll a device to a new user and you do not want to wait for large apps to install on the reassigned Windows device. You cannot access this feature unless your Windows devices and apps meet those requirements.
-
Edit Device – Edit device information such as Friendly Name, Asset Number, Device Ownership, Device Group Device Category.
-
Force BIOS Password Reset – Force the device to reset the BIOS password to a new auto-generated password.
-
Remote Management – Take control of a supported device remotely using this action, which starts a console application that enables you to perform support and troubleshoot on the device.
-
Request Device Log – Request the debug log for the selected device, after which you can view the log by selecting the More tab and selecting Attachments > Documents. You cannot view the log within the Workspace ONE UEM console. The log is delivered as a ZIP file that can be used to troubleshoot and provide support.
Starting with Hub clients 25.05+ a feature flag (WindowsLogFilterFeatureFlag) has been added that when enabled, allows admins to request a log from three components instead of two and filter for targeted log retrieval.
- Hub: provides logs from multiple agents running on the device (Intelligent Hub, App Deployment Agent, Provisioning Agent, Factory Provisioning, MDM).
- System: provides system-level logs (Windows, PCRefresh).
- Other: will now provide logs from Assist, DEEM Telemetry Agent, Workspace ONE Tunnel.
For targeted log filtering, you can now search by Duration and Hub Components. The duration timeframe for filtering can be set to either all the logs, or your choice from the last 1,3,7,or 14 days.
Note: Automatic merging of large Device logs for enhanced troubleshooting: Beginning 2410, admins can now collect and access large device logs more efficiently. Previously, the process involved uploading multiple small files from Workspace ONE Hub to UEM, requiring admins to download and merge numerous separate files, which was time consuming for troubleshooting large log files. With the latest update, logs are uploaded and automatically merged into a single file (up to 200MB), reducing the effort and time needed to troubleshoot devices. Minimum UEM version necessary to support this is v2410
-
Repair Hub - Repair the Workspace ONE Intelligent Hub on Windows devices to re-establish communication between the console and the device.
Certain events might impact the communication between the device and the console. Some examples are stopping key Workspace ONE UEM services, removing or the corruption of Workspace ONE Intelligent Hub related files, and the failing of upgrades of Workspace ONE Intelligent Hub components due to network interruptions.
The Repair Hub command takes steps to remediate these issues. After the Hub is successfully repaired, it checks for commands to recover HMAC. If there were HMAC errors, it automatically recovers HMAC. The Repair Hub also checks for a version upgrade. If an update is detected and is automatic, the updates to the Hub are enabled, and the Hub is upgraded.
-
Send Message – Send a message to the user of the selected device. Select between Email, Push Notification (through AirWatch Cloud Messaging), and SMS.
-
View BIOS Password – View the BIOS password for the device that the Workspace ONE UEM console auto-generated. You see the Last Password Applied and the Last Password Submitted.
-
Suspend BitLocker - You can now suspend and resume BitLocker encryption from the console. This feature is helpful for users who do not have permissions to manage BitLocker but need help with their device.
When you select to Suspend BitLocker for a device, the console displays several options and one of them is for Number of Reboots. Select the number of times you think the device restarts for the applicable scenario. For example, helping a user update their BIOS can require the system to reboot twice, so select 3. This value gives the system one extra reboot with encryption suspended to ensure that the BIOS updates properly before resuming BitLocker.
However, if you do not know how many reboots a task requires, select a larger value. You can use the More Actions > Resume BitLocker after you have completed the task.
Manage Your Microsoft HoloLens Devices
Workspace ONE UEM supports enrolling and managing Microsoft HoloLens devices. You must use the native enrollment and management functionality to manage your Windows HoloLens devices.
Before you can manage your HoloLens devices using Workspace ONE UEM, you must apply the Licensing XML file to the devices. If you are using HoloLens 1 devices, you must apply the file before enrolling. For more information on applying licensing, see Unlock Windows Holographic for Business features. This step is not required for HoloLens 2 devices.
Enroll Your HoloLens Devices
You can enroll your Microsoft HoloLens devices into Workspace ONE UEM using native management functionality. You must use native Windows enrollment methods as HoloLens devices do not support Workspace ONE Intelligent Hub functionality. Enroll with one of the native MDM enrollment procedures, with or without Windows Auto Discovery.
Manage Your HoloLens Devices
After enrolling, you can apply supported profiles to your HoloLens devices using Workspace ONE UEM. For a list of the supported CSP, see CSPs supported in HoloLens devices.
Manage and Enroll Your Arm64 Devices
Workspace ONE UEM supports enrolling and managing ARM64 devices that are running Windows 11. Workspace ONE Intelligent Hub is supported on ARM64, allowing your ARM64 devices to be enrolled using the Hub or native MDM enrollment. After enrolling your devices, you can deploy and manage apps, apply sensors, scripts, and some profiles using Workspace ONE UEM. All OMADM profiles and Hub based Encryption profiles are currently supported on ARM64 devices.
Note: WMI based sensor queries are not supported on ARM64 devices. CIM based queries should be used instead. In general, CIM based sensor queries are recommended for all Windows devices.
Product Provisioning
Product provisioning enables you to create, through Workspace ONE UEM, products containing profiles, applications, files/actions, and event actions (depending on the platform you use). These products follow a set of rules, schedules, and dependencies as guidelines for ensuring your devices remain up to date with the content they need.
Product provisioning also encompasses the use of relay servers. These servers are FTP(S) servers designed to work as a go-between for devices and the Workspace ONE UEM console. Create these servers for each store or warehouse to store product content for distribution to your devices.
Managing Windows Device Updates
Windows device updates are now under the device profile. In the Workspace ONE UEM console navigate to: Resources > Profiles & Baselines > Profiles > Add > Select Add Profile > Windows > Windows Desktop > Device Profile > Windows Updates.
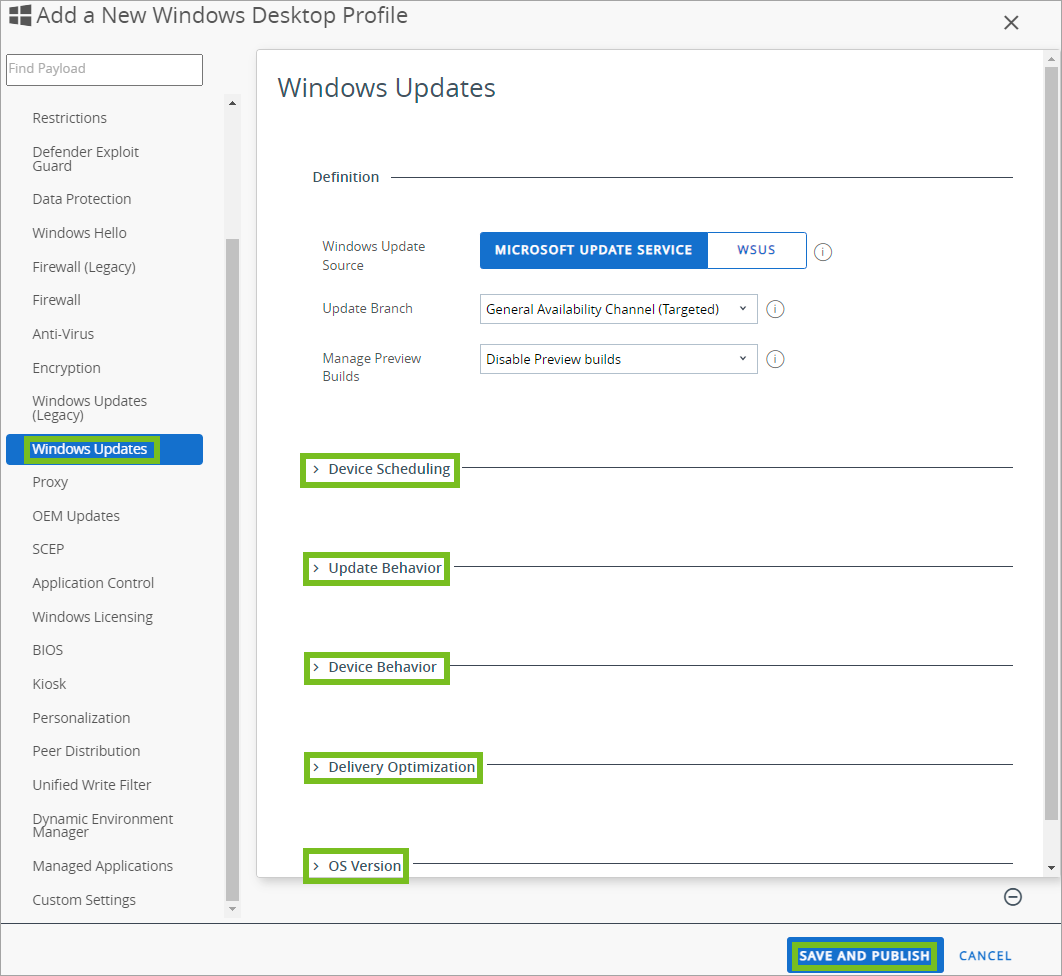
There are five categories that can be configured independently.
- Device Scheduling
- Update Behavior
- Device Behavior
- Delivery Optimization
- OS Version
Admins can customize these settings depending on their specific needs. The most frequently used settings are defaulted for each category. By selecting Enable or Disable you can configure these categories as needed. Remember when you are done configuring to select Save and Publish.
Resources - Device Updates
For Windows users, a feature has been added with 2406 that will allow for better update reporting. Because Windows has both Windows 10 and Windows 11 devices with different versions, this feature will provide an easy-to-understand overview showing every Windows Version in the organization group as well as the child organization. NOTE: This does require Modern Stack to be enabled for the environment.
To find devices that don't run on the latest Quality Update, check the revision overview to see the Version revision that identifies the installed Quality Update.
As the Admin, you can visually see what updates have and have not been delivered to each device, and can click on the sections to change their selections. You can filter or search by either an Update or Device Overview. Then, each of those categories also allow further filtering abilities through both the Filter as well as clicking on the table's column heading.
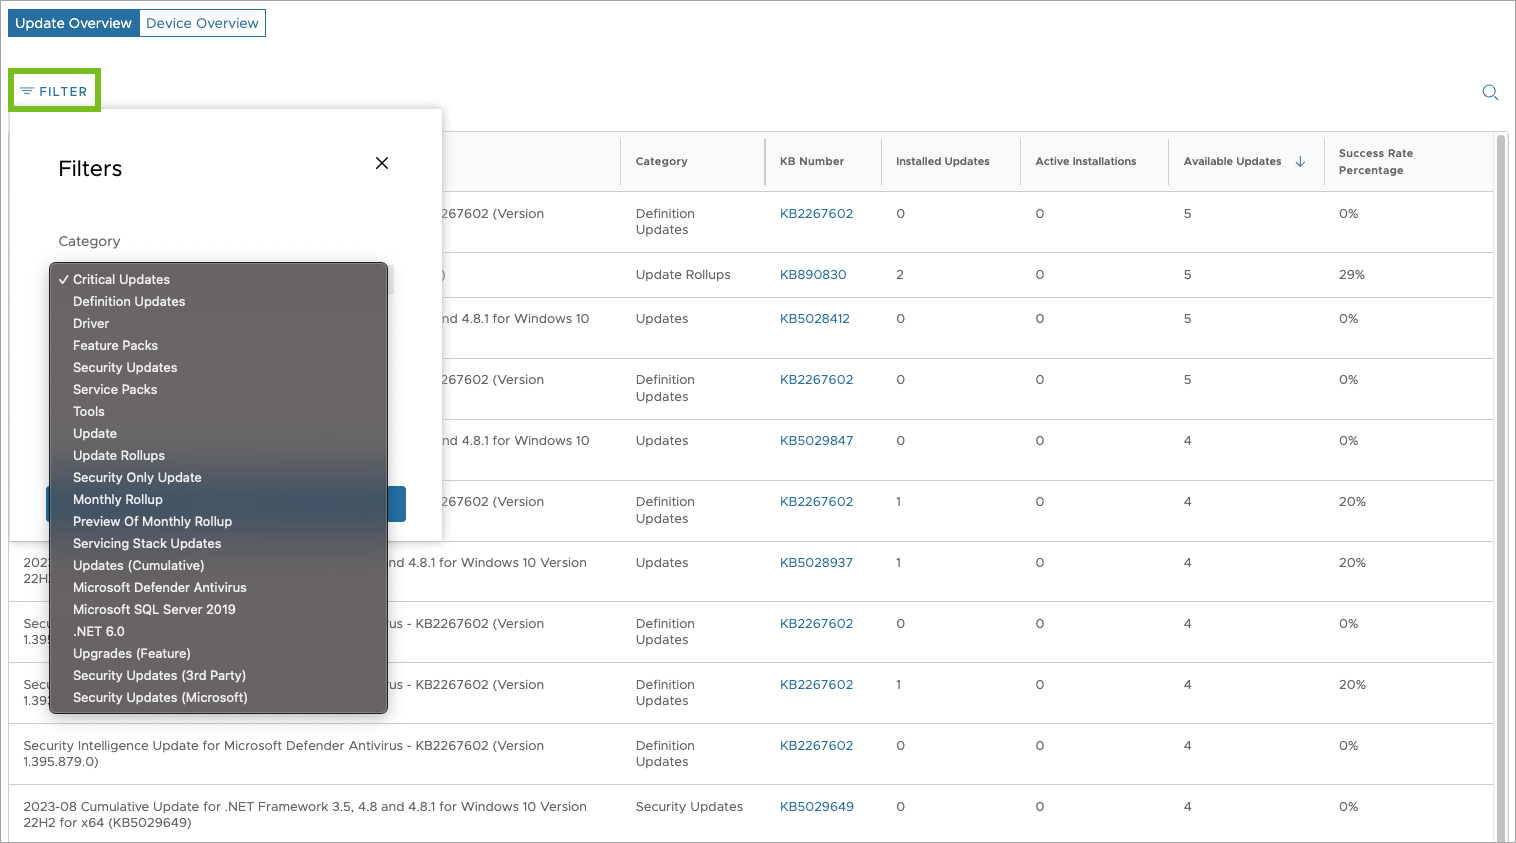
In your console under the Device Details > Device Updates, a feature has been added to view the devices associated with your updates. If you select the KB number and/or update title, you will then see the update overview. At the bottom it will now show the list the devices included in that update as well as their status overview. You can filter on that list as needed. We have also moved the KB column over to the left for easier access in the console.
Troubleshooting Feature & Quality Updates
Because Windows Updates can cause issues in combination with specific drivers or applications, three buttons were added to help admins troubleshoot these situations.
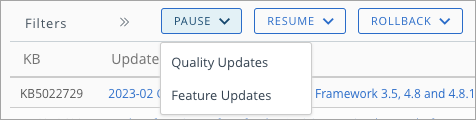
- Pause- this button allows a pause to both feature and quality updates before they go out (but only for 35 days).
- Resume- this button enables Windows Update search and installation again. Once you resume the updates, you will see that the registry for the start time will be cleared.
- Rollback- this button allows updates that were made but caused unforeseen issues to be temporarily returned to the previous version while you resolve the issue.
After any of these button commands are activated, the command will be queued on the device and the event log will stay empty. The command status will also not change but continue to show as pending. Success and or Failures will be shown in the troubleshooting tab in the console. For all button commands, 35 days is the maximum time allowed by Microsoft for any delay.
Granular Patch Management
Using Granular Patch Management, administrators can search for specific Windows Updates, set up specific deployment settings, and distribute updates on-demand to specific Windows 10/11 and Windows Server endpoints. This overrides the default Windows Update for phased deployments.
⚠️ Caution: Depending on the selected update, each file can be up to 5 GB in size. A single update may include multiple files, and all updates count toward the total storage quota. Once the storage limit is reached, no additional updates or applications can be added. Please note that inactive updates also count toward the storage quota.
Benefits of an emergency Windows Update patch deployment:
- Targeted patching for specific KBs - Administrators can search the Microsoft Windows Update catalog directly within Workspace ONE UEM and deploy specific updates by KB number, title, classification, or supported OS—without waiting for ring-based OS update policies.
- Delivers targeted update control following Windows Update approvals deprecation - Restores the ability to apply specific Windows Updates to chosen device sets, which was lost when Microsoft deprecated Windows Update approvals. This enables vulnerability management teams to immediately deploy targeted updates to exposed Windows 10, Windows 11, and Windows Server 2016 and later environments.
- Faster emergency response for zero‑day and critical issues - Combines a global Windows Updates metadata catalog with Targeted System Updates so security teams can quickly locate a critical or zero‑day patch and push it on-demand, without waiting for the next Windows Update for Business ring or monthly cumulative rollout.
- Consistent, catalog‑driven experience across tenants - A centralized global service maintains one standardized update catalog across all tenants, ensuring consistent patch search and selection while reducing administrator errors.
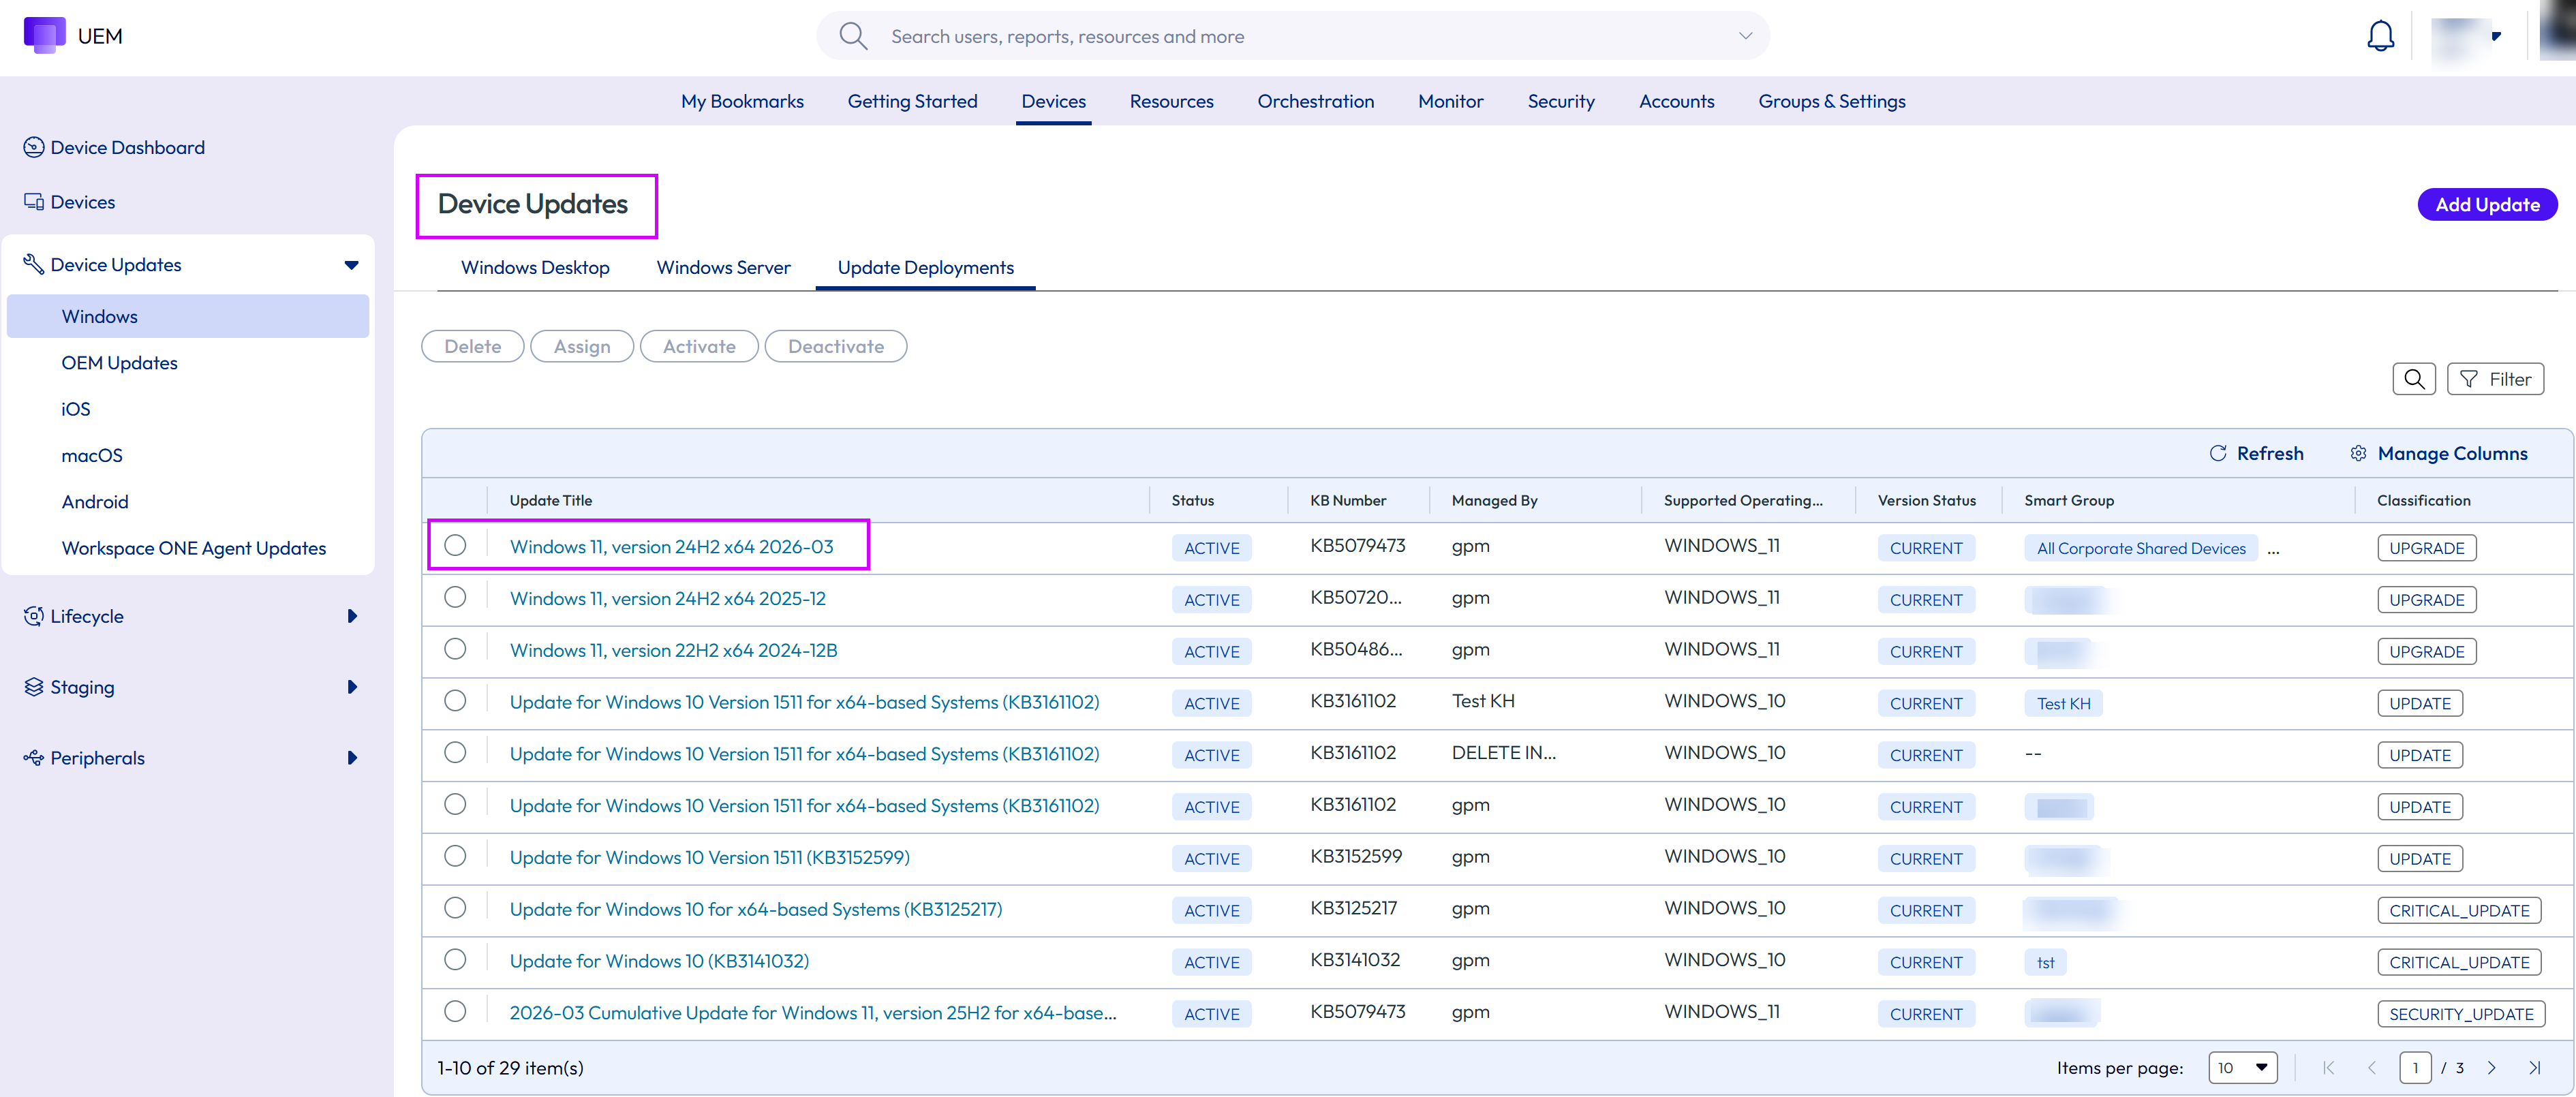
Admins can search for Windows Updates in the Workspace ONE UEM console by navigating to Devices > Device Updates > Windows > Update Deployments. The Update Deployments tab displays all Microsoft Windows Updates (KBs) available from Workspace ONE UEM and allows admins to deliver and install specific updates to targeted Windows devices. In the Update Deployments tab you can perform the following tasks:
- Activate a Windows Update deployment to begin distributing the selected update to targeted devices. Once activated, devices in the specified assignment groups will receive and install the update according to the configured deployment schedule.
- Deactivate a Windows Update deployment to stop distributing the update to targeted devices. Once deactivated, devices will no longer receive or install this update.
- Assign a Windows Update deployment to specific device groups, organizational groups, or individual devices to define which endpoints will receive the update. Assignment determines the deployment scope and ensures only intended devices download and install the patch. You can also exclude specific devices, device groups, or organizational groups that should not receive the update deployment.
- Delete an obsolete or invalid Windows Update deployment that is no longer valid, such as when a newer update is available; the update has been recalled by Microsoft, or the update is no longer applicable to your environment.
The following screenshot displays the Update Deployment screen, and the table below provides a detailed description of each setting available on this screen.
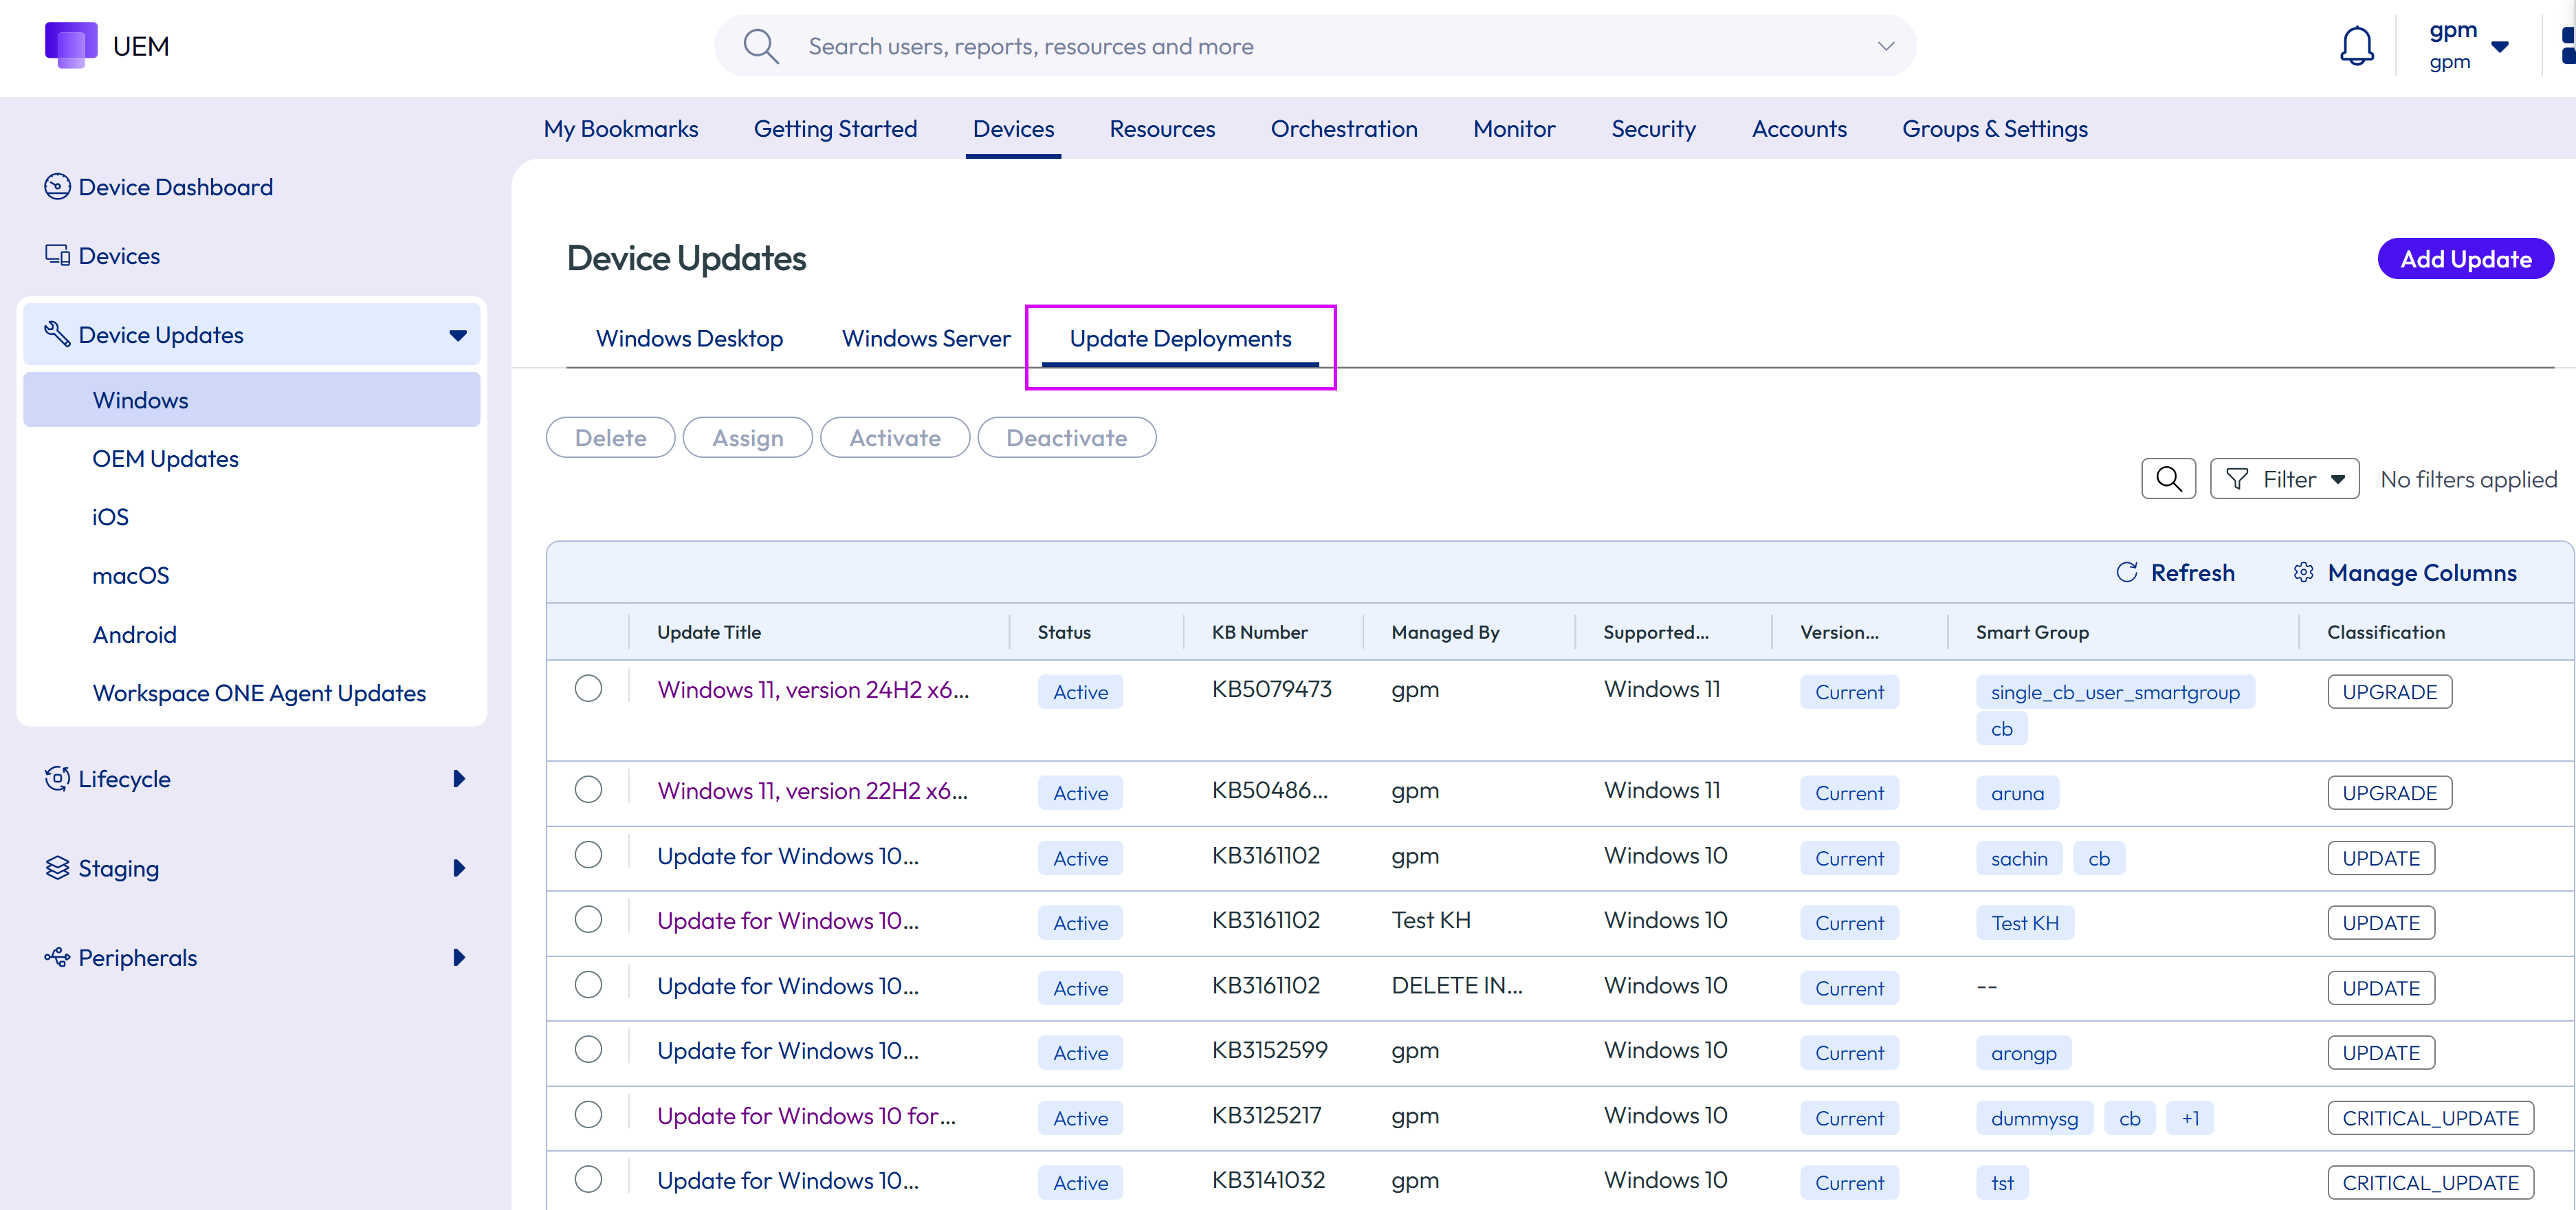
| Update Deployment Settings | Description |
|---|---|
| Update Title | Displays the specific Windows Update name and KB number being deployed to devices. |
| Status | Displays the status of the update deployment. - Active: The update is actively being deployed to targeted devices according to the configured schedule. - Inactive: Devices are not receiving or processing this update as the deployment has been paused or deactivated. - Import Failed: The update import from Microsoft's catalog failed, preventing deployment execution. - Import not started: Update import from the Microsoft catalog has not been initiated. |
| KB Number | Displays the Microsoft KB (Knowledge Base) update, which is a unique identification number (for example, KB500XXXX) for patches, security fixes, or feature updates released by Microsoft. |
| Managed By | Displays the Organization group associated with the Windows Update. |
| Supported Operating System | Displays the Windows versions and editions compatible with this update (for example, Windows 10, Windows 11, Server 2019) |
| Version Status | Displays the deployment version of the Windows Update and its current state. |
| Smart Group | Displays all the smart groups associated with the Windows Update. |
| Classification | Displays whether the Windows Update is an upgrade, security fix, feature update, or patch update and so on. |
Supported Admin Roles for Granular Patch Management
Granular Patch Management provides role-based access control to ensure that only authorized administrators can perform specific actions on targeted system updates. The following permissions define the level of access available to admin roles:
| Permission | Update Management | Description |
|---|---|---|
| Edit | Add targeted system update | Allows administrators to create and configure new targeted system updates for selected devices. |
| Edit | Edit targeted system update | Enables administrators to modify existing targeted system updates, including changes to configuration or deployment settings. |
| Edit | Delete targeted system update | Provdes the ability to remove targeted system updates that are no longer required. |
| Read | View targeted system update | Provides read-only access, allowing administrators to view details of targeted system updates without making any changes. |
Configure Update Deployments for Windows Devices
Configure update deployments to gain precise control over when and how Windows Update are distributed across your environment. Update Deployments feature enables you to search for specific Windows Updates, create targeted deployments, and push critical patches on-demand to selected Windows 10/11 and Windows Server devices independent of regular update schedules. The update deployment process consists of four main steps.
Step 1: Select Updates:
-
Navigate to Devices > Devices Updates > Windows > and click Update Deployments tab.
-
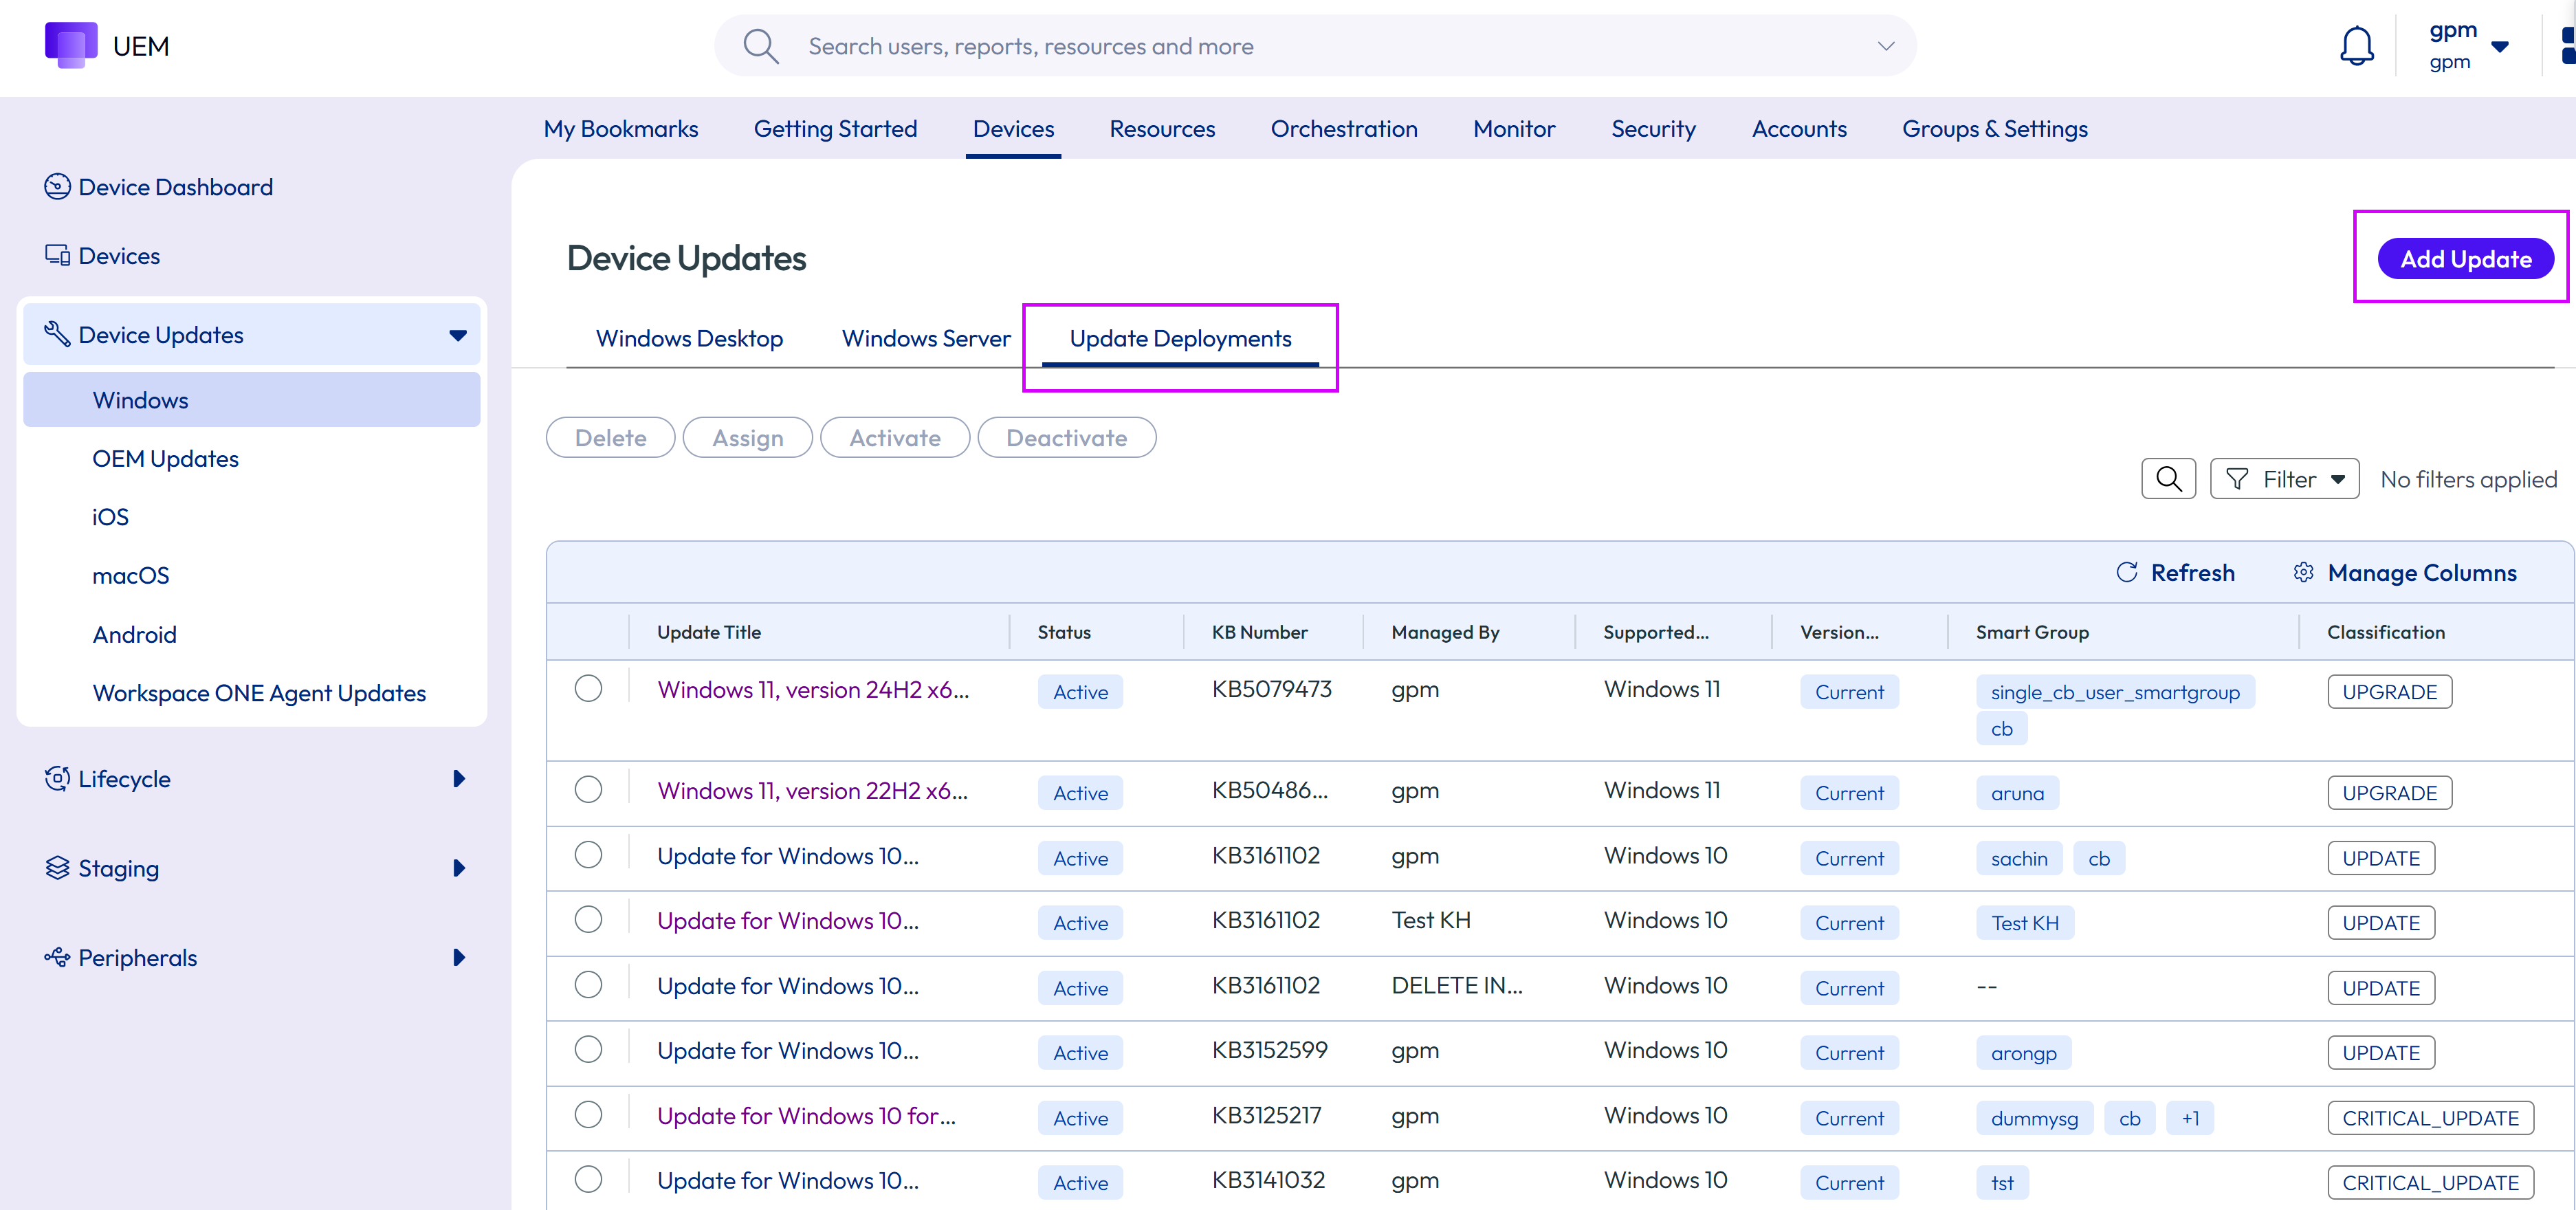
Click Add Update in the Update Deployments tab.
-
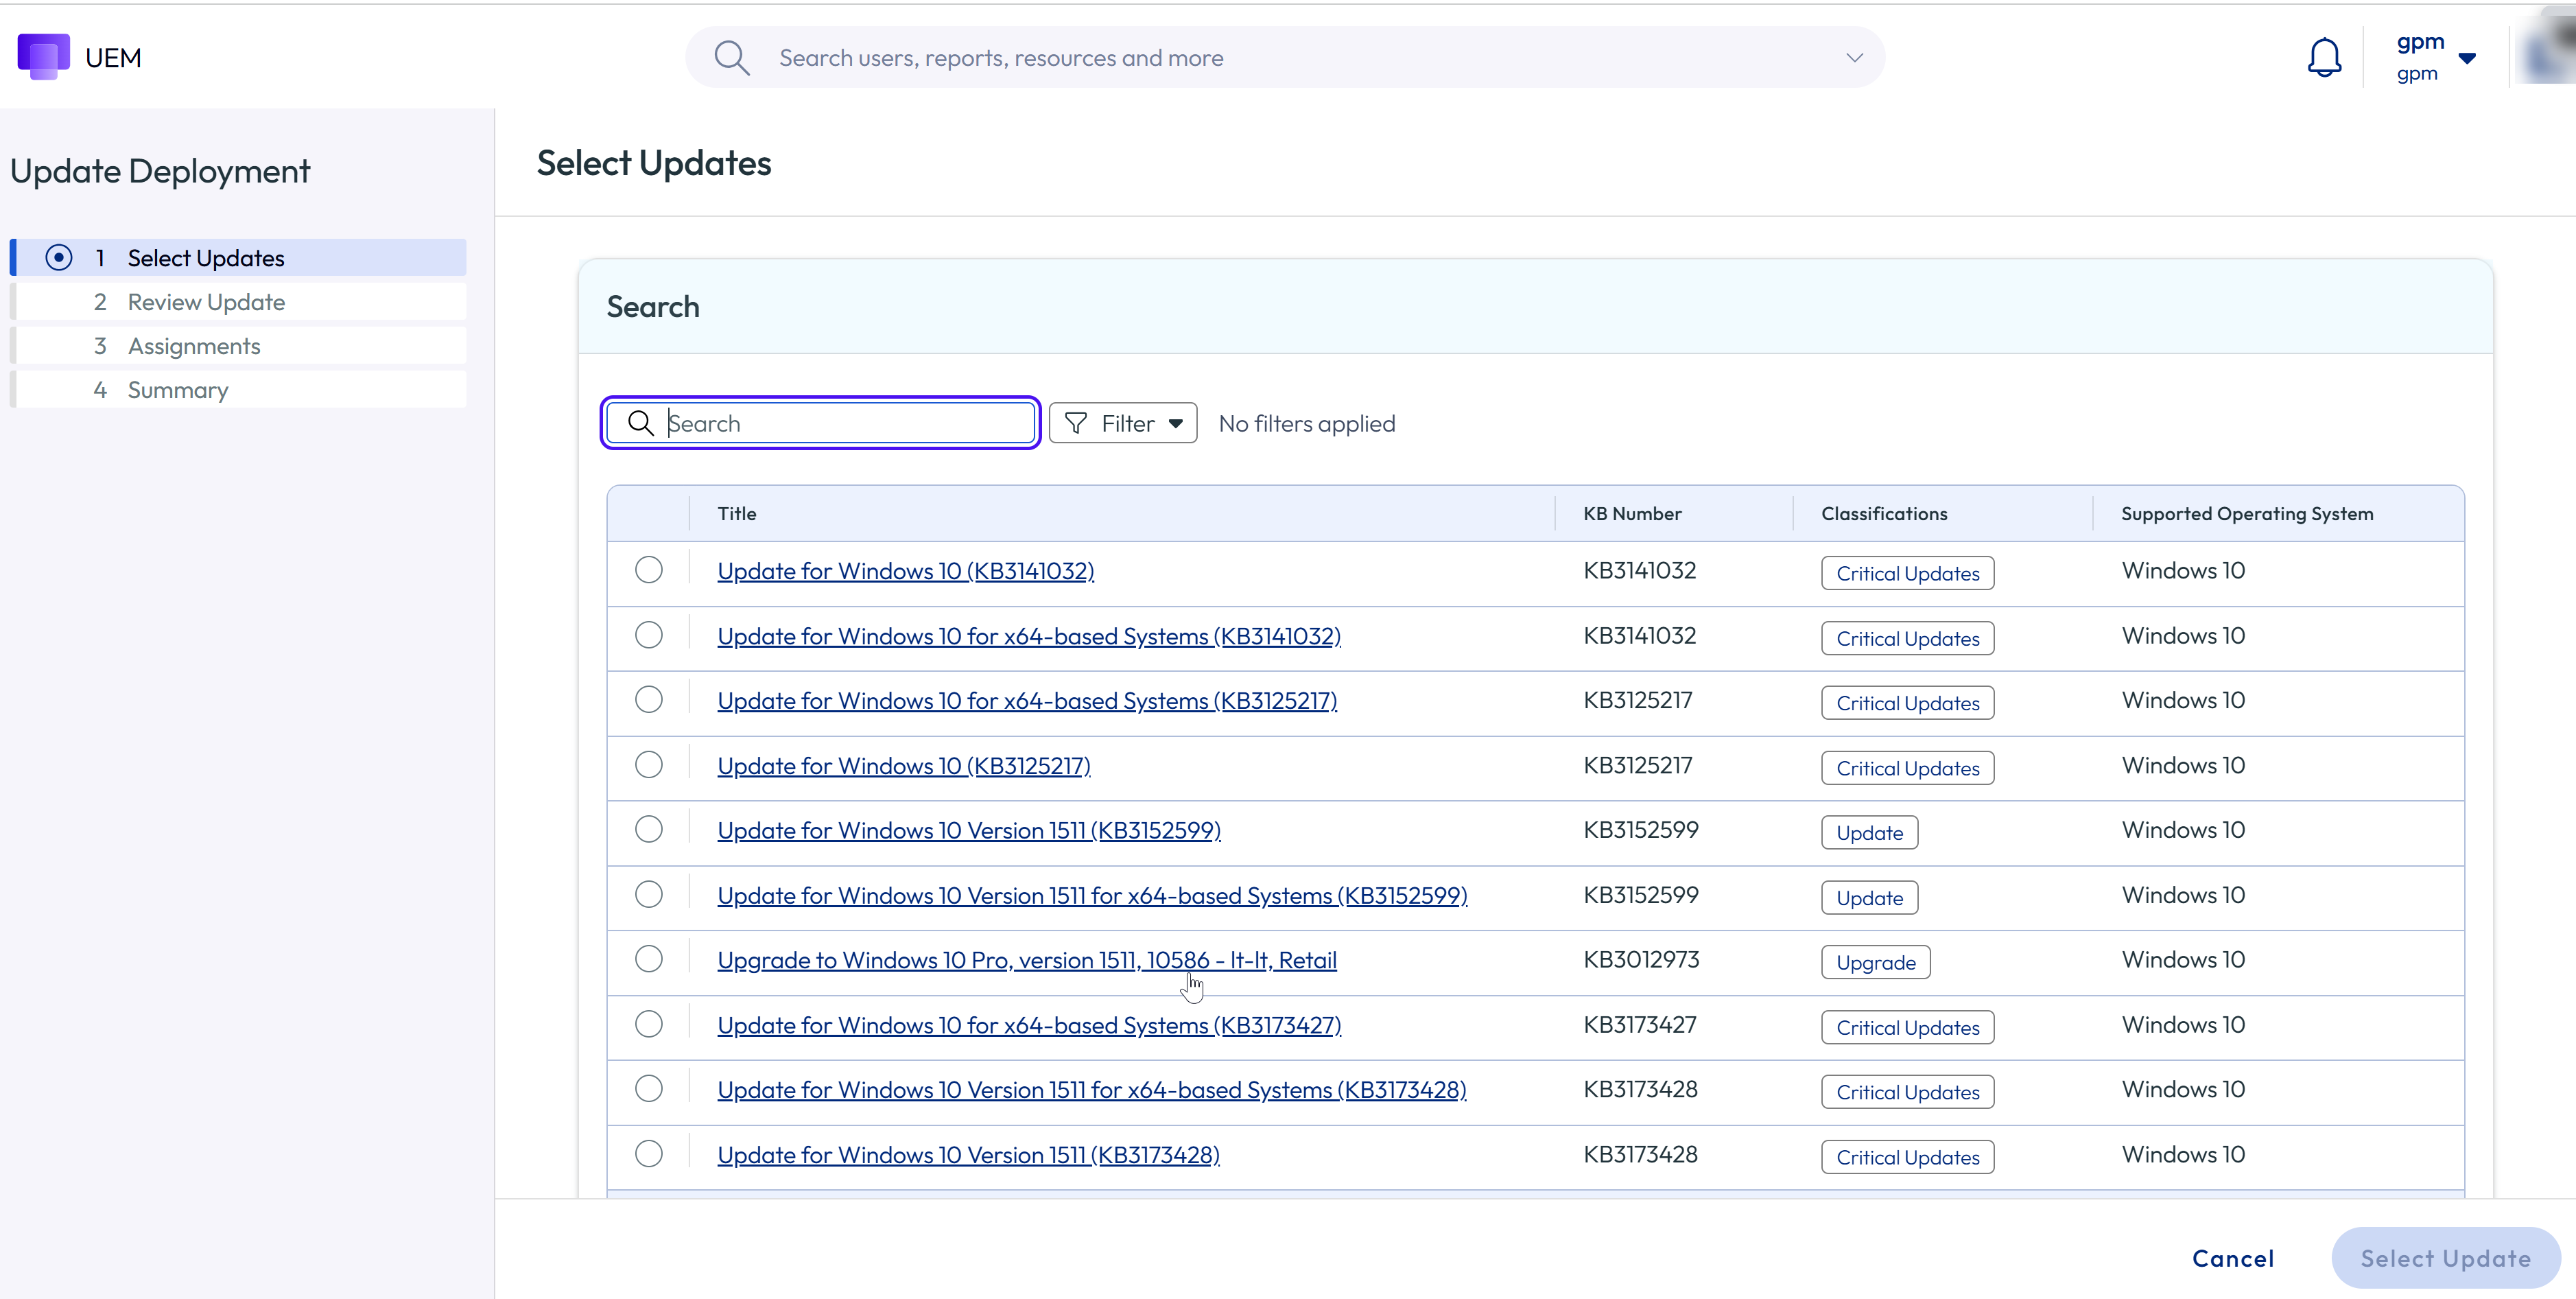
In the Select Updates screen, click the search icon and enter the KB ID you are looking for and all the related updates will display.
-
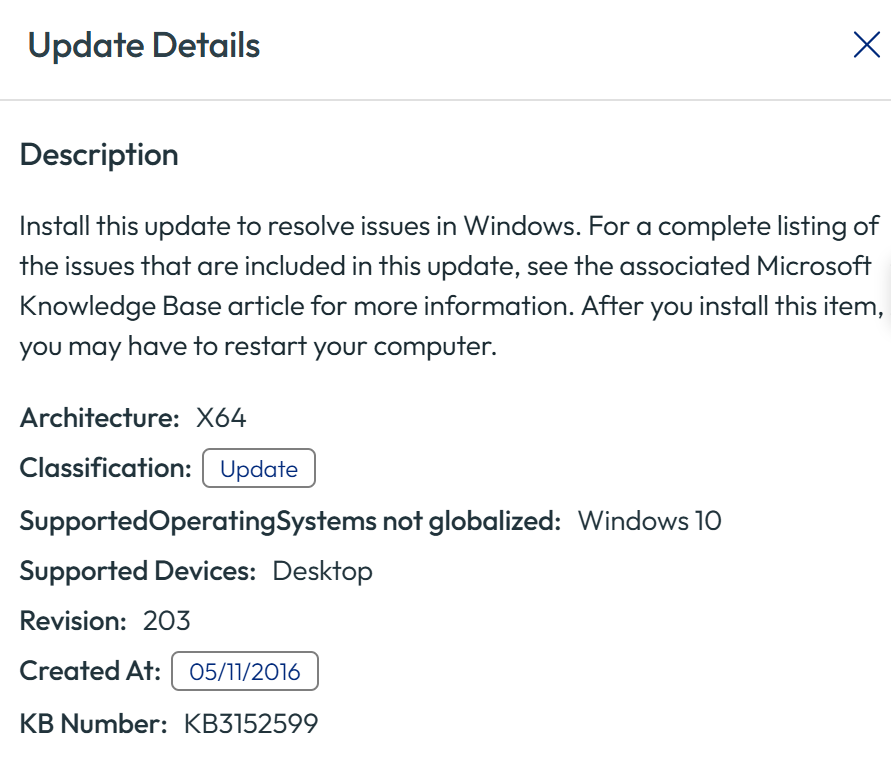
Click the specific update to view the update details. Note: You can also use the filter option to select a specific Windows OS version on which the update must be installed or you can select the type of update you want to perform on the device such as Critical update, upgrade, and so on. You can also select any update and review the update details to know more information about the update.
-
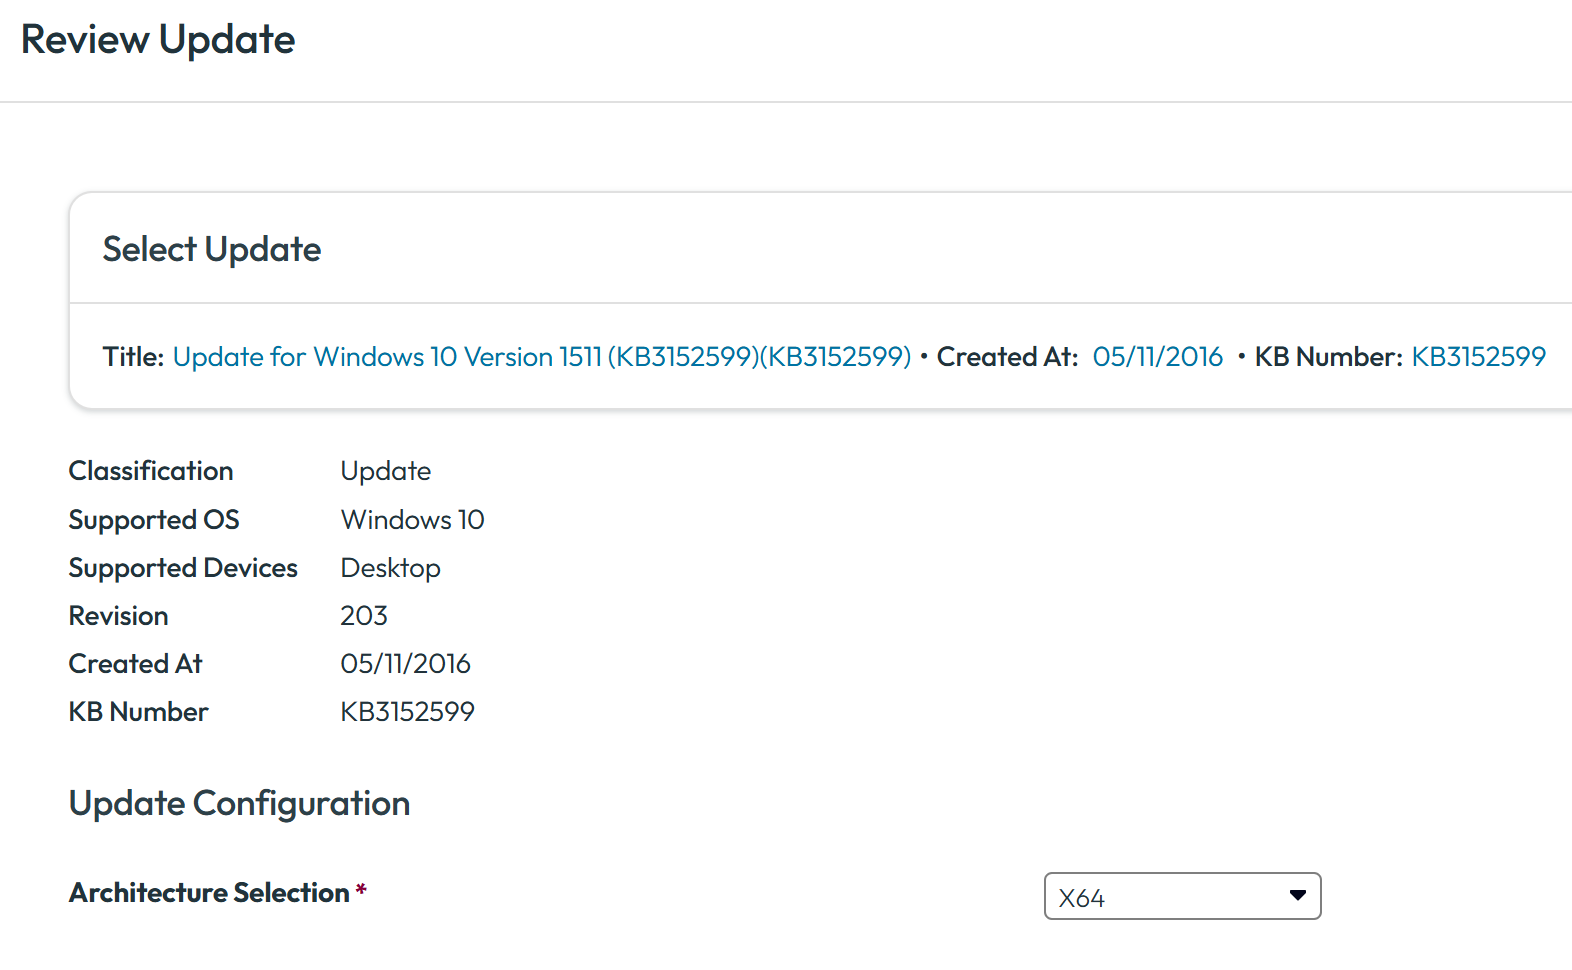
Click the Select Update and proceed to the Review Update screen, which displays comprehensive information about the selected Windows Update.
Step 2: Review Update:
-
In the Review Update screen, select the Windows architecture on which these updates must be deployed and click Continue.
Optional: Manually Upload The Update:
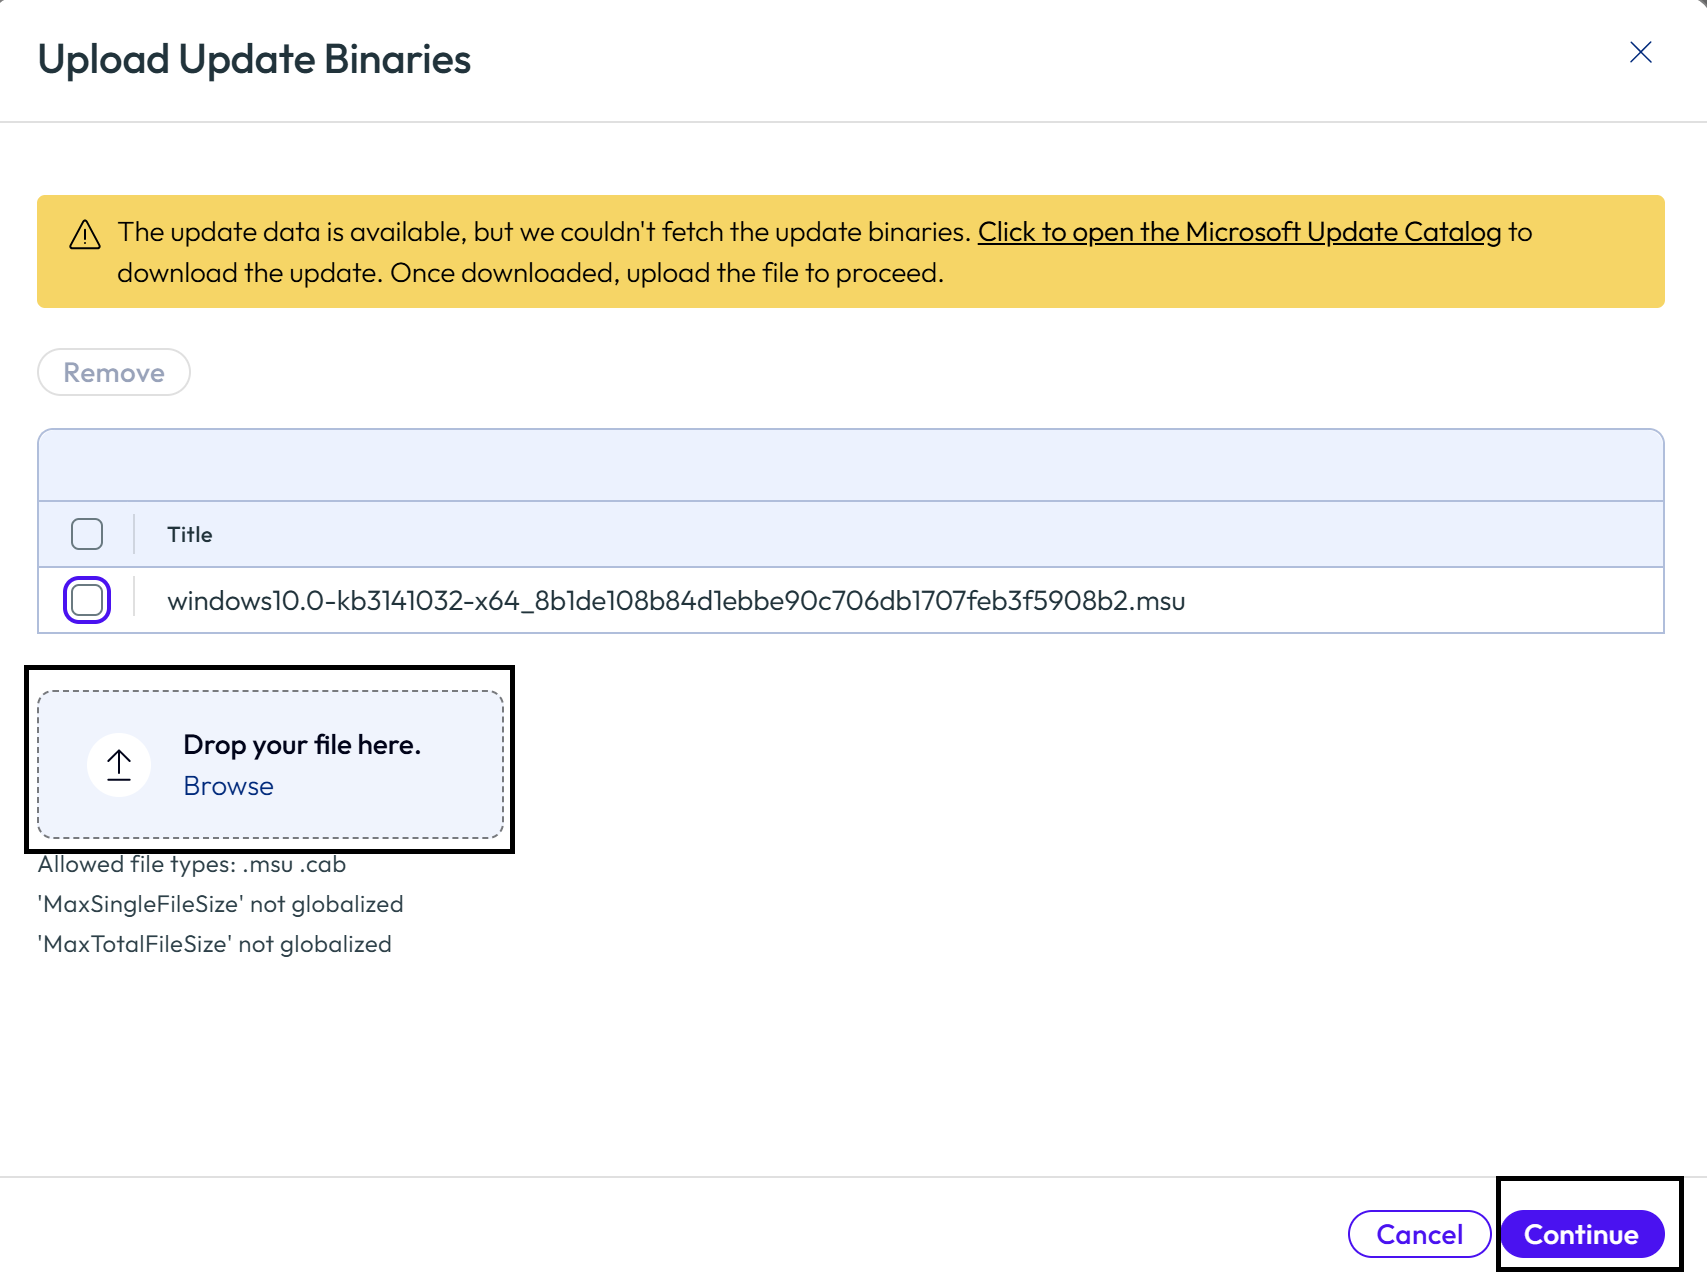
In some cases, Workspace ONE UEM is unable to automatically retrieve the update binaries. In such cases, the administrator must download the update files and upload them manually. After the files are uploaded, the rest of the deployment process is automated.
-
Click the link, open the Microsoft Update Catalog and download the update package.
-
Click Browse to upload the downloaded update file. After the file uploads successfully, click Continue.
Step 3: Assignments:
- In the Create Assignment screen, add an Assignment to the update. Click Add Assignment to create a new assignment rule.
Note:
-
Devices receive updates based on the assignment configurations.
-
Devices with multiple assignments follow priority order.
-
Adjusting one assignment's priority automatically reprioritizes other assignments.
-
New assignments are added to the bottom of the priority list.
-
In the Distribution screen enter the following fields:
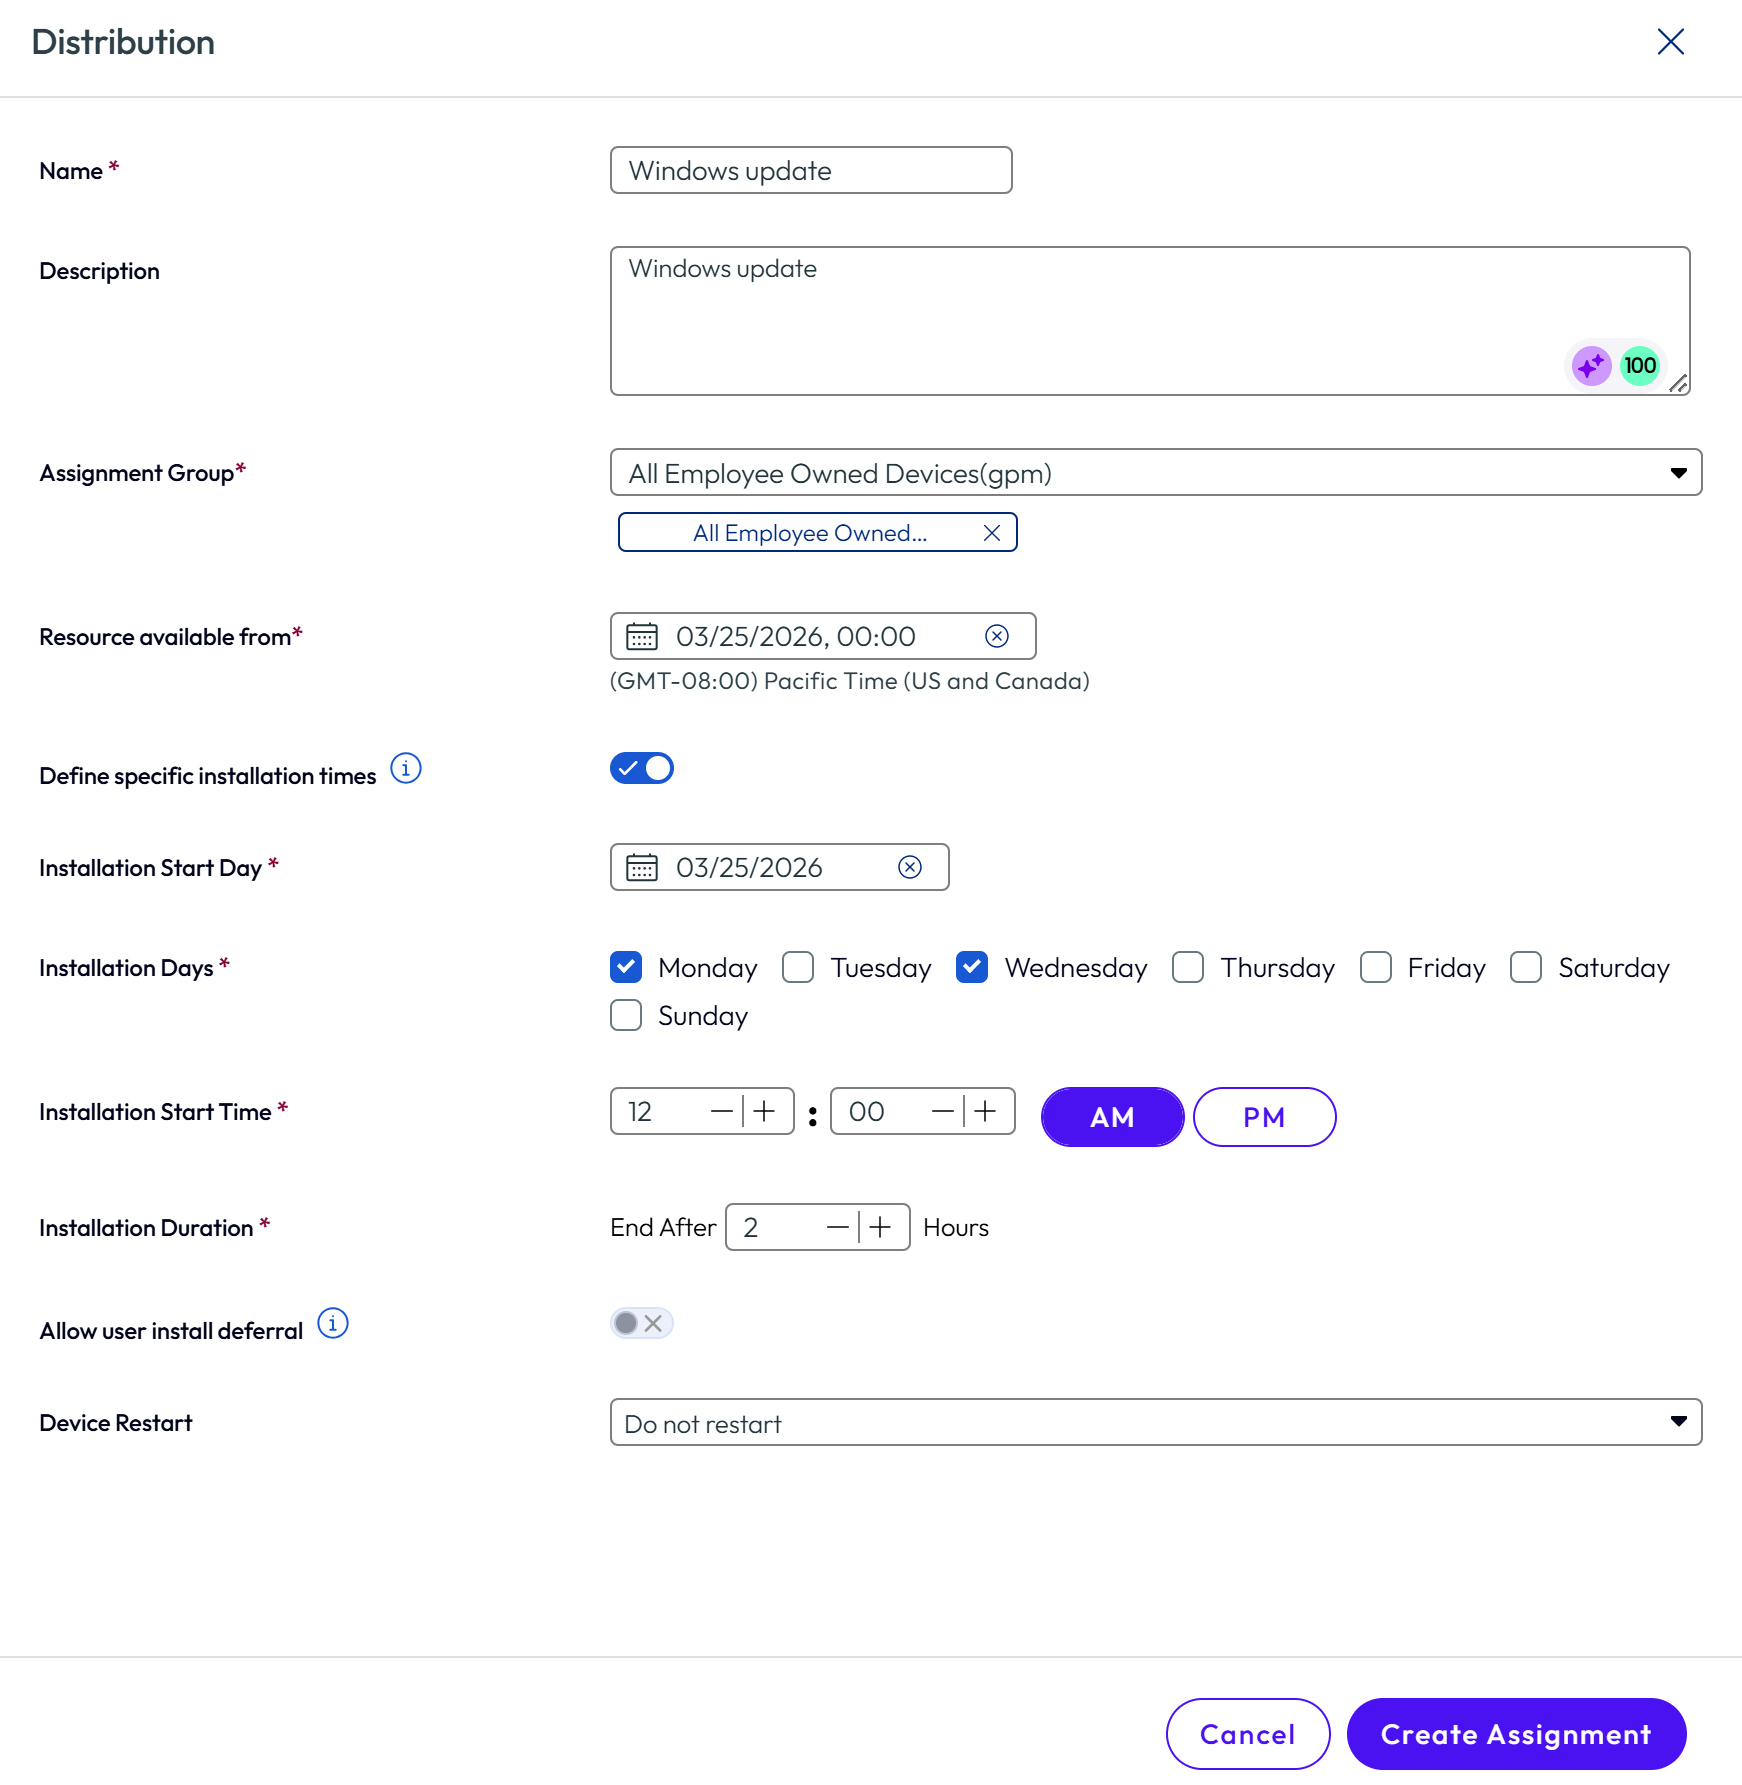
a. Name – Enter a descriptive name for the Windows Update deployment.
b. Description (Optional) – Provide additional context for the deployment.
c. Assignment Group – Select the device groups that will receive this update.
d. Resource Available From – Select the date and time when the update becomes available to devices and the download begins.
e. Define specific installation times – Configure the installation schedule:
-
Installation Start Day – The date when deployment begins on assigned devices.
-
Installation Days – The days of the week when installation is allowed (for example, Monday, Wednesday, Friday).
-
Installation Start Time – The time of day when installation can begin.
-
Installation Duration – The number of hours allocated for installation each day.
-
-
Click Create Assignment to save the configuration, then click Save and Assign to apply the update to the selected groups.
Step 4: Summary:
-
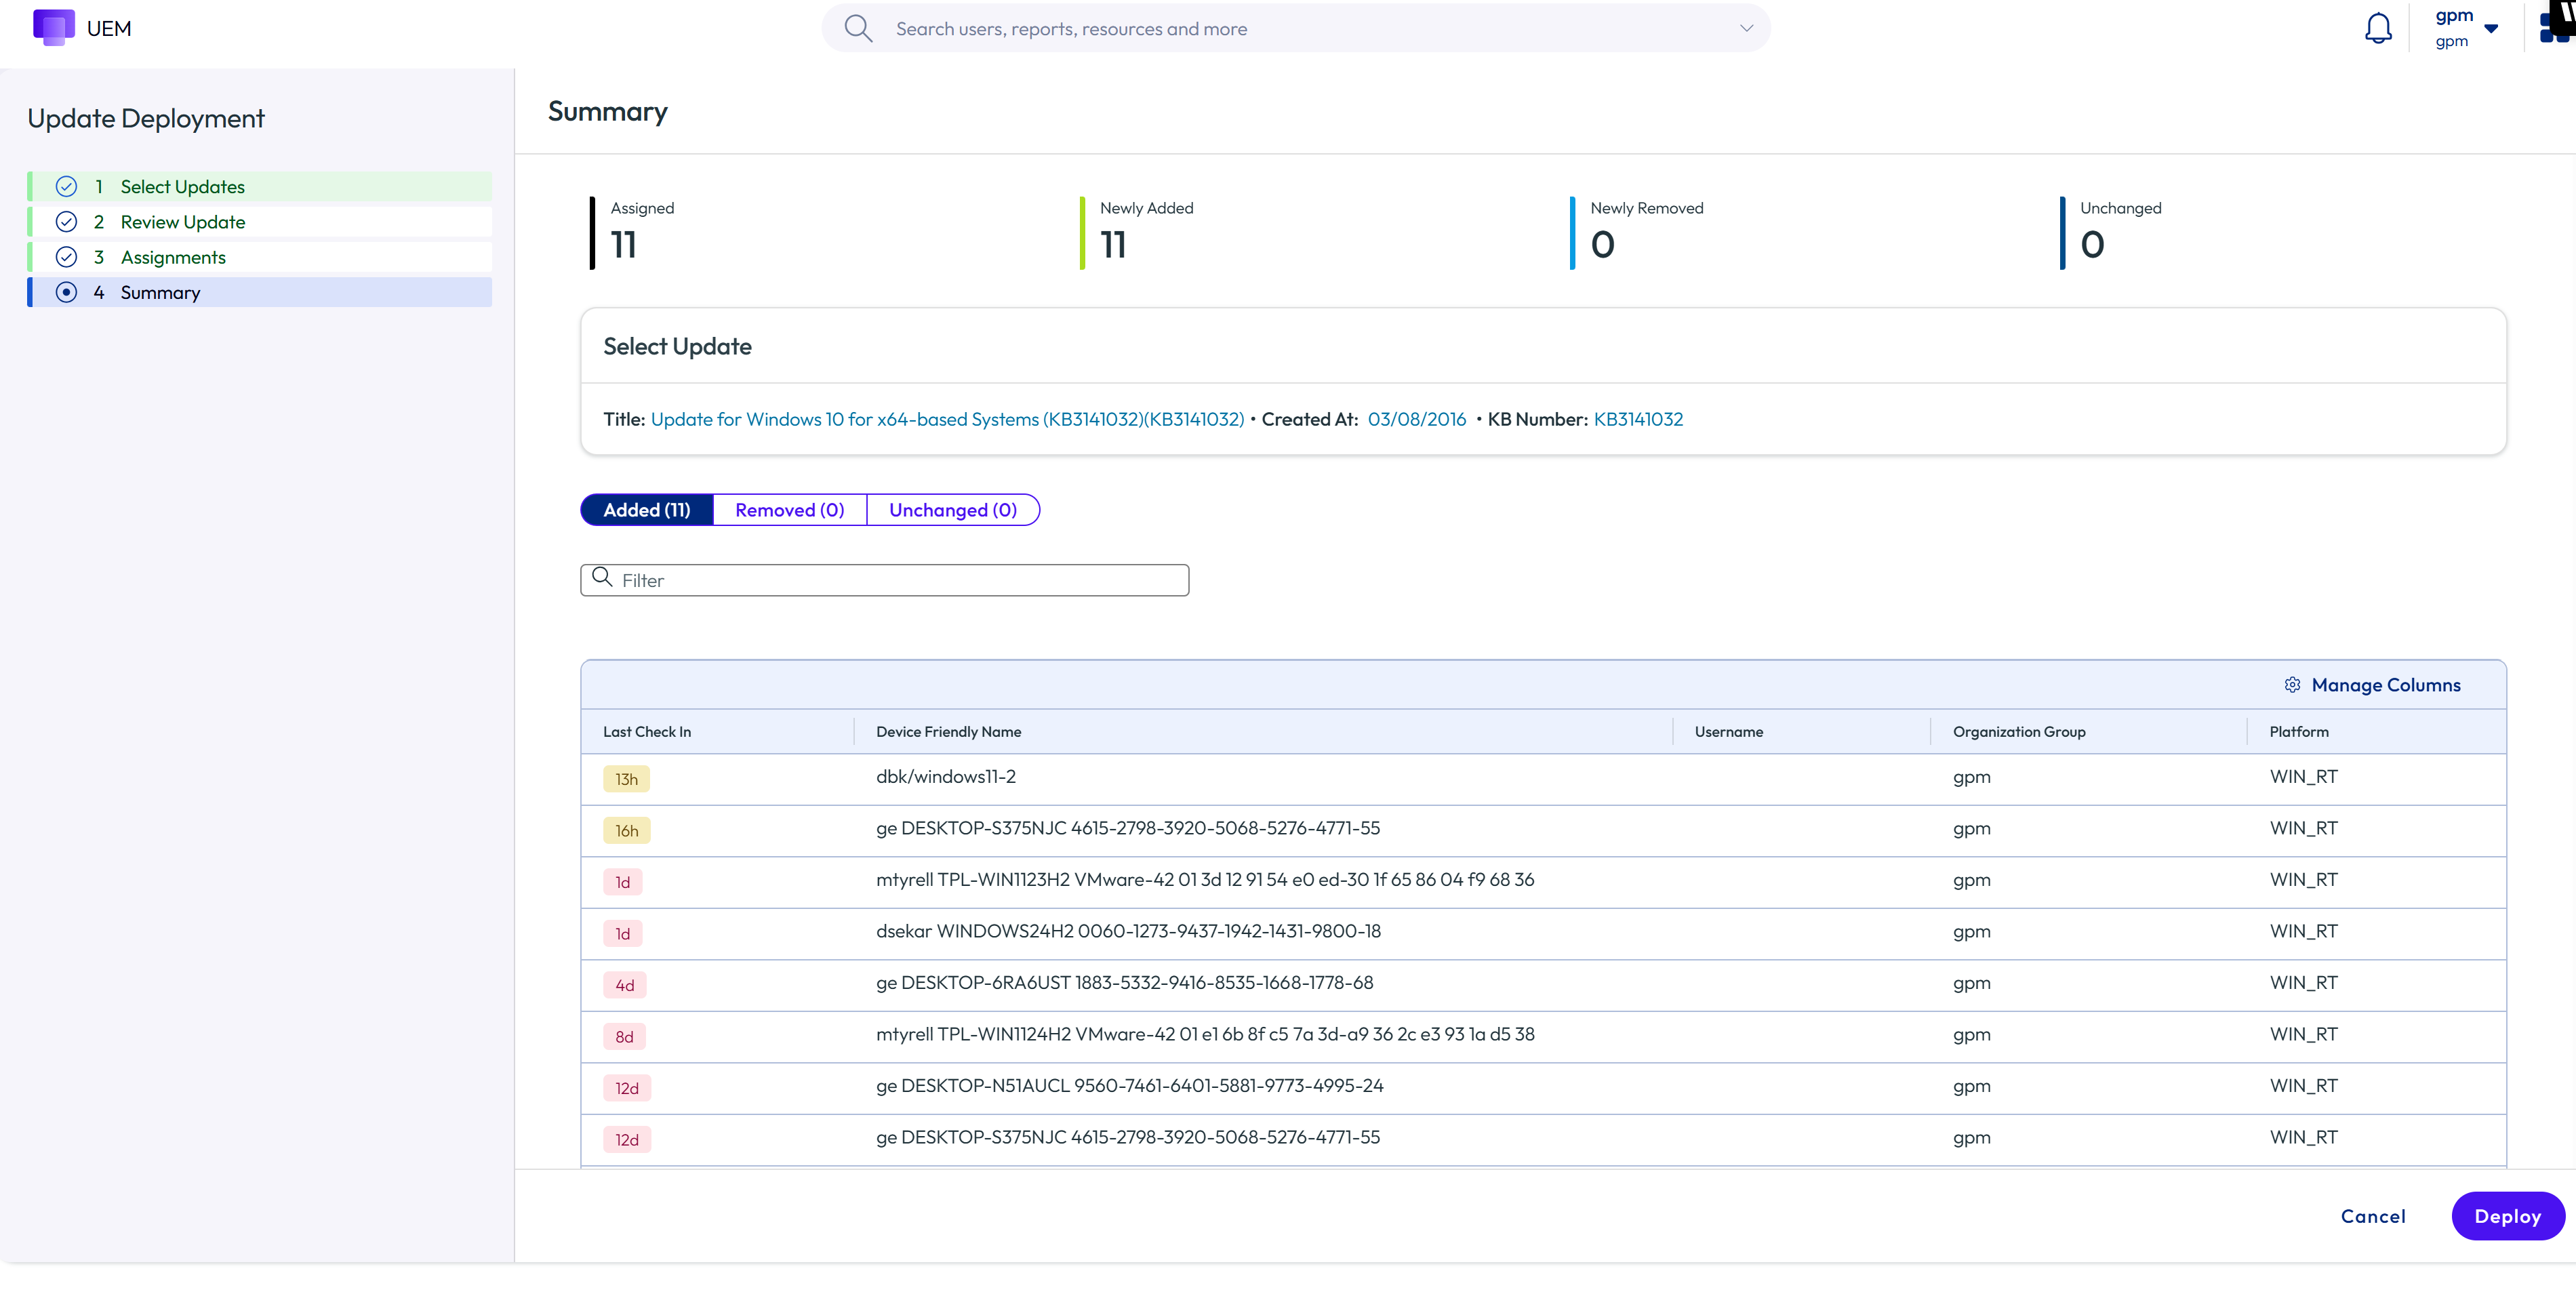
In the Summary screen, review all details related to the Windows Update deployment.
-
Click Deploy to activate the deployment and begin distributing the update to all devices in the assigned groups.
Review the Deployment status
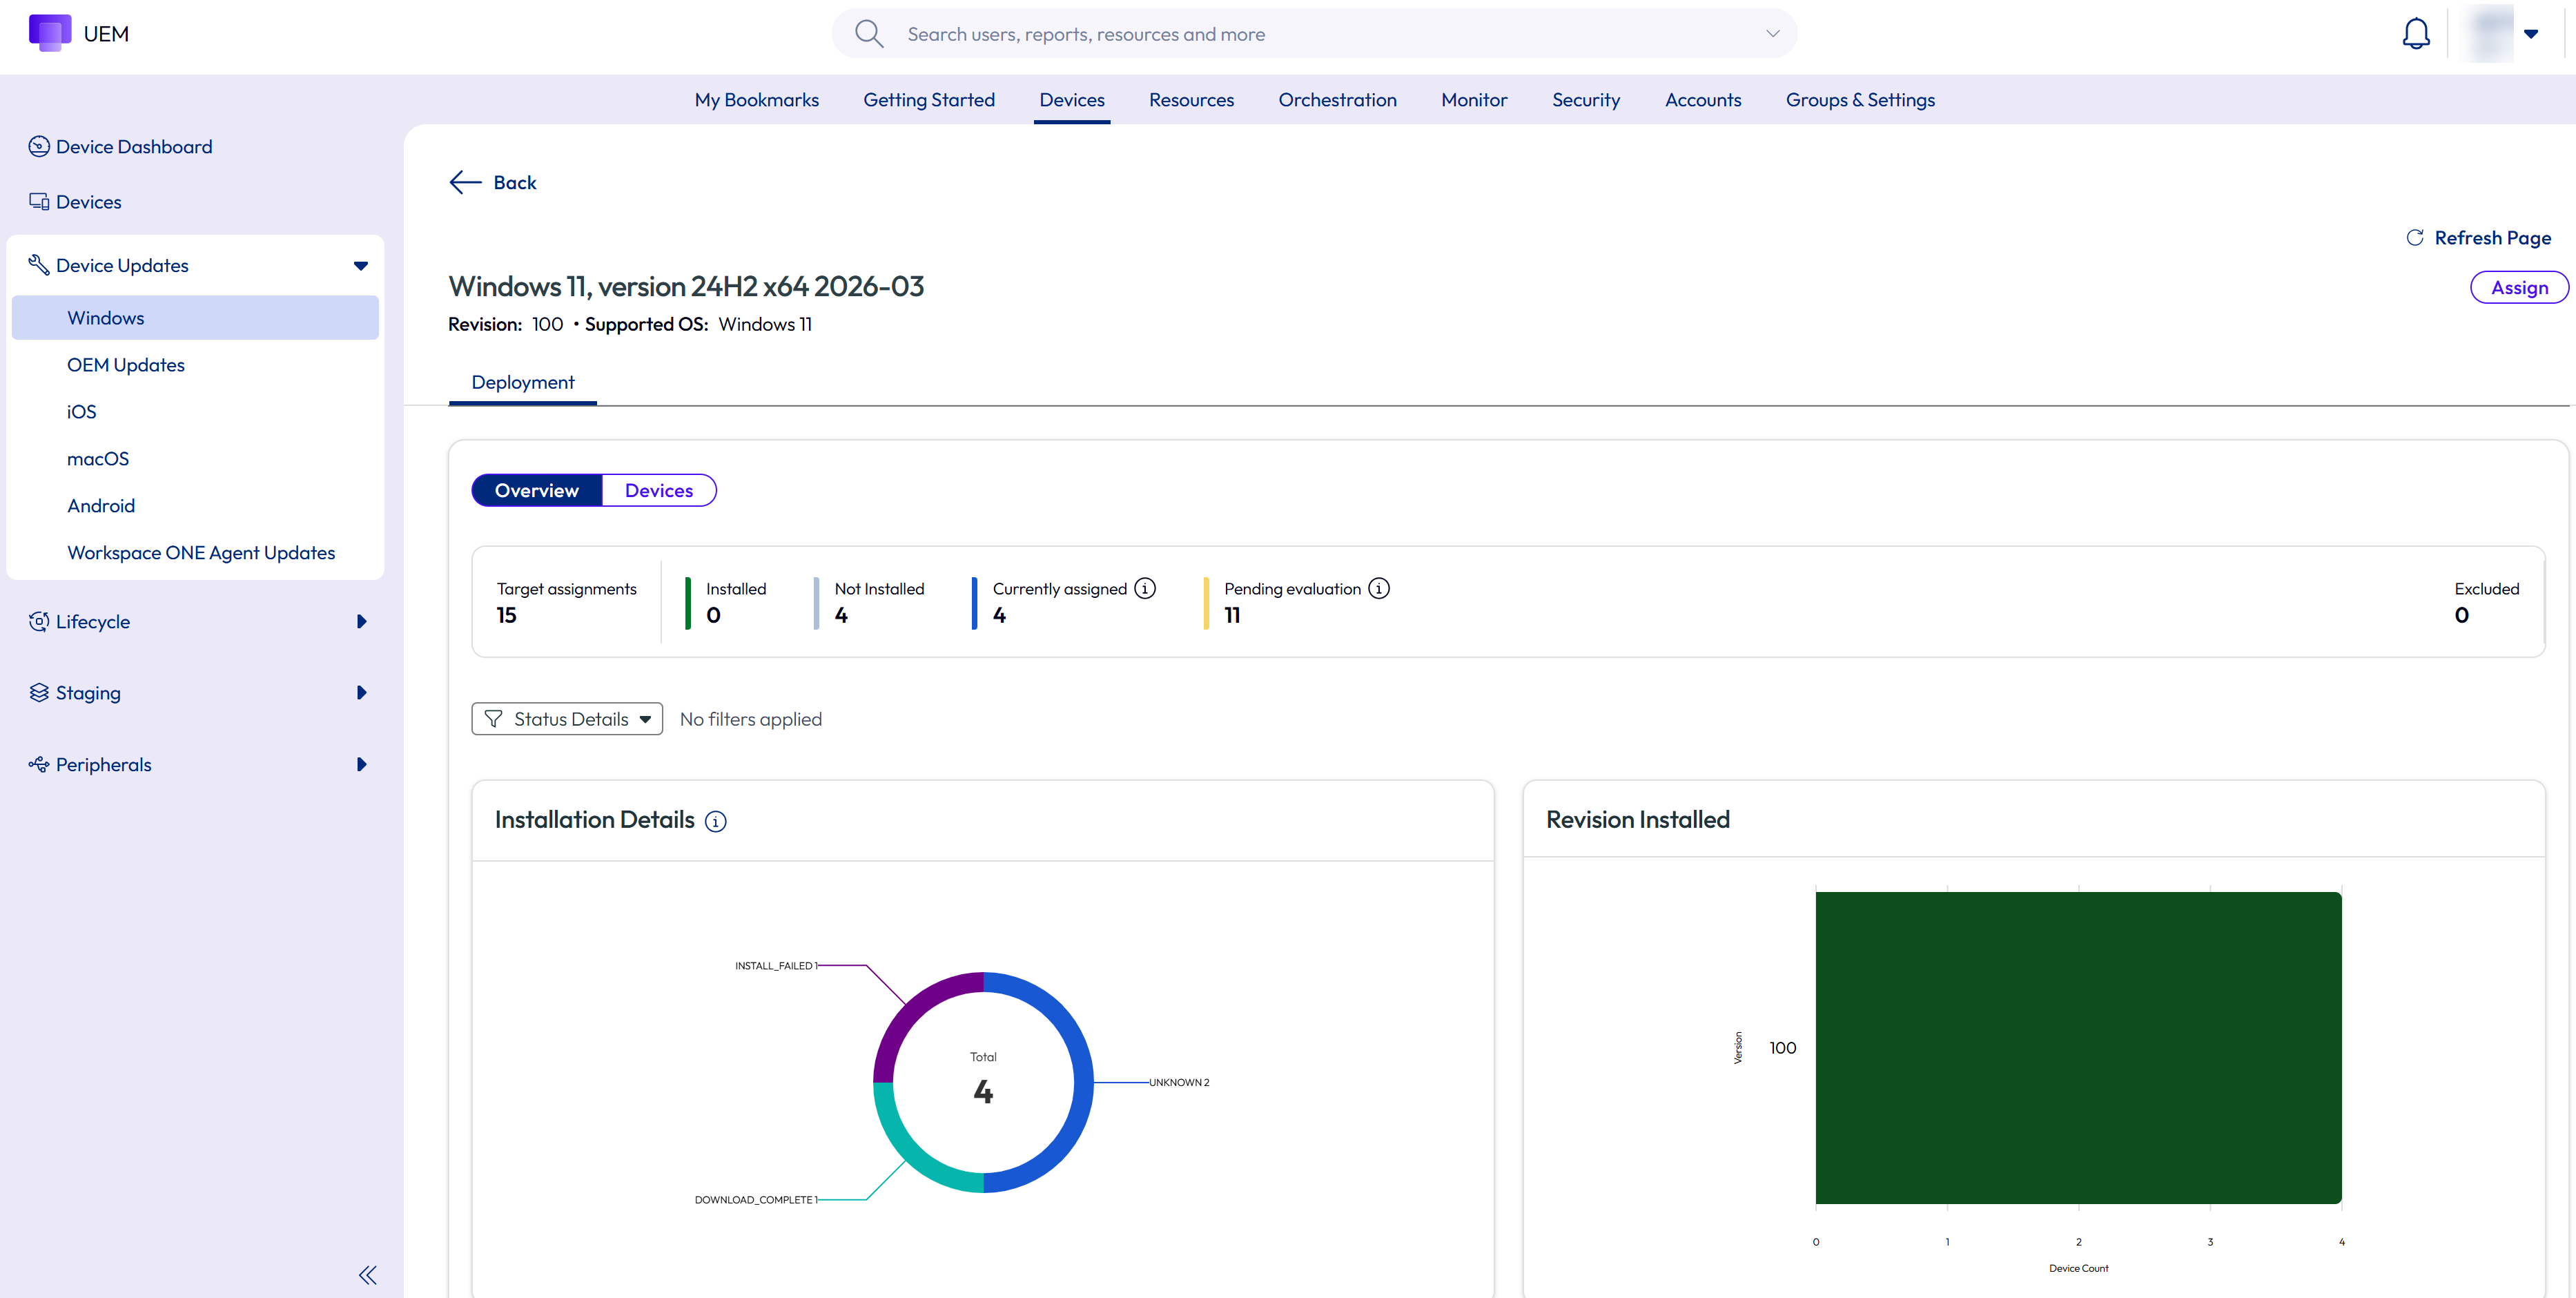
To review the current deployment status of an update, the administrator can click the Update Title on the Device Updates screen. This action opens a new screen that displays the deployment tracking details.
Note: Even if the Deployment Tracking marks an update as failed, this does not necessarily mean that the update was not installed. The installation can fail if the deployed update has already been superseded by a newer update. This can also occur if a required dependency update is missing. In such cases, the administrator must repush the installation command after the required dependency update has been installed. An update will also fail if it is deployed to an unsupported Windows version. For example, if the update targets Windows 11 25H2 but the device is running Windows 11 24H2, the installation will fail. The following screenshot shows the deployment tracking details screen.
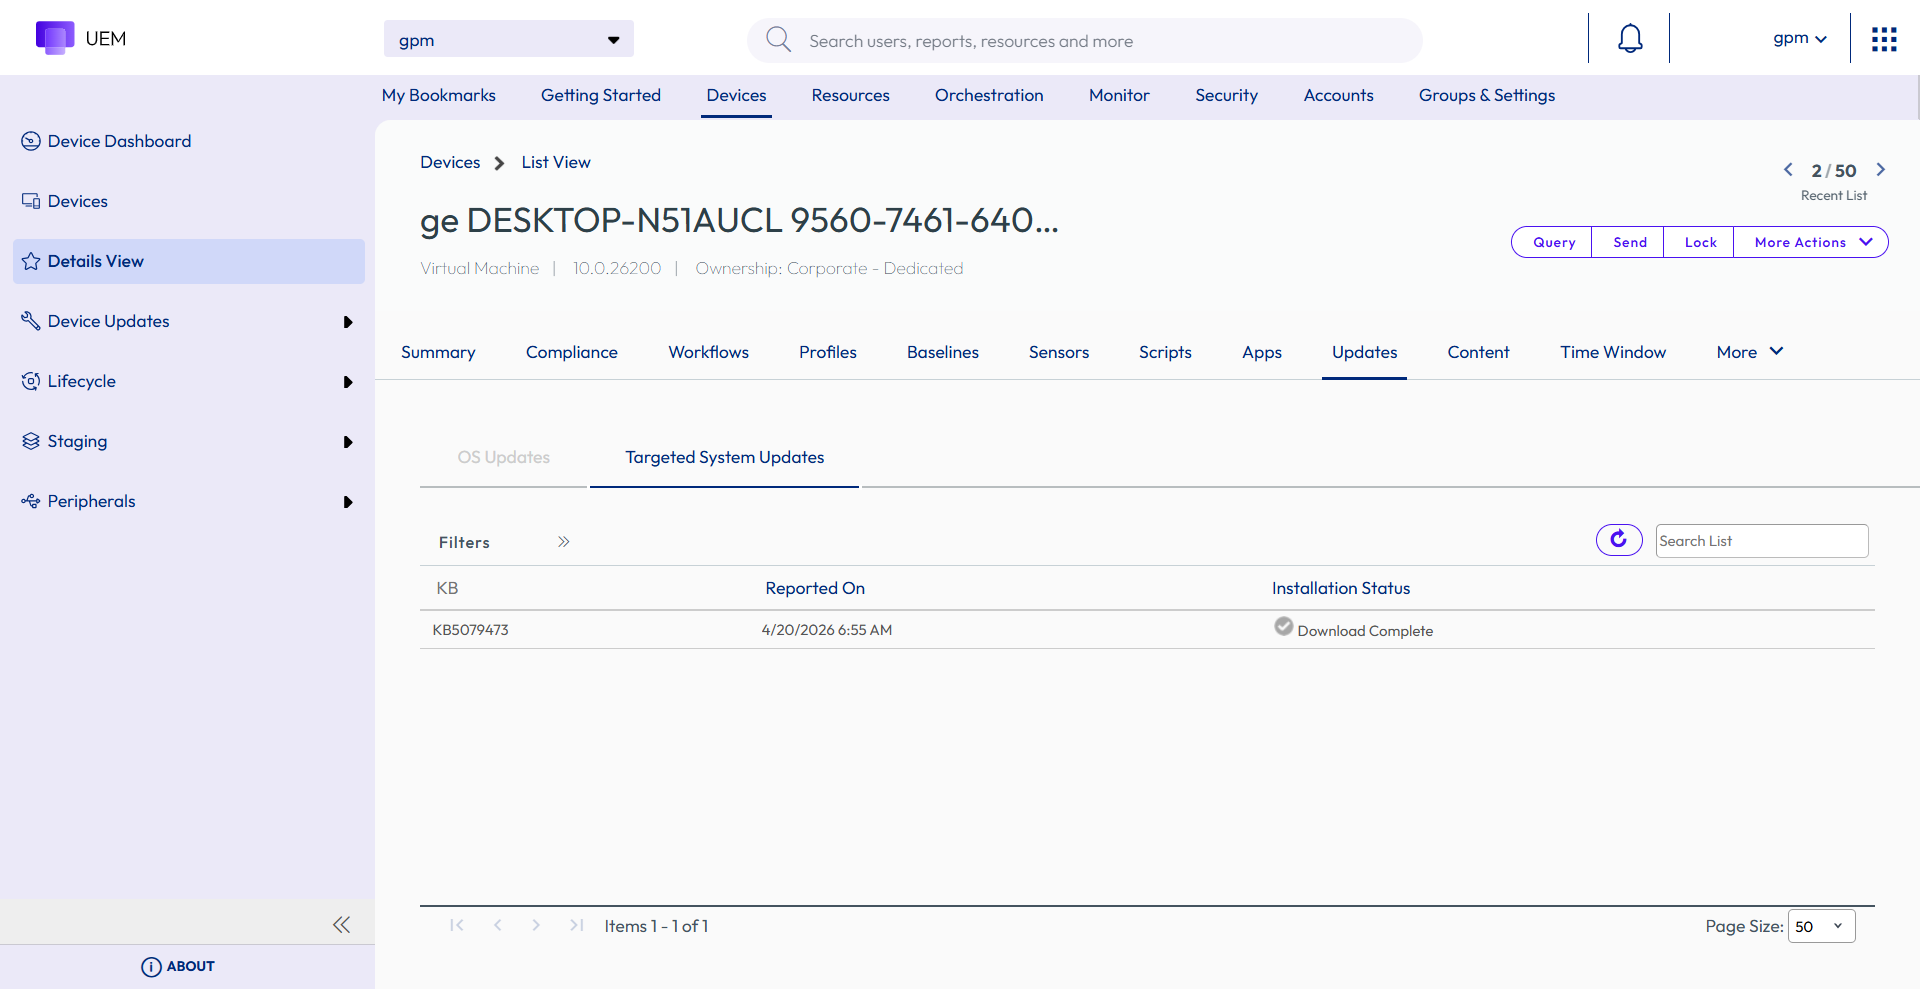
To view the targeted system updates for a specific device, navigate to Devices > Details View > List View, and then select the desired device. Click Updates to view the targeted system updates for that device.
Workspace ONE Agent Dashboard in Workspace ONE UEM Console
The Workspace ONE Agent Dashboard is a native capability within the Workspace ONE UEM console that provides administrators with centralized visibility into Intelligent Hub and Software Distribution Agent (SFD) versions across all enrolled devices, specifically for environments leveraging the seeded Hub deployment method. This dashboard aims to centralize and simplify Agent version tracking directly within UEM.
Key features of the Workspace ONE Agent Dashboard are listed as follows:
- Provides real-time visibility into Intelligent Hub and Software Distribution Agent (SFD) versions across all enrolled devices. You can quickly identify outdated Intelligent Hub or SFD versions across your device fleet without depending on custom Intelligence dashboards or manual reporting to determine which devices were running specific Hub or SFD versions.
- Helps quickly identify devices running unsupported or outdated agent versions, devices that are offline due to prolonged inactivity, or devices that experienced upgrade failures.
- Mitigates rollout risk by enabling quick identification of devices that missed or are delayed in receiving updates.
- Removes the dependency on Workspace ONE Intelligence for agent version tracking by offering a native, authoritative view directly within the Workspace ONE UEM console.
- Allows admins to identify Intelligent Hub upgrade failures and filter affected devices to be tagged for further remediation. -Displays visual charts by version and application architecture, so you can instantly see how a rollout is progressing.
- Enhances remediation workflows by allowing administrators to tag out-of-date devices directly from the dashboard, enabling targeted follow-up actions such as smart group assignment or automated upgrade workflow execution.
To access the Workspace ONE Agent dashboard, navigate to Devices > Device Updates > Workspace ONE Agent Updates.
Was this page helpful?