The information contained in this page and its subsections applies to you when you have decided to migrate your first-gen pod using the AKS type for the Horizon Edge Gateway deployment.
Introduction
These sections describe the specific AKS-related requirements which you must fulfill before running the migration wizard.
The information here assumes that you have read the section Decide on Your Deployment Type and Fulfill Its Requirements, answered the questions, and decided to use the AKS type for the pod's migration.
Important: When you plan to use the AKS deployment type, in addition to fulfilling the prerequisites described in the sections below, you must also ensure you fulfill the prerequisites described in the sections of page Prerequisites for Migrating a First-Gen Horizon Cloud Pod.
Special Case - If You Determined the Pod's VNet, Including Other Connected Networks, Contains AKS-Restricted IPs
As described in the section Determine Whether the Pod's VNet or Connected Networks Contain AKS-Restricted IP Addresses, when you want to deploy using the AKS type but the first-gen pod's VNet or the on-premises network connected to that VNet contain IP addresses from the AKS-restricted IP ranges, then for an AKS deployment type, you must:
- Set up another VNet in the pod's subscription, which doesn't contain IP addresses from the AKS-restricted ranges.
- Create a new management subnet in that VNet, with the subnet having a
/26minimum CIDR. - Ensure the new VNet and management subnet allow for network communication to the Horizon Cloud service's required endpoints, for its required ports and protocols, according to the pages:
- Peer that new VNet with the pod's existing VNet.
Then after the preceding four steps are completed, then you use that new management subnet and VNet when you fulfill the requirements described in the sections that follow below.
Note:
The AKS-restricted IP ranges to avoid are:
169.254.0.0/16172.30.0.0./16172.31.0.0/16192.0.2.0/24
In addition to avoiding the above ranges with the new VNet, you should also avoid using the CIDRs that you and your team have decided to use for the deployment's virtual IP ranges, described in AKS Type - Reserve Required Virtual IP Ranges to Prevent Conflicts with AKS.
AKS Type - Confirm Azure Resource Providers and Register New Required Ones
The AKS type of Horizon Edge Gateway deployment requires a specific set of resource providers in the Microsoft Azure subscription.
In the first-gen pod's subscription, confirm that the following resource providers all have Registered status.
Some of these are the same as are required for a first-gen pod deployment. The table notes which ones are additionally required to register for the AKS deployment type.
| Resource provider | |
|---|---|
| Additional new ones to register for Horizon Cloud AKS deployment type |
|
| Needed by Horizon Cloud which would've been previously registered for your first-gen pod |
|
To verify the resource providers in the first-gen pod's Microsoft Azure subscription:
-
Log in to the Azure portal and search for the pod's subscription.
-
Click the subscription name and scroll down until you see
 (Resource providers).
 -
Look for the resource providers in the preceding table and verify that they each display
 (Registered) status.
Use the Azure portal to register any resource providers from the table that have a status of
NotRegistered.
Important: Don't unregister already registered resource providers.
You might see that the pod's subscription has the resource providers required for the Horizon Edge Gateway already in Registered status. You might also see resource providers registered, such as Microsoft.Billing, that are unrelated to these that required by the Horizon Cloud service. This potential variation in status is a result of standard Microsoft Azure behavior, where they have a set of resource providers typically registered for all Azure subscriptions.
AKS Type - Configure Either a NAT Gateway or a Route Table and Associate to Management Subnet
For its outbound communication with the cloud control plane, the AKS type of Horizon Edge Gateway deployment requires one of the following items - NAT gateway or route table - associated on its management subnet.
In the pod's Microsoft Azure subscription, create the one you want to use and associate it with the pod's management subnet.
- NAT gateway
- Route table (This is a more advanced choice, typically used only when your pod's VNet already has route tables being used with your first-gen pods)
Important: Whichever one you create, ensure that you associate it with the appropriate management subnet - either the pod's existing management subnet or new management subnet if you had to create a new one to work around your VNet having AKS-restricted IP addresses.
Using a NAT Gateway - Create and Associate It to Management Subnet
As per the Microsoft Azure documentation, creation of a NAT gateway requires having a public IP address or a public IP prefix or both, your choice on which to use.
The Azure portal's Create NAT Gateway wizard will require you to make a choice. In the steps below, we choose to create a new public IP to use for our NAT gateway.
-
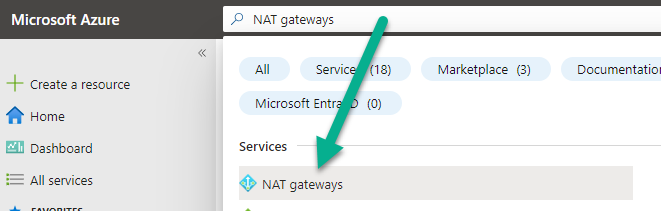
Log in to the Azure portal and use the search bar to search for NAT gateways and select that category.
-
Click + Create to start the Create NAT Gateway wizard.
-
In this first step of the Create NAT Gateway wizard, make sure the pod's subscription is selected, and choose a resource group for the NAT gateway to reside in.
-
Give the NAT gateway a name and make sure the selected region is the pod's Azure region. When filled-out, click to the Outbound IP step.
The following screenshot is an example where we name our NAT gateway as
first-pod-migration. It resides in Azure regionWest US 2.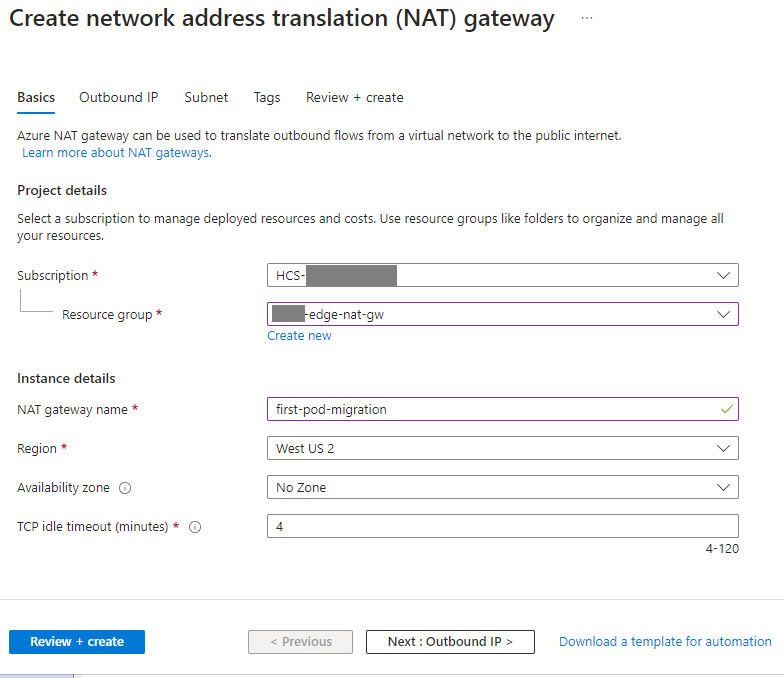
-
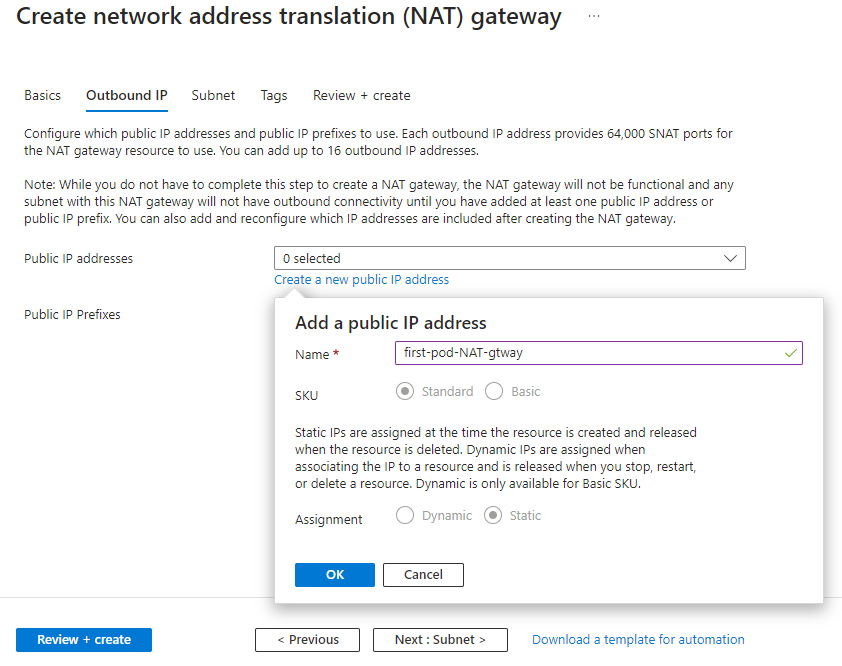
In the Outbound IP step, follow the on-screen instructions to select whether to use a public IP address or public IP prefixes for this NAT gateway.
The following screenshot is an illustration of this step where we chose to create a new public IP for this NAT gateway to use and gave it the name
first-pod-NAT-gtway.When this step is filled-out, click to the next wizard step, Subnet.
-
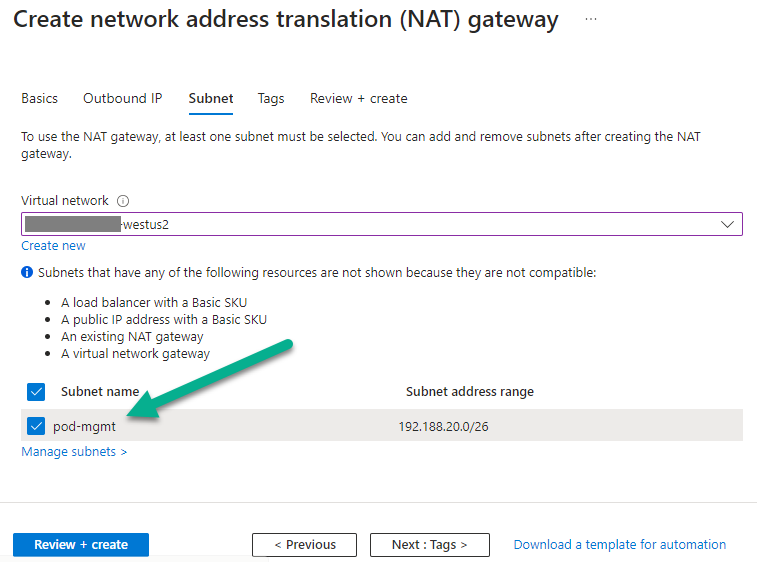
In the wizard's Subnet step, either:
- If you aren't working around having AKS-restricted IP addresses in your VNet, select the pod's VNet and its management subnet.
- Otherwise, if you created a new VNet and management subnet to work around the pod's VNet having AKS-restricted IP addresses, select the new VNet and new management subnet. The following screenshot illustrates this step of selecting the pod's VNet and its management subnet, associating the subnet with this NAT gateway.
-
Click Review + create.
If validation passes, click Create to finally create this NAT gateway.
Now the NAT gateway is associated with the management subnet, and ready for you to select in the migration wizard.
If You Choose Route Table - Create a Route Table and Associate It to Management Subnet
Configure this route table with the default route 0.0.0.0/0 pointing to a next hop of type Virtual appliance or Virtual network gateway.
-
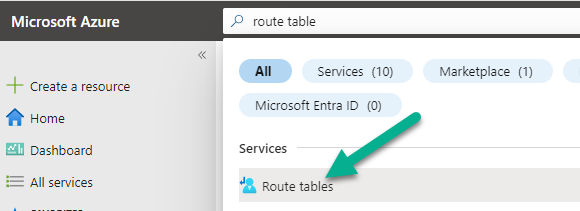
Log in to the Azure portal and use the search bar to search for route table and select that category.
-
Click + Create to start the Create Route table wizard.
-
In this first step of the Create Route table wizard, make sure the pod's subscription is selected, and choose a resource group for the route table to reside in.
Note: Keep in mind that if you decide to have the route table reside in a resource group different from the VNet's resource group and your first-gen pod's service principal uses a custom role, then the custom role will need to have
Network Contributorpermission on this route table's resource group. Using a custom role for a first-gen deployment is atypical. The reason for needing that permission to the route table's resource group is because an AKS deployment type needs to add entries to the route table associated with the management subnet. Those entries are for internal routing of the Kubernetes pods inside the AKS type of Horizon Edge Gateway deployment. -
Give the route table a name and make sure the selected region is the pod's Azure region.
For Propagate gateway routes, select No.
The following screenshot is an example where we name our route table as
first-pod-migration. It resides in Azure regionWest US 2.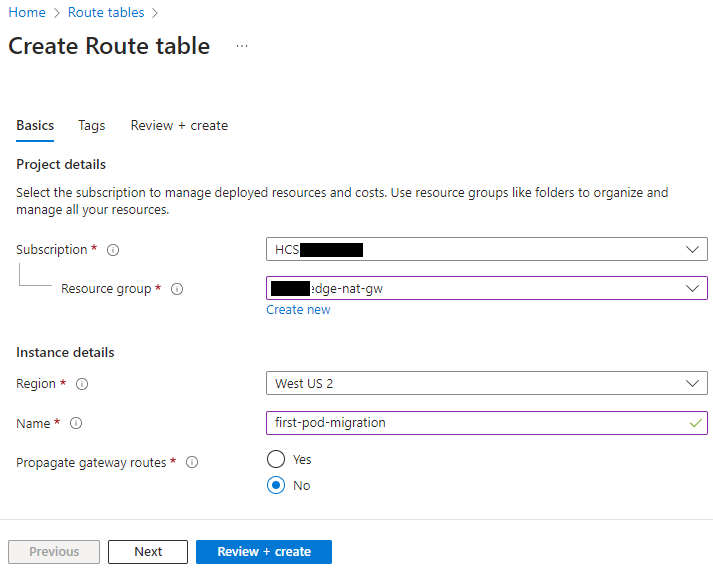
-
When the Create Route table form is filled-out, click Review + create.
If validation passes, click Create to finally create this route table.
-
Now navigate to the newly created route table to configure it with the default route
0.0.0.0/0pointing to a next hop of type eitherVirtual network gatewayorVirtual appliance.Because AKS only supports those two next hop types, the AKS type of Horizon Edge Gateway deployment supports those two specifically.
Virtual Applianceis typically used when you have an Azure Network Virtual Appliance (NVA) controlling the flow of outbound traffic between your pod's VNet and the public Internet.In the Add Route form, you'll need to provide the IP address of that NVA which can provide outbound internet connectivity.
You should ensure that IP address is reachable from the management subnet (the one where the Horizon Edge Gateway deployment will be deployed). That NVA must allow traffic to the endpoints that the Horizon Cloud environment requires for the AKS deployment type.
-
Click Routes and then + Add to add that default route.
The following screenshot illustrates this step. The Next hop type menu is expanded in this illustration to show you where the supported choices
Virtual network gatewayandVirtual applianceappear. Also, we've typed in a name for the route and the0.0.0.0/0destination IP address.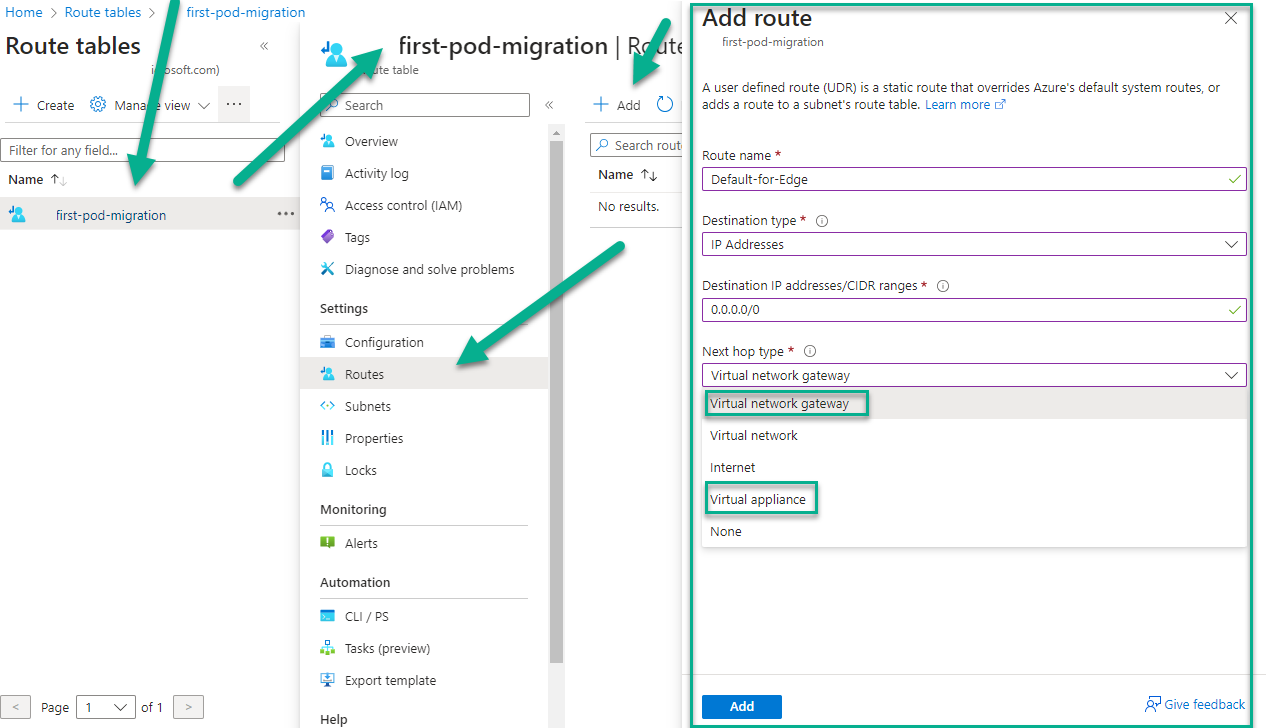
The following screenshot illustrates the Add route form filled-out with the next hop of
Virtual Network Gateway.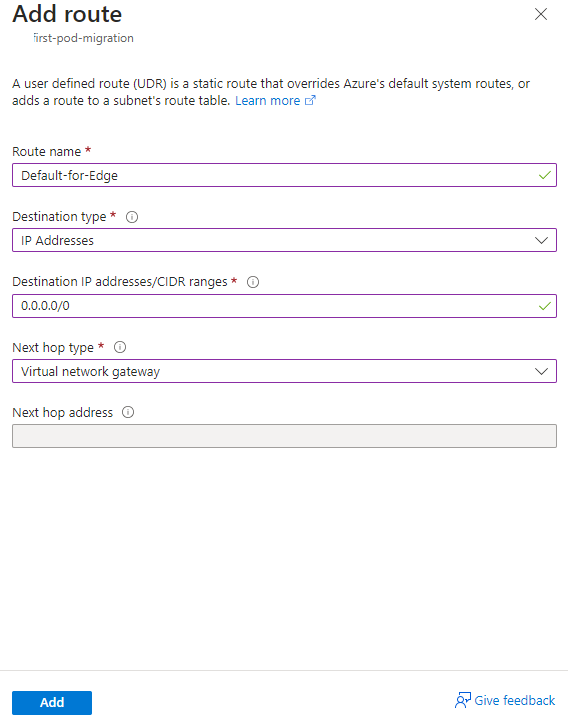
-
Click Add to add this route to the route table.
-
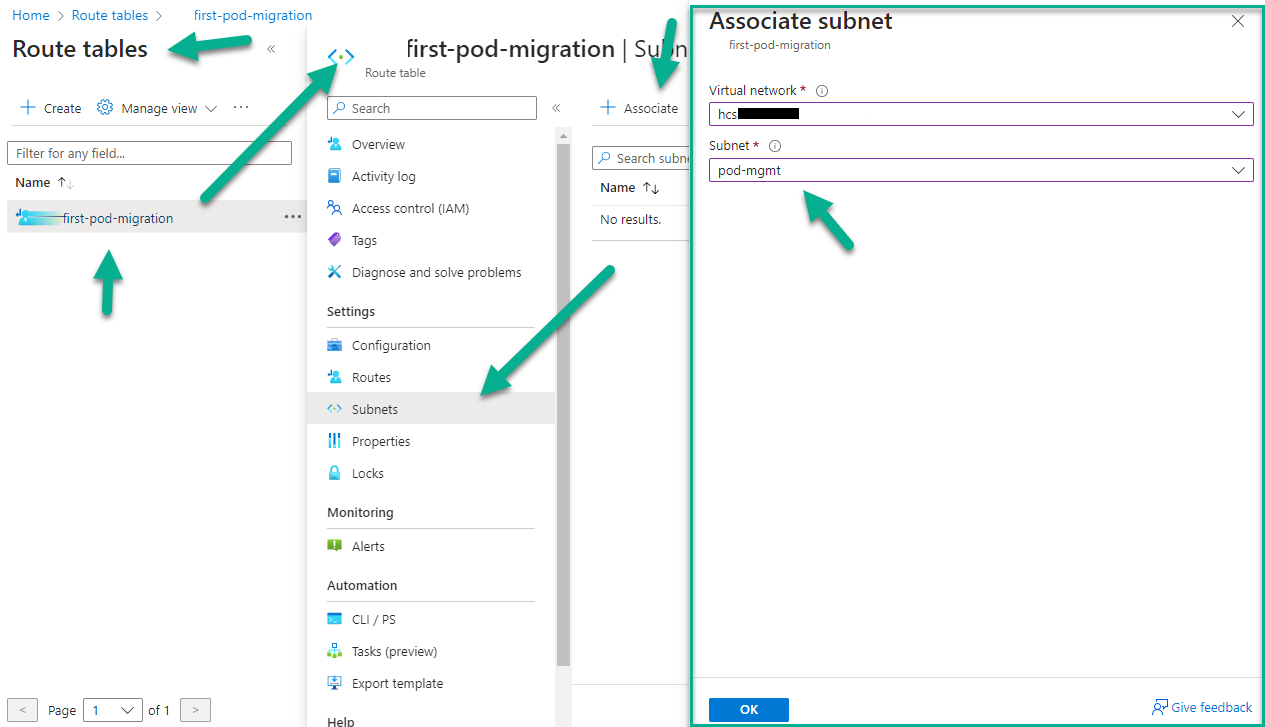
Now associate the new route table with the management subnet by clicking Subnets and + Associate.
The following screenshot illustrates this step. Select the appropriate VNet and management subnet according to the following:
- If you aren't working around having AKS-restricted IP addresses in your VNet, select the pod's VNet and its management subnet.
- Otherwise, if you created a new VNet and management subnet to work around the pod's VNet having AKS-restricted IP addresses, select the new VNet and new management subnet.
-
After selecting the subnet, click OK.
Now the route table is associated with the management subnet, and ready for you to select in the migration wizard.
AKS Type - Create a User-Assigned Managed Identity and Assign Required Role Permissions
When using the AKS type of Horizon Edge Gateway deployment, the pod's Microsoft Azure subscription must have a user-assigned managed identity.
You or your IT team can create and configure this identity using the Azure Portal.
This user-assigned managed identity must be configured with the following characteristics:
Network Contributorrole at the scope of the VNet's resource group. The applicable VNet is either:- If you aren't working around having AKS-restricted IP addresses in your VNet, the pod's VNet.
- Otherwise, if you created a new VNet to work around the pod's VNet having AKS-restricted IP addresses, that VNet.
Managed Identity Operatorrole at the scope of the pod's Microsoft Azure subscription.
The reason why this managed identity is needed for the AKS deployment type is because the Azure Kubernetes Service (AKS) cluster in the deployed gateway will require an identity to access Azure resources. Therefore, this identity is needed for the migration workflow to deploy this type.
Create the User-Assigned Managed Identity
-
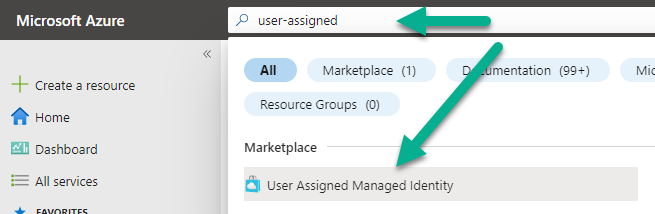
Log in to the Azure portal and use the search bar to search for user assigned and then select the User-Assigned Managed Identity result.
The following screenshot illustrates this step of searching in the portal.
-
When you click the search result for User-Assigned Managed Identity, the Create User-Assigned Managed Identity wizard starts.
Choose the pod's subscription and a resource group in which to store this identity resource after it is created.
Choose the pod's Azure region and type a name for this user-assigned managed identity.
The following screenshot illustrates this step, with portions redacted for privacy. Here, we have named our user-assigned managed identity as
AKS-Edge-identity.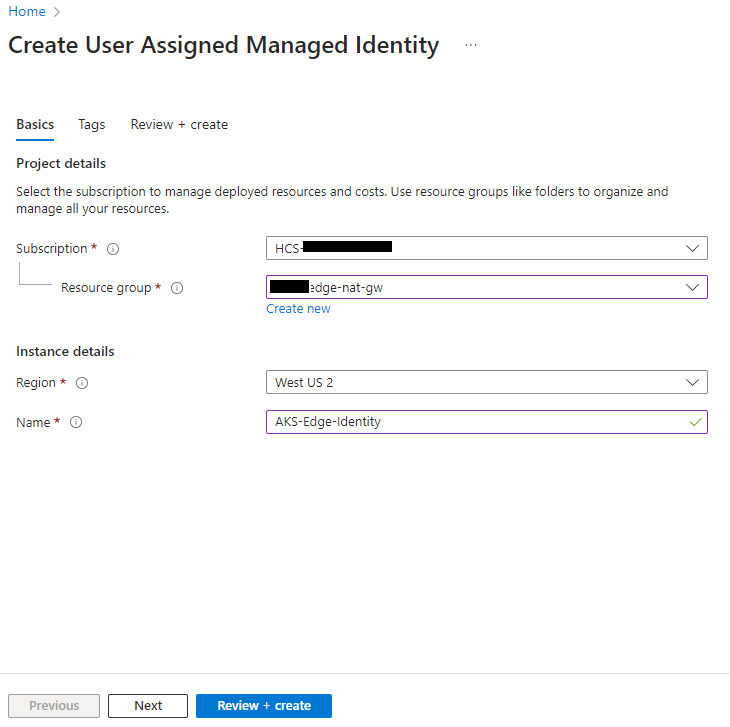
-
Click Review + create to move to the final wizard step.
-
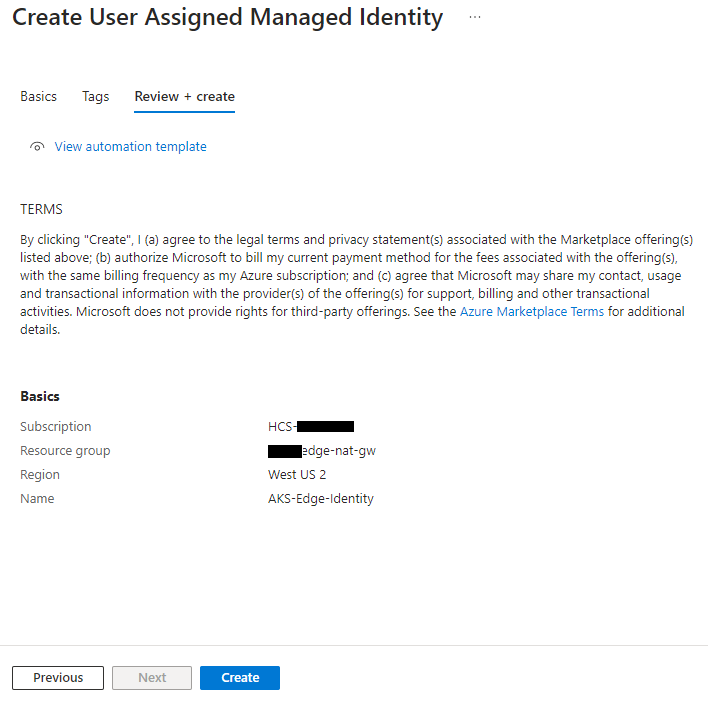
Review the information and click Create to complete the wizard and create the user-assigned managed identity.
This screenshot illustrates this final step before clicking Create.
-
Then add the role permissions to the newly created identity as described in the next section.
Assign the Required Role Permissions - Azure Preview Method
This section's steps illustrate the method of using the Azure Preview steps for assigning a role to a managed identity. If you follow the steps below and don't see the button + Add role assignment (Preview) when you look at your user-assigned managed identity's Azure role assignments area, you can instead assign the role permissions using the alternate method in the section after this one.
The permissions to add to the user-assigned managed identity are:
| Role Permission | Scope |
|---|---|
| Managed Identity Operator role | The pod's Microsoft Azure subscription |
| Network Contributor role | The VNet's resource group. The applicable VNet is either:
|
Note: Per Microsoft RBAC documentation, you must have Microsoft.Authorization/roleAssignments/write permissions to assign Azure roles.
-
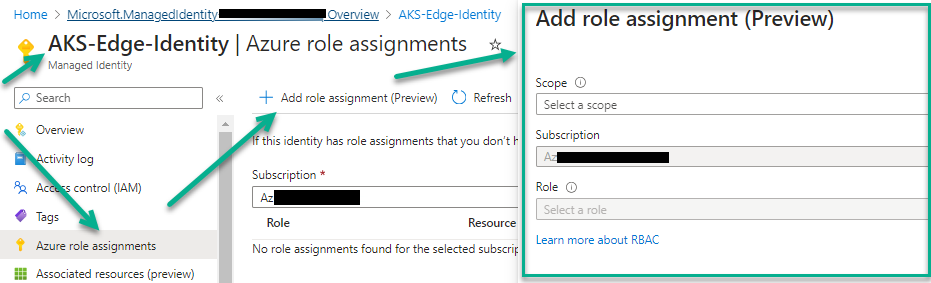
In the Azure portal, navigate to your newly created user-assigned managed identity, and click Azure role assignments and Add role assignment (Preview) until you see the Add role assignment (Preview) form.
The following screenshot illustrates that step.
-
In the Add role assignment (Preview) form, select Scope as Subscription, select the pod's subscription, and select Role of
Managed Identity Operator.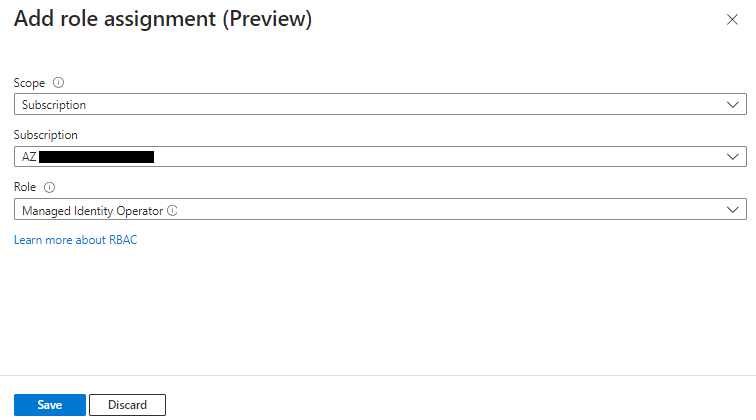
-
Click Save to save that
Managed Identity Operatorrole assignment to the identity. -
Click Refresh to see the newly added role listed.
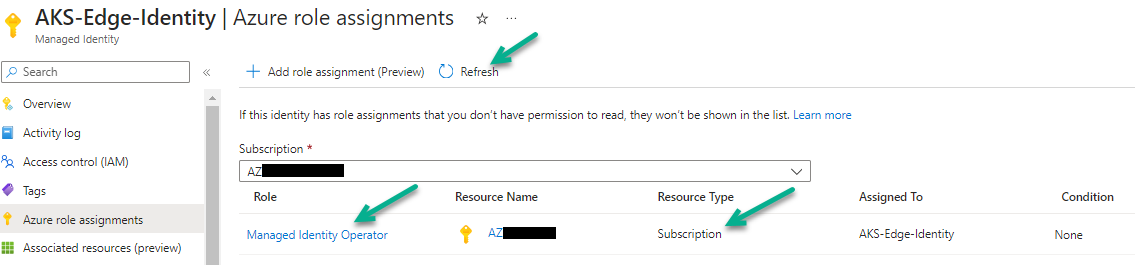
-
Reopen the Add role assignment (Preview) form by clicking Add role assignment (Preview).
-
This time, select Scope as Resource Group, select the applicable VNet's resource group, and select Role of
Network Contributor.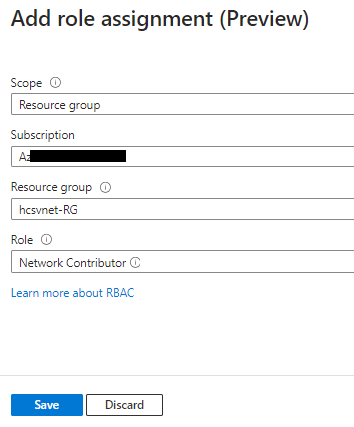
-
Click Save to save that
Network Contributorrole assignment to the identity. -
Click Refresh to see the newly added role. Now the two roles should be listed.
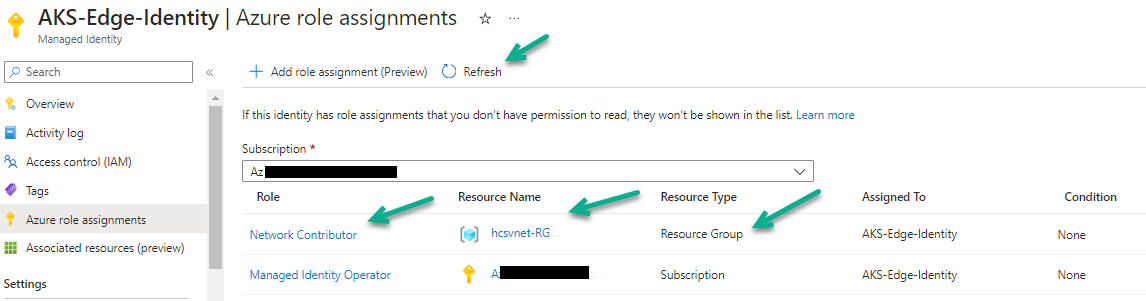
Now the required user-assigned managed identity exists and has the role permissions that the AKS deployment type requires.
Alternate Method of Assigning the Required Role Permissions
When you don't see the button + Add role assignment (Preview) when you look at your user-assigned managed identity's Azure role assignments area, you can instead assign the role permissions using this alternate method.
The permissions to add to the user-assigned managed identity are:
| Role Permission | Scope |
|---|---|
| Managed Identity Operator role | The pod's Microsoft Azure subscription |
| Network Contributor role | The VNet's resource group. The applicable VNet is either:
|
Note: Per Microsoft RBAC documentation, your userID in Azure must have Microsoft.Authorization/roleAssignments/write permissions to assign Azure roles.
-
First add the
Managed Identity Operatorpermission to the pod's subscription's scope:-
In the Azure portal, navigate to the subscription.
-
In that subscription's page, click Access control (IAM) and then click Role assignments tab.
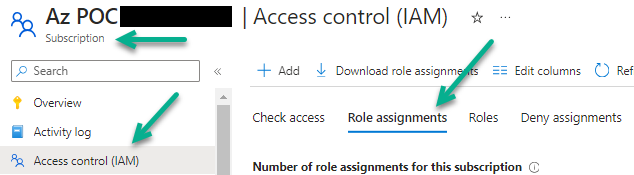
-
Click + Add > Add role assignment.
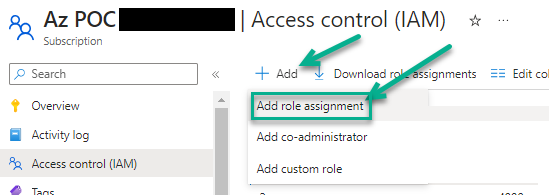
The Add role assignment wizard appears.
-
In that wizard, on its Role tab, search for and select the
Managed Identity Operatorrole. Make sure its row is selected before clicking Next.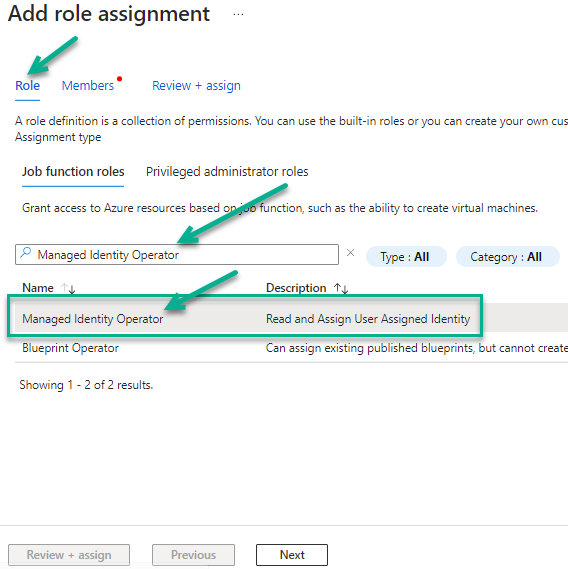
-
Click Next to move to the Members tab.
-
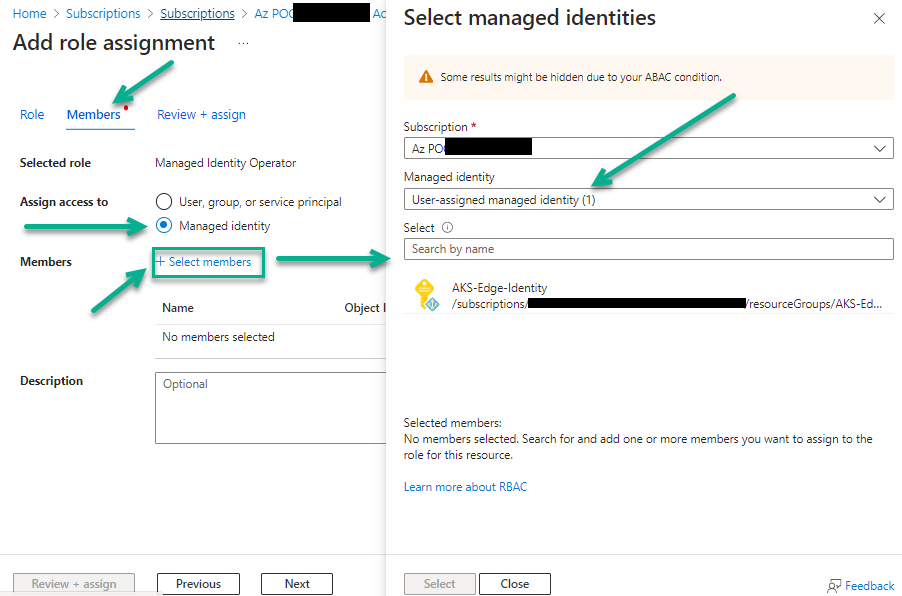
On the Members tab, select Managed identity and then + Select members, which displays the Select managed identities form.
The next step here has the example screenshot.
-
In the Select managed identities form, in the Managed identity menu, select User-assigned managed identity.
-
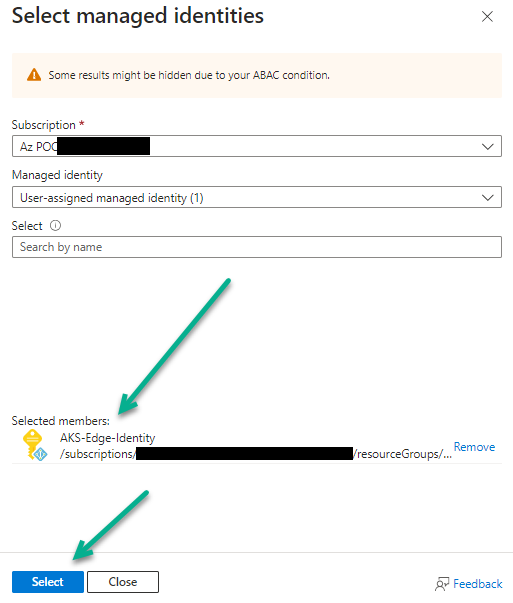
Then select the user-assigned managed identity that you created and click the Select button to add it to the Members tab.
-
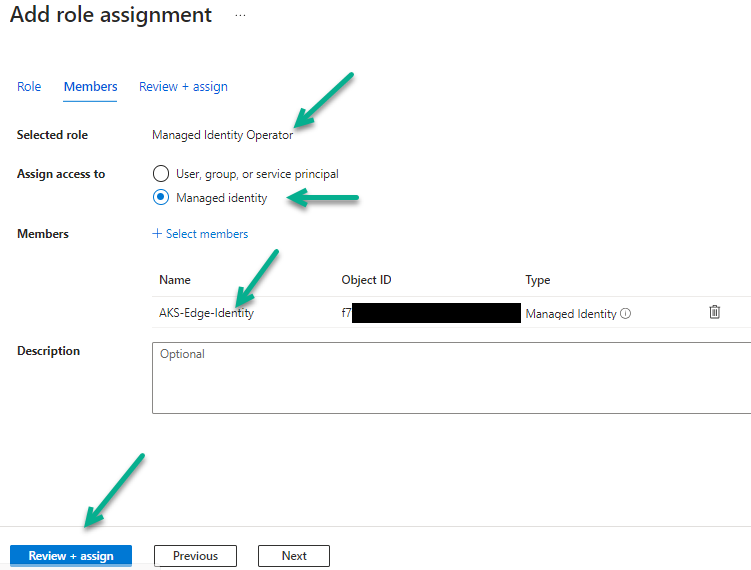
Now click Review + assign to move to the wizard's Review + assign tab.
-
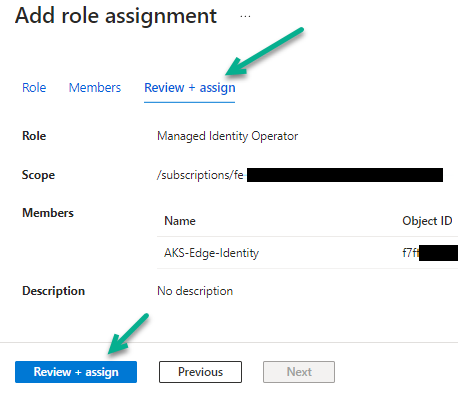
On the Review + assign tab, click the final Review + assign button to complete assigning this role to the identity at the subscription scope.
-
-
Now add the
Network Contributorpermission to the VNet's resource group's scope:-
In the Azure portal, navigate to the applicable VNet's resource group. The applicable VNet is either:
- If you aren't working around having AKS-restricted IP addresses in your VNet, the pod's VNet's resource group.
- Otherwise, if you created a new VNet to work around the pod's VNet having AKS-restricted IP addresses, that VNet's resource group.
-
In that resource group's page, use steps similar to what you did above for the subscription's permissions.
You click Access control (IAM) and click the Role assignments tab.
This screenshot illustrates this step for our VNet's resource group named
hcsvnet-RG.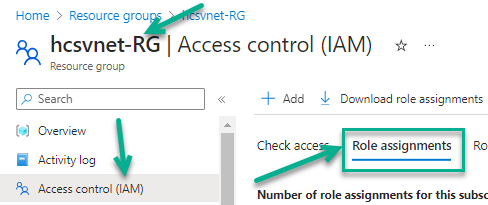
-
Click + Add > Add role assignment. The Add role assignment wizard appears.
-
In that wizard, on its Role tab, search for and select the
Network Contributorrole. Make sure its row is selected before clicking Next.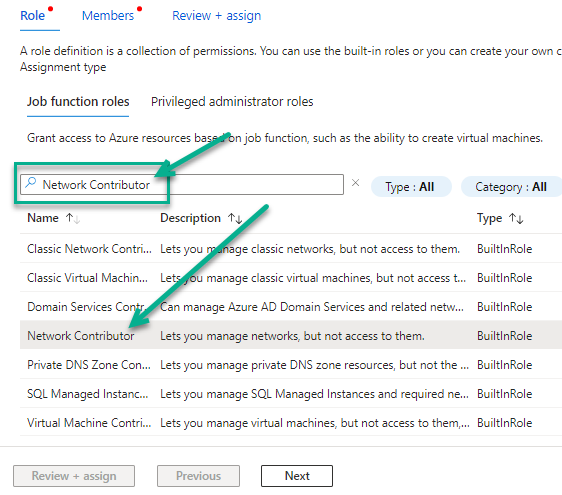
-
Then the same as before for the other permission, click Next to move to the Members tab, and select Managed identity and then + Select members, which displays the Select managed identities form.
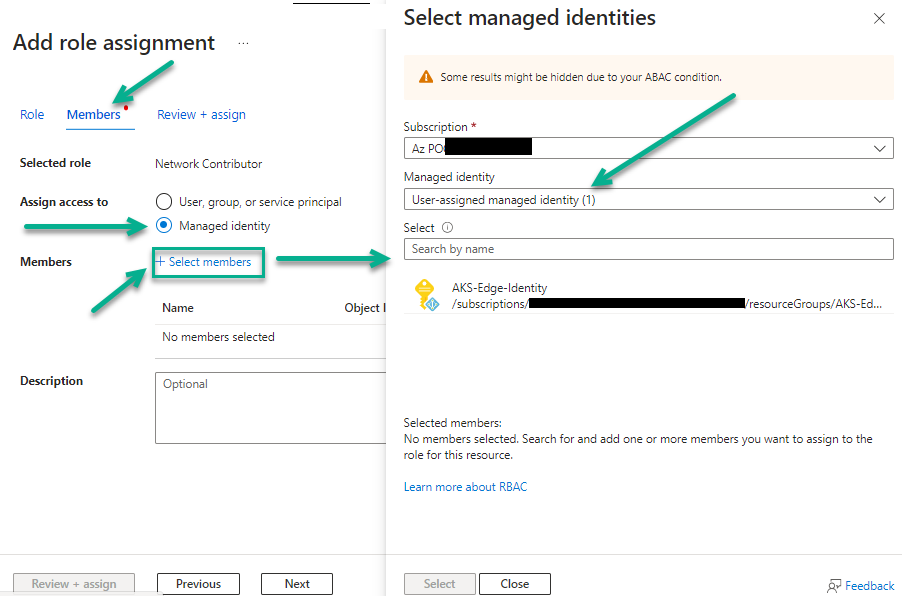
-
In the Select managed identities form, in the Managed identity menu, select User-assigned managed identity.
-
Then select the user-assigned managed identity that you created and click the Select button to add it to the Members tab.
-
Now move to the wizard's Review + assign tab, and click the Review + assign button to complete assigning this role to the identity at the VNet's resource group's scope.
This screenshot illustrates this step for our VNet's resource group named
hcsvnet-RG.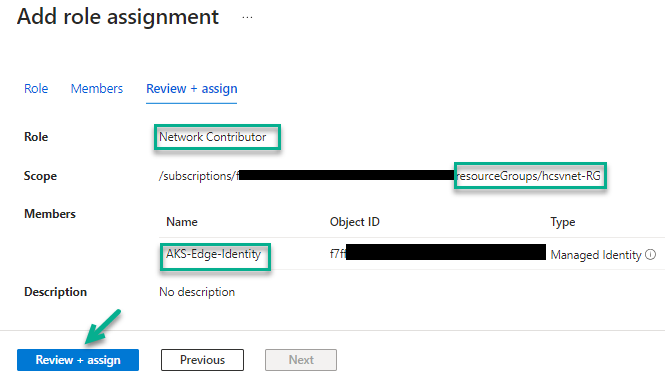
-
Now the required user-assigned managed identity exists and has the role permissions that the AKS deployment type requires.
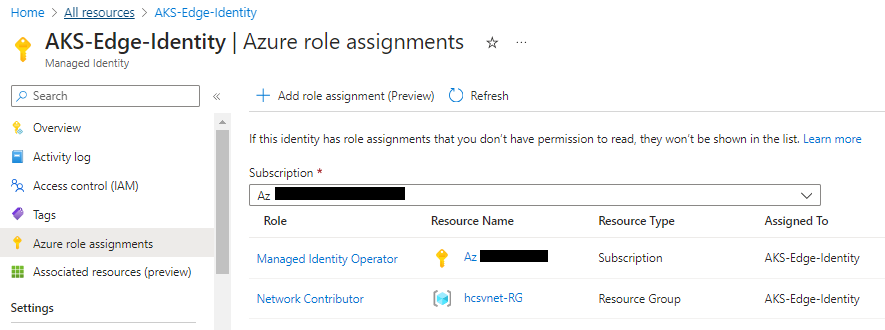
To confirm that the user-assigned managed identity has the two roles, navigate to the identity in the Azure portal and display its Azure role assignments page.
The following screenshot illustrates our user-assigned managed identity with the two roles listed in its Azure role assignments.
AKS Type - Reserve Required Virtual IP Ranges to Prevent Conflicts with AKS
This information is applicable when you have decided to migrate the pod using the AKS type for the Horizon Edge Gateway deployment. The AKS deployment type requires that some virtual IP ranges get reserved in your IP management method of choice, your IPAM system (IP address management system).
Introduction
These ranges are virtual IP ranges that are to be reserved for the sole use of the AKS type of Horizon Edge Gateway
By design, Kubernetes creates virtual networks within the Kubernetes cluster inside the Horizon Edge Gateway.
These virtual networks host the containers that run inside the cluster.
Why Do These Ranges Have to Be Reserved If They are Internal to the Edge?
The purpose of reserving these ranges is to prevent any other machines in your network space from getting those IP addresses assigned to them and using those IP addresses.
Even though the Edge's Kubernetes cluster's virtual networks are internal to the Horizon Edge Gateway and they aren't actually on the management network, the cluster's virtual networks do connect to the management subnet in your Azure VNet.
Services that run outside of the AKS cluster route traffic to the AKS-cluster-internal networks. For example, the Horizon Agents in VDI desktops need to send data to services running in this AKS cluster.
Therefore, if the ranges aren't reserved and another machine on your network happens to get assigned an IP address from the ranges, that could affect the routing and cause conflicts in the necessary service traffic to the AKS-cluster-internal networks.
By reserving the IP ranges in your IP address management system ahead of the pod migration, you avoid such potential conflicts.
Do I Need to Create Subnets of These Ranges?
No, you don't need to create subnets of these ranges.
These virtual IP ranges will live inside the Horizon Edge Gateway's AKS cluster's virtual network when the Horizon Edge is deployed as part of the migration process.
For Pod Migration, Do I Need to Know What My Reserved Ranges Are?
Yes. When you are planning to choose the AKS deployment type, you need to know the ranges you and your team have reserved for the purposes of that deployment.
The migration wizard UI will require you to input two IP ranges (CIDRs) in fields named Service CIDR and Pod CIDR.
Therefore, you must decide on what ranges you and your team have chosen to reserve prior to running the migration wizard.
What Type of Ranges Must I Reserve?
The AKS type of Horizon Edge Gateway requires two virtual IP ranges to be reserved for its use.
- A CIDR range of minimum
/27for what is called Service CIDR - A CIDR range of minimum
/21for what is called Pod CIDR
These two IP ranges must not overlap or otherwise collide with each other.
Important: Per the Azure documentation, these CIDRs must not use the following AKS-restricted ranges:
- 169.254.0.0/16
- 172.30.0.0./16
- 172.31.0.0/16
- 192.0.2.0/24
| IP Range to Reserve | Details |
|---|---|
| Service CIDR | Decide on an IP range for Service CIDR and reserve that IP space in your IPAM so that no other machines can use IP addresses from that range.
A minimum range of /27 is required.
Remember: As stated above, this is a virtual IP range and you don't have to create a subnet with this range. You only have to ensure no other machines in the network get assigned those addresses.
When you are deciding on the IP range, keep these points in mind:
|
| Pod CIDR | Decide on an IP range for Pod CIDR and reserve that IP space in your IPAM so that no other machines can use IP addresses from that range.
A minimum range of /21 is required.
Remember: As stated above, this is a virtual IP range and you don't have to create a subnet with this range. You only have to ensure no other machines in the network get assigned those addresses.
When you are deciding on the IP range, keep these points in mind:
|
Was this page helpful?